Setup Guide PINE HILLS DIRT RACING - A GUIDE BOOK TO RACING
←
→
Page content transcription
If your browser does not render page correctly, please read the page content below
PINE HILLS DIRT RACING - A GUIDE BOOK TO RACING

Version 1 - Australia's Premium Offroad Racing
Facility

A complete guide book to getting into racing, covering
everything from setting up the car to learning to
drive.
Written by Zac Ryan

                                                         Setup Guide

              PINE HILLS DIRT RACING - A GUIDE BOOK TO RACING
Contents
1. Facilities Overview
2. How to get into Racing
3. Club Racing - What a typical club day is and how to join
4. Calendar 4.1 Wednesday Night Practice and Training Clinics
5. Rules
6. Driving Techniques
7. Pre Race Checklist
8. Setup Guide and Tips
9. 1/10 electric - What to Buy?
10. 1/8 Electric - What to buy?
11. 1/8 Nitro What to buy?
12. Tire Guide - Whats are the best tires for our track
13. How to Prep and Glue Tires
14. How to Recycle Your Rims
15. Setting up a Nitro Engine and How to run it in.
16. Setting up a Starter Box
17. Radio Tips and Tricks
18. How to Prep a Body Shell
19. Chargers and Soldering
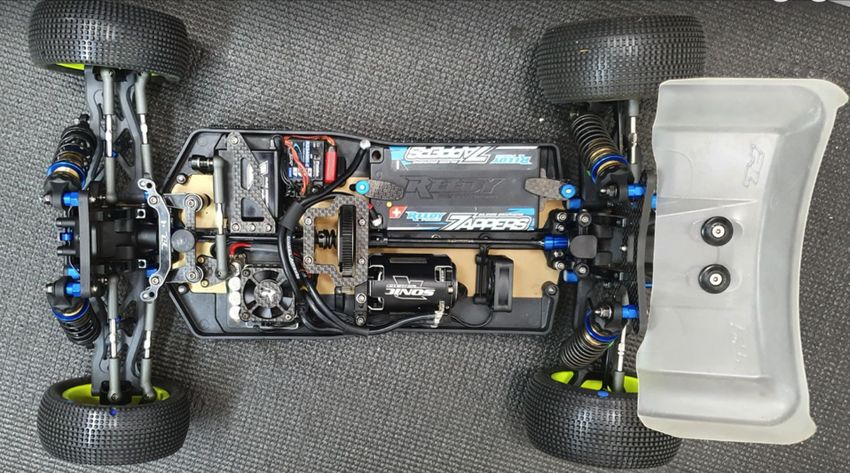
20. 1/10 EP Team Associated B74.1 with Christopher Sturdy
21. 1/8 EP Mugen MBX8 with Jackson Beale
22. 1/8 Nitro AE RC8 B3.2 with Alex Bernadzik
23. 1/8 Nitro HB D819RS with Zac Ryan
24. Local Hobbyshops
25. Working Bees
26. Video/Links
PHDR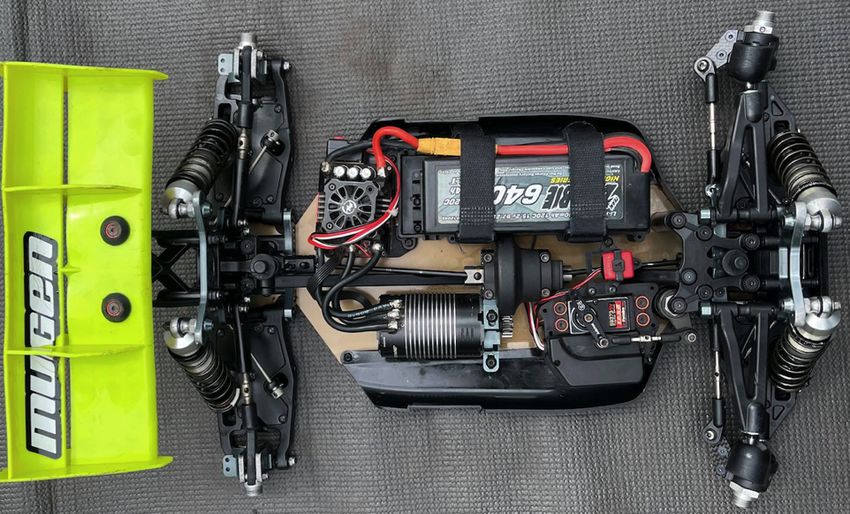
1.0 - Facilities
Fully Established Canteen Serving hot and cold food!              Large Bitumen Carpark

Undercover pit areas, including lights and power                  Permanent Bathroom facilities

Massive drivers stand designed to accommodate up to 15 drivers    Large light poles for night racing

Permanent professional track and layout                           Compressor bays
2.0 - How to Get into Racing
                  What is this? Pine Hills Dirt Racing has been an R/C club stretching back to the 1990's. This is a dedicated facility and track
                  specifically designed to accommodate r/c car racing. PHDR aims to provide to the community, racing for children (typically 12 yrs or
       ?          older) in cost-effective electric stock racing; through to classes for all ages yrs in ready-to-run buggies; through to high-end custom
                  nitro and electric vehicles. One of the great pleasures is seeing parents and their young children competing together in a safe and
                  friendly environment.

                    Webpage - Full details about the club, learn more about our club!                      http://pinehillsdirtracing.com/

                  Committee Page - Where the committee posts information about
                                                                                                           www.facebook.com/phdradmin
                  practice and racing, first place to check for announcements
                  Members Page - This is a public group that anyone can join, this is a
                                                                                                           www.facebook.com/groups/439369329569849
                  place for anyone to discuss racing, inquire about information etc.
                  Practice: If you want to get into racing but have never raced before its ok, we offer lots of opportunity to come and practice so you can learn to
                  get around the track before coming to a club race. Practice is open to anyone and is $10 for as many laps as you like. We announce practice
                  sessions on the committee and members page, they are typically every Wednesday/ second Friday.
When can I get
               Racing: We race every fortnight usually on a Sunday and in summer typically on a Saturday night under lights. Club racing is $15 for the day.
on the track?
               PHDR Member (inc Reciprocal Clubs) $15 first race class $5 per additional class
               PHDR Juniors $6 per class
               Temporary-Members (limit of 3 events pa) $20 per class
               After Hours Access – The committee holds regular practice days during the week and on weekends
               The main classes we race are:                                                             Transponders
               1/8 Nitro Buggy - Main Class                                                Transponders are used in the car which
What cars do 1/8 Electric Buggy - Main Class                                               allow the electronic lap counting system
  we use?      1/10 Electric buggies, Trucks and Short Course Trucks                       to record your lap times! AMB is the only
               1/8 Truggy                                                                  brand we use, it plugs into your receiver.
                                                                                           You can buy at your local hobbyshop.
    Age?       There is not really a minimum age, if the kid is really young we prefer to have adults marshal as the cars can travel quite fast on the track.
               Full calendar year (membership now renewable in Jan/Feb of the following year),            You can become a member through the link below, link
               Why become a member? Reduce your racing fees and help support the club,                    also in our "About" section on our PHDR facebook page:
Membership membership fees goes to maintaining the track and facility.
               Full Adult membership – 1 year $80
                                                                                                                   https://forms.gle/ZUUVYuebfcQsK2b78
               Full Junior Membership – 1 year $30 (Junior is aged 15 or under)
                      Where can I buy a car and how much is it going to cost? Full detail on parts in Section 9.0-11.0
    Local              Hobbyshop Name             Number                       Website                                           Location
 Hobbyshops                  OZ RC             (07) 3265 4547            http://OZRC.com.au                          1/129 Rd E, Geebung QLD 4034
                          Speedy RC             0418 776 974          http://speedyrc.com.au                         Mansfield, QLD (no shop front)
                     Mischief and Mayhem       (07) 5441 4731 facebook.com/mischiefandmayhemhobbies/          960 Nambour Connection Rd North Nambour
                      rchobbiesgoldcoast       (07) 5594 7900         rchobbiesgoldcoast.com              Unit 6/22/20 Manufacturer Dr, Molendinar QLD 4214
                        Hearns Hobbies         (03) 9614 3603        www.hearnshobbies.com                           295 Flinders St, Melbourne VIC
                        2nd Hand Cars               www.facebook.com/groups/AustralianRCTraders               You can also find 2nd hand cars for sale here
                                                                     Good Brands              What you will need                         Other Info
  1/10 Short
                                                                   Team Associated       Typically these come in a RC Hobbies GoldCoast have test kits and a
    Course
                                                                      Team Losi          ready to run package which small indoor track where you can test and
                                                                        Traxxas          include everything you       try a car before you buy.
 Est. Price for
                                                                                         need to get the car racing.
  everything
                                                                                                                      Short Course is a good cheap entry into rc
  $500-$600
                                                                                                                      racing.
                                                                     Good Brands              What you will need                         Other Info
  1/10 4wd
                                                                      HB Racing                      Car kit          A good cheap entry point to get into more
   Electric
                                                                   Team Associated            Radio/ Transmitter      serious racing. Being a smaller class the
                                                                      Team Losi                     Charger           equipment is generally cheaper then its
 Est. Price for
                                                                        Yokomo                     Batteries          1/8th counterparts.
  everything
                                                                         Tekno                  Speed Control
    $1000
                                                                        Kyosho                  Servos + Tires
                                                                     Good Brands              What you will need                         Other Info
 1/8 Electric
                                                                      HB Racing                      Car kit          HernsHobbies have a race package with
   Buggy
                                                                   Team Associated            Radio/ Transmitter      all the best gear in a combo deal. You can
                                                                      Team Losi                     Charger           find out about this special package at:
 Est. Price for
                                                                     Mugen Seiki                   Batteries
  everything                                                                                                           www.hearnshobbies.com/collections/1-8-
                                                                         Tekno                  Speed Control
    $1,500                                                                                                                     buggy-rtr-race-combo-deal
                                                                        Kyosho                  Servos + Tires
                                                                     Good Brands              What you will need                         Other Info
  1/8 Nitro                                                           HB Racing                      Car kit          This class is for the more experienced
   Buggy                                                           Team Associated            Radio/ Transmitter      racer, please discuss with a committee
                                                                      Team Losi                     Charger           member if you wish to know more about
 Est. Price for                                                      Mugen Seiki               Receiver Battery       this class and we can give you more
  everything                                                                                                          information on the best way to get into
    $1,700                                                               Tekno                    Engine .21
                                                                        Kyosho                  Servos + Tires        Nitro!
3.0 - Club Racing
                 The most important part about club racing is that its for all skill levels and ages. PHDR aims to cater to both the new/novice driver and the top
                 end racer. We all started as a beginner and there are lots of different experience and skill level at the club, so if you're thinking oh I cant do this
     Intro       because i'm not good enough, think again!! These steps can be followed to make club racing super easy!

                We also offer weekly Wednesday night practice sessions from 4:30-9pm, this is a great way to meet some racers in the club and learn the track.
                First thing to do is unpack and find a pitspace, usually there is enough room that you can pit in the permanent undercover pit area. If it’s a big
 1.0 When you
                race meeting we recommend bringing a portable table and chair, you can pick these up at bunnings pretty cheaply. For most club days though
    turn up
                you should be pretty right to pit under the permanent pit area.
                Usually one of the committee members will be in the race control, which is the green container under the drivers stand. Its best you write down
                your transponder number and head up and see the race director. They can enter in your details into the live timing software and ensure that
2.0 Sign up for
                you're in the right class for the day.
the day at race
    Control
                Once you have signed up head to the canteen where you can pay for your nominations. Club days are $15 for members and $20 for non
                members.
                We usually have an open track for an hour before racing starts, if you get to the track early enough and set up you can do some practice before
                the race meeting to make sure your car is working as required. A few good things to check are:
                1. You car is driving straight, so many racers dont check their trim regular enough and the car might drive slightly to one side. You can correct
                this with you radio trim settings.
   3.0 Open     2. Make sure you brakes are set correctly, again this can be done with your radio brake end point adjustment. For nitro you can also apply it
    practice    through your brake linkages, make sure you have slightly more front brake then rear, or the car will loose rear traction under brakes.
                3. Make sure your transponder is working, the computer will call your name and your lap time as you cross the line.
                4. Marshaling is not compulsory in practice, but it is a good way to learn the track by watching other cars.
                5. Setting your car down: Always start from the staging area/pitlane, then queue up at the drivers stand (Up stair). DO NOT put your car on the
                straight while waiting for your turn - if a car is travelling at high speed on the straight and hits your car, both will be damaged.
                Once all the nominations have been taken the race director will post the nominations where you can see which heat you are in.
                We usually post the latest link to our facebook page so keep an eye on that page.
                You can also access via the PHDR live RC page, this is where all the live timing data goes. This webpage is updated live.
                Find the heat sheet under the Race line ups and Results sections, click the link below:
                https://phdr.liverc.com/results/
    4.0 Heat
Sheets posted
  and Drivers
    Briefing

                 Once the heats are posted the race director will usually have a small drivers briefing to talk about how the race is going to be run and marshaling
                 responsibilities. The heat list is usually the order of the races so check which heat you are in so you know when you're up.
                 The first race is usually 5 minutes after the drivers meeting, so make sure your car is prepared to go before the meeting commences.
                 Have your car ready to go a few minutes before the end of the previous race, there are computer screens up to display remaining minutes left in
                 the race. Place your car in the staging area or keep your car on the warm up bench if you are running nitro.

                 All the drivers will line up at the bottom of the driver stand before the qualifying race, once all the drivers from the previous race have finished
                 and they have left the drivers stand you are right to head up on the stand. The race director will usually announce track is open, you are now
                 right to drive out of the staging area or for your pitman to release your car into the pits.

               You will usually get a minute to "Warm up" where your laps aren't recorded and you can practice before the qualifier. The computer will
5.0 Qualifying announce the time before the start of the qualifier.

                 Qualifying is racing against the clock, using a staggered start system (often called IFMAR qualifying). Once the computer calls the qualifying
                 started, each driver can start their own timing by crossing the loop. Once you cross the line the "loop is live" then you are on the clock. Now you
                 have to do as many clean laps in the allocated time. For example if its a 5 minute qualifier your total laps and times will be summed up at the end
                 to give you an overall time, such as 10Laps in 5minutes and 5 seconds.
                 Once the timer has expired the computer will call each racer finished as they cross the line. Its important to understand you are racing yourself
                 and the clock even though there are other cars on the track. Before starting your race, get clean track and separate yourself from other cars!
                 All starting at the same time will mean you are in traffic and will most likely mean your laps will be slower!

                 Typically you marshal the next race after your race. As soon as your qualifier is finished pick up your car as soon as possible and drop it off at
                 your pits and then head out to the track to marshal the next race.
6.0 Marshaling
                 Please read the marshaling rules under section - 4.0 Rules for Marshaling
                 Once all the qualifying is done the finals grid positions will be posted, head back to the Live RC page to view your position and results.

                 As per qualifying the same process is followed, only change with finals is with 30 seconds to go before the start of the race, you will line up on
                 the marked grid positions on the straight. The computer or race director will call you to the grid as well so please listen to the instructions.
  7.0 Finals
                 Electric - Usually 3 races , best of 2 of 3 races to count. Your finishing position will give you points and you will drop your worst final result.

                 Nitro - Usually one long final, you will require a pitman to drop you on the grid and refuel you. You are racing the cars on the track and your final
                 results will be how many laps you can do in the allocated time, you may require a pitman to refuel you depending on how long the race is and
                 how long you get out of a tank. Typical mileage is around 7.5 minutes, so come into the pits before then so you dont run out!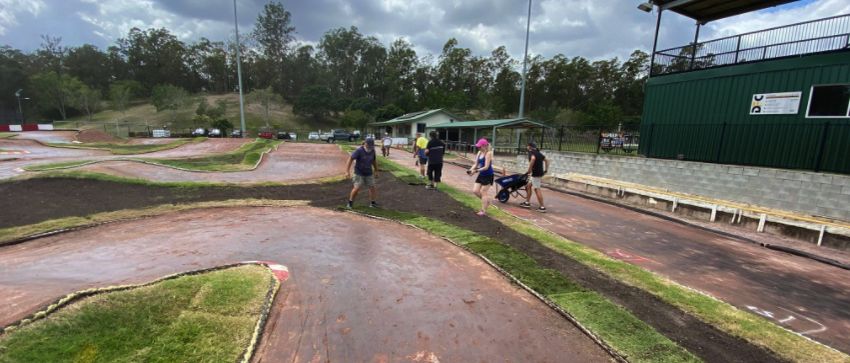
4.0 Calendar
See below our racing calendar to see when we race next!
You can download a version here:           https://drive.google.com/file/d/1__rFWEf_JZ1oV1y6dCusRaTt_PT3yeB9/view?usp=sharing

                                                                    Pine Hills Dirt Racing Calendar 2021

                    Jan-2021                                       Feb-2021                                       Mar-2021
                                                                                                                                                                 Events
  Mon   Tue   Wed     Thu      Fri   Sat   Sun   Mon   Tue   Wed     Thu      Fri   Sat   Sun   Mon   Tue   Wed     Thu      Fri   Sat   Sun
                               1     2     3      1     2     3       4       5     6      7     1     2     3       4       5     6      7                       Practice 4:30pm-9pm

   4     5     6       7       8     9     10     8     9    10       11      12    13    14     8     9    10       11      12    13    14                   7 Round Sat Series 2pm-8pm

  11     12    13      14      15    16    17    15    16    17       18      19    20    21    15    16    17       18      19    20    21     6-Feb             QLD Series - Meakin

  18     19    20      21      22    23    24    22    23    24       25      26    27    28    22    23    24       25      26    27    28     27-Feb             QLD Series - PHDR

  25     26    27      28      29    30    31                                                   29    30    31                                  20-Mar         QLD Series - Sunshine Coast

                    Apr-2021                                       May-2021                                       Jun-2021
                                                                                                                                                                 Events
  Mon   Tue   Wed     Thu      Fri   Sat   Sun   Mon   Tue   Wed     Thu      Fri   Sat   Sun   Mon   Tue   Wed     Thu      Fri   Sat   Sun
                       1       2     3     4                                        1      2           1     2       3       4     5      6                       Practice 4:30pm-9pm

   5     6     7       8       9     10    11     3     4     5       6       7     8      9     7     8     9       10      11    12    13                   7 Round Sat Series 2pm-8pm

  12     13    14      15      16    17    18    10    11    12       13      14    15    16    14    15    16       17      18    19    20                   8 Round Club Series 9am-3pm

  19     20    21      22      23    24    25    17    18    19       20      21    22    23    21    22    23       24      25    26    27    7-9 May              Major Race TBD

  26     27    28      29      30                24    25    26       27      28    29    30    28    29    30

                                                 31

                    Jul-2021                                       Aug-2021                                       Sep-2021
                                                                                                                                                                 Events
  Mon   Tue   Wed     Thu      Fri   Sat   Sun   Mon   Tue   Wed     Thu      Fri   Sat   Sun   Mon   Tue   Wed     Thu      Fri   Sat   Sun
                       1       2     3     4                                               1                 1       2       3     4      5                       Practice 4:30pm-9pm

   5     6     7       8       9     10    11     2     3     4       5       6     7      8     6     7     8       9       10    11    12                   8 Round Club Series 9am-3pm

  12     13    14      15      16    17    18     9    10    11       12      13    14    15    13    14    15       16      17    18    19                5 Round Night Series 6:30pm-9:30pm

  19     20    21      22      23    24    25    16    17    18       19      20    21    22    20    21    22       23      24    25    26    13-15 Aug            Major Race TBD

  26     27    28      29      30    31          23    24    25       26      27    28    29    27    28    29       30

                                                 30    31

                    Oct-2021                                       Nov-2021                                       Dec-2021
                                                                                                                                                                 Events
  Mon   Tue   Wed     Thu      Fri   Sat   Sun   Mon   Tue   Wed     Thu      Fri   Sat   Sun   Mon   Tue   Wed     Thu      Fri   Sat   Sun
                               1     2     3      1     2     3       4       5     6      7                 1       2       3     4      5                       Practice 4:30pm-9pm

   4     5     6       7       8     9     10     8     9    10       11      12    13    14     6     7     8       9       10    11    12                5 Round Night Series 6:30pm-9:30pm

  11     12    13      14      15    16    17    15    16    17       18      19    20    21    13    14    15       16      17    18    19     3-5 Dec              King of the Hill

  18     19    20      21      22    23    24    22    23    24       25      26    27    28    20    21    22       23      24    25    26

  25     26    27      28      29    30    31    29    30                                       27    28    29       30      31

                            4.1 Wednesday Night Practice and Training Clinics
Each Wednesday the committee aims to hold practice from appox 4-9pm, please keep an eye on our facebook page for confirmation posts.
We offer free    training clinics, please ask for Zac and we can set up a one on one session to review and go over your car and make sure its set up right. This
usually includes a test drive so we can feel how the car drivers on the track and then some driving tips and tricks.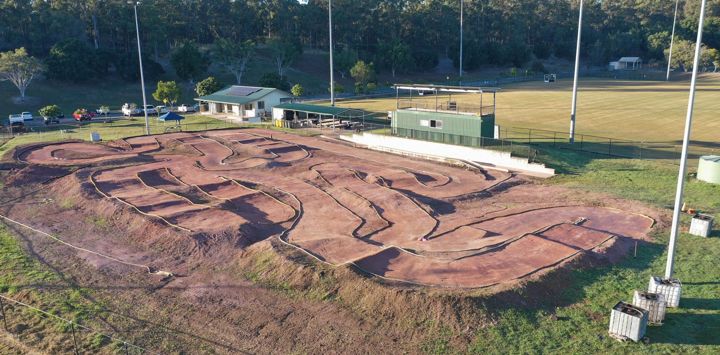
5.0 - Rules

    Rules to Race at PHDR
The objective of Pine Hills Dirt Racing is to provide a World class facility that is fun and vibrant, where everyone is welcome regardless of ability. All
PHDR members and competitors must read and adhere to the below rules for the betterment of the club.

  Club Rules
  1. No drugs or alcohol are permitted on the facility, we are not a licensed premises.
  2. Never yell from the drivers stand. Foul language will not be tolerated.
  3. Help out others and remember this is a fun hobby, no aggressive behaviour will be tolerated
  4. Clean up the area around you and use the bins provided.
  5. Assist committee if required to open up or close up facility, every bit of help is much appreciated.
  6. Closed footwear must be worn.

  10 Racing Rules:
  1. Do not argue with the Race Director, remember we are all volunteers trying our best to run these events for everyone’s enjoyment.
  2. Children under 12 must have parental supervision.
  3. After your race drop your car off in the pits as quickly as possible and head straight out to marshal, non-marshaling will result in your
      best round being dropped.
  4. Never drive into another car from the rear (it’s your fault).
  5. If you cause a wreck, don’t just take off, let the person you hit take the lead back.
  6. If you jump the course, you must stop and let the person behind you pass before you start again.
  7. Once you have been lapped, DO NOT race with the leaders, if you take out the leader after you have been lapped, you will be asked to pull
      off and let them go by.
  8. If there are any racing incidents raise them with the race director after the race, not the individual in question.
  9. Control speed through pitlane, no jumping into pitlane.
  10. Drivers are to refrain from leaning forward on the Drivers Stand as this obstructs other drivers view of the circuit.

  10 Marshaling Rules:
  1. Corner Marshall immediately after your race.
  2. Cars running on track have right-of-way.
  3. Don’t use your mobile phone while the race is on, watch your corner.
  4. Never flip or throw the cars.
  5. Place cars in the direction of traffic.
  6. Don’t touch a car if it’s wheels are still moving. Revving nitro cars will not be marshaled until brakes are applied!
  7. Watch your corner not the race. Marshal the way you would like to be marshaled.
  8. In a pile up, first car that crashed should be the first car turned over.
  9. Corner Marshall’s DO NOT fix cars.
  10. If returning car to pits, hold car above loop so lap is not recorded.

  The PHDR committee welcomes you to the club and we hope you enjoy everything PHDR. Thank you for your participation.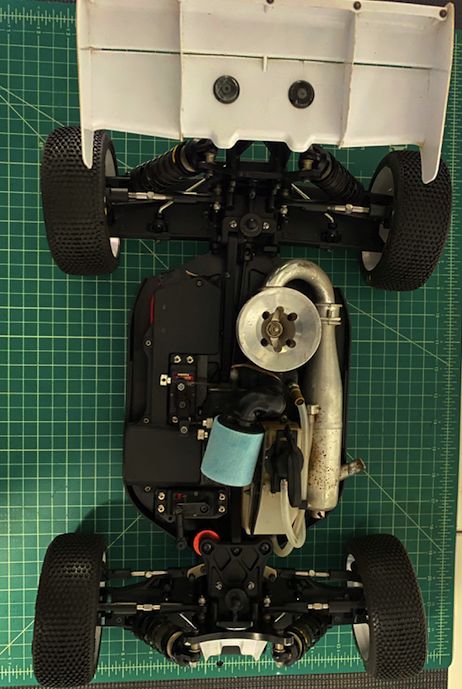
6.0 - Driving Techniques
Throttle and Brake Application
One of the most common mistakes new people have when they start racing is they have too much power. If you're starting out its good to ease into the power,
you can control this through the end point adjustment on your radio. Dial back the throttle end point adjustment, if you run say 80% of you full throttle this will
actually reduce the power band through the whole stroke on your trigger. Your physical trigger movement on your radio will stay the same but your servo or
speed control will be proportionally reduced through the whole stroke of the throttle.

Its important to practice smoothly pulling the throttle out of corners, new people tend to "blip" the throttle (aggressively pull the trigger) this can unsettle your
car as you pull the trigger, if you pull the trigger too hard you will lose rear traction and then you will be trying to correct the steering to keep the car straight.
During all of this you're not driving straight and you're losing lap speed.

The same slow smooth motion for brakes is just as important as squeezing the throttle, when you watch the fast drivers half the reason they are fast is all in how
they apply brakes. They will apply brakes when their car is in a straight line and smoothly so the brakes dont lock up. They will squeeze the brake forward
allowing the car to slow down quickly but in control without breaking traction. This all assists in keeping the car in the correct direction in the corner and
maintaining corner speed.

                                                                                  Slowly Squeeze the trigger and
                                                                                  apply the brake in smooth
                                                                                  motions.

Jumping
Jumping an r/c car has a certain skill to it, but it can be made easier by just a few tricks, if you follow the 4 steps below it will make your car jump straight and
flatter:
1. Make sure you are driving at the jump face as straight as possible! If you're at an angle as you go up the jump face, the car wont jump straight.
2. As you car's front wheels reach the bottom of the jump face you want give the throttle a quick blip until your front wheel lift off the top of the jump face. Then
you want to get off the throttle as quickly as you can, bringing your throttle back to neutral.
3. As you car leaves the jump face you want to slowly start to apply the brakes. The centrifugal (rotational energy) of you wheels stopping will make the car
rotate forward in the air and bring the nose of the car down. Note if your car leaves the jump face and the nose is "down", you need to apply throttle and the
centrifugal force of the tires accelerating will bring the nose of the car upwards. You can use the brake and throttle appropriately in the air to alter the cars angle
and keep it as flat as possible.
4. Now as your car is about to land on the down ramp you need to apply your brakes in the air slightly to align the car to the angle of the down ramp. The more
aligned to the angle of the down ramp the smoother the car will land. As your car lands you can squeeze the throttle and power down the ramp. If you can
practice this routine and get your car to land as close to the top of the down ramp, the quicker you will be between each section of the track. The key is to hit the
top of the down ramp, if you're over shooting the down ramp and landing on the flat section at the bottom, your car will get unsettled and it will be slower to put
the power down and accelerate to the next corner.
                                                                             3.
                                                                                                                            4.
                                     2.

             1.

Cornering through 180's
There are typically two types of cornering methods and they are usually dependent on the type of corner.
  Tight Apex - This is typically when there is just one straight pipe to         Sweeping Apex - When the corner has a wider apex its usually quicker to
  the apex, usually its very tight and the best approach is to go at the         arc the car through the corner, you start on the outside lane on entry
  corner at a slight angle and then brake heavily into the corner while          and brake before the corner, once slowed you drive through the corner
  turning, you want to try and get the rear end of the car to rotate and         hugging as close to the apex as possible and exit about mid track, this
  flick around, as the car is rotating you then want to get back on              method will hold the most amount of corner speed through a sweeping
  power which will help straighten the car back up allowing you to               apex.
  control the car and drive to the next corner.

                                                                                                                        Sweeping Apex
                             Tight Apex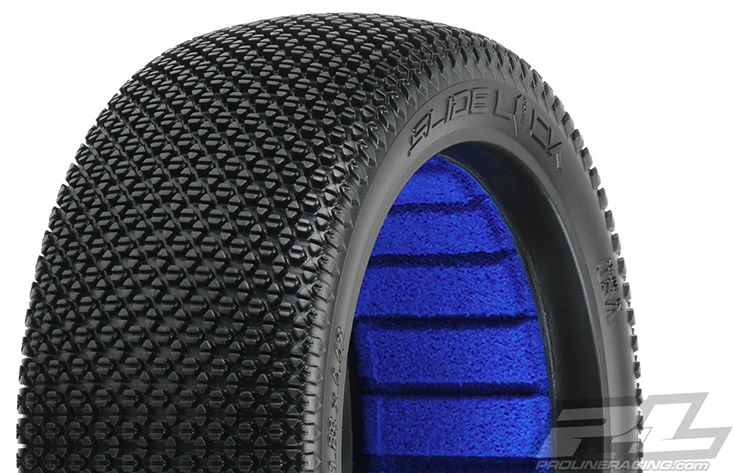
7.0 - Pre Race Checklist
This is a few simple things to get check before the start of your race, its good to get into a routine of checking each of these as they tend to
Intro change if you've had a crash or the temperature has changed. Running through these few checks before you race will make sure your car is
consistent and you will be less likely have a DNF (Did Not Finish). It's important to do these checks in this order as each step will impact the next.
1. Batteries While this may be a simple one, its easy to get side tracked, make sure you batteries are charged and ready to go.
Droop or "Downtravel" is the amount of movement your
1. arms have downwards. It is one of the most underlooked
parts of a setup.
More droop = More weight transfer, car rolls more and is
more responsive. Good for slippery/bumpy tracks.
Less Droop = Less weight transfer, car rolls less, makes
the car more stable and less prone to traction roll.
Good for smooth high grip tracks.
1. The easiest method of measuring your droop is to
2. Droop measure from centre of shock stand off on the tower to
centre of shock pin on arm. A set of calipers is the best
tool to measure with.
2.
2. The most preferred option is to measure axle height.
Depending on manufacture you will need to buy the
right sized block and gauge. We set the car on the blocks
Chassis -> without wheels and measure the height to the bottom of
Block the axle. This is the most consistent way of measuring as
if you change pills in the arm your shock length might
stay the same but your axle height could be different. HB
offer a specific ride height gauge to go with 35.5mm
blocks. Example on gauge shows the centre of the axle is
1mm below the chassis level. HB Gauge (HB204327)
Its important to be consistent when measuring ride
height. Set your car up as if you're about to go on the
track, i.e body on and tank full/battery in.
Drop the car from about 30cm, this will allow the car to
settle to its natural height. Now measure the front and
3. Ride Height rear from the flat sections of the chassis.
More ride height, car will roll more, good for slippery
track if you are looking for more grip.
Less ride height, car will roll less, good for high bite track
and if you're looking to take away grip/traction roll.
First its important to understand our cars usually have
quite a bit of slop so this is a hard measurement to get
perfect. Don’t buy expensive set up stations, they are a
waste of money, just buy a camber gauge and a set of
calipers. We want to measure the camber once the ride
height is set. Again drop the car from ~30cm.
Once your camber is close measure the
inner link length, make sure this is the Measure the angle of the wheel as close to the centre as
same length on each side of the car. possible, if you're measuring your front wheels make
4. Camber sure you have you car and radio turned on so you are
measuring with your wheels at neutral!
The right camber is mainly determined by how much grip
you have, if there is lots of grip your car will roll more
and your wheel will roll outwards, in this case you want a
lot of camber (-3/-4 deg), this will ensure your tire has
the most contact patch in the middle of the corner. If
there is less grip your car will roll less and you will need
less camber (-1/-2 deg) to keep the most contact patch.
A simple step but sometimes over looked. If you're tires
have been on for a while the nuts may have vibrated
Serrated back on loose. Just double check they are tight before heading
5. Wheel Nuts out.
wheel nut
The best wheel nuts have a small serrated surface to
help them bite into the rim and stop them from coming
undone.
8.0 - Setup Guide - What to Change
There are lots of different options to setting up you car, the below guide will help point you in the right direction when you’re searching on
what to change to improve your car’s handling.

When we are racing we can quickly get lost on what is the most important change. Its key to remember some changes will have far greater
impact to your car’s handling then others. You should always focus on the most influential setup changes first before you worry about
small changes like link positions and pill inserts.

Before you look into setup ensure your mechanical build is correct. E.g. link length the same, servo centered, EPA set correctly left to right,
servo save tension set correctly, brake and throttle linkages smoother and aligned, arms free when you have your shocks off, no binding
anywhere.

When you have your kit built correctly the order of the most influence in off-road set up is usually:

1. Tyres and Compound (70% of your setup) 2. Shocks - Oil and Springs 3. Diff Oil 4. Ride Height 5. Sway Bar Size 6. Engine Tune and
Clutch 7. Shock Angle 8. Caster 9. Camber 10. Link Position 11.Wheel Base

                         Guides are in order of influence from most to least difference:
           What to do first on a high traction track:                                          Better Jumping Ability:
            1. Harder tyre compound (S3/S2)                                                      1. Stand up shocks
            2. Front shock out on arm                                                            2. Stiffer shock springs
            3. Thicker diff oil Front/Rear                                                       3. Thicker shock oil
            4. Stiffer sway bars                                                                 4. Smaller piston holes
            5. Less ride height                                                                  5. More anti-squat
            6. Smaller piston holes or thicker shock-oil                                         6. More down travel (specially front)
                                                                                                 7. More kickup
           What to do first on a low traction track:
            1. Softer tyre compound (M4/M3)                                                    More Rear Traction:
            2. More ride height                                                                 1. Thinner diff oils
            3. Lighter diffs                                                                    2. More rear toe-in
            4. Lean shocks over                                                                 3. Larger holes, or more holes in piston
            5. Larger piston holes, or thinner oil                                              4. Lean rear shocks over on tower
            6. Long upper links                                                                 5. Lower complete lower link
                                                                                                6. Long rear upper link
           More Overall Steering:                                                               7. Raise upper link on tower compared to hub
            1. Tighter servo saver tension
            2. More steering lock                                                              Better Bump Handling:
            3. Lower shock mounting in on arm.                                                   1. Adjust shock oil (usually thinner)
            4. Thinner oil in front shocks.                                                      2. Thinner diffs (if slippery)
            5. Softer front springs                                                              3. More ride height
            6. Stiffer rear springs                                                              4. Lean shocks over on tower
            7. Short rear upper link                                                             5. More down travel (droop)
            8. Longer front upper link
            9. Thinner sway bar                                                                More acceleration and forward bite:
            10. More front arm kickup                                                           1. Thicker oil in diffs
            11. Less rear toe in                                                                2. Long upper links
            12. Short Ackermann plate                                                           3. Thicker clutch springs
                                                                                                4. Smaller clutchbell, larger main gear
           More Steering Into the Corner:
            1. Thinner oil in front diff                                                       Less Overall Steering:
            2. Less caster                                                                       1. Front shock out on arm
            3. Stand up front shocks on tower                                                    2. Thicker front shock oil
            4. Front upper link down on tower                                                    3. Thicker oil in front diff
            5. Short ackerman plate                                                              4. Thicker front sway bar
            6. Steering link back on Ackermann plate                                             5. Stiffer front spring
            7. Thinner rear sway bar                                                             6. More rear toe-in
            8. Lean rear shocks down on tower                                                    7. Long rear upper link
                                                                                                 8. Raise front upper link on tower
           More Steering Mid-to-Exit of the Corner and On-Power:
            1. Thicker oil in Front diff                                                       More stability in long sweeping corners:
            2. More caster                                                                      1. Stiffer sway bars
            3. Lean front shocks down on tower                                                  2. Thicker oils in diffs
            4. Thicker rear sway bar                                                            3. Stiffer front springs
            5. Stand up rear shocks on tower
9.0 - 1/10 Electric What to Buy?
Car - 1/10th Electric 4wd Buggy Servos
You cant go wrong if you Not as critical as Nitro to
buy any of the major get large torque KG ratings.
brands:
Spec you are aiming for are:
HB Racing Torque around 20kg.
Team Associated Speed below 0.1s/60deg
Team Losi
Mugen Seiki Good Examples:
Tekno Protek 160T
Xray Savox SC-1267SG
Spektrum RC S6245
Approx. $700 Futaba BLS371SV
Motor Tires
4WD Stock is 13.5T, Please see section 11.0 -
2WD Stock is 17.5T Tire Guide - What tires and
4WD Mod is usually 5.5/6.5T compound should you buy?
2WD Mod is usually 8.5T. But you can run
any turn motor in Mod. Good 4wd Mod
Motor:
Hobbywing Xerun V10 G3 Competition
Modified Brushless Motor (5.5T)
If you intend to race sanctioned races later,
buy an approved motor, you can see the
latest approved motor list below.
https://www.brca.org/rules-documents/18-electric-board
Speed Control Pinion
Hobbywing make a great Its best to check out a few
speed control - Hobbywing setups that the pros are
XERUN XR10 Pro G2 Elite running. Usually you can
Edition 160Amp Brushless find these on the Car
ESC - HWA30112610 manufactures website to
see what gearing they are
going with.
Battery Charger
There are a lot of batteries Please see section 19.0
on the market, most of Chargers for
them are reasonable recommendations
quality.
Typically a "shorty" pack is
the best sized pack for 1/10
Approx. $120
Radio How-To: Wire Your RC Car For A Clean Factory Look
Futaba is the most reliable
brand.
7PXR - ~$900
4PM - ~$400
3PV - ~$200
Sanwa also offer a great
radio
M17 - ~$750
MT44 - $390
https://www.youtube.com/watch?v=3BUR5ub2Bco10.0 - 1/8 Electric What to Buy?
Car - 1/8th Electric Buggy Servos
You cant go wrong if you Futaba have the best
buy any of the major quality servos, I've gotten
brands: years out of a futaba servo
before, while they are a
HB Racing little more expensive you
Team Associated really do get what you pay
Team Losi for.
Mugen Seiki
Tekno FUTABA HPS-CB700
Kyosho Specs: (0.07S/49KG)
Xray
You only need one for
steering
Motor Tires
Hobbywing 4268G2 1900kv Please see section 11.0 -
Tire Guide - What tires and
Anything around the compound should you buy?
1900kv mark is a good sized
motor that will cover you
for most tracks
Speed Control Pinion
Hobbywing XR8 Plus has Its best to check out a few
been run by a number of setups that the pros are
club members with great running. Usually you can
success. find these on the Car
manufactures website to
see what gearing they are
going with.
Battery Charger
There are a lot of batteries Please see section 19.0
on the market, most of Chargers for
them are reasonable recommendations
quality.
Jackson Beale has had great
success with the Team
Zombie 6400Mah 120c HV
series - 14.8-15.2v
Radio XT60 Plugs
Futaba is the most reliable
brand.
7PXR - ~$900
4PM - ~$400
3PV - ~$200
Sanwa also offer a great
radio
M17 - ~$750
MT44 - $390
A great plug to use on your batteries is the XT60 plugs, you should be
able to pick these up at your local hobbyshop.11.0 - 1/8 Nitro What to Buy?
Car - 1/8th Nitro Buggy Servos
You cant go wrong if you Futaba have the best
buy any of the major quality servos, I've gotten
brands: years out of a futaba servo
before, while they are a
HB Racing little more expensive you
Team Associated really do get what you pay
Team Losi for.
Mugen Seiki Specs Aim for: (0.07s/25kg)
Tekno
Kyosho FUTABA HPS-CB700
Xray These can be used for both
steering and throttle.
Specs: (0.07S/49KG)
.21 Engine Tires
There are a few brands on the market but Please see section 11.0 -
by far OS Engines are the most reliable and Tire Guide - What tires and
readily available. We strongly recommend compound should you buy?
OS, best to ensure the engine comes with a
21J carb, this is the best carb available!
The Adam Drake 2 comes with 21J Carb, this
engine is one of the best on the market.
Best engine of all time OS B2101 with 21J
Pipe Receiver Battery - 7.4v Lipo
Its important to go with the There are a lot of batteries
pipe that matches the on the market, most of
engine, the best all rounder them are reasonable
is the OS 2090. This has the quality.
smoothest power delivery
out of all the pipes LRP offer a great pack which
is 2700 mAh 7.4V Lipo. It
best to get 7.4v lipos as the
latest servos need the lipo
voltage.
Plug Glow Warmer
Usually a P4 plug is your Mugen Seiki offer the best
best all round plug with glow warmer, it comes with
30% nitro. If the a plug gauge that will show
temperatures are really if the glow plug is broken.
cold then P3 is suitable. Very handy glow warmer!
The gold OS plugs have no Part No. MUGB0244-1
performance gain, don’t
waste your money on them
just run the normal plugs.
Radio Starter Box
Futaba is the most reliable
brand.
7PXR - ~$900
4PM - ~$400
3PV - ~$200
Sanwa also offer a great
radio
M17 - ~$750
MT44 - $390
Hudy offer the lightest and most reliable box12.0 - Tire Guide - What tires and compound should you buy?
1/10 Tires
Tires that work well at PHDR - 1. Holeshot 2. Fugitive Tires that work well at PHDR - 1. Sprinter, 2. Reflex, 3. Double Dees.
Foam - Molded foams are preferred over stock white open cells Foam - Molded foams
Compound Guide Condition Compound Guide Condition
M4 When grip is Low, temp is cool Black When grip is Low, temp is cool
Preferred - M3 When grip is med/high, temp is cool Preferred - Green When grip is med/high, temp is cool
S3 When grip is high, temp is hot Blue When grip is high, temp is hot
Slide lock, these are the most common tire at PHDR, these are the most Reflex - Best all round tire from J concepts, easiest to drive if off line
recommended and quickest tires. and quick in most conditions.
Compound Guide Condition Compound Guide Condition
M4 When grip is Low, temp is cool Green When grip is med, temp is cool
1/8 Tires
Preferred - M3 When grip is med/high, temp is cool Preferred - Blue When grip is med/high, temp is cool
S3 When grip is high, temp is hot Red When grip is high, temp is hot
Fugitives, these are a great all rounder tire, easier to drive then the Rehab - A very fast tire when the track is clean, more suited to a more
Slidelocks and they last a lot longer, great for the beginner. experienced racer.
Compound Guide Condition Compound Guide Condition
M4 When grip is Low, temp is cool Green When grip is med, temp is cool
Preferred - M3 When grip is med/high, temp is cool Preferred - Blue When grip is med/high, temp is cool
S3 When grip is high, temp is hot Red When grip is high, temp is hot13.0 - How to Prep and Glue Tires
What you need
There are a couple of items that will make gluing tires a lot easier. First never glue in aircon, super glue needs moisture to set properly! Always glue outside!!
1. Tire Bands - These can be picked up at your local hobby shop, they help keep the pressure on the tire once the glue has been applied. J Concepts JCO2212-2
2. Blue towel - Helps clean the rubber $10 from the PHDR canteen 3. Super Glue - $12 from the PHDR canteen, this is the best glue available! Don't use cheap
glue! Always store your super glue in the fridge or it will go off in the bottle and deteriorate 4. Hole punch - from bunnings for about $12. 5. Simple Green $7-
used to clean the rubber from the release mold to help ensure they glue correctly. Diggers all purpose Thinners is also a good substitute.
1.
2.
3. 4. 5. 5.
Step 1 Step 2
Punch two holes in the corner of the tire opposite each other. This is With the foam in the tire, spray a small amount of simple green/thinners on the blue
critical to allow the air to escape the tire once its glued, if you don’t punch towel and then rub the bead of the tire. You may see a small amount of brown mold
holes in the tire, it will balloon up when you're driving and the car will feel release come off the bead. Keep doing this until you don’t see any more mold
"bouncy". release, this is critical to ensure the glue penetrates the rubber when you're gluing.
Tip, Fold up the blue towel
it makes it easier!
Step 3 Step 4
Put the tire on the rim and then the tire band. Its good to peal back the Gluing is the tricky part, you want to peal back the bead and drop a small amount of
bead of the tire from the rim slightly with your thumb to make sure the glue inbetween the bead and the rim. Then push the bead back onto the rim working
bead is seated nicely on the rim before you start gluing. Push bead into the glue around until the drop of glue has run out. Repeat process until tire is glued
place so that it sits flush with rim. all the way around, once glued write on the inside of the rim the compound e.g. M3.14.0 - How to Recycle your Rims
You can save a bit of money if you recycle your rims, typically you can get at least one more set of tires use out of a set of rims.
Bunnings has all you need to recycle the rims, in the paint section pick up a 4L tin of Acetone, this will last you a couple of years. Its also important to get the right
bucket. A bucket with a solid sealed lid is important otherwise the acetone will evaporate, the Handy 11.1 bucket comes with a great sealed lid, I've been using it
for 2 years and I'm still on the same 4L of acetone and I've recycled about 20 sets of rims.
Note always have adult supervision and appropriate Personal Protective Equipment when using Acetone, rubber gloves and eye protection recommended.
Step 1
Cut your foams out, you can also re use
the foams at least twice. Its best to use
curved scissors for this so you don’t
damage the foam when you're cutting
them out.
You want to have just the rubber bead
left, this will allow you to fit more rims
into the bucket at once.
Step 2
Put the rims into the bucket full of
acetone, its ok if the rims aren't
submerged in the acetone, the fumes will
still dissolve the glue.
Make sure when you replace the lid that it
is firmly shut.
Typically I wait a 3-4 days before I remove
the rims from the bucket. Once done the
rubber beads will pull straight off the rim
ready for the rim to be cleaned.
Step 3
Wash the rim in soapy water, give them a
good scrub, remember the acetone only
dissolves the glue it doesn’t clean them.
Once the rims are clean I use a dremel
with a sanding bit and lightly sand the
bead to help remove any excess old glue
and roughen up the surface for the next
time I glue a set of tires on.
That's it, you're ready to go with a new set
of recycled rims, easy as that!15.0 - Setting up a Nitro Engine
Keeping a nitro engine in good working order requires attention to detail on a few core components. To make sure your engine is reliable you need to check
these components before installing the engine. Too often I see people having a reliability issue and they keep restarting the engine and then it flames out again.
If the engine is routinely flaming out, its not going to be fixed by just restarting it, you need to pull the engine out and inspect the engine and make sure all the
components are in good working order. Lets run through a few important components and how to set them up.
1 - Engine bolts 5 - Return Rubber Band to enact as failsafe if radio shuts down
M3x6mm
1 4
Return to Neutral
3 2
Remove the grub screw in the carb ball and install an M3x6mm button head with
Loctite. Install a rubber band over the button head and loop it over the top end
Its good to go over your screws and make sure the engine head and back needle. Once the engine is installed in the car make sure when the radio gear is
plate are tight. When ever you are tightening up these screws make sure turned off that you can pull the servo to full throttle by hand and the servo returns to
you tighten them in order displayed, this ensures the button goes on flat. neutral. If it doesn't, align you carb straighter to the servo or install more bands.
2 - Collet 7- Fuel Line
Usually kits come with a copper collar, these tend to deform when you
tighten the flywheel and can come undone. The best collar on the market
is the kyosho steel collar. When installing the fly wheel I usually put one
washer behind the collar. When tightening the clutch nut to secure the When installing fuel line keep it simple, you don’t need to run an inline fuel filter as
flywheel you need to make sure its very tight, crank down on the nut really the tanks have stone filters, The best fuel tube on the market is the Losi tube Part
really tight, I don't run Loctite. Part no. IFW143 Steel Collet No. LOSA9314 Losi Ultra Fuel Tubing
3 - Clutch Shoe Shimming 7- How to run the engine in
Clutch
Shoe 0.5mm
washer
under
clutch
shoe
Flywheel
Its important to put small shims between you clutch shoe and flywheel.
When the clutch shoes wear they get burs on their sides and get stuck on
the flywheel. By shimming them off the flywheel you ensure the shoe can
return at idle and not stall the engine. Typically its best to run 0.5mm Adam Drake has a great video which runs through everything from start to finish
under each clutch shoe. Part no. KYO96641 Kyosho Shim set https://www.youtube.com/watch?v=2_qddxn1k6A
4 - Clutchbell Shimming 8- Precision Internals Run in Service - Automated Oil Bath Run in Service
Crank
Washer You need to be
able to rock the
clutch bell back
and forth
approx. 0.5mm
When installing your clutchbell you need a small amount of float between
the clutch bearings and the crank washer, this gives room for expansion
when the parts get hot which ensures the bearings don’t get lateral
loading/pressure. Once everything is tight you can still rock the bell back Save yourself the hassle and get your engine run in for you at Precision Internals
and forth approx. 0.5mm.. Part no. PTK-H-5905 Protek Clutchbell Shim https://www.facebook.com/precisioninternals16.0 - Setting up a Starter Box
Starter boxes if not set up correctly can make starting the engine difficult and also wear out the rubber wheel quickly, check out these steps to set it up!
Step 1
Use double sided velcro tape on the
battery and put the opposite side of the
velcro strip inside the starterbox. I also put
super glue on the bottom side of the strip
before sticking the velco down onto the
box so it sticks more permanently.
Best battery which is also light weight is
the Zippy - 2200 mAh 4 cell 14.8v.
Step 2
Its best to install the battery in the back
compartment next to the motor. You can
see the battery stuck into the box with the
velcro tape.
Step 3
Depending on which car you have, I've
found if you cut the front of the top plate
Aluminium posts on the start box as shown the front arms
with washers don’t rub on the starter box and this
allows the chassis to sit flat on the box.
For the posts I don’t use the plastic posts
Small section of starter box top deck that come with the box, try and find some
cut out to allow room for front arms aluminium posts, I use the Kyosho
IFW402B Aluminum Wing Stay Collar Set
and cut them in half. Being aluminium
allows you to tighten them up really well
compared to the plastic ones. This ensure
they dont move once they're in the right
place.
Step 4
Final step is lining up the box. Take your engine out of
the car and then push your car down on the box and
observe where the rubber wheel sits in the chassis cut
out. You want to adjust the post on the box so that the
rubber wheel is as square and central to the cut out as
possible!
Spend the time getting this perfect so the car cant move
around on the box between the posts. If you get this
right you will get ages out of the rubber wheel and your
engine will start super easy!
Rubber wheel is super
square to the chassic cut
out17.0 - Radio Tricks and Tips
While there are a lot of functions on a radio, typically you only need to understand a few to set your radio and car up properly. These Include:
1. Throttle trim - Sets where the center position of your servo is for the throttle/brake.
2. Steering Trim - Sets where the center position of your servo is for the steering.
3. End Point Adjustment - Sets how far your servo will travel for either throttle, brake or steering left to right. Each set individually.
4. Dual Rate - Evenly increases or decreases your steering end point position left and right at the same time.
5. Brake ATL - This is just your Brake end point adjustment.
Its good to set your radio buttons up so
that’s its easy to adjust the main functions
Steering Trim from your buttons.
The futaba comes with two buttons for
your thumb I set these as:
- Dual Rate
Throttle Trim - Brake ATL
The buttons above the wheel I set as
throttle trim and steering trim.
Setting these buttons up allows you to
Dual Rate
quickly and easily adjust if you need to
fine tune your car on the track. Please
Brake ATL refer to your radios manual for details on
how to set your button functions.
Throttle linkage to carb
2. Steering
1. Throttle Trim
Trim
1mm
Set your throttle at neutral, you want to ensure the car
rolls freely and the brake isn't on. A good tip for nitro is to Set you wheels so they are as straight as possible, then next time
make sure you also have about 1mm gap between you you're driving down pitlane, drive slowly and keep the wheels in
servo horn and throttle grommet, this gives room for the neutral and observe if the car drives straight, adjust accordingly with
car to flex and not apply throttle. your trim button so at neutral the car drives straight.
Steering arm slightly
touching the cast block
Caster
Block
3. Throttle End 3.1. Steering
Point End Point
Steering
Pull full throttle and adjust you high end point adjustment
Arm
so the carb is just fully open to the venture. Sometimes if I
find I have too much power I will reduce the throttle end
point so that when I pull full throttle it doesn't open all the
way to the venturi. This helps smooth out power delivery, You want your steering end point to be set so when you turn full left or
the minimum I would go is 80% of fully open. right the steering arm slightly touches the caster block.
Once you have set up your steering end point adjustments Once you have set your end point for brake, I usually initially set it so
this is a great function to evenly reduce or increase at full brake I have lots of brake, then you can fine tune the brake
steering end point. amount by reducing your brake % by clicking out the Brake ATL button.
This function can be used frequently depending on how During warm up sessions before a qualifier or final, I will testing the
much grip there is. If you feel your car has too much amount of brake pressure I have on the track by driving into a corner
steering then you can reduce your Dual Rate by clicking a and applying full brake. By either adding or reducing the Brake ATL
4. Dual Rate few % out on the button. Or if you feel you car doesn't 5. Brake ATL button I can get the right amount of brake feel, where the brakes don't
have enough steering then increase your dual rate to slam on too hard or aggressively or too softly and not pull the car up in
evenly increase your steerings end point adjustments. time. This is where you can easily add or reduce brakes depending on
the grip level and find the perfect amount of brake pressure at full
Note be careful when increasing your dual rate you don't brake that you like to drive with.
go to far and stress the servo. if your servo is flexing the
radio tray on full lock its most likely too far, its best to
reduce your dual rate until your servo isn't flexing the tray.18.0 - How to Prep a Body Shell
What you need
There are a couple of items that will make cutting out a body shell super easy, having the right tools is the first step!
1. Curved scissors you can pick these up at your local hobbyshop. 2. Dremel sanding bit and smaller metal cutting bit. 3 Hobby Knife 4. Insulation tape (bunnings
has this tape, its expensive but last for ever).
3. 4.
1.
2.
Step 1 - Cut out the body as close to the cut lines as you can with the Step 2 - Use the the smaller metal cutting bit to make your body post holes, typically I
curved scissors, then go around and clean up all the edges with a sanding don’t just make these a circle hole, I make them an oval shape the width of the body
dremel bit. In some cases its hard to cut directly on the line, thats ok the post. By making them an oval shape you allow the body to move back and forwards
dremel will allow you to cut into the tricky spots. on the body post when the car flexes which reduces the chance of the body cracking
under a crash.
Step 3 - Once the body is cut out I use the silver insulation tape and cover Repairs - Now if you do get cracks in your body, the best repair method is to use
the inside of the body. I usually cut it into strips and lay it down in the body "Original Shoe Goo" in clear. Its by far the best shoe goo on the market and will hold
and work the tape into the groves with my fingers. Once in I use a hobby the body together really well if you get cracks.
knife to cut and trim the tape to the holes. This tape makes the body last It can be hard to find but usually you can buy it on EBay or Amazon
way longer and saves your paint from being scratched off.19.0 Chargers and Soldering
Chargers
This is a good all round charger for 1/8 nitro and Electric. Price range SKYRC D100 V2 AC/DC DUAL CHARGER, This charger is excellent for the 1/8 EP racer,
between $160-$200. Many club members use this charger with no issues, it also has phone app integration and fast charge for 1/8 batteries. Local hobby shops
its handy as its one of the smallest chargers on the market, good for travel. have availability of this charger. Approx $180.
https://speedyrc.com.au/collections/battery-chargers/products/skyrc-d100-v2-ac-dc-
dual-charger-power-supply-sku-sk-100131
Soldering
Soldering is a technique which will take time to master, but if you follow these few steps you will one step closer to becoming a soldering guru!
Step 1 - Critical to be able to solder correctly is having the right tools. A Step 4 - Tin the tip by melting a small amount of solder on the tip. I find the best type
soldering iron that can get up to abut 300 deg c is important. Resin Core of tip is a flat tip, it gives more area for solder and therefore more surface area for
High Grade solder is also important to get a good join. the type of soldering we usually do with R/C.
Step 5 - Tin both the end of the wire and what you about to solder it to. Using the
Step 2 - Make sure you have a wet sponge, once the solder tip is hot, clean solder tip, heat the joint and push the solder wire into the wire/connector until its
the tip by wiping it on the sponge. covered in solder. Slide your heat shrink over the wire now.
Tip - Once the
solder has cooled
push the heat
shrink over the
joint and heat it
with a cigarette
lighter to cover
the joint.
Step 6 - Again clean the tip in the wet sponge and tin the soldering tip. Using the
multi tool to holder the wires/plugs heat the wires/plugs pushing them together with
Step 3 - Its handy having a multi tool to hold wires so you can tin the wire. the soldering tip. Hold them together with the tip until both have melted together.
Part no. PTK-5340 ProTek RC Carbon Fiber Soldering Jig Release the solder tip and hold the wires together until cooled. Job done!20.0 - 1/10 EP Setup with Chris Sturdy Driver Interview Name - Christopher Sturdy Age - 24 How long have you been racing and what class did you start in? 14 years, started in 1/10th ep offroad Home Track? PHDR, Logan, Chargers RC Favorite Event? 2019 Reedy Race Of Champions Racing Highlights? IFMAR Worlds in 2wd 7x EP Offroad Australian Champion Sponsor Time, here is the chance to thank the people who help you out. Team Associated Plaig Bearings Factory Team Jspec Stickers Reedy Power T-Works Pro-Line Speedy RC Protoform Bezerk RC, Subway Batemans Bay, 1up Racing JA Designs, Gazza Motorsport Car Details Car Team Associated B74.1 Motor Reedy M4 5.5T ESC Reedy Blackbox 510R Radio Futaba 7PX-R Servos Reedy RT1508 Tires Pro-Line Battery Reedy SG3 6100mhA Other Notes/Option Parts used: Bezerk: T-Works: B74.1 5mm front shock tower Gold steel and titanium bolts B74.1 rear tower(extra 1Up Racing: camber link hole) Servo mounting screws Lipo tab holder set Precision Alloy Shims +3 steering plates Team Associated: Steering bellcrank arm Chrome shock shafts RDRP Fox coated shock bodies Alloy +4 steering rack Machined internal shock spacers Alloy steering bellcranks Titanium turn buckles Alloy rear wheel hubs 10deg castor blocks
21.0 1/8 EP Mugen MBX8 with Jackson Beale
Driver Interview
Name - Jackson Beale
Age - 15
How long have you been racing and what class did you start in?
6yrs and I started at PHDR in nitro buggy.
Home Track?
Pine Hills Dirt Racing
Favorite Event?
IFMAR 2018 Worlds Perth
Racing Highlights?
1 -Worlds Junior finalist
2 - Rocky Cup: TQ and 1st Nitro Truggy and 3rd Nitro Buggy
3 - Meakin Masters: TQ and 1st place Truggy, Best U/15 Driver.
4 - Queensland State Titles TQ and 1st Place Nitro Truggy
5- Australian National Titles – A Main finalist Nitro Buggy, 3rd Nitro Truggy

Sponsor Time, here is the chance to thank the people who help you out.
#Proline, #MMI, #mugenseiki, #grasshopperslawncare,
#racersedgeaustralia, #maximafuels, #speedyrc, #TeamZombie
Car Details

Car              Mugen MBX8 Eco with Worlds edition upgrades
Motor            Hobbywing 4268G2 1900kv
ESC              Hobbywing XR8 Plus
Pinion/Spur      15T / 46T
Radio            Futaba 7PX
Servos           Futaba S9373SV
Tires            Proline - Usually M3/S3 at PHDR
Battery          Team Zombie 6400Mah 120c HV series 14.8v

Other Notes/Option Parts used:
Aluminum Servo Horn & rear Hubs
Worlds Edition center Dog Bones
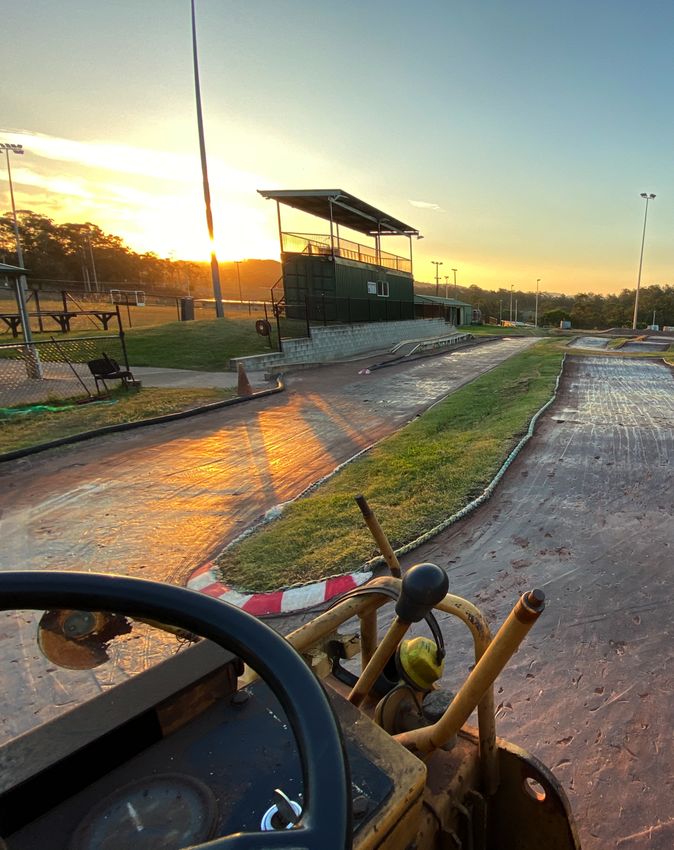
22.0 1/8 Nitro AE RC8 B3.2 with Alex Bernadzik
Driver Interview
Name - Alex Bernadzik
Age - 18
How long have you been racing and what class did you start in?
7 years, I started in 2wd Short Course
Home Track?
Pine Hills Dirt Racing
Favorite Event?
2018 IFMAR Worlds Perth

Racing Highlights?
1. 2019 National Series Champion
2. Sunshine Coast Night Race 1st Place
3. King Of The Valley 2020 1st Place

Sponsor Time, here is the chance to thank the people who help you out.
Team Associated, Reedy Power, JConcepts, Runnertime and Dad for all of
his help.
Car Details

Car             Team Associated RC8B3.2
Engine          O.S B21 Ty
Pipe            OS 2090
Plug            OS P4
Radio           Sanwa M17
Servos          Reedy RT2706A
Tires           Jconcepts
Battery         Reedy Power 2400mah

Other Notes/Option Parts used:
Kashima Shock Bodies, Titanium Screw Kit, JConcepts titanium turnbuckles,
Aluminium servo saver arm, Aluminium shock standoffs, Fast Race Shock
Caps, 30 gram brass chassis weight
23.0 1/8 Nitro HB D819RS with Zac Ryan
Driver Interview
Name - Zac Ryan
Age - 34
How long have you been racing and what class did you start in?
20 yours! I started in the best class ever the 1/10 gas trucks.
Home Track?
Pine Hills Dirt Racing
Favourite Event?
Thailand Buggy Party, Manila Masters and any major race at PHDR.
Racing Highlights?
Winning Australian Gas truck titles, runner up twice at 1/8 gas buggy nats,
3rd at FEMCA, Winning the last thailand buggy party race
Sponsor Time, here is the chance to thank the people who help you out.
HB Racing, Hearns Hobbies, Proline Australia and all the legends at PHDR!
Car Details
Car               HBD819RS
Engine            OS Speed B2101
Pipe              OS 2090
Plug              OS P4 in most occasions, P3 if its cold
24.0 Local Hobbyshops
                                           Info                                                                  Links

                                                                                                       https://speedyrc.com.au/
A great local hobby shop with lots of racing equipment for sale, up to stock with most
major brands.

                                                                                                         https://ozrc.com.au/

Located at 1/129 Robinson Rd E, Geebung QLD 4034. This is an awesome hobby shop
which stocks a huge range of rc gear. Head into the hobby shop and check out their
selection. They are great at ordering in gear if they don’t have stock.

                                                                                                   https://www.hearnshobbies.com/

Great supple of HB Racing gear, hobby shop located in Melbourne but offer great
shipping options and an easy website to navigate.

                                                                                               https://www.campbelltownhobbies.com.au/

Campbeltown has lots of the major rc brands, specifically J concepts if you're chasing tires
this is the place to go. Hobby shop located in NSW.

                                                                                     https://www.facebook.com/mischiefandmayhemhobbies/

Located in Nambour, this is a great local hobby shops which supports local racing, check
em out!
25.0 - Working Bees One of the best part about being in a club is being part of the community and helping to keep the facility in great condition for everyone to enjoy. PHDR hosts working bees usually once a month, this is the time when we don’t race but instead improve and maintain the facility. If you can spare a little bit of your time to help out at working bees, its fun and every little bit goes a long way to having the best facility around! Thanks to all the champions that make this facility so great, check them out below working hard!
26.0 - Video and Links
                                          Info                                                                           Links

                                                                                                       https://thenonamercpodcast.podbean.com/

A great podcast that covers a massive range of topics, interviews with pros and info about
the latest big races happening. They are on spotify as well, check them out!

                                                                                                      https://www.youtube.com/user/JQProductsTV

Lots of info about 1/8 setup and engine tuning!

                                                                                                     https://www.youtube.com/user/AdamDrake117

A legend of the hobby, Adam runs through a huge amount of setup advice and 1/8 nitro
tricks and tips.

                                                                                                    https://www.youtube.com/c/RyanHarrisRC/videos

Ryan covers a huge range of electric 1/10 information from racing to setup and
maintenance.

                                                                                             https://www.youtube.com/channel/UC_N6DnCnM3oMQs_3hCF63LA

An IFMAR world champion Robert Batlle runs through lots of different information on 1/8
Nitro racing

                                                                                                     https://www.youtube.com/user/davidronnefalk

                                                                                                           http://www.davidronnefalk.com/
An IFMAR world champion David Ronnefalk runs through lots of different information on
1/8 Nitro racing mainly focused on setups for HB racing buggies.

                                                                                                     https://www.facebook.com/phdradmin/videos/

             Our video section of our facebook page, lots of historic videos!

                                             Website with the latest racing news.                                https://circusrc.com/
You can also read