SIY PROJECT LEARN. MAKE. LOVE - SIYSEWITYOURSELF
←
→
Page content transcription
If your browser does not render page correctly, please read the page content below
Learn. Make. Love.

                                           SIY Project

                                    Sew It Yourself
 The following project was created with fabric that your local retailer may no longer have available. You can re-
create these projects by replacing the fabrics shown using the fabric key as a guide for similar colorations or styles.

         PROJECT DISCLAIMER: Every effort has been made to ensure that all projects are error free. All the information is
       presented in good faith, however no warranty can be given not results guaranteed as we have no control over the
       execution of instructions. Therefore, we assume no responsibility for the use of this information or damages that may
      occur as a result. When errors are brought to our attention, we make every effort to correct and post a revision as soon
       as possible. We recommend that you test the project prior to cutting for kits. Finally, all free projects are intended to
                                             remain free to you and are not for resale.

                                       SIY - Sew It Yourself™ is a trademark of Jaftex Corporation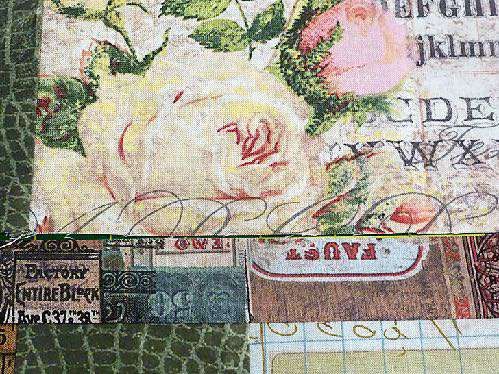
PAT
CHWORKPILL
OW LEARNHOW
Tuf
tedPa
tchworkF
loo
1rP
aC
tc
hu s
worh
kbai
s
io
csns
2 F
uss
ycut
ti
ng
3 Bi
asc
utpi
pi
ngs
tr
ips
4 Appl
yi
ngpi
pi
ng
5 F
ini
shi
ngpi
pi
nge
nds
6 E
nve
lopepi
l
lowba
ck
7 S
tra
ightl
i
nequi
l
ti
ngopt
ions
8 But
tonhol
esa
ndbut
tons
9 P
erf
ect
ings
qua
rec
orne
rs
Copy
right©2021S
ew4HomeL
LC.
All
Right
sRes
erv
ed.
ONEDE
SIGNF
OURDI
FFE
RENTL
OOK
SF
REE
SPI
RI
T,HE
NRYGL
ASS
,ST
UDI
OEANDBL
ANK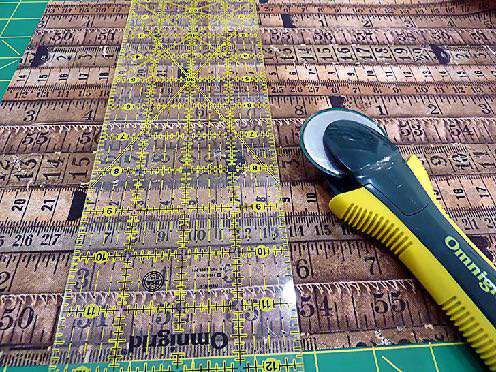
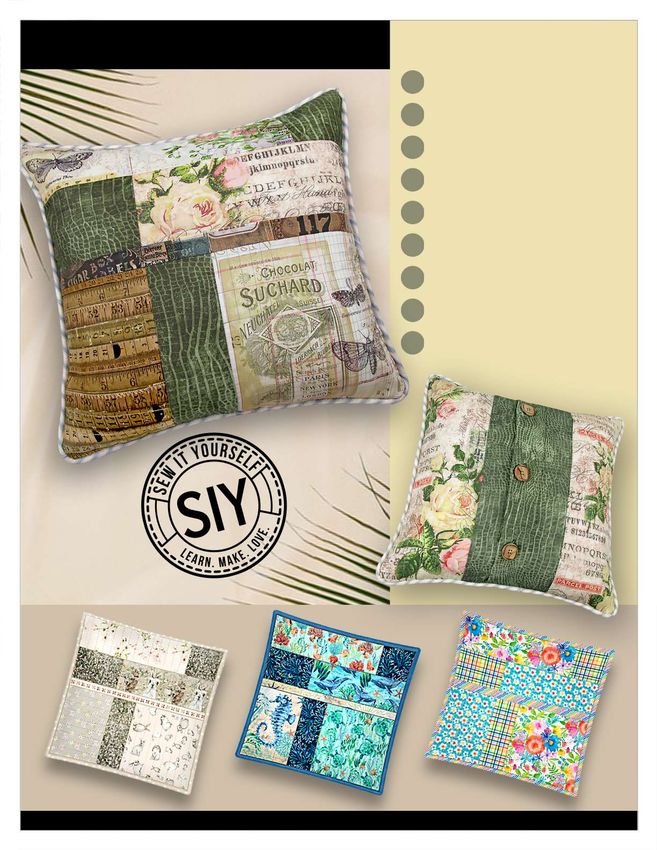
Jaftex SIY Patchwork Pillow by Sew4Home
What’s the #1 easy sewing project? A pillow! If                     four different collections from within the Jaftex family of
you’ve crossed that off your list, and you’re                        fabrics: FreeSpirit, Henry Glass, Blank, and Studio E.

ready to kick it up another notch; add                              For this main sample, we used six prints from the Tim Holtz
patchwork, piping, and more.                                        Eclectic Elements Foundations collection for FreeSpirit
                                                                    Fabrics plus one blender from Tim’s Worn Croc collection.
This pretty patchwork pillow is based on a classic four-row         The yardage amounts listed allow a bit extra to make sure
grid that allows you to mix and match a wide variety of             you can get nice fussy cuts to match the ones shown on our
fabrics from within a favorite collection. You’ll learn fussy       sample pillow(s).
cutting tips to isolate and showcase a fabric’s motifs, basic
piecing, how to make and attach bias piping, all the steps          The illustrations below show the front/back grids on which
for an envelope back with button and buttonhole closure             we based the patchwork for all FOUR pillow samples. As
plus a special side bar with steps for an alternate tie closure,    mentioned, our Tim Holtz pillow used seven different fabric
and other helpful tips and tricks that will take your sewing        options, however, by referring to the grids, you can
skills to the next level.                                           determine the yardage changes necessary should you wish
                                                                    to include fewer or even more fabrics on your patchwork
We recommend reading through all instructions prior to              pillow.
beginning your project.

Links within the instructions will take you to the
Sew4Home.com website for additional technique tutorials. If
you are new to any of the techniques used, these full step-by-
step tutorials are helpful if reviewed in advance of the project.

Sewing Tools You Need
• Sewing Machine and standard presser foot
• Quarter Inch Seam foot
• Zipper foot
• Walking/Even Feed foot or engage your machine’s built-
  in fabric feeding system
• Quilt Guide Bar; optional

Fabric and Other Supplies

                                                                    As noted above, yardage recommendations are based on
                                                                    the specific fabric we chose with its particular motif
                                                                    directions and sizing. Should you choose a fabric collection
                                                                    with more random or smaller motifs, you may be able to
                                                                    get away with less fabric. Our goal is always to recommend
                                                                    more than enough, which means we usually round up to
                                                                    the next nearest standard yardage cut.

Our custom patchwork design uses up to SEVEN
coordinated prints. We originally executed this design in

Copyright ©2021 Sew4Home LLC. All Rights Reserved.                                                                         1 of 18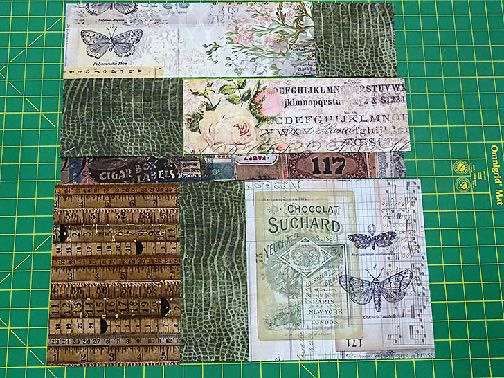
Jaftex SIY Patchwork Pillow by Sew4Home
                                                                  • All purpose thread to match fabric
                                                                  • See-through ruler
                                                                  • Fabric pen or pencil
                                                                  • Iron and ironing board
                                                                  • Scissors and/or rotary cutter and mat
                                                                  • Seam gauge
                                                                  • Seam ripper
                                                                  • Straight pins
                                                                  • Hand sewing needle
                                                                  • Safety pins for pin basting

                                                                  Getting Started
                                                                  NOTE: All cuts are based on a standard width x height motif
                                                                  pattern with width being WOF (width of fabric). If you use any
                                                                  directional prints, as we did, remember to pay attention to
• Piping Fabric: ½ yard of 44″+ wide quilting weight fabric;      their positioning within the patchwork to insure you cut the
  we used Ticking in Neutral                                      width and height dimensions correctly. In addition, all our
• Fabric A (grid sections: 2,3,7 and 10): ¾ yard of 44″+          pieces were fussy cut.
  wide quilting weight fabric; we used Worn Croc in Bayou

• Fabric B (grid section 6): ⅜ yard of 44″+ wide quilting
  weight fabric; we used Tape Measures in Neutral

• Fabric C (grid sections 4 and 9): ⅝ yard of 44″+ wide
  quilting weight fabric; we used Rose Parcel in Multi

• Fabric D (grid section 1): ¼ yard of 44″+ wide quilting
  weight fabric; we used Botanical in Multi

• Fabric E (grid section 8): ⅜ yard of 44″+ wide quilting
  weight fabric; we used Melange in Neutral

• Fabric F (grid section 5): ⅛ yard of 44″+ wide quilting
  weight fabric; we used Cigar Box Labels in Multi

• ⅝ yard of 45”+ wide low loft, fusible fleece
• 2¼ yards of ¼” piping cord                                      1. From the piping fabric (Ticking in Neutral in our sample),
                                                                     cut enough 2” strips on the bias to equal 80”.
• THREE 1” to 1¼” buttons
                                                                     NOTE: If you are new to working with bias strips and/or
• ONE 18″ x 18″ pillow form; we used PillowLoft pillow forms         making your own piping, take a look at our full tutorial on
  from Mountain Mist                                                 measuring, cutting, seaming, and more.
  NOTE: These were great forms with which to work. Not only
  are they perfectly plump with excellent loft, they also         2. From Fabric A (Worn Croc in Bayou in our sample), cut
  maintain their shape and wear wonderfully. The woven               the following:
  cover is made with a blend of 65% polyester and 35% cotton         ONE 4¾” x 4¾” for grid section 2
  with a 100% polyester fiber filling. The zipper closure makes      ONE 6¾” x 4½” for grid section 3
  cleaning easy – just remove the fiber filling and toss the         ONE 3½” x 9¾” for grid section 7
  cover in the wash.                                                 ONE 6¼” x 19” for grid section 10 underlap panel
                                                                     ONE 7¾” x 19” for grid section 10 overlap panel

Copyright ©2021 Sew4Home LLC. All Rights Reserved.                                                                        2 of 18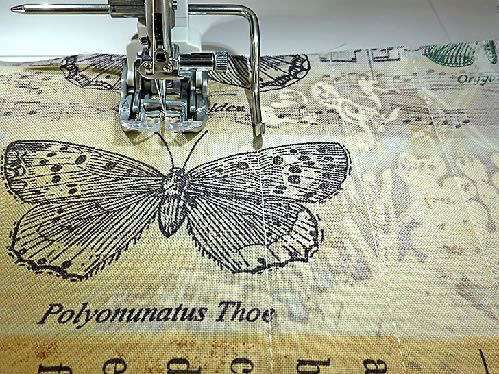
Jaftex SIY Patchwork Pillow by Sew4Home
3. From Fabric B (Tape Measures in Neutral in our sample),       FRONT PATCHWORK ASSEMBLY
   cut ONE 6¾” x 9¾” for grid section 6.
                                                                 1. Lay out all the pieces in order to match the front
4. From Fabric C (Rose Parcel in Multi in our sample), cut the      patchwork grid. As mentioned above, make sure all
   following:                                                       directional motifs are correct top to bottom and left to
   ONE 12¾” x 4½ “ for grid section 4                               right.
   TWO 7” x 19” for grid sections 9

5. From Fabric D (Botanical in Multi in our sample), cut ONE
   14¾” x 4¾ “ for grid section 1.

6. From Fabric E (Melange in Neutral in our sample), cut
   ONE 9¾” x 9 ¾”for grid section 8.

7. From Fabric F (Cigar Box Labels in Multi in our sample),
   cut ONE 19” x 1½” for grid section 5.
   NOTE: For this long, skinny strip, we were extra careful to
   fussy cut Tim’s collage design so the printed “seams/lines”
   between the motifs would align with the actual seams of
   the patchwork grid above and below.

                                                                 2. Start with the three pieces for the bottom row of the
                                                                    grid: 6, 7, and 8.

                                                                 3. Place pieces 6 and 7 right sides together. Pin together
                                                                    along their inside 9¾” edges.

8. From the fusible fleece, cut the following:
   ONE 18” x 18”
   ONE 11” x 18”
   ONE 10” x 18”

9. From the piping cord, cut ONE 80” length.

At Your Sewing Machine & Ironing Board                           4. Attach a Quarter Inch Seam foot. If needed on your
                                                                    machine, adjust settings for both the stitch length and
NOTE: All the front and back patchwork uses a ¼” seam               needle position for a ¼” seam allowance. Thread the
allowance. The final perimeter seam uses a ½” seam                  machine with thread to best match your fabric in the
allowance as does some construction within the envelope             top and bobbin. We used an ecru thread throughout.
overlap.
                                                                 5. Using a ¼” seam allowance, stitch together.

Copyright ©2021 Sew4Home LLC. All Rights Reserved.                                                                     3 of 18
Jaftex SIY Patchwork Pillow by Sew4Home
                                                                8. Using a ¼” seam allowance, stitch together. This forms
                                                                   the bottom row.

6. Find piece 8. This is a good example of a directional
   motif. We made sure it was positioned correctly prior to
   pinning.
                                                                9. Press both seam allowances together and towards the
                                                                   center of the row.

7. Pin piece 8 to the sewn 6/7 section, right sides together.
                                                                10. Find piece 5. It is a row in and of itself. As mentioned
                                                                    above, we were very careful with our fussy cutting to
                                                                    make sure the printed lines within our motif would
                                                                    align with the actual seams of the patchwork rows
                                                                    above and below. In the photo below, you can see how
                                                                    the motif marked with the pin aligns with the seam.

Copyright ©2021 Sew4Home LLC. All Rights Reserved.                                                                    4 of 18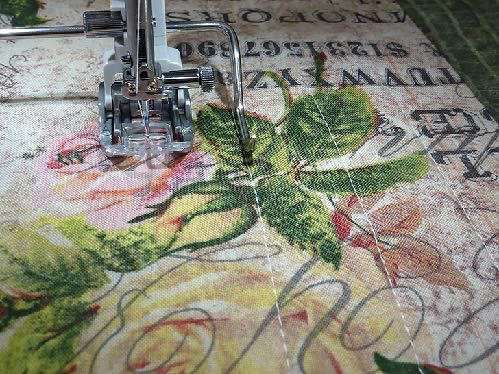
Jaftex SIY Patchwork Pillow by Sew4Home
                                                            13. Find pieces 3 and 4, which will make up the next row.

                                                            14. As you did above for the bottom row, first check be sure
                                                                any/all directional motifs are correctly positioned.

11. Pin the bottom raw edge of piece 5 across the top raw
    edge of section 6/7/8, right sides together.

                                                            15. Pin pieces 3 and 4, right sides together along their inner
                                                                4½” edges and stitch, using a ¼” seam allowance. Press
                                                                the seam allowance together and toward piece 3.

12. Using a ¼” seam allowance, stitch together.

                                                            16. Pin this new row to the completed two row panel, right
                                                                sides together. You are pinning the bottom raw edge of
                                                                the 3/4 row to the remaining top raw edge of piece 5.
                                                                Be extra careful to make sure the vertical seam in row
                                                                3/4 aligns with the vertical seam (pieces 6/7) in the
                                                                bottom row.

Copyright ©2021 Sew4Home LLC. All Rights Reserved.                                                                 5 of 18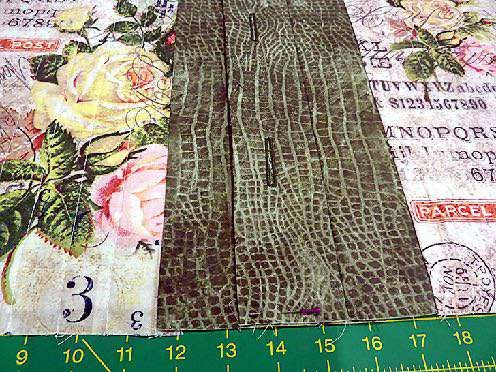
Jaftex SIY Patchwork Pillow by Sew4Home
                                                         20. Pin and seam them together in the same manner to
                                                             complete this final top row. Press the seam allowance
                                                             together and towards piece 2.

                                                         21. Pin the bottom raw edge of row 1/2 right sides
                                                             together with the remaining top raw edge of row 3/4.

17. Stitch across, using a ¼” seam allowance.

                                                         22. Stitch across, using a ¼” seam allowance. Press the
                                                             seam allowance together and up towards row 1/2.

18. Press the seam allowance together and down towards
    piece 5.

19. Finally, find the last two pieces: 1 and 2.

                                                         23. Press the finished front panel flat from the right side.

Copyright ©2021 Sew4Home LLC. All Rights Reserved.                                                                6 of 18
Jaftex SIY Patchwork Pillow by Sew4Home
                                                                QUILTING THE FRONT

                                                                1. The quilting on the pillow front is simple straight lines
                                                                   spaced 1” apart. To make it more interesting and to
                                                                   work within the patchwork design, some of the
                                                                   sections have quilting lines that run horizontally, some
                                                                   have lines that run vertically, and some have no quilting
                                                                   at all. The result is a very interesting textual finish.

                                                                2. Our original Grid Drawings are repeated here so you
                                                                   can see the recommended direction of all our quilting
                                                                   lines.

24. Find the 18” x 18” square of fusible fleece.

25. Center the fleece on the wrong side of the completed
    front panel so there is ½” of fabric showing beyond the
    fleece on all four sides.

26. Following manufacturer’s instructions, fuse the fleece in
    place securely from both the front and back.

Copyright ©2021 Sew4Home LLC. All Rights Reserved.                                                                   7 of 18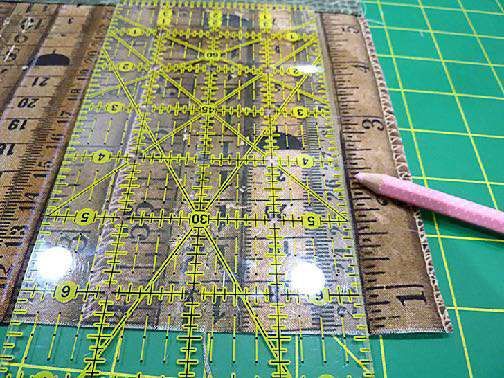
Jaftex SIY Patchwork Pillow by Sew4Home
3. If necessary, re-thread your machine with the thread
   you wish to use for all your quilting. We recommend
   staying with one thread color in a neutral tone that best
   coordinates with all your fabrics. As with the
   construction, we used an ecru thread for the quilting.

4. Attach a Walking/Even Feed foot or engage your
   machine’s built-in fabric feeding system (this was our
   choice).

5. Re-set for a slightly lengthened straight stitch.

6. There are two ways to set-up for perfectly spaced
   straight line quilting. The first is to use a Quilt Guide Bar
   that can be adjusted and set to a 1” increment.

7. The first line of quilting in any section should start 1”
                                                                   10. Stitch the horizontal lines in the same manner.
   from the nearest seam.

8. Once this first line has been stitched, the foot is
   positioned so the quilt bar runs along the previous line
   to stitch the next line in the sequence. We stitched the
   vertical Iines first.

                                                                   11. If you don’t have access to a Quilt Guide Bar, you can
                                                                       measure and mark 1” parallel lines with your ruler and a
                                                                       fabric pen or pencil.
                                                                       NOTE: Remember, any time you are working on the right
                                                                       side of your fabric, make sure your marking tool is one that
9. Start and stop each line of quilting at the seam line. Do           will easily wipe away or will vanish with exposure to the
   not cross the seam line. If it is a feature on your                 air or the heat of an iron.
   machine, we recommend using a lock stitch for the               12. Again starting from the nearest seam, measure and
   neatest start and finish. If you do not have this feature,          mark in 1” increments across the section.
   leave your thread tails long at the start and end of each
   line of quilting. When done, use a hand sewing needle
   to pull the threads through to the back, then hand knot
   to secure.

Copyright ©2021 Sew4Home LLC. All Rights Reserved.                                                                          8 of 18
Jaftex SIY Patchwork Pillow by Sew4Home
sections, and the two remaining fusible fleece
rectangles.
2. On the overlap piece 10, make a wide hem along the
inner edge.
NOTE: The fabric we used for our #10 pieces is non-
directional, so either side could have been the inner edge.
We simply picked one. If you have a directional fabric,
make sure you are hemming what will be the finished
inner edge that will overlap at the center of the pillow.
3. To make the wide overlap hem, fold back the raw edge
¼” and press.
13. Stitch along the drawn lines.
4. Fold back an additional 2½” and press again.
NOTE: We are stitching through just TWO layers: the top
patchwork panel and the layer of fusible fleece. Often
when quilting, you have a three-layer quilt sandwich with
an additional thin layer of backing. This backing can make
it easier for the panel to move across the needle plate. We
had no trouble at all with our two layers, but if you find
your machine is struggling or seems to be “grabbing” the
fleece, try adding the additional layer of backing. You can
use muslin or scrap cotton. Simply cut a 18” x 18” panel
and layer it with your top/fleece panel. Add a few large
safety pins through the center to help hold the layers,
positioning these pins within the sections that do not have
lines of quilting.
14. Set aside the finished front panel.
5. On the underlap panel, you’ll make a narrow hem. Fold
BACK PATCHWORK ASSEMBLY AND QUILTING back the raw edge ¼” and then fold back just an
additional ½”. Press well.
1. Find all the elements for the back panels: overlap piece
10, underlap piece 10, the two pieces for the #9 grid
Copyright ©2021 Sew4Home LLC. All Rights Reserved. 9 of 18Jaftex SIY Patchwork Pillow by Sew4Home
6. Lightly pin the hems in place. 10. Press each seam allowance together and toward piece
10.
NOTE: IF YOU ARE PLANNING TO USE THE OPTIONAL TIE
CLOSURE. THIS IS THE POINT AT WHICH YOU SHOULD STOP TO 11. Place each seamed panel wrong side up on your
MAKE AND INSERT THE TIES. SCROLL TO THE BOTTOM OF THE ironing surface. Unpin/unfold the hem so the crease
INSTRUCTIONS FOR THESE ALTERNATE STEPS. lines are visible. Find the appropriate panel of fusible
fleece (the 10” wide piece is for the overlap, the 11” for
7. Pin a hemmed panel right sides together with each of
the underlap).
the #9 pieces. You are pinning the raw edge of the
hemmed panel to the inside raw edge of outer panel. 12. Position the fleece on the wrong side of the fabric so
As always, make sure any directional motifs are the inner edge is aligned with the innermost crease line
correctly positioned so when the final button overlap is of the hem. On the other three sides, there should be
in place everything looks good top to bottom and left ½” of fabric showing beyond the fleece.
to right.
13. Following manufacturer’s instructions, fuse each fleece
8. Re-thread the machine if necessary with thread to best panel in place.
match the fabric in the top and bobbin (we continued
to use the same ecru) and re-set for a standard stitch
length.
9. Using a ½” seam allowance, stitch each pair of panels
together.
Copyright ©2021 Sew4Home LLC. All Rights Reserved. 10 of 18Jaftex SIY Patchwork Pillow by Sew4Home
14. Re-fold each hem into position, which means it is now 17. If necessary, re-thread the machine with the same
wrapping over the fused fleece. Press again so each thread you used for quilting on the front of the pillow.
panel is nice and flat. Keep a slightly lengthened straight stitch.
18. Use the same method as above to add 1” spaced
vertical quilt lines within each grid section 9. Refer to
the grid drawings above if needed. There is no quilting
within the button overlap panels.
15. Re-thread the machine if necessary with thread to best
match the overlapping panels in the top and bobbin.
We did change out our thread this time to match the
dark green of the Worn Croc fabric.
16. Re-set for a slightly lengthened stitch and topstitch BUTTONHOLES
each hem in place, using the markings on your
machine’s throat plate as a guide to run your 1. Find the back panel that will be the overlap panel. It’s
topstitching seam along the inner fold of each hem. the slightly narrower panel with the wide hem.
2. Mark for the three buttonholes. They should be evenly
spaced. If you are using the same size button as
recommended, one buttonhole should be 3½” down
from the top raw edge, one 3½” up from the bottom
raw edge, and the third in the center – 9½” down the
the top raw edge.
Copyright ©2021 Sew4Home LLC. All Rights Reserved. 11 of 18Jaftex SIY Patchwork Pillow by Sew4Home
5. Referring to your manual, set up your machine to make
a vertical buttonhole at each of the three marked
points.
3. For all three, they are then centered side to side within
the wide hem of the #10 overlap panel.
6. When finished, run a line of seam sealant down the
stitched buttonhole.
4. Use a button to confirm the top, bottom, and center
point for each buttonhole.
7. Carefully cut open each buttonhole.
Copyright ©2021 Sew4Home LLC. All Rights Reserved. 12 of 18Jaftex SIY Patchwork Pillow by Sew4Home
8. With both back panels right side up, overlap the two 5. Stitch across, using a ¼” seam allowance.
panels (overlap on top, underlap on bottom) until the
width of the overlapped panels equals 19”. Pin in place
top and bottom. If desired, you could hand or machine
baste at the top and bottom for additional security to
keep these two panels together through the remainder
of construction.
6. Repeat to stitch together as many bias-cut lengths as
necessary to yield 80”.
7. Press each tiny seam allowance open and flat.
8. Press the completed strip flat.
MAKE AND PLACE PIPING 9. Place the flattened strip wrong side up on your work
surface. Find the 80” length of piping cord. Lay the cord
1. If this is your first time making piping, see our
down the center of the strip on the wrong side.
tutorial, How to Make and Attach Your Own Piping.
2. If necessary, re-thread the machine with thread to best
match the piping fabric in the top and bobbin. Re-set
for a straight stitch. Attach a standard presser foot.
3. Find all the 2” bias-cut strips.
4. You’ll attach the strips end to end to equal your final 80”
of needed length. To do this, place the strip lengths at
right angles to one another.
10. Wrap the fabric, right side out, around the cord. The raw
edges of the strip should be flush. Lightly pin close to
the cord to hold the fabric in place.
11. Lengthen the stitch to its maximum for basting. Attach
a Zipper foot.
12. Stitch close to the cord to create your fabric
covered piping.
Copyright ©2021 Sew4Home LLC. All Rights Reserved. 13 of 18Jaftex SIY Patchwork Pillow by Sew4Home
13. Find the front panel. 19. Fold under the end of the loose fabric of the tail to
create a clean edge. Trim away excess fabric if necessary
14. Starting at the center bottom, pin the piping to prior to folding. Overlap the folded end to conceal
the right side of the panel, aligning the raw edges of the piping cord and create a clean joint. Pin in place.
the piping fabric with the raw edge of the panel, and This joint should lay flat against the pillow panel.
leaving about 2” free at the head and tail.
20. Still using a Zipper foot, and with the stitch still
15. Continue pinning around the perimeter of the pillow. lengthened for machine basting, baste the piping in
At each corner, you can clip into the piping to better place around the entire panel. Run the seam as close to
allow it to curve around the corner. Be careful to not cut the piping cord as possible.
too deep; keep the snip below the basting.
16. When you get back to your starting point, lay
the piping against the fabric so it is flat and smooth.
Slice the head of cording so that end is straight.
17. With a seam ripper, peel back the fabric on the tail to
expose the cording underneath.
18. Trim the end of cording tail so it exactly butts together
with the head of the cording.
Copyright ©2021 Sew4Home LLC. All Rights Reserved. 14 of 18Jaftex SIY Patchwork Pillow by Sew4Home
½” but could be slightly wider or narrower; the goal is
to stitch as close to the cord as possible.
ASSEMBLE FRONT TO BACK AND ADD BUTTONS TO
FINISH
1. Place the front panel right side up and flat on your work 6. Clip each corner at the diagonal, being careful to not
surface. clip into the seam.
2. Find the back panel; it should still be secured top and 7. Turn the cover right side out through the back overlap.
bottom within the seam allowance to hold the panels Gently push out and smooth all four corners. A long,
together. Working with the two panels as one unit blunt tool works well for this, such as a knitting needle,
makes it easier to stitch front and back together chopstick or point turner. Press flat.
without shifting.
8. Insert a fabric pen or pencil through the exact center of
3. Place the overlapped back panel right side down on the each buttonhole to mark the position for each button
front panel, sandwiching the piping between the on the underlap panel below.
layers. The two layers are right sides together. Pin the
layers together along all four sides.
9. Thread the hand sewing needle and hand stitch each
button in place. We used a decorative “X” stitch for our
4. Re-set the stitch length to normal, but keep the Zipper four-hole buttons.
foot in place.
5. Stitch around all four sides, stopping to sharply pivot at
each of the four corners. This seam allowance should be
Copyright ©2021 Sew4Home LLC. All Rights Reserved. 15 of 18Jaftex SIY Patchwork Pillow by Sew4Home
10. Insert the pillow form through the overlap opening, 4. Using a ¼” seam allowance, stitch along the side and
fluff it out in the corners, and button closed. across the end, pivoting at the corner. Remember, the
opposite end remains unsewn.
OPTIONAL TIE CLOSURE AS SHOWN ON THE HENRY
GLASS YOU ARE LOVED PILLOW
1. From your selected tie fabric, cut three 2½” x 36″ strips.
We used the You Are Loved pink dot fabric for both the
piping and the ties on our sample pillow.
5. Clip the corner diagonally. Be careful not to clip into
your seam.
6. Press open the seam allowance.
2. Cut each strip in half to create two ties: 2½” x 18″. You
should now have three sets of two 2½” x 18″ ties.
3. Fold each tie in half (1¼” x 18″). Pin in place along the
side and across one end. The opposite end remains raw.
Copyright ©2021 Sew4Home LLC. All Rights Reserved. 16 of 18Jaftex SIY Patchwork Pillow by Sew4Home
7. Turn each sewn tie right side out through its open end.
NOTE: If you’re struggling with turning skinny tubes, check
out our tutorial on our favorite method using a hemostat.
8. Carefully reach in through the opening with a long
blunt tool, such as a knitting needle, chopstick or point
turner, and gently push out the corners so they are nice
and sharp. Press flat.
9. Find the two #9 back panels. Place them right side up
and flat on your work surface.
10. Position a tie along the inside edge of each panel. Align
the raw edge of each tie with the raw edge of the panel.
11. Just like the buttonhole option, the ties should be
evenly spaced: one 3½” down from the top raw edge,
13. Using a ½” seam allowance, stitch each pair of panels
one 3½” up from the bottom raw edge, and the third in
together. This seams secures the ties in place. From this
the center – 9½” down the the top raw edge. Pin the
point forward, follow the instructions above. You will, of
end of each tie in place.
course, skip the steps about making buttonholes and
stitching buttons.
12. Find the two hemmed #10 back panels. Pin a hemmed
panel right sides together with each of the #9 pieces,
sandwiching the ties between the layers. You are 14. When doing the final perimeter stitching, you may
pinning the raw edge of the hemmed panel to the want to pin or loosely knot the ties at the center of the
inside raw edge of outer panel. back panels to keep them out of the final perimeter
seam.
15. With your pillow form inserted, tie three beautiful bows.
Copyright ©2021 Sew4Home LLC. All Rights Reserved. 17 of 18Jaftex SIY Patchwork Pillow by Sew4Home
The explanations and instructions in this PDF are published in good faith and have been reviewed for accuracy, however, no warranty,
either expressed or implied, is made nor are successful results guaranteed. Since the nature and quality of the materials used and the
workmanship of the individual creator are unknown, the finished products bear no warranty as to their safety or ability to perform any
function adequately.
Sew4Home LLC shall not be liable for any special or consequential damages that result from the use of, or the inability to use, these
instructions or the performance of the products recommended.
Should a typographical error be found, we will make every effort to resolve it. Once resolved, no restitution beyond replacement with a
corrected version will be made.
All Sew4Home patterns and instructions are copyrighted and are for personal use only. All material (projects, artwork, text, patterns,
photos, etc.) on Sew4Home is protected under the copyright laws. The instructions themselves and any associated patterns or pictures
cannot be reproduced or reprinted in any way without the written permission of Sew4Home LLC. This also means our tutorials cannot be re-
printed as a handout for use within a class without prior written permission. In addition, manufacturing of products made from our
original designs for mass production or commercial use is strictly prohibited.
Copyright ©2021 Sew4Home LLC. All Rights Reserved. 18 of 18You can also read