SL-Dante-MIX Option Card - Installation and Hookup Guide - PreSonus
←
→
Page content transcription
If your browser does not render page correctly, please read the page content below
SL-Dante-MIX Option Card
Installation and Hookup Guide

                     ®
                     www.presonus.com
Table of Contents
1      Updating the StudioLive AI Console Firmware — 1

2      Installing Your SL-Dante-MIX Card — 6
2.1    Customizing Dante Stream Labels — 6

3      Setting Up Your Dante Network — 7
3.1    Selecting the Right Switch — 7
3.2    Adding a Wireless Router — 8
3.3    Choosing the Right Cables — 9
3.4    Downloading Dante Controller — 9

4      Customizing Your Dante Settings — 11
4.1    Routing Audio to the Digital Returns — 11
4.2    Enable Sync To External — 12
4.3    Routing Audio on the Dante Network — 13
4.4    Dante Virtual Soundcard — 13

SL-Dante-MIX Installation and Hookup Guide

                      Register online for software downloads, manuals,
                      and video guides

                      my.PreSonus.com

Before proceeding, please be sure to register online. You’ll need
the latest firmware and software to ensure your SL-Dante-MIX card
functions properly. Upon registration you’ll also have access to helpful
installation and setup guides, as well as video tutorials and support.
SL-AVB-MIX Installation and Hookup Guide

1       Updating the StudioLive AI
        Console firmware
The firmware update process is designed to preserve your mixer’s scene and
Fat Channel preset memory. Nevertheless, as a precaution, we recommend
that you back up your scenes and presets before updating the firmware.

     If your mixer is registered to your My PreSonus account and is
     connected to a network with Internet access, you can update the
     firmware directly and skip to Step 11.

                                                      1. Download the
                                                      firmware files for your
                                                      mixer from your My
                                                      PreSonus account. To
                                                      find these files, click
                                                      on the “View More

                                                                                English
                                                      Details” link on your
                                                      StudioLive
                                                      registration and click
                                                      the “Firmware” tab in
                                                      the downloads area.

     IMPORTANT: StudioLive 16.4.2AI, 24.4.2AI, and 32.4.2AI mixers each

                                                                                Español
     use different firmware files. Loading the wrong firmware can cause the
     mixer to function improperly and can potentially damage the unit.

                                                      2. Open your
                                                      Downloads folder
                                                      and locate the
                                                      StudioLive firmware
                                                      folder. The folder will
                                                                                Deutsch

                                                      be named with your
                                                      mixer’s model
                                                      number and the new
                                                      firmware version
                                                      (e.g.,
                                                      SL3242AI_v4733).
                                                                                Français

                                                                            1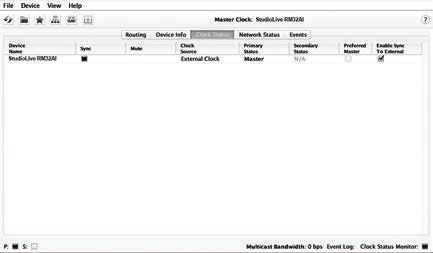
                          3. Depending
                          on your system
                          preferences, the
                          firmware.zip
                          archive file might
                          not automatically
                          decompress. To
                          expand the .zip
                          archive, simply
                          double-click it.

                          4. Open the firmware
                          folder; you will find
                          five files inside. You
                          will need all five
                          files to upgrade
                          your mixer.
                          - Initvars.scr
                          - Recovery.scr
                          - Rootfs.img
                          - uImage
                          - upgrade.bin

        5. Connect a FAT32-formatted USB
        thumb drive to your computer.

                Power User Tip: Most small USB
                drives (16 GB or less) should be
        formatted correctly, but if your mixer
        does not detect your thumb drive at
        first, we suggest reformatting it, even if
        it’s already formatted as FAT32. On
        Windows, be sure to do a “Full” format
        as opposed to a “Quick” format. On
        Macs, the choice will be listed as
        MS-DOS (FAT). Please refer to the list of
        suggested drives that can be found on
        our Knowledge Base.

    2
SL-AVB-MIX Installation and Hookup Guide
6. Select all five firmware files and
either copy/paste or drag them
to the root of your thumb drive.
Eject your drive and disconnect
it from your computer.
7. Power ON your StudioLive AI mixer.
English
Español
8. Remove the Wi-Fi LAN adapter
(if connected).
Deutsch
Français
3
                                  9. Plug in the FAT32-formatted
                                  USB thumb drive.

                      USB Drive

                                  10. It will take approximately five
                                  seconds for your mixer to detect your
                                  thumb drive. Count to five slowly
        1 Louisiana               before proceeding to the next step.
        2 Louisiana
        3 Louisiana
        4 Louisiana
        5 Louisiana

                                  11. Press the System button.

                                                   12. Press the
                                                   Pg Dn button
                                                   until you reach the
                                                   last page of the
                                                   System menu.

    4
SL-AVB-MIX Installation and Hookup Guide
13. Press the Recall button.
14. You will be
instructed that the
mixer is reading the
firmware update
files.
English
Warning: Do not power off the mixer during the update.
15. When the update
is complete, you will
be prompted to
restart the mixer.
Español
16. Power down your mixer.
Deutsch
Français
52.1 Customizing Dante Stream Labels
2 Installing Your SL-Dante-MIX Card
1. Power off your mixer and
disconnect all outputs for your safety.
2. Remove the option card currently
installed in your mixer.
3. Insert your new SL-Dante-MIX
option card and tighten the screws.
2.1 Customizing Dante Stream Labels
The SL-Dante-MIX card was designed to work with any StudioLive AI-
series mixer. As a result, the Dante streams are generically labeled.
You can customize your Dante streams using the Dante Firmware
Update Manager and the Dante firmware file for your mixer model.
You can download this software application and the appropriate
Dante firmware for your mixer from your My PreSonus account.
1. After downloading and installing the
Dante Firmware Update Manager,
download the customized Dante
firmware for your mixer and save
it to the same computer.
2. Connect your mixer and your
computer to your Dante network.
3. Open the Dante Firmware
Update Manager.
6SL-AVB-MIX Installation and Hookup Guide
4. Select Update Dante Firmware.
5. Click Browse.
6. Browse the directory in which you
saved your firmware update files.
7. Select your mixer’s Dante firmware.
The Firmware Update Manager will
now scan for devices on the network
that match the firmware update file.
Warning: If you have multiple StudioLive AI mixers
connected to your network, they must all be the same
model type to be connected simultaneously during this
process. If you have two or more different StudioLive AI
mixer models (for example, a StudioLive 32.4.2AI and
an RM32AI), only connect one at time. Only StudioLive
mixers of the same model should be connected to your
Dante network while installing custom firmware.
8. View the discovered Dante devices,
English
and select those you wish to update, by
clicking the associated checkboxes.
9. Click Start. Each device will be updated
in turn, taking 2-4 minutes per device.
As each mixer is updated, its Status
column will change to “Updating (n/m)”.
When the mixer has finished updating,
the Status will change to “Done”.
Español
10. Power cycle the mixers that have
been updated to finish applying
the custom firmware. Deutsch
Français
72.1 Customizing Dante Stream Labels
3 Setting Up Your Dante Network
Dante does away with heavy, expensive analog or multicore cabling,
replacing it with low-cost, easily available CAT5e, CAT6, or fiber optic
cable for a simple, lightweight, and economical solution. Dante
integrates media and control for your entire system over a single,
standard IP network. While Dante utilizes standard networking
hardware, there are a few best practices to keep in mind.
What follows is a brief guide on selecting hardware and configuring your
Dante network. More information can be found on
www.Audinate.com and in the PreSonus Audio Networking guide,
available for download from your My PreSonus user account.
3.1 Selecting the Right Switch
While Dante is compatible with standard network hardware, there are a few
basic requirements to keep in mind when choosing your network switch:
•• Non-blocking layer-2 gigabit switch with
a packet-forwarding rate of 1.488 Mpps per
port. For example, if you purchase an 8-port
switch, the packet-forwarding rate would
have to be 11.904 Mpps (1.488 Mpps x 8).
•• Energy Efficient Ethernet (EEE), also known
as Green Ethernet or IEEE 802.3az, reduces
power consumption when there isn’t much
traffic on the network. Unfortunately, this can
lead to audio interruptions and can degrade
clocking. If your switch provides this feature,
make sure that you can and do disable it.
•• Managed switches are required if you plan to use
UC Surface with a wireless device, such as an iPad,
to remote control your loudspeaker. Managed
switches can also help you create a more stable
Dante network if you have a complicated setup.
•• Most managed switches support Quality
of Service (QoS). This allows you to choose
Dante clock synchronization as the highest
priority and audio data as the next-highest
8SL-AVB-MIX Installation and Hookup Guide
priority. This is especially important if you
are transferring large amounts of data over
your Dante network or if you are transferring
non-Dante data over the same network.
•• If you are using multiple switches on your
Dante network, we recommend using
the same make and model to simplify
setup and guarantee compatibility.
3.2 Adding a Wireless Router
Dante audio and routing cannot travel over a wireless network.
You can still wirelessly remote control your StudioLive AI-
series mixer over a Dante network using UC Surface and
QMix-AI, but you’ll have to do a little more setup.
1. To connect a wireless router to your
Dante network, you will need to
purchase a managed switch and dive
English
into its configuration settings.
2. Select the port to which you’ve connected
your wireless router and set Multicast
Filtering to “On.” This will stop the flow
of Dante traffic to that port and allow it
to be used for wireless remote control
of your mixer. Do not connect Dante
Español
devices to the ports on a wireless router.
Please consult the documentation that
came with your managed switch for
instruction about enabling Multicast
Filtering on a specific port.
3. Because your mixer is hardwired to the
switch, no additional setup is required
to remote control it from UC Surface.
Deutsch
Simply connect your device to the wireless
router network and launch UC Surface.
Complete instructions UC Surface can be found in your StudioLive AI-series
Software Manual available from your My PreSonus user account and at
www.PreSonus.com.
NOTE: Installation of the SL-Dante-MIX option card disables the use of
Français
the USB Wi-Fi LAN adapter for StudioLive AI-series mixers. All control
must be done through the Ethernet connections on the option card.
92.1 Customizing Dante Stream Labels
3.3 Choosing the Right Cables
Be sure to use CAT5e or higher (CAT6 or CAT7) network cable. The CATE5e
specification supports transmitting data up to 100 meters but cable and
termination quality, as well as the environment in which the cable is used,
can shorten this potential transmission distance. If you are terminating the
connections yourself, it is important to note that if the cable is not properly
terminated, it will not be capable ofthe maximum transmission distance.
Power User Tip: CAT5e cable checkers can verify long-distance
transmission performance. These tools are readily available through
many electronics and online retailers.
Another thing to keep in mind when selecting Ethernet
cable is whether it is solid- or stranded-core:
•• In a solid-core cable, each of the conductors
is a single copper wire, which is a better fit
for installations and long cable runs (more
than 70m). Stranded-core cables use multiple,
thinner copper wires for each conductor,
making them more flexible and easier to
handle. This makes stranded-core cable a
better fit for touring and shorter cable runs.
•• To prevent electromagnetic interference, shielded
twisted-pair (STP) cables are recommended. Unlike
their unshielded cousins, STP cables have shielding
that reduces noise. Like a balanced analog cable,
STP cables have to be grounded, so you’ll need to
use STP-compatible RJ45 or EtherCon connectors.
3.4 Downloading Dante Controller
To connect your Dante network, you will need a Mac or Windows computer
with an Ethernet port and Audinate’s Dante Controller application.
Dante Controller is a free software application that allows you to route
audio and configure devices on a Dante network. Automatic device
discovery, one-click signal routing, and user-editable device and
channel labels make setting up a Dante network relatively simple.
Dante Controller also provides essential device status information
and powerful real-time network monitoring, including device-level
latency and clock stability stats, and multicast bandwidth usage,
enabling you to identify and resolve network issues. You can also
back up, restore, move, and reuse Dante network configurations
using presets and can edit Dante routing configurations offline.
The Dante Controller application and associated
documentation are available at:
www.audinate.com/products/software/dante-controller.
10SL-AVB-MIX Installation and Hookup Guide
4 Customizing Your Dante Settings
Your new SL-Dante-MIX card provides several customizable user settings
for configuring you the StudioLive AI-series mixer on a Dante network. For
complete Dante setup instructions, please refer to the Dante Controller User
Manual, which is available as a downloadable PDF from www.Audinate.com.
NOTE: you must update the firmware on your StudioLive AI-series
mixer to enable Dante functionality.
4.1 Routing Audio to the Digital Returns
Each Digital Return on your StudioLive AI-series mixer
can be sourced either from the Dante network or from
an audio stream on your computer over FireWire.
Inputs
English
The Digital Returns
on your StudioLive AI
mixer will default to
source from the
network, rather than
FireWire. On
StudioLive AI-
console mixers, this
Español
can be changed from
the Channel Info
page. When you
select a channel, the
Channel Info page
will be shown on the
screen.
Deutsch
Press the Next button until the Digital
Return option is highlighted, then use
the Value knob to change the setting
to FireWire.
Français
114.2 Enable Sync To External
For StudioLive AI rackmount mixers, this can be changed from the
Input settings area. To assign an input on the RM mixer to a FireWire
source select the input source or open the Channel Settings view in
UC Surface and then change the source from Network to FireWire.
4.2 Enable Sync To External
Your StudioLive AI mixer is always the master clock. Because of this,
the SL-Dante-MIX card must be set to ‘Enable Sync To External’ so
it will use the external word clock from its host equipment.
To do this, click on
the Clock Status tab
in the Dante
Controller
application and
check the Enable
Sync to External box
next to your mixer.
Note: While the Dante network protocol supports devices of different
samples rates existing on the same network, only devices set to the same
sample rate can route audio to one another. The sample rate for your
StudioLive AI mixer must be set manually from the System menu. If you
are having trouble routing audio to and from your mixer, verify its sample rate
matches that of the devices you are trying to route audio to and from.
12SL-AVB-MIX Installation and Hookup Guide
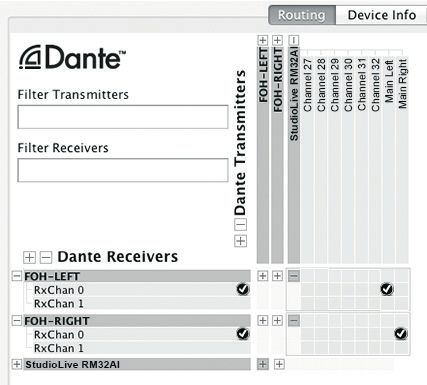
4.3 Routing Audio on the Dante Network
As previously mentioned, all routing to and from the Dante network
is done from Audinate’s Dante Controller application. This easy-to-use
application allows you to view every Receiving (Input) channel and
Transmitting (Output) channel available for your StudioLive AI-series mixer.
To route audio to and
from your mixer,
simply click on the
intersecting box
between the input
and the output.
Note: Dante
does not permit
audio to be
routed locally
on a device. In other
English
words, you can’t route
an output on your
StudioLive AI mixer to
an input on the same
mixer.
Español
4.4 Dante Virtual Soundcard
Dante Virtual Soundcard turns your computer into a Dante-powered
workstation, seamlessly integrating your PC or Mac with Dante audio
devices on your network. Instantly connect to record, process and playout
using any audio application and any combination of Dante-enabled devices.
Dante Virtual Soundcard is a separate application from Dante
Deutsch
Controller. Once installed, you will see your Windows or OS
X computer as a routable device in Dante Controller.
A free Dante Virtual Soundcard license is provided
for registered SL-Dante-MIX customers.
Français
134.2 Enable Sync To External
© 2015 PreSonus Audio Electronics, Inc. All Rights Reserved. StudioLive and XMAX are trademarks or registered trademarks of PreSonus Audio
Electronics, Inc. Capture and Studio One are trademarks or registered trademarks of PreSonus Software Ltd. Mac and Mac OS are registered
trademarks of Apple, Inc., in the U.S. and other countries. Windows is a registered trademark of Microsoft, Inc., in the U.S. and other countries. Other
product names mentioned herein may be trademarks of their respective companies. All specifications subject to change without notice.
14SL-Dante-MIX
Guía de instalación y conexiones
®
www.presonus.com
        Tabla de contenidos
        1      Actualizando el firmware de la consola
               StudioLive AI — 17
        2      Instalando su tarjeta SL-Dante-MIX — 22

        3      Configurando su red Dante — 23
        3.1    Seleccionando el Switch correcto — 23
        3.2    Agregando un router inalámbrico — 24
        3.3    Eligiendo los cable correctos — 25
        3.4    Descargando Dante Controller — 25

        4      Personalizando sus ajustes Dante — 27
        4.1    Configurando el puerto secundario — 27
        4.2    Ruteando audio a los Retornos Digitales — 29
        4.3    Ruteando Audio en la red Dante — 30

        SL-Dante-MIX Guía de instalación y conexiones

                              Regístrese en línea para obtener descargas
                              de software, manuales, y guías en video.

                              my.PreSonus.com

        Antes de continuar, por favor asegúrese de registrarse en línea.
        Usted necesitará la última versión de firmware y software para
        asegurarse que la tarjeta SL-Dante-MIX funcione correctamente.
        Luego del registro también tendrá acceso a guías de instalación y
        configuración muy útiles, así como a tutoriales en vídeo y soporte.

    2
SL-Dante-MIX Guía de instalación y conexiones
1 Actualizando el firmware de la consola
StudioLive AI
El proceso de actualización de firmware está diseñado para preservar las
escenas de la consola y la memoria de presets Fat Channel. Sin embargo,
como medida de precaución, recomendamos que haga una copia de
seguridad de sus escenas y presets antes de actualizar el firmware.
Si su consola ha sido registrada en su cuenta MyPreSonus y está
conectada a una red con acceso a Internet, puede actualizar el
firmware directamente, vaya al paso 11.
1. Descargue los
archivos de firmware
para la consola
mezcladora desde su
cuenta MyPresonus.
English
Para encontrar estos
archivos, haga clic en
el enlace “View More
Details” (Ver más
Detalles) en su
registro StudioLive y
haga clic en la
pestaña “Firmware”
Español
en el área de
descargas.
IMPORTANTE: Las consolas StudioLive 16.4.2AI, 24.4.2AI, y 32.4.2AI
utilizan cada una diferentes archivos de firmware. Si carga un archivo de
firmware equivocado puede provocar que la consola no funcione
correctamente y potencialmente dañar la unidad.
Deutsch
2. Abra la carpeta de
Descargas y busque
la carpeta StudioLive
firmware. La carpeta
se nombrará con el
número de modelo
de su consola y con
la nueva versión de
Français
firmware (por
ejemplo,
SL3242AI_v4733).
3
                         3. Dependiendo de
                         las preferencias de su
                         sistema, el archivo de
                         firmware.zip puede
                         no descomprimirse
                         automáticamente.
                         Para expandir
                         el archivo .zip,
                         simplemente haga
                         doble clic en el.

                         4. Abra la carpeta de
                         firmware, encontrará
                         cinco archivos
                         dentro de la misma.
                         Usted necesitará los
                         cinco archivos para
                         actualizar su consola.
                         - Initvars.scr
                         - Recovery.scr
                         - Rootfs.img
                         - uImage
                         - upgrade.bin

        5. Conecte un pendrive USB con
        formato FAT32 a su computadora.

               Consejo de usuario avanzado:
               La mayoría de las unidades USB
        pequeñas (16 GB o menos) deberían
        estar formateadas correctamente,
        pero si su consola no detecta la unidad
        de disco USB desde un primer
        momento, sugerimos formatear
        nuevamente , incluso si ya está
        formateada como FAT32. En Windows,
        asegúrese de hacer un formateo
        “completo” en lugar de un formateo
        “rápido”. En Mac, la elección se
        mostrará como MS-DOS (FAT). Por
        favor, consulte la lista de unidades
        sugeridas disponible en nuestra base
        de conocimientos.

    4
SL-Dante-MIX Guía de instalación y conexiones
6. Seleccione los cinco archivos de
firmware y copie/pegue los mismos
o arrástrelos al directorio raíz de
su pendrive. Expulse su pendrive y
desconéctelo de su computadora.
7. Encienda su consola StudioLive AI.
English
Español
8. Quite el adaptador Wi-Fi LAN
(si está conectado).
Deutsch
Français
5
                                  9. Conecte el pendrive USB
                                  formateado en FAT32.

                      USB Drive

                                  10. Le tomará aproximadamente cinco
                                  segundos a su consola detectar su
                                  pendrive. Cuente hasta cinco
        1 Louisiana               lentamente antes de proceder con el
        2 Louisiana               siguiente paso.
        3 Louisiana
        4 Louisiana
        5 Louisiana

                                  11. Presione el botón System.

                                                  12. Presione el
                                                  botón Pg Dn hasta
                                                  que alcance la
                                                  última página del
                                                  menú System.

    6
SL-Dante-MIX Guía de instalación y conexiones
13. Presione el botón Recall.
14. Se le indicará que
la consola está
leyendo los archivos
de actualización de
firmware.
English
Precaución: No apague la consola durante la actualización.
15. Cuando la
actualización esté
completa, se le
pedirá reiniciar la
consola.
Español
16. Apague su consola.
Deutsch
Français
72.1 Personalizando etiquetas de flujos de datos Dante
2 Instalando su tarjeta SL-Dante-MIX
1. Apague su consola y desconecte
todas la salidas para su seguridad.
2. Quite la tarjeta opcional
actualmente instalada en su consola.
3. Inserte su nueva tarjeta opcional
SL-Dante-MIX y ajuste los tornillos.
2.1 Personalizando etiquetas de flujos de datos Dante
La tarjeta SL-Dante-MIX fue diseñada para trabajar
con cualquier consola StudioLive de la serie AI.
Como resultado, los flujos de datos Dante se
etiquetan genéricamente. Usted puede personalizar
sus flujos de datos Dante usando el gestor de
actualizaciones de firmware de Dante y el archivo
de firmware Dante correspondiente a su modelo
de consola. Puede descargar esta aplicación de
software y el firmware Dante apropiado para
consola de mezclas desde su cuenta My PreSonus.
1. Luego de descargar e instalar el gestor
de actualizaciones de firmware de
Dante, descargue el firmware Dante
personalizado para los requisitos
particulares de su consola y guárdelo
en la misma computadora.
8SL-Dante-MIX Guía de instalación y conexiones
2. Conecte su consola y su
computadora a la red Dante.
3. Abra el gestor de actualizaciones
de firmware Dante (Firmware
Update Manager).
4. Seleccione actualizar firmware
dante (Update Dante Firmware).
5. Haga clic en explorar (Browse).
6. Explore el directorio en el cual guardó
los archivos de firmware descargados.
7. Seleccione el firmware Dante
correspondiente a su consola. El
gestor de actualizaciones explorará su
computadora buscando dispositivos
en la red que coincidan con el archivo
de actualización de firmware.
English
Precaución: Si usted tiene múltiples consolas StudioLive
AI conectadas a la red, todas deben ser del mismo
tipo de modelo para conectarse simultáneamente
durante este proceso. Si usted tiene dos o más modelos
diferentes de consolas StudioLive AI (por ejemplo, una
StudioLive 32.4.2AI y una RM32AI), conecte solamente
una a la vez. Solamente las consolas StudioLive del
mismo modelo deben estar conectadas a su red
Dante al instalar el firmware personalizado.
Español
8. Vea los dispositivos Dante descubiertos
y seleccione aquellos que desea
actualizar, para esto haga clic en las
casillas de verificación asociadas.
9. Haga clic en Iniciar (Start). Cada dispositivo
será actualizado en forma sucesiva,
demorando entre 2 a 4 minutos por
Deutsch
dispositivo. A medida que cada consola es
actualizada, su columna de estado (Status)
cambiará a “Updating (n/m)”. Cuando la
consola haya finalizado la actualización,
el estado cambiará a “Hecho” (Done).
10. Reinicie las consolas que han sido
actualizadas para finalizar el procedimiento
y aplicar el firmware personalizado.
Français
92.1 Personalizando etiquetas de flujos de datos Dante
3 Configurando su red Dante
Dante acaba con el cableado analógico multinúcleo caro y pesado,
reemplazándolo con cables de bajo costo fácilmente disponible, CAT5e,
CAT6, o de fibra óptica para una solución simple, ligera y económica.
Dante integra medios de comunicación y de control de todo el sistema
a través de una red IP única, estándar. Dado que Dante utiliza hardware
de red estándar, hay algunas buenas prácticas a tener en cuenta.
Lo que sigue es una breve guía sobre la selección de hardware y la
configuración de su red Dante. Puede encontrar más información en:
www.Audinate.com y en la guía de PreSonus Audio Networking,
disponible para su descarga desde su cuenta de usuario My PreSonus.
3.1 Seleccionando el Switch correcto
Como Dante es compatible con el hardware de red estándar, hay
algunos requisitos básicos a tener en cuenta al elegir su switch de red:
•• Switch sin bloqueo de capa de 2 Gigabit con una
tasa de reenvío de paquetes de 1.488 Mpps por
puerto. Por ejemplo, si usted compra un switch
de 8 puertos, la tasa de reenvío de paquetes
tendría que tener 11.904 Mpps (1.488 Mpps x 8)
•• Energy Efficient Ethernet (EEE), también conocida
como Green Ethernet o IEEE 802.3az, reduce
el consumo de energía cuando no hay mucho
tráfico en la red. Desafortunadamente, esto puede
conducir algunas interrupciones de audio y puede
degradar de clock. Si su switch proporciona esta
función, asegúrese de que se pueda desactivar.
•• Si va a utilizar UC Surface con un dispositivo
inalámbrico, como un iPad, para controlar a
distancia su altavoz es necesario un switch
gestionable. Los switches gestionables también
pueden ayudarlo a crear una red Dante más
estable si tiene una configuración complicada
•• La mayoría de los switches gestionables soportan
Quality of Service (QoS). Esto le permite elegir la
sincronización con el clock Dante como la mayor
prioridad y el audio como la siguiente mayor
prioridad. Esto es especialmente importante
10SL-Dante-MIX Guía de instalación y conexiones
si va a transferir grandes cantidades de datos
a través de su red Dante o si va a transferir
datos que no son Dante en la misma red.
•• S i está utilizando múltiples switches en
la red Dante, se recomienda utilizar la
misma marca y modelo para simplificar la
configuración y garantizar la compatibilidad.
3.2 Agregando un router inalámbrico
El audio y el ruteo Dante no pueden viajar a través de una red inalámbrica.
Usted todavía podrá controlar de forma inalámbrica remota su consola
StudioLive de la serie AI sobre una red Dante usando UC Surface y
QMix-Ai, pero tendrá que realizar algunas configuraciones más.
11. Para conectar un router inalámbrico a
la red Dante, usted tendrá que comprar
un switch gestionable y sumergirse
en sus valores de configuración.
English
12. Seleccione el puerto al que ha conectado el
router inalámbrico y configure el filtrado de
multidifusión (Multicast Filtering) en “On.”
Esto va a detener el flujo de tráfico Dante
a ese puerto y permitirá que sea utilizado
para el control remoto inalámbrico de sus
altavoces. No conecte los dispositivos Dante
Español
a los puertos en un router inalámbrico. Por
favor, consulte la documentación que viene
con su switch gestionable para obtener las
instrucciones sobre cómo habilitar el filtrado
de multidifusión en un puerto específico.
13. Debido a que su consola está cableada
al switch, no se requiere ninguna
configuración adicional para controlarla
Deutsch
desde UC Surface. Basta con conectar
el dispositivo a la red del router
inalámbrico e iniciar UC Surface.
Las instrucciones completas para UC Surface se pueden encontrar en la
Guía de software para las consolas StudioLive de la serie AI disponible
en la cuenta de usuario My Presonus en www.PreSonus.com.
Français
NOTA: La instalación de la tarjeta opcional SL-Dante-SPK deshabilita el
uso del adaptador Wi-Fi LAN USB para la consola StudioLive de la serie
AI. Todo control debe ser realizado a través de la conexión EtherCon
compartida en la tarjeta opcional.
112.1 Personalizando etiquetas de flujos de datos Dante
3.3 Eligiendo los cable correctos
Asegúrese de utilizar un cable de red CAT5e o superior (CAT6 o CAT7).
La especificación CATE5e soporta la transmisión de datos de hasta
100 metros, pero la calidad del cable y la terminación, así como el
entorno en el que se utiliza el cable, puede acortar esta distancia de
transmisión potencial. Si está haciendo las conexiones usted mismo es
importante señalar que si el cable no está correctamente terminado,
no va a ser capaz de alcanzar la distancia de transmisión máxima.
Consejo de usuario avanzado: Los verificadores de cables CAT5e
pueden verificar el rendimiento de transmisión a larga distancia. Estas
herramientas están disponibles en muchos tiendas de productos
electrónicos online y comercios minoristas.
Otra cosa a tener en cuenta al seleccionar el cable Ethernet es si
es de conductores con núcleo sólido o de hilos trenzados:
•• En un cable de núcleo sólido, cada uno de los
conductores es un solo cable de cobre, que es la
mejor opción para instalaciones y tramos largos
de cable (más de 70m). Los cables de núcleo
trenzado utilizan múltiples hilos de cobre finos
para cada conductor, haciéndolos más flexibles
y más fáciles de manejar. Esto hace que el cable
de núcleo trenzado sea la mejor opción para
las giras y recorridos de cable más cortos
•• Para evitar interferencias electromagnéticas, se
recomiendan cables blindados de par trenzado
(STP). A diferencia de sus primos no blindados,
los cables STP tienen blindaje que reduce el ruido.
Al igual que un cable analógico balanceado,
los cables STP tienen que estar conectados a
tierra, por lo que tendrá que utilizar conectores
RJ45 o EtherCon compatibles con STP.
3.4 Descargando Dante Controller
Para conectar su red Dante, necesitará una computadora
Mac o Windows con un puerto Ethernet y la aplicación
controladora Dante Controller de Audinate.
La aplicación Dante Controller es una aplicación de software gratuita
que le permite dirigir audio y configurar dispositivos de una red
Dante. Gracias a la detección automática de dispositivos, ruteo de
la señal en un solo clic y dispositivos y etiquetas de canal editables
por el usuario, crear una red Dante es relativamente simple.
La aplicación Dante Controller también proporciona información de
estado esencial del dispositivo y poderoso monitoreo de red en tiempo
real, incluyendo la latencia a nivel de dispositivo y las estadísticas de
12SL-Dante-MIX Guía de instalación y conexiones
estabilidad de clock, el ancho de banda de multidifusión y un registro de
eventos personalizado, que le permite identificar y resolver problemas
de red. También puede realizar copias de seguridad, restaurar, mover
y volver a utilizar las configuraciones de red Dante usando presets
con la posibilidad de editar configuraciones de ruteo Dante offline.
La aplicación Dante Controller y la documentación asociada están
disponibles en www.audinate.com/products/software/dante-controller.
English
Español
Deutsch
Français
132.1 Personalizando etiquetas de flujos de datos Dante
4 Personalizando sus ajustes Dante
Su nueva tarjeta SL-Dante-MIX proporciona varias configuraciones de
usuario personalizables para la configuración de la consola StudioLive AI
en una red Dante. Para obtener instrucciones completas de configuración
Dante, por favor consulte el manual de usuario de Dante Controller, que
está disponible en formato PDF descargable desde www.Audinate.com.
NOTA: debe actualizar el firmware de su consola StudioLive AI para
habilitar la funcionalidad Dante.
4.1 Ruteando audio a los Retornos Digitales
Cada Retorno Digital en su consola StudioLive AI puede ser
provisto desde la red Dante o de un flujo de audio en su
computadora a través de una conexión FireWire .
Entradas
Los Retornos
Digitales en su
consola StudioLive AI
tendrán de forma
predeterminada
origen de red, en
lugar de FireWire.
En las consolas
StudioLive AI, esto se
puede cambiar
desde la página de
Info del canal.
Cuando selecciona
un canal, la página
Info del canal se
mostrará en la
pantalla.
Presione el botón Next hasta que la
opción Retorno Digital (Digital Return)
este resaltada, luego utilice el encoder
Value para cambiar el ajuste a FireWire.
14SL-Dante-MIX Guía de instalación y conexiones
Para consolas StudioLive AI de montaje en rack, esto se puede
cambiar desde el área de configuración de entrada. Para asignar
una entrada de la consola RM a una fuente FireWire seleccione
la fuente de entrada o abra la vista de los ajustes del canal en UC
Surface y luego cambie la fuente desde Network (Red) a FireWire.
4.2 Habilitando el sincronismo externo (Sync To External)
Su consola StudioLive AI es siempre el clock master (Maestro).
Debido a esto, la tarjeta SL-Dante-MIX puede ser configurada
en “Enable Sync To External” de manera que utilice Word
clock externo proveniente de su equipamiento host.
Para hacer esto, haga
clic sobre la pestaña
Clock Status en la
aplicación Dante
Controller y marque
la casilla de
verificación “Enable
English
Sync to External” al
lado de su consola.
Nota: Si bien el protocolo de red Dante soporta dispositivos de
Español
diferentes frecuencias de muestreo existentes en la misma red,
solamente los dispositivos configurados a la misma frecuencia de
muestreo pueden rutear audio uno al otro. La frecuencia de
muestreo para su consola StudioLive AI debe ser ajustada manualmente
desde el menú del sistema (System).
Si usted está teniendo problemas de ruteo de audio desde y hacia
su consola, verifique si la frecuencia de muestreo coincide con la del
dispositivo desde y hacia el cual está queriendo rutear audio.
Deutsch
Français
154.3 Ruteando Audio en la red Dante
4.3 Ruteando Audio en la red Dante
Como se mencionó anteriormente, todo el enrutamiento desde y hacia la
red Dante se hace desde la aplicación Dante Controller de Audinate. Esta
aplicación fácil de usar le permite ver cada Recepción (Entrada) y canal de
transmisión (Salida) de canal disponible para su consola StudioLive AI.
Para dirigir audio
desde y hacia su
consola de mezclas,
simplemente haga
clic en la casilla de la
intersección entre la
entrada y la salida.
Nota: Dante no
permite rutear
audio en un
dispositivo
localmente. En otras
palabras, usted no
puede rutear una
salida en su consola
StudioLive AI a una
entrada en la misma
mesa de mezclas.
4.4 Tarjeta de sonido virtual Dante
La tarjeta de sonido virtual Dante convierte su computadora en una estación
de trabajo impulsada por Dante, integrando perfectamente su PC o Mac
con dispositivos de audio Dante en su red. Instantáneamente conecte para
grabar, procesar y reproducir utilizando cualquier aplicación de audio y
cualquier combinación de dispositivos habilitados para redes Dante.
La Tarjeta de sonido virtual Dante es una aplicación separada de
Dante Controller. Una vez instalada, usted verá su computadora
Windows u OS X como un dispositivo ruteable en Dante Controller.
Una licencia gratuita para la Tarjeta de sonido virtual Dante
es proporcionada para los usuarios de SL-Dante-MIX.
16SL-Dante-MIX
Anleitung für Installation
und Verkabelung
®
www.presonus.com
        Inhaltsverzeichnis
        1      Aktualisieren der Firmware der
               StudioLive AI Konsole — 3
        2      Installation Ihrer SL-Dante-MIX-Karte — 8
        2.1    Benutzerdefinierte Dante-Kanalnamen — 8

        3      Anleitung für Installation und Verkabelung — 10
        3.1    Auswahl eines geeigneten Switchs            — 10
        3.2    Hinzufügen eines WLAN-Routers        — 11
        3.3    Anleitung für Installation und Verkabelung — 12
        3.4    Herunterladen von Dante Controller          — 12

        4      Anpassen Ihrer Dante-Einstellungen — 14
        4.1    Routing von Audiosignalen auf die Digital Returns — 14
        4.2    Aktivieren von Sync To External — 15
        4.3    Routing von Audiosignalen über das Dante-Netzwerk — 16
        4.4    Dante Virtual Soundcard — 16

        SL-Dante-MIX – Anleitung für Installation und Verkabelung

                               Registrieren Sie sich online, um die Software,
                               Handbücher und Videoanleitungen herunterzuladen.

                               my.PreSonus.com

        Bevor Sie weiterlesen, registrieren Sie sich bitte auf unserer
        Webseite. Um eine ordnungsgemäße Funktion Ihrer SL-Dante-
        MIX Erweiterungskarte sicherzustellen, benötigen Sie die aktuelle
        Firm- und Software. Als registrierter Anwender haben Sie zudem
        Zugriff auf hilfreiche Installations- und Einrichtungshandbücher
        sowie auf Videoanleitungen und Supportleistungen.

    2
SL-AVB-MIX Installation and Hookup Guide
1 Aktualisieren der Firmware der
StudioLive AI Konsole
Bei der Aktualisierung der Firmware bleiben Ihre gespeicherten
Mixer-Szenen und Fat-Channel-Presets erhaltent Wir empfehlen
dennoch, Ihre Szenen und Presets vorsichtshalber zu sichern,
bevor Sie eine Aktualisierung der Firmware durchführen.
Sofern Ihr Mixer in Ihrem PreSonus-Account eingetragen und mit einem
Netzwerk mit Internet-Zugang verbunden ist, können Sie zu Schritt 11
springen und die Firmware direkt aktualisieren.
1. Laden Sie die
Firmware-Dateien für
Ihren Mixer über Ihren
English
PreSonus-Account
herunter. Um die
entsprechenden
Dateien anzuzeigen,
klicken Sie im
Registrierungseintrag
für Ihr StudioLive auf
den Link „Details
Español
anzeigen“ und dann
im Download-Bereich
auf den Reiter
„Firmware“.
WICHTIG: Für die Modelle StudioLive 16.4.2AI, 24.4.2AI und 32.4.2AI
werden unterschiedliche Firmware-Dateien benötigt. Eine
Aktualisierung mit einer falschen Firmware kann zu Fehlfunktionen und
Schäden am Gerät führen.
Deutsch
2. Öffnen Sie Ihren
Downloads-Ordner
und suchen Sie den
Ordner mit der
StudioLive-Firmware.
Der Ordner ist nach
der Modellnummer
Français
Ihres Mixers und der
neuen Firmware-
Version benannt (z. B.
SL3242AI_v4733).
3
                               3. Abhängig von
                               Ihren
                               Systemeinstellungen
                               wird das
                               firmware.zip. Archiv
                               eventuell nicht
                               automatisch
                               entpackt. Um das
                               ZIP-Archiv zu
                               entpacken, klicken
                               Sie die Datei einfach
                               doppelt an.

                               4. Wenn Sie den
                               Firmware-Ordner
                               öffnen, finden Sie
                               darin fünf Dateien:
                               Sie benötigen alle
                               fünf Dateien, um
                               Ihren Mixer zu
                               aktualisieren.
                               - Initvars.scr
                               - Recovery.scr
                               - Rootfs.img
                               - uImage
                               - upgrade.bin

        5. Schließen Sie einen FAT32-formatierten
        USB-Stick an Ihrem Computer an.

              Profi-Tipp: Die meisten kleineren
              USB-Laufwerke (16 GB oder kleiner)
              sind bereits korrekt formatiert. Sofern
              Ihr Mixer den USB-Stick jedoch nicht
        gleich erkennt, empfehlen wir eine
        Neuformatierung, auch wenn der Stick
        bereits für FAT32 formatiert ist. Unter
        Windows dürfen Sie dabei nicht die Option
        „Schnellformatierung“ auswählen, da der
        USB-Stick sonst nicht vollständig formatiert
        wird. Auf einem Mac wählen Sie als Format
        die Option MS-DOS (FAT). In unserer
        Knowledge Base finden Sie eine Liste mit
        empfohlenen USB-Sticks.

    4
SL-AVB-MIX Installation and Hookup Guide
6. Wählen Sie alle fünf Firmware-Dateien
aus und bewegen Sie sie per Kopieren/
Einfügen oder per Drag-and-Drop in das
Stammverzeichnis des USB-Sticks. Werfen
Sie Ihren Stick aus und ziehen Sie ihn von
Ihrem Computer ab.
7. Schalten Sie Ihren StudioLive AI Mixer ein
English
(Position ON ).
Español
8. Entfernen Sie den Adapter für Wireless
LAN (sofern angeschlossen).
Deutsch
Français
5
                                  9. Stecken Sie stattdessen den für FAT32
                                  formatierten USB-Stick in den Port.

                      USB Drive

                                  10. Der Mixer benötigt ca. 5 Sekunden, bis
                                  er den USB-Stick erkannt hat. Zählen Sie
                                  also langsam von 5 nach unten, bevor Sie
        1 Louisiana
        2 Louisiana               mit dem nächsten Schritt fortfahren.
        3 Louisiana
        4 Louisiana
        5 Louisiana

                                  11. Drücken Sie die System-Taste.

                                                        12. Drücken Sie die
                                                        Taste Pg Dn, bis Sie
                                                        die letzte Seite im
                                                        System-Menü
                                                        erreicht haben.

    6
SL-AVB-MIX Installation and Hookup Guide
13. Drücken Sie die Recall-Taste.
14. Nun erscheint die
Meldung, dass der
Mixer die
Aktualisierungsdateien
einliest.
English
Warnung: Schalten Sie den Mixer während der Aktualisierung
in keinem Fall aus.
15. Nach
abgeschlossener
Installation müssen Sie
Ihren Computer neu
Español
starten.
16. Schalten Sie den Mixer aus.
Deutsch
Français
72.1 Benutzerdefinierte Dante-Kanalnamen
2 Installation Ihrer SL-Dante-MIX-Karte
1. Schalten Sie aus Sicherheitsgründen
zunächst Ihren Mixer aus und ziehen Sie alle
Kabel von den Ausgängen ab.
2. Entfernen Sie die aktuell eingebaute
Erweiterungskarte aus Ihrem Mixer.
3. Setzen Sie Ihre neue SL-Dante-MIX
Erweiterungskarte ein und ziehen Sie die
Schrauben fest.
2.1 Benutzerdefinierte Dante-Kanalnamen
Die SL-Dante-MIX Erweiterungskarte wurde für den Einsatz mit allen
Modellen der StudioLive AI Mixer-Serie entwickelt. Aus diesem Grund
sind die Benennungen der Dante-Kanäle allgemein gehalten. Um
Ihre Dante-Kanäle umzubenennen, benötigen Sie die Software Dante
Firmware Update Manager sowie die für Ihren Mixer passende Firmware-
Datei. Die Software sowie die für Ihren Mixer passende Dante-Firmware
können Sie über Ihren MyPreSonus-Account herunterladen.
1. Nachdem Sie den Dante Firmware Update
Manager heruntergeladen und installiert
haben, laden Sie die Firmware für Ihren
Mixer auf denselben Computer herunter.
2. Verbinden Sie Ihren Mixer und Ihren
Computer mit Ihrem Dante-Netzwerk.
3. Starten Sie den Dante Firmware
Update Manager.
4. Wählen Sie die Option „Update
Dante Firmware“ aus.
8SL-AVB-MIX Installation and Hookup Guide
5. Klicken Sie auf „Durchsuchen“.
6. Wechseln Sie in das Verzeichnis, in dem Sie
das Firmware-Update gespeichert haben.
7. Wählen Sie die Dante-Firmware
für Ihren Mixer aus. Der Firmware
Update Manager durchsucht nun das
Netzwerk nach Geräten, die mit dem
Firmware-Update kompatibel sind.
Achtung: Sofern Sie mehrere StudioLive AI Mixer in Ihrem Netzwerk betreiben,
dürfen während dieses Vorgangs nur Mixer desselben Typs angeschlossen
sein. Sofern Sie zwei oder mehrere verschiedene StudioLive AI Mixer-Modelle
besitzen (z. B. ein StudioLive 32.4.2AI und eine RM32AI), schließen Sie diese
nacheinander an. Während der Installation der angepassten Firmware dürfen
nur StudioLive Mixer desselben Typs mit dem Dante-Netzwerk verbunden sein.
8. Wählen Sie über die Auswahlfelder aus den
angezeigten Dante-Geräten diejenigen
aus, die Sie aktualisieren möchten.
English
9. Klicken Sie auf „Start“. Die Geräte werden
nacheinander aktualisiert. Der Vorgang
dauert pro Gerät ca. 2 – 4 Minuten.
Während der Aktualisierung wird in der
Statuszeile „Updating (n/m)“ eingeblendet.
Nach Abschluss der Aktualisierung
wechselt die Statusanzeige zu „Done“.
10. Um die Firmware-Aktualisierung
Español
abzuschließen, starten Sie alle
aktualisierten Mixer neu.
Deutsch
Français
93.1 Auswahl eines geeigneten Switchs
3 Anleitung für Installation und
Verkabelung
Dante macht schwere, teure Analog- und Multicore-Kabel überflüssig
und ersetzt sie durch günstige, einfach zu beschaffende CAT5e-,
CAT6- oder LWL-Kabel für eine einfache, leichte und preisgünstige
Verkabelungslösung. Dante realisiert die Übertragung der Audio- und
Steuersignale für Ihr gesamtes System über ein und dasselbe Standard-
IP-Netzwerk. Auch wenn Dante herkömmliche Netzwerk-Hardware
verwendet, müssen Sie dennoch einige Besonderheiten beachten.
Daher folgt nun eine kurze Anleitung zur Auswahl der geeigneten Hardware
sowie zur Konfiguration Ihres Dante-Netzwerks. Weitere Informationen dazu
finden Sie auf www.Audinate.com und in der PreSonus Audio-Netzwerk-
Anleitung, die Sie über Ihren PreSonus-Account herunterladen können.
3.1 Auswahl eines geeigneten Switchs
Zwar ist Dante mit Standard-Netzwerk-Komponenten
kompatibel, bei der Auswahl Ihres Netzwerk-Switchs
sollten Sie aber dennoch ein paar Dinge beachten.
•• Non-Blocking Layer-2 Gigabit-Switch mit
einer Forwarding-Geschwindigkeit von
mindestens 1,488 Mpps je Port. Wenn Sie
beispielsweise einen 8-Port-Switch kaufen,
sollte die Forwarding-Rate mindestens
11,904 Mpps (1,488 Mpps x 8) betragen.
•• Energiesparende Netzwerkkomponenten
(Energy Efficient Ethernet – EEE), auch als Green
Ethernet oder IEEE 802.3az bezeichnet, sorgen
für einen reduzierten Strombedarf bei geringer
Netzwerklast. Leider kann es dadurch zu Signal-
Unterbrechungen und Problemen mit der Clock-
Synchronisierung kommen. Sollte Ihr Switch
diese Option bieten, stellen Sie sicher, dass sie
sich deaktivieren lässt, und tun Sie dies auch.
•• Wenn Sie Ihre Lautsprecher mit UC Surface
drahtlos über ein WLAN-Gerät wie z. B. ein
iPad steuern möchten, benötigen Sie einen
Managed Switch. Mangaged Switches haben
außerdem den Vorteil, dass sie die Stabilität
in komplexen Dante-Netzwerken erhöhen.
•• Die meisten Mangaged Switches bieten eine
QoS-Funktion (Quality of Service). Mit dieser
Funktion können Sie der Clock-Synchronisierung
im Dante-Netzwerk eine höhere Priorität zuweisen
10SL-AVB-MIX Installation and Hookup Guide
als den Audiodaten. Das ist insbesondere
dann unerlässlich, wenn Sie über Ihr Dante-
Netzwerk große Datenmengen oder zusätzliche
Dante-fremde Daten übertragen möchten.
•• Wenn Sie gleichzeitig mehrere Switches in
Ihrem Dante-Netzwerk verwenden, empfehlen
wir den Einsatz identischer Modelle und
Versionen, um die Einrichtung zu vereinfachen
und die Kompatibilität sicherzustellen.
3.2 Hinzufügen eines WLAN-Routers
Die Dante-Audio- und -Routing-Daten können nicht über ein drahtloses
Netzwerk übertragen werden. Sie können Ihren StudioLive AI Mixer über
ein Dante-Netzwerk und die Software UC Surface bzw. QMix-AI steuern,
allerdings sind für die Einrichtung noch zusätzliche Schritte notwendig.
11. Um einen WLAN-Router in Ihr Dante-
Netzwerk zu integrieren, benötigen Sie
English
einen Managed Switch, den Sie noch
entsprechend konfigurieren müssen.
12. Wählen Sie den Port aus, an dem Sie Ihren
WLAN-Router angeschlossen haben, und
stellen Sie die Option Multicast Filtering
auf „On“. Damit verhindern Sie, dass über
diesen Port Dante-Daten übertragen
werden, sodass Sie ihn für die drahtlose
Español
Steuerung Ihres Mixers verwenden
können. Schließen Sie keine Dante-Geräte
an den Ports eines WLAN-Routers an.
Für eine Anleitung zur Aktivierung der
Multicast-Filtering-Option für einen
bestimmten Port lesen Sie bitte die
Anleitung Ihres Managed Switchs.
13. Da Ihr Mixer über ein Netzwerkkabel
Deutsch
mit dem Switch verbunden ist, können
Sie ihn ohne weitere Konfiguration
über UC Surface steuern.
Verbinden Sie einfach Ihr Gerät mit dem Netzwerk des WLAN-Routers und
starten Sie UC Surface. Umfassende Informationen zu UC Surface finden
Sie in Ihrem StudioLive AI Software-Handbuch, das über Ihren PreSonus-
Account und auf www.PreSonus.com zum Download bereit steht.
ANMERKUNG: Wenn Sie die SL-Dante-MIX-Erweiterungskarte
Français
installiert haben, kann der USB WLAN-Adapter des StudioLive AI
Mixers nicht verwendet werden. Alle Steuerungsaufgaben müssen
dann über die Ethernet-Schnittstelle der Erweiterungskarte erfolgen.
113.3 Anleitung für Installation und Verkabelung
3.3 Anleitung für Installation und Verkabelung
Verwenden Sie ausschließlich CAT5e- oder höherwertige Kabel
(CAT6 oder CAT7). CATE5e-Kabel sind für die Datenübertragung bei
Kabellängen von bis zu 100 m spezifiziert, dieser Wert kann aber je nach
Anschlussqualität und Umgebungsbedingungen auch niedriger sein. Wenn
Sie die Kabel selbst terminieren, beachten Sie bitte, dass nicht korrekt
terminierte Kabel nicht die volle Übertragungsentfernung erreichen.
Profi-Tipp: Mit einem CAT5e-Kabeltester können Sie die
Übertragungsqualität bei großen Kabellängen überprüfen. Diese
Testgeräte sind bei vielen Elektronik- und Online-Händlern erhältlich.
Beachten Sie bei der Kabelauswahl außerdem, dass
es starre und flexible Kabeltypen gibt.
•• Ein starres Kabel enthält für jeden Leiter einen
einzelnen Kupferdraht und empfiehlt sich für
Festinstallationen und lange Kabelstrecken (über
70 m). Bei flexiblen Kabeln bestehen die einzelnen
Leiter aus Bündeln dünnerer Kupferdrähte,
sodass diese Kabel biegsamer und leichter zu
verlegen sind. Sie empfehlen sich damit für mobile
Anwendungen und kürzere Kabelstrecken.
•• Um elektromagnetische Einstreuungen
auszuschließen, sollten geschirmte Kabel (STP-
Kabel) verwendet werden. Im Gegensatz zu
ihren ungeschirmten Verwandten, sind STP-
Kabel mit einer Abschirmung ausgestattet,
die Einstreuungen reduziert. Ebenso wie
symmetrische Analogkabel müssen auch STP-
Kabel geerdet sein: Verwenden Sie daher STP-
kompatible RJ45- bzw. EtherCon-Stecker.
3.4 Herunterladen von Dante Controller
Um sich mit Ihrem Dante-Netzwerk verbinden zu können,
benötigen Sie einen Mac oder Windows-Computer mit einem
Netzwerkanschluss sowie die Software Audinate Dante Controller.
Mit der kostenlosen Software Dante Controller konfigurieren
Sie das Audio-Routing und die Geräte in Ihrem Dante-Netzwerk.
Dank der automatischen Geräte-Erkennung, der Möglichkeit,
das Routing mit nur einem Klick einzurichten, und den
benutzerdefinierbaren Geräte- und Kanal-Beschriftungen verläuft
die Einrichtung eines Dante-Netzwerks relativ einfach.
Dante Controller bietet darüber hinaus wichtige Informationen
zum Gerätestatus und umfangreiche Funktionen zur Echtzeit-
Überwachung des Netzwerks wie beispielsweise statistische Daten
zur gerätespezifischen Latenz und Clock-Stabilität sowie zur Multicast-
12SL-AVB-MIX Installation and Hookup Guide
Bandbreitenauslastung und ein konfigurierbares Ereignisprotokoll
zur Identifizierung und Beseitigung von Netzwerkproblemen.
Außerdem können Sie Dante-Netzwerk-Konfigurationen sichern,
wiederherstellen, übertragen und als Presets wiederverwenden
sowie Ihre Dante-Routingkonfigurationen offline bearbeiten.
Die Anwendung Dante Controller sowie die
zugehörigen Anleitungen finden Sie unter:
www.audinate.com/products/software/dante-controller.
English
Español
Deutsch
Français
133.4 Herunterladen von Dante Controller
4 Anpassen Ihrer Dante-Einstellungen
Ihre neue SL-Dante-MIX-Erweiterungskarte bietet verschiedene, vom
Anwender konfigurierbare Einstellungen zur Anmeldung des StudioLive
AI Mixers in einem Dante-Netzwerk. Für umfassende Informationen zur
Einrichtung von Dante lesen Sie bitte die Bedienungsanleitung für Dante
Controller, die Sie als PDF zum Download auf www.Audinate.com finden.
HINWEIS: Um die Dante-Funktionalität nutzen zu können, müssen Sie
zuerst die Firmware Ihres StudioLive AI Mixers aktualisieren.
4.1 Routing von Audiosignalen auf
die Digital Returns
Jeder Digital Return Ihres StudioLive AI Mixers lässt sich
wahlweise über das Dante-Netzwerk oder über FireWire mit
einem Audiostream von Ihrem Computer speisen.
Eingänge
In der Voreinstellung
empfangen die
Digital Returns Ihres
StudioLive AI Mixers
ihr Audiosignal über
das Netzwerk und
nicht über FireWire.
Bei StudioLive AI
Konsolen lässt sich
diese Einstellung auf
der Channel-Info-
Seite ändern. Wenn
Sie einen Kanal
auswählen, wird die
Channel-Info-Seite
im Bildschirm
geöffnet.
Drücken Sie die Taste Next, sodass die
Digital-Return-Option markiert ist, und
wählen Sie dann mit dem Value-
Endlosregler die Einstellung FireWire aus.
14SL-AVB-MIX Installation and Hookup Guide
Bei den Rack-Mixern der StudioLive AI-Serie wird diese Option im
Abschnitt Input Settings konfiguriert. Um einem RM-Mixer-Eingang
eine FireWire-Quelle zuzuweisen, wählen Sie in UC Surface den
entsprechenden Eingang aus bzw. öffnen dort die Kanaleinstellungen
und wählen anstelle des Netzwerks die Option FireWire als Quelle.
4.2 Aktivieren von Sync To External
Ihr StudioLive AI Mixer ist immer als Master Clock konfiguriert. Aus diesem
Grund muss für die SL-Dante-MIX Erweiterungskarte die Option „Enable Sync
To External“ aktiviert sein, damit sie sich auf die externe Clock synchronisiert.
Klicken Sie dazu in
Dante Controller im
Reiter „Clock Status“
neben dem Eintrag
für Ihren Mixer auf
das Auswahlfeld
„Enable Sync to
External“.
English
Hinweis: Zwar werden vom Dante Netzwerkprotokoll im selben Dante-
Netzwerk Geräte mit unterschiedlichen Samplingraten unterstützt, jedoch
Español
können Audiodaten nur zwischen Geräten mit identischer Samplingrate
übertragen werden. Die Samplingrate für Ihren StudioLive AI Mixer muss
über das System-Menü manuell eingestellt werden. Wenn Sie Schwierigkeiten
bei der Audioübertragung von oder auf Ihren Mixer haben, überprüfen Sie, ob
die Samplingraten der betroffenen Geräte übereinstimmen.
Deutsch
Français
154.3 Routing von Audiosignalen über
4.3 Routing von Audiosignalen über
das Dante-Netzwerk
Wie bereits erwähnt, werden sämtliche Routing-Einstellungen, die
das Dante-Netzwerk betreffen, über die Steuersoftware von Audinate
konfiguriert. Über diese benutzerfreundliche Anwendung können Sie
sich alle Empfangs- bzw. Eingangs- und Ausgabe- bzw. Ausgangskanäle
anzeigen lassen, die für Ihren StudioLive AI Mixer zur Verfügung stehen.
Um ein Audiosignal
über Ihren Mixer ein-
oder auszugeben,
aktivieren Sie das
Auswahlfeld am
Schnittpunkt
zwischen den
gewünschten Ein-
und Ausgängen.
Anmerkung:
Ein lokales
Routing
innerhalb
eines Geräts ist im
Dante-Protokoll
nicht zulässig. Sie
können auf ein- und
demselben Mixer
also nicht einen
Ausgang auf einen
Eingang routen.
4.4 Dante Virtual Soundcard
Dante Virtual Soundcard macht aus Ihrem Windows-PC oder Mac
eine Dante-fähige Workstation, die sich nahtlos in Ihr bestehendes
Dante-Audio-Netzwerk integrieren lässt. Ab sofort können Sie
in Ihrer Audio-Software beliebige Dante-fähige Geräte für die
Aufnahme, die Bearbeitung und die Wiedergabe nutzen.
Dante Virtual Soundcard ist eine separate Anwendung. Sobald
Sie die Anwendung installiert haben, wird Ihr Windows PC bzw.
Mac in Dante Controller als Dante-fähiges Gerät angezeigt.
Registrierte Besitzer von SL-Dante-MIX erhalten eine
kostenlose Lizenz für Dante Virtual Soundcard.
16You can also read