Red Sea REEFER SERIES - Reef-Ready systems for advanced hobbyists ENG DE
←
→
Page content transcription
If your browser does not render page correctly, please read the page content below
Aquariums
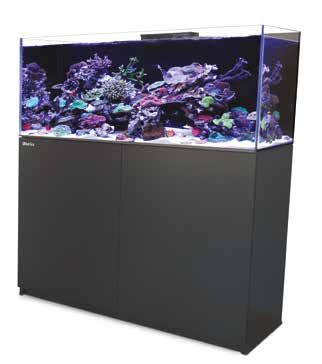
REEFER™
Join
MA o®ur Re
Ow X /RE d Sea
n E
on ers gr FER ™
Face oup
boo
k!
Red Sea REEFER™ SERIES
Reef-Ready systems for advanced hobbyists
Operation Manual
ENG DE FR CHN JPENG 1-11 DE 12-23 FR 24-35 CHN 36-47 JP 48-59
ENG

                                                                                          Red Sea REEFER™SERIES
                                                                                       Reef-Ready systems for advanced hobbyists
                                                                                                                   Operation Manual

This product is protected under Community Design 003003474, US Serial No 29/555,022 and Chinese Design Application. No. 201630060633.1
Red Sea REEFER™ Series
REEFER™ Operation Manual
Safety....................................................................................4
Location.................................................................................5
Assembly...............................................................................6
Overview of the REEFER™ water management system .......8
Operation..............................................................................9
Maintenance...........................................................................10
Warranty...............................................................................11
2ENG
Congratulations on your purchase of the
Red Sea REEFER™ reef system.
Red Sea’s REEFER™ Systems provide advanced hobbyists with a solid
foundation for building a fully featured reef or marine aquarium. The
REEFER™ Series combines a contemporary, rimless, ultra-clear glass
aquarium with a stylish cabinet and a comprehensive water management
system, including a professional sump with integrated automatic top-up,
and Red Sea’s unique silent down-flow system.
Incorporating technologies originally developed for Red Sea’s all-in-
one MAX® coral reef systems, the REEFER™ series is designed for ease
of operation while enabling hobbyists to install an unlimited choice
of lighting, filtration, circulation and controllers to create a uniquely
customized system.
This manual complements the graphic assembly manuals and contains
installation and operational instructions for all of the REEFER™ series
aquariums.
We hope that you enjoy your REEFER™ and your reef.
To benefit from product update information and exclusive special offers to registered
REEFER™ owners, please register your REEFER™ on-line at redseafish.com
3Red Sea REEFER™ Series
1 Safety
Please read and follow all safety instructions. Always unplug an appliance from an outlet when not in use, before
putting on or taking off parts, and before cleaning. Never pull the cord
DANGER: To avoid possible electric shock, special care should be itself to remove the plug from the outlet. Grasp the plug and pull to
taken when handling a wet aquarium. For each of the disconnect.
following situations, do not attempt repairs yourself; return
Do not use an appliance for anything other than its intended use. The use
the appliance to an authorized service facility for service or
of attachments not recommended or sold by the appliance manufacturer
discard the appliance.
may cause an unsafe condition.
Do not install or store the appliance where it will be exposed to the
WARNING: To guard against injury, basic safety precautions should be weather or to temperatures below freezing point.
observed, including the following: Make sure an appliance mounted on a tank is securely installed before
Do not operate any appliance if it has a damaged cord or operating it.
plug, if it is malfunctioning, or if it is dropped or damaged
in any manner. Read and observe all the important notices on the appliance.
If the external cable Is damaged, It shall be replaced by the
NOTE: A cord rated for less amperes or watts than the appliance
manufacturer.
rating may overheat. Care should be taken to arrange the cord
To avoid the possibility of the appliance plug or receptacle getting wet, so that it cannot be tripped over or pulled accidental.
position the aquarium stand and tank to one side of a wall mounted
receptacle to prevent water from dripping onto the receptacle or plug.
You should create a “drip loop” (see Figure 1) for each cord connecting
an aquarium appliance to a receptacle. The “drip loop” is that part of the
cord below the level of the receptacle, or the connector. Use an extension
cord, if necessary, to prevent water traveling along the cord and coming
into contact with the receptacle. If the plug or receptacle does get wet,
DO NOT unplug the cord. Disconnect the fuse or circuit breaker that
supplies power to the appliance. Then unplug the device and examine for
presence of water in the receptacle.
Close supervision is necessary when any appliance is used by
or near children.
Drip Loop
To avoid injury, do not contact moving parts. figure 1
4ENG
2 Location
The first step in setting up the REEFER™ is to choose a suitable location.
Weight Accessibility
The flooring directly below the system must be rated to support the Ensure that there is at least 10cm / 4” of clearance behind the
following weight: REEFER™ to allow easy access for installing/removing cables
from the sump as well as sufficient air circulation for a chiller
(larger models only). It is recommended to leave approximately
Approximate total weight of system including water
60cm/24” between one of the sides of the aquarium and any
Model Nano 170 XL 200 250 XL 300 350 450 adjacent walls or furniture for access to the rear of the tank.
Weight 180kg/ 275Kg/ 315kg/ 380Kg/ 470kg/ 530kg/ 680kg/
400lb 607lb 695lb 840lb 1035lb 1170lb 1500lb General considerations
Ensure that the area surrounding the aquarium is waterproof and
Model XL 425 XL 525 XXL 625 XXL 750 3XL 900 P 500 P 650 consider moving away anything that water might damage or may be
corroded by the salt.
Weight 670kg/ 830kg/ 930kg/ 1110kg/ 1300kg/ 760kg/ 940kg/
1480lb 1840lb 2060lb 2460lb 2870lb 1680lb 2080lb
NOTE: The REEEFER™ system should not be moved when full of water.
Model S 850 S 1000
Weight 1210kg/ 1465kg/
2675lb 3240lb
Room temperature
Site selection is important for correct temperature maintenance.
We recommended that you keep the ambient room temperature a
comfortable and stable 22°C / 72°F. Avoid placing the tank in front of
an air conditioner, heating vents or direct sunlight. A well ventilated
room with moderate light is the best place to position the aquarium.
5Red Sea REEFER™ Series
3 Assembly
The following information complements the graphic manuals. The top of the cabinet is approximately 86cm/34” ( 100cm/40” for
Peninsula ) from the floor.
WARNING: If you are not experienced in the construction of self-
The table shows the approximate weights of the different models of the
assembly furniture or the installation of aquarium systems,
REEFER™ aquarium glass.
seek suitably qualified assistance.
ATTENTION: The top board of the cabinet (Part C) and some other parts Approximate weight of Aquarium Glass
of the cabinet (in certain models) are packed under the Model Nano 170 XL 200 250 XL 300 350 450
aquarium. In order to retrieve these parts, remove the
aquarium from its packaging. Make sure to avoid contact Weight 25kg/ 35Kg/ 40kg/ 55Kg/ 58kg/ 64kg/ 100kg/
between the Bulkheads on the bottom of the tank and the 55lb 77lb 88lb 122lb 128lb 140lb 220lb
floor, by placing the glass aquarium on Styrofoam parts
that are used in the package. Model XL 425 XL 525 XXL 625 XXL 750 3XL 900 P 500 P 650
The REEFER™ includes the following main components: Weight 90kg/ 120kg/ 155kg/ 195kg/ 225kg/ 105kg/ 170kg/
• Glass aquarium 200lb 265lb 340lb 430lb 500lb 230lb 375lb
• Cabinet (self-assembly)
• Glass Sump including Bubble trap sponge, 225 micron filter bags/ Model S 850 S 1000
media cups (according to model) and Float valve for automatic top-up Weight 226Kg/ 258Kg/
• Internal Piping kit with outlet nozzle 500lb 570lb
• Top-up reservoir (not included with 3XL900 & REEFER-S 850/1000)
• Glass Extension Sump (3XL900 and REEFER-S 850/1000 models only) Ensure that you have the correct number of people to lift the aquarium
according to its weight and size.
Detailed instructions for the complete assembly of the REEFER™ can be
found in the accompanying graphic manuals. Ensure that anyone lifting the aquarium is physically suitable for such an
Complete the assembly of the cabinet including the doors as shown in the operation and has been instructed in the correct methods of lifting heavy
graphic assembly manual and place in the final operating position (see objects.
location above). Once the aquarium is correctly aligned with the cabinet, check that the
NOTE: It is important to assemble the REEFER™ in the order indicated. cabinet has not moved. If necessary readjust the position of the cabinet.
For units with adjustable legs: Using a spirit level on the top surface of the
glass tank, adjust the height of the legs to level the aquarium. Make sure
WARNING: Read before lifting the glass aquarium onto the cabinet.
that all legs are touching the floor.
6ENG
NOTE: The REEFER™ aquarium system should not be moved when full
of water.
Before placing the glass sump in the cabinet make sure that the cabinet
doors are correctly aligned (see instructions in the cabinet assembly
manual). Once the sump is in position it will not be possible to make
adjustments to the lower hinge without moving the sump.
With the doors properly aligned, rotate the front section of the push
opener to the correct extension so that the doors will pop open when
pushed.
Overflow box pipes: Make sure that that the O-rings are in position on the
threaded connectors before assembly. To ensure correct assembly, firmly
hold the threaded connectors from inside the cabinet and tighten well by
hand. Do not use tools. Avoid unscrewing the pipes from the overflow box
once assembled as the locking mechanism that prevents counter-rotation
will be less effective.
Sump pipes: Make sure that that the O-rings are in position on the
connectors before assembly. After assembly check that the pipes are
vertical and the securing nut is holding the pipe in position. Do not use
tools and do not overtighten.
Overflow Box Cover: The overflow box cover reduces noise from the water
fall of the surface skimmer. If you wish to use the rear wall of the overflow
box for mounting equipment such as lighting, break out the section of the
cover as shown in the graphic manual. After breaking out the removable
section, smooth the remaining edge with a file or sandpaper.
7Red Sea REEFER™ Series
4 Overview of the REEFER™
water management system
Surface Skimmer / Overflow Box Sump /ATO
Surface water from the aquarium flows via the removable comb sections Water from the flow-regulated main downpipe and the secondary
of the surface skimmer into the overflow box that houses the dual overflow bypass pipe enter a compact reception chamber in the sump.
intakes of the silent-flow downpipe system and the outlet nozzle of Care should be taken in the choice of any filter media placed in the
the sump return pump. The silent-flow downpipe system includes a reception chamber as the turbulent flow conditions from the downpipe
flow-regulated main downpipe and a secondary overflow bypass pipe. could cause a constant discharge of fine media particles.
An external pipe with a clear upper section is placed over the main The water then flows through the 400 micron filter before entering the
downpipe to ensure positive water motion throughout the entire height constant-height main reactor or skimmer chamber. If the filter bags are not
of the overflow box. cleaned frequently enough and become blocked, the water will bypass the
The fine adjustment flow valve on the main downpipe enables the water filter bags without affecting the overall operation of the sump.
level in the overflow box to be maintained at a constant height between A bubble trap labyrinth with coarse foam separates the reactor chamber
the intakes of the main and bypass pipes, which ensures positive surface from the pump compartment to prevent bubbles from the skimmer being
skimming while eliminating all noise from the water flow to the sump. returned to the aquarium.
An incorrect setting of the flow valve will be accompanied by the sound
of the water returning to the sump and is an indication that the flow Any loss of water due to evaporation will cause a drop in the water level
valve needs adjusting. in the pump compartment of the sump which will be compensated by
the ATO system.
Maintaining a constant water height in the pump compartment (with the
ATO) is essential for the stability of the entire water management system
by ensuring a constant head pressure on the intake of the main pump.
The reservoir contains water for approximately 3 days of evaporation and
should be kept topped up at all times.
8ENG
5 Operation
Return Pump Initial Fill
The recommended flow rates for the return pumps are as shown in the Check that all pipes are properly assembled and that any flexible tubes
table below. The use of higher rated pumps will result in a higher water are suitably secured in position.
level in the aquarium unless an appropriate modification is made to the Install any equipment that will take up water volume in the sump before
surface skimmer combs. starting to fill the system.
Recommended flow rate for return pumps Open the main flow valve (rotate anti-clockwise) to maximum.
Add approximately 15cm/6” of water to the overflow box to make sure
Model Nano 170 XL 200 250 XL 300
that all the pipe joins are watertight. Check for leaks inside the cabinet.
Flow 2000lph 2000lph 2000lph 2500lph 3000lph Add water to the main tank and once it is full, monitor the water level in
/530gph /530gph /530gph /660gph /790gph the sump as it begins to fill.
As soon as there is approximately 15cm/6” of water in the main pump
Model 350 450 XL 425 XL 525 XXL 625
WARNING: Overfilling the sump with equipment or water may cause
Flow 3000lph 4000lph 4000lph 4000lph 6000lph
a flood in the event of an interruption of electric power.
/790gph /1060gph /1060gph /1060gph /1600gph
compartment switch on the pump and stop adding water.
Model XXL 750 3XL 900 P 500 P 650
Switch on skimmers or other filters that will affect the water level in the
Flow 7000lph 10000lph 6000lph 7000lph sump and add more water as required to maintain the 15cm/6” of water
/1850gph /2640gph /1600gph /1850gph in the main pump compartment.
Allow the system to run for a few minutes and adjust the flow valve (as
Model S 850 S 1000 described below) so that the water level in the overflow box is at the
correct level.
Flow 9,000lph/ 10,000lph/
Add/remove water to/from the system and adjust the flow valve until
2,385gph 2650gph
the water levels in the system stabilise.
9Red Sea REEFER™ Series
Main downpipe valve adjustment 6 Maintenance
To raise the water level in the overflow box, rotate the valve clockwise.To
lower the water level in the overflow box, rotate the valve counter clockwise. For continuous smooth operation of the water management system make
regular checks of the following:
The main downpipe flow valve provides a very fine control of the flow
rate however after making adjustments it takes the system a few • Water level in the overflow box - adjust the flow valve as required
minutes to stabilize at the new setting. • Water level in the reservoir – top up with RO water as required
Once you have established the approximate setting for the valve make • Water level in the sump, check that the top-up float valve is
very small adjustments and wait for a few minutes each time. It may operating correctly
take a number of occasional adjustments to reach a stable level. When • Micron Filter Bags – check that water is flowing through the bags
set properly this system removes all of the noise of water flowing down and clean/replace as required
to the sump.
• Surface skimmer combs – remove any deposits that reduce water flow
ATO • Pump outlet nozzle – check for blockages and build-up of algae
On initial set-up, wait until the saltwater system is stable before using
Micron Filter bags
the ATO. Ensure that the top-up flow valve is fully closed.
Fill the top-up reservoir with RO water. Disconnect the top-up flow valve It is recommended to have at least 3 sets of filter bags.
from the float valve and slowly open the flow valve until the top-up There are a few options for cleaning the filter bags:
water drips at a rate of approximately 1 drop per second. Reconnect the Quick and effective – Spray the outside of the bags with a powerful
flow valve to the float valve. water jet such as a garden hose to back-flush the detritus from the
Adjust the angle of the float so that the valve is closed when the water Polyester bag.
level is above the inlet of the pump but below the top of the bubble trap. More thorough – soak the bags in bleach or diluted vinegar for 24 hours
prior to spraying as above. Rinse well to remove all chemicals before
NOTE: It is recommended to close the valve on the outlet of the returning to sump.
reservoir whenever doing maintenance in the sump
The filter bags can also be put in a cold wash in a washing machine with regular
detergent or with vinegar (may require approval from a higher authority).
Power-out test
After completing the initial set up and after adding any new equipment
to the sump, make any adjustments necessary to the main valve to
stabilise the system and perform a “power-out” test to check that water
does not rise above the rim of the sump.
10ENG
Warranty otherwise) or the technical and/or safety standards of the country in
which the Product is used. Additionally, any modification of the Product
other than by an authorized Red Sea service center will invalidate this
Red Sea Aquarium Products Limited Warranty. warranty.
Thank you for purchasing a Red Sea Aquarium System (hereinafter “the
In order to effect this warranty, please contact your local service center.
Product”).
For your convenience, details of authorized service centers can be found
Red Sea Aquatics (UK) Ltd. (hereinafter “Red Sea”) warrants the Product on Red Sea’s website. Proof of purchase will be required before warranty
against manufacturer’s defects in material and workmanship for 24 performance is rendered.
months from your date of purchase. If you register your Product within
The sole and exclusive remedy against Red Sea shall be for the repair
90 days of purchase, Red Sea will provide you with an additional 12
or replacement of the Product as provided above. NO OTHER REMEDY
months of warranty on the glass aquarium only (but not on any other
(including but not limited to, incidental or consequential damages for
components of the Product.) In jurisdictions where warranty terms
lost profits, lost sales, or any other incidental or consequential loss) shall
conditioned on registration are prohibited by law, registration is not
be available. Some jurisdictions do not allow the exclusion of incidental
required, and you shall receive the additional 12 months warranty on the
or consequential damage, so the above limitation may not apply to
glass aquarium even if you do not register.
you. To the full extent allowed by applicable law, in no event shall Red
You can register your Product at www.redseafish.com Sea be liable for any loss or damage to aquatic life, and/or damage to
other property and/or individuals resulting from the use of the Product
The warranty provided by Red Sea is NOT TRANSFERABLE AND IS or arising out of any breach of this warranty. All implied warranties are
LIMITED TO THE ORIGINAL PURCHASER. If the Product is eligible under excluded to the full extent allowed by applicable law, and to the extent
this warranty, Red Sea will either repair the Product free of charge (not that they may not be excluded, are limited to the applicable warranty
including shipping costs) with new or refurbished parts or replace the period set forth above. Some jurisdictions do not allow limitations on how
Product with a new or refurbished Product at Red Sea’s sole discretion. long an implied warranty or condition lasts, so this limitation may not
This warranty DOES NOT COVER normal wear and tear, or items that apply to you. The express warranties made in this warranty are exclusive
have a limited natural life or are consumable, such as, but not limited to and may not be altered, enlarged, or changed by any distributor, dealer,
impellers, sponges, filter socks, and “O” rings. It also DOES NOT COVER or other person, whatsoever.
damage which occurs in shipment and/or failures or defects resulting
from use outside the normal, and/or natural disasters, accidents, power
line surges, neglect, improper installation, operation or maintenance, USA
servicing of the Product conducted by anyone other than an authorized Some states do not allow the exclusion or limitation of incidental or
Red Sea service center, or failure to use or assemble the Product in consequential damages, or limitations on how long an implied warranty
accordance with any instructions provided (in the Product manual or lasts, so the above exclusion or limitations may not apply.
11Red Sea REEFER™ Series 12
ENG
                                                                                                                                      DE

                                                                                             Red Sea REEFER™SERIE
                                                                                             Innovative rahmenlose Riffsysteme für
                                                                                                alle anspruchsvollen Aquarianer

                                                                                                     Bedienungshandbuch

Dieses Produkt ist im Rahmen des gemeinschaftlichen Entwurfs 003003474, US-Serien-Nr. 29 / 555,022
und chinesischer Entwurfs-Anmeldung Nr. 201630060633.1 geschützt                                                                     13
Red Sea REEFER™ Series
REEFER™ Bedienungshandbuch
Sicherheit..............................................................................16
Standort.................................................................................17
Montage................................................................................18
Übersicht zum Wassermanagementsystem des REEFER™...20
Betrieb...................................................................................21
Wartung.................................................................................22
Garantie..................................................................................23
14ENG
Herzlichen Glückwunsch zu Ihrem Kauf des DE
Red Sea REEFER™ Riffsystems.
Die Red Sea REEFER™ Aquariumserie bietet dem erfahrenen Aquarianer
eine solide Grundlage zum Aufbau eines Riff- oder Meerwasseraquariums.
Die REEFER™ Serie vereint ein zeitgemäßes, rahmenloses
Ultraklarglasaquarium mit einem eleganten Unterschrank und einem
umfassenden Wassermanagementsystem, welches ein professionelles
Technikbecken mit integrierter Nachfüllautomatik und den einzigartig
leisen Überlauf von Red Sea enthält.
Einschließlich der Technologien, die eigens für die “All-In-One” MAX®
Korallenriffsysteme von Red Sea entwickelt wurden, wurde die REEFER™
Serie für eine einfache Handhabung konzipiert, die es dem erfahrenen
Aquarianer ermöglicht, aus einer unbegrenzten Komponentenvielfalt
Beleuchtung, Filterung, Strömung und Steuerungseinheiten zu wählen und
sich so sein individuelles, einzigartiges System zusammen zu stellen.
Dieses Handbuch enthält Anleitungen zum Aufbau und Betrieb aller
Aquarien der Baureihe Red Sea REEFER™.
Wir hoffen, dass Sie an Ihrem REEFER™ viel Freude haben.
Um in den Genuss von Informationen zu Produkt-Updates und exklusiven
Sonderangeboten für registrierte REEFER™-Besitzer zu kommen, registrieren Sie
bitte Ihr REEFER™ online unter redseafish.com
15Red Sea REEFER™ Series
1 Sicherheit
Bitte lesen und befolgen Sie alle hier aufgeführten Sicherheitshinweise. wird, müssen diese gut beaufsichtigt werden. Zur Vermeidung von
Verletzungen keine Teile berühren, die sich in Bewegung befinden.
GEFAHR: Zur Vermeidung von Stromschlägen sollten Sie beim Umgang
Ziehen Sie immer den Netzstecker eines Gerätes, wenn dieses nicht
mit einem nassen Aquarium besonders vorsichtig sein.
in Gebrauch ist, bevor Sie Teile anbringen oder entfernen und vor
Versuchen Sie in keiner der im Folgenden beschriebenen
dem Reinigen. Ziehen Sie nie am Netzkabel, um den Netzstecker aus
Situationen Reparaturen selber durchzuführen, sondern
der Steckdose zu lösen. Fassen Sie den Netzstecker an und ziehen sie
geben Sie elektronische Komponenten zur Reparatur an eine
ihn heraus. Benutzen Sie ein Gerät immer nur für den vorgesehenen
autorisierte Kundendienststelle oder entsorgen Sie das Gerät.
Verwendungszweck. Die Verwendung von Anbauteilen, die nicht vom
Gerätehersteller empfohlen oder verkauft werden, kann zu einem
WARNUNG: Zum Schutz vor Verletzungen sollten grundlegende unsicheren Betriebszustand führen. Installieren oder lagern Sie das
Sicherheitsvorkehrungen beachtet werden, Gerät nicht dort, wo es der Witterung oder Temperaturen unter dem
einschließlich der folgenden Hinweise: Gefrierpunkt ausgesetzt ist. Vergewissern Sie sich, dass ein an ein Becken
Betreiben Sie kein Gerät mit beschädigtem Netzkabel montiertes Gerät sicher installiert ist, bevor Sie es in Betrieb nehmen.
oder ein Gerät, das nicht ordnungsgemäß funktioniert, Lesen und befolgen Sie alle wichtigen Hinweise auf dem Gerät.
heruntergefallen ist oder anderweitig beschädigt ist.
HINWEIS: Ein Kabel, das für eine geringere Ampere- oder Wattzahl als
Um ein Nasswerden des Gerätesteckers oder der Steckdose zu die des Gerätes ausgelegt ist, kann sich überhitzen. Achten
vermeiden, stellen Sie Gestell und Becken des Aquariums neben einer Sie darauf, dass das Kabel so verlegt wird, dass man nicht
Wandsteckdose so auf, dass kein Wasser auf die Steckdose oder den darüber stolpern oder es versehentlich herausziehen kann.
Netzstecker tropfen kann. Der Benutzer sollte eine „Tropfschleife“
(Abbildung 1) für jedes Netzkabel bilden, das ein Gerät des Aquariums
mit der Steckdose verbindet. Die „Tropfschleife“ ist der Teil des
Netzkabels, der unterhalb der Steckdose oder der Anschlussdose liegt.
Vermeiden Sie wenn möglich ein Verlängerungskabel, um zu vermeiden,
dass Wasser am Kabel entlangläuft und mit der Steckdose in Berührung
kommt. Wenn der Stecker oder die Steckdose nass wird, Netzkabel
NICHT aus der Steckdose ziehen. Schalten Sie die Sicherung oder den
Sicherungsschalter des Stromkreises für das Gerät aus. Ziehen Sie
erst danach das Netzkabel des Gerätes heraus und überprüfen Sie die
Steckdose auf das Vorhandensein von Wasser.
Wenn das Gerät von Kindern oder in der Nähe von Kindern benutzt Tropfschleife
Abbildung 1
16ENG
2 Standort DE
Der erste Schritt beim Aufbau des REEFER™ ist die Wahl eines geeigne-
ten Standortes.
Gewicht Zugänglichkeit
Der Fußboden direkt unter dem System muss für die jeweilige Rückseite: Stellen Sie sicher, dass hinter dem REEFER™ ein
statische Belastung ausgelegt sein: Freiraum von mindestens 10 cm zur Installation bzw. zum
Entfernen von Stromkabeln und für ausreichende Luftzirkulation
Ungefähres Gesamtgewicht des Systems inklusive Wasserinhalt für einen Kühler verbleibt.
Modell Nano 170 XL 200 250 XL 300 350 450
Seitlich: Sorgen Sie für genügend Platz (ca. 60 cm) zwischen
Gewicht 180kg/ 275Kg/ 315kg/ 380Kg/ 470kg/ 530kg/ 680kg/ den Seiten des Aquariums und benachbarten Wänden oder
400lb 607lb 695lb 840lb 1035lb 1170lb 1500lb Möbelstücken, damit Sie Zugang zur Beckenrückseite haben.
Modell XL 425 XL 525 XXL 625 XXL 750 3XL 900 P 500 P 650 Allgemeine Überlegungen
Gewicht 670kg/ 830kg/ 930kg/ 1110kg/ 1300kg/ 760kg/ 940kg/ Stellen Sie sicher, dass die Umgebung des Aquariums wasserfest
1480lb 1840lb 2060lb 2460lb 2870lb 1680lb 2080lb ist und stellen Sie alle Gegenstände fort, die durch Wasser
Schaden nehmen oder vom Salz angegriffen werden könnten.
Modell S 850 S 1000
Gewicht 1210Kg/ 1465Kg/
2675lb 3240lb
Raumtemperatur
Die Wahl des Standortes spielt eine wichtige Rolle für die
Aufrechterhaltung der richtigen Temperatur. Vermeiden Sie es, das SICHERHEITSHINWEIS: Das REEFER™-Aquarium sollte nicht mehr
Becken vor Klimaanlagen, Heizlüftern oder in direktes Sonnenlicht zu bewegt werden, wenn es mit Wasser
stellen. Ein gut belüfteter, mäßig heller Raum ist der beste Standort gefüllt ist.
für ein Aquarium.
17Red Sea REEFER™ Series
3 Montage
Die folgenden Informationen ergänzen die grafischen Anleitungen. HINWEIS: Es ist wichtig, bei der Montage in der angegebenen
Reihenfolge vorzugehen.
WARNUNG: Wenn Sie keine Erfahrung im Zusammenbau von Möbeln
zur Selbstmontage haben, sollten Sie sich qualifizierte
WARNUNG: Lesen Sie zuerst die Anleitung zu Ende durch, bevor Sie
Hilfe suchen.
das Glasaquarium auf den Schrank stellen.
WARNUNG: Die obere Platte des Schrankes (Teil C) und einige
Die Oberkante des Unterschranks ist etwa 84 cm (100cm für das
andere Teile des Schrankes (bei bestimmten Modellen)
Peninsula) vom Boden entfernt. Die Tabelle zeigt das jeweilige ungefähre
werden unter dem Aquarium verpackt. Um diese Teile
Gewicht der verschiedenen REEFER™ Glasaquarien.
zu entnehmen, nehmen Sie das Aquarium aus seiner
Verpackung. Achten Sie darauf, den Kontakt zwischen
den Schotten am Boden des Beckens und dem Boden zu Ungefähres Gewicht des Glasaquariums
vermeiden, indem Sie das Glasaquarium auf Styroporteile
Modell Nano 170 XL 200 250 XL 300 350 450
stellen, die in der Verpackung verwendet werden.
Gewicht 25kg/ 35Kg/ 40kg/ 55Kg/ 58kg/ 64kg/ 100kg/
Die REEFER™ enthalten die folgenden Komponenten: 55lb 77lb 88lb 122lb 128lb 140lb 220lb
• Glas-Aquarium
• Schrank (zu montieren) Modell XL 425 XL 525 XXL 625 XXL 750 3XL 900 P 500 P 650
• Technikbecken aus Glas inklusive Blasenfangschwamm, Mikron
Gewicht 90kg/ 120kg/ 155kg/ 195kg/ 225kg/ 105kg/ 170kg/
• 225-Mikron-Beutel / Filtrationskaps (je nach Modell) und
200lb 265lb 340lb 430lb 500lb 230lb 375lb
Nachfüllautomatik
• Interne Verrohrung und Rücklauf Düse
Modell S 850 S 1000
• Osmose-Wasserversorgung (nicht enthalten bei REEFER 3XL900 & )
Reefer-S 850/1000 ) Gewicht 226Kg/ 258Kg/
• Verlängerung Technikbecken (REEFER 3XL900 & REEFER-S nur 500lb 570lb
850 / 10000 ).
Genaue Beschreibungen für die vollständige Montage der Aquarien der Stellen Sie sicher, dass ausreichend Personen zum Anheben des
Baureihe REEFER™ finden Sie in den grafischen Aufbauanleitungen, die Glasaquariums zur Verfügung stehen, die dem Gewicht und der Größe des
mit den Aquarien geliefert werden. Aquariums angemessen sind.
Komplettieren Sie den Aufbau des Unterschrankes inkl. der Türen, so Stellen Sie sicher, dass die Personen, die das Aquarium anheben,
wie es in der grafischen Aufbauanleitung gezeigt wird, und stellen es körperlich für eine solche Tätigkeit geeignet und über Methoden des
anschließend an einem geeigneten Standort auf (siehe oben: Standort). richtigen Hebens schwerer Gegenstände unterrichtet sind.
18ENG
DE
Prüfen Sie, nachdem Sie das Aquarium korrekt auf dem Unterschrank Abdeckung Überlaufschacht: Die Abdeckung vom Überlaufschacht
ausgerichtet haben, ob sich der Unterschrank dabei bewegt hat und reduziert Geräusche durch fließendes Wasser des Abschäumers. Sofern
korrigieren Sie gegebenenfalls noch einmal seine Position. Sie die Rückwand des Schachtes zur Installation weiterer Geräte, wie
Für Systeme mit verstellbaren Beinen: Verwenden Sie eine Wasserwaage z.B. einer Lampe nutzen möchten, brechen Sie den dafür vorgesehenen
auf der Oberseite des Glasaquariums und verstellen Sie die Höhe der Teil, wie in der graphischen Anleitung beschrieben, heraus. Anschließend
Beine, um das Aquarium zu nivellieren. Stellen Sie sicher, dass alle Füße glätten Sie die Sollbruchstelle mit einer Feile oder Schleifpapier.
den Boden berühren.
HINWEIS: Das REEFER™-Aquarium sollte nicht mehr bewegt werden,
wenn es mit Wasser gefüllt ist.
Bevor Sie den Glasfiltersumpf im Schrank einbauen, stellen Sie sicher,
dass die Schranktüren richtig ausgerichtet sind (siehe Anweisungen
in der Schrankmontageanleitung). Sobald der Filtersumpf einmal
eingebaut ist, ist es nicht mehr möglich Anpassungen an den unteren
Scharnieren vorzunehmen ohne den Filtersumpf wieder auszubauen.
Der automatische Türöffner kann durch leichtes Herausdrehen verstellt
werden und so optimal eingestellt werden.
Verrohrung des Überlaufschachtes: Vergewissern Sie sich, dass die
Dichtungsringe vor dem Verschrauben richtig auf dem Gewindeanschluss
sitzen. Um eine korrekte Montage zu gewährleisten, halten Sie den
Gewindeanschluss innerhalb des Schrankes und drehen Sie diesen dann
mit der Hand fest. Verwenden Sie keine Werkzeuge. Vermeiden Sie das
Abschrauben der Verrohrung vom Überlaufschacht, da dies durch eine
mechanische Sperre verhindert werden sollte.
Filtersumpfrohre: Stellen Sie den richtigen Sitz der Dichtungsringe
sicher, bevor Sie die Universalverbindungen für die Rohre anbringen.
Nach der Montage sicherstellen, dass die Rohre vertikal stehen und
die Befestigungsmutter das Rohr in Position hält. Keine Werkzeuge
verwenden, und nicht zu fest anziehen.
19Red Sea REEFER™ Series
4 Übersicht zum
Wassermanagementsystem
des REEFER™
Oberflächenabzug / Überlaufschacht Filtersumpf / Nachfüllautomatik
Oberflächenwasser aus dem Aquarium fließt über den abnehmbaren Wasser läuft über das durchflussregulierte Hauptüberlaufrohr und
Überlaufkamm in den Überlaufschacht, in dem die beiden den Notüberlauf in die Auffangkammer des Filterbeckens. Bei der
Überlaufrohre und die verstellbare Auslassdüse untergebracht sind. Das Auswahl von Filtermedien jeglicher Art für die Auffangkammer
Überlaufrohrsystem umfasst einen regulierbaren Hauptüberlauf und einen sollte man berücksichtigen, dass aufgrund von turbulenten
Notüberlauf. Ein Außenrohr mit einem durchsichtigen Oberteil auf dem Strömungsbedingungen aus dem Fallrohr hinaus, eine konstante
Hauptüberlaufrohr sorgt für zusätzliche Wasserbewegung innerhalb des Abgabe von Feinfilterpartikeln bewirkt werden könnte.
Überlaufschachtes. Anschließend fließt das Wasser durch den 400 Micron feinen Filterbeutel,
ehe es in die Hauptreaktor- bzw. Abschäumerkammer mit konstantem
Wasserstand gelangt. Wenn der Feinfilterbeutel nicht regelmäßig gereinigt
Das fein einstellbare Durchflussventil sorgt dafür, dass der Wasserstand
wird, verstopf dieser, sodass das Wasser einfach hinüber abläuft, was
im Überlaufschacht immer die gleiche Höhe zwischen dem Haupt- und
jedoch keinerlei Einfluss auf den grundsätzlichen Wasserdurchlauf im
dem Notüberlauf hat. Bei richtiger Einstellung ist der Überlauf leise. Bei
Sumpf hat.
falscher Einstellung des Durchflussventils hört man deutlich, wie das
Wasser in den Filtersumpf zurückläuft – dieses Geräusch zeigt an, dass Eine Blasenfalle mit grobem Schaumstoff trennt die Reaktorkammer von
die Einstellung des Durchflussventils geändert werden muss. Drehen Sie der Pumpenkammer und verhindert, dass Blasen vom Abschäumer zurück
hierfür einfach an dem Ventil. Bitte beachten Sie, dass sich der endgültige in das Aquarium gelangen. Der Schaumstoff muß regelmäßig gereinigt
Wasserstand immer erst verzögert einstellt. werden, um nicht zu verstopfen.
Jeglicher Wasserverlust durch Verdunstung führt zu einem sinkenden
Wasserstand innerhalb der Pumpenkammer im Filtersumpf, welches durch
die automatische Nachfüllanlage kompensiert wird.
Ein konstanter Wasserstand (mit Hilfe der automatischen
Nachfüllanlage) ist wichtig zur Aufrechterhaltung eines stabilen
Wassermanagementsystems, wobei ein gleichbleibender Druck auf die
Hauptförderpumpe gewährleistet wird. Der Vorratsbehälter enthält Wasser
für ungefähr 3 Tage gegen Verdunstung und sollte fortwährend nachgefüllt
werden.
20ENG
5 Betrieb DE
Rückförderpumpe Erstbefüllung
Die empfohlenen Durchflussraten für die Rückförderpumpen sind in der Überprüfen Sie, ob alle Rohre ordnungsgemäß montiert und dass alle
nachstehenden Tabelle dargestellt. Schläuche in geeigneter Weise befestigt und gesichert sind. Installieren
Sie sämtliche Geräte, die im Filtersumpf Platz einnehmen, vor dem
Befüllen. Öffnen Sie das Haupt-Durchflussventil (durch Drehen gegen
Empfohlene Durchflussrate für Rückförderpumpen den Uhrzeigersinn) vollständig. Füllen Sie etwa 15 cm Wasser in den
Modell Nano 170 XL 200 250 XL 300 Überlaufschacht, um sicherzustellen, dass alle Rohre wasserdicht
verschlossen sind. Achten Sie auf Lecks im Unterschrank. Füllen Sie
Durchfluss 2.000 2.000 2.000 2.500 3.000 Wasser in das Hauptbecken und sobald dieses gefüllt ist, kontrollieren
l/Std l/Std l/Std l/Std l/Std Sie den Wasserstand im Filtersumpf, wenn dieser sich zu füllen beginnt.
Schalten Sie, sobald der Wasserstand im Abteil für die Hauptpumpe etwa
Modell 350 450 XL 425 XL 525 XXL 625 15 cm erreicht hat, die Hauptpumpe an und hören Sie mit der Befüllung
des Beckens auf. Schalten Sie den Abschäumer oder andere Filter ein,
Durchfluss 3.000 4.000 4.000 4.000 6.000
die den Wasserstand im Filtersumpf beeinflussen und fügen Sie, falls
l/Std l/Std l/Std l/Std l/Std
erforderlich, Wasser hinzu, um die 15 cm Wasserstandshöhe in der
Hauptpumpenkammer zu erreichen.
Modell XXL 750 3XL 900 P 500 P 650
Durchfluss 7.000 10.000 6.000 7.000 WARNUNG: Das Überfüllen des Filtersumpfes kann bei Unterbrechung
l/Std l/Std l/Std l/Std der Stromzufuhr zu einem Überlaufen führen.
Modell S 850 S 1000 Lassen Sie das System einige Minuten laufen und versuchen Sie das
Durchflussventil (wie unten beschrieben) so einzustellen, dass der
Durchfluss 9.000 10.000 Wasserstand der Überlaufkammer die gewünschte Höhe erhält. Fügen Sie
l/Std l/Std Wasser hinzu oder entnehmen Sie entsprechend Wasser und sobald Sie
einen stabilen Wasserstand erreicht haben, justieren Sie das Durchflussventil
der Nachfüllanlage.
Einstellen des Durchflussventils des Hauptfallrohrs
Um den Wasserstand im Überlauffach zu erhöhen, Drehen Sie das Ventil im
Uhrzeigersinn und den Wasserstand zu Senken, drehen Sie das Ventil gegen
den Uhrzeigersinn.
21Red Sea REEFER™ Series
Das Durchflussventil des Hauptfallrohrs ermöglicht eine sehr feine
Steuerung der Durchflussmenge, nach Veränderungen der Einstellung 6 Wartung
benötigt das System jedoch ein paar Minuten, um sich mit der neuen
Einstellung zu stabilisieren. Für einen kontinuierlichen und reibungslosen Betrieb des
Nehmen Sie nach der Grobeinstellung des Ventils die Feineinstellung Wassermanagementsystems sollten folgende regelmäßige
mit jeweils kleinen Korrekturen vor, nach denen Sie jeweils einige Überprüfungen durchgeführt werden:
Minuten warten. Zur Erreichung einer stabilen Durchflussmenge können • Wasserstand im Überlaufschacht - stellen Sie das Durchflussventil
Nachjustierungen erforderlich sein. Wenn dieses System richtig eingestellt entsprechend ein
ist, fließt das Wasser völlig geräuschlos in den Filtersumpf herab. • Wasserstand im Reservoir – füllen Sie den
Frischwasservorratsbehälter mit Umkehrosmosewasser (UO-Wasser)
Verdunstungswasser-Nachfüllautomatik auf
Warten Sie bis das Salzwassersystem sich nach der Erstbefüllung stabilisiert • Wasserstand im Filtersumpf - prüfen Sie, ob das Schwimmerventil
hat, ehe Sie die Nachfüllautomatik benutzen. Stellen Sie sicher, dass der Nachfüllautomatik einwandfrei funktioniert
das Durchflussventil der Nachfüllautomatik vollständig geschlossen ist. • Micron Filterbeutel – überprüfen Sie, dass Wasser durch die Beutel
Füllen Sie den Frischwasservorratsbehälter mit Umkehrosmosewasser fließt und reinigen bzw. wechseln Sie diese wenn nötig
(UO-Wasser) auf. Trennen Sie das Durchflussventil der Nachfüllautomatik
vom Schwimmerventil und öffnen Sie langsam das Durchflussventil, • Überlaufkamm – entfernen Sie jegliche Ablagerungen, die den
bis das Nachfüllwasser mit einer Geschwindigkeit von ca. 1 Tropfen pro Wasserdurchfluss reduzieren würden
Sekunde tropft. Verbinden Sie dann wieder das Durchflussventil mit dem • Pumpenauslassdüse – auf Verkrustungen und Algen überprüfen
Schwimmerventil. Stellen Sie den Winkel des Schwimmers so ein, dass das
Ventil geschlossen ist, wenn der Wasserstand über dem Pumpeneinlass, Micron Filterbeutel
aber unterhalb der Blasenfalle liegt.
Es wird empfohlen, mindestens 3 Sätze Filterbeutel vorrätig zu haben.
ANMERKUNG: Es wird empfohlen, das Ventil am Auslass des Reservoirs Hinweise zur Reinigung der Filterbeutel:
zu verschließen, wenn Sie Wartungsarbeiten im
Spülen Sie die Außenseite der Beutel mit einem kräftigen Wasserstrahl ab.
Filtersumpf durchführen
Die Filterbeutel können ebenso in der Waschmaschine kalt gewaschen werden.
Herstellerangaben beachten.
Strom-Aus-Test
Nach Abschluss der Ersteinrichtung und nach der Installation neuer
Komponenten innerhalb des Filtersumpfes, die das Nachjustieren des
Hauptventiles erfordern, um das System zu stabilisieren, führen Sie den
“Strom-Aus-Test” durch, um sicher zu stellen, dass kein Wasser über den
Filtersumpf hinausläuft.
22ENG
Garantie (im Produkthandbuch oder anderweitig) oder den technischen und/oder
Sicherheitsstandards des Landes, in dem das Produkt verwendet wird,
DE
zurückzuführen sind. Darüber hinaus führt jede andere Modifikation des
Beschränkte Garantie für Red Sea Aquarienprodukte. Produkts als die durch ein autorisiertes Red Sea-Servicezentrum zum Erlöschen
dieser Garantie.
Vielen Dank für den Kauf eines Red Sea Aquarium Systems (im Folgenden „das
Produkt„). Zur Inanspruchnahme dieser Garantie wenden Sie sich bitte an Ihr lokales
Servicezentrum. Einzelheiten zu den autorisierten Servicezentren finden Sie
Red Sea Aquatics (UK) Ltd. (im Folgenden “ Red Sea „) garantiert das Produkt
auf der Website von Red Sea. Bevor die Garantieleistung erbracht wird, ist ein
für 24 Monate ab Kaufdatum gegen Material- und Verarbeitungsfehler
Kaufnachweis erforderlich.
des Herstellers. Wenn Sie Ihr Produkt innerhalb von 90 Tagen nach dem
Kauf registrieren, gewährt Ihnen Red Sea eine zusätzliche 12-monatige Das einzige und ausschließliche Rechtsmittel gegen Red Sea besteht in der
Garantie ausschließlich auf das Glasaquarium (nicht jedoch auf andere Reparatur oder dem Austausch des Produkts wie oben beschrieben. Es stehen
Produktbestandteile). In Gerichtsbarkeiten, in denen die von der Registrierung KEINE WEITEREN RECHTSMITTEL (einschließlich, aber nicht beschränkt auf, Neben-
abhängigen Garantiebedingungen gesetzlich verboten sind, ist eine oder Folgeschäden für entgangenen Gewinn, entgangenen Umsatz oder andere
Registrierung nicht erforderlich. Sie erhalten die zusätzliche Garantie von 12 Neben- oder Folgeschäden) zur Verfügung. Einige Gerichtsbarkeiten verbieten
Monaten auf das Glasaquarium, auch wenn Sie sich nicht registrieren. den Ausschluss von Neben- oder Folgeschäden, so dass die oben genannte
Einschränkung möglicherweise nicht für Sie gilt. In dem nach geltendem Recht
Sie können Ihr Produkt unter www.redseafish.com registrieren.
zulässigen Umfang haftet Red Sea unter keinen Umständen für Verluste oder
Die von Red Sea gewährte Garantie ist NICHT ÜBERTRAGBAR UND AUF DEN Schäden an Wasserlebewesen und/oder Schäden an anderen Gegenständen
URSPRÜNGLICHEN KÄUFER beschränkt. Wenn das Produkt unter diese Garantie und/oder Personen, die sich aus der Verwendung des Produkts oder aus einer
fällt, repariert Red Sea das Produkt entweder kostenlos (ohne Versandkosten) Verletzung dieser Garantie ergeben. Alle stillschweigenden Gewährleistungen
mit neuen oder überholten Teilen oder ersetzt das Produkt nach eigenem sind in dem nach geltendem Recht zulässigen Umfang ausgeschlossen und,
Ermessen durch ein neues oder überholtes Produkt. soweit sie nicht ausgeschlossen werden können, auf die oben genannte
geltende Garantiezeit beschränkt. Einige Gerichtsbarkeiten erlauben keine
Diese Garantie GILT NICHT für normale Abnutzung oder Gegenstände, die eine Einschränkungen der Dauer einer stillschweigenden Garantie oder Bedingung,
begrenzte natürliche Lebensdauer haben oder Verbrauchsmaterialien sind, wie so dass diese Einschränkung möglicherweise nicht für Sie gilt. Die in dieser
beispielsweise, aber nicht beschränkt auf Laufräder, Schwämme, Filtersocken Garantie enthaltenen vertraglichen Gewährleistungen sind ausschließlich
und „O“-Ringe. Sie DECKT AUCH KEINE Schäden ab, die beim Transport auftreten und dürfen von keinem Vertriebspartner, Händler oder einer anderen Person
und/oder Ausfälle oder Mängel, die auf eine Verwendung außerhalb des modifiziert, erweitert oder geändert werden.
Normalbetriebs und/oder Naturkatastrophen, Unfälle, Überspannungen
der Stromleitung, Vernachlässigung, unsachgemäße Installation, Bedienung
oder Wartung, Serviceleistungen an dem Produkt durch eine andere Person
als von einem autorisierten Red Sea-Servicezentrum oder Nichteinhaltung
der Verwendung oder Montage des Produkts gemäß den Anweisungen
23FR
Red Sea REEFER™SERIES
systèmes récifaux pour aquariophiles
expérimentés
Mise en route
Ce produit est protégé par le Community Design No. 003003474, le US Serial No. 29/555,022, et le Chinese Design Application No. 201630060633.1.Red Sea REEFER™ Series
Mise en route du REEFER™
Sécurité...............................................................................................28
Positionnement...................................................................................29
Assemblage.........................................................................................30
Vue d’ensemble du système de traitement d’eau des REEFER™ ..... 32
Mise en route......................................................................................33
Maintenance.........................................................................................34
Garantie................................................................................................35
26ENG
Félicitations pour l’achat de votre aquarium DE
Red Sea REEFER™. FR
Les systèmes Red Sea REEFER™ fournissent aux aquariophiles
expérimentés une base solide pour se composer un aquarium marin ou
récifal. Les systèmes REEFER™ sont la combinaison d’aquariums en verre
extra blanc au design très contemporain, de systèmes de traitement d’eau
professionnels incluant une décantation à compensation d’évaporation et
du système de descente d’eau silencieuse unique de Red Sea. Intégrant
des technologies initialement développées pour les systèmes récifaux
tout-en-un MAX® de Red Sea, la série des REEFER™ a été conçue pour
être facile à utiliser tout en permettant aux passionnés un choix illimité
d’éclairages, filtrations, brassages et autres contrôleurs afin de créer un
système unique et personnalisé.
Ce mode d’emploi complète le manuel graphique d’assemblage. Les
instructions d’installation et de fonctionnement sont valables pour tous les
modèles de REEFER™.
Nous espérons que vous profiterez bien de votre REEFER™ et de votre récif.
Pour profiter des informations sur les mises à jour des produits et d’offres spéciales
exclusives, enregistrez votre REEFER™ sur redseafish.com
27Red Sea REEFER™ Series
1 Sécurité
Merci de lire et de respecter toutes les instructions de sécurité. directement le cordon pour débrancher le produit. Tirez ou poussez
toujours en tenant uniquement la prise.
DANGER: pour éviter tout risque d’électrocution, un soin particulier
N’utilisez pas le produit pour un autre usage que celui auquel il est
doit être apporté à la manipulation d’un aquarium en eau.
destiné. L’utilisation de produits optionnels non recommandés par le
Pour chacune des situations suivantes, ne tentez pas de
fabricant peut être dangereuse.
réparer vous-même, retournez la partie défectueuse du
produit au service après-vente. N’installez pas ou ne stockez pas le produit dans un endroit où le climat
et les températures peuvent descendre sous 0°C.
Soyez sûr que tout dispositif installé sur l’aquarium est fixé en respectant
ATTENTION : pour prévenir toute blessure, des précautions basiques les règles de sécurité avant de le faire fonctionner.
de sécurité doivent être suivies: N’intervenez pas sur le
produit si un câble électrique ou une prise est endommagé,
s’il ne fonctionne pas correctement ou s’il est tombé ou Lire et respecter toutes les informations importantes concernant le
endommagé de quelque manière que ce soit. produit.
NOTE: un câble supportant moins d’ampères ou de watts que ce dont
Pour éviter que de l’eau entre en contact avec les prises électriques, a besoin le produit peut surchauffer. Un soin particulier devra
placez l’aquarium à côté de la prise murale. être appliqué au positionnement du câble afin d’éviter toute
Vous devriez créer une boucle “anti goutte” pour chaque fil électrique torsion ou tirage accidentels.
reliant l’aquarium aux prises murales. La boucle “anti goutte” est cette
partie du câble électrique qui est sous la prise murale. Utilisez une
rallonge électrique si nécessaire pour éviter que l’eau ne s’écoule le long
du câble jusqu’à la prise murale. Si de l’eau entre en contact avec la prise
murale ou la prise du câble, NE DEBRANCHEZ PAS le câble. Déconnectez
le fusible du disjoncteur qui contrôle l’alimentation électrique du produit
puis débranchez le produit pour examiner la présence d’eau dans la prise
murale ou sur la prise du câble.
Une surveillance rapprochée est nécessaire en présence d’enfants.
Pour éviter toute blessure, ne touchez pas les pièces en mouvement.
Débranchez toujours le produit quand il n’est pas utilisé, quand vous
enlevez certains de ses éléments ou avant son nettoyage. Ne tirez jamais Figure 1:
boucle anti-goutte
28ENG
2 POSITIONNEMENT DE
La première étape dans l’installation de votre REEFER™ est de choisir
un emplacement convenable.
FR
Poids Accessibilité
Le sol sous le REEFER™ doit être capable de supporter les poids
suivants: Soyez sûr qu’il y ait au moins 10 cm derrière le REEFER™ pour faciliter
l’installation des câbles et permettre une circulation d’air suffisante
pour le groupe froid optionnel (emplacement prévu seulement sur
Poids approximatifs des systèmes complets
les gros modèles). Il est recommandé de laisser approximativement
Modèle Nano 170 XL 200 250 XL 300 350 450 60 cm de chaque côté de l’aquarium pour accéder à l’arrière de
l’aquarium.
Poids 180kg 275Kg 315kg 380Kg 470kg 530kg 680kg
Modèle XL 425 XL 525 XXL 625 XXL 750 3XL 900 P 500 P 650 Plus généralement
Assurez-vous que la zone entourant votre REEFER™ ne craint pas
Poids 670kg 830kg 930kg 1110kg 1300kg 760kg 940kg
l’eau et n’oubliez pas de déplacer tout ce que l’eau de mer pourrait
endommager (gonflement du bois, corrosion…).
Modèle S 850 S 1000
Poids 1210kg 1465Kg
Température de la pièce
La sélection de l’emplacement est importante pour la maintenance
d’une température adéquate. Nous vous recommandons de fixer la
température à 22°C. Evitez de placer l’aquarium face à une sortie
d’air conditionné, de chauffages ou du soleil direct. Une pièce bien NOTE: votre REEFER™ ne doit plus être déplacé une fois en eau.
ventilée et modérément éclairée est le meilleur choix.
29Red Sea REEFER™ Series
3 ASSEMBLAGE
Les informations suivantes complètent le manuel graphique.
NOTE: il est important d’assembler votre REEFER™ en suivant l’ordre
ATTENTION : si vous n’êtes pas habitué au montage de meubles à indiqué.
assembler ou à l’installation d’aquarium, faites appel à
une personne qualifiée. ATTENTION : à lire avant de poser l’aquarium sur son meuble.
Le haut du meuble est à environ 86 cm (100cm pour Peninsula).
ATTENTION : Le panneau supérieur du meuble (partie C) et certaines
autres parties du meuble ( sur certains modèles) sont Le tableau montre les poids approximatifs des différents modèles de
cuves en verre des REEFER™.
placés sous l'aquarium. Pour récupérer ces parties, retirez
l'aquarium de son emballage. Veillez à éviter tout contact Poids approximatifs des aquariums en verre
entre les passes parois au fond de l'aquarium et le sol, en
Modèle Nano 170 XL 200 250 XL 300 350 450
posant l'aquarium sur les morceaux de polystyrène utilisés
dans l'emballage. Poids 25kg 35Kg 40kg 55Kg 58kg 64kg 100kg
Les REEFER™ contiennent les composants suivants : Modèle XL 425 XL 525 XXL 625 XXL 750 3XL 900 P 500 P 650
• Aquarium en verre Poids 90kg 120kg 155kg 195kg 225kg 105kg 170kg
• Meuble (à monter)
• Décantation en verre comprenant une éponge piège bulles, micron Modèle S 850 S 1000
bags de 225 micron/godets de filtration (selon le modèle) et
système de compensation de l'évaporation Poids 226Kg 258Kg
• Tuyauterie interne et buse de retour
Assurez-vous d’être accompagné de suffisamment de personnes pour
• Réserve d'eau osmosée (non comprise avec les Reefer 3XL900 & soulever et manipuler votre REEFER™ en toute sécurité.
Reefer-S 850/1000)
Assurez-vous que chacune des personnes est physiquement capable
• Extension de décantation en verre (Reefer 3XL900 et REEFER-S
d’effectuer cette opération et qu’elle a été formée aux bonnes méthodes
850/1000 uniquement)
de levage d’objets lourds.
Les instructions détaillées pour l’assemblage complet des REEFER™ se
Une fois que l’aquarium est correctement aligné au meuble, vérifiez que
trouvent dans le manuel graphique.
le meuble n’a pas bougé. Si nécessaire, réajustez la position du meuble.
Terminez le montage du meuble et de ses portes comme indiqué dans
le manuel graphique et placez-le à son emplacement définitif (voir Pour les modèles avec pieds ajustables: à l'aide d'un niveau à bulle posé
positionnement ci-dessus). sur la surface supérieure de la vitre de l'aquarium, ajustez la hauteur des
pieds pour mettre à niveau l'aquarium.
30You can also read