VeriWash - USER MANUAL 3D PRINTED PARTS CLEANER
←
→
Page content transcription
If your browser does not render page correctly, please read the page content below
VeriWash

   USER MANUAL
     3D PRINTED PARTS CLEANER

Whip Mix Corporation 361 Farmington Avenue Louisville, KY USA 40209
           800-626-5651 502-637-1451 www.whipmix.com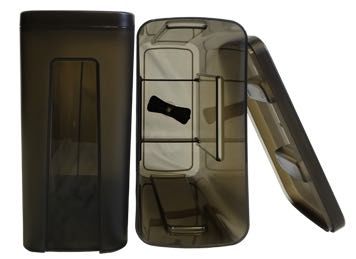
VERIWASH User Manual                                                                                      Whip Mix Corporation

CONTENTS
        1. Introduction  . . . . . . . . . . . . . . . . . . . . . . . . . . . . . . . . . . . . . . . . . . . . . . . .  2
             1.1 Declaration of CE conformity . . . . . . . . . . . . . . . . . . . . . . . . . . . . . .  2
             1.2 Transport of the unit  . . . . . . . . . . . . . . . . . . . . . . . . . . . . . . . . . . . . .  3
        2. Components . . . . . . . . . . . . . . . . . . . . . . . . . . . . . . . . . . . . . . . . . . . . . . . .  3
        3. Technical Specifications . . . . . . . . . . . . . . . . . . . . . . . . . . . . . . . . . . . . . . .  5
        4. Installation . . . . . . . . . . . . . . . . . . . . . . . . . . . . . . . . . . . . . . . . . . . . . . . . . . 5
        5. Operation . . . . . . . . . . . . . . . . . . . . . . . . . . . . . . . . . . . . . . . . . . . . . . . . . .  7
        6. Cautions  . . . . . . . . . . . . . . . . . . . . . . . . . . . . . . . . . . . . . . . . . . . . . . . . . . .  8
        7. Cleaning, Maintenance, and Care . . . . . . . . . . . . . . . . . . . . . . . . . . . . . .  9
             7.1 Cleaning . . . . . . . . . . . . . . . . . . . . . . . . . . . . . . . . . . . . . . . . . . . . . . . .  9
             7.2 Maintenance and Care . . . . . . . . . . . . . . . . . . . . . . . . . . . . . . . . . . . .  9
        8. Troubleshooting and Repair . . . . . . . . . . . . . . . . . . . . . . . . . . . . . . . . . .  10
        9. Environmental Conditions . . . . . . . . . . . . . . . . . . . . . . . . . . . . . . . . . . . . 10
        10. Packaging  . . . . . . . . . . . . . . . . . . . . . . . . . . . . . . . . . . . . . . . . . . . . . . . . .  11
        11. Warranty  . . . . . . . . . . . . . . . . . . . . . . . . . . . . . . . . . . . . . . . . . . . . . . . . .  11

                                                                 2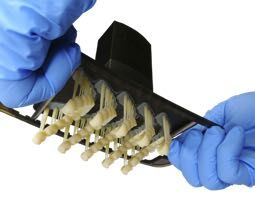
VERIWASH User Manual                                                  Whip Mix Corporation

1. INTRODUCTION
Thank you for purchasing the VERIWASH automated cleaning unit. VERIWASH efficiently
cleans uncured resin from 3D printed parts using isopropyl alcohol (Isopropanol). To ensure
that your VERIWASH gives you the highest level of performance, review and follow the
guidelines outlined in this User Manual and keep it for future reference.
Das Benutzerhandbuch ist auf www.whipmix.com in deutscher Sprache verfügbar.
Le manuel d'utilisation est disponible en français sur le site www.whipmix.com.
El manual del usuario se encuentra disponible en español en www.whipmix.com.
Il manuale utente è disponibile in italiano sul sito https://www.whipmix.com.

         1.1 DECLARATION OF CE CONFORMITY
         VERIWASH has been tested for CE marking according to the following European
         Directive and standards:
            Electromagnetic Compatibility Directive 2014/30/EU
                   EN 61326-1:2013, Class A (Basic Immunity)
                   EN 55011:2016 +A1:2017
                   EN 61000-3-2:2014
                   EN 61000-3-3:2013
                   EN 61010-1:2010 (Third Edition)
            RoHS
                   EN 50581:2012
                   IEC 62321-3-1:2013
                   IEC 62321-8: 2017

         1.2 TRANSPORT OF THE UNIT
         Upon receipt of the VERIWASH, examine the shipment to determine whether
         any items in the shipment are missing, defective or damaged. Notify Whip Mix
         of any shortages, defects, or damage within 1 day of receipt of the shipment.
         Within 10 days after the receipt of such notice, the company will take action
         based on the findings. Whip Mix will repair or replace any part proven defective
         in material or workmanship at no charge.

                                             3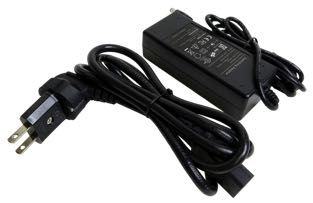
VERIWASH User Manual Whip Mix Corporation
2. COMPONENTS
AC to DC Adapter with cable:
Provides power to the VERIWASH.
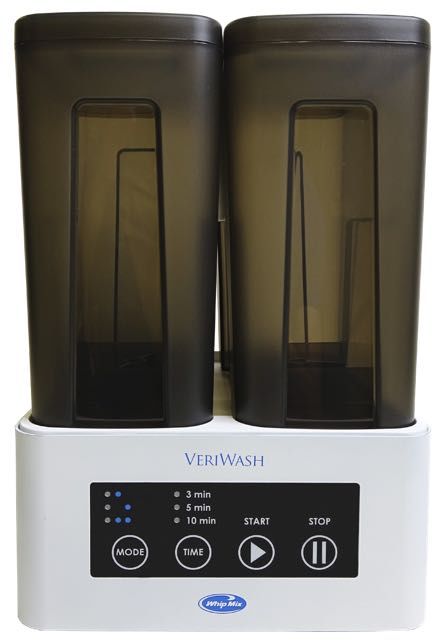
Main body (Base): Touch screen
displays the control interface with
the MODE, TIME, START and
STOP buttons. MODE button
selects which wash container to
use. Indicator lights shows which
wash container is selected.
Mesh Basket: The removable
basket is used to wash parts that are
unattached to the build platform.
The basket is inserted and secured
into the Wash Container to clean
the parts.
Universal Build Plate Jig /
Metal Rods: To clean printed
parts while they are attached to
the printer build plate, place the
Metal Rods (two of them) into the
appropriate slots of the Universal
Jig (adjustable positioning to fit
build plate size up to 180mm ×
90mm) (7.08” × 3.54”).
4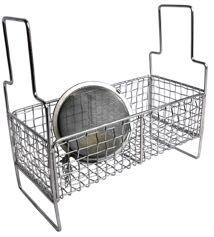
VERIWASH User Manual                                                     Whip Mix Corporation

                                                     Wash Containers/Lids: There
                                                     are two separate removable
                                                     containers, each holding up to 3
                                                     liters of isopropanol. One is used for
                                                     the first bath, and the second for a
                                                     second (fresh) bath. Each has its own
                                                     lid. A rotating impeller at the bottom
                                                     circulates the solvent.

                                                 Disposable Main Body Cover
                                                 (PET): Clear plastic cover is made
                                                 out of alcohol resistant material to
                                                 protect the main body of the unit
                                                 from spilled alcohol or resin.


3. TECHNICAL SPECIFICATIONS
        MODEL: VERIWASH 3D PRINTED PARTS CLEANER
        Product Dimensions: 24(L) × 24(W) × 35(H) cm (9.45” × 9.45” × 13.8”)
        Package Dimensions: 29(L) × 29(W) × 52(H) cm (11.4” × 11.4” × 20.5”)
        Product Weight: 3 kg (6.6 Ib)
        Shipping Weight: 4.4 kg (9.7 Ib)
        Rated Power: 48W
        Voltage: AC 100~240 V, ~50 / 60 Hz
        Transient overvoltage: 2,500 V

                                             5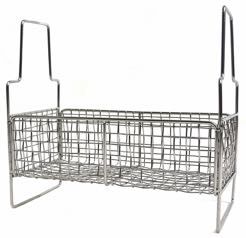
VERIWASH User Manual                                                  Whip Mix Corporation

4. INSTALLATION
        4.1   Place the Main Body (Base) on flat surface.
              NOTE: The disposable clear plastic cover is already in place.
              This is a disposable item and can be changed if it becomes
              soiled with spilled resin or alcohol.
        4.2   Place each Wash Container on the Main Body. Be sure each fits well.
        4.3   CAREFULLY fill the Wash Container with 2.5 - 3.0 liter of Isopropanol.
              NOTE: It is recommended to dedicate one container as the
              first bath for the parts coming directly from the printer, and
              the other container as a second bath, filled with fresh IPA
              (ISOPROPANOL).
              NOTE: Keep the Lid closed when the VERIWASH is not in use to
              minimize the evaporation rate of the alcohol.
        4.4   Use the Mesh Basket only to wash 3D printed parts not attached to the
              printer build plate.
              NOTE: To clean small 3D printed parts such as dies or single
              crowns, there are two options as follows:
                  Put them into a 3” stainless steel tea ball infuser (not sold by
                  Whip Mix, can be purchased online), then insert into the mesh basket
                  as shown below.

                  For a 3D printer with a build plate size up to 180 mm x 90 mm (7.08”
                  x 3.54”), when not using the stainless steel tea ball infuser, keep the
                  printed parts attached to the build plate and use the Universal Build
                  Plate Jig as instructed in 4.5.

                                            6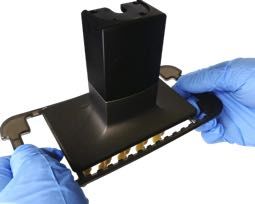
VERIWASH User Manual                                                    Whip Mix Corporation

        4.5   Use the Universal Build Plate Jig and the Metal Rods to wash the printed
              parts while they are attached to the build plate and the build plate size is up
              to 180 mm x 90 mm (7.08” x 3.54”).
              4.5.1		 Position the Metal Rods in the slots of the Universal Jig based on the
                      size of your printer build plate.
              		NOTE: Check and adjust the position of the two Metal
                Rods several times until the build plate is placed over
                them securely.
              4.5.2 Check the proper position of the build plate over the two Metal Rods,
                    set aside.
              4.5.3 Insert the Universal Jig with the positioned Metal Rods inside the
                    Wash Container.
              4.5.4		 Secure the printer build plate over the positioned Metal Rods.
              		 NOTE: Ensure printed parts are fully secured to the build
                 plate. Washing loose parts directly in the wash container
                 may damage printed parts, create noise, and interfere
                 with the impeller at the bottom.
        4.6   Insert either the Mesh basket or the Universal Jig into the Wash Container
              as instructed in 4.4 or 4.5.
        4.7   Insert the AC cable into the receptacle in the back of the unit.

5. OPERATION
        5.1. To turn on the unit, select and press the MODE button depending on which
             Wash Container you want to operate - left, right, or both. LED (Blue) light
             indicates which container is selected.

                  Left           Right           Both
        5.2   Select the TIME (3 min, 5 min, or 10 min).
              NOTE: Time cannot be changed while the cleaning cycle is in
              progress.
        5.3   Do not start the unit until the Containers, the Lid/Mesh Basket, and the
              Universal Jig are all secured in their proper position.

                                             7
VERIWASH User Manual Whip Mix Corporation
5.4 Press the START button to begin the wash cycle. The cleaning cycle will
operate for the length of time selected in the control interface. The impeller
reverses direction every 60 seconds.
NOTE: The speed at which the isopropyl alcohol is stirred is the
same for both Wash Containers and any cleaning duration
(3, 5, or 10 minutes).
5.5 To adjust the speed of BOTH containers, unit must be in OFF mode. Press
and hold the START and STOP button simultaneously for 5 – 7 seconds.
This will move you to the speed control mode.
To increase the speed: Press the START button repeatedly.
To decrease the speed: Press the STOP button repeatedly.
To save the speed: Press the MODE button.
NOTE: You cannot adjust the speed while the cleaning cycle is in
progress.
NOTE: To end the cleaning cycle before it is finished, press the
STOP button.
NOTE: When you press the STOP Button, it cancels the
remaining time of the wash cycle.
6. CAUTIONS
Before operating, read the VERIWASH USER MANUAL carefully. Follow the
instructions to avoid errors, equipment damage, or injury to the user.
Do not change the position of the Wash Container during operation.
Do not allow water or alcohol to get into the main body of the VERIWASH.
Ensure that no isopropyl alcohol spills when you fill the wash container at any time.
Spilled alcohol may damage the electronics or the base material.
Use only authorized accessories (power cord with appropriate rating).
Refer to the alcohol supplier safety data sheet (SDS) as the primary source of
information on the storage and handling of the alcohol.
Alcohol is flammable and should be stored away from sources of ignition.
Wear gloves and handle alcohol in well-ventilated areas.
Alcohol evaporates quickly, so keep the lid(s) closed whenever possible.
Do not modify the unit. VERIWASH is intended to be used as directed only.
Keep away from children.
Do not operate with a damaged cord or plug. A damaged cord may only be replaced
by a power cord of the same type.
Only use well-maintained equipment.
Operate on a clear and flat surface.
Always use the equipment in the safest possible manner.
Ensure that the Wash Containers, lids, and the mesh basket are all secured in their
proper positions before starting a cleaning cycle.
8VERIWASH User Manual Whip Mix Corporation
7. CLEANING, MAINTENANCE, AND CARE
7.1 CLEANING
Always keep the main body clean from alcohol or resin. Keeping the
disposable cover on the main body at all times will protect the main
body from spilled alcohol
Always disconnect the power cable before cleaning/maintenance.
Remove the Wash Container from the base.
Remove the Universal Build Plate Jig, Mesh Basket, and Metal Rods
from the Wash Container.
Remove all alcohol from the Wash Containers.
Clean the inside of the Wash Containers with water, and wipe with
smooth clean cloth.
NOTE: Ensure that all water completely dries before
refilling the container and operating.
Wipe the outer surface of the VERIWASH with Isopropyl alcohol or
water using a smooth clean cloth.
7.2 MAINTENANCE AND CARE
Isopropyl Alcohol
The Isopropyl alcohol should be changed periodically. Use up to
99% isopropyl alcohol.
The Isopropyl alcohol can be used for multiple cleaning cycles, but
the cleaning effectiveness of reused alcohol will decrease with each
cleaning cycle, depending upon the resin used and the printed part
geometry. In case of settling of solid polymerization residues, the
used alcohol must be changed immediately.
As Alcohol decreases over time due to use or evaporation, add
fresh alcohol to keep the right level of alcohol inside the wash
container.
Replace the alcohol when the wash is no longer effective and when
printed parts are tacky even after washing.
It is solely up to the operator to determine when the alcohol needs
to be changed.
Dispose of used Isopropyl alcohol per local and national
regulations.
Accessories can be replaced if needed. For purchasing accessories and
spare parts, visit WhipMix at shop.whipmix.com or www.whipmix.com.
9VERIWASH User Manual Whip Mix Corporation
8. TROUBLESHOOTING AND REPAIR
VERIWASH has been designed to enable the user to replace parts or fix the unit without
sending it anywhere. Replacement parts are readily available at www.shop.whipmix.com.
If problems do occur, consult the chart below. If additional information is needed, watch the
appropriate videos on the Whip Mix channel at www.youtube.com.
If still not satisfied, refer to the warranty agreement to determine your course of action. If
the unit is out of warranty, contact Whip Mix at (800) 626-5651.
Error Cause Solution
Loud noise High concentration of resin Adjust the speed – refer to the
in alcohol (viscosity change) operation process.
affects rotation speed
Unusual noise Obstruction in the Wash Check for loose parts or debris
Container on the bottom of the bucket.
Check that the impeller rotates
properly.
The Display doesn’t turn off Software issue Disconnect and reconnect the
power (restart).
The Display doesn’t turn on Software issue Disconnect and reconnect the
power after 1-2 min (restart).
Faulty electrical connection Check the power supply. Try
another outlet.
Disconnect and reconnect the
power.
Motor Jammed Misaligned impeller or debris Check for loose printed parts
stuck around it or debris stuck under the
impeller and remove it.
Check the impeller alignment
and proper rotation. Contact
Whip Mix for instruction.
9. ENVIRONMENTAL CONDITIONS
Installation: Indoor use
Altitude: up to 2,000 m
Operating temperature/humidity: 5–40°C / 20–80 %
Pollution degree: 2
Degree of protection: 1
10VERIWASH User Manual Whip Mix Corporation
10. PACKAGING
Take care when opening.
Keep your packaging.
Use the original box when sending for service.
11. WARRANTY
Whip Mix Corporation offers a one-year warranty for VERIWASH, starting from the date
of purchase. Whip Mix Corporation warrants the VERIWASH free of all defects in material
and workmanship. Refer to separate warranty agreement at www.whipmix.com for
warranty coverage and service details.
11Whip Mix Corporation 361 Farmington Avenue Louisville, KY USA 40209
800-626-5651 502-637-1451 www.whipmix.com
02/21 REV DVeriWash
MANUAL DEL
USUARIO
LIMPIADORA DE PIEZAS
IMPRESAS EN 3D
Whip Mix Corporation 361 Farmington Avenue Louisville, KY USA 40209
800-626-5651 502-637-1451 www.whipmix.comVERIWASH Manual del Usuario Whip Mix Corporation
ÍNDICE
1. Introducción . . . . . . . . . . . . . . . . . . . . . . . . . . . . . . . . . . . . . . . . . . . . . . . . 2
1.1 Declaración de conformidad CE . . . . . . . . . . . . . . . . . . . . . . . . . . . . 2
1.2 Transporte de la unidad . . . . . . . . . . . . . . . . . . . . . . . . . . . . . . . . . . 3
2. Componentes . . . . . . . . . . . . . . . . . . . . . . . . . . . . . . . . . . . . . . . . . . . . . . . 3
3. Especificaciones técnicas . . . . . . . . . . . . . . . . . . . . . . . . . . . . . . . . . . . . . . 5
4. Instalación . . . . . . . . . . . . . . . . . . . . . . . . . . . . . . . . . . . . . . . . . . . . . . . . . . 6
5. Funcionamiento . . . . . . . . . . . . . . . . . . . . . . . . . . . . . . . . . . . . . . . . . . . . . 8
6. Precauciones . . . . . . . . . . . . . . . . . . . . . . . . . . . . . . . . . . . . . . . . . . . . . . . . 9
7. Limpieza, Mantenimiento, y Cuidado . . . . . . . . . . . . . . . . . . . . . . . . . . . 9
7.1 Limpieza . . . . . . . . . . . . . . . . . . . . . . . . . . . . . . . . . . . . . . . . . . . . . . . . 9
7.2 Mantenimiento, y Cuidado . . . . . . . . . . . . . . . . . . . . . . . . . . . . . . . 10
8. Solución de problemas y reparación . . . . . . . . . . . . . . . . . . . . . . . . . . . 10
9. Condiciones ambientales . . . . . . . . . . . . . . . . . . . . . . . . . . . . . . . . . . . . 11
10. Embalaje . . . . . . . . . . . . . . . . . . . . . . . . . . . . . . . . . . . . . . . . . . . . . . . . . . 11
11. Garantía . . . . . . . . . . . . . . . . . . . . . . . . . . . . . . . . . . . . . . . . . . . . . . . . . . 11
2VERIWASH Manual del Usuario Whip Mix Corporation
1. INTRODUCCIÓN
Gracias por adquirir la unidad de limpieza automatizada de VERIWASH. VERIWASH limpia
eficazmente la resina no curada de las piezas impresas en 3D mediante el uso de alcohol
isopropílico (Isopropanol). A fin de asegurarse de que su VERIWASH le otorgue el más alto
nivel de rendimiento, revise y siga las instrucciones descritas en este Manual del Usuario y
guárdelo para futuras consultas.
The user manual is available in English at www.whipmix.com.
Das Benutzerhandbuch ist auf www.whipmix.com in deutscher Sprache verfügbar.
Le manuel d'utilisation est disponible en français sur le site www.whipmix.com.
Il manuale utente è disponibile in italiano sul sito https://www.whipmix.com.
1.1 DECLARACIÓN DE CONFORMIDAD CE
El marcado de CE ha sido examinado en VERIWASH de acuerdo con las
siguientes Directivas Europeas y normas:
Directiva de Compatibilidad Electromagnética 2014/30/EU
EN 61326-1:2013, Clase A (Inmunidad Básica)
EN 55011:2016 +A1:2017
EN 61000-3-2:2014
EN 61000-3-3:2013
EN 61010-1:2010 (Tercera Edición)
RoHS
EN 50581:2012
IEC 62321-3-1:2013
IEC 62321-8: 2017
1.2 TRANSPORTE DE LA UNIDAD
Al recibir la VERIWASH, examine el envío para determinar si algún artículo
falta, está defectuoso o dañado. Notifique a Whip Mix de cualquier falta,
defecto, o daño dentro del primer día de recibir el envío. Dentro de los 10 días
después de recibir dicho aviso, la empresa tomará medidas en función de los
hallazgos. Whip Mix reparará o reemplazará sin cargo cualquier pieza que se
compruebe que es defectuosa tanto en materiales como en mano de obra.
3VERIWASH Manual del Usuario Whip Mix Corporation
2. COMPONENTES
Adaptador de CA a CC con
cable: Suministra electricidad a la
VERIWASH.
Cuerpo principal (Base):
La pantalla táctil muestra la interfaz
de control con los botones MODE
[MODO], TIME [TIEMPO], START
[INICIO] y STOP [PARAR]. El botón
MODE selecciona qué recipiente de
lavado se usará. Las luces indicadoras
mostrarán qué recipiente de lavado es
seleccionado.
Canasta de Malla: La canasta
removible se usa para lavar piezas
que no están unidas a la plataforma
de construcción. Para limpiar las
piezas inserte y asegure la canasta
en el Recipiente de Lavado.
Plantilla de Placa de
Construcción Universal /
Varillas de Metal: Para limpiar
las piezas impresas mientras están
adjuntas a la placa de construcción
de la impresora, ponga las Varillas
de Metal (dos de ellas) en las
ranuras de la Plantilla Universal
correspondientes (posicionamiento
ajustable para adaptarse al tamaño
de la placa de construcción hasta
180mm × 90mm) (7.08” × 3.54”).
4VERIWASH Manual del Usuario Whip Mix Corporation
Recipientes de Lavado/
Tapas: Hay dos recipientes
removibles separados, cada uno
de ellos contiene hasta 3 litros de
isopropanol. Uno se utiliza para el
primer baño y el segundo para un
segundo baño (fresco). Cada uno
tiene su propia tapa. Un impulsor
giratorio en la parte inferior hace
circular el disolvente.
Cubierta Descartable del
Cuerpo Principal (PET
[tereftalato de polietileno]):
La cubierta de plástico transparente
está hecha con material resistente
al alcohol para proteger el cuerpo
principal de la unidad en caso de
derrames de alcohol o resina.
3. ESPECIFICACIONES TÉCNICAS
MODELO: LIMPIADORA DE PIEZAS IMPRESAS EN 3D
VERIWASH
Dimensiones del Producto: 24(L) × 24(A) × 35(Alt.) cm (9.45” × 9.45” × 13.8”)
Dimensiones del Paquete: 29(L) × 29(A) × 52(Alt.) cm (11.4” × 11.4” × 20.5”)
Peso del Producto: 3 kg (6.6 Ib)
Peso de Envío: 4.4 kg (9.7 Ib)
Potencia Nominal: 48W
Voltaje: CA 100~240 V, ~50 / 60 Hz
Sobretensión transitoria: 2.500 V
5VERIWASH Manual del Usuario Whip Mix Corporation
4. INSTALACIÓN
4.1 Coloque el Cuerpo Principal (la Base) sobre una superficie plana.
NOTA: La cubierta descartable de plástico transparente ya
está en su lugar. Este es un artículo descartable y puede ser
cambiado si se mancha por un derrame de resina o alcohol.
4.2 Coloque cada Recipiente de Lavado en el Cuerpo Principal. Asegúrese de
que cada uno encaje bien.
4.3 CON MUCHO CUIDADO llene el Recipiente de Lavado con 2.5 - 3.0 litros
de Isopropanol.
NOTA: Se recomienda separar un recipiente como primer
baño para las piezas que vienen directamente de la impresora,
y el otro recipiente como segundo baño, lleno de IPA
(ISOPROPANOL) fresco.
NOTA: Mantenga la Tapa cerrada cuando la VERIWASH no
está en uso para minimizar la tasa de evaporación del alcohol.
4.4 Utilice la Canasta de Malla solamente para lavar las piezas impresas en 3D
que no están unidas a la placa de construcción de la impresora.
NOTA: Para limpiar pequeñas piezas impresas en 3D, tales
como matrices o coronas individuales, hay dos opciones, como
se ve a continuación:
Póngalas en un contenedor redondo para infusión de té de acero
inoxidable de 3” (Whip Mix no lo vende; se puede comprar en
línea), luego insértelo en la canasta de malla tal como se muestra a
continuación.
En el caso de una impresora 3D con una placa de construcción
de hasta 180 mm x 90 mm (7.08” x 3.54”), cuando no se utilice el
contenedor redondo para infusión de té de acero inoxidable, mantenga
las piezas impresas unidas a la placa de construcción y use la Plantilla
de Placa de Construcción Universal como se indica en 4.5.
6VERIWASH Manual del Usuario Whip Mix Corporation
4.5 Utilice la Plantilla de Placa de Construcción Universal y las Varillas de
Metal para lavar las piezas impresas mientras estén unidas a la placa de
construcción y el tamaño de la placa de construcción sea de no más de
180 mm x 90 mm (7.08” x 3.54”).
4.5.1 Coloque las Varillas de Metal en las ranuras de la Plantilla Universal
según el tamaño de la placa de impresión de la impresora.
NOTA: Revise y ajuste la posición de las dos Varillas de
Metal varias veces hasta que la placa de construcción
encaje sobre ellas de forma segura.
4.5.2 Revise que la posición de la placa de construcción sobre las dos
Varillas de Metal sea adecuada; déjela apartada.
4.5.3 Inserte la Plantilla Universal con las Varillas de Metal posicionadas
dentro del Recipiente de Lavado.
4.5.4 Ajuste la placa de construcción de la impresora sobre las Varillas de
Metal posicionadas.
NOTA: Asegúrese de que las piezas impresas estén
totalmente fijas en la placa de construcción. Lavar piezas
sueltas directamente en el recipiente de lavado puede
dañar piezas impresas, hacer ruido e interferir con el
impulsor en la parte inferior.
4.6 Inserte la Canasta de Malla o la Plantilla Universal en el Recipiente de
Lavado como se indica en 4.4 o 4.5.
4.7 Inserte el cable de CA en el receptáculo, en la parte posterior de la unidad.
7VERIWASH Manual del Usuario Whip Mix Corporation
5. FUNCIONAMIENTO
5.1. Para encender la unidad, seleccione y pulse el botón MODE según el
Recipiente de Lavado que usted quiera utilizar - izquierdo, derecho, o
ambos. La luz LED (Azul) indica qué recipiente es seleccionado.
Izquierdo Derecho Ambos
5.2 Seleccione el TIEMPO [TIME] (3 min, 5 min, o 10 min).
NOTA: No se puede cambiar el tiempo una vez que el ciclo de
limpieza está en marcha.
5.3 No encienda la unidad hasta que los Recipientes, la Tapa/la Canasta de
Malla y la Plantilla Universal estén fijos en su posición adecuada.
5.4 Presione el botón START para comenzar el ciclo de lavado. El ciclo de
limpieza funcionará durante el período de tiempo seleccionado en la interfaz
de control. El impulsor invierte la dirección cada 60 segundos.
NOTA: La velocidad en la que el alcohol isopropílico se revuelve
es la misma para ambos Recipientes de Lavado y para cualquier
duración de limpieza (3, 5, o 10 minutos).
5.5 Para ajustar la velocidad de AMBOS recipientes, la unidad debe estar
en el modo OFF. Presione y sostenga los botones START y STOP
simultáneamente durante 5 a 7 segundos. Esto lo llevará al modo de control
de velocidad.
Para aumentar la velocidad: Presione el botón START repetidamente.
Para disminuir la velocidad: Presione el botón STOP repetidamente.
Para guardar la velocidad: Presione el botón MODE.
NOTA: No podrá ajustar la velocidad mientras el ciclo de
limpieza esté en marcha.
NOTA: Para finalizar el ciclo de limpieza antes de que termine,
presione el botón STOP.
NOTA: Al presionar el botón STOP, se cancela el tiempo
restante del ciclo de lavado.
8VERIWASH Manual del Usuario Whip Mix Corporation
6. PRECAUCIONES
Antes de ponerla en funcionamiento, lea el MANUAL DEL USUARIO DE LA
VERIWASH con atención. Siga las instrucciones para evitar errores, dañar el equipo o
que el usuario sufra una lesión.
No cambie la posición del Recipiente de Lavado mientras esté en marcha.
No permita que el agua o el alcohol penetren en el cuerpo principal de la VERIWASH.
Asegúrese de que en ningún momento se derrame alcohol isopropílico al llenar el
recipiente de lavado. El alcohol derramado puede dañar los componentes electrónicos
o el material básico.
Utilice solo accesorios autorizados (cable de alimentación con clasificación adecuada).
Consulte la ficha de datos de seguridad (SDS, por sus siglas en inglés) del proveedor
de alcohol como la principal fuente de información sobre el almacenamiento y
manipulación del alcohol.
El alcohol es inflamable y debe ser almacenado lejos de las fuentes de ignición.
Use guantes y manipule el alcohol en áreas bien ventiladas.
El alcohol se evapora rápidamente, por lo tanto, mantenga la(s) tapa(s) cerrada(s)
cuando sea posible.
No modifique la unidad. VERIWASH está diseñada para ser usada solamente según las
indicaciones.
Manténgala lejos de los niños.
No la ponga en funcionamiento con un cable o enchufe dañados. Un cable dañado solo
puede ser reemplazado por un cable de alimentación del mismo tipo.
Utilice solo equipos en buen estado.
Opere sobre una superficie despejada y plana.
Siempre utilice el equipo de la manera más segura.
Asegúrese de que los Recipientes de Lavado, las tapas y la canasta de malla estén bien
asegurados en sus correspondientes posiciones antes de comenzar un ciclo de limpieza.
7. LIMPIEZA, MANTENIMIENTO Y CUIDADO
7.1 LIMPIEZA
Limpie siempre el alcohol o la resina del cuerpo principal. Mantener
la tapa descartable sobre el cuerpo principal, en todo momento,
protegerá al cuerpo principal si se derrama alcohol.
Siempre desconecte el cable de alimentación antes de la limpieza o el
mantenimiento.
Saque el Recipiente de Lavado de la base.
Saque la Plantilla de Placa de Construcción Universal, la Canasta de
Malla y las Varillas de Metal del Recipiente de Lavado.
Saque todo el alcohol de los Recipientes de Lavado.
Limpie la parte interna de los Recipientes de Lavado con agua, y
páseles un trapo suave y limpio.
9VERIWASH Manual del Usuario Whip Mix Corporation
NOTA: Asegúrese de que toda el agua se seque
completamente antes de volver a llenar el recipiente y
poner la unidad en marcha.
Limpie la superficie exterior de la VERIWASH con alcohol isopropílico
o agua y use un trapo suave y limpio.
7.2 MANTENIMIENTO Y CUIDADO
Alcohol Isopropílico
El alcohol isopropílico debe ser cambiado periódicamente. Use
alcohol isopropílico de hasta 99%.
El alcohol isopropílico se puede usar en múltiples ciclos de limpieza,
pero la eficacia de la limpieza del alcohol reutilizado disminuirá
con cada ciclo de limpieza; según la resina utilizada y la geometría
de la pieza impresa. En caso de sedimentación de residuos
sólidos de polimerización, el alcohol usado debe ser cambiado
inmediatamente.
Debido a que el alcohol disminuye con el tiempo por su uso o
por evaporación, agregue alcohol nuevo para mantener el nivel
adecuado dentro del recipiente de lavado.
Reemplace el alcohol cuando el lavado ya no sea efectivo y cuando
las piezas impresas queden pegajosas aún después del lavado.
Únicamente el operador puede determinar cuándo hay que
cambiar el alcohol.
Tire el alcohol isopropílico usado de acuerdo con las normas
locales y nacionales.
Los accesorios pueden ser reemplazados si es necesario. Para comprar
accesorios y piezas de repuestos, visite WhipMix en shop.whipmix.com
o www.whipmix.com.
8. SOLUCIÓN DE PROBLEMAS Y REPARACIÓN
VERIWASH ha sido diseñada para que el usuario pueda reemplazar piezas o reparar la
unidad sin necesidad de enviarla a ninguna parte. Las piezas de repuesto están fácilmente
disponibles en www.shop.whipmix.com.
Si surgen problemas, consulte la tabla siguiente. Si necesita información adicional, mire los
vídeos correspondientes en el canal de Whip Mix en www.youtube.com.
Si aún no está satisfecho, consulte el contrato de garantía para determinar su curso de
acción. Si la unidad está fuera de garantía, comuníquese con Whip Mix al +502-637-1451.
10VERIWASH Manual del Usuario Whip Mix Corporation
Error Causa Solución
Ruido fuerte La alta concentración de Ajuste la velocidad – consulte el
resina en el alcohol (cambio proceso de operación.
de viscosidad) afecta la
velocidad de rotación
Ruido inusual Obstrucción en el Recipiente Revise si hay piezas sueltas o
de Lavado escombros en el fondo del balde.
Revise que el impulsor rota
adecuadamente.
La Pantalla no se apaga Problema de software Desconecte y vuelva a conectar la
alimentación (reiniciar).
La Pantalla no se prende Problema de software Desconecte y vuelva a conectar la
alimentación después de 1 a 2 min.
(reiniciar).
Conexión eléctrica Revise la fuente de alimentación.
defectuosa Pruebe con otro toma.
Desconecte y vuelva a conectar la
alimentación.
El motor está atascado Impulsor desalineado o Revise si hay piezas impresas sueltas
escombros pegados a su o escombros pegados bajo el
alrededor impulsor y sáquelos.
Revise la alineación del impulsor
y si la rotación es adecuada.
Comuníquese con Whip Mix para
recibir instrucciones.
9. CONDICIONES AMBIENTALES
Instalación: Para uso en interiores
Altitud: hasta 2.000 m
Temperatura/humedad de funcionamiento: 5–40°C / 20–80 %
Grado de polución: 2
Grado de protección: 1
10. EMBALAJE
Tenga cuidado al abrirlo.
Guarde el embalaje
Use la caja original cuando la envíe para algún servicio.
11. GARANTÍA
A partir de la fecha de compra Whip Mix Corporation ofrece un año de garantía para la
VERIWASH. Whip Mix Corporation garantiza que la VERIWASH está libre de defectos de
materiales y de mano de obra. Consulte el contrato de garantía que está por separado en
www.whipmix.com, para conocer la cobertura de la garantía y los detalles del servicio.
11Whip Mix Corporation 361 Farmington Avenue Louisville, KY USA 40209
800-626-5651 502-637-1451 www.whipmix.com
02/21 REV DVeriWash
BENUTZER-
HANDBUCH
REINIGUNGSSTATION FÜR
3D-DRUCKTEILE
Whip Mix Corporation 361 Farmington Avenue Louisville, KY USA 40209
800-626-5651 502-637-1451 www.whipmix.comVERIWASH Benutzerhandbuch Whip Mix Corporation
INHALT
1. Einleitung . . . . . . . . . . . . . . . . . . . . . . . . . . . . . . . . . . . . . . . . . . . . . . . . . . . 2
1.1 CE-Konformitätserklärung . . . . . . . . . . . . . . . . . . . . . . . . . . . . . . . . 2
1.2 Transport des Geräts . . . . . . . . . . . . . . . . . . . . . . . . . . . . . . . . . . . . . 3
2. Bestandteile . . . . . . . . . . . . . . . . . . . . . . . . . . . . . . . . . . . . . . . . . . . . . . . . 3
3. Technische Daten . . . . . . . . . . . . . . . . . . . . . . . . . . . . . . . . . . . . . . . . . . . . 5
4. Aufstellen des Geräts . . . . . . . . . . . . . . . . . . . . . . . . . . . . . . . . . . . . . . . . 6
5. Betrieb . . . . . . . . . . . . . . . . . . . . . . . . . . . . . . . . . . . . . . . . . . . . . . . . . . . . . 8
6. Wichtige Sicherheitshinweisee . . . . . . . . . . . . . . . . . . . . . . . . . . . . . . . . . 9
7. Reinigung, Pflege und Wartung . . . . . . . . . . . . . . . . . . . . . . . . . . . . . . . . 9
7.1 Reinigung . . . . . . . . . . . . . . . . . . . . . . . . . . . . . . . . . . . . . . . . . . . . . . . 9
7.2 Pflege und Wartung . . . . . . . . . . . . . . . . . . . . . . . . . . . . . . . . . . . . . 10
8. Fehlersuche und -behebung . . . . . . . . . . . . . . . . . . . . . . . . . . . . . . . . . . 11
9. Betriebsbedingungen . . . . . . . . . . . . . . . . . . . . . . . . . . . . . . . . . . . . . . . . 12
10. Verpackung . . . . . . . . . . . . . . . . . . . . . . . . . . . . . . . . . . . . . . . . . . . . . . . . 12
11. Garantie . . . . . . . . . . . . . . . . . . . . . . . . . . . . . . . . . . . . . . . . . . . . . . . . . . 12
2VERIWASH Benutzerhandbuch Whip Mix Corporation
1. EINLEITUNG
Wir freuen uns, dass Sie sich für die automatische Reinigungsstation VERIWASH
entschieden haben. VERIWASH entfernt ungehärtetes Druckharz von 3D-Druckteilen auf
effiziente Weise unter Verwendung von Isopropylalkohol (Isopropanol). Um sicherzustellen,
dass Ihre VERIWASH Ihnen das optimale Leistungsniveau bietet, sollten Sie die Richtlinien in
diesem Benutzerhandbuch befolgen. Lesen Sie sich daher das Benutzerhandbuch gründlich
durch und bewahren Sie es so auf, dass Sie bei Bedarf darauf zurückgreifen können.
The user manual is available in English at www.whipmix.com.
Le manuel d'utilisation est disponible en français sur le site www.whipmix.com.
El manual del usuario se encuentra disponible en español en www.whipmix.com.
Il manuale utente è disponibile in italiano sul sito https://www.whipmix.com.
1.1 CE-KONFORMITÄTSERKLÄRUNG
VERIWASH wurde gemäß der folgenden europäischen Richtlinie und Normen für
die CE-Kennzeichnung geprüft:
Richtlinie 2014/30/EU über die elektromagnetische Verträglichkeit
(EMV-Richtlinie)
EEN 61326-1:2013, Klasse A
EN 55011:2016 + A1:2017
EN 61000-3-2:2014
EN 61000-3-3:2013
EN 61010-1:2010 (dritte Fassung)
RoHS-Richtlinien
EN 50581:2012
IEC 62321-3-1:2013
IEC 62321-8: 2017
1.2 TRANSPORT DES GERÄTS
Prüfen Sie das Gerät bei Erhalt der Lieferung auf Vollständigkeit und
Unversehrtheit. Benachrichtigen Sie Whip Mix innerhalb von 1 Tag nach Erhalt
der Lieferung über jedwede Beschädigungen oder Mängel. Whip Mix wird den
Vorgang innerhalb von 10 Tagen nach Erhalt einer solchen Benachrichtigung
prüfen und entsprechende Maßnahmen ergreifen. Bei erwiesenen Material- und/
oder Verarbeitungsfehlern wird das betroffene Teil kostenlos repariert oder
ersetzt.
3VERIWASH Benutzerhandbuch Whip Mix Corporation
2. BESTANDTEILE
Netzteil mit Kabel: versorgt die
VERIWASH mit Strom.
Gerätekörper (Sockel): Der
Touchscreen stellt die Bedienoberfläche
mit den Tasten MODE, TIME, START
und STOP dar. Mittels der MODE-
Taste wird der zu verwendende
Waschbehälter ausgewählt. Die
Anzeigeleuchten geben an, welcher
Waschbehälter ausgewählt wurde.
Siebkorb: Der herausnehmbare
Siebkorb wird zur Reinigung von
Teilen verwendet, die nicht an der
Aufbauplattform befestigt sind. Dazu
wird der Korb in den Waschbehälter
eingesetzt und gesichert.
Universal-Haltevorrichtung
für Aufbauplattformen und
Metallstäbe: Um die Druckteile zu
reinigen, während sie noch auf der
Aufbauplatte des Druckers befestigt
sind, platzieren Sie die Metallstäbe (zwei
Stück) in den entsprechenden Schlitzen
der Universal-Haltevorrichtung, die auf
diese Weise für Aufbauplatten bis zu
einer Größe von 180 x 90 mm genutzt
werden kann.
4VERIWASH Benutzerhandbuch Whip Mix Corporation
Waschbehälter/Deckel: Die
VERIWASH ist mit zwei separaten
herausnehmbaren Waschbehältern
ausgestattet, die jeweils bis zu 3 Liter
Isopropanol fassen. Ein Waschbehälter
dient für die erste Reinigung, der zweite
für das zweite (frische) Bad. Beide
Waschbehälter verfügen über einen
separaten Deckel. Ein rotierendes
Flügelrad am Boden der Behälter sorgt
für die Zirkulation des Lösungsmittels.
Gehäuseabdeckung aus PET
(austauschbar): Die durchsichtige
Kunststoffabdeckung besteht aus
alkoholbeständigem Material und
dient dem Schutz des Gerätekörpers
vor verschüttetem Alkohol oder
Druckharz.
3. TECHNISCHE DATEN
MODELL: VERIWASH-REINIGUNGSSTATION FÜR
3D-DRUCKTEILE
Gerätemaße: 24 cm (L) × 24 cm (B) × 35 cm (H)
Versandmaße: 29 cm (L) × 29 cm (B) × 52 cm (H)
Gerätegewicht: 3 kg
Versandgewicht: 4,4 kg
Nennleistung: 48 W
Netzspannung: 100~240 V, ~50 / 60 Hz
Transiente Überspannung: 2.500 V
5VERIWASH Benutzerhandbuch Whip Mix Corporation
4. AUFSTELLEN DES GERÄTS
4.1 Platzieren Sie den Gerätekörper (Sockel) auf einer ebenen Oberfläche.
HINWEIS: Die durchsichtige Kunststoffabdeckung ist bereits
aufgesetzt. Dabei handelt es sich um ein Verschleißteil, das
ersetzt werden kann, wenn es durch verschüttetes Harz oder
Alkohol verschmutzt wird.
4.2 Platzieren Sie beide Waschbehälter auf dem Gerätekörper. Achten Sie dabei
auf sicheren Sitz.
4.3 Füllen Sie die beiden Behälter VORSICHTIG mit 2,5 bis 3,0 Liter Isopropanol.
HINWEIS: Wir empfehlen, einen der Behälter als den Behälter
für das erste Bad (für Teile, die direkt aus dem Drucker
kommen) und den anderen als den Behälter für das zweite Bad
(mit frischen Isopropanol) festzulegen.
HINWEIS: Halten Sie die Deckel geschlossen, wenn die
VERIWASH nicht in Gebrauch ist, um die Verdunstungsrate des
Alkohols zu minimieren.
4.4 Benutzen Sie den Siebkorb nur zur Reinigung von 3D-Druckteilen, die nicht
an der Aufbauplattform des Druckers befestigt sind.
HINWEIS: Um kleine Druckteile (wie Modelle einzelner Zähne
oder Kronen) zu reinigen, gibt es zwei Möglichkeiten:
Tun Sie sie in ein kugelförmiges Teesieb (siehe Abbildung) aus Edelstahl
mit einem Durchmesser von bis zu 7,5 cm und legen Sie dieses in den
Siebkorb. (Whip Mix verkauft keine Teesiebe, diese sollten jedoch online
problemlos erhältlich sein.)
Falls Sie einen 3D-Drucker mit einer Aufbauplattform von bis zu 180 x
90 mm Größe verwenden, können Sie die Druckteile alternativ auch auf
der Aufbauplattform belassen. Verfahren Sie dann so, wie unter
4.5 beschrieben.
6VERIWASH Benutzerhandbuch Whip Mix Corporation
4.5 Nutzen Sie die Universal-Haltevorrichtung und die Metallstäbe, um
Druckteile zu reinigen, die noch auf der Aufbauplattform befestigt sind. Dies
ist bei Aufbauplattformen von einer Größe von bis zu 180 x 90 mm möglich.
4.5.1 Stecken Sie die Metallstäbe in die für Ihre Aufbauplattform passenden
Schlitze der Universal-Haltevorrichtung.
HINWEIS: Achten Sie unbedingt auf einen sicheren Halt
der Aufbauplattform und passen Sie die Position der
beiden Metallstäbe bei Bedarf an.
4.5.2 Überprüfen Sie noch einmal, dass die Metallstäbe richtig positioniert
sind. Stellen Sie die Aufbauplatte dann beiseite.
4.5.3 Setzen Sie die Universal-Haltevorrichtung mit den passend
positionierten Metallstäben in den Waschbehälter ein.
4.5.4 Sichern Sie die Aufbauplattform des Druckers auf den Metallstäben.
HINWEIS: Achten Sie auch darauf, dass die Druckteile
fest auf der Aufbauplattform sitzen. Die Reinigung loser
Teile direkt im Waschbehälter kann zu Beschädigungen
der Druckteile sowie zu Lärmentwicklung führen und die
Funktion des Flügelrads am Behälterboden stören.
4.6 Setzen Sie entweder den Siebkorb oder die Universal-Haltevorrichtung in
den Waschbehälter ein, wie in Punkt 4.4 bzw. 4.5 beschrieben.
4.7 Schließen Sie das Netzteil an die Anschlussdose auf der Rückseite des
Geräts an.
7VERIWASH Benutzerhandbuch Whip Mix Corporation
5. BETRIEB
5.1. Um das Gerät einzuschalten, betätigen Sie zunächst die MODE-Taste zur
Auswahl des Waschbehälters, den Sie benutzen wollen: linker Behälter,
rechter Behälter oder beide Behälter. Die blaue LED zeigt die aktuelle
Auswahl an.
links rechts beide
5.2 Wählen Sie dann mittels der TIME-Taste die Waschdauer aus (3, 5 oder
10 min).
HINWEIS: Wenn der Waschzyklus läuft, kann die Dauer nicht
mehr geändert werden.
5.3 Starten Sie das Gerät erst, nachdem Sie sich versichert haben, dass die
Behälter, die Deckel sowie der Siebkorb bzw. die Universal-Haltevorrichtung
sicher eingesetzt sind.
5.4 Betätigen Sie die START-Taste, um den Reinigungszyklus zu starten. Dieser
läuft für die zuvor eingestellte Dauer. Währenddessen ändert das Flügelrad
alle 60 Sekunden seine Richtung.
HINWEIS: Die Geschwindigkeit, mit der der Isopropylalkohol
gerührt wird, ist für beide Waschbehälter und jede
Reinigungsdauer (3, 5 oder 10 Minuten) identisch.
5.5 Um die Geschwindigkeit für BEIDE Behälter zu ändern, muss das
Gerät AUSgeschaltet sein. Halten Sie die START- und die STOP-Taste
gleichzeitig 5-7 Sekunden lang gedrückt. Dadurch wird das Gerät in den
Geschwindigkeits-Einstellmodus versetzt.
Um die Rührgeschwindigkeit zu erhöhen: betätigen Sie wiederholt die
START-Taste.
Um die Rührgeschwindigkeit zu verringern: betätigen Sie wiederholt die
STOP-Taste.
Um die eingestellte Geschwindigkeit zu speichern: betätigen Sie die
MODE-Taste.
HINWEIS: Während eines laufenden Reinigungszyklus lässt sich
die Geschwindigkeit nicht ändern.
8VERIWASH Benutzerhandbuch Whip Mix Corporation
HINWEIS: Betätigen Sie die STOP-Taste, um einen
Reinigungszyklus vorzeitig zu beenden.
HINWEIS: Die STOP-Taste fungiert nicht als Pausentaste,
sondern bricht den Reinigungszyklus ab.
6. WICHTIGE SICHERHEITSHINWEISE
Lesen Sie sich das BENUTZERHANDBUCH gründlich durch, ehe Sie die VERIWASH
in Betrieb nehmen. Befolgen Sie die Anweisungen, um Fehler, Geräteschäden und
Verletzungen zu vermeiden.
Ändern Sie Position der Waschbehälter nicht bei laufendem Gerät.
Verhindern Sie, dass Wasser oder Alkohol in den Gerätekörper der VERIWASH
gelangen.
Achten Sie immer darauf, keinen Alkohol zu verschütten, wenn Sie die Waschbehälter
füllen. Verschütteter Alkohol kann die Elektronik oder das Material des Gerätekörpers
beschädigen.
Nutzen Sie ausschließlich zugelassenes Zubehör (Netzkabel mit entsprechender
Leistung).
Konsultieren Sie das Sicherheitsdatenblatt des Alkohol-Herstellers als wichtigste Quelle
für Hinweise zur Lagerung und Handhabung des Isopropylalkohols.
Alkohol ist leicht entzündlich und darf daher nicht in der Nähe von Zündquellen
gelagert werden.
Hantieren Sie nur in gut belüfteten Räumen mit Isopropylalkohol und tragen Sie dabei
Handschuhe.
Alkohol verdunstet schnell. Halten Sie daher die Behälterdeckel nach Möglichkeit
geschlossen.
Nehmen Sie keine Veränderungen an dem Gerät vor. Die VERIWASH ist nur für den
bestimmungsgemäßen Gebrauch vorgesehen.
Halten Sie Kinder von dem Gerät fern.
Betreiben Sie das Gerät nicht, wenn Netzstecker oder Netzkabel Beschädigungen
aufweisen. Ein beschädigtes Netzkabel darf nur durch ein Kabel desselben Typs ersetzt
werden.
Benutzen Sie nur gut gewartete Ausstattung.
Betreiben Sie das Gerät auf einer aufgeräumten und ebenen Arbeitsfläche.
Gehen Sie bei der Nutzung des Geräts konzentriert und umsichtig vor.
Achten Sie darauf, dass die Waschbehälter, die Deckel und der Siebkorb vor Beginn
eines Reinigungszyklus sicher an ihrem Platz sind.
7. REINIGUNG, PFLEGE UND WARTUNG
7.1 REINIGUNG
Vermeiden Sie, dass der Gerätekörper mit Alkohol oder Druckharz in
Berührung kommt. Belassen Sie die Kunststoffabdeckung immer auf
dem Gerätekörper, um ihn vor verschüttetem Alkohol zu schützen.
9VERIWASH Benutzerhandbuch Whip Mix Corporation
Ziehen Sie vor der Reinigung/Wartung immer als erstes den
Netzstecker.
Nehmen Sie die Waschbehälter aus dem Sockel.
Entfernen Sie die Universal-Haltevorrichtung, den Siebkorb und die
Metallstäbe aus dem Waschbehälter.
Entfernen Sie sämtlichen verbliebenen Alkohol aus den Waschbehältern.
Reinigen Sie das Behälterinnere mit Wasser und wischen Sie sie mit
einem weichen, sauberen Lappen trocken.
HINWEIS: Stellen Sie sicher, dass die Behälter innen
komplett trocken sind, ehe Sie den Alkohol einfüllen und
das Gerät in Betrieb nehmen.
Wischen Sie die Außenseite der VERIWASH mit einem weichen
sauberen Lappen mit Isopropylalkohol oder Wasser ab.
7.2 PFLEGE UND WARTUNG
Isopropylalkohol
Der Isopropylalkohol sollte regelmäßig gewechselt werden.
Benutzen Sie bis zu 99%igen Isopropylalkohol.
Der Isopropylalkohol kann für mehrere Reinigungszyklen verwendet
werden. Allerdings verringert sich die Wirksamkeit des Alkohols
mit jedem Reinigungszyklus in Abhängigkeit von dem verwendeten
Druckharz und der Form der Druckteile. Wenn sich feste
Polymerisationsrückstände absetzen, muss der verwendete Alkohol
sofort gewechselt werden.
Füllen Sie frischen Alkohol nach, wenn sich der Alkoholpegel im
Behälter im Laufe der Zeit durch Gebrauch oder Verdunstung
verringert.
Ersetzen Sie den Alkohol komplett, wenn die Reinigung an
Wirksamkeit verliert oder die Druckteile sich auch nach dem
Waschvorgang klebrig anfühlen.
Wann der Alkohol ausgetauscht werden muss, liegt im Ermessen
des Betreibers des Geräts.
Stellen Sie sicher, dass der Isopropylalkohol sachgerecht und
vorschriftsgemäß entsorgt wird.
Zubehörteile können bei Bedarf ersetzt werden. Ersatzteile und
Zubehör erhalten Sie von Whip Mix unter shop.whipmix.com oder
www.whipmix.com.
10VERIWASH Benutzerhandbuch Whip Mix Corporation
8. FEHLERSUCHE UND -BEHEBUNG
Die VERIWASH-Reinigungsstation wurde bewusst so konzipiert, dass der Benutzer Teile
austauschen oder das Gerät selbst reparieren kann, ohne dass es eingesendet werden muss.
Ersatzteile sind unter www.shop.whipmix.com verfügbar.
Falls Probleme auftreten, konsultieren Sie die nachstehende Tabelle. Auf dem Whip-Mix-
Kanal auf www.youtube.com stehen darüber hinaus Videos zur Hilfestellung zur Verfügung.
Sollte das Problem auf diese Weise nicht gelöst werden können, lesen Sie in der
Garantievereinbarung nach, welche Handlungsmöglichkeiten Sie haben. Falls die
Garantiezeit bereits abgelaufen ist, wenden Sie sich unter der Rufnummer +502-637-1451
an Whip Mix.
Fehler Ursache Behebung
Lärmentwicklung Eine hohe Harzkonzentration Passen Sie die Geschwindigkeit an
im Alkohol (siehe Kapitel „Betrieb“)
(Viskositätsänderung)
wirkt sich auf die
Rotationsgeschwindigkeit aus.
ungewöhnliche Fremdkörper im Überprüfen Sie den Boden des
Geräusche Waschbehälter Waschbehälters auf lose Teile und
Harzrückstände.
Stellen Sie sicher, dass sich das
Flügelrad unbehindert drehen kann..
Display schaltet sich Softwareproblem Ziehen Sie den Netzstecker und
nicht aus stecken Sie ihn dann wieder ein
(Neustart).
Display lässt sich nicht Softwareproblem Ziehen Sie den Netzstecker und
einschalten stecken Sie ihn nach 1-2 Minuten
wieder ein (Neustart).
fehlerhafter Stromanschluss Überprüfen Sie die Stromversorgung.
Probieren Sie eine andere Steckdose
aus.
Ziehen Sie den Netzstecker und
stecken Sie ihn dann wieder ein.
Motor blockiert verkantetes Flügelrad Überprüfen Sie, ob sich lose Teile
oder Behinderung durch oder Harzrückstände unter dem
Fremdkörper Flügelrad verkeilt haben.
Prüfen Sie, ob das Flügelrad gerade
ausgerichtet ist und sich frei drehen
kann. Wenden Sie sich an Whip Mix,
um Hilfestellung zu erhalten.
119. BETRIEBSBEDINGUNGEN
Aufstellung: Nur zur Verwendung in Innenräumen.
Höhenlage: bis zu 2.000 m
Betriebstemperatur/Luftfeuchtigkeit: 5–40 °C / 20–80 %
Verschmutzungsgrad: 2
Schutzart: 1
10. VERPACKUNG
Vorsicht beim Öffnen und Entfernen der Verpackung.
Bewahren Sie die Verpackung auf.
Schicken Sie das Gerät im Reparaturfall in der Originalverpackung ein.
11. GARANTIE
Die Whip Mix Corporation gewährt auf VERIWASH eine Garantie von einem Jahr ab
dem Kaufdatum. Die Whip Mix Corporation gewährleistet, dass die VERIWASH frei von
Material- und Verarbeitungsfehlern ist. Weitere Hinweise zu den Geltungsbedingungen der
Garantie und zum Kundendienst finden Sie in der Garantievereinbarung unter
www.whipmix.com.
Whip Mix Corporation 361 Farmington Avenue Louisville, KY USA 40209
           800-626-5651 502-637-1451 www.whipmix.com

                                                              02/21 REV D
VeriWash
GUIDE
D’UTILISATION
NETTOYEUR DE PIÈCES
IMPRIMÉES EN 3D
Whip Mix Corporation 361 Farmington Avenue Louisville, KY USA 40209
800-626-5651 502-637-1451 www.whipmix.comVERIWASH Guide d’utilisation Whip Mix Corporation
CONTENU
1. Introduction . . . . . . . . . . . . . . . . . . . . . . . . . . . . . . . . . . . . . . . . . . . . . . . . 2
1.1 Déclaration de conformité CE . . . . . . . . . . . . . . . . . . . . . . . . . . . . . 2
1.2 Transport de l'unité . . . . . . . . . . . . . . . . . . . . . . . . . . . . . . . . . . . . . . 3
2. Composants . . . . . . . . . . . . . . . . . . . . . . . . . . . . . . . . . . . . . . . . . . . . . . . . 3
3. Caractéristiques techniques . . . . . . . . . . . . . . . . . . . . . . . . . . . . . . . . . . . 5
4. Installation . . . . . . . . . . . . . . . . . . . . . . . . . . . . . . . . . . . . . . . . . . . . . . . . . . 6
5. Fonctionnement . . . . . . . . . . . . . . . . . . . . . . . . . . . . . . . . . . . . . . . . . . . . . 8
6. Mises en garde . . . . . . . . . . . . . . . . . . . . . . . . . . . . . . . . . . . . . . . . . . . . . . 9
7. Nettoyage, entretien et maintenance . . . . . . . . . . . . . . . . . . . . . . . . . . . 9
7.1 Nettoyage . . . . . . . . . . . . . . . . . . . . . . . . . . . . . . . . . . . . . . . . . . . . . . 9
7.2 Entretien et maintenance . . . . . . . . . . . . . . . . . . . . . . . . . . . . . . . . . 10
8. Dépannage et réparation . . . . . . . . . . . . . . . . . . . . . . . . . . . . . . . . . . . . 10
9. Conditions environnementales . . . . . . . . . . . . . . . . . . . . . . . . . . . . . . . . 11
10. Emballage . . . . . . . . . . . . . . . . . . . . . . . . . . . . . . . . . . . . . . . . . . . . . . . . . 11
11. Garantie . . . . . . . . . . . . . . . . . . . . . . . . . . . . . . . . . . . . . . . . . . . . . . . . . . 11
2VERIWASH Guide d’utilisation Whip Mix Corporation
1. INTRODUCTION
Merci d'avoir acheté l'appareil de nettoyage automatique VERIWASH. VERIWASH nettoie
efficacement la résine non durcie des pièces imprimées en 3D, à l'aide d'alcool isopropylique
(isopropanol). Pour vous assurer que votre VERIWASH vous donne le plus haut niveau de
performance, passez en revue et suivez les directives décrites dans ce guide d'utilisation et
conservez le guide pour référence ultérieure.
The user manual is available in English at www.whipmix.com.
Das Benutzerhandbuch ist auf www.whipmix.com in deutscher Sprache verfügbar.
El manual del usuario se encuentra disponible en español en www.whipmix.com.
Il manuale utente è disponibile in italiano sul sito https://www.whipmix.com.
1.1 DÉCLARATION DE CONFORMITÉ CE
VERIWASH a été testé pour le marquage « CE », conformément à la directive et
aux normes européennes suivantes :
Directive sur la compatibilité électromagnétique 2014/30/EU
EN 61326-1:2013, Classe A (exigences de base relatives à l'immunité)
EN 55011:2016 +A1:2017
EN 61000-3-2:2014
EN 61000-3-3:2013
EN 61010-1:2010 (3e édition)
RoHS
EN 50581:2012
IEC 62321-3-1:2013
IEC 62321-8: 2017
1.2 TRANSPORT DE L'UNITÉ
À la réception du VERIWASH, examinez la livraison pour déterminer si certains
articles sont manquants, défectueux ou endommagés. Informez Whip Mix
de tout manque, défaut ou dommage dans un délai d'un jour à compter de
la réception de la livraison. Dans les 10 jours suivant la réception de cet avis,
l'entreprise prendra des mesures en fonction des constatations. Whip Mix
réparera ou remplacera gratuitement toute pièce si un défaut de matériau ou
de fabrication est avéré.
3VERIWASH Guide d’utilisation Whip Mix Corporation
2. COMPOSANTS
Adaptateur CA à CC avec
câble : Fournit l'alimentation
électrique au VERIWASH.
Corps principal (Base) :
L'écran tactile affiche l'interface
de commande avec les touches
MODE, TIME, START et STOP.
La touche MODE permet de
sélectionner le récipient de lavage
à utiliser. Des voyants lumineux
indiquent quel récipient de lavage
est sélectionné.
Panier en mailles : Le panier
amovible est utilisé pour laver les
pièces qui ne sont pas fixées au
plateau d’impression. Le panier est
inséré et fixé dans le récipient de
lavage pour nettoyer les pièces.
Gabarit universel pour
plateau d’impression / tiges
métalliques : Pour nettoyer
les pièces imprimées pendant
qu'elles sont fixées au plateau
de l'imprimante, placez les tiges
métalliques (deux d'entre elles) dans
les fentes appropriées du gabarit
universel (positionnement réglable
pour s'adapter aux dimensions du
plateau jusqu'à 180 mm × 90 mm).
4VERIWASH Guide d’utilisation Whip Mix Corporation
Récipients de lavage /
couvercles : Il y a deux récipients
amovibles distincts, chacun
pouvant contenir jusqu'à 3 litres
d'isopropanol. L'un est utilisé pour
le premier bain, et le second pour
un second bain (propre). Chacun a
son propre couvercle. Une turbine
rotative située au fond fait circuler le
solvant.
Couvercle de corps principal
jetable (PET) : Le couvercle en
plastique transparent est fait d'un
matériau résistant à l'alcool pour
protéger le corps principal de
l'unité contre l'alcool ou la résine
renversé(e).
3. CARACTÉRISTIQUES TECHNIQUES
MODÈLE : NETTOYEUR DE PIÈCES IMPRIMÉES EN 3D
VERIWASH
Dimensions du produit : 24 x 24 x 35 cm (9,45 × 9,45 × 13,8 po)
[Long. x larg. x haut.]
Dimensions de l’emballage : 29 x 29 x 52 cm (11,4 × 11,4 × 20,5 po)
[Long. x larg. x haut.]
Poids du produit : 3 kg (6,6 lb)
Poids à l’expédition : 4,4 kg (6,6 lb)
Puissance nominale : 48 W
Tension : CA 100 à 240 V, 50 / 60 Hz (environ)
Surtension transitoire : 2 500 V
5VERIWASH Guide d’utilisation Whip Mix Corporation
4. INSTALLATION
4.1 Placez le corps principal (base) sur une surface plane.
REMARQUE : Le couvercle en plastique transparent jetable est
déjà en place. C'est un article jetable et il peut être changé s'il
est souillé par de la résine ou de l'alcool renversé(e).
4.2 Installez chaque récipient de lavage sur le corps principal. Assurez-vous de
bien enclencher les deux.
4.3 Remplissez DÉLICATEMENT le récipient de lavage de 2,5 à 3 litres
d'isopropanol.
REMARQUE : Il est recommandé de dédier un récipient pour
le premier bain pour les pièces provenant directement de
l'imprimante, et l'autre récipient pour un second bain, rempli
d'IPA propre (ISOPROPANOL).
REMARQUE : Gardez le couvercle fermé lorsque le VERIWASH
n'est pas utilisé afin de minimiser le taux d'évaporation de
l'alcool.
4.4 Utilisez le panier à mailles uniquement pour laver les pièces imprimées en
3D qui ne sont pas fixées au plateau de l'imprimante.
REMARQUE : Pour nettoyer de petites pièces imprimées en 3D,
telles que des matrices ou des couronnes individuelles, il existe
deux options :
Mettez les pièces dans une boule à thé en acier inoxydable de 3 po (non
vendue par Whip Mix; peut être achetée en ligne), puis placer la boule
dans le panier en mailles comme illustré ci-dessous.
Pour une imprimante 3D avec une taille de plateau jusqu'à 180 mm x
90 mm, lorsque vous n'utilisez pas la boule à thé en acier inoxydable,
gardez les pièces imprimées fixées au plateau et utilisez le gabarit
universel pour plateau de fabrication comme indiqué au point 4.5.
6You can also read