SMART WIFI LED BULB - BNETA
←
→
Page content transcription
If your browser does not render page correctly, please read the page content below
IoT
                         Smart WiFi LED Bulb
      FEATURES
 C
        Apps available for                                            IMPORTANT
        Android and Apple smart
 M
        phones                                                          Please read before
        Remotely control via                                             using this product
 Y      phone
        No hubs
CM      Set your schedule
        Dimmable & RGB color
        light selectable
MY
        Adjustable color
        temperature
CY      Group Bulbs
        Sharing feature
CMY

 K

      User Manual
      BNETA International
      Section 14, Sheldon Place, 5 Lone Close, Lonehill, South Africa, 2191
      sales@bneta.co.za
      www.bneta.co.za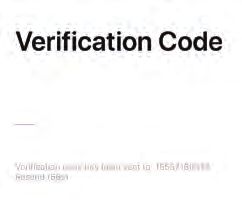
IMPORTANT INFORMATION
RISK OF ELECTRONIC SHOCK OR BURNS - USE IN DRY LOCATION ONLY. Do not use outdoors, with wet
hands, or when standing on wet or damp surfaces.
NOT FOR USE IN TOTALLY ENCLOSED LUMINAIRES. DO NOT USE WITH DIMMERS.
Please make sure voltage of the LED bulb is compatible with the mains electricity of your country before
connecting to a bulb holder. Ensure that the base of the bulb matches the bulb holder.
APP DOWNLOAD AND QUICK START GUIDE
C
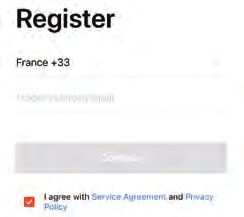
Download iO.e app from App Store or Google play. Register account on your iO.e app.
M
Search “iO.e” on App Store or Google play, or scan the barcode on the right to
download.
Y
Click “Agree” on the Privacy Policy page.
CM
Select your country code, enter the cellphone number We’ll send you a verification code. Enter it in the
MY or email address and the tap “Continue” to get a “Verification Code” field, set your password and tap
message containing a verification code. “Login”.
CY
CMY
KAPP INSTALLATION
When logged in , click “Add Home” to go
to the “Add Household” page. Set a
name and enter the address of the Home.
Select rooms for the Home. Click “Done”
at the top right corner to complete room
settings.
Room settings can be changed anytime
C by clicking on “My Household” as shown
in Picture 3.
M
Y
Picture 1. Picture 2.
CM
My
MYHome
HOME
MY
Click the pull-down iO.e
arrow at the top left
CY
corner of “My
Household” to add a
CMY house hold and
manage households.
K
One account can
manage multiple
households at the
same time. The user
can operate a device in
a household by
selecting it in the
household menu.
Picture 3. Picture 4. Picture 5.ADD DEVICE
Step One: Screw in the smart WiFi bulb. Power on.
Step Two: Add Device.
iO.e
C
M
Y
CM
MY
CY
Tap “+” or “Add Select “Smart Bulb”. Make sure the bulb quickly Enter Wi-Fi Password and
CMY Device” button . The flashes and then tap click “Confirm” to connect.
Select Device Type “Confirm light rapidly
page appears. blank”. The “Adding device
K
Click “All”. succeeded”message
If the light is not flashing appears after you
quickly, turn the bulb off connection completed.
and on for 3 times until it
quickly flashes.RESET DEVICE
When the current Internet status is unstable, use the AP Mode to connect.
C

 M

 Y

CM

MY

CY

CMY

 K
Turn off-on the light for 3 times Select Wi-Fi and input the The app page goes through the
until light is slowly flashing. Then password. changes during the configuration
tap “Confirm light slowly blink”. process and then once connected,
Open the mobile device’s wireless the “Adding device succeeded”
settings, connect to the hot spot message will be displayed.
named “SmartLife-XXXX”.CONTROL PANEL
After selecting an Bulb Light from the ‘Devices’ screen, the Smart Switch Control Panel screen appears.
CONTROL PANEL: LIGHT ON
Tap the light image in the middle to switch the light ON or OFF. When the light is switched on, the Control Panel options
are displayed. The Schedule option at the bottom allows you to add scheduled timers for turning the light on/off.
CONTROL PANEL: LIGHT OFF
Tap the light image in the middle to switch the light ON or OFF. When the light switched off, the Control Panel options are
displayed. The Schedule option at the bottom allows you to add scheduled timers for turning the light on/off.
C
CONTROL PANEL OPTIONS
When the Smart Bulb is switched on, the Control Panel options are displayed. The following options appear: Adjust
M
(applied to white, CCT and RGBW model), Colour (applied to RGB and RGBW model); Scene; Schedule.
Adjust: Adjust white brightness and/or change color temperature (applied to white, CCT and RGBW model).
Y Colour: Choose colour and edit the brightness and concentration (applied to RGB and RGBW model).
Scene: Select a scene and edit by clicking on the pencil icon.
Schedule: Adds scheduled timers for turning the bulb on/off.
CM
MY
CY
CMY
K
LIGHT ON LIGHT OFF SCENEDEVICE MODIFICATION MENU
When click the “…” on the top right, The device modification menu appears.
The device modification menu is shown in the picture:
Change basic information: You can change the name and location of a device.
Share devices: You can share any individual device with others by entering their
C
mobile phone numbers. (Note: Their mobile phone numbers must be registered
with GSE Home Control app.)
M Create group: All the devices have been added and with the smae model
number will appear when you click. A group cannot be created for devices with
different model numbers.
Y
Device information: Check device ID, Wi-Fi signal strength, IP address, Mac
address and device time zone.
CM Feedback: You can submit feedback on problems encountered during usage.
Check for Firmware update: You can check the firmware version and update.
Remove device: Delete a previously added device from the list of devices.
MY
Factory reset: Remove devices and clear all data.
CY
SHARE DEVICES
Tap “Share devices” in More page.
Tap “Share devices” (Picture 1), tap “Add”.
CMY Enter phone number or email of the account, tap “Done”
K REMOVE THE SHARED USER
To stop sharing with an account previously added, press and hold to delete in
Android, or slide to the left to delete in iOS.
GROUP CONTROL
Click "Create Group" under "More" on a selected device page.
The page displays all devices with the same model number and available to
be added as a group. Select a device and click Save, then enter group name
and click OK to finish.
When a group has been created successfully, the page will be automatically
redirected to a group control panel, where grouped devices can be
managed.SMART SCENE
SMART SCENE - AUTOMATION
1. Click Add Smart Device on the "Smart Features" page or "+" at the top right corner and select "Automation" to go to the
smart configuration page, as shown in Picture. 8.
2. Click "+" as shown in Picture. 8 to add multiple conditions or multiple actions.
C
M
Y
CM
MY
CY
CMY
Picture 6. Picture 7. Picture 8.
K
ADD CONDITION
Click “+” to add For example, to add
temperature as a condition, select
temperature , configure temperature
related conditions, and then click "Next" to
add the condition.
ADD ACTION
Click "Add action" or "+" at the top right
corner to open the menu. There are four
action types: scenario, automation, device,
and push notification.SMART SCENE
Conditions and actions of automation can all be set up as shown in the picture 9.
The system primarily supports three types of automation:
Inter-device synchronization, such as turning on the aroma diffuser and air
purifier automatically at the same time the A/C unit is turned on.
External environment and device synchronization, such as turning on the
heater automatically when the temperature falls below 0°C.
Timed actions, such as drawing back the curtains drawn automatically at 8:00
am every morning.
C
SMART SCENE - SCENE
M
Select a scenario as shown in Picture 7 and go to the configuration page. As
shown in Picture 10, you can edit the scene name.
Y Click "Add action" or "+" at the top right corner to add an action.
The action menu is shown in Picture 11. Configuration is similar to that of
automated devices.
CM
To configure a scene with "Trigger automation", you must set up an
MY automated scene in advance. If existing automation options are available as
shown in Picture 9, click “+” button in Picture 10, and select “Choose
automation” in Picture 11.
CY Picture 9.
Select an existing automation and "Enable after triggering" or "Disable after
triggering" appear to be choosen, as shown in Picture 12 .
CMY Then, click "Next" and enter scene name, and click "Save" at the top right
corner to finish configuration.
K
Picture 12.
Picture 10. Picture 11.PROFILE
“Profile” allows you to manage your personal information.
Tap the “Profile” button from the “Devices” screen to open the Profile options. The options include:
Personal Information: Tap the “Tap tp set your name” to edit name, profile photo, change account password, link
your mobile number to your account, configure your gesture password, and terminate your account. Tap “Log
out” to log out of the app. Upon reentering the iOs app you will need to login again, as shown in Picture 14.
Home Management: Household Management
Message Center: Displays messages.
Scan QR code: Use this function to scan QR codes.
C
FAQ: Displays common questions and answers about the device and app.
Feedback: Allows you to submit feedback.
M Settings: Tap to set the sounds and vibration of your mobile device and to log out of the application.
Y
GESTURE PASSWORD
Click "Gesture Unlock" to set up a gesture password. Once a gesture password is activated, you will have to use the gesture
to access the app. If you forgot your gesture password, click "Forgot Gesture Password" to have an authentication code
CM
sent to your registered mobile phone number. Enter the code and set up a new gesture password to continue.
MY
SYSTEM REQUIREMENTS
CY WiFi router with 2.4Hz WiFi networks IEEE 802.11 B/
G/N.
iPhone, ipad (IOS 7.0 or higher) or Android 4.0 or
CMY higher.
io.e App available on App Store and Google Play
Remote control with Wi-Fi /3G / 4G.
K Voice control (works with Amazon Echo and Google
Home).
For Indoors Dry Location Use Only.
Picture 13. Picture 14.C M Y CM MY CY CMY K
You can also read