T320 E-business technologies: foundations and practice - Eclipse
←
→
Page content transcription
If your browser does not render page correctly, please read the page content below
T320 E-business technologies:
foundations and practice

Block 3 Part 6 Activity 2: Testing a web
service for WS-I conformance
Prepared for the course team by Neil Simpkins

Introduction                                                                         1
Configuring the soapUI plug-in                                                       2
  WSI_HOME variable                                                                  2
  soapUI preferences                                                                 3
Using the soapUI plug-in                                                             6
WS-I profile conformance report                                                    13
  Report structure                                                                 13
  Saving the WS-I report                                                           16

Introduction
Earlier in this block you developed, deployed and tested the 'Hello' web service. In this
short activity you will learn how to test this simple web service for conformance to the
WS-I interoperability basic profile.
To do this I shall demonstrate the use of the soapUI plug-in for Eclipse. In fact, soapUI
is a much more general tool than we need to test for WS-I conformance. It is a general
testing tool that has many facilities for scripting and running tests against a web
service.
The plug-in versions of soapUI are available from
http://www.soapui.org/ideplugins.html, but here I shall restrict myself to the Eclipse
plug-in, which is described at http://www.soapui.org/eclipse/index.html.

Copyright © 2008 The Open University
This document is made available under the Creative Commons Attribution - No Derivative
Works 3.0 Unported Licence (http://creativecommons.org/licenses/by-nd/3.0/)                 WEB 00713 0   1.1

T320 E-business technologies: foundations and practice

Configuring the soapUI plug-in
The soapUI plug-in you will be using should already have been installed as part of the
Eclipse installation distributed by the OU. To use the plug-in, you will first need to
carry out the following two steps:
1   Set up an environment variable WSI_HOME, which points to the WS-I tools that
    are supplied within the T320 Eclipse directory.
2   Configure the soapUI preferences within Eclipse.
These steps are described next.

WSI_HOME variable
The WSI_HOME variable has to be set up with a value that is the path to the 'wsi-test-
tools' directory. This directory contains the WS-I testing tools that have been taken
from the WS-I web site. Normally you will find it at the path:
    C:\T320\eclipse\wsi-test-tools
First confirm the path to the 'wsi-test-tools' directory. Then go to Start > Control Panel
and select the System Properties tool. When the System Properties window opens,
select the 'Advanced' tab (Figure 1).

Figure 1   System Properties 'Advanced' tab
Click on the 'Environment Variables' button to open the Environment Variables
window, as shown in Figure 2. You can then choose to create a new variable just for
the user account you are using ('Neil' in the figure) or as a system-wide (for all users)
variable.

                                                                                             Block 3 Part 6 Activity 2   | 2
T320 E-business technologies: foundations and practice
Figure 2 Environment Variables window
Click one of the 'New' buttons. You will see a New User Variable window as shown in
Figure 3. Fill in the variable and value as shown, before clicking 'OK' in each of the
three open windows.
Figure 3 New User Variable window
If you are running Eclipse, you will need to restart it so that the new variable and its
value are found.
soapUI preferences
To access the soapUI preferences, go to the Window menu in Eclipse and select
Preferences…. This will present you with the Preferences window shown in Figure 4.
Block 3 Part 6 Activity 2 | 3T320 E-business technologies: foundations and practice
Figure 4 Eclipse Preferences window
Expand the 'soapUI' item shown on the left of Figure 4 and select the last item in the
list, 'WSI Settings' (Figure 5).
Figure 5 Expanded soapUI settings
When the 'WSI Settings' item is selected, you will see the preferences and
configuration options for the WSI tools. Alter the settings as shown in Figure 6, so that
'Verbose' and 'Show Log' are ticked and the tool and log locations are specified as in
the figure.
You must make sure that the log directory exists or create it yourself by hand if it isn't
already there. This directory is used to store the WS-I compliance report output from
the test.
Block 3 Part 6 Activity 2 | 4T320 E-business technologies: foundations and practice
Figure 6 WSI Settings in Eclipse Preferences
If you look at the options in the drop-down menu (Figure 7) you will see four possible
levels of test reporting:
• 'all' will report all tests, no matter what their outcome
• 'onlyFailed' will report only conformance tests that are failed
• 'notPassed' will report tests that are not passed (i.e. failed or for which there is not
sufficient information to perform the test)
• 'notInfo' will report tests for which there is not sufficient information to perform the
test.
Select 'all' as shown in the figure.
Figure 7 Possible levels of test reporting
When you are ready, click 'OK' to finish.
Block 3 Part 6 Activity 2 | 5T320 E-business technologies: foundations and practice
Using the soapUI plug-in
To access the facilities of the soapUI plug-in, you need to open a new perspective in
Eclipse. To do this select Window > Open Perspective > Other…, which will generate
the pop-up selection box shown in Figure 8.
Figure 8 Eclipse Open Perspective selection box
Select the 'soapUI' option and click 'OK'. This will open the soapUI perspective, as
shown in Figure 9. This perspective includes two new panels:
• the soapUI Navigator, which displays all the projects and elements that have been
created as a graphical hierarchy
• the soapUI Logs view, which displays all the messages, such as errors and
warnings, that are being written into the soapUI logs. This has four tabs at the
bottom of the panel for different logs related to soapUI.
As you might expect, the soapUI tool can be used to test a web service that is
described by a WSDL file. The next step is therefore to 'import' such a file. There are
several ways you can approach this, but one reasonable approach is to first create a
project into which your 'Hello' web service description can be brought.
Right-click on the 'Projects' icon in the soapUI Navigator window to reveal the pop-up
menu shown in Figure 10.
Block 3 Part 6 Activity 2 | 6T320 E-business technologies: foundations and practice
Figure 9 soapUI perspective in Eclipse
Figure 10 soapUI Projects context menu
To create a new project based on the 'Hello' web service's WSDL, select the New
WSDL Project option. This will cause the New WSDL Project dialogue box to be
presented (Figure 11).
Block 3 Part 6 Activity 2 | 7T320 E-business technologies: foundations and practice
Figure 11 New WSDL Project dialogue box
The project name can be any name you choose, but here I am going to call the project
'Hello' after the original web services project. Note that this project is a soapUI-type
project intended for testing the web service, not for developing a web service as was
the earlier 'Hello' project.
As well as a project name, we want to import the web service's WSDL file, so click the
'Browse…' button and navigate to the WSDL file in the 'Hello' web service project.
This project will be inside the workspace you used in the earlier activity; the WSDL file
can be found down the path 'Hello/WebContent/wsdl/Hello.wsdl' if you called the
project 'Hello'.
Once you have specified the project name and located the WSDL file (Figure 12), click
'OK' to proceed.
Figure 12 New WSDL Project dialogue box completed
After the WSDL has been processed, you will see some messages in the soapUI Logs
pane and the 'Hello' project listed in the soapUI Navigator (Figure 13).
In the Navigator you should see (or be able to expand out) the SOAP binding for the
web service. If you expand this out further, you will see that the project contains a
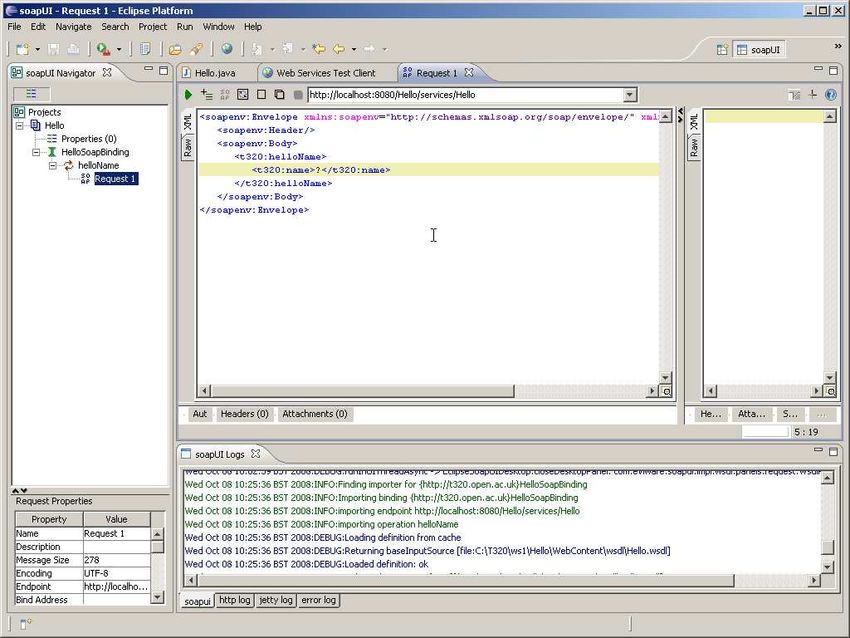
single binding and this a single request. Double-click on the request and you will see
an XML skeleton of the SOAP request that can be put to the web service (Figure 14).
Block 3 Part 6 Activity 2 | 8T320 E-business technologies: foundations and practice
Figure 13 Eclipse after creating new soapUI 'Hello' project
Block 3 Part 6 Activity 2 | 9T320 E-business technologies: foundations and practice
Figure 14 Expanded WSDL binding and SOAP request
In fact the soapUI tool is able to simulate the entire service for testing purposes, but
that is not the reason we are using the tool here. We want the soapUI tool to run tests
to determine whether the 'Hello' web service conforms to the WS-I basic profile. To do
this, right-click on 'HelloSoapBinding' in the soapUI Navigator. This will produce the
pop-up menu shown in Figure 15.
Block 3 Part 6 Activity 2 | 10T320 E-business technologies: foundations and practice
Figure 15 Pop-up menu from 'HelloSoapBinding'
Select the Check WSI Compliance option, which will start the test. You will see that
there are messages being written into the Eclipse Console view; this is simply
reporting the tasks being performed and listing any problems or errors encountered.
After a short time you will see a new view open in the centre of your workbench, called
WS-I Report (Figure 16).
The soapUI Logs view should look something like Figure 17.
If you have any problems following this practical activity, you should examine the
information in the Console and soapUI Logs views. Then report any error messages,
together with your observations, to the appropriate course forum (and your tutor) for
help.
Block 3 Part 6 Activity 2 | 11T320 E-business technologies: foundations and practice
Figure 16 WS-I conformance report in Eclipse
Figure 17 soapUI Logs in Eclipse
Block 3 Part 6 Activity 2 | 12T320 E-business technologies: foundations and practice
WS-I profile conformance report
The WS-I report is produced as an XML document, which is then processed to
produce an HTML document using XSLT. If you wished, you could obtain the XML
version of the report and process this yourself to extract the information you are
interested in or to present the information in another format, rather than use the
formatting and HTML presentation provided as a default.
Here we are interested in the structure of the report and the overall outcome of the
testing (i.e. is the service generally good at interoperating?). There's also a quick and
simple way to save the report for later reference.
Report structure
The results of the conformance test are listed in the WS-I Report panel. If you start to
scroll down the report, you will see that it is divided into sections. The first section you
will encounter gives some 'Analyzer Tool Information' (Figure 18).
Figure 18 'Analyzer Tool Information' section of WS-I conformance report
Moving further down the report you will find the 'Summary' section (Figure 19). This
section includes the all-important 'Result', which in this case is 'passed'. You can also
see that the binding is named but that no message was tested.
The soapUI tool allows various web service elements to be tested against the WS-I
basic profile, not just bindings. The tools is designed to test:
• a web services description (WSDL document)
• the web service's messages (SOAP request and response)
• the web service's UDDI entries.
Here we are simply testing the element of the web service's WSDL. This
is a major component in the overall testing required for basic profile conformance.
If you want to apply the tool more generally then you should download the soapUI tool
and also read the user guide, which is available in the 'wsi-test-tools/common/docs'
directory inside the Eclipse installation.
Block 3 Part 6 Activity 2 | 13T320 E-business technologies: foundations and practice
Figure 19 'Summary' section of WS-I conformance report
The test tool is very configurable and uses an XML configuration file (which you can
view by clicking on the 'Config' tab in the WS-I Report window, as shown in
Figure 20). Here I shall not explore soapUI very far, but if you are interested in the
tool's facilities beyond WS-I conformance testing then you should read the
documentation and experiment with the 'Hello' web service.
Figure 20 XML soapUI configuration file
If you click back on the 'Report' tab and scroll further down the report, you will find an
'Artifacts' section that has four subsections: 'discovery', 'description', 'message' and
'envelope' (Figure 21). Each of these sections lists tests related to the artefact type.
So, 'discovery' lists tests on UDDI descriptions, 'description' lists tests on WSDL, and
'message' and 'envelope' are related to SOAP encoding aspects.
If you scroll further you can see individual tests and their results being listed. The tests
listed in Figure 22 (BP2010 to BP2020) have been either passed or found not to be
applicable.
Block 3 Part 6 Activity 2 | 14T320 E-business technologies: foundations and practice
Figure 21 WS-I report 'Artifacts' section headings
Figure 22 Sample WSDL test results
Test results in the report are listed in a range of formats. In Figure 22 a summary is
given, whereas in Figure 23 a few individual tests are listed.
If you want to know exactly what a test relates to, you can look up the test number (for
example, 'BP2010' in the WS-I basic profile document). Go to http://www.ws-
i.org/Profiles/BasicProfile-2_0(WGD).html and search for the BPXXXX that you are
interested in.
Block 3 Part 6 Activity 2 | 15T320 E-business technologies: foundations and practice
Figure 23 Individual tests listed in WS-I report
The BP2010 test is a test on the WSDL, which is described as shown in Table 1. The
test ensures that operation names are unique.
Table 1 Description of BP2010 test
Test Assertion: BP2010
Description: name attributes of Operations are unique in the wsdl:portType
definition
Prerequisite: BP2703
Context: //wsdl:definitions/wsdl:portType
Match: not(wsdl:operation/@name =
preceding::wsdl:portType/wsdl:operation/@name) and
not(wsdl:operation/@name =
following::wsdl:portType/wsdl:operation/@name)
Error Message: name attributes are not unique within the portType definition.
Diagnostic: list of duplicate name(s) and of elements that use them.
Source: http://www.ws-i.org/Profiles/BasicProfile-2_0(WGD).html#BP2010
Saving the WS-I report
Saving the report is very simple. At the top of the window that shows the report you
might have noticed the small icon shown in Figure 24 (see Figure 16 for the position of
this), consisting of a tiny arrow and what looks like a page of text.
Figure 24 Save WS-I report icon
If you click on this icon, you will be taken to a Save Report dialogue box where you
can specify the path and file name for the HTML report file. You can then open the file
using a browser to review the report at any time.
Block 3 Part 6 Activity 2 | 16You can also read