The Use of Lasers in Dentistry - A Clinical Reference Guide for the Diode 810 nm & Er:Yag - elexxion AG
←
→
Page content transcription
If your browser does not render page correctly, please read the page content below
powered by technology

The Use of Lasers
     in Dentistry
    A Clinical Reference Guide
    for the Diode 810 nm & Er:Yag

                           Rev. 1.0 / Oct. 2009
2 Clinical Reference Guide
powered by technology

Elexxion’s goal as leading manufacturer of dental lasers is to provide not only best in class lasers but also the
information, education and training to enable superior results with our products.

One of the challenges for many new as well as experienced laser users is to acquire and maintain the knowledge
to use their laser in a way to achieved best results.

The purpose of this brochure is to be the source for practical clinical knowledge covering a wide range of soft as
well as hard tissue procedures. Leaders in laser dentistry and customers from Europe, United States and Asia
contributed with their extensive expertise and knowledge. The result will benefit dentists new to lasers as well
as experienced user.

We would like to take the opportunity to thank all of our partners and friends in the dental community who have
contributed with their expertise and feedback to the creation of this clinical reference guide.

In particular we are grateful to the support of Mike Swick, DMD, Kenneth Luk, Dr. Dr. Claus Neckel, Leif Nordval.

Per Liljenqvist                                          Olaf Schäfer
Vorstand, CEO                                            Vorstand, CTO
4   Clinical Reference Guide

    Dr. Kenneth Luk

    Dr. Kenneth Luk recevied his BDS degree at the University of Liverpool in 1987. He was awarded the Diploma in
    General Dental Practice from The Royal College of Surgeons ( England) in 1994.

    He was in NHS / Private practice ,as well as serving part-time in the University of Liverpool before returning to
    Hong Kong in 1995.
    Currently, he is a part-time lecturer at the Conservative Dentistry, The University of Hong Kong. He also
    maintains a private practice with particular interest in multi-disciplinary aesthetic dentistry and laser dentistry. He
    has achieved fellowship status from the International Congress of Oral Implantologists (ICOI).

    Dr. Luk has incorporated the use of laser in his practice since 2002. He is a member of the Academy of Laser
    Dentistry (ALD) and he has achieved Standard Proficiency in various laser wavelengths. He also serves in the
    International Relations Committee in the Academy.

    He has made textbook contributions and is interested in developing new techniques in the use of laser in
    dentistry. He is a trainer and laser safety representative for a dental laser company.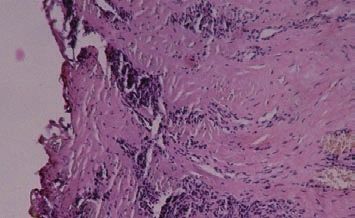
powered by technology

Dr. Mike Swick

Dr. Michael Swick is a general dentist and has offices in Allison Park and Conneaut Lake Pennsylvania. He practices
Microdentistry employing air abrasion and laser, working through a surgical operating microscope. He holds an
advanced proficiency in the 980 nm and 2940 nm wavelengths and standard proficiency in CO2, Nd:Yag, 810 nm
diode, 980 nm diode and Er:Yag wavelengths, through the Academy of Laser Dentistry.

He is also a certified educator and his courses are accepted for Standard Proficiency Certification through the
Academy of Laser Dentistry where he is currently serving on the, board of directors, the Research and Education
committee and the Scientific Sessions committee.

Additionally, he holds certification, from St. Luke’s Medical Center, in the Pinero Pre-cardiac Surgery Protocol with
lasers. He is a fellow in the American Society of Laser Medicine and Surgery. He also is a lectured for the bioLitec
and Hoya Conbio laser companies.

Dr. Swick has presented more than one hundred continuing education and hands-on courses on dental lasers
both nationally and internationally.
6   Clinical Reference Guide

    Table of contents
    Introduction                        6   3 · ENDODONTICs                          41
                                             Bacterial decontamination in the canal   41
    1 · SURGERY                        19
    Surgery General                    22   4 · HARD TISSUE                          43
    Treatment of Abscess               22   Bleaching                                46
    Apthous Ulcer Therapy              23   Combined perio program                   47
    Hemostasis                         23   Hard tissue ablation low / med / high    48
    Curettage                          23
    Epulides                           24   5 · SOFTLASER                            49
    Irritation Fibroma                 24   Aphtha                                   49
    Frenectomy                         25   Decubital ulcer                          50
    Gingivectomy prior to impression   26   Herpes labialis                          50
    Granuloma                          28   Suppress gag reflex                      51
    Hemangioma                         28
    Removal of Hyperplastic tissue     29   6 · SPECIALS                             53
    Bacterial Reduction                29   Depigmentation                           53
    Flap surgery                       29   eLAP	                                    54
    Excisional biopsy                  30
    Retention cyst                     31   7 · Studies, Abstracts, Cases            57
    Exposure of Impacted Teeth         31
    Edentulous ridge                   31   8 · Appendix                             75
    Seeping hemorrhage                 32   Application charts
    Sulcus preparation                 33   claros nano                              75
    Verrucae                           34   claros                                   77
    Vestibuloplasty                    35   duros / delos                            83
    Root end rescetion                 35

    2 · PERIODONTology                 37
    Pocket treatment                   37
    Gingivectomy                       37
    Internal bevel incisiona           37
    Bacterial reduction                38
    Decontaminate membranes            38
    Open curettage                     39
    Pocket reduction                   39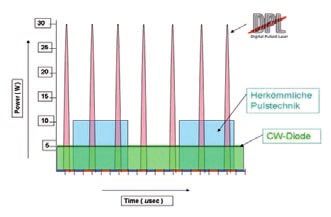
powered by technology

Preface
Lasers are a valuable adjunct to dental treatment in terms of infection control, wound healing control, bleeding
control and vibration control in hard tissue removal.

Success in clinical applications of dental lasers relys on a firm basis of laser physics.

Different laser wavelengths are absorbed in varying degrees by the major oral tissue components namely; water,
hydroxyapatite, haemoglobin and melanin. From the lowest energy delivery to the highest , lasers can be used for
diagnosis of caries and calculus, low level laser therapy, teeth whitening, haemostasis and coagulation, tissue de-
contamination, melanin depigmentation , hard and soft tissue ablation. A combination of the above procedures
will make up almost all of the dental procedures in daily dental practice. The understanding of the wavelength
characteristics in terms of energy delivery from the laser devise, laser tissue interactions and techniques will en-
able the operator to deliver the desired treatment effectively. During laser treatment, the clinician should keep in
mind the laser wavelength and emission mode being used for the tissue interaction desired. It is imperative that
tissue interaction is monitored and appropriate adjustments are made during the procedure.

The concept and application of laser energy for dental procedures differs greatly from the use of rotary and piezo
instruments. There is hence, likely to be a slightly longer learning curve for dental lasers than other dental equip-
ment.

I · What is a laser?
I.1     Introduction
I.2     Fundamentals of dental lasers
I.2.1   History and properties of laser
I.2.2   Basic laser components
I.2.3   Lasers used in dentistry
I.2.4   Laser parameters
I.2.5   Laser tissue interactions
I.2.6   Clinical applications with dental lasers
8   Clinical Reference Guide

    I.1 Introduction
    In early 1960s, the first working laser was invented by Theodore Maiman who inserted a ruby rod into a photo-
    graphic flashlamp. In 1964, Ralph Stern and Reidar Sognnaes used the ruby laser to vaporise enamel and dentine.
    In 1969 Leon Goldman used the laser clinically on enamel and dentine.

    Design and built of the first working ruby laser

    Dr. Theodore H. Maiman
    July 11, 1927 - May 5, 2007

    Initially, application of lasers for dental use was tested for hard tissue, but surface cracking and thermal damage
    to the enamel and dentine were reported. It is not until 1989 when the first dental laser was developed, a 3W
    neodymium-doped yttrium aluminium garnet (Nd:YAG) by Drs Terry and Bill Meyers.,for soft tissue use, Since that
    time a variety of laser wavelengths have been introduced and marketed.

    Dental lasers are now being used in all fields of dental disciplines from oral surgery , restorative dentistry in caries
    removal and tooth preparation , cosmetic dentistry in soft tissue contouring and osseous crown lengthening to
    periodontology and endodontics in bacterial decontamination and associated surgical treatments. Most recently,
    researchers are looking into the application of lasers in implant dentistry and treatment of peri-implantitis.

    This chapter provides a brief overview of the fundamentals of laser physics; laser wavelengths most commonly
    used in dentistry.
powered by technology
I.2 Fundamentals of dental lasers
I.2.1 History and properties of laser
The word laser is an acronym for Light Amplification by Stimulated Emission of Radiation.
Neil Bohr’s model explained spontaneous emission as an atom which absorbs a quantum of energy and is el-
evated to a new energy level. The excited state decays to the lower energy state emitting the excess energy as
photon, or quanta of light.
In 1916, Albert Einstein theorized that photoelectric amplification in the same amplitude of an atom already in
an excited state could emit a single frequency, or stimulated emission decaying into a stable state. This time the
emission will be two coherent quanta. The result of stimulated emission is that multiple photons of precisely the
same wavelength are emitted in phase in a coherent manner.
Light is a form of energy. It is comprised of photons (energy packets or wavelets) which travel in a waves. A wavlet
of photons (electromagnetic wave) has four basic properties:
1. Velocity : The speed of light in a vacuum = 2.99 x 1010 cm/sec.
2. Amplitude: The total height of the wave from peak to peak (measured in millijoules)
3. Wavelength: The distance between any two corresponding points on the wave (measured generally in
nanometers in dental lasers)
4 Frequency: the amount of wave cycles per second.
5. The basic mathmatical formula that relates wavelength, frequency, and the speed of light is: c= f
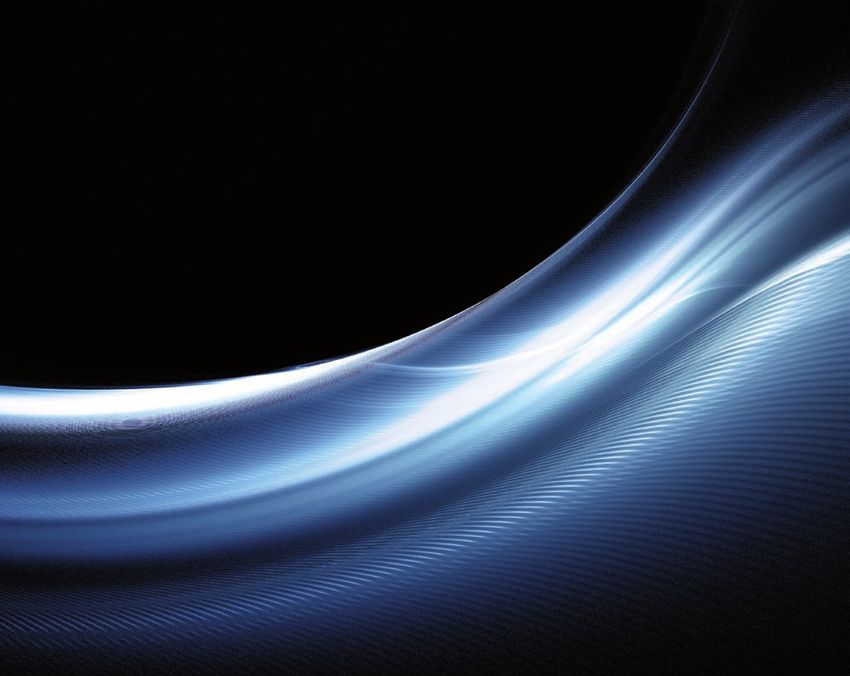
Unlike ordinary light, laser light is monochromatic (Fig 1) because only one wavelength is being produced rather
than a spectrum of wavelengths. Laser light can also be produced in waves that are in phase showing it as charac-
teristically organised, efficient and coherent energy. The laser light can be highly focused and directional produc-
ing a collimated beam (summarised in Fig 2).10 Clinical Reference Guide
Fig 1
Spectrum of visible light Monochromatic light from a laser
Electromagnetic spectrum ranges from invisible ionising radiation such as gamma rays, x-rays, Ultra violet (100-
400nm) ; visible light (400-750 nm) to invisible thermal radiation such as infrared (750+ nm) and radio waves.
Dental wavelengths currently used ranges from 488 to 10600 nm. They are emitted from the visible spectrum in
the form of nonionizing radiation ; hence not mutagenic to cellular DNA components.
Fig 1 · Comparison between ordinary visible light and laser light
Ordinary visible light Laser light
Multiple wavelength = Typically one colour-monochromatic, specific
wavelenght(s) generated
white light (Polychromatic)
Highly focusedand directional-collimated
Non-directional beam
Non-focused Organised , efficient
Unorganised , incoherent Coherent Energy
Low Intensity High Intensity
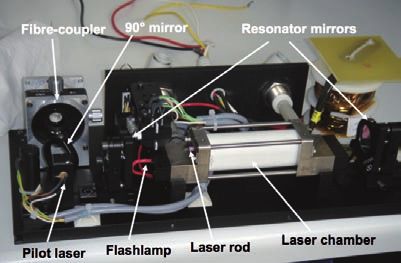
0.1 W/cm2 108-1016 W/cm2powered by technology I.2.2 Basic laser components 1. Active medium The active medium can be gas, liquid or solid state where laser light is generated via a process called stimulated emission. The active medium used determines the laser wavelength, power and energy. The active medium typically denotes the name of the different types of lasers. For example: Carbon dioxide laser , Er:YAG laser and Nd:YAG laser. Erbium doped YAG laser rod Erbium:YAG rod 2. Pumping mechanism External power source supplies energy continuously to excite (pump) the active medium so that stimulated emis- sion can occur achieving a population inversion. In the case of semiconductor diode lasers, the power source is electricity. Laser rod of a solid-state laser or dye cell of a liquid laser is pumped with light energy, hence optical pumping. The light sources include flashlamps, arc lamps and other lasers (laser pump). 3. Optical Resonator The active medium is positioned within an optical subsystem called the laser resonator. The resonator consists of two mirrors separated by the active medium in between. The mirrors are aligned and parallel to each other. On each end of the optical resonator the mirror reflects the excited photons produced by the excited active medium back and forth in a direction perpendicular to the mirror surfaces. This movement of light through the active medium amplifies the power, a ‘population inversion’ is achieved. One of the mirrors is partially reflective (output coupler). The non reflective surface on this mirror allows the photons to exit the resonator as a monochromatic and directional beam of energy, ie. laser. Erbium:YAG laser components
12   Clinical Reference Guide

     4. Cooling system
     Not all power put into the active medium is converted into laser energy. Some of the power is converted into heat
     which raises the temperature of the active medium. A cooling system must be employed to maintain the active
     medium below its maximum operating temperature.

     5. Control panel
     Microcomputer or microprocessor installed for the operator to control the parameters for the output of laser
     energy.

     User friendly control panel designs for operator

     6. Delivery systems
     Laser energy is delivered to the target site by various delivery systems:

     1.1	Fiber-optic – Generally quartz-silica flexible fiber with a quartz or sapphire tip. Transmission efficiency in
          the region of 80% to 90% at wavelengths between 300nm and 2400nm. Wavelengths outside this range are
          absorbed by quartz.
     1.2	Fiber-optic – For Er:YAG lasers, the fiber system uses more rigid yet slightly flexible fiber. For example
          Zirconia Aluminium Fluoride or Germanium oxide
     2.	Hollow waveguide – A semi-rigid reflective hollow metal or plastic tube that guides the laser energy
          through its internal lumen
     3. Articulated arm – Hollow tubes reflecting the beam with 45 degree mirrors.

     Visible and near infrared lasers use flexible fiber-optic systems with bare glass fibers. Mid infrared wavelengths
     may be deliverd by rigid fiber glass , hollow waveguide or articulated arms. Far infrared wavelengths can be de-
     livered by the hollow waveguide or articulated arms
powered by technology
I.2.3 Lasers used in dentistry
In the visible light spectrum:
1. Argon (Ar) : 488 nm Blue wavelength
2. Argon (Ar) : 514 nm Blue-green wavelength
3. Frequency doubled Neodymium-doped yttrium aluminium garnet laser ; Nd:YAG with a potassium titanyl
phosphate (KTP) crystal : 532 nm Green ; commonly known as KTP laser
4. Low-level lasers: 635 nm (for therapy & photo activated disinfection), 655 nm (for caries and calculus
detection) and 660 nm (Photodynamic therapy) Red wavelength
Argon lasers are less commonly used for dentistry with the emergence of smaller compact diode lasers.
In the near, middle and far infrared portion of the electromagnetic spectrum, laser light is invisible and a guiding
beam is used for the operator to locate the laser beam on the target site.
Near infrared lasers
Diode lasers emit laser wavelengths between 800 nm and 980 nm. Depending on the active medium used, dif-
ferent wavelengths can be produced
1. Aluminium, gallium and arsenide 800 nm - 830 nm
2. Gallium and arsenide 904 nm
3. Indium, gallium and arsenide 980 nm
Neodymium-doped yttrium aluminium garnet (Nd:YAG) emits a laser wavelength of 1064 nm
Mid infrared lasers
The most commonly used wavelengths in the mid infrared portion is the erbium family.
1. Erbium-chromium doped yttrium scandium gallium garnet (Er,Cr:YSGG) of 2780 nm
2. Erbium doped yttrium aluminium garnet (Er:YAG) of 2940 nm
Far infrared lasers
CO2 lasers emits wavelengths of 9600 nm , 10600 nm and 11200 nm. 10600 nm, is most commonly used CO2
wavelength in dentistry.14 Clinical Reference Guide
I.2.4 Laser parameters
Operators should have a clear understanding on laser parameters as well as clinical techniques when using
different wavelengths of lasers (Table 1).
For example: 1W continuous wave of diode laser for 1 second has an average power of 1W. An average power of
1W from Nd:YAG laser at 100usec , 50mj per pulse & 20Hz per second delivers a peak power of 500W.
Table 1
Terminology
• Peak Power – Watts (Joules/sec) • Pulse Width/Depth – Seconds
• Pulse Energy – W(PP) x Time(PD) = Joules • Frequency – Hz (Pulse Per Second)
• Average Power – PE x Hz • Duty Cycle PD/(PD + Relaxation Time) x 100 %
• Energy Density (Fuence) – J (PE) / Area • Power Density – W (PP) / Area
Relaxation Time – Off time between pulses
Temporal emission modes
Temporal emission modes or emission modes describes the way that the laser energy proceeds with time. There
are two basic modes of emission in dental lasers:
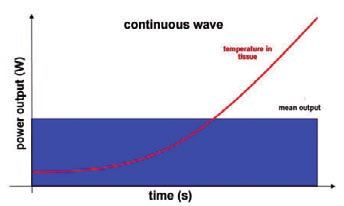
Continuous wave (cw) – CO2 , Argon and diode lasers operate in this mode. The laser energy is emitted continu-
ously without time lapse (1sec). Lasers that emits continuous wave also have mechanical shutter to ‘cut’ the con-
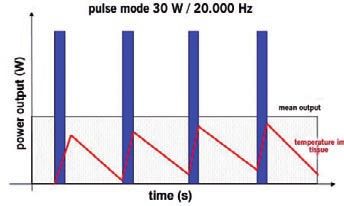
tinuous wave allowing time for tissue to relax from the continuous energy exposure. Gated pulse mode produces
pulse duration in 0.1sec to 0.01sec. The power output, pulse on time & pulse off time are variables for operator
selection in almost all lasers.
Digital pulsed mode produces pulse duration from continuous wave down to 2.5 μsec (one millionth of a second).
Selection modes include output power, pulse duration and frequency.powered by technology Breaking up the continuous energy emission can minimize undesirable tissue damage beyond the target site (collateral thermal damage). The accumulative rise in tissue temperature is delayed avoiding carboni- sation of the tissue. Free running pulse – Nd:YAG, Er:YAG, Er,Cr:YSGG are free running pulse lasers. High level of laser energy (even up to 2000W) is emitted in very short pulse between 50μsec to 1000μsec. As free running pulse exhibits much shorter pulse duration and lower duty cycle (laser on time / laser on + off time X 100%) undesirable thermal damage is even lower. Care should be taken into account due to the high peak power. The average power, pulse energy, pulse duration and frequency are variables for the operator to select.
16   Clinical Reference Guide

     I.2.5	Laser tissue interactions
     Chromophores

     Various components of dental tissue exhibit different absorption characteristics in the electromagnetic spectrum.
     Each laser wavelength will therefore, interact with their specific chromophore(s). The chromophores in dental
     tissue components are water, enamel, dentine, hydroxyapatite, haemoglobin and melanin.

     Approximate absorption curves of dental tissue components

     In dental tissues, the target site will be a combination of water, hydroxyapatite, blood, and tissue pigments. A
     clear understanding of laser and target tissue interactions enables the clinician to choose the appropriate wave-
     length for specific procedures.

     The unique optical absorption of each wavelength determines the depth of tissue penetration. In the case of
     the erbium and CO2 lasers, water is highly absorbed. As there are high water content in all tissue components,
     penetration depth by these lasers is only limited to the tissue surface. Argon, diode and Nd:YAG lasers penetrate
     tissues in varying depths due to their poor optical absorption properties with water. The varying depths of pen-
     etration depends on their specific chromophores and energy intensities. This property is useful for low level laser
     therapy. As there is no immediate visual tissue effect, care must be taken in case of excessive energy delivery
     which will result in deep tissue damage even a few days after treatment (similar to tissue burns).

     Tissue interactions

     Laser energy is either absorbed, reflected, refracted, transmitted or scattered by the tissue. The level of tissue
     responses are related to the wavelength and power of the laser used.
     Different levels of energy absorption produce different tissue response. The laser energy absorbed can be con-
     verted into different types of energies:
powered by technology Photothermal – Heat energy is converted which results in rise in tissue temperature. The rise in temperature ranges from: 1. hyperthermia (37°C-50°C) 2. coagulation / denaturation of protein (>60°C) 3. welding (70°C-90°C) 4. vaporization (100°C-150°C) 5. carbonisation (>200°C) Excision site ablated with diode laser Photochemical – Chemical energy is converted where chemical bonds in the molecules are broken directly by laser. Photoacoustic – Also known as photodisruptive where energy is converted into mechanical energy in the form of shock wave, or high pressure wave. This causes physical disruption of the target tissue. Photoacoustic effect on dentine ablation by Er:YAG laser Photodynamic – A kind of photochemical interaction. Photodynamic interactions occur when a specific light- absorbing molecule is used to mediate the interaction. A biochemically reactive form of oxygen is produce ; call singlet oxygen. Biostimulation & biomodulation – Low power of lasers are thought to affect tissue in a cellular level such as increase in ATP production (380nm-700nm) & calcium transport mechanism. Much research are required to establish these specific effects.
18 Clinical Reference Guide
I.2.6 Clinical applications with dental lasers
Low intensity laser energy applications
• Diagnosis: Caries and calculus
• Low level laser therapy LLLT ( Low intensity laser therapy LILT )
• Photo activated decontamination
• Haemostasis and coagulation
• Teeth whitening
High intensity laser energy applications
• Bacterial decontamination
• Soft tissue ablation (cutting)
• Enamel ablation
• Dentine ablation
• Osseous ablation
• Depigmentation of melanin and other endogenous pigments
Single application or combination applications of the above provide clinical applications of lasers in ASSISTING
dental procedures.
Main Type Active Medium Abbr. Wavelength (nm) Clinical Applications Manufactures
Gas Lasers Carbon Dioxide Co2 10,600 Soft tissue incision and ablation Deka
Subgingival soft tissue curettage Lumenis
Diode Lasers Indium-Gallium-Arsenide- Diode 655-810-980 Bacterial decontamination Biolase
Phosphide (GA-Al-As) Caries and calculus detection Elexxion
Soft tissue incision and ablation HoyaConBio
Subgingival soft tissue curettage KaVo
Ivoclar Vivadent
Siron
Solid-Sate Laser Neodymium-doped: Nd:YAG 1,064 Bacterial decontamination Deka
Yittrium-Aluminium- Soft tissue incision and ablation Fotona
Garnet Subgingival soft tissue curettage Periolase
Erbium-doped: Er:YAG 2,940 Bacterial decontamination Deka
Yittrium-Aluminium- Soft tissue incision and ablation Elexxion
Garnet Subgingival soft tissue curettage Fotona
Scaling and root debridement HoyaConBio
Hard tissue conditioning KaVo
Hard tissue ablation Lumenis
Syneron
Erbium-Chromium doped: Er,Cr:YSGG 2,780 Biolase
Yittrium-Selenium-
Gallium-Garnet
Current Laser Wavelengths
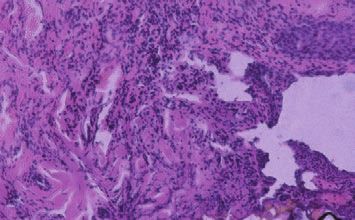
Commonly Used in Clinical Dentistrypowered by technology Epilog by the editor The histology presented above by Dr Neckel , Bad Neustadt, Germany, is a tribute to his vision and hard work. A majority of the dental laser industry has followed the trend that the use of lower power in continuous wave mode is less damaging than using higher power settings. However, because of his understanding of emission modes, this is definitively proven by Dr. Neckel’s work to be incorrect. He initially presented his findings, “A comparative study on CW mode versus pulsed mode in AlGaAs diode lasers,” at the SPIE (originally The International Society for Optical Engineering) meeting and later at the Academy of Laser Dentistry meeting in 2001. As a matter of interest, the editor of this manual, Dr Michael Swick, Allison Park/Conneaut Lake, Pennsylvania, US, working independently from Dr Neckel, an ocean away, came to similar conclusions during the same time pe- riod,, through anecdotal clinical results and later histology. His work employed longer pulses due to the absence of a short pulse diode in the US, but was supplemented using water for cooling to reduce thermal damage. See: A Char –Free Technique for the Ceralas D15 Diode Laser, Wavelengths 2000;8(4):20 and A comparative Study of two Intraoral Laser Techniques, SPIE, Progress in Biomedical Optics and Imaging, Lasers in Dentistry IX, Vol.4, No.2 ISSN 1605-7422. pg. 11-17. To the best of the editor’s knowledge they were the only practitioners at the time to utilize diode lasers at higher power levels.
20 Clinical Reference Guide
powered by technology

Clinical Reference Guide
1 · Surgery
SURGICAL PROCEDURES WITH THE DIODE LASER ARE OFTEN BLOODLESS AND PAIN FREE. THESE ARE VERY
DESIREABLE ATTRIBUTES FOR BOTH THE DENTIST AND PATIENT.

Important surgical principles and considerations:
1.	Always use the correct protective eyewear. The wave length and optical density will be marked on the lens
    and frame. Elexxion will supply the correct eyewear.
2. Always use high speed suction or smoke evacuation.
3. Always place the tissue targeted for surgery under tension if possible.
4.	The surgeon’s hand speed will depend on the average power, pulse duration and pause interval used by
    the surgeon. Carbonization is an undesirable outcome and should be avoided. Using water irrigation for
    cooling can aid in reducing carbonization and lateral thermal damage
5.	A reciprocal (back and forth) motion should be used for conservation of movement and increased
    effectiveness.
6. In most cases sutures and periodontal dressings will not be needed.
7.	The fiber should always be used in light contact and at an angle of 90° due to the divergence of the energy
    as it exits the fiber tip. Contact with the tissue also reduces the potential for reflectance and back scatter.
    Attempts at non contact ablation should only be attempted by only the most experienced surgeons due to
    the penetration depth of all near infrared wavelengths.
8.	Coagulum (denatured protein) will collect on the fiber tip; this should be removed regularly using moist
    gauze. Alcohol gauze should not be used as accidental combustion can occur.
9.	All surgical procedures should be followed with low level therapy using the laser therapy programs and
    the T8 glass rod.

Choosing a Fiber
1.	Fiber size is an important factor to be considered in laser surgery. Fiber size controls the power density of
    the beam at the fiber tip.
2. Power density is the radiant power transmitted per unit area of cross-section of a laser beam.
3. General tendencies of power density :
    a. The larger the fiber size the lower the power density the smaller the fiber size the higher the power den-
       sity. Therefore a 200 µm fiber will have a higher power density than a 400 µm fiber and a 400 µm fiber
       will have a higher power density than a 600 µm fiber and so on.
       i. Higher power densities will vaporize more quickly than lower power densities.
       ii. Lower power densities will tend to coagulate better than higher power densities.
4.	When choosing a fiber it is important to remember that the power density varies inversely with the square
    of the diameter of the focal spot. Thus, if the diameter if the focal spot is reduced by a factor of 2, the aver-
    age power density increases by a factor of 4, and vice-versa.
22 Clinical Reference Guide
General information about high power, digitally micropulsed diode lasers
Comparison between a low power, pulsed diode laser and high power digitally micropulsed laser
Histological findings by Dr. Claus Neckel
Materials and methods
• Laser by Oralia:
• GaAlAs Diode Laser emitting 810 nm
• Maximum power output 20W
• CW Mode and gated pulsation of up to 10.000 Hz
• Pulse- pause ratio (PPR) of 1:1 to 1:10
• clinical parameters for Oralia:
• Group I: 1.5 W CW- mode,100% emission cycle, 400µm fiber
• Group II: 5 W gated 50% emission cycle, 400µm fiber
• Group III: 20 W gated, 33% emission cycle, 400µm fiber
• Group IV: 20 W gated, 10% emission cycle, 400µm fiber
• elexxion claros:
• GaAlAs Diode Laser emission wavelength 810 nm
• Maximum power output up to 30W
• CW Mode and pulsation up to 20.000 Hz
• Variable pulse width, digital pulse
• clinical parameters for elexxion claros:
• Group V: 30 W, Micropulsed, 18% Emission cycle, 20.000 Hz
9 μs pulse width, 400 μm;
• Group VI: 25 W, 20% emission cycle, Micropulsed, 20.000 Hz
10 μs pulse width, 400 μmpowered by technology
Histological findings
Group I • 1
.5 W Continuous Wave Mode, Group II • G
ated 5 W, Emission Cycle 50%,
Emission cycle 100% 10,000 Hz
The thermal damage zone was up to 125 μm. Dehydration and All thermal effects are more drastic than in group I. The diffe-
protein denaturation is prominent. Charring is accompanied by ring extent of charring leads to an inconsistent thermal damage
deeper thermal damage. depth between 250 and 800 μm.
Group III • Gated, 20 W, Emission cycle 33% Group IV • 20 W, Gated, Emission cycle 10%
Thermal damage zone was found to be between 45 and 65 μm. Group IV: thermal damage between 35 and 50μm. No charring
The zone was rather consistent. Little charring was present. was visible.
Group V • 30 W, Emission cycle 18%, Group VI • E mission cycle 20%, 10 μs pulse width,
9 μs pulse width, 20.000 Hz 20.000 Hz pulsed
Elexxion claros. Thermal damage between 15 and 25 μm. No Elexxion claros. Thermal damage between 20 and 35 μm. No
charring was visible. charring was visible.24 Clinical Reference Guide
Please Note:
As elexxion has several laser models, for the proper parameters for the laser you are using see the appendix
at the end of this manual.
Surgery
1. Surgery General
a. Indications: This is the high performance program; the laser is working at its highest power level. This
setting is to be used by only the most experienced laser surgeons.
b. Laser parameters: Surgery General Setting, 400µm or 600µm fiber.
c. Technique: Rapid fiber movement is necessary. Carefully monitor laser tissue interaction. Excessive
carbonization or tissue blanching should not be present.
2. Treatment of Abscess
a. Indications: A localized periapical or periodontal abscess must be present.
b. Laser Parameters: Puncture Abscess Setting, 200µm fiber.
c. Technique: Use the surgery hand piece with a 200µm fiber and penetrate into the abscess to the
maximum depth while firing the laser. After 3-4 seconds the bacteria should be killed and the abscess will
resolve over the next few days. Additionally, after the puncture, you can use the laser with the softlaser
program “post-extraction pain” for better healing..
d. Alternate technique: Incise and drain: Using a small amount of anesthesia Incise the abscess using
the flap surgery setting and drain with a surgical suction. Irradiate the interior of the abscess with the bac-
terial decontamination setting.
Case courtesy of Michael D. Swick DMD, United States.powered by technology
3. Apthous Ulcer Therapy
a. Indications: apthous ulceration of the cheek or tongue
b. Laser Parameters: Aphtha Setting, 400µm fiber.
c. Technique: You can treat the ulcerations with the softlaser or surgery. When using the surgical program
give a small amount of anaesthesia, topical should suffice.. Use the hand piece for surgery and move in a
grid with a distance of approximately 1mm over tissue. After treatment for patient comfort use the therapy
laser in the program “post-extraction pain” with the glass root “T8” under contact.
4. Hemostasis
a. Indications: bleeding following any dental surgery procedure.
b. Laser Parameters: Haemostasis Setting Or Bacterial Reduction under Periodontics.
c. For cessation of bleeding, use the hand piece for surgery and the 600µm fiber activate the laser and maintain
a distance of approximately 2mm until the bleeding stops. An additional technique to try would be: rinse
the area of bleeding to locate the precise areas where the bleeding is occurring (bleedings points). With a 90
degree incident angle apply the laser only to the bleeding spots at 1 watt CW (bacterial reduction under Peri-
odontics) until the bleeding stops. This technique should achieve rapid hemostasis
5. Curettage
a. Indications: Treatment of advanced periodontal disease 6-10mm.
b. Laser Parameters: Curettage setting, 400µm or 600µm fiber.
c. Starting at the gingival margin and continuing to the base of the pocket with a reciprocal sweeping motion,
remove the intrasulcular epithelium. The size of the fiber will determine the width of tissue removed. Total
root debridement which is facilitated by the opened pocket then follows utilizing scaling and root planning
techniques with appropriate ultrasonic and hand instrumentation. Following root debridement coagulation
and final bacterial reduction is accomplished by repeating the curettage motion with the bacterial reduc-
tion setting.
Case courtesy of Michael D. Swick DMD, United States.26 Clinical Reference Guide
6. Epulides
a. Indications: Epulis Fissurata all biotypes from granulomatous to giant cell, and fibrous.
b. Laser Parameters: Epulides setting, 400µm or 600µm fiber.
c. Technique: Using the surgical handpiece, tissue forceps and appropriate fiber place the tissue to be
removed under tension. Activate the laser keeping the tissue under tension while cutting. Send tissue sam-
ples to the pathologist as appropriate for biopsy.
7. Irritation Fibroma
a. Indications: Fibromas of the tongue, lip, cheek, and gingiva.
b. Laser Parameters: Fibroma setting, 400µm.
c. Technique: Place the fibroma under tension with the tissue forceps, and excise the lesion aiming the fiber
parallel to the cheek surface. It is not necessary to suture or to place any type of wound bandage. After
excision treat the wound with low level laser therapy using the “Post-extraction pain” program with the T8
glass rod.
Case 1 • Case report from Dr. Michel Vock/Switzerland
Fibroma cutting with 600µm fibre
4 days post OP 30 days post OP
Case 2
Fibroma Pre-OP Excision with 600µm fibrepowered by technology
8. Frenectomy
a. Indications: labial and lingual Frenectomy for relief of excess muscle tension.
b. Laser Parameters: Frenectomy setting, 400µm.
c. Technique: less injectable anaesthetic or topical may be used. Sutures and surgical dressings are generally
not needed. Post surgery the low level therapy program for post-extraction pain should be applied for bet-
ter healing and less postoperative pain.
i. Labial frenula: Important; the mental nerve must be avoided in the mandibular bicuspid region. Place
the frenum under tension by stretching the lip, Apply the laser with the fiber parallel to the alveolar ridge.
Continue deepening the incision until the muscle pull is relieved.
ii. Lingual frenula: Important; a complete and thorough knowledge of the sublingual anatomy is needed
prior to attempting this treatment. Delicate structures must be avoided. A hemostat may be used to anchor
the frenum and facilitate treatment. The incision should parallel the floor of the mouth and the tongue.
Frenulum Pre-OP Cutting with 600µm fibre
Cutting with 600µm fibre Immediately after treatment
4 days later 7 days later 4 weeks later28 Clinical Reference Guide
9. Gingivectomy prior to impression or cad cam crown.
a. Indications: excess tissue needing removal prior to crown impression, cosmetic recontouring.
b. Laser Parameters: gingivectomy setting, 300, 400 or 600 µm fiber as needed.
c. Technique: remove excess tissue as determined by examination, bone evaluation and periodontal probing. A
blade technique (cutting like a blade or ablation technique, erasing tissue like a pencil eraser can be used.
Case courtesy of Michael D. Swick DMD, United States.
Pre operative Post surgery
Immediately post op 3 weeks Post operativepowered by technology Case courtesy of Michael D. Swick DMD, United States. Pre Operative Tissue removal prior to endodontics Rubber dam in place Endodontics and build up completed Further tissue removal on 2nd molar Tissue removal 1st molar Immediately Post operative
30   Clinical Reference Guide

     10. Granuloma
     a. Indications: granulomatous tissue present necessitating removal.
     b. Laser Parameters: Granuloma setting, 400µm fiber.
     c.	Technique: as seen previously with a fibroma place the granuloma under tension and excise parallel to the
         cheek or gingival tissue. Sutures are not needed.

     11.   Hemangioma
     a.    Indications: hemangiomas of the lip cheek or tongue as well as blue or venous lake lesions.
     b.    Laser Parameters: Hemangioma setting for Surgical excision, 400µm fiber.
     c.    Technique: Case report Dr Kenneth Luc Hong Kong.
           a. 25 year old Female patient of Chinese ancestry complained of long standing dark red patch on her power
               lip. Haemagioma was diagnosed previously by her medical doctor. No treatment was able to be offered
               to improve her condition. She has been frustrated by this aesthetic problem. The only remedy with her
               social life would be putting on dark coloured lipstick. This could not completely mask the area. Patient was
               informed of the treatment procedure and consented to this treatment protocol.
           b. Procedure: Elexxion Claros DPL (810nm) laser was set at 30W, 20000Hz and 16usec. A 600um un-initiated
               fiber was held at right angle to pigmented area. After administration of local anesthetics, the pigmented
               area was fired in constant motion (non contact mode) and cooled with air (3 in 1 syringe). The procedure
               took 8 seconds to complete.
           c. Result: There was immediate disappearance of pigment. Subsurface coagulation was noted. Surface abla-
               tion on the mucosal surface was minimal. 2 days post-op showed scalp formation on the area. (Patient
               reported tissue slothing one day post-op). 2 weeks post-op showed healing of the surface epithelium com-
               plete. There was still some dark red pigment visible. 3 months review showed virtually complete disappear-
               ance of dark red pigment on the lower lip.
           d. Conclusion: The use of digital pulsed diode laser was effective in the removal of haemangioma. Patient’s
               aesthetics was improved. There was no need to mask the area with dark colored lipstick. She now prefers
               her natural lip color to using lipstick. Her self confidence and quality of life is now much improved.

     Case Images

     Pre-op                                                         Immediate Post-op

     2 days post-op                                                 2 weeks post-op
powered by technology
ii. Case report from Dr. Kenneth Luke, Hong Kong
5 days post-Op
12. Removal of Hyperplastic tissue
a. Indications: removal of any type of hyperplastic tissue.
b. Laser parameters: Hyperplasia program, 400 or 600µm fiber.
c. Technique: anesthesia as needed, depending on the type of hyperplasia the tissue can be removed under
tension of a tissue forceps with a cutting motion with a simple incision or by erasing in a grid type motion at
a 90° angle. Sutures or wound dressings will not be needed.
13. Bacterial Reduction
a. Indications: any surface area needing reduction of bacteria.
b. Laser parameters: bacterial reduction program, 200 or 300µm fiber.
c. Technique: irradiate the area to be decontaminated at an incident angle of 90°. Move the fiber in a grid
across the entire area for 5-10 seconds taking care not to overheat the structure.
14. Flap surgery
a. Indications: any area requiring a bloodless flap where compromised vascularity is not an issue, for example
a split thickness flap for a connective tissue graft is not an area where the laser should be used.
b. Laser parameters: flap surgery program.
c. Technique: the initial incision should be made with the 200µm fiber for the first 2mm. The remaining depth
can then be cut with the 300µm fiber, if desired, for more control and coagulation. Prior to suturing the flap
should be refreshed with a blade if primary intention healing is desired.32 Clinical Reference Guide
15. Excisional biopsy
a. Indications: any tissue requiring removal that is indicated for a pathology report.
b. Parameters: Biopsy program, 300 or 400µm fiber.
c. Technique: using a tissue forceps or a suture on the tissue to be excised, place the tissue under tension and
remove tissue using water for cooling to limit the damage to the tissue sample. Tissue carbonization and
blanching are to be voided. Sutures and wound bandages are not needed.
Case courtesy of Michael D. Swick DMD, United States.
Punch biopsy Punch completed
Suture capture of sample Laser removal
Sample removed and placed in biopsy bottle laser coagulation
Coagulation continued Final site coagulatedpowered by technology
16. Retention cyst
a. Indications: any retained cystic tissue.
b. Parameters: Cyst Program, 300 or 400µm fiber.
c. Technique: Access the cyst and with a combination of laser energy and mechanical curettage remove the
cyst keeping it intact if possible.
17. Exposure of Impacted Teeth
a. Indications; removal of impacted teeth or exposure for orthodontic purposes.
b. Parameters: exposure program, 300 or 400µm fiber.
c. Technique; using the laser in a blade type motion, access the impacted tooth and expose either for removal
or placement of an orthodontic appliance.
Case courtesy of Michael D. Swick DMD, United States.
Molar to be exposed for orthodontics Incision
Tissue removal Completed exposure without bleeding
18. Edentulous ridge
a. Indications: removal of excess tissue for preprosthetic surgery.
b. Parameters: edentulous ridge program and 300 or 400µm fiber.
c. Technique: Using tissue forceps place the tissue under tension and remove as needed.34 Clinical Reference Guide
19. Seeping hemorrhage
a. Indications: areas of persistent bleeding.
b. Parameters: Seeping hemorrhage program, 600µm fiber.
c. Technique: Irradiate the area of bleeding at a distance of 2mm from the tissue until a scab-like formation
occurs stopping the bleeding
i. Alternate technique: rinse the area in question and locating the bleeding points. Touching the fiber to the
bleeding points fire the laser until the bleeding stops. Repeat rinsing and firing the laser until all of the
bleeding points have been treated.
Case courtesy of Michael D. Swick DMD, United States.
Molar to be exposed for orthodontics Incision
Tissue removal Completed exposure without bleedingpowered by technology
20. Sulcus preparation
a. Indications: preparing the sulcus for impressions for crowns or for cad cam images for crowns.
b. Parameters: sulcus preparation program or a suitable program of lower average power such as implant
exposure if the power is more than the operator desires. Keep in mind that sulcus preparation is a precision
procedure rather than a speed procedure so lower power may be indicated. Use a 200 or 300µm fiber for
anterior teeth or a 400 or 600µm fiber for posterior teeth.
c. Technique: Moving the fiber parallel to the tooth surface accurately remove the intrasulcular epithelium
clearing the margins for the impression or cad cam image, without removing gingival height.
Case courtesy of Michael D. Swick DMD, United States.
Second case 4 unit anterior bridge
Sulcus preparation complete
Impresson taken
Final insertion of bridge36 Clinical Reference Guide
21. Verrucae
a. Indications: Removal of all Verrucae, wart like and papillomatous lesions.
b. Parameters: Verrucae program and a 300 or 400µm fiber.
c. Technique: Similar to fibroma removal place tension on the lesion with tissue forceps and excise. A deeper
incision may be necessary for these lesions.
Case courtesy of Michael D. Swick DMD, United States.
Verrucae placed under tension with tissue forceps Laser incision
Lesion excised Coagulation of any remaining parts of the lesion
Treatment completepowered by technology
22. Vestibuloplasty
a. Indications: Ill fitting dentures due to high muscle attachments.
b. Parameters: Vestibuloplasty setting and a 400 or 600µm fiber.
c. Technique: Pull the lip and or cheek away to place tension on the tissue relieve the muscle attachments
down to the periosteum working parallel to the alveolar ridge. Do not put excessive energy into the bone.
Relieve the muscles o the depth of the vestibule. Sutures are generally not needed. Reline the denture with
a tissue conditioner or temporary soft reline material and instruct the patient to wear the denture continu-
ously removing only to rinse.
Case courtesy of Michael D. Swick DMD, United States.
23. Root end rescetion
a. Indications: Failed endodontic treatment needing endodontic surgery (apicoectomy/apicesectomy).
b. Parameters: root end resection program and 300 or 400µm fiber.
c. Technique: After exposure of the lesion, granulation tissue can be removed using a combination of the laser
and surgical curettes. After resection of the root apex the area can be decontaminated using the “retro-
grade bacterial reduction” program in the Endodontics section of the laser programs.38 Clinical Reference Guide
powered by technology

2 · Periodontology
The diode wavelengths have desireable charac teristics for peridontsal therapy because of an excellent bacterial
decontamination rate of 99.6%

1.   Pocket treatment
a.   Indications: periodontally generated pain
b.   Parameters: Pocket treatment program under periodontology, T8 glsss rod.
c.   Technique irradiate the painful area for several minutes or until the pain is resolved.

2. Gingivectomy
a. Indications: excessive gingiva, sufficient attached tissue and biologic width is needed.
b. Parameters: 400 or 600µm fiber.
c.	Technique: Angle the fiber at a 45° angle to the tooth long axis, follow the anatomic border of the gingiva
    and excise the desired amount of tissue. A 90° angle may be used if the practitioner later thins the margin
    and creats a bevel with a pencil eraser type motion,

Case courtesy of Michael D. Swick DMD, United States.

3. Internal bevel incisiona
a. Indications: swollen gingiva, excessive pocket depth that will not resolve with conservative treatiment.
b. Parameters: 300, 400, or 600µm fiber. Internal gingivectomy program.
c.	Technique: with a rapid motion make an internal bevel incision and femove the intersulcular epithelium and
    well as lowering the gingival margin to the desired height.
40 Clinical Reference Guide
4. Bacterial reduction
a. Indications: mild to advanced periodontal disease accompanied by bleeding and or bone loss.
b. Parameters: 300 or 400µm fiber. Bacterial reduction program.
c. Technique: Several techniques are documented that work well for this procedure. The main idea is to cover
the entire area of the pocket with laser radiation the will kill the bacteria. Some practitioners start at the
top of the pocket and move apically in a circumferential motion to an area 1mm short of the pocket depth,
some move from the base of the pocket ot the gingival crest while others work vertically with and up and
down motion. All seem to work as long as all of the area is covered. Total time in the pocket is 15 to 30
seconds.
Case Images
X-Ray, first day Pocket depth 6mm
“Bacterial reduction in pocket”, 300µm, 90° hand piece X-Ray 3 month post
5. Decontaminate membranes
a. Indications: any surface which is in need of bacteial decontamination.
b. Parameters: 600 µm fiber decontaminate membranes program.
c. Technique: Using an overlapping motion irradiate the surface to be decontaminated from a distance of
3mm for 2 minutes, taking care not to overheat the surface. Tissue being decontaminated should not co-
agulate (turn white).powered by technology
6. Open curettage
a. Indictions: Pocket depth in excess of 7 mm where access and visualization of calculus for removal is
necessasary.
b. Parameters: A 300,400 or 600µm fiber can be utilized depending on the amount of access that is desired by
the practitioner. The larger the fiber the greater the access.
c. Technique: starting at the gingival margin move circumfrentially around the tooth gradually deepening the
incision until the base of the pocket is reached. A small thin elevator can then be used to aid in visualizing
the calculus as needed for removal.
Case courtesy of Michael D. Swick DMD, United States.
7. Pocket reduction
a. Indications: excessive pocket depth or a need to remodel the gingival architecture to a more favorable state
where the attached gingiva is sufficient for removal, ie.the hard palate.
b. Parameters: 400µm fiber should be used to remove the gingiva utilizind the pocket reduction program.
c. Technique: the tissue removal can be accomplished positioning the fiber parallel to the tooth surface with a
pencil eraser type motion of perpendicular to the surface with a blade type incision.42 Clinical Reference Guide
powered by technology

3 · Endodontics
Diode lasers provide excellent bacterial reduction in endodontic canals. The laser offers much better reduction
than other means. Investigation of the dentinal tublii shows bacterial contamination up to 1,100µm in depth.
Chemical decontamination produces activity up to only 100µm. Diode lasers will produce complete decontamina-
tion up to 1,000µm.

1.	Bacterial decontamination in the canal
a. Indications: all endodontic canals particularly infected canals and canals being retreated.
b. Parameters: 200µm fiber and bacterial reduction program.
c.	Technique: open the canal to a minimum of ISO 30, dry the canal following normal chemical methods with
    a paper point. Mark the canal length on the fiber 1 mm short of the apex. Place the fiber at that length, fire
    the laser while slowly removing it rotating it as you back out. Limit the time to 15 seconds per canal.

Case report from Dr. Leif Nordvall/Unident

Endo treatment at tooth 22                                  X-Ray

Opening canal minimum ISO 30 length with X-Ray              Controlling of the canal

Conditioning the surface with Er:YAG                        Dry the canal with paper tip
44 Clinical Reference Guide
Measuring length of canal and marking at 200 µm fibre Go with fibre until you fell the apex, pull back 1mm press foot-
step and move in circulating motion out of canalpowered by technology 4 · Hard tissue The upper class of laser dentistry is the Er:YAG laser. It is the reason why our patients and dentists have the dream of the painless, vibration free and minimal invasively treatment. The Er:YAG is the best marketing instrument a dentist could have! ! Important user instruction ! • Installation: take hand piece out of the box and remove the two protection caps at the ends. • Remove protection cap from the fibre end at the laser device. • Stick the hand piece very carefully on the hand piece connector at the laser device • Clean the sapphire tip at both ends with alcohol and a softly tissue
46   Clinical Reference Guide

     • Put the sapphire tip in the hand piece, till you can hear a click

     • Work with the sapphire tip approximately in a distance of 1 - 2mm to the surface

     • Insure that there is enough water on the surface from the water spray. (when you get black patches on the
        surface, you have not enough water)
     • Keep the sapphire tip still moving, do not stay on place
     • Keep the sapphire tip in an angle of 30 - 45° degrees to the surface

     • When you want to change the tip, press please at first stop in the program, now you can hear the air for ca. 10
        sec. When the air stops, you can change the tip now. Take care, that the tip is not damaged and that it’s clean.

     • Autoclave procedure: remove carefully the hand piece from the fibre end. Protect the fibre end with the pro-
        tection cap. Now close the hand piece with the two protection caps. Put the hand piece in a plastic bag and
        lay it into the autoclave at 136°C.
powered by technology • Take care that the fibre end is always dry when you put the hand piece on it. • The fibre end must be always closed with the protection cap or hand piece. • Sapphire tips are consumer goods or – materials. • Check the tip regular all 2 - 3 minutes and clean it in the front with alcohol Different tips Generally: the smaller the tip diameter is, the higher is the power density on the surface! 400µm tip: smallest one for excavations and opening fissures 800µm tip: dentin and enamel preparation, apectomie, bone prep, conditioning 1200µm tip: dentin and enamel preparation, apectomie, bone prep, conditioning Paro tip: removement of calculus
48   Clinical Reference Guide

     Bleaching
     A treatment which gets much more famous to every year in aesthetic dentistry is bleaching.

     First step is to clean up the customize. Apply the light or water curing gingival protector at the marginal gingiva
     and the 35% coloured (red or blue) hydro oxygen on the teeth surface, 1 - 2mm thickness.

     Now wait please 3 - 5 minutes, until the bleaching gel will start to oxidize.

     Choose the program “Bleaching” under “Hard tissue” and use T8 glass root. Move in a distance of approximately
     1mm over the gel, in a time of 15 seconds for two teeth.

     Let the gel further 3 minutes on the surface, now wash it up please. When the result is ok, is no further treatment
     necessary, when not, please same procedure again.

     Case report from Dr. Köstlinger/Germany

     Colour B4/A3                                                  after bleaching B2/A2, one treatment
powered by technology Combined perio program Is the combined program where you can remove the tartar in the first step, second step is the bacterial reduction in pocket. After activating the program in the menu under hard tissue/combined perio program, you can choose the single treatment steps over the buttons on the footstep. Green button is for diode and blue for the Er:YAG, the LED under the display is showing you which side is activated. Case Images
50   Clinical Reference Guide

     Hard tissue ablation low, med & high
     Indications are excavation and etching/conditioning with low settings and 400µm/800µm or 1200µm tipp.

     Dentin preparation and pulp near dentin preparation with 800µm or 1200µm tipp have to be done with the med
     settings.

     For enamel preparation you have to choose the program with high settings. Please use 800µm or 1200µm tipp,
     avoid the using of the 400µm tipp with these settings.

     Case Images

     Preparation with med settings and
     800µm tipp

     After preparation and conditioning   The result
powered by technology 5 · Softlaser/Therapy The therapy laser (LLLT – low level laser therapy) is a good instrument for a pain reduction, better wound healing and a biostimulation. Please work always under contact with the T8 (T – therapy, 8 – diameter 8mm). Between the single treatments, there should be a time of 12 hours. Aphtha The second possibility to treat aphtha is the treatment with the softlaser. Under the chapter of surgery we had the other way of aphtha treatment, the surgical way. This program is a softlaser program which could reduce the pain without anaesthesia. Choose the program “Aphtha”, use the T8 glass root (“T” for Therapy, “8” for diameter 8mm), go under contact on the aphtha, press the footstep, time is limited, laser stops the program automatically. Case report from Leif Nordvall/Unident Sweden First day in the morning second day in the evening, after 3 treatments Case report Patient with an aphta case, treatment with the softlaser in the program „Aphta“. Aphta was one day old and hurted much. Patient gets three treatments, at the first day in the evening, at the second day in the morning and in the evening. Patient felt after every treatment a relief. In the evening of the second day the patient felt nearly no pain and aphtha was nearly healed.
52   Clinical Reference Guide

     Decubital ulcer
     Case Images

     Herpes labialis
     Choose under “Therapy” the program “Herpes Labialis”. Use the T8 glass root for the therapy. Treat the herpes
     labialis for the fixed time in the program, when treatment is finished, laser stops automatically.

     Case report from Dr. G. Bach/university Freiburg

     First day in the morning                                 second day in the evening, after 3 treatments
powered by technology Suppress gag reflex Please us T8 glass root and the acupuncture points LG25 and HG 27. Case Images
54 Clinical Reference Guide
powered by technology

6 · Specials
Depigmentation
Use the normal hand piece for this indication with the 600µm fibre. A small anaesthesia could be sensefull,
choose the program “Surgery general” and move fast in a distance approximately 1mm over gingival. After treat-
ment you have to wait two or three days to control the result. When result is not OK, treat it again.

Case report from Dr. Kenneth Luke/Hong Kong

Pre - OP                                                  1 week post - OP

Pre - OP                                                  3 week post - OP
You can also read