Use Guide for Sending Documents with
←
→
Page content transcription
If your browser does not render page correctly, please read the page content below

Use Guide for Sending Documents with
DocuSign for Senders

         Contents
         Welcome to DocuSign for Senders    3
         The Benefits of Using DocuSign     3
         DocuSign Guiding Principles        3
         DocuSign Terminology               5
         Email Phishing                     6
         Sending DocuSign Envelopes         6
         Basic Sending Steps                6
         Using a Template                  10
         Add a Template to an Envelope     11
         The Manage Page                   13
         DocuSign Support                  14
         Clearing Browsers                 14

         Revised: 1/7/2020                  2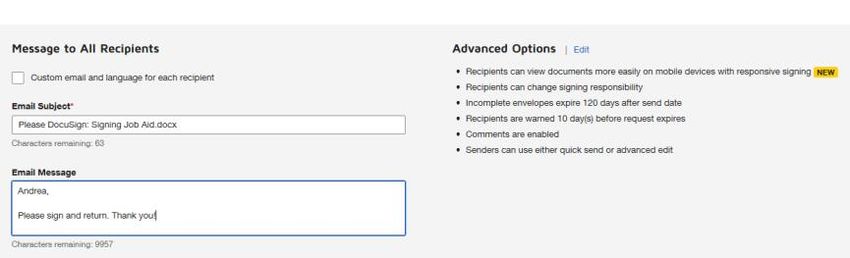
DocuSign for Senders

 Welcome to DocuSign for Senders
              Imagine doing business with any campus department or employee, anywhere and at any time,
              without the need to print, sign, or email back and forth multiple times. Now imagine the
              number of resources that can be saved by doing business electronically.

              Introducing DocuSign at UCSC!

              DocuSign is a self-service tool that allows members of the campus to create and route electronic
              documents for signatures.

               The Benefits of Using DocuSign
               ● Provides a complete audit trail of signatures.
               ● No faxing, scanning, or copies needed.
               ● Reduces paperwork error rates and rework.
               ● Saves time, money, and resources.

               ●       Use it from any smartphone or device, anywhere, anytime.
               ●       Sign, send, and receive documents in minutes. Drag and drop
                       your own signature into documents with a few clicks or swipes.

 DocuSign Guiding Principles
               ● Contracts: All contract signatures at UCSC are subject to the University’s policies. Please
                 ensure that people added as signers to the routing are operating within their designated
                 signatory authorization for contracts and agreements.
               ● Form Ownership: Each campus form (and associated process) is managed by a campus
                 office. All staff, faculty, and students have the ability to sign documents through
                 DocuSign using University credentials to access Single-Sign-On service.
               ● DocuSign has been approved for internal routing and legally-binding electronic signature
                 collection.
               ● Access to UCSC's DocuSign account is made through the University’s Single Sign-On (SSO)
                 service. Use of the University’s DocuSign tool should be limited to University business
                 and operations.
               ● Individual’s personal business and matters should not be conducted utilizing the
                 University DocuSign account.

         Revised: 1/7/2020                                                                              3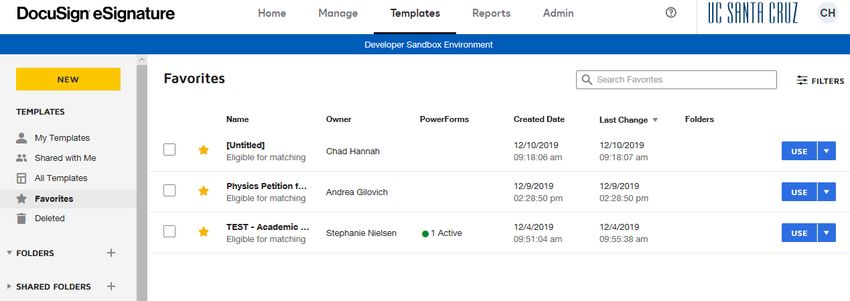
DocuSign for Senders

               ● Any employee who is authorized to sign an agreement on behalf of the University and
                 signs via DocuSign must sign the agreement using their CruzID @ucsc email address and
                 have their signature authenticated into the system. An employee signature that does not
                 employ this method at the time of signature may not be binding. Email aliases are not
                 supported. Signers are requested to notify senders of their primary UCSC email address.
               ● An employee signer is prohibited from delegating signing authority via
                 DocuSign to those who are not otherwise authorized delegated
                 signatories.
               ● Employees, including student employees, are required to sign with DocuSign when sent
                 documents for electronic signature transactions to conduct University business.
               ● Individuals, including students, and external parties not affiliated with or employed by
                 the University, are asked to utilize DocuSign for electronic signature transactions when
                 sent documents to conduct business with the University through DocuSign, unless the
                 University or the external party opts out of conducting such transaction electronically.
                 See opt-out procedures below.
               ● All employee signers are required to read the ELECTRONIC RECORD AND SIGNATURE
                 DISCLOSURE found in the DocuSign account under “PREFERENCES” or under the “MORE”
                 tab prior to signing.

               It is important to remember that DocuSign is not a system of record retention. All documents
               are purged every 90 days. An employee executing a document via DocuSign is responsible for
               maintaining the fully-executed document, including all attachments, and the certificate of
               completion (CoC), in a manner consistent with the University’s Record Retention Policy and
               their own departmental requirements.

               For the review of Acceptable Uses and Guiding Principles of DocuSign, please visit:
               Acceptable Uses and Guiding Principles

         Revised: 1/7/2020                                                                            4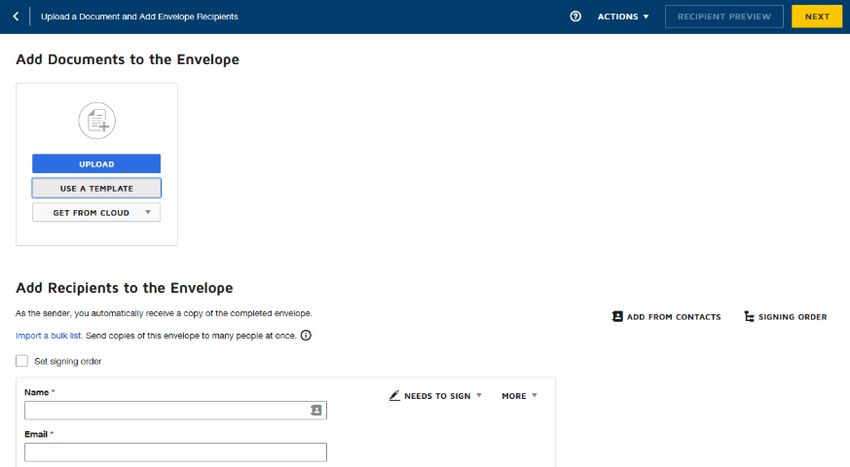
DocuSign for Senders

 DocuSign Terminology
              Envelope
              ● Envelope is a DocuSign transaction that is comprised of the documents you send for
                 signature, and the recipient and other information that you associate with it.

              Initiator
              ● Initiator is the individual who initiates and sets up the DocuSign transaction.

              Locate Template
              ● Action Required: envelopes awaiting your actions, which you need to either sign or view.
              ● Waiting for Others: envelopes sent by you that are waiting for others to act on, wither to
                 sign or to view.
              ● Expiring Soon: in process envelopes that are due to expire within six days.
              ● Completed: envelopes with the status Completed, either sent or received.
              Recipient
              ● Recipient is an individual who will receive and / or sign the document.

              Recipient Actions Options
              ● Needs to Sign: recipient must complete the required fields assigned to them, such as
                 signature, initial, date.
              ● Receives a Copy: recipient receives a copy with no further action needed.
              ● Needs to view: recipient must open and view document.

              Signing Order
              ● Signing Order: allows sender to control the order in which recipients receive and sign
                  documents.
              ● Sequential Routing Order: each recipient receives the email notification once the previous
                  recipient has completed their action.
              ● Parallel Routing Order: when Set Signing Order feature is disabled.

              Template
              ● Template is a commonly used document that is ready to send out using DocuSign.

         Revised: 1/7/2020                                                                             5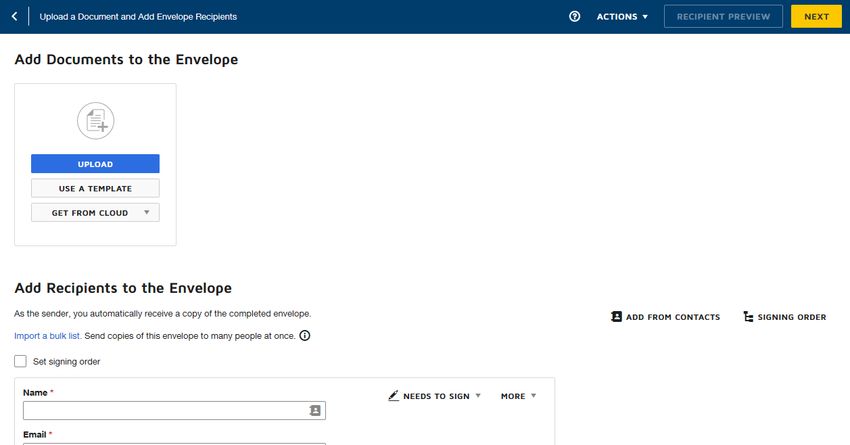
DocuSign for Senders

              Email Phishing
              An important reminder regarding phishing emails:
              We all do our best to be up-to-date on phishing scams. Since the process of DocuSign is for
              recipients to open an envelope from an email request, please remember that they may not
              initially recognize the request and delete the envelope.
              If this happens, we’ll show you how to quickly recreate the request to be sent to the recipient
              again.

              Sending DocuSign Envelopes
              All transactions, including signing, sending, and using Power Forms, will require either you or
              the system to use an envelope. Think in terms of how you’d send a real envelope, only now
              we’re able to save on resources using DocuSign.

              As we review the details of sending an envelope, we’ll be reviewing basic sending steps. As we
              move through the training, we’ll also review how to create and use templates.

              Basic Sending Steps

              The basic steps for creating and sending a document for signatures include:
              ● Send an envelope: You can start with a new envelope, use a template stored in DocuSign
                 eSignature, or finish a previously saved draft.
              ● Add your documents: DocuSign eSignature supports a broad variety of file formats.
              ● Add recipients: Specify who receives your envelope and what action you want them to
                 take. As a reminder, documents cannot be sent to an alias address.
              ● Add messages: Enter the email subject and message details for your recipients.
              ● Advanced Options: Set special recipient privileges, reminder settings, and expiration
                 options.
              ● Add fields: For each recipient, add fields to your documents to gather the desired electronic
                 signatures and other information, such as title, date signed, and more.
              ● Preview and send: Review your field setup and send the envelope to your recipients.

         Revised: 1/7/2020                                                                                6
DocuSign for Senders
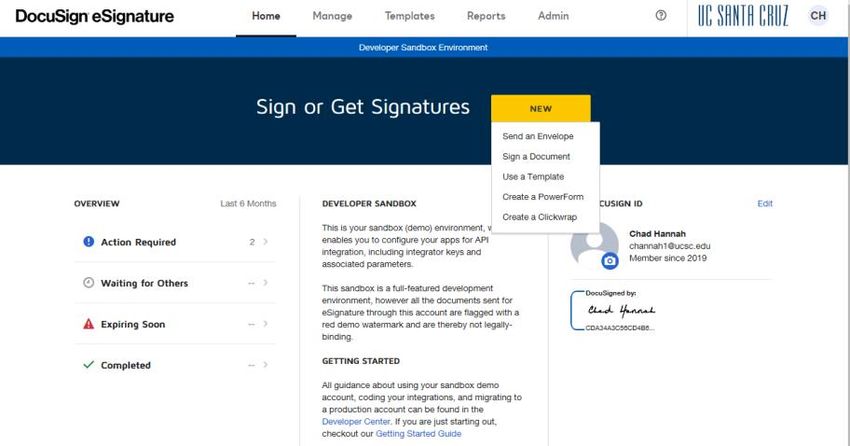
Step 1: Send an Envelope
From your DocuSign Account, click NEW, then click Send an Envelope.
Step 2: Upload your document
Click UPLOAD A FILE to upload a document from your computer. Locate the document you want
to upload and click Open.
Revised: 1/7/2020 7DocuSign for Senders
Step 3: Add the recipient
In the RECIPIENTS field, enter the recipient's name and email address. Click the drop-down
NEEDS TO SIGN option to identify the action you want the recipient to take.
Step 4: Add the email subject and message
DocuSign automatically adds
an email subject when you
upload a document.
You can edit this subject and add a message to the recipient by filling in the MESSAGE fields.
Click NEXT.
Step 5: Add signing fields
The Fields Palette containing the tags and your document will appear. The recipient name is
displayed in the Recipients List. To assign a signature or other tag for the recipient, click and
drag a tag from the Fields Palette and place it on the document. You can click on the pages to
the right to change the page displayed.
In this scenario, we have two pages in the document, and we’re looking for one signature on the
first page.
Revised: 1/7/2020 8DocuSign for Senders
Recipient
name
To add fields, drag each item from
your Fields Palette into the
document. In this example, we’re
adding a signature request.
Tags
Step 6: Preview and send your document
When you have finished adding documents, recipients, messages, and signing fields, you are
ready to
preview
your
work,
and
send
your
envelope.
From the Add Fields view, the top navigation bar presents options to send, preview, save, or
discard the envelope.
● To save a draft without sending, click ACTIONS and select SAVE AND CLOSE.
● To cancel the envelope preparation and return to your Manage page, click ACTIONS and
select DISCARD.
● To preview your recipients' experience, click RECIPIENT PREVIEW.
● To send your envelope, click SEND.
When you send your envelope, your recipients receive an email notification asking them to
review and sign. If you included yourself as a signer, you can start the signing process from
within your account.
Revised: 1/7/2020 9DocuSign for Senders
For additional information on resending envelopes to one or to all recipients, click here.
Using a Template
Step 1: Navigate to the Templates page. Select the template collection you want to select from.
My
Templates: Contains all of the templates you created or were transferred to your ownership.
Shared with Me: Contains all the templates that are shared with you, either directly or through
a shared folder. If you are an account admin, Shared with Me will include all templates on the
account that you do not own.
o All Templates: Contains all templates to which you have access. This collection includes your
own templates and those shared with you.
o Favorites: Contains all templates you mark as a favorite. You can have up to 50 favorite
templates.
4. Deleted: Contains all templates you have recently deleted. Locate the template you want to use
by searching, filtering, or simply scanning the list. To use the template to start a new document,
click USE.
5.
6. A new envelope will open with your template settings loaded.
Revised: 1/7/2020 10DocuSign for Senders
Step 2: Enter your Message to All
Recipients subject and text. If your
template includes a message
subject and text, that information
is added to your envelope. You can
use the template message as is, or
modify it.
TIP: If you send the same envelope
over and over, enter a custom
subject line. If you use the default
subject as is, the envelopes will all
be titled the same, making it hard
to identify a particular one.
● To review the recipient fields, click NEXT.
● To send your envelope click SEND.
Add a Template to an Envelope
If you start an envelope, you can add one or more templates to the envelope. You can add other
documents, recipients, and fields to the envelope separate from the templates you add.
Step 1: From the Home or Manage page, start a new envelope from NEW > SEND AN
ENVELOPE. Or from the Prepare
view, under Add Documents to
the Envelope, click USE A
TEMPLATE.
Step 2: In the Select Templates
dialog, browse or search through
the template collections at left and select one or more templates to use.
Revised: 1/7/2020 11DocuSign for Senders
Step 3: Click ADD SELECTED. The documents, recipients, messages, and recipient fields are
added to your document.
Revised: 1/7/2020 12DocuSign for Senders
The Manage Page
The Manage page provides a convenient workspace for all of your envelope management
activities:
● Access all details of your sent, received, and in process envelopes
● Use the convenient filters to find envelopes by status, sender, or date quickly and easily
● Create custom folders to file and organize your envelopes
● Resume preparing your draft envelopes with a single click
● Start a new envelope
● Take further action, such as sign, correct, create a copy, void, delete, or remind your
recipients to sign.
Revised: 1/7/2020 13DocuSign for Senders
DocuSign Support
If you are having issues logging in, downloading, sending or signing a document; one quick solution
is to try and clear the cache and cookies in your browser. This can be a quick fix for your issue. If you
have cleared your cache and cookies and are still having issues, there are three options for you to
use:
1. Visit the DocuSign Support Center at https://support.docusign.com. You can open a ticket
with DocuSign directly.
2. Open a ticket with ITS (website).
3. Third option listed here.
● DocuSign is supported in the browsers listed below:
● Chrome
● Firefox
● Microsoft Edge
● Internet Explorer 9+
● Opera
● Safari
Mobile Browsers
● Android
● iOS/Apple
Clearing Browsers
Chrome
1. Open chrome://history/ in a new tab.
2. Click on Clear Browsing Data.
3. Check Cookies and other site and plug-in data.
4. Check Cached images and files.
5. From the Obliterate drop-down menu, you can choose the period of time for which you want
to clear cached information. To clear your entire cache, select the beginning of time.
6. Click Clear browsing data.
7. Exit/close all browser windows and re-open the browser.
Revised: 1/7/2020 14DocuSign for Senders
Firefox
1. From the History menu, select Clear Recent History.
2. If the menu bar is hidden, press Alt to make it visible.
3. From the Time range to clear drop-down menu, select the desired range; to clear your entire
cache, select Everything.
4. Next to "Details", click the down arrow to choose which elements of the history to clear; to
clear your entire cache, select all items.
5. Click Clear Now.
6. Exit/close all browser windows and re-open the browser.
Microsoft Edge
In the top right, click the Hub icon (looks like three horizontal lines).
Click the History icon, and then select Clear all history.
1. Select Browsing history, then Cookies and saved website data, and then Cached data and
files. Click Clear.
2. After the "All Clear!" message appears, exit/close all browser windows and re-open the
browser.
Safari 8
1. From the Safari menu, select Clear History and Website Data
2. Select the desired time range, and then click Clear History.
3. Go to Safari > Close Safari or press Command-Q to exit the browser completely.
1.
Revised: 1/7/2020 15You can also read