USER GUIDE X-Station 2 - Version 1.00 English - EasySecure International
←
→
Page content transcription
If your browser does not render page correctly, please read the page content below
X-Station 2
USER GUIDE
Version 1.00
English

EN 102.00.XS2 V1.00A
Contents

  Safety instructions .............................................................................. 4
     Instructional icons

  Introduction ......................................................................................... 6
     Components
     Name and function of each part
         Cables and connectors
     How to scan a QR code/barcode

  Admin Menu ......................................................................................... 11
     All Menus

  User ..................................................................................................... 12
     Registering user information
     Modifying User Information
     Delete All Users
     View User Usage

  Authentication ................................................................................... 14
     Auth Mode
         Modifying Auth Mode
         Delete Auth Mode
         Add Auth Mode
     Operation
     QR/Barcode Operation

  T&A Mode ........................................................................................... 16

  Display & Sound ................................................................................ 17

  Network .............................................................................................. 18
     Network Settings
         Ethernet
         Server
         Serial Setting

  Device .................................................................................................. 20
     Relay
     Date & Time
     Daylight Saving Time
     Device Info
     Memory Info
     USB Memory
     Secure Tamper
     Restart Device
     Restore Default
     User ID Type

  Event Log ........................................................................................... 25
Safety instructions

   Search Log
   Delete All Logs
   View Log Usage

Troubleshooting ................................................................................ 27
   Checklist before reporting a failure

Product specifications ...................................................................... 28
   Dimensions
      XS2-QAPB, XS2-QDPB
      XS2-APB, XS2-QDPB

FCC compliance information........................................................... 30

EU Declaration of Conformity (CE) ............................................... 30

Appendices ......................................................................................... 31
   Disclaimers
   Copyright notice
   Open Source License
      GNU General Public License
      BoringSSL License
      OpenSSL License
      Original SSLeay License
      Apache License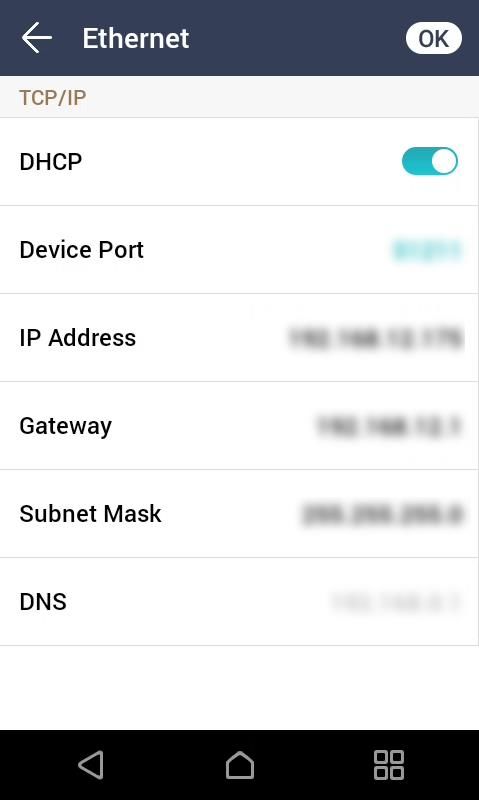
Safety instructions

Safety instructions
Please read this safety instructions before you use the product to prevent injury to yourself and others and to prevent
property damage. The term 'product' in this manual refers to the product and any items provided with the product.

Instructional icons

       Warning: This symbol indicates situations that could result in death or severe injury.

       Caution: This symbol indicates situations that may result in moderate injury or property damage.

       Note: This symbol indicates notes or additional information.

      Warning

Installation
Do not install or repair the product arbitrarily.
•   This may result in electric shock, fire, or product damage.
•   Damages caused by any modifications or failure to follow installation instructions can void your manufacturer’s
    warranty.
Do not install the product in a place with direct sunlight, moisture, dust, soot, or a gas leak.
•   This may result in electric shock or fire.
Install the product in a well-ventilated and cool place away from direct sunlight to prevent overheating when
installing it outside.
Do not place the product inside the sealed enclosure when installing it outside.
•   It increases the internal temperature of the enclosure and this may result in electric shock, fire, or malfunction.
Do not install the product in a location with heat from an electric heater.
•   This may result in fire due to overheating.
Install the product in a dry location.
•   Humidity and liquids may result in electric shock or product damage.
Do not install the product in a location where it will be affected by radio frequencies.
•   This may result in fire or product damage.

Operation
Keep the product dry.
•   Humidity and liquids may result in electric shock, fire, or product damage.
Do not use damaged power supply adaptors, plugs, or loose electrical sockets.
•   Unsecured connections may cause electric shock or fire.
Do not bend or damage the power cord.
•   This may result in electric shock or fire.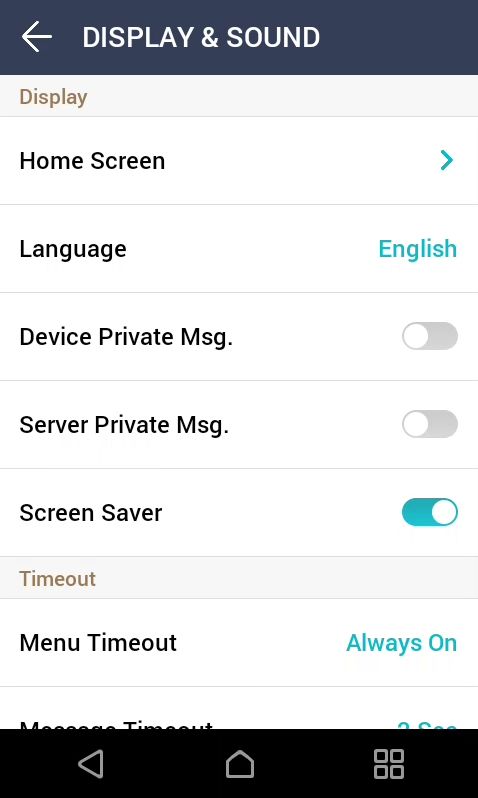
Safety instructions

       Caution

Installation
Do not install the product under direct sunlight or UV light.
•      This may result in product damage, malfunction, discoloration, or deformation.
Do not install the power supply cable in a location where people pass by.
•      This may result in injury or product damage.
Do not install the product near magnetic objects, such as a magnet, TV, monitor (especially CRT), or speaker.
•      The product may malfunction.
Keep the minimum distance between products when installing multiple products.
•      The product may be affected by radio frequencies emitted by other products and the product may malfunction.
Use only a power supply adaptor of either D.C 24 V and 800 mA or higher or D.C 12 V and 1,500 mA or higher.
•      If the right power supply is not used, the product may malfunction.
Use a separate power supply for the Secure I/O 2, electric lock, and the product.
•      If connecting and using the same power supply, the product may malfunction.
Do not connect and use the power supply and Power over Ethernet (PoE) simultaneously.
•      The product may malfunction.

Operation
Do not drop the product or cause impacts to the product.
•      The product may malfunction.
Do not disclose the password to others and change it regularly.
•      This may result in illegal intrusion.
Do not press buttons on the product by force or do not press them with a sharp tool.
•      The product may malfunction.
Do not store your product in very hot or very cold places. It is recommended to use your product at temperatures
from -20 °C to 50 °C.
•      The product may malfunction.
When cleaning the product, mind the following.
•      Wipe the product with a clean and dry towel.
•      If you need to sanitize the product, moisten the cloth or the wipe with a proper amount of rubbing alcohol and gently
       clean all exposed surfaces including fingerprint sensor. Use rubbing alcohol (containing 70% Isopropyl alcohol) and a
       clean, non-abrasive cloth like lens wipe.
•      Do not apply liquid directly to the surface of the product.
Do not use the product for anything other than its intended use.
•      The product may malfunction.

    RTC battery
    Replacing the battery with an incorrect type of battery may cause explosion.
    Discard the battery according to the appropriate regional or international waste regulations.
Introduction

Introduction

Components

                                                     Device and Wall Bracket                       Drilling Template
    Device and Wall Bracket
     (XS2-QAPB, XS2-QDPB)                              (XS2-APB, XS2-DPB)

                                                                  Diode                              120 Ω resistor
             Cables

                                PVC Anchor x2                Fixing Screw x2                       Bracket Fixing Screw
  Ferrite Core
                                                                                                      (Star Shaped)

                                     Shrink Tube                          Quick Guide              Open Source Software
    Cable Cover
                                                                                                          Guide

     •    Components may vary according to the installation environment.
     •    When assembling the product with the bracket, you can use the included bracket fixing screw (Star Shaped) instead of the
          product fixing screw for enhanced security.
     •    For more details regarding the product, visit the Suprema website (https://www.supremainc.com) and refer to the user
          guide.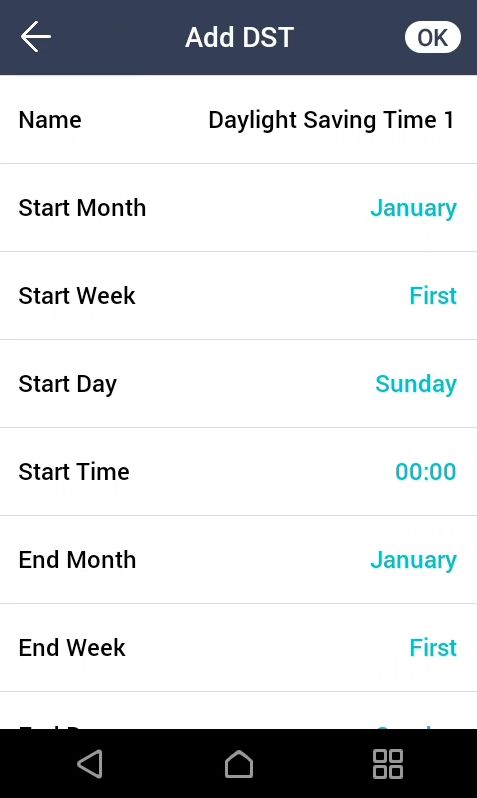
Introduction

Name and function of each part

                     Camera

                 LCD screen

   RF card and mobile access
     card authentication unit

             QR code/Barcode
          authentication unit

    USB (Type-C) cable slot

             Cable connector

                    Speaker

             Name                                                    Description

Camera                          Captures actual images.

LCD screen                      Provides UI for operation.

RF card and mobile access
                                Part to scan a RFID card or mobile access card for entrance.
card authentication unit
QR code/Barcode
                                Part to scan a QR code or barcode for entrance.
authentication unit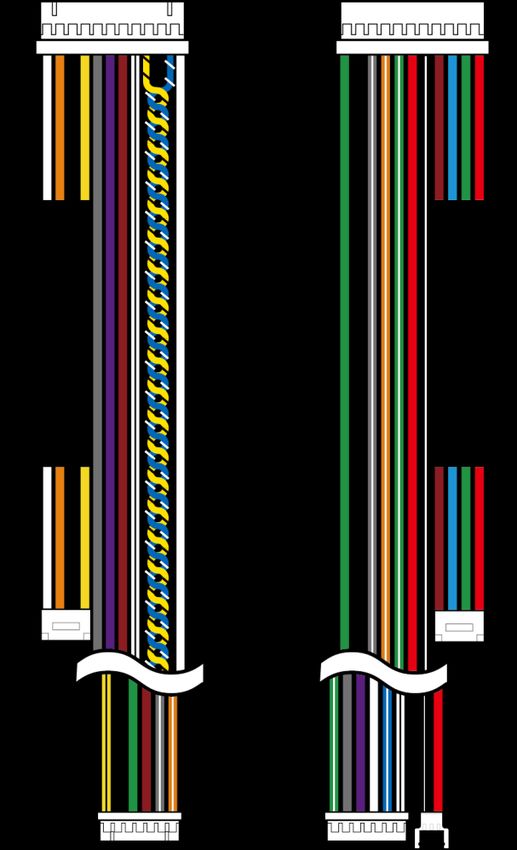
Introduction

USB (Type-C) cable slot           Connects the USB cable.
                                  Connects cables.
                                  • Power supply
                                  • Ethernet + PoE
Cable connector                   • RS-485
                                  • Wiegand input and output
                                  • TTL input
                                  • Relay
Speaker                           Delivers sound.

       •    Only XS2-QAPB and XS2-QDPB models support QR code/barcode authentication.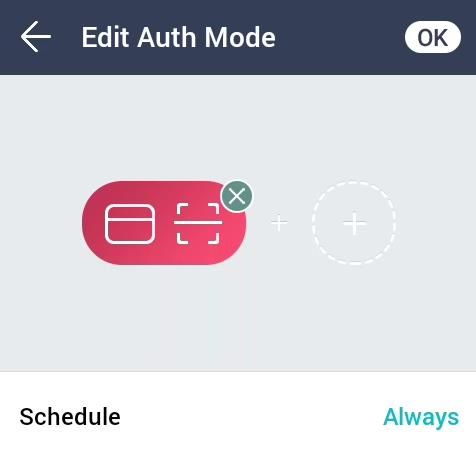
Introduction

Cables and connectors

                           Cable       PIN         Name           Color

                        RJ-45         1      ENET TXP      White
                        (Ethernet +
                                      3      ENET TXN      Orange
                        PoE)
                                      5      ENET RXP      Black

                                      7      ENET RXN      Yellow

                        TTL input     9      TTL GND       Gray

                                      11     TTL IN0       Purple

                                      13     TTL IN1       Brown

                        RS-485               485 GND       White (Black
                                      15
                                                           stripe)

                                             485 TRXN      Yellow (Black
                                      17
                                                           stripe)

                                             485 TRXP      Blue (White
                                      19
                                                           stripe)

                        Wiegand       21     WG D1         White

                                      22     WG D0         Green

                                      20     WG GND        Black

                        Relay                RLY NO        Gray (White
                                      18
                                                           stripe)

                                             RLY NC        Orange (White
                                      16
                                                           stripe)

                                             RLY COM       Green (White
                                      14
                                                           stripe)

                        Power         12     PWR +VDC      Red

                                             PWR GND       Black (White
                                      10
                                                           stripe)

                        RJ-45         8      VB2           Brown
                        (Ethernet +
                                      6      VB2           Blue
                        PoE)
                                      4      VB1           Green

                                      2      VB1           Red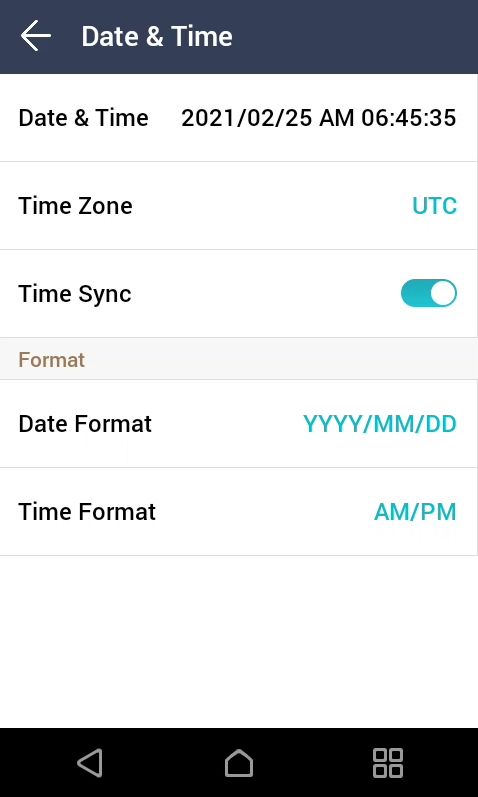
Introduction

How to scan a QR code/barcode
You can issue a QR code/barcode to a user and use it as an authentication method. Scan the QR code/barcode pr
operly by following the instructions on the screen to increase the recognition rate.

                                 •   Keep 5 cm to 20 cm of distance between the QR code/Barcode authentication unit of
                                     the device and the QR code/barcode.
                                 •   Hold the smartphone with the screen facing towards the QR/Barcode code
                                     authentication unit and place the guide beam at the center of the QR code.
                                 •   When authenticating with the QR code/barcode downloaded to your smartphone,
                                     adjust the brightness of your smartphone so that the device can read the QR
                                     code/barcode clearly.
                                 •   If you do not follow the instructions on the screen, it may take a long time to scan the
                                     QR code/barcode, or it may fail.

          •    Only XS2-QAPB and XS2-QDPB models support QR code/barcode authentication.
          •    You can issue QR codes only on BioStar 2. For more information on how to issue a QR code/barcode, refer to BioStar 2
               Administrator's manual.
Admin Menu
All Menus
1 Press and authenticate with the Admin level credential.
2 Select the desired menu.
• If the administrator has not been designated, the menu screen will be displayed when you press .User
User
Registering user information
The user information including credentials can be registered.
1 Press and authenticate with the Admin level credential.
2 Select USER > , and choose a credential you want to register.
There are two steps for the user registration. Some options are available after the credential has been registered
• : Take a picture of a user with the built-in camera.
• Name: Enter the username.
• ID: Enter a number between 1 and 429467295 to register as the user ID. If User ID Type set to Alphanumeric, a
combination of alphanumeric characters and symbols (_, -) can be used for the ID. Up to 32 characters can be input.
• Card / QR Code: Register a card for user authentication. Press and scan the card which will be assigned to the
user. To register an additional card, press again. You can issue QR codes only on BioStar 2.
• PIN: Enter the PIN you wish to use. Enter the PIN you wish to use, and then enter the same PIN again for
confirmation. Enter a number between 4 and 16 digits to prevent leaking.
• Operator Level: Select the level you wish to assign to a user.
Available menus vary according to the set user level.
• None: This is the general user level and menus cannot be accessed.
• Administrator: All menus can be accessed.
• Configuration: AUTHENTICATION, DISPLAY & SOUND, NETWORK, DEVICE, and EVENT LOG menus can be
accessed.
• User Management: USER and EVENT LOG menu can be accessed.
• Period: Set an expiry date to use the user account.
• Access Group: Select an access group for the user. Access groups can be registered only in BioStar 2.
• Private Auth Mode: Change the authentication method according to the user.User
Modifying User Information
User Management or Administrator can modify the registered user information. A card can be added, and PIN and level can
be modified.
1 Press and authenticate with the Admin level credential.
2 Press USER > .
3 Select your search terms. You can search for a user by All, User ID, Name, and Card / QR Code.
4 Select a user you wish to modify.
5 Modify the information by referring to Registering User Information and press OK.
• To delete a user, select and then press OK.
• Access Group can be registered in BioStar 2. For detailed contents regarding registering an access group, refer to the
BioStar 2 Administrator Manual.
Delete All Users
You can delete all registered users at once.
1 Press and authenticate with the Admin level credential.
2 Select USER > .
3 Check Delete All to delete all registered users and press OK.
4 When you press OK, all registered users will be deleted.
View User Usage
You can see the number of registered users, and cards at a glance.
1 Press and authenticate with the Admin level credential.
2 Select USER > . User usage information appears.Authentication
Authentication
Auth Mode
Modifying Auth Mode
You can set the authentication method and schedule according to each credential. You can set up to 3 auth modes.
1 Press and authenticate with the Admin level credential.
2 Select AUTHENTICATION > Auth Mode.
3 Select the authentication mode to modify.
4 When you press , the selected credential will be deleted, and when you press , available credentials to be added
will be displayed on the screen.
5 Set the desired auth mode and select a schedule.
Category Description
• : Mode to use a card or QR code only.
Card / QR
Code • + : Mode to authenticate with a card or QR code, and then enter PIN.
User ID • + : Mode to enter ID and then enter PIN.
6 When you press OK, settings will be saved.
• The icon image may differ depending on the model you use.
• A schedule can be set in BioStar 2. If there is no set schedule, only can be selected.
• For detailed contents regarding setting a schedule, refer to BioStar 2 Administrator's manual.Authentication
Delete Auth Mode
1 Press and authenticate with the Admin level credential.
2 Select AUTHENTICATION > Auth Mode.
3 Press and select the authentication mode to delete. You can select multiple options.
4 Press OK. To delete the selected option, press OK. Or, press Cancel to cancel the deletion.
Add Auth Mode
You can register up to 3 auth modes.
1 Press and authenticate with the Admin level credential.
2 Press Authentication > Auth Mode.
3 Press .
4 Set the desired auth mode by pressing , and then select a schedule.
5 When you press OK, the auth mode will be added.
Operation
1 Press and authenticate with the Admin level credential.
2 Press AUTHENTICATION and then modify items below Operation.
• Face Recognition: When you set Face Recognition, X-Station 2 can detect real face, and authentication can be done
only when a face is detected after authenticating with a card, QR code, or PIN.
• Auth Timeout: If the authentication is not completed during a set time, the authentication will fail. You can set a
time between 3 seconds and 20 seconds.
• Server Matching: When you set Server Matching, the user authentication is not carried out in the device, but
instead is carried out in BioStar 2. Server Matching can be useful when there is a large amount of user information
in the device or you do not wish to publicly expose the device where user credential information is saved.T&A Mode
QR/Barcode Operation
1 Press and authenticate with the Admin level credential.
2 Press AUTHENTICATION and then modify items below QR/Barcode Operation.
• QR/Barcode: Set to use QR code or Barcode to authenticate.
• QR/Barcode Scan Timeout: If you do not scan the QR code or Barcode within the set time, the authentication will
fail. You can set a time between 4 seconds and 10 seconds.
T&A Mode
You can set how to register T&A Mode.
1 Press and authenticate with the Admin level credential.
2 Press AUTHENTICATION and then modify items below T&A Mode.
3 Select and set the desired item.
• T&A Mode: Set the method to use T&A mode.
• T&A Code: You can register T&A events. Select T&A Code > to register a T&A event and set an icon, name of
T&A event, and schedule.
• T&A Required: Set to require a user to select a T&A event when authenticating.
• Fixed T&A Key: Set to use only a T&A event selected by the administrator. This option can be used when Fixed is
set for T&A Mode.
• Job Code: Select whether to use Job Code.
4 To save settings, press OK.Display & Sound
Display & Sound
You can change the display and sound settings of the device.
1 Press and authenticate with the Admin level credential.
2 Press DISPLAY & SOUND.
3 Change the desired item.
• Home Screen: Select items to be displayed in the background of the home screen.
• Language: Set the language you wish to use.
• Device Private Msg.: Set whether to use a Private Message, which will be displayed on the screen when the user
authenticates. You can set Device Private Msg. by using the BioStar 2 Device SDK.
• Server Private Msg.: Set whether to use a Private Message, which will be displayed on the screen when the user
authenticates. You can set the Server Private Msg. by using the BioStar 2 API. If you have not set it on the server,
the device does not display a message when authentication is successful even if Server Private Msg. is enabled on
the device.
• Screen Saver: Set this option to use the screen saver feature. It reduces unnecessary energy consumption by
lowering the brightness of the LCD screen when the device is not in use.
• Menu Timeout: Set the time (sec) for the menu screen to disappear automatically. If there is no button input during
a set time, the screen will return to the home screen.
• Message Timeout: Set the time (sec) for a setting complete message or information message to disappear
automatically.
• Backlight Timeout: Set the time (second) to turn off the lighting of LCD screen.
• Voice Instruction: Set to use the voice instruction instead of alarm sounds.
• Volume: Set the volume.
• Refer to the BioStar 2 Device SDK webpage on the Suprema Knowledge Base website (kb.supremainc.com/bs2sdk/)
for more information on the BioStar 2 Device SDK.Network
Network
Network Settings
You can change the network settings of the device.
Ethernet
1 Press and authenticate with the Admin level credential.
2 Select NETWORK > Ethernet.
3 Change the desired item.
• DHCP: Set whether to use DHCP. If DHCP setting is disabled, the user can modify Port, IP Address, Gateway,
Subnet Mask, and DNS.
• Device Port: Set the device port.
• IP Address: View the IP address of the device. To modify, disable DHCP setting.
• Gateway: View the gateway of the device. To modify, disable DHCP setting.
• Subnet Mask: View the subnet mask of the device. To modify, disable DHCP setting.
• DNS: Set the DNS server address.
4 To save settings, press OK.Network
Server
1 Press and authenticate with the Admin level credential.
2 Select NETWORK > Server.
3 Change the desired item.
• Device -> Server: You can send a connection signal from the device to a server with the input information directly.
When you select Server -> Device, Server IP, Server URL and Server Port cannot be entered.
• Server IP: Enter the IP address of the PC on which BioStar 2 is installed. Input is accepted only when Device ->
Server is set for Connection Mode.
• Server URL: Enter server URL instead of Server IP. Input is accepted only when Device -> Server is set for
Connection Mode.
• Server Port: Enter the port of the PC on which BioStar 2 is installed. Input is accepted only when Device -> Server
is set for Connection Mode.
4 To save settings, press OK.
Serial Setting
1 Press and authenticate with the Admin level credential.
2 Select NETWORK.
3 Change the desired item.
• RS-485: Select the RS-485 mode.
• Baud Rate: Select the desired baud rate.
4 To save settings, press OK.Device
Device
Relay
You can set the open time and the input port of the exit button in the device.
1 Press and authenticate with the Admin level credential.
2 Select DEVICE > Relay.
• Relay: You can set whether relay is enabled or not. To set the open time and the input port of the exit button,
activate this option.
• Open Time: Set the duration for the door to remain open when standard user authentication has been carried out.
• Exit Button: Select the input port where the exit button is connected.
• Switch: Select the relay type (N/O or N/C).
Date & Time
You can set date and time. Set the date and time accurately to collect accurate log data.
1 Press and authenticate with the Admin level credential.
2 Select DEVICE > Date & Time.
3 Change the desired item.
• Date & Time: Check the current date and time. To modify it manually, disable Time Sync.
• Time Zone: Set the time reference of the current location.
• Time Sync: Synchronize the server and the time. If you wish to synchronize the server and the time, enable Time
Sync.
• Date Format: Set the date format. You can select among YYYY/MM/DD, MM/DD/YYYY and DD/MM/YYYY.
• Time Format: Set the time format. You can select either 24-Hour or AM/PM.Device
Daylight Saving Time
You can use the device by applying daylight saving time. Set the start and end time correctly.
1 Press and authenticate with the Admin level credential.
2 Select DEVICE > Daylight Saving Time and press to add additional daylight-saving time.
3 Select the desired item and change the setting.
• Name: Set the name of daylight-saving time.
• Start Month / Start Week / Start Day / Start Time: Set details of when the daylight-saving time option begins.
• End Month / End Week / End Day / End Time: Set details of when the daylight-saving time ends.
4 To save settings, press OK.Device
Device Info
You can view the model name, device ID, serial number, firmware version of device ID, and MAC address.
1 Press and authenticate with the Admin level credential.
2 Select DEVICE > Device Info. You can view the information including Model Name, Device ID, Serial No., HW, FW,
Kernel, and MAC.
Memory Info
View the status of memory usage.
1 Press and authenticate with the Admin level credential.
2 Select DEVICE > Memory Info. You can view the memory usage status of the device.Device
USB Memory
Connect USB Memory and import user information to the device or export log and user information from the device.
Upgrade the firmware.
1 Press and authenticate with the Admin level credential.
2 Select DEVICE > USB Memory.
3 Select the desired item and change the setting.
• Import: Import user information from the connected USB memory.
• Export: Select information you wish to export to the connected USB memory.
• FW Upgrade: Upgrade the firmware if the firmware files are saved in the connected USB memory.
The type of supported USB memory is as follows. If you use a different type of USB memory, the function may not operate
normally.
• Samsung Electronics: SUM-LSB 8 GB, SUM-PSB 8 GB, SUM-PSB 16 GB, SUM-BSG 32 GB
• LG Electronics: XTICK J3 WINDY 8 GB, SMART USB MU1 White 8 GB, MU 1 USB 32 GB, MU28GBC 32 GB, XTICK MOBY J1
16 GB
• SanDisk: Cruzer 16 GB, Cruzer Blade CZ50 4 GB, Cruzer Blade CZ50 32 GB, CZ48 Ultra USB 3.0 64 GB, CZ80 USB3.0 64
GB, CZ52 64 GB, Cruzer Glide Z60 128 GB, Cruzer Force CZ71 32 GB
• Sony: Micro Vault Click 8 GB, MicroVault CLICK 16 GB, USM-SA1 32 GB
• Transcend: JetFlash 760 8 GB, JetFlash 760 32 GB, JetFlash 500 8 GB
• Memorette: MINI500 8 GB
• A-DATA: S102 PRO 8 GB
• Trigem Pastel 8 GBDevice
Secure Tamper
When the tamper is turned on, you can set to delete the entire user, the entire log, and the security key.
1 Press and authenticate with the Admin level credential.
2 Select DEVICE.
3 Activate Secure Tamper to delete data of all registered users, all logs, and secure keys when a temper event occurs.
Restart Device
The user can restart the device.
1 Press and authenticate with the Admin level credential.
2 Select DEVICE > Restart Device.
3 To restart the device, press OK. To return to the previous screen, press Cancel.
Restore Default
Device settings, network settings, and operator levels will be reset.
1 Press and authenticate with the Admin level credential.
2 Select DEVICE > Restore Default.
• All settings: You can reset all settings stored on the device. Press OK to reset all device settings.
• Keep Network Settings: You can reset all settings except network settings. Press OK to reset all settings except
network settings.
• Factory Default: You can delete all the information saved in the device and the root certificate and restore default
settings.
• Delete the Root Certificate: You can delete the root certificate saved in the device.
3 If you proceed to restore the defaults, the device will restart.
• When you reset, the operator level will be reset as well. After resetting, make sure to set the operator level again.
• Language setting will not change after resetting.
• Factory Default menu can be used when the root certificate is saved in the device.
• Delete the Root Certificate menu can be used only when the root certificate is saved in the device and Administrator
has been designated.
User ID Type
You can set the type of user ID to be registered on the device to a combination of alphabetic characters, numbers, and
symbols (_, -).
1 Press and authenticate with the Admin level credential.
2 Select DEVICE > User ID Type.
3 Change to the desired item and press OK.Event Log Event Log Search Log You can set a condition and search a log. 1 Press and authenticate with the Admin level credential. 2 Select EVENT LOG. All event logs appear. 3 Press to search a specific log and change the condition. 4 Press OK. A log that matches the condition will be displayed on the screen. Delete All Logs You can delete all saved logs. 1 Press and authenticate with the Admin level credential. 2 Select EVENT LOG. 3 To delete all logs, select and then press OK. To return to the previous screen, press Cancel.
Event Log

View Log Usage
You can check the status of log usage.

1   Press       and authenticate with the Admin level credential.

2   Select EVENT LOG >      . You can check the capacity of event and image logs on the device.
Troubleshooting

Troubleshooting

Checklist before reporting a failure
 Category               Problem                                               Solution

             The power is being supplied    •   If the terminal and the bracket are far away from each other, the
Power        but the device does not            device may not operate due to the temper switch.
             operate.                       •   Check the adaptor or the power cable.

                                            •   For a normal user PIN, request it from the administrator and enter it
             I lost my PIN.                     again.
                                            •   If you have lost the Admin PIN, contact the installation company.
PIN                                         •   Check if you have entered the registered PIN correctly.
             I entered my PIN and
                                            •   Check if you have changed the PIN recently.
             pressed the OK button, but I
             still cannot open the door.    •   If you cannot remember the PIN, request it from the administrator
                                                and enter it again.
                                            •   Refer to How to scan a QR code/barcode and try again.
                                            •   Place the guide beam at the center of the QR code.
             It fails to scan a QR          •   Adjust the brightness of your smartphone so that the device can read
QR/Barcode
             code/barcode.                      the QR code/barcode clearly and try again.
                                            •   If the problem persists, contact the administrator who issued
                                                the QR code/barcode.
             The door cannot be locked      •   The electric lock may be malfunctioning. Have an inspection through
Door Lock
             when I close the door.             the installation company.

                                            •   X-Station 2 is equipped with a built-in battery but if power is not
             Suddenly the time has              supplied for a long time, the built-in battery may die, causing the time
Time
             become incorrect.                  to become incorrect. You can correct the time by referring to Date &
                                                Time.

                                            •   The administrator grants an access permission in X-Station 2, so only
             I lost my Admin PIN, so I          the administrator can access the Admin menu.
Admin
             cannot access the Admin        •   If you need to access the Admin menu, you can issue a PIN through a
Access
             mode.                              required procedure. Ask the installation company for the procedure to
                                                issue the password.
Product specifications
Product specifications
Category Feature Specification
• XS2-DPB, XS2-QDPB: 125 kHz EM & 13.56 MHz MIFARE, MIFARE Plus, DESFire
EV1/EV2*, FeliCa
RF Option
• XS2-APB, XS2-QAPB: 125 kHz EM, HID Prox & 13.56 MHz MIFARE, MIFARE Plus,
DESFire EV1/EV2, FeliCa, iCLASS SE/SR/Seos
RF read range* MIFARE, DESFire, iCLASS, HID Prox, EM: 50 mm / Felica: 30 mm
Mobile NFC, BLE
Barcode and QR code Supported (XS2-QDPB, XS2-QAPB)
CPU 1.5 GHz Quad Core
Memory 16 GB Flash + 1 GB RAM
LCD type 4" IPS color LCD
LCD resolution 480 x 800
Sound 24 bit
Operating temperature -20 °C~50 °C
Storage temperature -40 °C~70 °C
Operating humidity 0 %~80 %, non-condensing
Storage humidity 0 %~90 %, non-condensing
Camera type CMOS 2M pixels
General Camera resolution 1600 x 1200
• XS2-DPB, XS2-APB: 82 mm x 159 mm x 25.9 mm
Dimension (W x H x D)
• XS2-QDPB, XS2-QAPB: 82 mm x 203 mm x 33.9 mm
• Device
- XS2-DPB, XS2-APB: 280 g
- XS2-QDPB, XS2-QAPB: 343 g
Weight
• Bracket
- XS2-DPB, XS2-APB: 67 g (Including washer and bolt)
- XS2-QDPB, XS2-QAPB: 88 g (Including washer and bolt)
IP rating IP65
Certificates KC, CE, FCC (Compliance: RoHS, REACH, WEEE)
Max. User 500,000
Max. Card 500,000
Capacity
Max. Text Log 5,000,000
Max. Image Log 50,000
Ethernet Supported (10/100 Mbps, auto MDI/MDI-X)
RS-485 1 ch Host or Slave (Selectable)
Wiegand 1 ch Input or Output (Selectable)
TTL input 2 ch Inputs
Interface
Relay 1 Relay
USB USB 2.0 (Host)
PoE Supported (IEEE 802.3af compliant)
Tamper Supported
Power DC 12 V (Max. 0.8 A) or DC 24 V (Max. 0.45 A)
Min.: 3 V
Switch input VIH
Max.: 5 V
Switch input VIL Max.: 1 V
Switch Pull-up resistance 4.7 kΩ (The input pots are pulled up with 4.7 kΩ.)
Electrical Wiegand output VOH More than 4.8 V
Wiegand output VOL Less than 0.2 V
Wiegand output Pull-up
Internally pulled up with 1 kΩ
resistance
Voltage: Max. 30 VDC
Relay
Current: Max. 1 A
* RF read range will vary depending on installation environment.
* DESFire EV2 cards are supported by having backward compatibility of DESFire EV1 cards. CSN and smart card functions are compatible
with X-Station 2.Product specifications
Dimensions
XS2-QAPB, XS2-QDPB
(Unit: mm)
203 196
69.6
82 33.9
XS2-APB, XS2-DPB
159
69.6
82 25.9FCC compliance information
FCC compliance information
THIS DEVICE COMPLIES WITH PART 15 OF THE FCC RULES.
Operation is subject to the following two conditions:
(1) This device may not cause harmful interference, and
(2) This device must accept any interference received, including interference that may cause undesired operation.
Note: This equipment has been tested and found to comply with the limits for a Class A digital device, pursuant to part 15
of the FCC Rules. These limits are designed to provide reasonable protection against harmful interference in a residential
installation. This equipment generates, uses, and can radiate radio frequency energy and, if not installed and used in
accordance with the instructions, may cause harmful interference to radio communications. However, there is no guarantee
that interference will not occur in a particular installation. If this equipment does cause harmful interference to radio or
television reception, which can be determined by turning the equipment off and on, the user is encouraged to try to correct
the interference by one or more of the following measures:
• Reorient or relocate the receiving antenna.
• Increase the separation between the equipment and receiver.
• Connect the equipment into an outlet on a circuit different from that to which the receiver is connected.
• Consult the dealer or an experienced radio/TV technician for help.
Modifications not expressly approved by the manufacturer could void the user's authority to operate the equipment under
FCC rules.
This appliance and its antenna must not be co-located or operation in conjunction with any other antenna or
transmitter.
A minimum separation distance of 20 cm must be maintained between the antenna and the person for this appliance
to satisfy the RF exposure requirements.
EU Declaration of Conformity (CE)
This product is CE marked according to the provisions of the Radio Equipment Directive (RED) 2014/53/EU. Hereby, Suprema
Inc. declares that this product is in compliance with the essential requirements and other relevant provisions of Radio
Equipment Directive (RED) 2014/53/EU.
• Bluetooth Transmit Power: -0.1 dBm
• Bluetooth Frequency: 2402~2480 MHz
• NFC Frequency: 13.56 MHz
• RFID Frequency: 13.56 MHz + 125 kHz
For more information, contact us at the following contact information.
Suprema Inc.
Website: https://www.supremainc.com
Address: 17F Parkview Tower, 248, Jeongjail-ro, Bundang- gu, Seongnam-si, Gyeonggi-do, 13554, Rep. of KOREA
Tel: +82-31-783-4502 / Fax: +82-31-783-4503Appendices
Appendices
Disclaimers
• The information in this manual is provided with regard to the Suprema's products.
• The right to use is acknowledged only for products included in the terms and conditions of the sales agreement
guaranteed by Suprema. The right of license to other intellectual property rights not discussed in this manual is not
acknowledged.
• Suprema does not guarantee or hold responsibility for the suitability and commerciality of the product for a specific
purpose, or the infringement of patent, copyright, or other intellectual property rights with regard to sales or usage
of Suprema's products.
• Do not use the product of Suprema under the situations related to medical, rescue of human lives, or maintenance of
life, as a person may get injured or lose his/her life due to product malfunction. If an accident occurs while a
consumer is using the product under the situations described as examples above, employees, subsidiaries, branches,
affiliated companies and distributors of Suprema do not accept responsibility nor will they reimburse for all related
direct and indirect expenses or expenditure including attorney fees even if the consumer has discovered any
shortcomings in the product design or manufacturing process and claims this as a significant fault.
• Suprema may modify the product size and specifications at any time without proper notice in order to improve the
safety, function and design of the product. Designers must keep in mind that functions or descriptions indicated as
"to be implemented" or "undefined" may change at any time. Suprema will implement or define such functions or
descriptions in the near future and Suprema accepts no responsibility for compatibility issues and any other
problems arising from such compatibility issues.
• If you wish to obtain the newest specifications before ordering the product, contact Suprema through a Sales
Representative or local distributor of Suprema.
Copyright notice
The copyright of this document is vested in Suprema. The rights of other product names, trademarks and registered
trademarks are vested in each individual or organization that owns such rights.
Open Source License
• The software of this product is based on "Linux Kernel 4.x", which is licensed under GPL. As for GPL, please refer to
the GNU General Public License in this manual.
• This product uses the "BoringSSL", which is licensed under the OpenSSL and Original SSLeay licenses. As for the
OpenSSL and Original SSLeay licenses, please refer to OpenSSL License and Original SSLeay License in this manual.
• This product uses the "Original SSLeay", which is licensed under the Original SSLeay licenses. As for the Original
SSLeay licenses, please refer to Original SSLeay License in this manual.
• This product uses the "AOSP", which is licensed under the Apache License 2.0. As for the Apache License 2.0, please
refer to Apache License in this manual.
• To request the modified source code based on Linux Kernel 4.x and the source code of BoringSSL, Original SSLeay,
and AOSP, which are included in this product, please contact us at support.supremainc.com.
GNU General Public License
Version 3, 29 June 2007
Copyright © 2007 Free Software Foundation, Inc.
Everyone is permitted to copy and distribute verbatim copies of this license document, but changing it is not allowed.
Preamble
The GNU General Public License is a free, copyleft license for software and other kinds of works.
The licenses for most software and other practical works are designed to take away your freedom to share and change theAppendices works. By contrast, the GNU General Public License is intended to guarantee your freedom to share and change all versions of a program--to make sure it remains free software for all its users. We, the Free Software Foundation, use the GNU General Public License for most of our software; it applies also to any other work released this way by its authors. You can apply it to your programs, too. When we speak of free software, we are referring to freedom, not price. Our General Public Licenses are designed to make sure that you have the freedom to distribute copies of free software (and charge for them if you wish), that you receive source code or can get it if you want it, that you can change the software or use pieces of it in new free programs, and that you know you can do these things. To protect your rights, we need to prevent others from denying you these rights or asking you to surrender the rights. Therefore, you have certain responsibilities if you distribute copies of the software, or if you modify it: responsibilities to respect the freedom of others. For example, if you distribute copies of such a program, whether gratis or for a fee, you must pass on to the recipients the same freedoms that you received. You must make sure that they, too, receive or can get the source code. And you must show them these terms so they know their rights. Developers that use the GNU GPL protect your rights with two steps: (1) assert copyright on the software, and (2) offer you this License giving you legal permission to copy, distribute and/or modify it. For the developers' and authors' protection, the GPL clearly explains that there is no warranty for this free software. For both users' and authors' sake, the GPL requires that modified versions be marked as changed, so that their problems will not be attributed erroneously to authors of previous versions. Some devices are designed to deny users access to install or run modified versions of the software inside them, although the manufacturer can do so. This is fundamentally incompatible with the aim of protecting users' freedom to change the software. The systematic pattern of such abuse occurs in the area of products for individuals to use, which is precisely where it is most unacceptable. Therefore, we have designed this version of the GPL to prohibit the practice for those products. If such problems arise substantially in other domains, we stand ready to extend this provision to those domains in future versions of the GPL, as needed to protect the freedom of users. Finally, every program is threatened constantly by software patents. States should not allow patents to restrict development and use of software on general-purpose computers, but in those that do, we wish to avoid the special danger that patents applied to a free program could make it effectively proprietary. To prevent this, the GPL assures that patents cannot be used to render the program non-free. The precise terms and conditions for copying, distribution and modification follow. TERMS AND CONDITIONS 0. Definitions. “This License” refers to version 3 of the GNU General Public License. “Copyright” also means copyright-like laws that apply to other kinds of works, such as semiconductor masks. “The Program” refers to any copyrightable work licensed under this License. Each licensee is addressed as “you”. “Licensees” and “recipients” may be individuals or organizations. To “modify” a work means to copy from or adapt all or part of the work in a fashion requiring copyright permission, other than the making of an exact copy. The resulting work is called a “modified version” of the earlier work or a work “based on” the earlier work. A “covered work” means either the unmodified Program or a work based on the Program. To “propagate” a work means to do anything with it that, without permission, would make you directly or secondarily liable for infringement under applicable copyright law, except executing it on a computer or modifying a private copy. Propagation includes copying, distribution (with or without modification), making available to the public, and in some countries other activities as well. To “convey” a work means any kind of propagation that enables other parties to make or receive copies. Mere interaction
Appendices

with a user through a computer network, with no transfer of a copy, is not conveying.

An interactive user interface displays “Appropriate Legal Notices” to the extent that it includes a convenient and
prominently visible feature that (1) displays an appropriate copyright notice, and (2) tells the user that there is no warranty
for the work (except to the extent that warranties are provided), that licensees may convey the work under this License,
and how to view a copy of this License. If the interface presents a list of user commands or options, such as a menu, a
prominent item in the list meets this criterion.

1. Source Code.
The “source code” for a work means the preferred form of the work for making modifications to it. “Object code” means
any non-source form of a work.

A “Standard Interface” means an interface that either is an official standard defined by a recognized standards body, or, in
the case of interfaces specified for a particular programming language, one that is widely used among developers
working in that language.

The “System Libraries” of an executable work include anything, other than the work as a whole, that (a) is included in the
normal form of packaging a Major Component, but which is not part of that Major Component, and (b) serves only to
enable use of the work with that Major Component, or to implement a Standard Interface for which an implementation is
available to the public in source code form. A “Major Component”, in this context, means a major essential component
(kernel, window system, and so on) of the specific operating system (if any) on which the executable work runs, or a
compiler used to produce the work, or an object code interpreter used to run it.

The “Corresponding Source” for a work in object code form means all the source code needed to generate, install, and
(for an executable work) run the object code and to modify the work, including scripts to control those activities. However,
it does not include the work's System Libraries, or general-purpose tools or generally available free programs which are
used unmodified in performing those activities but which are not part of the work. For example, Corresponding Source
includes interface definition files associated with source files for the work, and the source code for shared libraries and
dynamically linked subprograms that the work is specifically designed to require, such as by intimate data communication
or control flow between those subprograms and other parts of the work.

The Corresponding Source need not include anything that users can regenerate automatically from other parts of the
Corresponding Source.

The Corresponding Source for a work in source code form is that same work.

2. Basic Permissions.
All rights granted under this License are granted for the term of copyright on the Program, and are irrevocable provided
the stated conditions are met. This License explicitly affirms your unlimited permission to run the unmodified Program.
The output from running a covered work is covered by this License only if the output, given its content, constitutes a
covered work. This License acknowledges your rights of fair use or other equivalent, as provided by copyright law.

You may make, run and propagate covered works that you do not convey, without conditions so long as your license
otherwise remains in force. You may convey covered works to others for the sole purpose of having them make
modifications exclusively for you, or provide you with facilities for running those works, provided that you comply with the
terms of this License in conveying all material for which you do not control copyright. Those thus making or running the
covered works for you must do so exclusively on your behalf, under your direction and control, on terms that prohibit
them from making any copies of your copyrighted material outside their relationship with you.

Conveying under any other circumstances is permitted solely under the conditions stated below. Sublicensing is not
allowed; section 10 makes it unnecessary.

3. Protecting Users' Legal Rights From Anti-Circumvention Law.
No covered work shall be deemed part of an effective technological measure under any applicable law fulfilling obligations
under article 11 of the WIPO copyright treaty adopted on 20 December 1996, or similar laws prohibiting or restricting
circumvention of such measures.

When you convey a covered work, you waive any legal power to forbid circumvention of technological measures to the
extent such circumvention is effected by exercising rights under this License with respect to the covered work, and you
Appendices

disclaim any intention to limit operation or modification of the work as a means of enforcing, against the work's users,
your or third parties' legal rights to forbid circumvention of technological measures.

4. Conveying Verbatim Copies.
You may convey verbatim copies of the Program's source code as you receive it, in any medium, provided that you
conspicuously and appropriately publish on each copy an appropriate copyright notice; keep intact all notices stating that
this License and any non-permissive terms added in accord with section 7 apply to the code; keep intact all notices of the
absence of any warranty; and give all recipients a copy of this License along with the Program.

You may charge any price or no price for each copy that you convey, and you may offer support or warranty protection for
a fee.

5. Conveying Modified Source Versions.
You may convey a work based on the Program, or the modifications to produce it from the Program, in the form of source
code under the terms of section 4, provided that you also meet all of these conditions:

•    a) The work must carry prominent notices stating that you modified it, and giving a relevant date.
•    b) The work must carry prominent notices stating that it is released under this License and any conditions added
     under section 7. This requirement modifies the requirement in section 4 to “keep intact all notices”.
•    c) You must license the entire work, as a whole, under this License to anyone who comes into possession of a copy.
     This License will therefore apply, along with any applicable section 7 additional terms, to the whole of the work, and
     all its parts, regardless of how they are packaged. This License gives no permission to license the work in any other
     way, but it does not invalidate such permission if you have separately received it.
•    d) If the work has interactive user interfaces, each must display Appropriate Legal Notices; however, if the Program
     has interactive interfaces that do not display Appropriate Legal Notices, your work need not make them do so.

A compilation of a covered work with other separate and independent works, which are not by their nature extensions of
the covered work, and which are not combined with it such as to form a larger program, in or on a volume of a storage or
distribution medium, is called an “aggregate” if the compilation and its resulting copyright are not used to limit the access
or legal rights of the compilation's users beyond what the individual works permit. Inclusion of a covered work in an
aggregate does not cause this License to apply to the other parts of the aggregate.

6. Conveying Non-Source Forms.
You may convey a covered work in object code form under the terms of sections 4 and 5, provided that you also convey
the machine-readable Corresponding Source under the terms of this License, in one of these ways:
•    a) Convey the object code in, or embodied in, a physical product (including a physical distribution medium),
     accompanied by the Corresponding Source fixed on a durable physical medium customarily used for software
     interchange.
•    b) Convey the object code in, or embodied in, a physical product (including a physical distribution medium),
     accompanied by a written offer, valid for at least three years and valid for as long as you offer spare parts or
     customer support for that product model, to give anyone who possesses the object code either (1) a copy of the
     Corresponding Source for all the software in the product that is covered by this License, on a durable physical
     medium customarily used for software interchange, for a price no more than your reasonable cost of physically
     performing this conveying of source, or (2) access to copy the Corresponding Source from a network server at no
     charge.
•    c) Convey individual copies of the object code with a copy of the written offer to provide the Corresponding Source.
     This alternative is allowed only occasionally and noncommercially, and only if you received the object code with such
     an offer, in accord with subsection 6b.
•    d) Convey the object code by offering access from a designated place (gratis or for a charge), and offer equivalent
     access to the Corresponding Source in the same way through the same place at no further charge. You need not
     require recipients to copy the Corresponding Source along with the object code. If the place to copy the object code is
     a network server, the Corresponding Source may be on a different server (operated by you or a third party) that
     supports equivalent copying facilities, provided you maintain clear directions next to the object code saying where to
     find the Corresponding Source. Regardless of what server hosts the Corresponding Source, you remain obligated to
     ensure that it is available for as long as needed to satisfy these requirements.
•    e) Convey the object code using peer-to-peer transmission, provided you inform other peers where the object code
     and Corresponding Source of the work are being offered to the general public at no charge under subsection 6d.

A separable portion of the object code, whose source code is excluded from the Corresponding Source as a System
Appendices
Library, need not be included in conveying the object code work.
A “User Product” is either (1) a “consumer product”, which means any tangible personal property which is normally used
for personal, family, or household purposes, or (2) anything designed or sold for incorporation into a dwelling. In
determining whether a product is a consumer product, doubtful cases shall be resolved in favor of coverage. For a
particular product received by a particular user, “normally used” refers to a typical or common use of that class of product,
regardless of the status of the particular user or of the way in which the particular user actually uses, or expects or is
expected to use, the product. A product is a consumer product regardless of whether the product has substantial
commercial, industrial or non-consumer uses, unless such uses represent the only significant mode of use of the product.
“Installation Information” for a User Product means any methods, procedures, authorization keys, or other information
required to install and execute modified versions of a covered work in that User Product from a modified version of its
Corresponding Source. The information must suffice to ensure that the continued functioning of the modified object code
is in no case prevented or interfered with solely because modification has been made.
If you convey an object code work under this section in, or with, or specifically for use in, a User Product, and the
conveying occurs as part of a transaction in which the right of possession and use of the User Product is transferred to the
recipient in perpetuity or for a fixed term (regardless of how the transaction is characterized), the Corresponding Source
conveyed under this section must be accompanied by the Installation Information. But this requirement does not apply if
neither you nor any third party retains the ability to install modified object code on the User Product (for example, the
work has been installed in ROM).
The requirement to provide Installation Information does not include a requirement to continue to provide support
service, warranty, or updates for a work that has been modified or installed by the recipient, or for the User Product in
which it has been modified or installed. Access to a network may be denied when the modification itself materially and
adversely affects the operation of the network or violates the rules and protocols for communication across the network.
Corresponding Source conveyed, and Installation Information provided, in accord with this section must be in a format
that is publicly documented (and with an implementation available to the public in source code form), and must require
no special password or key for unpacking, reading or copying.
7. Additional Terms.
“Additional permissions” are terms that supplement the terms of this License by making exceptions from one or more of
its conditions. Additional permissions that are applicable to the entire Program shall be treated as though they were
included in this License, to the extent that they are valid under applicable law. If additional permissions apply only to part
of the Program, that part may be used separately under those permissions, but the entire Program remains governed by
this License without regard to the additional permissions.
When you convey a copy of a covered work, you may at your option remove any additional permissions from that copy, or
from any part of it. (Additional permissions may be written to require their own removal in certain cases when you modify
the work.) You may place additional permissions on material, added by you to a covered work, for which you have or can
give appropriate copyright permission.
Notwithstanding any other provision of this License, for material you add to a covered work, you may (if authorized by the
copyright holders of that material) supplement the terms of this License with terms:
• a) Disclaiming warranty or limiting liability differently from the terms of sections 15 and 16 of this License; or
• b) Requiring preservation of specified reasonable legal notices or author attributions in that material or in the
Appropriate Legal Notices displayed by works containing it; or
• c) Prohibiting misrepresentation of the origin of that material, or requiring that modified versions of such material be
marked in reasonable ways as different from the original version; or
• d) Limiting the use for publicity purposes of names of licensors or authors of the material; or
• e) Declining to grant rights under trademark law for use of some trade names, trademarks, or service marks; or
• f) Requiring indemnification of licensors and authors of that material by anyone who conveys the material (or modified
versions of it) with contractual assumptions of liability to the recipient, for any liability that these contractual
assumptions directly impose on those licensors and authors.
All other non-permissive additional terms are considered “further restrictions” within the meaning of section 10. If the
Program as you received it, or any part of it, contains a notice stating that it is governed by this License along with a term
that is a further restriction, you may remove that term. If a license document contains a further restriction but permits
relicensing or conveying under this License, you may add to a covered work material governed by the terms of that licenseAppendices document, provided that the further restriction does not survive such relicensing or conveying. If you add terms to a covered work in accord with this section, you must place, in the relevant source files, a statement of the additional terms that apply to those files, or a notice indicating where to find the applicable terms. Additional terms, permissive or non-permissive, may be stated in the form of a separately written license, or stated as exceptions; the above requirements apply either way. 8. Termination. You may not propagate or modify a covered work except as expressly provided under this License. Any attempt otherwise to propagate or modify it is void, and will automatically terminate your rights under this License (including any patent licenses granted under the third paragraph of section 11). However, if you cease all violation of this License, then your license from a particular copyright holder is reinstated (a) provisionally, unless and until the copyright holder explicitly and finally terminates your license, and (b) permanently, if the copyright holder fails to notify you of the violation by some reasonable means prior to 60 days after the cessation. Moreover, your license from a particular copyright holder is reinstated permanently if the copyright holder notifies you of the violation by some reasonable means, this is the first time you have received notice of violation of this License (for any work) from that copyright holder, and you cure the violation prior to 30 days after your receipt of the notice. Termination of your rights under this section does not terminate the licenses of parties who have received copies or rights from you under this License. If your rights have been terminated and not permanently reinstated, you do not qualify to receive new licenses for the same material under section 10. 9. Acceptance Not Required for Having Copies. You are not required to accept this License in order to receive or run a copy of the Program. Ancillary propagation of a covered work occurring solely as a consequence of using peer-to-peer transmission to receive a copy likewise does not require acceptance. However, nothing other than this License grants you permission to propagate or modify any covered work. These actions infringe copyright if you do not accept this License. Therefore, by modifying or propagating a covered work, you indicate your acceptance of this License to do so. 10. Automatic Licensing of Downstream Recipients. Each time you convey a covered work, the recipient automatically receives a license from the original licensors, to run, modify and propagate that work, subject to this License. You are not responsible for enforcing compliance by third parties with this License. An “entity transaction” is a transaction transferring control of an organization, or substantially all assets of one, or subdividing an organization, or merging organizations. If propagation of a covered work results from an entity transaction, each party to that transaction who receives a copy of the work also receives whatever licenses to the work the party's predecessor in interest had or could give under the previous paragraph, plus a right to possession of the Corresponding Source of the work from the predecessor in interest, if the predecessor has it or can get it with reasonable efforts. You may not impose any further restrictions on the exercise of the rights granted or affirmed under this License. For example, you may not impose a license fee, royalty, or other charge for exercise of rights granted under this License, and you may not initiate litigation (including a cross-claim or counterclaim in a lawsuit) alleging that any patent claim is infringed by making, using, selling, offering for sale, or importing the Program or any portion of it. 11. Patents. A “contributor” is a copyright holder who authorizes use under this License of the Program or a work on which the Program is based. The work thus licensed is called the contributor's “contributor version”. A contributor's “essential patent claims” are all patent claims owned or controlled by the contributor, whether already acquired or hereafter acquired, that would be infringed by some manner, permitted by this License, of making, using, or selling its contributor version, but do not include claims that would be infringed only as a consequence of further modification of the contributor version. For purposes of this definition, “control” includes the right to grant patent sublicenses in a manner consistent with the requirements of this License. Each contributor grants you a non-exclusive, worldwide, royalty-free patent license under the contributor's essential patent
You can also read