USER MANUAL ADVENTURE KINGS AWNINGS - PLEASE READ ALL INSTRUCTIONS PRIOR TO USE - 4WD Supacentre
←
→
Page content transcription
If your browser does not render page correctly, please read the page content below
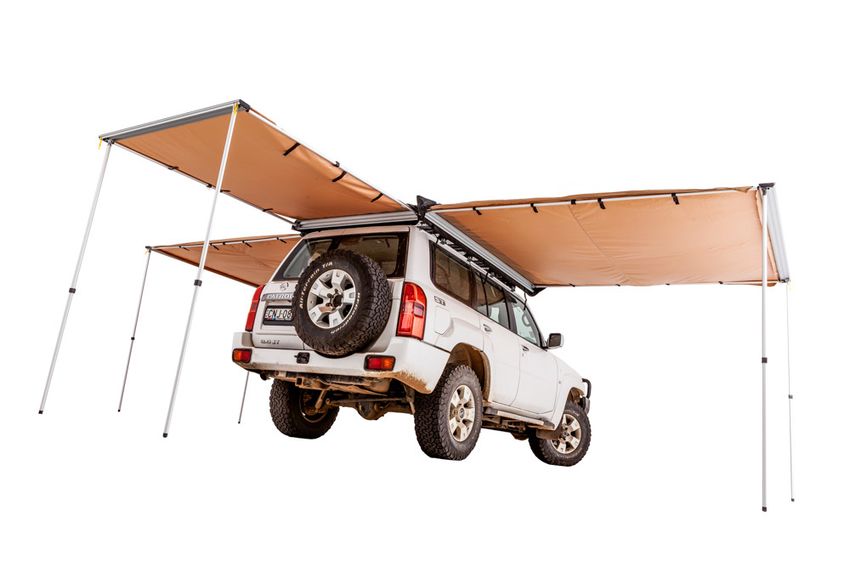
ADVENTURE KINGS AWNINGS
    USER MANUAL

      PLEASE READ ALL INSTRUCTIONS PRIOR TO USE
Warning & Safety Information
INSPECTIONS
• During trips regularly check that all nuts and bolts attaching your Awning to your vehicle are tight and
in good repair.
SAFETY WARNING
• DO NOT ATTEMPT TO SETUP AWNING IN WINDY CONDITIONS.
• ALL GUY ROPES MUST BE ATTACHED AND PEGGED TO THE GROUND AT ALL TIMES.
• GUY ROPES ARE TRIP HAZARDS IN THE DAY AND NIGHT.
• KEEP ALL FLAME AND HEAT SOURCES AWAY FROM THE AWNING MATERIALS.
• UNDER NO CIRCUMSTANCE SHOULD ANY NAKED FLAME SOURCES OR HEATING DEVICES BE
USED UNDER OR NEAR THE AWNING.
• KEEP A LOOK OUT FOR ANY AIRBORNE BURNING EMBERS THAT MAY COME INTO CONTACT
WITH THE AWNING.
• DO NOT OPERATE ANY DEVICE WHICH BURNS FUEL INSIDE OF THE AWNING.
• KEEP EXIT CLEAR.
Adventure Kings Awnings 2Fitting Instructions
It is important when mounting the awning to ensure that all the ‘L’ mounting brackets supplied are
spaced far enough apart to adequately support the weight of the awning. Remember when you are
positioning the awning to allow sufficient clearance for the vehicle doors to open.
OPTION 1 - MOUNTING DIRECTLY TO A ROOF RACK
1. Slide the small bolts into the mounting rail of the
awning, as seen in the picture to the right.
2. With help from another person, hold the awning in
place and mark the mounting holes for the awning.
It is best to have the mounting bolts as far apart as
possible.
3. Carefully drill the holes into the roof rack.
4. Align awning into desired position and tighten the
nuts.
5. Re-check all nuts and bolts periodically
OPTION 2 - CLAMP TO THE ROOF RACK
1. Supplied in the mounting kit are two extra (three if
larger awning) flat steel plates.
2. Place the long part of the ‘L’ bracket on top of the
rack mesh.
3. Place the steel plates under the rack mesh and align
with holes in the ‘L’ bracket. Screw together with
supplied bolts.
4. Re-check all nuts and bolts periodically.
Adventure Kings Awnings 3Fitting Instructions cont.
OPTION 3 - MOUNTING DIRECTLY TO ROOF CROSS BAR
1. Ensure that the roof bars are of enough distance
apart to provide sufficient support for the awning.
2. Align the long side of the “L” shaped brackets on to
the roof bars as seen to the right, with the brackets
in suitable position to allow easy access to the
awning, without it protruding to far from the side of
the vehicle.
3. Mark the holes and centre punch.
4. Drill the holes to clear the long bolts.
5. Bolt the “L” shaped brackets to the roof bars.
6. Slide the head of the small bolts into the mounting
rail of the awning.
7. With help from another person, position the awning
onto the “L” shaped brackets and install the nylon
nuts.
8. Align awning into desired position and tighten all
nuts and bolts.
9. Re-check all nuts and bolts periodically.
Adventure Kings Awnings 4Setup Procedure
1. Undo the zipper on the protective bag and whilst holding the awning in place, release the captive
buckles.
2. Flip the awning over the top of the cover, this will now allow you to easily swing out the horizontal
poles past 90°. Once you have pulled the horizontal poles out extend them out as far as possible and
twist to lock into place.
3. Holding the awning in your hands, unroll it to its full length, taking care as you get to the end as the 2
Vertical poles may have come loose during travel.
4. Carefully release the legs from inside the channel, and with one hand holding the centre of the
awning, set each leg to the desired height and twist the bottom half of the leg to lock.
5. Whilst holding the awning end beam with one arm, align the end pin on one of the horizontal legs with
the hole in the end beam. Twist the leg to lock in position. Repeat on the other horizontal leg.
6. Fix the awning material to the horizontal arms using the Velcro straps.
7. Using the pegs and guy ropes secure the awning front beam diagonally outwards to secure the legs.
NOTE: The pegs supplied are designed to be used in hard soil. A different peg design and size may
be required to secure your awning depending on the type of terrain you are anchoring it to.
8. Pack away is a reverse of steps 1-7. Be sure to roll the awning material underneath itself. Avoid
packing away the awning wet, if the awning has been stored wet, open it at a more convenient time
to allow it to dry.
Warning
1. ALWAYS SET UP AWNING WITH SUFFICIENT ANGLE TO ALLOW THE WATER TO RUN OFF AND
NOT POOL ON TOP OF THE AWNING.
2. IT IS HIGHLY RECOMMENDED THAT EXTRA MEASURES ARE TO BE USED TO SECURE
YOUR ADVENTURE KINGS AWNING TO THE GROUND IN WINDY CONDITIONS. IN EXTREME
CIRCUMSTANCES THE AWNING SHOULD BE PACKED AWAY TO PREVENT DAMAGE. OUTDOOR
SUPACENTRE PTY LTD TRADING AS ‘4WD SUPACENTRE’ WILL NOT BE HELD LIABLE FOR
AWNINGS THAT ARE DAMAGED DUE TO ADVERSE WEATHER, OR ANY CONSEQUENTIAL
DAMAGES.
3. ANY ELEMENTS APPLIED ON THE VEHICLE ROOF CHANGES THE NORMAL VEHICLE HANDLING.
THE MANUFACTURER DISCLAIMS ALL RESPONSIBILITY IN CASE OF ACCIDENTS DUE TO
IMPROPER USE, WRONG MAINTENANCE, OR NOT CHECKING THE TIGHTNESS OF THE
FASTENING HARDWARE/ BRACKETS.
Adventure Kings Awnings 5Care Instructions
• Clean only with cold water and soft brush - do not use soap or detergent.
• Do not expose to petrol, oil or solvents.
• Avoid creases and seams when rolling up the awning.
• Allow the awning to dry before packing away.
Adventure Kings Awnings 612 MONTH LIMITED
WARRANTY
WARRANTY PERIOD:
Full 12 month warranty from date of purchase against all manufacturing defects.
WHAT DOES THE WARRANTY COVER?
Under normal usage conditions, this warranty covers:
a. Any defect in design or manufacture which results in the product failing to perform substantially as
described in authorised advertising or literature.
b. We will either repair or replace the product at our discretion providing that the fault is found to have
been caused by a design or manufacturing defect and not misuse or tampering.
Our goods come with guarantees that cannot be excluded under the Australian Consumer Law. You are
entitled to a replacement or refund for a major failure and for compensation for any other reasonably
foreseeable loss or damage. You are also entitled to have the goods repaired or replaced if the goods
fail to be of acceptable quality and the failure does not amount to a major failure. The benefits provided
to you as the consumer by this warranty are in addition to other rights and remedies available to you
under the law.
THE WARRANTY DOES NOT COVER:
a. Any damage resulting from improper use
b. Faulty installation or modification made during installation
c. The cost of removing and reinstalling the product
d. Travel and /or other expenses due to customer’s remote location
e. Transport charges and damage in transit. It is your responsibility to deliver and pick up your product,
including any costs associated with the postage of your repair or replacement product. If you do
freight your product we recommend that you insure against loss or damage.
f. Any loss directly or indirectly associated with the product failing to operate.
g. Damage caused by mould, insects, animals, misuse, incorrect operation, adverse weather, accidents
and fair wear and tear
TO MAKE A CLAIM, PLEASE ENSURE YOU RETAIN YOUR SALES RECEIPT OF PURCHASE
CALL 1800 88 39 64
OUTDOOR SUPACENTRE PTY LTD
2 Stanley St Silverwater NSW, 2128
PHONE: 1800 88 39 64
www.4wdsupacentre.com.au
Adventure Kings Awnings 7You can also read