Cheetah Folding Bike - Thank you for purchasing a Dillenger Cheetah Folding Bike, please read this manual before using this product.
←
→
Page content transcription
If your browser does not render page correctly, please read the page content below
Cheetah Folding Bike

Thank you for purchasing a Dillenger Cheetah Folding Bike, please read this manual before
                                   using this product.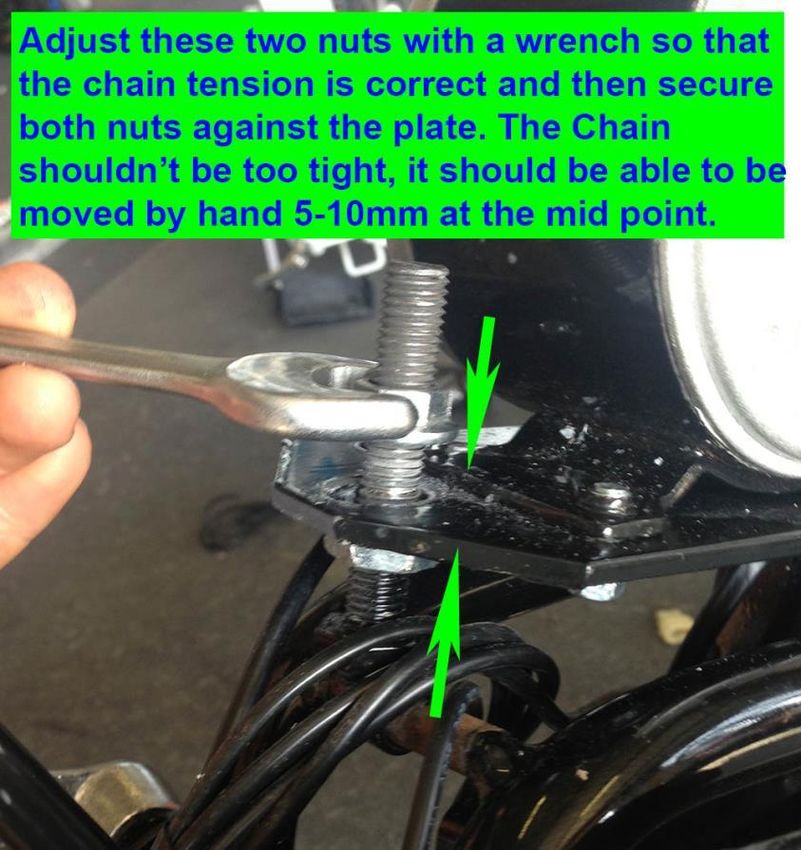
TABLE OF CONTENTS
Assembly Instructions ............................................................................................................................................. 3

Safety ............................................................................................................................................................................. 3

Taking Care Of Your Batteries .............................................................................................................................. 4

Charging the battery ................................................................................................................................................ 5

Maintenance ................................................................................................................................................................ 6

   Brake adjustment .................................................................................................................................................. 6

       Front calliper brake adjustment: ..................................................................................................................................6

       Rear brake adjustment: ....................................................................................................................................................6

       Fine brake adjustment (front and rear).....................................................................................................................7

   Motor Chain Tightening: ..................................................................................................................................... 9

   Troubleshooting. ................................................................................................................................................. 13

                                                                                                                                                                                   2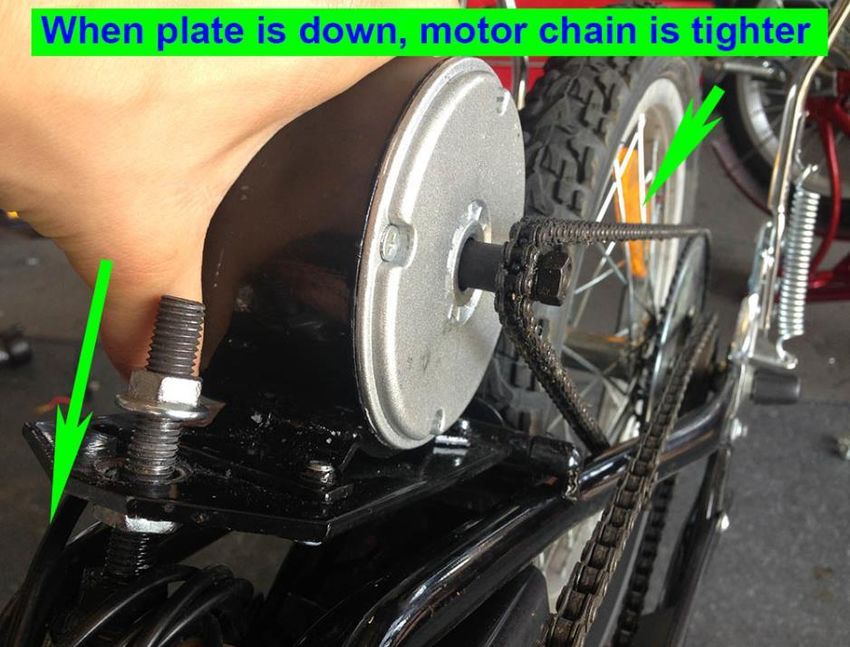
ASSEMBLY INSTRUCTIONS
     It is very important to follow these instructions carefully before using this product for the first time.

     The bike will arrive fully assembled but in a stored state. Before it can be ridden please complete the
     following steps:

1.  Remove the bike from packaging. Remove the zipties holding the components together for shipping.
2.  Locate and separate the pedals and charger (smaller box within).
3.  Lift the back of the bike up and place the stand in the down position.
4.  The handlebars will already be assembled. The handlebars fold on an angle for easy collapsing of the
    Cheetah. The handlebar folding joint has a different mechanism to the main folding joint.
5. Attach the pedals using the 15mm spanner provided. Each pedal will only fit on its respective side; they
    are marked for easy installation either with a sticker on the pedal or embossed on the end of the
    threaded section. A 15mm spanner is needed for this (or 5/8”).
6. A 13mm spanner (or 1/2”) must be used to fasten the seat angle in place. The horizontal seat
    adjustment bolt is tightened enough to prevent the black fastening nuts from coming loose, but
    will need to be tightened further before a first use. Select the correct angle for your riding
    position and then fasten the black fastening nuts on either side of the horizontal bolt running
    through the seat bracket.
7. Check the tyre pressures and inflate to amount recommended on the tyre sidewall (40-50PSI)
8. It’s best to charge the battery fully before a first use. This may take up to 6-8 hours
9. Make sure the battery is locked into the frame with the ignition key to prevent the battery from losing
    connectivity over a bump
10. Turn the key and ride!

     SAFETY
     Helmet:

     Always wear an approved helmet when riding your Dillenger electric bike and follow the helmet
     manufacturer’s instructions for fit, use and care of your helmet. It’s your responsibility to familiarise
     yourself with the laws of the areas where you ride and to comply with all applicable laws.

     Mechanical Safety Check:

     Routinely check the condition of your bike before every ride. Make sure no nuts or bolts are loose. Do a
     quick visual inspection of the whole bicycle before every ride. Make sure tires are correctly inflated
     within the range given on the tyre sidewall. Check the brakes for proper operation.

     Your First Ride:

     When you buckle on your helmet and go for your first ride, be sure to pick an area away from cars, other
     cyclists, obstacles or other hazards to become familiar with the controls, features and performance of
     your new electric bike. We suggest you start riding with the electric motor turned off until you are
     comfortable. Then, turn the key to turn the motor on.

                                                                                                                 3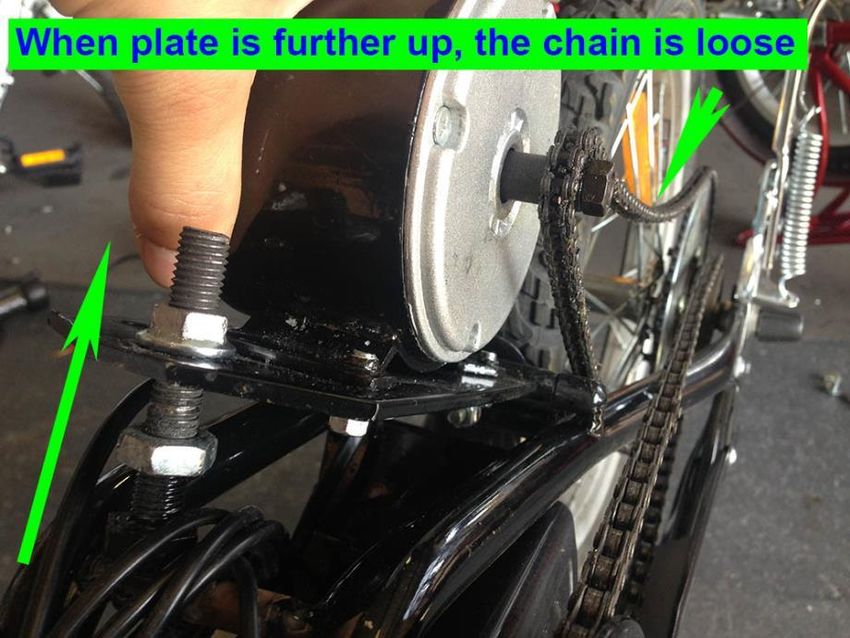
TAKING CARE OF YOUR BATTERIES
Charge the battery at least every 30 days
Make sure the battery is fully charged (as indicated by status on charger) before use.
Q: I HAVE HAD MY ELECTRIC BIKE A WHILE NOW AND IT’S NOT GOING AS FAR AS IT DID WHEN NEW,
DOES THE BATTERY NEED REPLACING? – It is a possibility, however there may certain other factors
causing this -
Are your tyres inflated correctly? It’s important to keep your tyres inflated to the correct pressure
as stated on the side of the tyre. It’s amazing how much effect this can have, in fact a tyre that is half
the pressure it should be can affect your range up to 40%! So check them every couple of weeks and
inflate as necessary.
When was your bike last serviced? Something as simple as a brake pad rubbing can slow you down
considerably. With the extra assistance on an electric bike, you may not even notice the extra drag.
But the motor will be working much harder to assist you and therefore will drain the battery faster.
Its best to get your bike serviced once a year to keep it in good shape (electric bikes are very similar
in design to a regular pushbike, your local bike shop should be able to assist you in maintaining your
bike).
4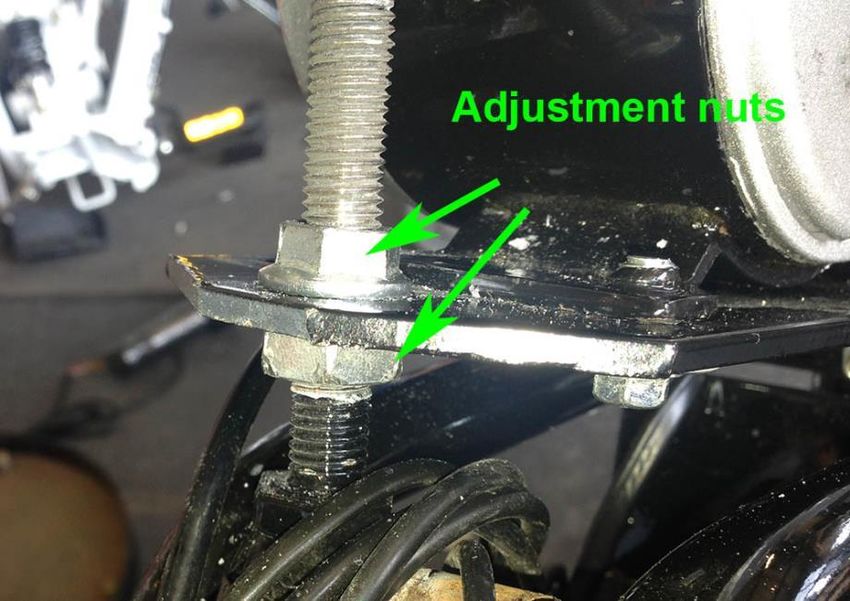
CHARGING THE BATTERY
The charger is provided with the Cheetah.

   1.   Do not use any other type of charger
   2.   Do not leave on charge for more than 12 hours
   3.   Do not leave a charging battery in the sun
   4.   Do not let the battery of charger get wet or damp
   5.   Make sure that the charging socket is all the way in when charging

If you raise the carry handle on the top of the battery, you will see the charging port.

   1. Plug the charger into the wall, wait for the green light to come on
   2. Then plug the charger plug into the battery charging port
   3. The charging light should change to red
   4. When the battery is very low and/or also brand new, the battery may take up to 8 hours to
      charge
   5. Once the battery is finished charging, the green light will display
   6. It’s not damaging to leave the charger on and connected to the battery, but do not leave it on
      charge for more than 12 hours, otherwise the lifespan of the charger will be decreased.

                                                                                                  5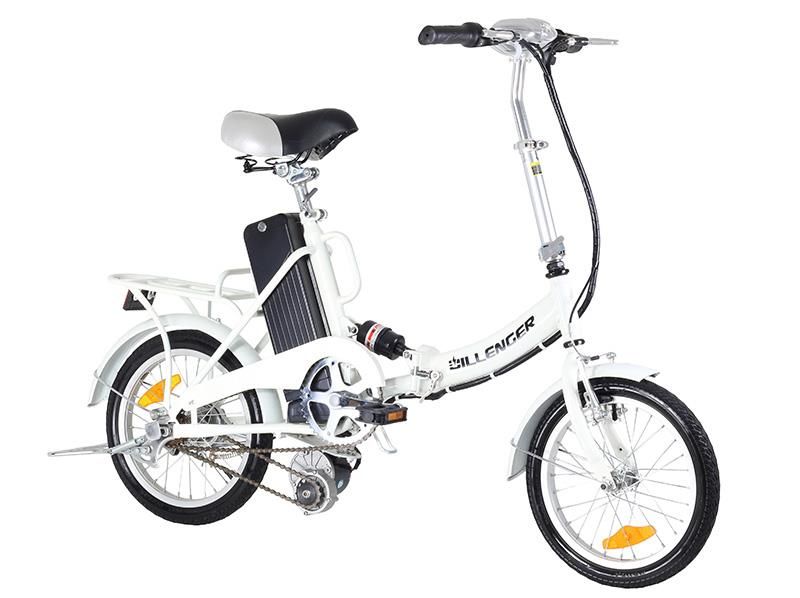
MAINTENANCE
BRAKE ADJUSTMENT
FRONT CALLIPER BRAKE ADJUSTMENT :

For front brake adjustments, please see this video:

http://www.youtube.com/watch?v=W1xcWoGlTdk

REAR BRAKE ADJUSTMENT :

Loosen the main cable tensioning nut as shown in this photo (other model shown):

Pulling the cable through in the direction of the arrow tightens the brakes.

                                                                                   6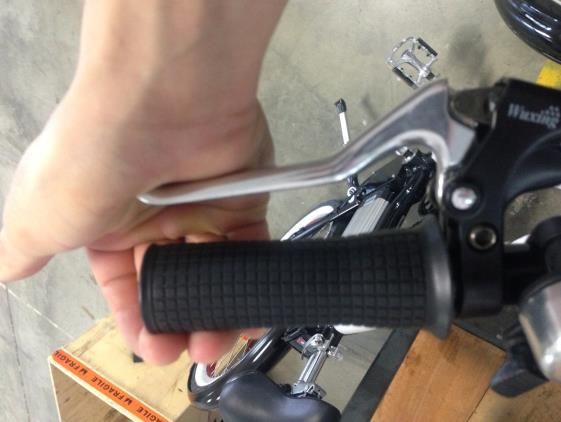
FINE BRAKE ADJUSTMENT (FRONT AND REAR )

The fine brake adjustment is used to adjust the front and rear brakes as they are ‘run-in’ or to fine-tune
the adjustment after adjusting the cable length as just described.

This is how the mechanism looks when done up:

The two silver nuts are used to tighten and loosen each braking cable. The smaller silver nut on the left
unwinds to make the cable longer, or winds back into the brake lever module to make the cable shorter
(loosening the brakes). The larger silver nut on the right locks the mechanism in place once the
adjustment is made.

In this photo, both nuts have been undone in order to adjust the brakes:

                                                                                                        7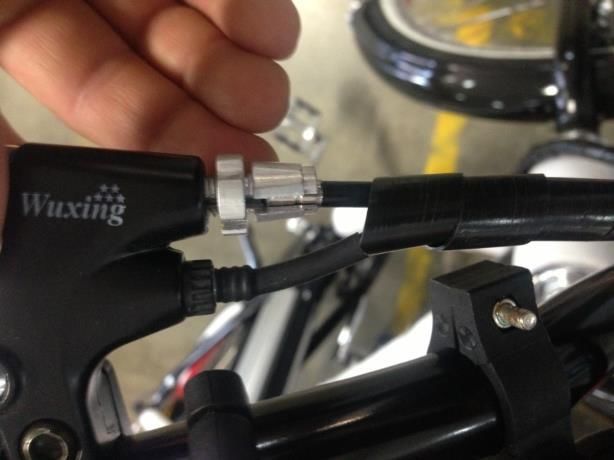
Once the adjustment has been made, retighten the larger nut in place so the adjustment doesn’t change
while riding.

Tips on brake adjustment:

   1. For front or rear, start by screwing in the fine adjustment so both nuts are all the way in
   2. Then adjust the main cable length adjustment on the front or rear brakes. Tight then cable to
      the point that it is slowing the wheel without the levers at all, then release just a small amount
      of cable so that it does not bind against the wheel or slow the wheel down
   3. Fast the main adjustment very firmly
   4. Once that is fastened, finished off with the fine adjustments on the brake levers which may be
      used to tighten the cable just a small amount
   5. The levers, when pulled, should decelerate the bike sufficiently and should not be able to be
      pulled past the position shown on this page. If they can be pulled all the way back to the rubber
      grip, more adjustment will be needed

                                                                                                       8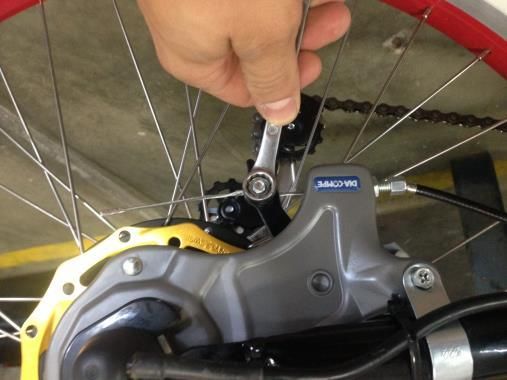
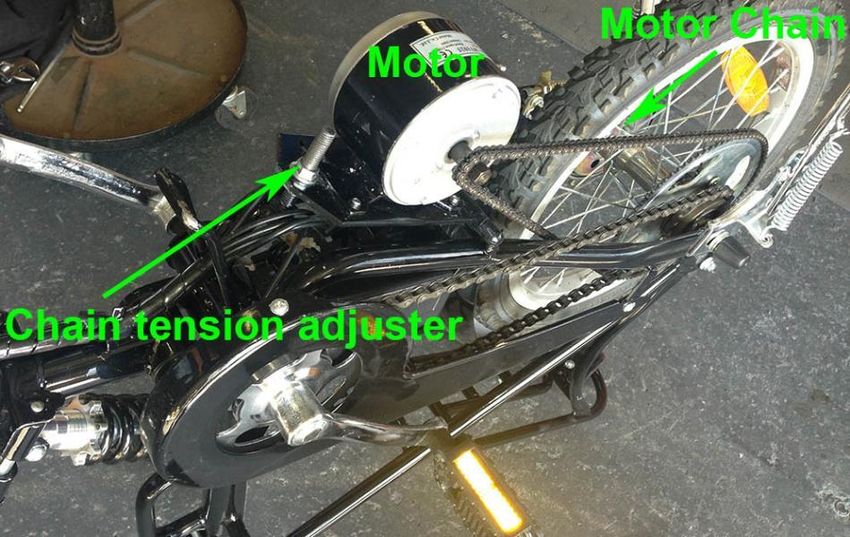
MOTOR CHAIN TIGHTENING:

For tightening the motor driver chain independently, here is the procedure:

If you look at the motor, you will see it is mounted to a metal plate that pivots at one end. That plate is
held in place by a large vertical bolt that goes through the plate and holds the plate with a nut on either
side of the plate (top and bottom). By loosening and tightening those nuts, the plate holding the motor
pivots which tightens and loosens the motor chain. You firstly loosen the top nut (screwing it upwards)
and then tightening the bottom nut (screwing it upwards also).

Only a small adjustment in this system is required to change the tension of the chain substantially.

Please make sure you don't over tighten it.

                                                                                                         9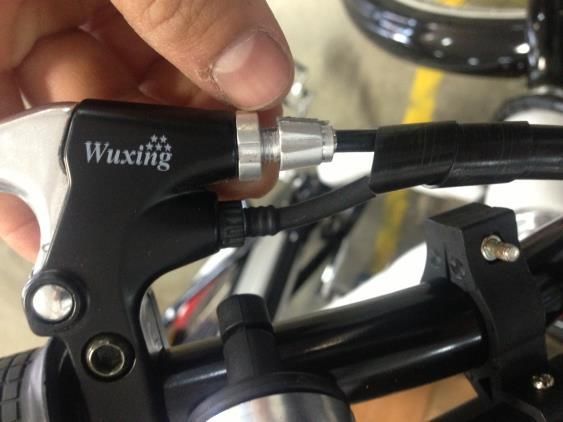
10
11
12
TROUBLESHOOTING.
Problem:
Cheetah will not turn on
Solution:
Check that the battery is correctly seated and is not being held off the terminals by the locking
bolt being incorrectly positioned, preventing the battery from contacting the contacts.
Check that the 4 metal terminals that you can see on the bike when you remove the battery are
not bent out of alignment. They must be perfectly straight for them to meet up with the base of
the battery. These can be bent out of place if the battery is inserted incorrectly.
Check that the battery has been fully charged
If that solution does not work, report the fault to Dillenger and please let us know the following:
Do the lights on the handlebar display illuminate?
Is there any response from the throttle or pedal assist?
Does the battery charger light up red when the battery was last charged?
Does the battery charger not light up green?
Problem:
Cheetah will not charge
Solution:
Check that other appliances work on the power outlet.
Check that the charger is all the way in the wall socket and the battery charger socket.
If that solution does not work, report the fault to Dillenger and please let us know the following:
Does the battery charger light up red when the battery was last charged?
Does the battery charger not light up green?
Problem:
Motor chain is too loose and the chain comes off whilst riding
Solution:
Follow the steps to tighten the motor chain. This manual is available for download from
Dillenger.zendesk.com (type this address into your URL bar on your internet browser).
13You can also read