Epson WorkForce DS-510 Color Document Scanner - clicking sound, mulitple page feed broken - iFixit
←
→
Page content transcription
If your browser does not render page correctly, please read the page content below
Epson WorkForce DS-510 Color Docume…                                     Guide ID: 65721 - Draft: 2021-03-02

     Epson WorkForce DS-510 Color Document
   Scanner - clicking sound, mulitple page feed
                                                   broken
 There is a jointed shaft that controls multi-page feed operations and one of the joints rounds out.
                     This will show how to work around, replace or NEW repair

                                               Written By: steve

This document was generated on 2021-03-03 08:47:28 AM (MST).
© iFixit — CC BY-NC-SA                                www.iFixit.com                            Page 1 of 12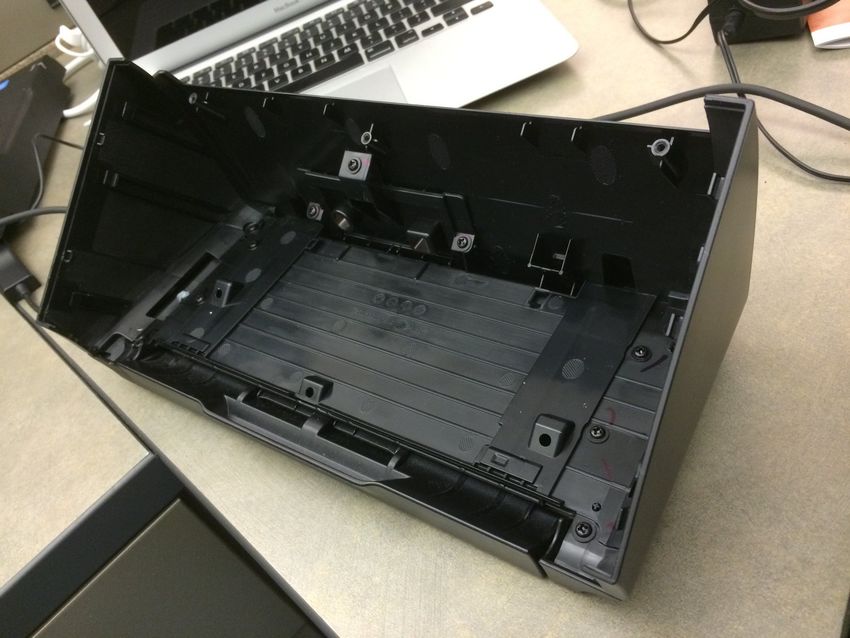
Epson WorkForce DS-510 Color Docume…                                   Guide ID: 65721 - Draft: 2021-03-02

This document was generated on 2021-03-03 08:47:28 AM (MST).
© iFixit — CC BY-NC-SA                                www.iFixit.com                          Page 2 of 12
Epson WorkForce DS-510 Color Docume…                                           Guide ID: 65721 - Draft: 2021-03-02

    INTRODUCTION

    UPDATE 6/6/18 Someone makes a replacement piece! Masica, thank you for the tip! Look on eBay
    for “DS-560 shaft” and it came up right away from seller g_loc.

    For the workaround you need only a staple, bent straight -- or a straight pin. For the repair with a
    paperclip you will need two very small flathead screwdrivers for prying and one normal Philips head
    screwdriver and a pair of pliers or two. You will be removing the outer shells of the two main body
    pieces, removing a small shaft and bending a paperclip around the shaft to make it fit tightly in place
    again.

    THE PROBLEM: In the front section that you pull up on the gray lever to allow to swivel out about 30
    degrees --it's the section that says Epson on the front and has the lights-- a piece went bad in there.
    Here's the gist-- in order to pull just one sheet at a time, the rollers in the front panel must not move
    until the last sheet; they provide friction as the scanner pulls the sheets underneath out. What's
    happened is that one piece that's supposed to hold the roller from moving has failed and the roller
    now rolls and therefore the whole stack comes through. A small plastic shaft has tabs that have
    become splayed on one end and won't hold the rollers in place.

    It should be easily replaceable -- almost without disassembly, but the Epson parts diagrams don't
    show this piece separately so I haven't found a place to buy a new one.

      TOOLS:
     Phillips #2 Screwdriver (1)
     Flathead 3/32" or 2.5 mm Screwdriver (2)
     Slip Joint Pliers (2)

This document was generated on 2021-03-03 08:47:28 AM (MST).
© iFixit — CC BY-NC-SA                                www.iFixit.com                                  Page 3 of 12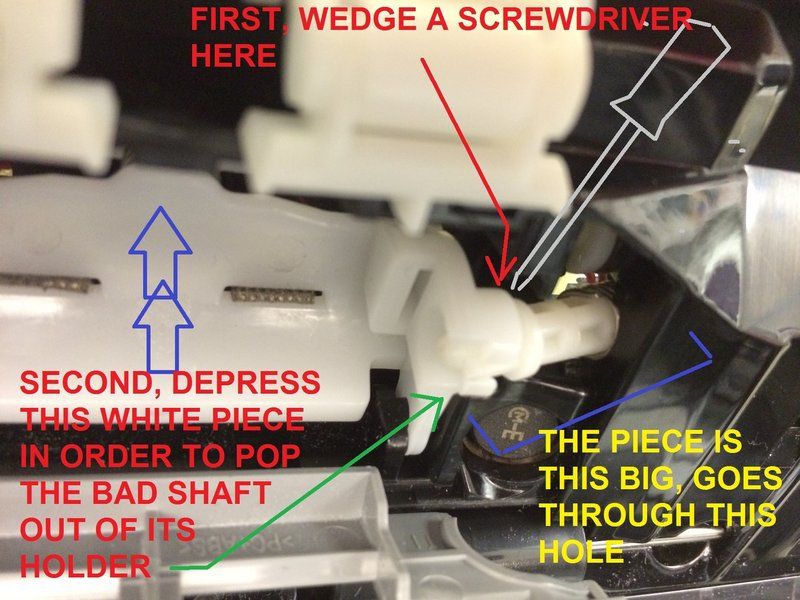
Epson WorkForce DS-510 Color Docume… Guide ID: 65721 - Draft: 2021-03-02
Step 1 — Workaround
This first few step are a
WORKAROUND, the repair guide
starts at step FOUR. Use this if
you're desperate and absolutely
need it to scan hundreds of pages
RIGHT NOW. Open the front panel
by pulling the gray lever as
indicated.
NOTE: One person posted that this
worked for them without it jamming
and is therefore their permanent fix
so try this first.
From Saul Rosenthal: "[can do it]
without disassembling any of the
covers. Go directly to the rollers and
remove, then follow removal of the
stub shaft for your repair. Assembly
required that the DS-510 be put on
its side looking down into the access
hole and ensure that the interior
shaft is there to engage and
complete assembly and reinstall
rollers."
This document was generated on 2021-03-03 08:47:28 AM (MST).
© iFixit — CC BY-NC-SA www.iFixit.com Page 4 of 12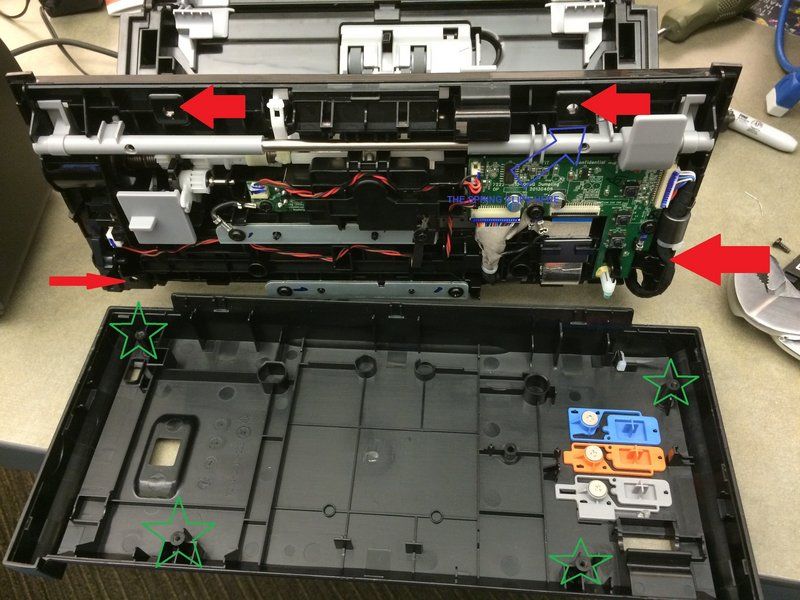
Epson WorkForce DS-510 Color Docume… Guide ID: 65721 - Draft: 2021-03-02
Step 2
Inside, on the back of the panel you just opened, you will see two identical foam rollers. Stick a
straightened staple or straight pin through the foam so they won't be able to roll anymore once the
pin hits the bar between them. NOTE: One person posted that this worked for them without it
jamming, so try this first.
Step 3
When you go to scan this way, you'll have to put an extra sheet at the end of your stack that will
then "jam" once it tries to scan, since the rollers won't let go of it, but you'll at least get the rest of
the papers scanned.
This document was generated on 2021-03-03 08:47:28 AM (MST).
© iFixit — CC BY-NC-SA www.iFixit.com Page 5 of 12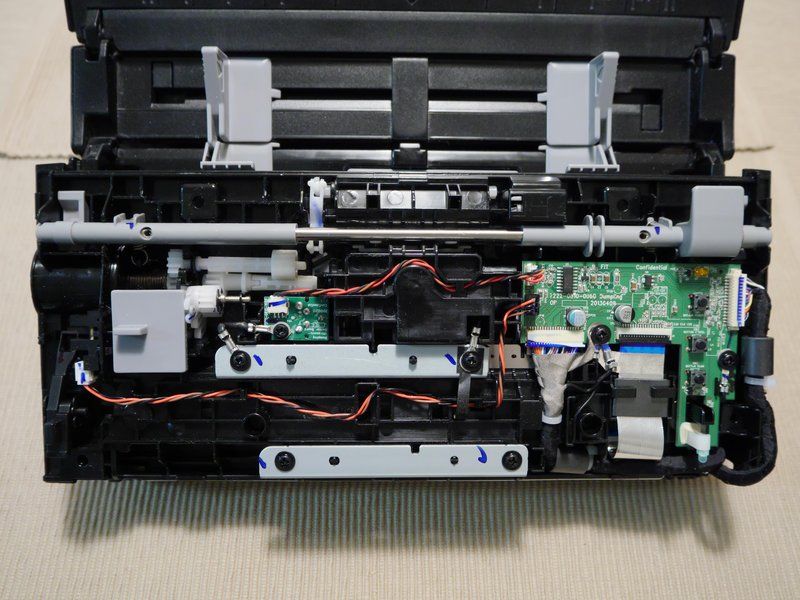
Epson WorkForce DS-510 Color Docume… Guide ID: 65721 - Draft: 2021-03-02
Step 4 — Repair instead
THE REPAIR: There are 4 screws
on the front panel's cover that we
need to remove, but they're not
accessible until you remove that
whole panel from the main body of
the scanner. The screws nearest
where it hinges are the ones that are
tough to remove.
If you have a very low-profile ratchet
you may be able to get to all four
without having to remove the front
panel. If so, skip straight to step 7.
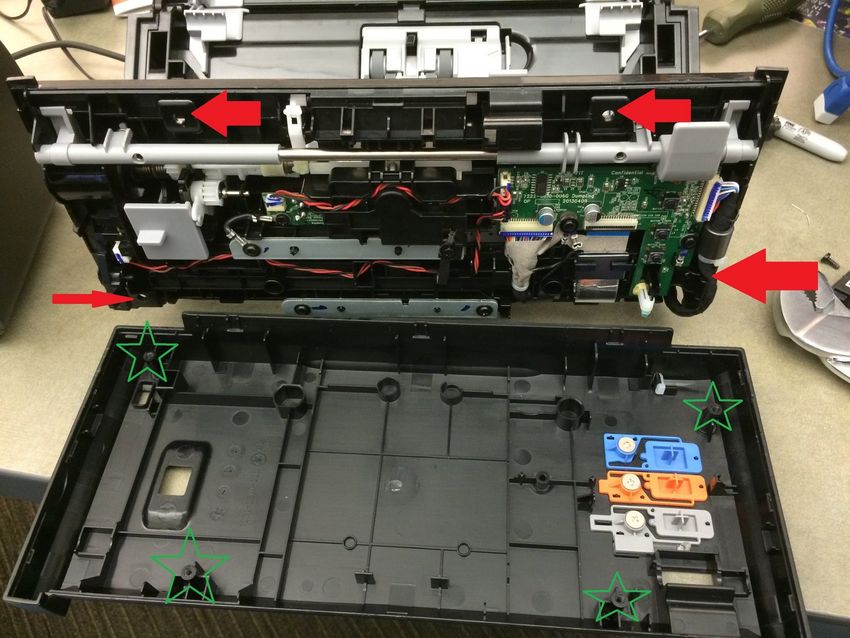
Step 5
find and remove the three screws on the bottom of the main body-- you will need to extend the tray
all the way out to access one of them. Then there are three more screws up above, on the main
face of the scanner, where you place the sheets to be scanned. One is beneath the replaceable
roller, two are behind the gray paper width sliders
This document was generated on 2021-03-03 08:47:28 AM (MST).
© iFixit — CC BY-NC-SA www.iFixit.com Page 6 of 12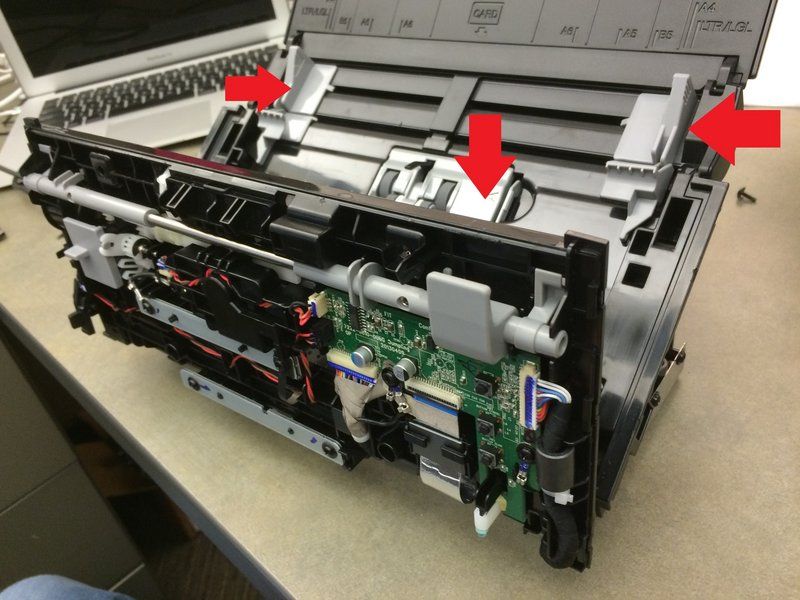
Epson WorkForce DS-510 Color Docume… Guide ID: 65721 - Draft: 2021-03-02
Step 6
Once that's accomplished you pull
the main body of the scanner OUT
of its wraparound shell (back,
bottom and sides), using a small pry
tool to help pop the shell loose
around the edges. It's tough plastic
so you probably won't break
anything, and it's mostly hollow too
so don't worry about where the
screwdriver goes inside of it while
you're prying
Seen here is the shell once the
"guts" are out of it.
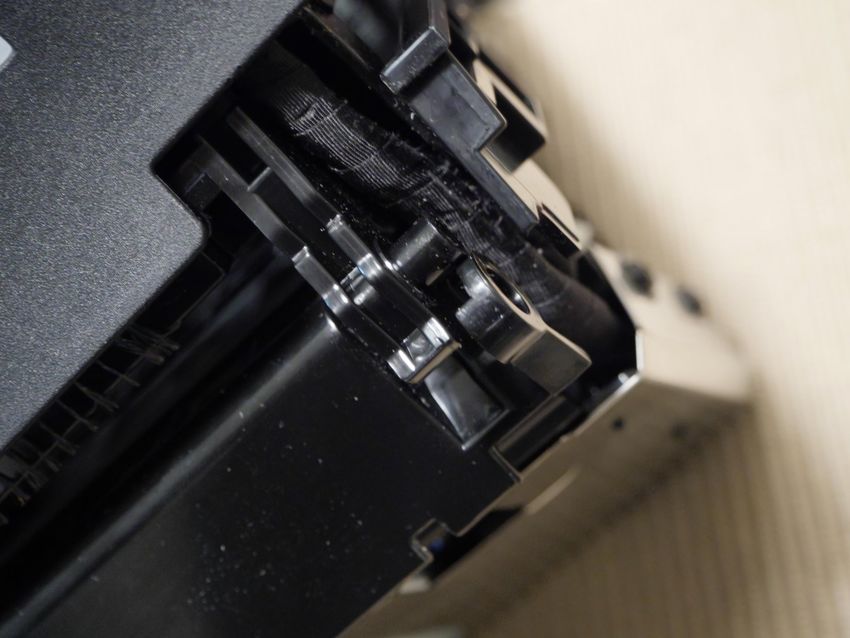
Step 7
you will need to remove a screw from each side for the hinges for the front panel and they both
have little covers to take off too.
This document was generated on 2021-03-03 08:47:28 AM (MST).
© iFixit — CC BY-NC-SA www.iFixit.com Page 7 of 12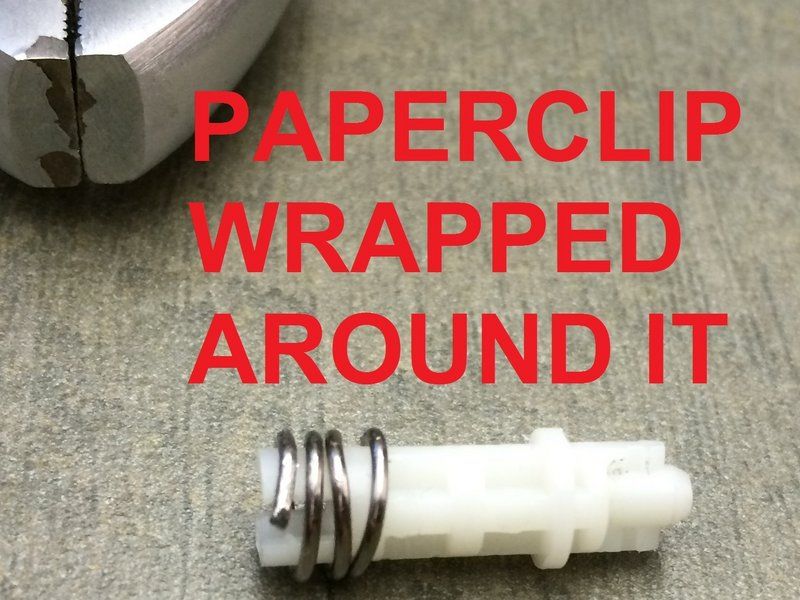
Epson WorkForce DS-510 Color Docume… Guide ID: 65721 - Draft: 2021-03-02
Step 8
THEN you can remove the front
panel from the hinges if you start
from the RIGHT SIDE (as you face
the unit). This takes some finagling.
Now except for the cabling, the
panel is free of the main and you
can expose the screws.
Step 9
Remove the four screws and use a small flat tool to pop/pry the cover off of the panel. The gray bar
that runs inside, that has on it the lever to open the panel-- because of its springs you should keep
it attached to the panel and NOT the cover. You can pop it out of its groove in the cover you're
removing and thus not need to take the spring off.
This document was generated on 2021-03-03 08:47:28 AM (MST).
© iFixit — CC BY-NC-SA www.iFixit.com Page 8 of 12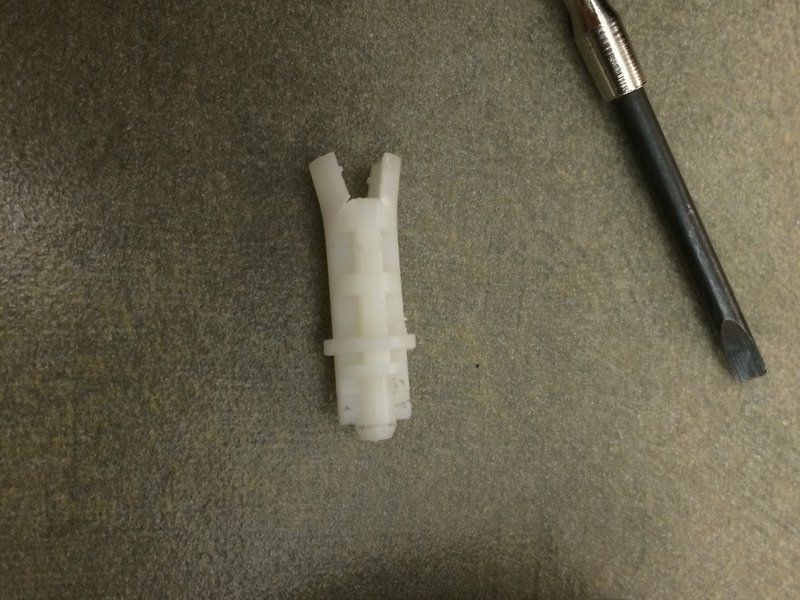
Epson WorkForce DS-510 Color Docume… Guide ID: 65721 - Draft: 2021-03-02
Step 10
Remove the rollers from the inboard side of the panel (the ones that are covered in foam, they
touch the paper once the panel is closed) and wedge a small flathead screwdriver behind the end
of the bad shaft that you can see from that side.
Step 11
Keep the screwdriver in place as you simultaneously depress the carrier that the rollers were in.
That will pop the bad shaft out of its groove. You can only do this while the shaft is turned one
particular way, however; otherwise it has tabs that make it too wide to come out of the groove, so
you may need to turn it by hand which is not difficult.
This document was generated on 2021-03-03 08:47:28 AM (MST).
© iFixit — CC BY-NC-SA www.iFixit.com Page 9 of 12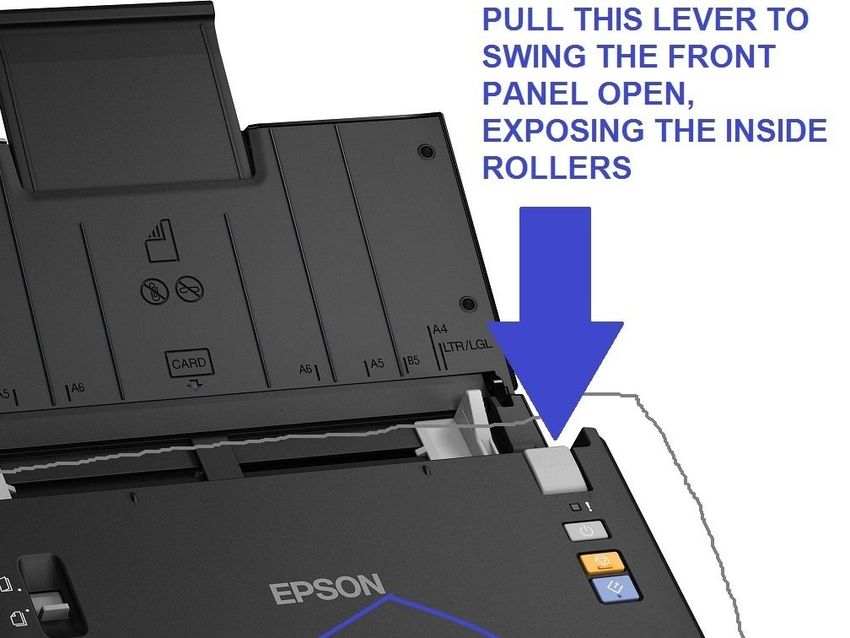
Epson WorkForce DS-510 Color Docume… Guide ID: 65721 - Draft: 2021-03-02
Step 12
I used parts from eBay seller "g_loc". They are interchangeable with the Epson parts. My fix has
the original Epson inner shaft and the g_loc outer shaft.
You can also fix the Epson part using a variety of methods: a paper clip, heat shrink tubing, small
spring (like from a pen), aluminum duct tape, thin fiber-glass tape impregnated with JB Weld let dry
overnight, short length of copper pipe or a plastic straw. See the comments for this section and the
general comments for more ideas.
For the paper clip fix, using pliers, tightly wrap a paperclip around the shaft you have removed.
Wrap it near the end that is NOT splayed out, then pull it up to the end which IS bad, as you move
it up, it will squeeze the splayed ends back in place.
Be careful if you use the heatshrink tubing fix. I tried it and melted the Epson inner shaft in
seconds. The pen spring fix seems much safer.
This document was generated on 2021-03-03 08:47:28 AM (MST).
© iFixit — CC BY-NC-SA www.iFixit.com Page 10 of 12Epson WorkForce DS-510 Color Docume… Guide ID: 65721 - Draft: 2021-03-02
Step 13 — Alternative to paperclip
I used silicon caps (for 5 mm diameter shelf pins) such as the one shown here. Cut the closed end
to obtain ~ 0.75 cm length cap and inserted them over the plastic parts at the two joints. It was a
snug and secure fit.
Inserted the long plastic components from the side shown in the second image and secured in its
slot first on the other side before pushing it out with a flat screw driver and inserting it into its slot
on this side shown in the image. It ran smoothly after the fix. It remains to be seen how long it will
last.
Another user, Eric Hargis, recommends as another alternative putting an old spring over it
Yet another user, lszablya recommended a different twist: "I used double wall heat shrink tubing.
Looks like it sucked in around the prongs just fine."
This document was generated on 2021-03-03 08:47:28 AM (MST).
© iFixit — CC BY-NC-SA www.iFixit.com Page 11 of 12Epson WorkForce DS-510 Color Docume… Guide ID: 65721 - Draft: 2021-03-02
Step 14
The original poster on Amazon who inspired me to try this fix (and if I could find his name I'd give
him credit) recommended tightening up the defective piece with some string tightly wound around it
and then caulking it to keep the string from getting caught up in things, but I'm doubtful about it
holding up long-term.
Step 15
If you're like me, you may wonder why not just glue it to the next shaft in line. Well it actually needs
to meet that next shaft at a constantly changing angle, so that will not work.
To reassemble your device, follow these instructions in reverse order.
This document was generated on 2021-03-03 08:47:28 AM (MST).
© iFixit — CC BY-NC-SA www.iFixit.com Page 12 of 12You can also read