User Manual - Explain Everything
←
→
Page content transcription
If your browser does not render page correctly, please read the page content below

User Manual


Welcome to the multi-touch book for
Explain Everything!
It is a detailed guide about the different tools, features, and uses of the app with
a focus on educational and business contexts. Our goal is for this book
to be a comprehensive handbook for Explain Everything and that also may
provide some new ideas for using the app in the classroom and with your
coworkers.

The book has two main sections: tools and use cases. The tools section covers
the features of Explain Everything including navigation, creating projects,
adjusting settings, sharing, collaborating, and more. The use cases section
explores several examples of using the app and its services, as well as aims to
give inspiration on what you can do.

We hope this book gives all the learners new and interesting ideas for how to
use our platform!

                                                                                       2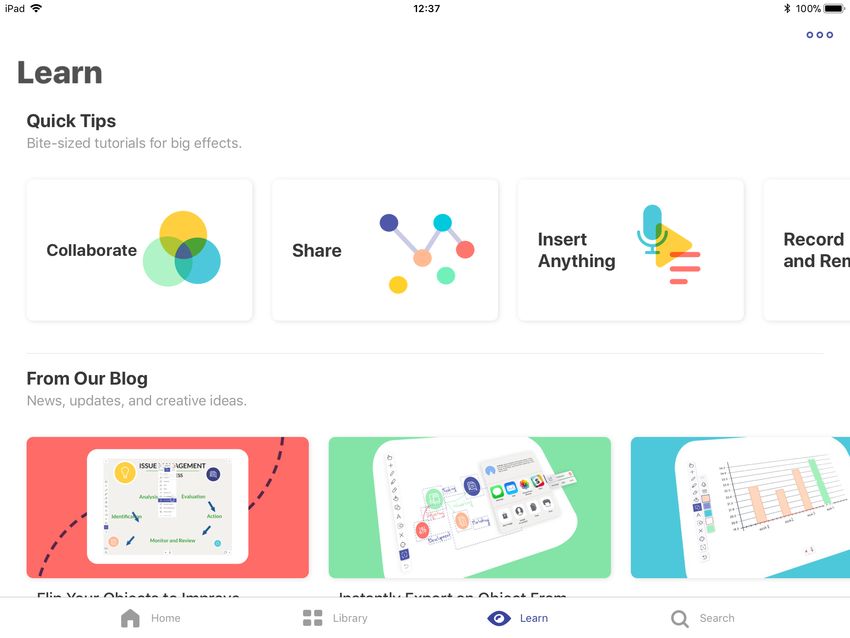
What is Explain Everything

Explain Everything is an interactive whiteboard platform where people collaborate,
share, and learn without boundaries. Every project starts with an infinite canvas
where you can add new and existing media (including video, images, PDFs,
and web browsers), annotations, and text to create truly unique visual stories.
                                                                                                            Types...Motion   Share

Thanks to the real-time, cross-platform collaboration teams can communicate
and develop ideas in a new visual way. Projects can also be shared back and
forth for continuous development. Record everything to capture authentic
moments of ideation and understanding. Then share what’s most compelling for
                                                                                                       Linear motion
your audience.
                                                                                            TYPES OF MOTION
                                                                                                  Radial motion

                                                                                     100%

                                                                                                                                     4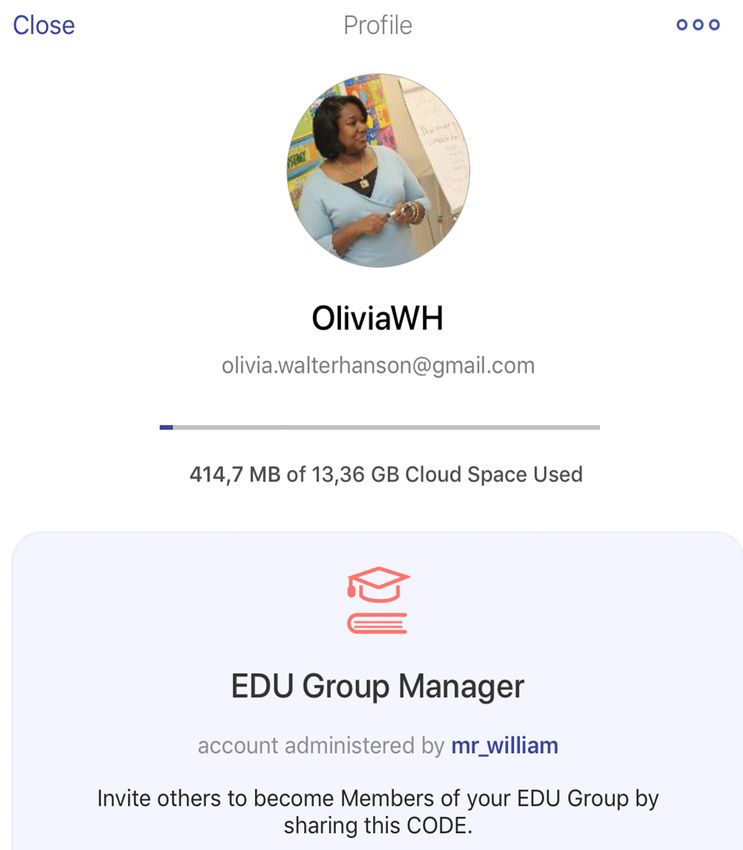
The history behind
Explain Everything
For a number of years, Bart Gonczarek and Piotr Sliwinski had
a hobby of making funny podcasts and wanted to start making
videos. The only plausible way to capture their ideas was to
make simple cartoons. In 2008 Piotr made a proof of concept
for the Mac. In 2009, there were rumors about Apple reinventing
the tablet device. It seemed ideal for an animation app, so Piotr
ported it to iOS. It was submitted as PhotoPuppet. In October
2010, Reshan Richards wrote a blog post about it as a new tool
to use with his math classes. Once it was published and posted
on Twitter, he received an email from Piotr. They engaged in a
dialogue where Reshan provided his educational perspective
while Piotr shared the entertainment perspectives. In January
2011, Reshan started working with Piotr and Bart on building a
new app based on his experiences in PK-12 schools and his
ongoing doctoral research on screencasting and assessment.
                                                                    Explain Everything co-founders: Dr. Bartosz Gonczarek (COO),
On August 19, 2011, Explain Everything made its debut on the        Dr. Reshan Richards (Chief Learning Officer & CEO), Piotr Śliwinski
App Store.                                                          (CIO)

                                                                                                                                          5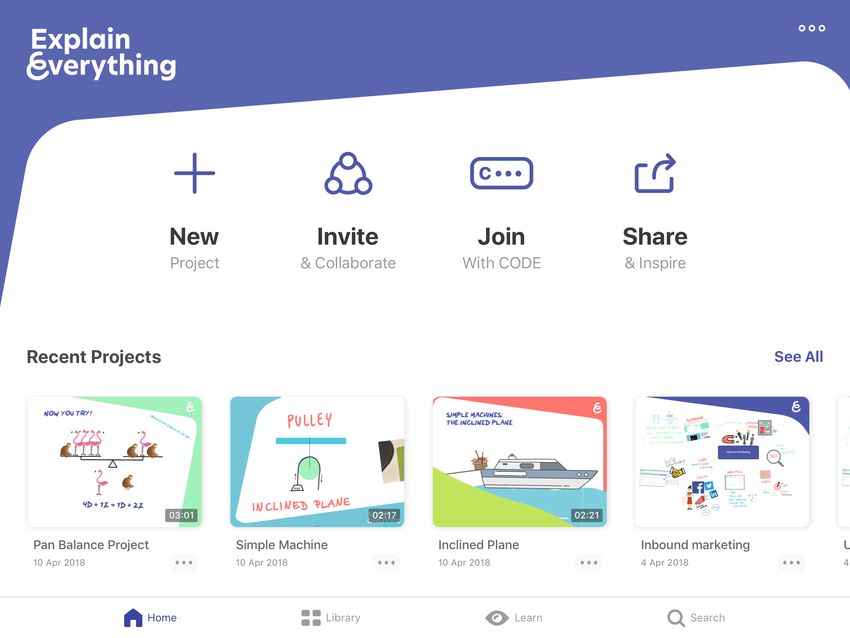
Home
On the Home Screen you can access the core functions of            From the Home Screen you can also access your Profile and
Explain Everything in a simple way. You can immediately cre-       Settings. Tap on the three dots in the upper right corner to ac-
ate a new project, invite others and set up a real-time collabo-   cess them. There you will also find the About section that al-
rative session. You can also join a sessions initiated by some-    lows you to check which version of the app you have, as well
body else and manage or share an existing project.                 as to rate Explain Everything, send us your feedback, visit
                                                                   our website, or check our Twitter account.
The New Project button lets you start by creating a new blank
project in landscape or portrait mode. You can also begin a
project from a template or import various files from the cloud
and use your own pictures or documents. Collaboration and
Sharing will be described in separate chapters. On the Home
Screen you can access your recent projects. You can also ac-
cess the Learn section that will walk you through crucial ar-
eas of using the app. Make sure to check them out!

                                                                                                                                  7
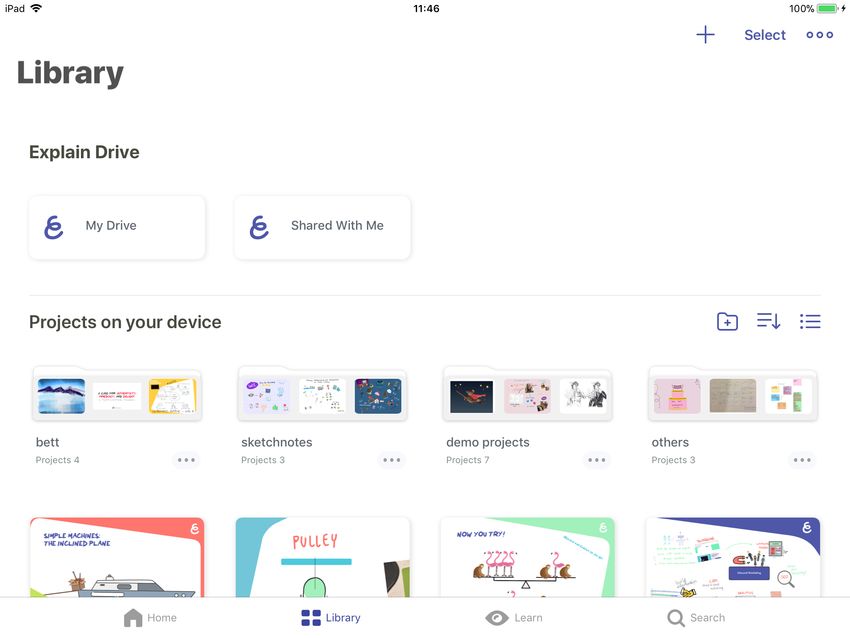
Library                                                            Learn
Go to the Library tab to see all of the projects you've created.   Watch several tutorials and tips to master Explain Everything.
You can access projects saved on your device as well as pro-       Check out news, updates and ideas from our blog. Still look-
jects you store on your Explain Drive. If you’re looking for a     ing for more? Go to the Knowledge Base section and take a
simple way to have your projects organized, you can create         look at our Help document and enroll in the Explain Every-
folders. In order to create one, tap and hold your project’s       thing Academy. You will learn how to use Explain Everything
thumbnail and move it on the top of another. This will allow       to innovate getting a message across - from your mind to the
you to merge projects or create a new folder.                      eyes and ears of your audience.

                                                                                                                                8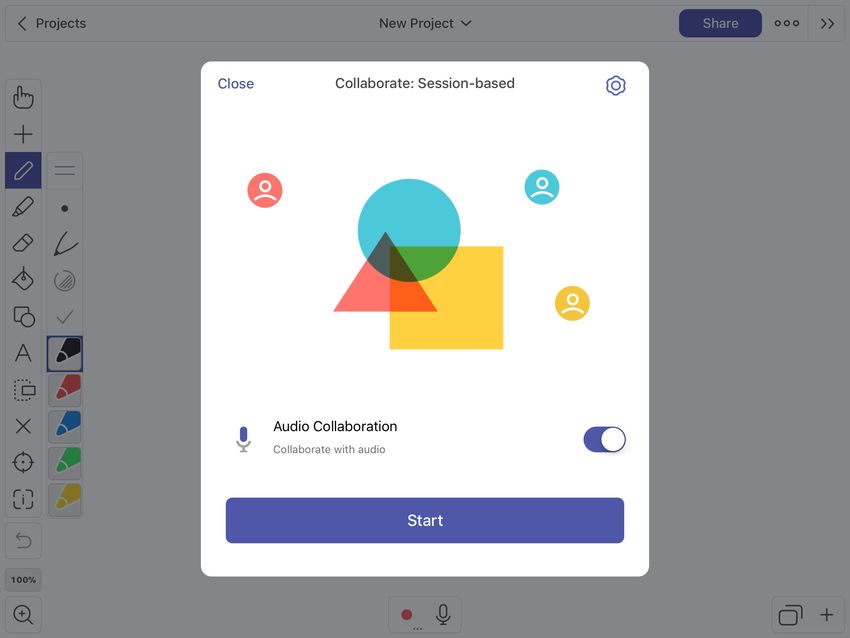
Invite & Collaborate
Choose the Collaboration tab to see projects broadcasted on Access My Drive to see all the projects uploaded by you to
your local network that you can join. If you want to join a col- the portal. You can organize projects by creating folders,
laborative session using a join CODE, enter it in the upper which can be also shared with others.
right corner.
Open Explain Drive to browse, watch, and download projects
created worldwide. All projects uploaded to the portal remain
editable project files, which if shared publicly anyone can
download and remix. Find a project by searching by name or
using a project’s unique CODE.
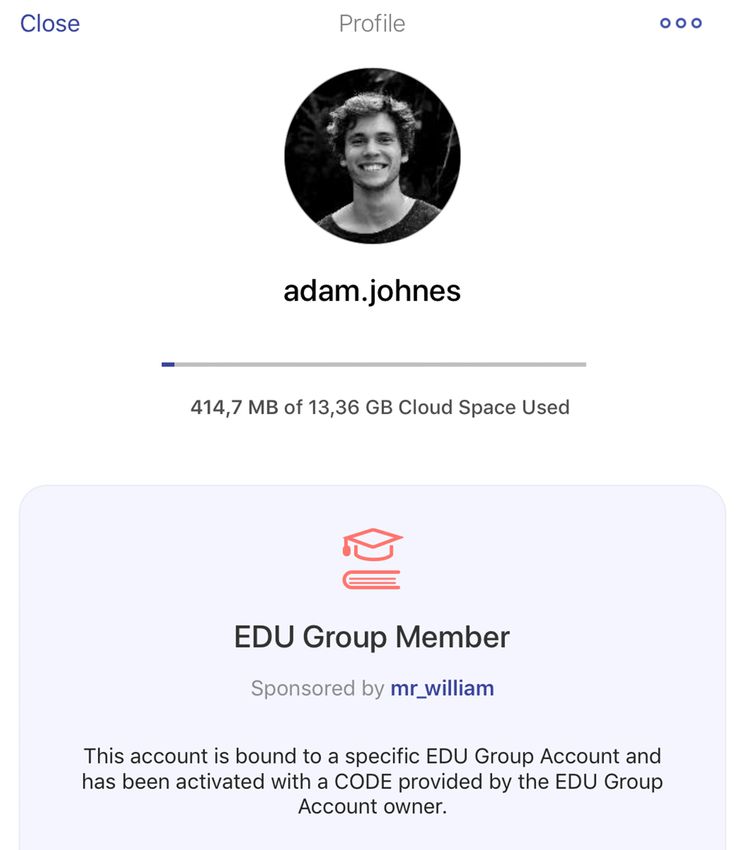
9Profile
Log in and out of your Explain Everything account and manage
it. Set a profile picture to customize your thumbnail. Find infor-
mation about your account and its validity as well as how much
Explain Drive storage space you've used. Remember, that using
the same credentials will let you log in to Explain Everything on
different devices, even if they using different operating systems.
For advanced account management and statistics visit
drive.explaineverything.com.
11General
Display
Height will fit the stage to the height of the external screen.
Toolbar alignment: Set whether the Toolbar should appear on With a 16x9 external screen, black strips will appear on the
the left or right side of the screen. sides. Width will fit the stage to the width of the external
screen. If width is selected on a 16x9 external screen, the top
Control Bar alignment: Set whether the Control Bar should and bottom parts of the screen will be cropped to retain the
appear on the top or bottom of the screen. proportions of the stage.
External screen mode: Set the display mode for an external
screen when it is present. Mirror will mirror the iPad screen
maintaining its proportions with the visible User Interface. 2nd
screen will display the canvas without User Interface ele-
ments and with the ability to select how the canvas will fit the
external screen.
Display on-screen taps and gestures: When ON, Explain
Everything will display touch indicators on the screen
whenever it is tapped or a gesture is performed. This allows
you to guide the audience through Explain Everything when
using the External screen mode's 2nd screen.
Fit inside external screen: Set the format in which Explain
Everything will be displayed on an external screen when the
2nd screen option is selected.
12Interface
Require browser password: This option controls access to the
Display the Save/Discard dialog when leaving a project: When
in-app web browser via the New Browser option in the Insert
ON, Explain Everything will ask whether to Save changes or
Object menu. To restrict access to the web from within Explain
Discard them when leaving a project. When OFF, changes will
Everything, enable the switch and create a 4-digit passcode to
be saved automatically when leaving.
lock the option. This passcode is needed to unlock access to
Simple interface: Simplified version of Explain Everythingʼs UI the in-app web browser.
for beginning users of any age.
Insert image from web: Turn ON to enable the Image From
Devices Web option in the Add Media menu. Image From Web allows
Adonit Jot: Slide to ON to pair with your Adonit Jot Bluetooth you to search for and insert images and photos from
stylus. Wacom Stylus: Slide to ON to pair with your Wacom Blu- OpenClipart.org, an open community driven web collection of
etooth stylus. free clipart.
Parental Control
Parental Gate: This is an option for restricting children under 13
access to external sources (eg. cloud services). When this is
set to ON, a user will have to confirm his/her age before log-
ging into external sources and solve a small puzzle.
13Editing
Editing projects
Hide video/audio object controls after a while: When ON,
Landscape project ratio: Set the ratio for newly created land- audio and video object controls will be hidden after a brief pe-
scape projects. 4:3 is a default iPad ratio and projects created riod of not using them. Tap on the object with the Hand Tool to
with this ratio will look best when viewed on the iPad screen. bring them back up.
The 16:9 project ratio will look best when viewed on a desk-
top computer or HDTV. Wrist guard: When you are writing and need to rest your hand
on the screen, this will prevent accidental drawing on the area
Offset laser pointer: Set to ON to make the Laser Pointer ap- covered with the Wrist guard layer.
pear slightly above your finger.
Display on-screen guides: Turns ON/OFF a red frame that in-
dicates the part of the screen that will be exported when ex-
porting to non-project formats. The frame will be visible only
when your iPad is in a different orientation than the project set-
ting and only during editing and recording.
14Default behavior for new objects
Auto-group drawings: Set to ON to make drawings automati-
cally group with the object below them. This will make your an-
notations stick to documents, images, and other objects.
Snap rotation: When ON, objects will be inserted with an acti-
vated Snap Rotation option. Use the Inspector ⟩ Lock ⟩ Snap
Rotation to toggle the setting manually for selected objects.
Add shadow to new objects: When ON, a shadow will be
added to newly inserted objects.
Switch to Hand Tool after shape creation: Set to ON to auto-
matically switch to the Hand Tool after inserting a shape with
the Shape Tool. This way you will be able to edit and move the
inserted shape without having to switch tools manually.
Websites in desktop mode: When ON, the inserted browser
will try to load desktop version of the website you're opening.
15Export
Video PDF documents
Resolution: This allows you to change the dimensions of of Quality: Set the quality of an exported PDF when using the
your exported movies (the default is 1024 x 768). Document option in the Share > Export menu.
Quality: This setting allows you to decrease the quality of the GIF
exported movie which will speed up compression and reduce Resolution: Set the resolution of an exported GIF when using
the file size. the Export as GIF option in the Timeline editing menu.
File format: Choose whether to save exported movies in the
MOV or MP4 format.
Include Audio: When set to OFF, the app will export a silent
movie.
Show audio objects in the exported file: When ON, exported
movies will not display audio objects inserted to the canvas
with the Add Media > Audio option.
Include slides without recordings: In Explain Everything you
can export slides without recording. This option adds 5, 10, or
15 seconds of empty recording time while exporting, so slides
without a recording will be present in your video. You can also
disable it by setting the added time to 0 seconds.
16Record
Front and Rear camera resolution: Sets the resolution of Mirror front camera video: Flips the video recording horizon-
video recorded by the iPad camera. Lower resolutions will re- tally.
sult in a lower quality video, but projects will compress much
faster during exporting. Timer display: Select whether the Timer should display the re-
cording duration of the current slide or of the whole project.
Recording quality: Frames per second: Set your project re-
cording frame rate to 30 or 60 frames per second (FPS). 30 Automatic smooth zooming in recording: Set to ON to enable
FPS is set as default. 60 FPS causes animation and transi- automatic Zoom smoothing during recording.
tions in your project to be smoother during recording.
Browser capture frequency
Seconds: Set how frequently an inserted website object will
be captured during recording. When set to OFF only auto-
matic captures will be visible during recording. Automatic cap-
tures are performed when a link is clicked and while scrolling.
17Integrations
Microphone: Mute mic while playing inserted video: When re- This panel lets you log in and out of services that can be inte-
cording while an inserted video is playing, the iPad micro- grated with Explain Everything.
phone picks up the sound from the video creating an echo ef-
fect. This option, when set to ON, mutes the iPad microphone Note: If using a shared iPad, you might want to log out of the
while a video is playing, though it also means that audio narra- cloud services before letting someone else use the device.
tion can't be done at the same time. When this setting is OFF,
you can reduce the echo effect by using headphones while
recording - or turn down the volume of the iPad speakers (or
use the volume control on the video itself to turn down the
sound from the video).
Audio Fade In for external mics: When set to ON this option
will mute the very beginning of each audio recording so that
any 'pops' caused by some external microphones are edited
out.
18Hand Tool
Choose the Draw Tool to draw and annotate on the screen. Hand Tool Gestures
Tap and hold the icon to change pen thickness. The drawing
color is chosen in the color picker. You can determine both
stroke and fill colors.
Switch between drawing styles to give your projects a unique
touch. Toggle the moveable Ruler and use it to draw precise
lines. Tap on the Ruler symbol again to hide it.
Draw Fill: Connects drawn lines and fills the drawing with a
color selected in the Color Picker under the Fill tab. Once
filled, the drawing becomes an object.
Complete Drawing: Turns the current drawing into an object
and allows you to continue drawing or writing. After an object
is created, a blue frame appears around it. Drawings also be- Tap an object to select and edit it (change the properties of a shape
come objects automatically when a different tool is selected, or edit a text box).
except when selecting Highlighter.
20Add Media
Insert various types of media from your iPad and other New Browser: Insert a fully functioning web browser
sources. onto the canvas. Tap the browser to activate it. Press the
eraser icon in the top right-hand corner to clear annotations.
New Picture: Opens the Camera to take a new photo
that is then added to the canvas. The Image Editor will ap-
pear after taking the picture that will let you scale, rotate, and
Note: Inserted browsers have limited recording capabilities
crop the image or remove its background with the Instant Al-
(e.g. Explain Everything will not record a YouTube video
pha before inserting it onto the canvas.
within a web page). If you see that there are some problems
on specific websites, please use the Quicksnap button in the
upper right corner, to capture the moment you want to be
New Video: Will insert an empty video to the canvas. If
shown during playback.
you are already recording, you have to press the record but-
ton at the bottom of the video object to start recording. If you
are in pause mode, pressing the global record at the bottom
of the screen will simultaneously start recording the video
object.
21New Equation: Insert a new text object with a special
math keyboard that allows you to create math formulas.
New Audio: Adds a new audio object to the canvas in
the same way you would create a new video. Press the re-
cord button under the object to start recording the sound. This
sound file will behave independently from the global project
recording button in the control bar on the bottom.
Existing Image/Video: Inserts an existing image(s) or
videos onto the canvas. Multiple images can be imported at
once. When importing a single image from one of the
sources, the Image Editor will appear.
You can start playing the video while recording globally - and
all your actions will be recorded. You can change the audio
volume, scrub the video backwards and forwards or pause it -
all while recording.
File: Insert any file types onto the canvas. Choose the
source of the file from the sources panel.
22Clipart: Insert high quality images from the Explain Everything
clipart library. Tap a clipart to add it to the canvas. You can also add
a custom clipart to your library with the Inspector Tool.
Image From Web: Search for and insert images and photos
from OpenClipart.org, an open community driven collection of free
clipart.
Existing Sound: Will open the iTunes menu from which you
can choose a sound file from your iTunes library. The inserted sound
file can be controlled just like an inserted video.
Placeholder: Insert a multimedia placeholder object. Tapping
on a placeholder that has been inserted to the canvas will open an
import menu with the corresponding media.
23Draw Tool
Choose the Draw Tool to draw and annotate on the screen. % Complete Drawing: Turns the current drawing into an
Tap and hold the icon to change pen thickness. The drawing object and allows you to continue drawing or writing. After an
color is chosen in the color picker. You can determine both object is created, a blue frame appears around it. Drawings
stroke and fill colors. also become objects automatically. when a different tool is
selected, except when selecting Highlighter.
Switch between drawing styles to give your projects a
unique touch.
Toggle the moveable Ruler and use it to draw precise
lines. Tap on the Ruler symbol again to hide it.
Draw Fill: Connects drawn lines and fills the drawing
with a color selected in the Color Picker under the Fill tab.
Once filled, the drawing becomes an object.
24Highlighter Bucket Fill
Highlighter behaves just like the Draw Tool but has automatic Fill in objects with selected colors. Use the Color Picker to
transparency. select color and opacity.
Eraser Shape Tool
Eraser has three different modes: Shape Tool: Tap to select the current shapes and lines. Tap
on the icon again to choose other shapes and lines, shadow
Erase Only Active Drawings: In this mode you will and border width, or switch to Freeform Shapes mode.
erase only lines part of the active drawing. Choose colors and transparency via the Color Pickers. Tap
and drag on the canvas to draw the initial shape or line
object.
Erase All Drawings: Erase all layers of the drawings,
this includes not only active drawings but drawing Freeform Shapes: With Freeform Shapes selected
objects as well. you can draw on the canvas and the drawings will
convert to the shape object that most closely matches.
Erase With Images: Erase all layers of drawings and
images.
25Text Delete
Tap on the canvas to insert a text box. Adjust the settings in Select the Delete tool and tap on the object on the stage that
the menu to change color, font, size and formatting. you want to remove. Tap the red X to remove the selected ob-
ject. If you want to remove a group of objects, double tap on
the object that is grouped with the other objects. The whole
Cutout Tool group will be marked with a red border and you will be able to
remove them by pressing the red X in the middle of the
Creates a new, separate flattened object from a selected part group.
of the stage. With the Cutout Tool selected, drag your finger
across the stage to make your rectangular selection.
Laser Pointer
Change into Lasso Cutout to select and copy freeform
areas of the stage. This tool will display a laser pointer under your finger. Tap on
the icon again to reveal the Laser Pointer styles. You can en-
Precise Cutout: selects and copies freeform areas with able offset of the laser pointer in Settings under General tab
a special extension that allows precise selection. so it appears slightly above your finger.
26Inspector
Set properties of objects on the canvas. Arrange objects for- Align Left will align selected objects vertically to the
wards and backwards,lock and edit them by copying, duplicat- left.
ing, flipping, enabling automatic rotation and more.
Align Center will align selected objects to the vertical
Arrange center.
Bring to Front will move the chosen object to the very Align Right will align selected objects vertically to the
top of the canvas. right.
Bring Forward will move the chosen object one layer Align Top will align selected objects horizontally to the
up. top.
Send Backward will move the chosen object one layer Align Middle will align selected objects to the horizontal
down. center.
Send to Back will move the chosen object to the back of Align Bottom will align selected objects horizontally to
the canvas. the bottom.
27Edit
Group will group the selected objects together so they
Set auto rotation turns on the control circle overlay - set
can act as one object.
the automatic rotation by placing your finger anywhere on the
circle and spinning it slow or fast. To stop rotation, tap any-
Ungroup separates grouped objects.
where on the circle. You can also move the rotation center
Duplicate button creates a clone of the selected object(s) and
point using the control element on the bottom of the control
places it on the canvas next to the original object.
circle.
Copy the selected object(s) to the clipboard.
Set as Background will lock the object as a background
Paste button adds copied objects to the canvas. You can copy
element meaning that drawings will not stick to it and when
and paste supported images and videos from outside of Explain
you use the Zoom and Pan tool, the background image will
Everything as well. Deselect All will deselect all selected ob-
not change its size, scale or position.
jects.
Flip Up/Down will flip selected objects on the vertical axis.
Flip Left/Right will flip selected objects on the horizontal
axis.
28Lock
Add as clipart will add selected objects as a flattened
Lock button will lock the object and keep it in place until it
clipart image that will be saved in Insert Object ⟩ Clipart ⟩
is unlocked with the Unlock option.
Custom menu.
Lock Rotation will prevent the rotation of an object when
Infinite Scroll enables infinite scrolling animation for a
using the Hand tool. Useful for documents.
selected object. Swipe on scrolling controllers to make the ob-
ject infinitely scroll in the direction of your swipe. Tap the blue
Lock Scale will prevent the object from resizing.
dot in the center of the controller to stop the animation.
Lock Horizontal allows the object to move only up or
down. Great for scrolling documents in slides when you %want
them to keep them steady.
Lock Vertical allows the object to move only left and right.
Snap Rotation will make the object snap to the closest
right angle when manually rotating using the Hand Tool.
29Undo Stealth Mode: In this mode, Zoom and Pan actions will
not be registered on the Timeline while recording. Also, if you
Undoes the last action. Redo: Redoes the last undone action. zoom out a red frame will appear indicating the current area
This button only appears after you Undo an action. that is being recorded or displayed on 2nd screen. Reset:
Brings Zoom level to the position before the Zoom & Pan tool
was selected. In the Stealth mode Reset will return the view
Zoom and pan: to the original level and position marked by the red frame.
Zoom and Pan: Zoom in and out on the entire canvas using
two finger pinch and reverse pinch gestures. Use one finger
to move the canvas around. Double tap to return to 100%
zoom of objects framed in the view. Every action performed There are 5 color pickers that can be individually set to
will be registered on the Timeline while recording. As a host of any color. Each tool that uses the Color Picker will retain
a Collaboration session, using Zoom & Pan will take over Color Picker settings made in other tools.
Zoom control on all participants' devices and they will be di-
rected to the view. you're currently in.
30Presentation and Navigation
Slide sorter: Displays the slide sorter menu, which al- Collaborate: Session-based: Lets you host a collaboration on
lows you to sort, delete, duplicate and change the color tem- your device and invite others to join you to work on the pro-
plates for individual slides. ject in real-time.
Previous slide: Go to the previous slide. Note: Session-based collaboration is hosted on your device
Next slide: Advance to the next slide. and session participants will be disconnected if you close
Add slide: Adds a new slide after the currently selected Explain Everything or keep it in the background for too long.
slide. You will be notified if it happens.
Navigation Bar
Explain Drive: Uploads the project to Explain Drive and allows
With the Navigation bar on the top of the screen you can Re- you to customize all privacy and visibility options.
name, Save, Duplicate, Undo all unsaved changes, and close
the active project. It is also where you Share your project, Export: Saves the project in a custom location in one of the
start Collaboration, and access the Main Menu. available formats: Video, Document, Image, Project.
Sharing options:
Web Video Link: Uploads the project to Explain Drive and gen-
erates a web link so you can immediately share it as a video
or slideshow. Tap on the generated link to share it.
31Recording
Mix: selecting this option will cause new recordings to
All the interactions on the screen can be recorded. Tap the Re- cre-ate new clips along already existing clips in the video
cord button on the bottom of the screen to begin recording track and overwrite the part of recording in the audio track.
audio and actions on the screen. A '+' symbol will be present on the record button when this
mode is selected.
Record: Begin recording from the current time. Press while re-
cording to pause/stop. If any video inserts are used, you can
separately set their preferences in the Record tab on the Set-
tings menu. For newly recorded videos, it's possible to change
the video resolution and quality and whether the front camera
should be mirrored. Press the recording button to choose the
recording mode: Overwrite or Mix.
Overwrite: when selected, a new recording will replace all
existing clips in unlocked tracks after the current time. You'll
be shown a confirmation popup each time you start recording
in this mode.
33Play: Playback the recording on the current slide. While Timer: Displays the current time within a slide. Tapping it will
recording, this becomes a pause button. display the timeline, which can be scrolled backwards and for-
wards. The timeline consists of two parts - the video track and
Play fullscreen: Tap and hold the Play button to reveal it. It the audio track. The video track displays the movement of ob-
plays back the entire project from the first slide to the last in jects, drawings and other actions that were recorded.
full screen. The audio track displays the corresponding audio wave file
for reference.
Rewind: Go to the beginning of the recording on the cur-
rent slide.
Fast Forward: Go to the end of the recording on the cur-
rent slide. Additional recordings can be added to the end of a
slide.
Mic Mute: Mutes the microphone. It's invisible by default.
It can be switched on in the Record tab on the Settings
menu: Show MIC MUTE button.
34Timeline Editing
You can refine and adjust your Explain Everything recordings
with the Timeline Editing menu. To do that open the Timeline
and touch and hold on a clip or the playhead.
Start selection: Lets you select a part of the timeline starting
from the playhead's position. Scroll the timeline to modify the
selection. A set editing options will appear after a selection is
made.
Delete: Clears the selected part of the recording.
Delete and compact: Removes the selected part of the record-
ing and joins the two remaining parts together.
Smooth: Makes the object and zoom movements more fluid
on the selected part of the recording.
Tip: To remove a single clip from the Timeline,
touch and hold on it and choose Delete.
35Speed up: Increases the playback speed on selected part of
the recording. You can set the playback speed to 2x, 4x, 8x,
or 16x of the original speed. If you want to change back to the
original speed, select the sped up part of the Timeline,
choose Speed up and tap 1x. Note: Please keep in mind that
the Speed up changes both the video and the audio tracks
playback speed.
Export as video: Shares the selected part of the recording as
a video file.
Export as GIF: Shares the selected part of the recording as
an animated GIF file.
Delete all clips from now on: Removes the recording starting
from the playhead to the end.
Split: Divides a clip into two separate clips at the point of the
playhead.
Fade in audio: Adds one second of silence that fades into
sound at the beginning of selected audio clip.
36Sharing is caring so share Explain Drive
your message with others. Explain Drive is a content portal for sharing, publishing, and
downloading editable project files. It provides users an addi-
tional destination to publish projects easily, discover the work
Web Video Link of others, and download, edit, and remix projects from the
global community.
Sharing a project as a video link is the quickest way of provid- The portal can be accessed from the app’s Home Screen or
ing others with an access to your project. While the project is by visiting drive.explaineverything.com.
still compressing in the cloud, you can already send others
the link where it will be found after a few minutes. The project
All projects uploaded to the portal, if shared publicly, can be
is automatically uploaded to Explain Drive, where you can
downloaded and edited by others. This way you can download
change your project’s accessibility at any time.
a project, copy graphics you like, and reuse them in your pro-
ject. You can also delete all recordings and make your own.
Your project’s privacy settings can be changed any time.
When you tap a project thumbnail, a player will open with op-
tions to view the recording, share, like, and download a local
copy of the project.
38My Drive
Export
My Drive is your local space on the portal. You will find all of
your projects that have been uploaded to Explain Drive as Once your project is ready, you can save it to your local pro-
well as saved links to projects made by others. You can man- jects or export it to one of numerous locations. You can export
age, organize them in folders, and set their visibility in the por- your creations as a video (MP4 or MOV file), PDF, image
tal. You can access My Drive from your iPad, iPhone, the web- (JPG), or .explain file so it will remain an editable project file.
site, plus also Android, Windows, and Chromebook device if
you sign in with the same credentials. (Doesn’t apply to Ex-
plain Everything Whiteboard on iOS). This way you can start
creating a project on one platform, and continue on another
one. It can be also very useful if you share a device with
someone else.
Collaborate session-based
Start real-time collaboration and bring everyone on the same
infinite canvas. Once you finish the work, everyone can save
a local copy of the project on their devices.
39Team up to explore a challenging question or build meaningful
content. With Explain Everything, a group can brainstorm col-
laboratively, annotate documents and images, and capture
conversations in real-time.
A group can build a storyboard or presentation together, with
each member working on a different part of a slide, or on differ-
ent slides.
A collaborative session can be broadcasted on local network
and anyone can join it. It’s also possible to create a private
session and only people with an access CODE will be able to
join. The host can determinate participants privileges such as
editing or storing the project at the end of the session.
41Collaboration options:
Voice Chat: Enable to allow collaboration participants use
voice communication. This setting can't be changed during
the session.
Allow editing: Disable to prevent session participants from ed-
iting the project. This is a default setting for participants and
can be changed during the session.
Allow storing project: Disable to prevent session participants
from being able to save the project on their devices after the
collaboration ends. This setting can't be changed during the
session.
Visible on local network: Enable to make your session visible
in the Nearby Collaborations list in the ... menu for users on
the same WiFi. This setting can't be changed during the ses-
sion.
Note: Some WiFi networks might not allow Visible
on local network option to work properly.
42Interactive learning
Capture Understanding
One of the key features of Explain Everything is the ability to
record visuals, motion, and audio, all which are impactful when
presenting and sharing ideas. When students capture understand-
ing, their teachers not only see the responses to a problem but
also the entire thinking process behind it. Gaps in understanding
emerge as do areas of strengths, both providing opportunities to
focus in on them. Not every student likes to speak to a group -
recording an explanation gives another way for those types of
students to have a voice. They can reflect upon their understand-
ing, listen to themselves and add what they might have missed at
first. Explain Everything allows for splitting the recording process
into parts so you can record audio and video separately.
By taking advantage of Mix Recording it’s easier to stay crystal
clear during explanations.
44Create and use just-in-time activity templates
Explain Everything lets you create templates to speed up your
processes and make sharing ideas and information with your
students easier. One simple way of creating activity templates
is by using placeholders. Placeholders are objects in Explain
Everything that you can insert into a project and then later tap Projects Gorillas Share
tivity
Complete the ac
to add desired content (images, files, video, audio, and clipart). and record your
explanation
Placeholders allow you to maintain consistency in your
projects. They can be found within the Insert tool. Once you Species Name
Indigenous to... Quick Facts
tap on a Placeholder, choose the type of media you want it to
add in the future. You can resize the text box placeholder in the
bottom right corner and adjust its size on the canvas. Once
your template is created, save your project and share it with
your class. Everyone will be able to work on individual copies
of the project, using the placeholders to add content within the
template. Of course, not all activity templates need to be built
add photos if
you like!
from placeholders. You can insert any image, picture or text
and have your students to work with them! 100%
45Instruction
Instruct in Real-Time
Create presentations that move at the modern speed of learn-
ing. Use video, notation, and audio recording to bring your in-
struction to life. Insert existing photos, videos or documents that
are always at your fingertips. Take a picture directly in the app
and use your surroundings to build a better bond with the audi-
ence. Use Infinite Zoom to focus on the tiny details on your can-
vas and zoom out to present larger context. Make sure to draw
attention to your key ideas. Want to show information found on
web? No need to leave the app! You can insert a web browser
and scroll through a page. You can even crop parts of it and
continue working on them offline.
46Create instructional videos Video instruction: Helps learners acquire new skills by viewing
a video. Record all your interactions and explain step by step
Using video in the classroom has a lot of benefits. It can how to complete a task. At the end, give your audience a simi-
produce authentic learning opportunities for students and lar task to complete imitating your steps.
encourage them to research. Videos humanizes the online
experience by letting students get to know their instructor as Mini-lessons: Mini-lessons are condensed versions of lectures.
a real person, not an abstraction. A significant benefit of They can be introduced to present new ideas followed by
video is giving students an opportunity to view complex pro- content-based exercises in the classroom. They can be a good
cedures as many times as they need. Instructional videos way to recap knowledge and give your students a short sum-
can be used not only in online classes, but also in face-to- mary of recently introduced material.
face environments to introduce new skills, knowledge or ac-
tivities to be learned or reinforced. Below are just a few types Tutorial: Tutorials are step-by step “how to” instructional videos
of instructional videos that might be helpful: welcome video, that teach a specific skill or technique. They are detailed dem-
video modeling, lecturette and tutorial. onstrations offering specialized knowledge on a certain topic,
often recorded in sequences.
Welcome video: Can be used to introduce students to you
and your course. They may be published online to be viewed
prior to class or shown in the classroom. It’s a great opportu- Tip: In order to give more personal look of your
instructional videos, make sure to add a video of yourself
nity to let your students get to know you better. You can ask
speaking to your audience. Insert a new video in Explain
your students to prepare welcome videos too, and get to Everything and switch to the front-facing camera.
know them as well!
47Demonstrating Furthermore, once an explanation of concept is recorded, we
can play it back and come back to the most significant parts of
Understanding the explanation. Explain Everything gives is simple and intuitive
and is used by students of different ages. In order to adjust to
Students as Teachers the youngest users, there is an option of the Simple Interface
which limits the numbers of tools.
Strengthen leadership and collaboration skills by giving stu- Anyone can become a creator!
dents the tools to create and share their own tutorials, animated
stories, and presentations. Technology has deepened the ability
for us to teach one another, and animation has played a signifi-
cant part of it. Explain Everything is a perfect platform for any
student to become a teacher! From teaching peers in class to
helping learners across the globe, animating learning through
Explain Everything is a perfect way to empower that inner
educator found in all of us. Explain Everything can be used
across all subjects allowing learning to be animated, exported,
and ready to share with the world. Since most people are visual
learners, animation becomes a more accessible form of having
a problem presented.
48Document and Reflect
Explain Everything provides teachers and students with an
easy way to document learning and reflect upon it. Explain
Everything integrates with all of the most frequently used
cloud destination, so students and teachers can seamlessly
import any kind of files. These can be papers, presentations,
videos, or just photos taken around the learning environment.
Even if a document is not available digitally, simply take a
picture of it and bring it into Explain Everything! Once work is
on the canvas, a teacher or student can reflect upon it. One
way to give feedback is to create a video. Once the recording
is started, use the Zoom tool to get closer to a specific sec-
tion, analyze, and comment on it. Highlight parts of text,
annotate the document and of course, speak to the author of
the content (which sometimes can be yourself!).
49Communicate Visually
with Your Clients Need a live internet browser? Import one into Explain Every-
thing and leave it just off screen for when you’re ready. Time to
It’s undeniable that there are advantages to getting visual while deliver your graph or chart? Just scroll over to where you stored
communicating, especially considering that 65% of people are it. Ready to show that clincher of a video? It’s waiting on stage
visual learners. With the advent of the smartphone and tablet, right, but only you know it’s there. The best storytelling makes
faster internet connections, and more refined pieces of soft- use of visual aids, tools, and most importantly – good timing.
ware, visual communication has been pushed to the forefront, Let your clients see your point and have that ‘wow moment’.
and with good reason. Not only does it increase understanding,
but it also increases retention rates of information. If you think
you have no time to create a visible explanation, think about all
the time you save by making your ideas clearer. You won’t need
to repeat anymore “No, like this…” while drawing a quick dia-
gram for your frustrated audience to clarify your point. Innova-
tions in technology and connectivity have produced so many
platforms and solutions that make assembling complete visual
content easier and faster. Explain Everything’s infinite canvas
makes this not only possible, but easy and intuitive. What do we
mean by infinite canvas? Imagine a piece of paper that never
ends – no matter how much you scroll or zoom, it just keeps go-
ing. What does this mean for storytellers and presenters? It
means you can have everything you need on one page so you
don’t need to change slides or switch windows/programs/apps.
51Turn Ideas
Into Understanding
Explain Everything’s interactive whiteboard is the ideal platform
for creating and sharing powerful, visual stories. Starting with
a blank infinite canvas or importing existing slides and media.
Write, annotate, and add emphasis to anything on the screen.
Interactive capabilities enable all participants to add their own
illustrative points and be an integral part of the conversation.
You can also capture, edit, and share all or part of your ses-
sions for continuous learning. This is especially helpful for peo-
ple who were not at the live meeting or who need to see how
an idea was developed. Explain Everything is the picture-
perfect catalyst for the two-way visual communication that is so
important in today’s world. From describing complex concepts
to connecting salespeople with prospects to onboarding new
employees, you can collaborate, share, and learn without
boundaries. Empower your teams to become visual communica-
tors and start turning ideas into understanding.
52Connect Your Teams
Many managers are looking to bypass expensive options and Remote workers can watch and contribute their design and
create authentic communications for clients, investors, and copy ideas as the team works to complete stages. As dis-
partners. Large and small teams benefit from collaboration persed teams become the norm, tools that allow open collabo-
tools that keep entire projects in a commonplace where the ration will cut down on send-backs and help remote stakehold-
whole team can access and edit simply by downloading them ers develop clear ideas of what’s expected.
from the cloud. Content teams can have strategists, creators,
and editors all working on the same document simultaneously. Changing structures and finding the best mix of new and exist-
When teams use tools that can synchronously share notes and ing technologies in your organization doesn’t have to spell
ideas on an infinite canvas without ever needing to switch doom and gloom for professionals. In fact, those digital disrup-
documents or open a handful of programs, a real-time collabo- tions are more likely to spell opportunity as businesses find the
rative environment is achieved. Far-flung workers and home right set of collaboration solutions that help nimbler teams
base employees need to be able to share ideas and create to- bring more projects to life in less time, and communicate
gether in real-time, whether they are cross-office or cross- across teams for better results. The trick will lie in keeping
country or across oceans. For example, a social media team teams connected, collaborative, and innovative as they go.
can pull slide decks or live browsers into an interactive,
collaborative whiteboard session, and draw, write, and outline
strategies.
53Have better meetings
with customers Connect elements and draw connections. Making connec-
tions among the key areas of your presentation will help the
audience to better memorize your message. You can make
When you are a salesman, you spend a lot of hours in trans- simple annotations, drawings, highlight parts of text or zoom
port. Your customers and meetings can be spread out a long in to make people focus on the same things you do rather
distance, and you need to adjust to always be on time. that read the whole descriptions that are on your slide.
Wouldn’t it be better to save this time and instead, use it for
actual conversations to understand your clients and under- When you lead 1:1 meetings, take some time to learn about
stand what keeps them up at night? In most talks, a good your listener. You may offer a solution very similar to your
speaker tries to affect explicit memory of the audience. competitors but having customers involved gives you an ad-
Explicit memory involves the aspects of presentations that vantage. Hold attention and show that you listen. Draw a
can be recalled later. However, many times you will aim to model based on what you hear, put your listeners name on
change the explicit memory of your listeners. There are cer- canvas, sketch. You don’t need to be an artist to make visual
tain areas you can focus on to improve what people remem- notes. Once you finish the meeting, send your customer a
ber from your presentation. Many of us remember the first video or a link to the project and keep the discussion going!
thing presented. Because of that, it’s important to discuss Give your presentations a unique style. Have your brand ele-
what you will speak about during your presentation and make ments always at your fingertips. Add your company’s logo to-
sure people will hear what you really want them to learn. gether with other assets that you often come back to into your
When running a presentation, don’t start with blank canvas. clipart library. Find the right colors using the hex system to let
Insert at least a sentence or a picture which will be your start- your brand speak with you.
ing point.
54First, a big “Thank You!” from all of us at Explain Everything
for exploring our book!
Our aim was to create something that provided an in depth explanation of the app's tools and some fresh ideas on
how to use them that also appealed to individual users, educators and entrepreneurs alike. We hope that the gath-
ered material enriches your knowledge of our app and enhances your work! While all of the images are taken from
the iOS version of Explain Everything, nearly all of the features can be found in every version. We're working hard
to bring every great feature to all platforms!
We can't wait to see more and more of your wonderful projects shared!
Stay up-to-date on the latest features on our blog!
56Explain Everything™
are proprietary marks
of Explain Everything.
Explain Everything' trademarks may not be used in connection with any
product or service that is not provided by Explain Everything, in any manner
that is likely to cause confusion among customers, or in any manner that dis-
parages or discredits Explain Everything.
All other trademarks displayed on Explain Everything's website or Service
are the trademarks of their respective owners, and constitute neither an en-
dorsement nor a recommendation of those Vendors. In addition, such use
of trademarks or links to the websites of Vendors is not intended to imply,
directly or indirectly, that those Vendors endorse or have any affiliation with
Explain Everything.
Apple, the Apple logo, and iPad are trademarks of Apple Inc., registered in
the U.S. and other countries. App Store is a service mark of Apple Inc.
58You can also read