Version history Known issues & solutions - May 2020 Steinberg Media Technologies GmbH
←
→
Page content transcription
If your browser does not render page correctly, please read the page content below
Version history
Known issues & solutions

May 2020

Steinberg Media Technologies GmbH
Contents
Dorico 3.5 ............................................................................................................................................................................................................. 3
    New features ................................................................................................................................................................................................... 3
         Pitch before duration in note input ........................................................................................................................................................ 3
         Expression maps ....................................................................................................................................................................................... 6
         Line style editors O ............................................................................................................................................................................ 9
         Figured bass .............................................................................................................................................................................................19
         Condensing for divisi and section players O .............................................................................................................................24
         Properties ..................................................................................................................................................................................................27
         Manual staff visibility changes ..............................................................................................................................................................29
         Clef and transposition overrides O...............................................................................................................................................30
         Used chord diagrams grid.....................................................................................................................................................................32
         Graphic slices O ...............................................................................................................................................................................34
         Hollywood-style parts.............................................................................................................................................................................35
         Blank staves..............................................................................................................................................................................................37
         Keda Indian Drum Basics sounds .......................................................................................................................................................37
    Improvements ................................................................................................................................................................................................38
    Issues resolved .............................................................................................................................................................................................57
Known issues and solutions ...........................................................................................................................................................................62
    Frequently asked questions .......................................................................................................................................................................62
    Knowledge base...........................................................................................................................................................................................62
    Entering the eLicenser Activation Code (Mac only) ............................................................................................................................62
    Key commands to transpose notes by an octave (Windows only) ..................................................................................................62

   Credit notice

   Steinberg, Dorico, WaveLab, Cubase, Nuendo, ASIO and VST are registered trademarks of Steinberg Media Technologies GmbH. VST Sound is a trademark of Steinberg
   Media Technologies GmbH. Windows is a registered trademark of Microsoft Corporation in the United States and other countries. Mac, Mac OS and OS X are trademarks of
   Apple Inc., registered in the U.S. and other countries. All other product and company names are trademarks and registered trademarks of their respective holders. All
   specifications are subject to change without notice. Made in Germany. Copyright © 2020 Steinberg Media Technologies GmbH. All rights reserved.

Dorico 3.5 Version History                                                                             Page 2                                                Steinberg Media Technologies GmbH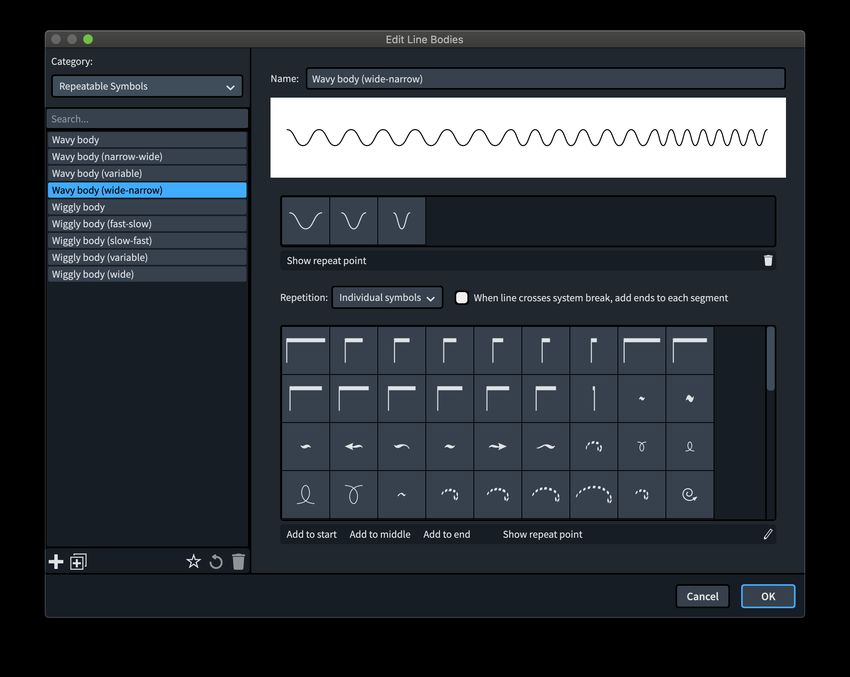
Dorico 3.5
                                 18 May 2020

       New features
                             Pitch before duration in note input
                                 When inputting music in Dorico in step time, using either the mouse, computer
                                 keyboard, or MIDI keyboard, it has always been necessary to choose the duration
                                 of a note before you specify its pitch. While many users find this very convenient,
                                 some users prefer to be able to specify the pitch of the note before choosing its
                                 duration, particularly if they use a MIDI keyboard for input and want to experiment
                                 with ideas or harmonies before committing to input that material.

                                 When specifying duration before pitch, provided the caret is visible and note input
                                 is active, a duration is always specified – it is sticky – which means that any pitch
                                 you specify by playing a note on your MIDI keyboard or typing its name on your
                                 computer keyboard is input immediately. If you want to try out melodic ideas
                                 without inputting them, you therefore have to exit note input each time you want to
                                 play something without inputting it.

                                 When specifying pitch before duration, by contrast, when the caret is visible and
                                 note input is active, a duration is not specified until you either type the number
                                 corresponding to that duration, or click its button in the notes panel. This means
                                 that any notes or chords you play on your MIDI keyboard will not be input, and you
                                 are constantly updating the pitch of the note or chord that will be input when you
                                 eventually specify a duration: this therefore allows you to try out ideas without
                                 exiting note input, only committing to input something when you are ready.

                                 You can freely switch between specifying duration before pitch or pitch before
                                 duration at any time during note input. In fact, when specifying pitch before
                                 duration, you will often want to make a particular duration sticky in order to input a
                                 run of notes all of the same length, and this is done by switching to specifying
                                 duration before pitch once more, which automatically makes the last chosen
                                 duration sticky.

                                 Default note input order. Although you can switch freely between specifying
                                 duration before pitch or pitch before duration at any time when using Dorico, you
                                 will probably develop a preference for the default state of note input when you start
                                 a new project or open an existing one. On the Note Input and Editing page of
                                 Preferences, the new option By default, specify pitch allows you to specify either
                                 Before duration (the new method introduced in this release) or After Duration
                                 (the default method that Dorico has always provided).

Dorico 3.5 Version History                               Page 3                        Steinberg Media Technologies GmbH
Immediately below this is another important option concerning selection behaviour
when specifying pitch before duration, which affects the order in which other
properties of the note to be input need to be specified. Normally, all properties of
the note – accidental, articulation, rhythm dot – must be chosen before it is
committed to the score, whether it is committed by specifying the pitch (in duration
before pitch) or the duration (in pitch before duration). However, if you would prefer
to specify the accidental, articulation and rhythm dot after the note has been
committed to the score, you can do this by setting set Specify accidental, rhythm
dot and articulations to After inputting note.
Similarly, if you are using a MIDI keyboard for input, you may find that you want to
adjust the enharmonic spelling of the note that you have just input, in which case it
is important that the note you have just input remains selected so that you can
change its spelling with Alt+-/=, so you may find After inputting note the more
useful setting when inputting using the MIDI keyboard.
If, on the other hand, you are using the computer keyboard and not a MIDI
keyboard, you may find it more helpful for the note you have just input not to be
selected, so that you can instead use Alt+↑/↓ to manipulate the shadow
notehead to specify the pitch of the next note. If this seems most useful to you,
choose Before inputting note.
Do take notice that Specify accidental, rhythm dot and articulations takes effect
regardless of whether you are using the new pitch before duration input method, or
Dorico’s original duration before pitch method. You may want to try out both
approaches to see what feels most natural to you.
Toggling between input orders. To toggle between pitch before duration
or duration before pitch at any time during input, simply type K, or click
the note input toolbox button shown on the right.
Mouse input and pitch before duration. When pitch before duration input is active,
you can use the mouse to position the shadow note, then either click the duration
of the note you want to input in the Notes panel or type its shortcut. If you prefer
not to use mouse input, activate the Select tool (the arrow at the top of the note
input toolbox).
Specifying pitch. When pitch before duration input is active, no note or chord will
be input until you choose the duration for the note to be input, but there is no
requirement for the note or chord to be held down when you choose the duration.
You can specify the pitch or pitches, and if you are using a MIDI keyboard, you can
release all of the keys before you choose a duration: the shadow noteheads will
show the pitch or pitches that will be input. Each time you play a new note or
Dorico 3.5 Version History Page 4 Steinberg Media Technologies GmbHchord, or each time you type a new pitch name on the computer keyboard, you
update the pitch of the pending note or chord.
If you are using the computer keyboard, type the note name to show the shadow
note. To specify the same pitch in a higher octave, hold Shift+Alt and type the
note name again; repeat this to transpose upwards by a further octave. To specify
a lower octave, hold Ctrl+Alt (Windows) or Control (Mac) and type the note name;
repeat to transpose downwards by a further octave. Once the shadow note is
shown, and provided the option When specifying pitch before duration is set to
Do Not Select Input Notes, you can also transpose the shadow note by step
using Alt+↑/↓.
To specify an accidental when using the computer keyboard, first type the note
name, then type the key command for the desired accidental (by default, 0 for
natural, - for flat, = for sharp).
Building chords. When using a MIDI keyboard, you can simply play all of the notes
of the chord together before you choose the duration. When using the computer
keyboard, engage chord input by typing Q. The familiar + sign appears to the left of
the caret. Now as you type each note name on the keyboard, a new shadow note is
added at the caret position; just as when inputting duration before pitch, build the
chord from the bottom up, and when you have specified all of the pitches, choose
the duration to input the chord.
Choosing duration. Once you have primed the pitch or pitches of the note or chord
to be input, choose the duration by typing the appropriate key command. If you
require a dotted note, type . or click the dotted note tool in the note input toolbox
before you type the key command for the chosen duration.
Inputting a run of notes of identical duration. If you want to input a run of, say,
eighth notes, you can continue to type 5 repeatedly after specifying each pitch, or
you can instead return temporarily to specifying duration before pitch by typing K,
which will cause the last chosen duration to become sticky. At the end of the run of
notes, type K again to return to pitch before duration.
Inputting tuplets. When inputting duration before pitch, you choose the unit of the
tuplet before invoking the tuplet popover, and the tuplet is created as soon as you
confirm the popover. When inputting pitch before duration, you have two options:
specify the unit of the tuplet in the popover; or allow Dorico to infer the unit of the
tuplet from the first note you input after confirming the popover.
To specify the unit of the tuplet in the popover, add the letter that corresponds to
the desired duration after the second number in the ratio:
§ Whole note (semibreve): w
Dorico 3.5 Version History Page 5 Steinberg Media Technologies GmbH§ Half note (minim): h
§ Quarter note (crotchet): q
§ Eighth note (quaver): e
§ 16th note (semiquaver): x
§ 32nd note (demisemiquaver): y
§ 64th note (hemidemisemiquaver): z
So, for example, to specify a quintuplet of eighth notes in the time of a quarter note,
enter 5:2e into the popover.
To allow Dorico to infer the unit instead, simply type the ratio as normal into the
tuplet popover: when the popover is confirmed, no tuplet will be created until you
next commit a note, at which point the tuplet will also be confirmed, taking its unit
from the duration of the note you input.
Rest input. To input a rest, type , (comma) to engage rest input, then simply type
the duration of the rest to be input; a shadow rest appears on the caret. There is no
need to specify a pitch. To leave rest input, simply type or play a pitch, and the
shadow note will reappear.
Lock Duration. Lock Duration behaves the same way regardless of the input order
you are currently using: simply type or play the note, and the caret automatically
advances to the next note, retaining the durations of the notes or chords at each
position. When you either type L to disengage Lock Duration or reach the end of
the existing music, pitch before duration input resumes automatically.
Expression maps
Dorico 3.5 brings a suite of improvements to its capabilities in working with today’s
sophisticated virtual instruments and sample libraries. We have surveyed a number
of the latest libraries from the top manufacturers to understand the kinds of
techniques their developers have used in designing their products, and introduced
features to make it easier to set up expression maps that work with the design of
these libraries, rather than against them.
It is important to understand that with today’s powerful and comprehensive sample
libraries, it is on the whole impractical for either Steinberg or the library
manufacturer to create and distribute a single expression map, or even a single set
of expression maps, that will provide a plug-and-play solution to make playback
sound great with no effort from you. Today’s sample libraries are so enormously
detailed and resource intensive that it is unlikely you will be able to load every
sound in a plug-and-play template for a whole orchestra on a typical computer, so
it is necessary for you to be more selective about which instruments – and even
which playing techniques and articulations for a certain instrument – you will load.
And while the general mechanical processes used by sample library developers to
Dorico 3.5 Version History Page 6 Steinberg Media Technologies GmbHmake it possible to choose between the different articulations, techniques, layers,
microphone positions and so on are broadly the same, using a combination of key
switch notes and MIDI controllers, the details of how these processes are
implemented are different for every library – very often even for libraries from the
same manufacturer.
But do not be disheartened: while this means that you will have to engage with the
details of how your chosen sample library works, and you will have to spend some
time working with expression maps in Dorico, this modest effort will pay off quickly.
Our primary goal with the improvements in Dorico 3.5 is to make it easier and
quicker for you to create and edit expression maps, and to that end there are not
only new capabilities – including automatic switching of articulation based on
played note length, add-on switches that can dramatically reduce the number of
technique combinations you need to define, and so on – but also usability
improvements in Play ▶ Expression Maps to make the process more pleasant.
Switch types. Switches in expression maps can now be one of three types:
§ Base: this is the type of switch that existed in previous versions of Dorico,
and to which all switches in existing expression maps created in earlier
versions will be mapped when you open your existing projects in Dorico
3.5. A base switch will typically describe a significant change in playing
technique or articulation, such as pizzicato versus arco, or staccato versus
legato. Base switches are by their nature mutually exclusive, so switching
from one base switch to another removes the prevailing playing technique
and switches to the new one.
§ Add-on: this new switch type can be useful for defining playing techniques
or articulations that can be added to an existing base switch; for example,
some libraries use a consistent set of MIDI controllers to control legato, and
this applies regardless of what base sound is currently in use. An add-on
switch does not remove or change a base switch. Add-on switches are
simpler than base switches and can only trigger simple key switch notes
and controller values.
§ Init: this new switch type can be used to send a particular set of
instructions when playback starts; for example, you might want to reset a
round-robin controller, or ensure a particular MIDI controller always starts at
a particular known value. Every expression map defines an init switch, but it
will be empty by default. Like add-on switches, the init switch can only
trigger simple key switch notes and controller values.
Conditions. Base switches can now define conditions that must be satisfied in
order for them to be triggered. In this release, note length is the only conditional
Dorico 3.5 Version History Page 7 Steinberg Media Technologies GmbHvalue supported, but we plan to expand support for conditions in future versions,
allowing you to create simple sets of conditions using Boolean logic. For an
example of conditions in action, look at the default HSO Violin Solo expression
map, which defines two switches for the Natural playback playing technique, and
two switches for Legato, with each of the two switches conditional on note lengths
being longer or shorter than the Medium length.
Note length can be one of five values:
§ Very short: dotted 16th at 120bpm (0.1875 seconds)
§ Short: dotted eighth at 120bpm (0.375 seconds)
§ Medium: dotted quarter at 120bpm (0.75 seconds)
§ Long: dotted minim at 120bpm (1.5 seconds)
§ Very long: any longer duration
This choice of note lengths allows you to easily switch between different lengths of
samples that are provided, for example to switch between staccatissimo, staccato,
marcato and short sounds, and can really enliven the interpretation of a phrase.
Enabling and disabling switches. It is now possible to disable a switch in your
expression map without removing it, which can be useful when experimenting with
a particular approach to handling a particular playing technique, or if you are
working with an expression map that defines a greater number of playing
techniques than you can load or require for your current project. Simply select the
switch from the table in the Base and Add-on Switches section and deactivate
the Enabled checkbox on the right-hand side.
Descriptive names for switches. Switches can now have a descriptive name,
instead of simply listing the combination of playback playing techniques they
handle. This allows you to match the name of a switch to the terminology used in
the sample library, if you would find that useful: simply select the switch from the
table in the Base and Add-on Switches section and then edit the Name field. To
see which playback playing techniques are handled by a switch with a custom
name, simply hover over the entry in the list, and the tool tip will show you.
Reordering actions. It is normally crucial that a series of MIDI messages intended
to trigger a particular playing technique in the sample library is received in the
correct order, so you can now change the order in which the actions for a switch
are output. In the action bar for the Actions table in the Base and Add-on
Switches section you will find upward and downward pointing arrows, which allow
you to re-order the switches.
Duplicating actions. You can now duplicate an entry in the Actions table by
clicking the new Duplicate Action button in the action bar.
Dorico 3.5 Version History Page 8 Steinberg Media Technologies GmbHAutomatic mutual exclusion groups. Mutual exclusion groups define the
relationships between playback playing techniques and how they can be combined
or otherwise in the particular sample library you are using. If two playback playing
techniques are defined as being mutually exclusive with each other, then if playing
technique A is active and a notated item that gives rise to playing technique B is
encountered, then playing technique A is removed and playing technique B is
added. If these techniques were not mutually exclusive, B would be added to A,
and the expression map would be expected to define a set of actions to produce
the combination A+B.
Although you are still free to define your own mutual exclusion groups in Dorico
3.5, the program can now define mutual exclusion groups automatically for you,
and indeed does so by default in any expression maps you create.
If you want to create your own mutual exclusion groups, expand the Mutual
Exclusion Groups section of the Expression Maps dialog, and deactivate the
Auto checkbox. Beware that if you later decide to re-enable automatic mutual
exclusion groups, when you reactivate the Auto checkbox, any manual mutual
exclusion groups you have created will be removed.
Combined dynamics. The combined dynamics , and can now give rise
to playback playing techniques if needed, allowing you to trigger dedicated
samples for these dynamics if your library provides them.
Importing expression maps. You can now import either Dorico or Cubase
expression maps by dragging and dropping the files onto the Expression Maps
dialog.
Importing Cubase expression maps. You can now import several Cubase
expression maps at once, and Dorico imports a wider variety of switches from
Cubase expression maps than in previous versions, mapping them on to the
appropriate playback playing technique in Dorico (including Bartòk pizzicato, snap
pizzicato, harmonics, con sord./senza sord., flautando, flutter-tongue, and others).
However, you should still consider an imported Cubase expression map only a
starting point for developing your own native Dorico expression map, as the two
applications approach the handling of sample libraries in a rather different way.
Line style editors O
Building on the flexible and powerful horizontal, note-attached and vertical lines
introduced in Dorico 3.1, Dorico 3.5 now makes it possible for you to extensively
customize these lines and design your own new ones, thanks to a set of four new
editors available from the Engrave menu.
Dorico 3.5 Version History Page 9 Steinberg Media Technologies GmbHIn order to understand how the four editors are used, it’s worth dwelling for a
moment on the anatomy of Dorico’s lines. A line is made up of the following
ingredients:
§ The main part of the line is the line body. This can be one of three kinds: a
generic straight line of a particular thickness, dot or dash pattern, or a
double line; a wedge, which goes from thick-to-thin or thin-to-thick over its
length; or one made up of multiple repeatable symbols.
§ The start and end of the line can each optionally show a cap. The cap can
be an arrowhead, a hook, a terminal line (a line that extends an equal
distance to either side of the body), an item of text, or a music symbol.
§ The middle of the line can optionally show an annotation, or show
hyphenated text over the length of the line body. The annotation can be an
item of text or a music symbol.
There are separate editors for line bodies, line annotations (which are used both as
start and end caps, and as annotations in the middle of the line body), and
repeatable symbols (which are used as raw materials for line bodies). These
ingredients are combined together in Engrave ▶ Lines, so we will begin there.
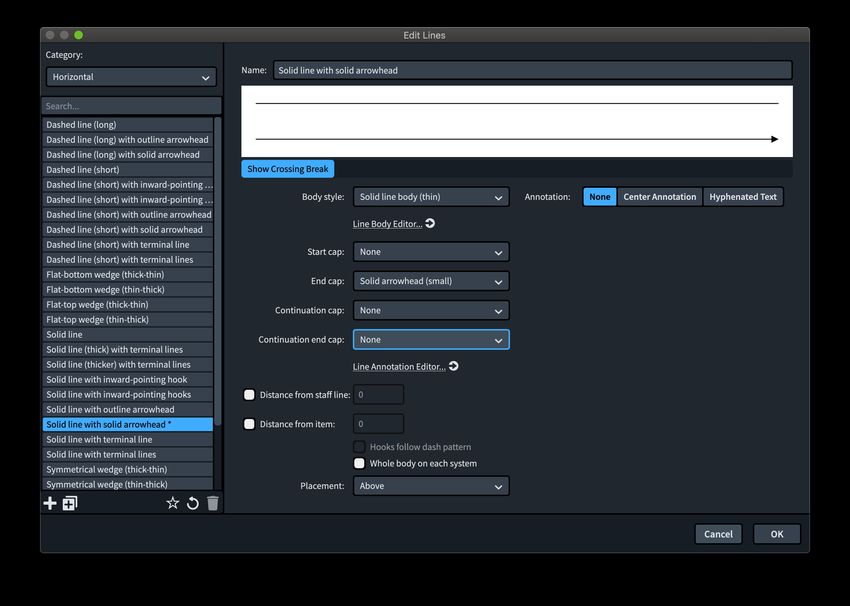
Lines editor. You can open the lines editor in one of the following ways:
§ Click the edit button in the action bar at the bottom of either section of the
Lines panel in Write mode; or
§ Select a line in the music in Engrave mode and type Return; or
§ Double-click a line in Engrave mode; or
§ Choose Engrave ▶ Lines.
The Edit Lines dialog appears:
Dorico 3.5 Version History Page 10 Steinberg Media Technologies GmbHOn the left-hand side, you can choose to edit either Horizontal or Vertical lines.
Select the line you want to edit, or use the buttons in the action bar at the bottom
of the list to create a wholly new line, or a new line based on the currently selected
line. The panel on the right-hand side of the dialog will look different depending on
whether you are editing a horizontal or vertical line; when editing a vertical line, the
preview runs up the right-hand side of the dialog, the better to show how it will
look in the score itself.
The options on the left-hand side of the panel are as follows:
§ Body style: this lists the line bodies, as defined in Engrave ▶ Line Bodies.
Below this selector is a link that jumps to the Line Bodies dialog, in case
you want to edit or create a line body.
§ Start cap / End cap: these selectors list all of the line annotations that can
be used as caps, as defined in Engrave ▶ Line Annotations.
§ Continuation cap: this is the line annotation that will be used at the start of
any segment of the line after the first (which uses the Start cap), if the line
continues across a system break, and only applies to horizontal lines. To
see a preview of how this cap will appear, ensure Show Crossing Break is
activated below the preview, which will show the line in two segments.
§ Continuation end cap: this is the line annotation that will be used at the
end of each segment of the line except for the last (which uses the End
cap), if the line continues across a system break, and only applies to
horizontal lines. Below is a link that jumps to the Line Annotations dialog,
in case you want to edit or create an annotation.
§ Distance from staff line: when the line is positioned outside the staff, this
defines the minimum distance that Dorico must maintain between the
outermost staff line and the line. If this value is not set, the value for Default
distance from staff on the Lines page of Engraving Options will be used
instead.
§ Distance from item: when an item protrudes outside the staff, this defines
the minimum distance that Dorico must maintain between the protruding
item and the line. Dorico will always use the larger of the Distance from
staff line or Distance from item values as appropriate. If this value is not
set, the value for Minimum distance from protruding items on the Lines
page of Engraving Options will be used instead.
§ Hooks follow line pattern: for lines that are set to use a hook or terminal
line for any of its caps, activating this option will cause Dorico to use the
same line pattern as the line body for the hook or terminal line, if possible.
So if, for example, you have a dotted line body, or a line body that uses a
pattern of alternating long and short dashes, provided the hook or terminal
line is sufficiently long to fit the line body pattern into its length, Dorico will
Dorico 3.5 Version History Page 11 Steinberg Media Technologies GmbHdraw the hook or terminal line in the same style as the line body; otherwise,
the hook or terminal line will be drawn using the line type defined for the
line annotation. If the dot or dash pattern has multiple pairs of values, the
hook or terminal line will draw only using the first pair of values.
§ Whole body on each system: if a line crosses one or more system breaks,
this option determines whether or not each segment of the line should
contain the complete line body, or whether the line body should be split
proportionally between the total number of segments. This is easiest to see
in the case of lines using wedge bodies: when Whole body on each
system is activated, each segment will show the complete wedge from
thin-to-thick or thick-to-thin; when it is not activated, each segment will
show only a portion of the overall wedge. Similarly, if the line uses a Center
Annotation or Hyphenated Text, Whole body on each system
determines whether the entire annotation should be repeated in each
segment, or should be divided between all segments.
The options on the right-hand side of the panel change, depending on the choice
made under Annotation, which allows you to add a further annotation to the line.
If you choose Center Annotation, this allows you to show a text or music symbol
annotation in the middle of the line, with the following options:
§ Annotation: this selector lists all of the compatible line annotations. By
default in a newly-created project there will be none listed here, because
there are no text or music symbol line annotations in Dorico’s factory library.
Define suitable line annotations in Engrave ▶ Line Annotations and they
will appear here.
§ Vertical position: this selector specifies the position of the line annotation
relative to the line, allowing you to choose between the annotation being
centered on the line, or positioned above or below the line.
§ Repeat: allows you to specify whether the annotation should appear just
once in the middle of the line, or whether it should be repeated multiple
times along the length of the line. If you choose to repeat the annotation, it
can be repeated at regular intervals (Equidistant), or with larger intervals at
the start of the line and smaller intervals at the end of the line
(Accelerating), or the converse, smaller intervals at the start of the line and
larger intervals at the end of the line (Decelerating). When Equidistant is
chosen, Repeat distance specifies the distance in spaces between
repetitions of the annotation.
§ Placement: specifies whether the annotation should appear in the Center
of the line (the default), or at the Start or End. If the annotation is shown at
the start or end of the line, the annotation will be inset from the start or end
Dorico 3.5 Version History Page 12 Steinberg Media Technologies GmbHby the value of Start/end gap. If Start/end gap is set to 0, and the line
starts or ends with a cap, be aware that the annotation will overprint the
cap at that end of the line.
§ Always horizontal: this specifies whether or not the line annotation should
be allowed to rotate when the line is rotated.
If you choose Hyphenated Text, this allows you to show a series of syllables (such
as “slen-tan-do-po-co-a-po-co”) over the length of the line, with the following
options:
§ Syllables: enter the text that you want to appear along the length of the line
here; be sure to separate each syllable with a hyphen.
§ Font style: specifies the font style, defined in Engrave ▶ Font Styles, to
use for the hyphenated text.
§ Starts with text: when activated, this means the first syllable will appear at
the start of the line, instead of whatever is defined as the Start cap. When
not activated, the first syllable will appear some distance after the start of
the line.
§ Ends with text: when activated, this means the final syllable will appear at
the end of the line, instead of whatever is defined as the End cap. When
not activated, the final syllable will appear some distance before the end of
the line.
§ Gap on the left / Gap on the right: these values define how much white
space should be left between the line body and the syllable at each
occurrence.
§ Position: defines the vertical position of the text relative to the line body.
You can save any line you define as a default for new projects you create in future
by clicking the star icon ( ) in the action bar at the bottom of the list of lines on
the left-hand side of the dialog. If you edit one of the factory line types and want to
return it to its factory state, click the revert icon ( ).
Line bodies editor. Choose Engrave ▶ Line Bodies to open the line bodies editor:
Dorico 3.5 Version History Page 13 Steinberg Media Technologies GmbHUsing the Category selector in the top-left corner, you can choose between the
three types of line bodies you can design. We will take each of them in turn.
For Generic, the following options are available:
§ Style: determines whether the line will be Solid, which produces a single
solid line; Double line, which produces two parallel solid lines; or Dashed
or dotted, which produces a single line with a variable pattern of dashes or
dots.
§ Line width: specifies the width, in spaces, of the line.
§ Dash-gap pattern: specifies a series of pairs of values that describe the
pattern of dashes or dots and gaps to be used for the line. There must
always be an even number of values here: the first value describes the dash
length or dot diameter, and the second value describes the following gap.
Each value must be separated from its neighbour with a semicolon. You
can specify the length either as a fraction (for example, 1/2 or 1 3/4) or a
floating-point decimal value (for example, 0.5 or 1.75). To specify the length
dash, use a positive value; to specify the diameter of a dot, use a negative
value. For example, the values 1/2; 1/2; -1/2; 1/2 produces a series of
alternating dashes and dots, separated by gaps of half a space.
§ Line separation: specifies the distance in spaces between the two parallel
lines when Style is set to Double line.
Dorico 3.5 Version History Page 14 Steinberg Media Technologies GmbHFor Repeatable Symbols, things work a little differently. The preview at the top of
the panel shows how the various settings below combine.
Below that is a single-row grid showing which symbols are used to produce the
line body. If the line begins or ends with a specific symbol, those symbols will be
annotated with S for start and E for end. Activate Show Repeat Point to show a
vertical line on each item showing the point at which the next symbol will be drawn.
To remove a symbol from the grid, either select it and click the delete icon at the
right-hand side of the action bar, or simply double-click it in the grid.
To add a new symbol to the grid, use the multi-row grid below. If you double-click a
symbol in the multi-row grid, it will be added to the grid above as a regular symbol
that can appear anywhere in the line body. To add a specific symbol for the start of
the line body, select it and click Add to Start. Similarly, to add a specific symbol for
the end of the line body, select it and click Add to End. The symbols that appear in
this multi-row grid are defined in Engrave ▶ Repeatable Symbols, which is
described below.
Finally, the Repetition selector between the two grids allows you to specify how
the symbols should be repeated along the length of the line body:
§ Individual symbols: this divides the symbols between the whole length of
the line body. If you had three symbols in the line body, for example, Dorico
will repeat the first symbol for the first third of the line body, the second
symbol for the middle third, and the third symbol for the final third.
§ Whole pattern: this repeats the entire pattern along the whole length of the
line body, cycling through each symbol once, then repeating the whole
pattern again.
When line crosses system break, add ends to each segment specifies whether
each segment of the line should start and end with the symbols given those special
roles.
For Wedge, the following options are available:
§ Wedge type: determines the shape of the wedge to be used. Flat outside
produces a wedge that will have a flat top when placed above the staff, or
a flat bottom when placed below the staff; Flat inside the converse.
Symmetrical produces a wedge that proceeds from its maximum thickness
to its minimum thickness equally above and below.
§ Start thickness: specifies the width, in spaces, of the left-hand end of the
wedge.
§ End thickness: specifies the width, in spaces, of the right-hand end of the
wedge.
Dorico 3.5 Version History Page 15 Steinberg Media Technologies GmbHLine annotations editor. Choose Engrave ▶ Line Annotations to open the line
annotations editor:
Using the Category selector in the top-left corner, you can choose between the
various types of line annotations you can create in the dialog. We will take each of
them in turn.
For Arrowhead, the following options are available:
§ Arrow style: specifies whether the arrowhead will be a pair of angled lines
(Chevron), or an outline (Empty triangle) or solid (Filled triangle)
arrowhead.
§ Width: defines the width of the arrowhead, in spaces.
§ Height: defines the height of the arrowhead, in spaces.
§ Line width: defines the width of the line to be used to draw the arrowhead,
in spaces.
For Hook, the following options are available:
§ Length: defines the length of the hook, in spaces.
§ Line width: defines the width of the line to be used for the hook, in spaces.
§ Direction: defines the direction in which the hook should point. For hooks
intended for use with horizontal lines, the most useful values are probably
Inward, which means that it will point towards the staff whether it is placed
above or below the staff, and Outward, which means it will point away from
the staff, but you can also force the hook to always point Up or Down. For
Dorico 3.5 Version History Page 16 Steinberg Media Technologies GmbHhooks intended for use with vertical lines, the only values that are likely to
be useful are Right and Left.
§ Rotation: specifies whether the hook should follow the rotation of the line
(Rotated), or whether it should always point to one of the four cardinal
directions (Aligned with axis).
For Music Symbol, the following options are available:
§ Symbol: click Edit to open the symbol editor, in which you can choose one
or more glyphs from a font, add text, or import a graphic. Once you have
edited the symbol and click OK to confirm the symbol editor, the chosen
symbol will appear in the previews at the top of the panel.
§ Horizontal attachment: defines the attachment point of the symbol relative
to a vertical line.
§ Vertical attachment: defines the attachment point of the symbol relative to
the horizontal line.
§ Gap above / Gap below / Gap on the left / Gap on the right: define the
gap between the symbol and the line body, in spaces.
§ Rotation: specifies whether the symbol should follow the rotation of the
line (Rotated), or whether it should always point to one of the four cardinal
directions (Aligned with axis).
For Terminal Line, the following options are available:
§ Length: defines the length of the terminal line, in spaces.
§ Line width: defines the width of the line to be used for the terminal line, in
spaces.
§ Rotation: specifies whether the terminal line should follow the rotation of
the line (Rotated), or whether it should always point to one of the four
cardinal directions (Aligned with axis).
For Text, the following options are available:
§ Text: defines the actual text that should appear on the line.
§ Font style: specifies the font style, defined in Engrave ▶ Font Styles, to
use for the text.
§ Horizontal attachment: defines the attachment point of the text relative to
a vertical line.
§ Vertical attachment: defines the attachment point of the text relative to the
horizontal line.
§ Gap above / Gap below / Gap on the left / Gap on the right: define the
gap between the text and the line body, in spaces.
Dorico 3.5 Version History Page 17 Steinberg Media Technologies GmbH§ Rotation: specifies whether the text should follow the rotation of the line
(Rotated), or whether it should always point to one of the four cardinal
directions (Aligned with axis).
§ Erase background: specifies whether an area around the text should be
erased; activate this if you plan to use the line within the staff, as this will
cause the staff lines and barlines to be knocked out around the text.
§ Ignore font metrics determines whether Dorico should position the text
according to its tight bounding rectangle, rather than using the font’s
normal metrics for ascenders and descenders; this also affects the size of
the background erasure if Erase background is active.
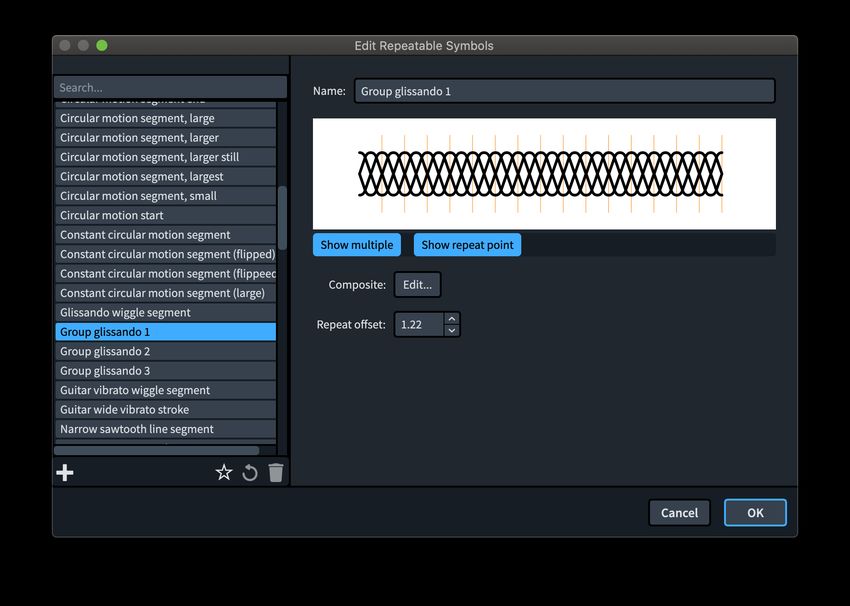
Repeatable symbols editor. Choose Engrave ▶ Repeatable Symbols to open this
dialog:
This allows you to define your own repeatable symbols that can be used in line
bodies. The options are as follows:
§ Symbol: click Edit to open the symbol editor, in which you can choose one
or more glyphs from a font, add text, or import a graphic. Once you have
edited the symbol and click OK to confirm the symbol editor, the chosen
symbol will appear in the previews at the top of the panel.
§ Repeat offset: this determines the point, in spaces, from the left-hand side
of the symbol at which the next symbol in the sequence should begin. A
value of zero means the left-hand side of the symbol with maximum overlap.
The preview at the top of the panel provides a couple of tools to help you achieve
the correct tessellation. Show Multiple draws the symbol multiple times, one after
the other, with the next symbol starting at the position defined by Repeat offset.
Dorico 3.5 Version History Page 18 Steinberg Media Technologies GmbHShow Repeat Point draws a vertical line in orange at the position defined by
Repeat offset.
If you want to see how one particular symbol tessellates with other symbols, use
Engrave ▶ Line Bodies to define a line body that uses several different repeatable
symbols.
Figured bass
Figured bass is a musical shorthand commonly used in European music notation
throughout the 17th and 18th centuries. Figures (numerals) are used to describe
the changing harmony of the music, with each figure describing the interval above
the written bass note.
Figured bass was typically played on accompanying instruments such as
keyboards and fretted instruments, and meant both that the composer could
communicate the intended harmony efficiently and that the performer was given
considerable creative leeway in the interpretation of the figures through
improvisational performance.
Dorico 3.5 introduces a new popover for the input of figured bass and provides
comprehensive options for its appearance in your score, together with some
unique capabilities arising from its semantic understanding of what the figures
themselves actually mean.
The way Dorico approaches figured bass is intended to address two distinct types
of usage: firstly, to make it possible to reproduce existing editions closely, with the
ability to specify exactly how and where figures should appear at the time of input;
and secondly, to provide a more flexible approach that allows Dorico more freedom
to respond to changes to the music more intelligently, and which affords you more
options for deciding how overall the figures should be presented using the
provided engraving options.
This is conceptually similar to working with the Force Duration feature for note
input switched on or switched off. When Force Duration is switched on, you can
specify exactly how each note, chord and rest should be notated, but when you
make large structural changes to the music, like changing meter or inserting or
removing music, Dorico has less freedom in how it can rewrite the affected music
to make sense of the changes. When Force Duration is switched off, by contrast,
you allow Dorico’s notation options to determine key aspects of the notation, such
Dorico 3.5 Version History Page 19 Steinberg Media Technologies GmbHas how notes are split into ties and how rests are grouped, which both allows you
to input music more quickly and also gives you greater future flexibility in making
large structural changes to the music, since Dorico is free to rewrite the music to fit
the new structure.
It is therefore quite important that you make this choice at the outset of your
project.
Input options. The most important input option is found on the new Figured Bass
page of Write ▶ Note Input Options. If you need to reproduce an existing edition
exactly, or you are very particular about exactly how you expect figured bass to
appear, set When inputting via the popover to Follow input literally. If, on the
other hand, you do not know at the outset exactly how you want your figures to
appear or expect to be making substantial revisions to the music over the course of
the project, choose Follow Engraving Options.
This option affects figured bass at the time it is input: changing this option has no
retrospective effect on figured bass you have already input in your project. You can,
however, later reset existing figured bass if you need to – see below.
Figured bass popover. To input figured bass, show the caret on the staff
where you want to start inputting, or select a note on that staff, then
either type Shift+G or click the button shown to the right, which is found in the
notations toolbox on the right-hand side of the window in Write mode. The popover
appears at the caret or selection position, allowing you to input figures.
§ You can input figures from 1 to 9 in the popover, in any order: Dorico will
rearrange the figures into ascending order automatically.
§ To specify accidentals, type # for sharp, b for flat, and n for natural. Dorico
can usually determine by context whether the accidental should apply to
the preceding or following figure, but to remove any ambiguity, you can
separate each figure with accidental from the next with commas; for
example, 6,#4,2.
§ To input a raised third, you can type # on its own.
§ Dorico will infer figures beyond those you type, so to input common figures
you can input only one or two figures, allowing Dorico to fill in the gaps. For
example, to input a first inversion triad (6 over 3), you can simply type 6.
§ To specify that a particular figure should be hidden, enclose it in angle
brackets, e.g. 6 will tell Dorico to show the 6 but hide the 3.
§ To specify a suspension with resolution, type for example 4->3, which
describes a fourth resolving to a third.
Dorico 3.5 Version History Page 20 Steinberg Media Technologies GmbHYou can also use the same input syntax as you would use in the Shift+Q popover
for inputting chord symbols, so you can type things like Em7 or G/B, and Dorico
will convert these chord symbols into the correct figures.
Advancing the popover. The figured bass popover can be advanced with the
following keys:
§ Space advances to the next beat, or the next note, whichever comes
sooner.
§ ←/→ advances to the previous or next rhythmic grid position.
§ Tab/Shift-Tab advances to the start of the next or previous bar.
Specifying where figured bass appears. Dorico will automatically make figured
bass appear on any instrument on which you invoke the Shift+G popover. You can
further choose which instruments should show figured bass via the Players to
show figured bass option in the new Figured Bass section of the Players page
of Layout Options. Here you will also find an option that determines whether
figured bass should appear below the staff (the default) or above.
Local figured bass. By default, figured bass is specified globally; that is to say, it is
assumed that the same figures apply to all the instruments in the ensemble. If you
need to show different figures on different instruments, this can be done by
creating local figured bass. While the popover is open, hold Alt to temporarily
specify that the current figure should be created for the current instrument only; to
input a run of local figured bass, type Alt+L to lock the popover to local input, and
to return to global input, type Alt+G.
Figures are relative to the bass note. When you input figured bass, Dorico
calculates the absolute pitches of the notes corresponding to the figures you have
entered relative to the bass note at the position of the popover, and stores these.
This allows Dorico to recalculate the figures in the event that you change the pitch
of the bass note: for example, if you change the inversion by moving the bass note,
the figures will be rewritten to reflect the new inversion. This also means that if you
have global figures shown on instruments with differing bass notes, different
figures will appear on each instrument.
Transposing figured bass. When you transpose music that includes figured bass,
Dorico will transpose the figures along with the music, including replacing sharps
with flats or flats with sharps as necessary.
Hold lines. When the bass note changes but the notes in the chord above it are
held, a hold line is drawn proceeding from the figures for the rhythmic duration for
which the figures should continue to apply. To add a hold line, select the figures
and type Shift+Alt+→ to make a hold line appear; type Shift+Alt+→ again to
Dorico 3.5 Version History Page 21 Steinberg Media Technologies GmbHextend the hold line by the current rhythmic grid value, or click and drag the circular
handle to extend or retract the hold line.
Alternatively, you can activate the Duration property in the Figured Bass group in
the Properties panel. The property allows you to specify the duration of the hold
line as a rhythmic duration: the left-hand value is the number of quarter note
(crotchet) beats, while the right-hand value allows you to specify that the hold lines
should end at a grace note position if necessary.
Suspensions. When you specify a suspension, for example by typing 4->3, the
resolution figure is created immediately to the right of the suspension figure. You
can click and drag the circular handle that appears on the resolution figure to
adjust its position, or alternatively you can activate the Resolution pos. property to
specify its rhythmic position.
Choice of figures. The Figures section of the Figured Bass page of Engraving
Options provides options that determine how Dorico handles all of the common
combinations of figures, including triads in root position and inversions, how raised
thirds should appear, and so on. These options will be followed if When inputting
via the popover is set to Follow Engraving Options in Note input Options; if, on
the other hand, you have input the figures with Follow input literally, Dorico will
reproduce exactly the figures you have input.
Diminished intervals. There are different conventions in use for whether or not it is
considered necessary to show figures when they form a diminished interval, either
with a lower figure or with the bass note. For example, in the key of C major, if you
had a bass note of B and a raised third, often the fifth would not be given an
explicit figure; by convention, because diminished fifths are rare in the music of this
period, the fifth would nevertheless also be raised, to avoid forming a diminished
interval with the bass note.
You can choose how Dorico should handle situations like this using the Hide
raised or lowered figures if they form a diminished interval options in the
Figures section of the Figured Bass page of Engraving Options.
In a similar vein, you can determine how Dorico infers intervals when inputting
figured bass via the popover using the Interpretation of diminished intervals
during figured bass input option on the Figured Bass page of Note Input
Options.
Cautionary alterations. Dorico can also calculate cautionary alterations for figured
bass and automatically add cautionary accidentals to figures to remove ambiguity
for the continuo player. To enable this behaviour, set Cautionary alterations to
Dorico 3.5 Version History Page 22 Steinberg Media Technologies GmbHeither Show in same bar or Show in same and following bar in the Accidentals
section of the Figured Bass page of Engraving Options.
Resetting figured bass. If you used the Follow input literally option when inputting
figured bass via the popover and later want to reset some or all of the existing
figures in your project so that they will update in response to changes to the
engraving options for figured bass, you can reset them by selecting one or more
stacks of figures and choosing Edit ▶ Figured Bass ▶ Reset Figured Bass.
The converse operation is Edit ▶ Figured Bass ▶ Force Current Appearance,
which effectively fixes the appearance the selected figures, as if you had input them
with Follow input literally activated. This means that if you subsequently change
the figured bass engraving options, these figures will not update.
Appearance of figured bass. The Accidentals section of the Figured Bass page of
Engraving Options provides a choice between using accidentals and using figures
annotated with slashes to indicate raised and lowered figures. The Design section
provides further options for the precise choice of annotated figures for the raised
fifth and raised sixth, as well as a choice between using the traditional bold
appearance for figures and using the numerals from a regular text font.
If you want to use a different font, you can either set Figured bass appearance to
Plain font, which tells Dorico to use the Figured bass plain font style that you can
edit in Engrave ▶ Font Styles, or you can choose Bold font, then edit the
individual music symbols used in the Figured Bass category of Engrave ▶ Music
Symbols. If you choose to use the plain font, you should also ensure that
Appearance of raised or lowered figures is set to Always use accidentals, as a
regular text font does not contain the annotated figures necessary to show raised
intervals.
Further options for hold lines and suspensions are provided, including the option to
show a single hold line for a set of figures instead of one hold line for each figure in
a column of figures, and the vertical position of that single line if shown.
Dorico performs sophisticated automatic kerning for figured bass across the width
of the system, dynamically adjusting the line spacing between each row of figures
to ensure that every combination of figure plus accidental is clear, even at small
sizes. Options for the default distances between accidentals and figures and
between rows of figures can be found in the Vertical Positioning section of the
Figured Bass page of Engraving Options.
Engrave mode. You can nudge columns of figures in Engrave mode by holding Alt
and using the arrow keys; if you nudge a column of figures with hold lines shown,
the hold lines will move with the figures, and will always be kept horizontal. The
Dorico 3.5 Version History Page 23 Steinberg Media Technologies GmbHstart and end offset of each hold line can also be adjusted left and right if required.
You can drag stacks of figures with the mouse to position them if you prefer.
Further developments. It is not yet possible to show figures within brackets, and
this is planned for future releases.
Dorico 3.5’s support for figured bass is not intended to meet the requirements of
using figured bass as part of a broader set of notations used in academic writing
for harmonic analysis, but expanding the tools for harmonic analysis is also planned
for future releases of the software.
Condensing for divisi and section players O
Building on the unique condensing features introduced last year, Dorico 3.5 now
expands condensing in two important new ways: it is now possible for section
players to participate in condensing, and divisi passages written for section players
can also be condensed.
Condensing for section players. When writing for ensembles like concert and wind
band, it is often the case that, for example, the Clarinet 1 part will actually be
played by a number of clarinettists all playing the same music. In Dorico 3.0, if you
wanted to create a condensed conductor’s score for a wind or concert band score,
you would have to use solo players instead of section players; this restriction has
now been lifted.
To enable condensing for section players, set the new Section players option in
the Condensing section of the Players page of Layout Options to Condense
divisi and adjacent players. If you are writing for an ensemble that mixes section
players in both the wind and string sections, you may also wish to activate Exclude
adjacent violin section players from condensing, which will prevent Violin 1 and
Violin 2 from condensing.
Once you have activated Condense divisi and adjacent players and clicked
Apply to confirm your changes, you will see the automatically detected condensing
groups for the section players in the layout listed in Groups to exclude from
condensing, so that you can prevent specific section players from condensing.
You can create custom condensing groups for section players, but you cannot mix
section and solo players in the same custom condensing groups, and the section
players must themselves be adjacent to one another in the layout to be permitted
to condense.
It is also possible to define manual condensing for condensing groups consisting
of section players in Engrave ▶ Condensing Change if required. In general,
condensing for section players works identically to condensing for solo players.
Dorico 3.5 Version History Page 24 Steinberg Media Technologies GmbHYou can also read