Digiface Dante User's Guide - USB 3.0 Digital I/O System 64 Channels Dante / AES67 Interface - RME
←
→
Page content transcription
If your browser does not render page correctly, please read the page content below
User's Guide

Digiface Dante
        Portable Dante via USB!

     USB 3.0 Digital I/O System
64 Channels Dante / AES67 Interface
    64 Channels MADI Interface
  2 Channel Analog Stereo Monitor
    24 Bit / 192 kHz Digital Audio
      128 x 128 Matrix Router
       Stand-Alone Operation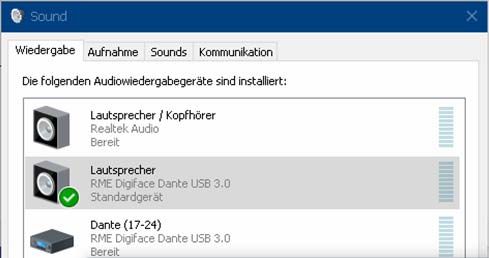
General

1       Introduction ...............................................................6
2       Package Contents .....................................................6
3       System Requirements ..............................................6
4       Brief Description and Characteristics.....................6
5       First Usage - Quick Start ..........................................7
     5.1 Connectors – LEDs .................................................7
     5.2 Quick Start ..............................................................8

     Installation and Operation - Windows

6      Driver and Firmware
     6.1  Driver Installation .................................................10
     6.2  De-installing the Drivers.......................................10
     6.3  Firmware Update..................................................11
7      Configuring the Digiface Dante
   7.1    Settings Dialog .....................................................12
   7.2    WDM Configuration..............................................14
   7.3    Dante Controller ...................................................16
8      Operation and Usage
   8.1 Playback...............................................................17
   8.2    DVD Playback (AC-3 / DTS) ................................17
   8.3    Channel Count under WDM.................................17
   8.4    Multi-client Operation ...........................................18
   8.5    Digital Recording..................................................18
   8.6    Clock Modes - Synchronization ...........................18
9      Operation under ASIO
   9.1    General ................................................................19
   9.2    Channel Count under ASIO .................................19
   9.3    Known Problems ..................................................20
10     Using more than one Interface ..............................20
11     DIGICheck Windows ...............................................21
12     Hotline – Troubleshooting......................................22

     Installation and Operation - Mac OS X

13    Driver and Firmware
   13.1 Driver Installation .................................................24
   13.2 De-installing the Drivers.......................................24
   13.3 Firmware Update..................................................25
14    Configuring the Digiface Dante
   14.1 Settings Dialog .....................................................26
   14.2 Dante Controller ...................................................27
   14.3 Channel Count under Core Audio........................28
   14.4 Various Information ..............................................28
15    Using more than one Interface ..............................28
16    DIGICheck Mac ........................................................29
17    Hotline – Troubleshooting......................................30

 2                                         User's Guide Digiface Dante © RME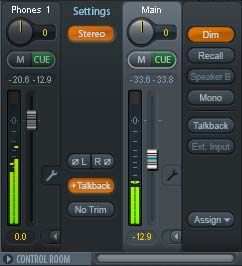
TotalMix FX

18    TotalMix: Routing and Monitoring
   18.1 Overview .............................................................. 32
   18.2 The User Interface ............................................... 34
   18.3 The Channels....................................................... 35
      18.3.1 Settings ........................................................ 37
   18.4 Section Control Room.......................................... 38
   18.5 The Control Strip.................................................. 39
      18.5.1 View Options................................................ 40
      18.5.2 Snapshots - Groups..................................... 41
      18.5.3 Channel Layout – Layout Presets................ 42
      18.5.4 Scroll Location Marker ................................. 43
   18.6 Preferences.......................................................... 44
      18.6.1 Store for Current or All Users (Windows) .... 45
   18.7 Settings ................................................................ 46
      18.7.1 Mixer Page................................................... 46
      18.7.2 MIDI Page .................................................... 47
      18.7.3 OSC Page.................................................... 48
      18.7.4 Aux Devices ................................................. 48
   18.8 Hotkeys and Usage ............................................. 49
   18.9 Menu Options....................................................... 50
   18.10 Menu Window ...................................................... 51
19    The Matrix
   19.1 Overview .............................................................. 51
   19.2 Elements of the Matrix View ................................ 51
   19.3 Operation ............................................................. 52
20    Tips and Tricks
   20.1 ASIO Direct Monitoring (Windows)...................... 52
   20.2 Copy a Submix..................................................... 52
   20.3 Doubling the Output Signal (Mirror)..................... 52
   20.4 Delete a Submix................................................... 52
   20.5 Copy and Paste everywhere................................ 53
   20.6 Recording a Submix - Loopback ......................... 53
   20.7 MS Processing..................................................... 54
21    MIDI Remote Control
   21.1 Overview .............................................................. 55
   21.2 Mapping ............................................................... 55
   21.3 Setup.................................................................... 56
   21.4 Operation ............................................................. 56
   21.5 MIDI Control......................................................... 57
   21.6 Loopback Detection ............................................. 58
   21.7 OSC (Open Sound Control)................................. 58
22    DAW Mode ............................................................... 59
23    TotalMix Remote ..................................................... 60

                                             User's Guide Digiface Dante © RME         3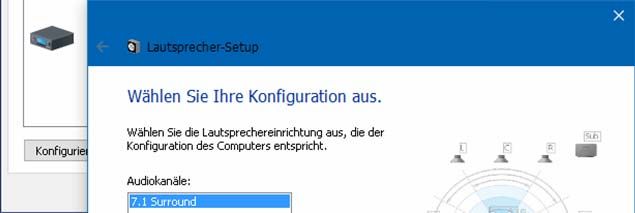
Technical Reference

24    Technical Specification ..........................................64
   24.1 Firmware ..............................................................65
   24.2 General ................................................................65
25    Technical Background
   25.1 USB Audio............................................................67
   25.2 MADI Basics.........................................................68
   25.3 Terminology .........................................................68

     Miscellaneous

26      Warranty...................................................................72
27      Appendix ..................................................................72
28      Declaration of Conformity ......................................73

 4                                         User's Guide Digiface Dante © RME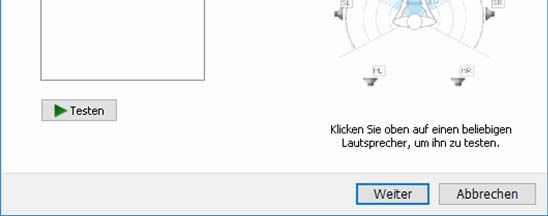
User's Guide

Digiface Dante

              General

   User's Guide Digiface Dante © RME   5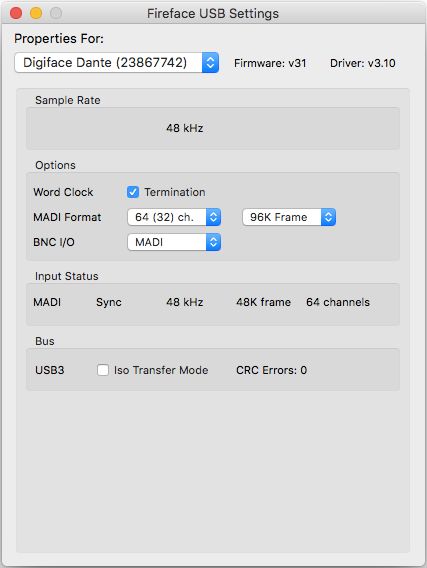
1. Introduction
Thank you for choosing the Digiface Dante. This unique, compact and portable audio interface
is capable of transferring USB digital audio data and MADI from/to Mac or PC to the world's
most popular audio network, Dante. The latest Plug & Play technology guarantees a simple
installation, even for the inexperienced user. The numerous unique features and well thought-
out configuration dialog puts the Digiface Dante at the very top of the range of computer-based
audio interfaces.

The package contains drivers for Windows 7 / 8 / 10 and Mac OS X x86 (Intel).

2. Package Contents
Please check that your Digiface Dante package contains each of the following:

x   Digiface Dante
x   Cable USB 3.0, 1.8 m (6 ft)
x   RME Driver CD with manual in PDF format
x   Switched power supply, lockable connector, DC 12 V 24 W
x   Power cord

3. System Requirements

x Windows 7 or up, Intel Mac OS X (10.11 or up)
x USB 3 port, or
x USB 2.0 port (requires computer with at least Intel Core i3 CPU, reduced channel count)

4. Brief Description and Characteristics

x   All settings can be changed in real-time
x   Buffer sizes/latencies from 32 up to 8192 samples selectable
x   64 channels Dante (AES67), 64 channels MADI
x   32 channels 96 kHz/24 bit record/playback Dante & MADI each
x   16 channels 192 kHz/24 bit record/playback Dante & MADI each
x   Clock modes slave and master
x   Clock sources MADI, internal or Dante
x   4 x Gigabit ethernet port, 100 Mbit/s compatible
x   TotalMix for latency-free submixes and perfect ASIO Direct Monitoring
x   TotalMix: 4096 channel mixer with 46 bit internal resolution
x   Analog/Line headphone output, separate output for independent submix
x   DIGICheck DSP: Level meter in hardware, peak- and RMS calculation
x   Stand-alone mode with Dante to MADI and vice versa converter functionality
x   USB error analysis, displayed in the Settings dialog

6                              User's Guide Digiface Dante © RME
5. First Usage – Quick Start
5.1 Connectors – LEDs
The front of the Digiface Dante features four Gigabit Ethernet ports, 2 BNC sockets for word or
MADI I/O, a state LED, and the headphone output.
The four network sockets, RJ45 format, support both 100 Mbps and 1 Gbps. The integrated
LEDs show the states connected (yellow) and data traffic (green). The four ports can be used in
switched (4) or redundancy (2) mode (Primary/Secondary).
The State LED beside the BNC input shows Lock and Sync state for the word or MADI input
signal.
Phones is a low impedance line output.
It provides a sufficient and undistorted
volume even when used with
headphones.
In case this output should operate as
Line output, an adapter TRS plug to
RCA phono plugs, or TRS plug to TS
plugs is required.
The pin assignment follows in-
ternational standards. The left channel
is connected to the tip, the right chan-
nel to the ring of the TRS jack/plug.
The rear of the Digiface Dante features the USB 3 port, a status LED, a power supply connec-
tor, and a hook to remove strain from the connectors. The LED indicates both power supply
(USB bus power, green), as well as the USB status (yellow: USB 2, blue: USB 3).
USB 3.0: Standard USB socket for connection to the computer. Please make sure the Digiface
Dante can have the full voltage/current delivered from the computer by using hi-quality USB
cables (like the one included). USB extension cables and USB hubs should be avoided. When
connected to USB 2 the channel count is reduced to 64 channels (Dante only).
The Digiface Dante uses USB bus power. In case of USB 3 this is usually sufficient to run the
interface. But using all 4 network connections plus headphones can draw more current than the
USB 3 spec suggests (900 mA). The Digiface Dante therefore ships with a power supply for
stable operation even at highest load.
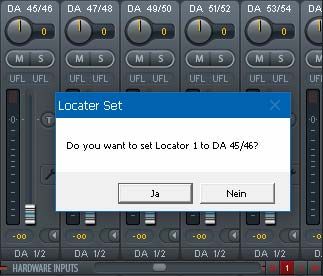
User's Guide Digiface Dante © RME 75.2 Quick Start After the driver installation (chapter 6 / 13) the Digiface Dante has to be connected to a Dante network. A Dante network consists of a connection to at least one other Dante equipped device or computer with Dante Via installed. The Dante Controller does not allow any further settings without detecting a Dante network. Some basic and OS-specific options are available in the Settings dialog of the MADIface series driver. Level adjustment of the analog output Phones is done in TotalMix FX. The output is optimized for phones, but can also be used as line output TotalMix FX remembers all settings, and loads these automatically when the Digiface Dante drivers are loaded. Stand-alone Operation The Digiface Dante can be used stand-alone, powered by any USB power wall wart or USB battery, like those for mobile phones and MP3 players. When not connected to a computer host the device operates as 64 channel MADI to/from Dante converter. All channels are trans- ferred to the other format unchanged, both ways. To make most use of the additional Phones output, a submix of all MADI and Dante input chan- nels can be set up in computer-connected operation, and stored in the Digiface Dante for stand- alone operation. To store the current Submix Phones go to Options, Store current State into Device in TotalMix FX. 8 User's Guide Digiface Dante © RME
User's Guide

Digiface Dante

Installation and Operation - Windows

       User's Guide Digiface Dante © RME   9
6. Driver and Firmware
6.1 Driver Installation
RME is constantly improving their drivers - the included Driver CD is most probably already
outdated when unpacking the product. Please download the latest drivers from the RME web-
site at http://rme.to/usbe. Unzip the downloaded file and start the driver installation with rmein-
staller.exe.
If internet access is not available insert the RME Driver CD into your CD-ROM drive. The driver
installer is located in the directory \MADIface_Net. Start rmeinstaller.exe and follow the instruc-
tions of the installer. After installation connect computer and Digiface Dante. Windows detects
the new hardware as Digiface Dante and installs the drivers automatically.
After a reboot, the icons of TotalMix FX and Settings dialog appear in
the notification area.
The Digiface Dante driver also enables an internal USB Ethernet adapter for easier access to
the Dante Controller (see below). The Device Manager shows a RME MADIface USB Ethernet
device if the MADIfaceNet driver has been installed (current version 0.9389).
The Digiface Dante includes a module (Brooklyn II) from Australian company Audinate which
provides all the Dante network technology. The software to control and access the Dante
network, Dante Controller, needs to be installed on at least one computer in the Dante
network. It is available from Audinate directly, http://www.audinate.com.
Chapter 25.1 explains how to find the ideal USB port.
Driver Updates do not require to remove the existing drivers. Simply install the new driver over
the existing one.
Possible reasons why a Digiface Dante is not found after driver installation:
x The USB port is not active in the system (check the Device Manager)
x The USB cable is not, or not correctly inserted into the socket. Check that the LED beside
the USB port is lit, it indicates power.
x The Digiface Dante does not receive any or not enough power. Remove current-consuming
hard drives from nearby ports. Avoid USB extension cables and USB hubs.
6.2 Uninstalling the Drivers
A de-installation of the driver files is not necessary – and not supported by Windows anyway.
Thanks to full Plug & Play support, the driver files will not be loaded after the hardware has
been removed. If desired these files can then be deleted manually.
Unfortunately Windows Plug & Play methods do not cover the additional autorun entries of
TotalMix, the Settings dialog, and the registration of the ASIO driver. These entries can be
removed from the registry by a software de-installation request. This request can be found (like
all de-installation entries) in Control Panel, Software. Click on the entry 'RME Digiface Dante'.
The software Dante Controller is uninstalled the same way.
10 User's Guide Digiface Dante © RME6.3 Firmware Update
The Flash Update Tool updates the firmware of the Digiface Dante to the latest version. It re-
quires an already installed driver.
Download the latest version from the RME website at http://rme.to/usbe. Unzip the
downloaded file and start the program fut_usbplus_avb_dante.exe under Windows, or USB
Series Flash Tool under Mac. The Flash Update Tool displays the current revision of the Digi-
face Dante's firmware and whether it needs an update or not. If so, then simply press the 'Up-
date' button. A progress bar will indicate when the flash process is finished (Verify Ok).
After the update the unit needs to be reset. This is done by unplugging the Digiface Dante for a
few seconds. A reboot of the computer is not necessary.
When the update fails (status: failure), the unit's Safety BIOS will be used from the next boot on,
the unit stays fully functional. The flash process should then be tried again.
The manufacturer of the Dante Brooklyn II module, Audinate, also publishes firmware updates.
The current firmware version can be checked in the Dante Controller software, Device View.
There is currently no need to update the Dante module in the Digiface Dante, as they ship with
the latest 4.x firmware.
Audinate will soon be launching Dante Updater, a new free Dante firmware management
application for Windows and macOS desktops. Dante Updater allows Dante users to update
entire networks of devices from multiple manufacturers with just a couple of clicks. Please
check with Audinate's website for this new app:
https://www.audinate.com/
Note: Starting the Dante Updater for the first time will bring up the Windows Firewall dialog.
Make sure to allow access for both private and public networks or the flash process might fail.
User's Guide Digiface Dante © RME 117. Configuring the Digiface Dante 7.1 Settings Dialog Configuration of the Digiface Dante is done via its own settings dialog. The panel Settings can be opened: x by clicking on the fire symbol in the Task Bar's notification area The mixer of the Digiface Dante, TotalMix FX, can be opened: x by clicking on the circle symbol in the Task Bar's notification area The following is available in the Settings dialog: x ASIO Latency x USB error analysis x Configuration of the WDM devices x Configuration of the hardware x State of input x Display of current sample rate Any changes made in the Settings dialog are applied immediately - confirmation (e.g. by clicking on OK or exiting the dialog) is not required. The tab About includes information about the current driver and firmware version plus four more options: Lock Registry Default: off. Checking this option brings up a dialog to enter a password. Changes in the Settings dialog are no longer written to the registry. As the settings are always loaded from the registry when starting the computer, this method provides an easy way to define an initial state for the Digiface Dante. Enable MMCSS for ASIO activates support with higher priority for the ASIO driver. Note: At this time, activating this option seems to be useful only with the latest Cubase/Nuendo at higher load. With other software this option can decrease performance. The change becomes active after an ASIO reset. Therefore it is easy to quickly check which setting works better. Sort ASIO Devices Changes the order only of the ASIO channels when using more than one interface. Limit ASIO to 32 Channels Some software crashes when presented with more than 32 ASIO channels. This workaround removes all higher channels, which can still be accessed and used via TotalMix FX. 12 User's Guide Digiface Dante © RME
Buffer Size
The setting Buffer Size determines the latency between incoming and outgoing ASIO and WDM
data, as well as affecting system stability (see chapter 7.1).

USB Diagnosis shows specific USB transmission errors (CRC5, usually 0) and general errors.
If the unit detects a record or playback error the number shown will no longer be 0. An audio
reset is performed automatically. The counter is reset on start of playback/record. More
information can be found in chapter 25.1.

Sample Rate
Display of the currently active sample rate. Its setting / change takes place exclusively via the
Dante Controller. Neither WDM nor ASIO programs can change the sample rate.

WDM Devices
Allows to freely set which I/Os are available as WDM devices, whether these are stereo or
multi-channel devices (up to 8 channels), and whether one or multiple of the currently active
WDM devices should have the Speaker property. Digiface Dante provides a maximum of 52
stereo WDM devices, or 16 multichannel devices. More details are found in chapter 7.2.

Options
Word Clock In Term.
Checking this option terminates the word clock input internally with 75 Ohms.

MADI Coaxial
Defines the format of the MADI output signal. MADI can be a 56 or 64 channel signal. Sample
rates in Double Speed range (64/88.2/96 kHz) can be transmitted by the normal 48K Frame, or
using a native 96K Frame.

BNC I/O
The BNC input and output can be used as word clock I/O or MADI I/O.

Iso(chronous) Streaming (USB 3 only)
The Digiface Dante uses a special transmission mode with error correction in record mode. In
case the default mode does not work Isochronous Streaming can be tried. This is the standard’s
native mode for audio transmission and should work with any USB 3 controller. See also
chapter 25.1.

Input Status
Word / MADI
Indicates presence of a valid signal at the word clock / MADI input (Lock, No Lock) and whether
the signal is synchronous (Sync). The third column shows the sample rate detected by the
hardware (coarse recognition, 32 kHz, 44.1 kHz, 48 kHz etc.), or the current channel format
(56/64 channels).

                                 User's Guide Digiface Dante © RME                           13
7.2 WDM Configuration
The WDM Devices configuration has one
button to enter the edit dialog, a status
display showing the number of currently
enabled WDM devices, and a listbox to
select between Stereo or Multi-Channel
devices.
The number represents both record and
playback devices, so ‘1’ means one input
and one output device.
The screenshot to the right shows the
stereo WDM devices available with the
Digiface Dante. Here the first four stereo
devices had been activated. Any can be
activated. Also only higher numbered
devices might be active. For example
using 25+26 for system based audio
does not require to activate the prior
stereo devices. Only Dante (25+26) will
show up in the Windows Sound control
panel.
The checkbox All to the right allows for a
quick check/uncheck of all devices.
The screenshot to the left shows the
multi-channel WDM devices available
with the Digiface Dante after selecting
‘Multi-Channel’ in the WDM Devices
listbox and hitting WDM Configure. In this
example the devices Dante 1-8, 9-16, 17-
24 and 25-32 are active.
Using a multi-channel WDM device
allows for the use of multi-channel
playback with specialized software as
well as Surround sound from DVD or Blu-
Ray player software.
Please note that configuring the WDM
device to a specific surround mode in the
control panel Sound requires the device
to have the Speaker property. See next
page.
Again the checkbox All to the right allows
for a quick check/uncheck of all devices.
14 User's Guide Digiface Dante © RMEChanging to the tab Speaker presents a
list of all currently activated WDM
devices. Any of these can now get the
Speaker property.
Please note that defining more than one
device as Speaker usually makes no
sense, and the speakers also don’t get
numbered or renamed in Windows, so it
is impossible to find out which one is
which.
After leaving the dialog with OK the WDM
devices are reloaded so Windows sees
their new properties. In the Windows
Sound control panel the modes Stereo
and 7.1 can now be checked by selecting
the playback device and clicking the
Configure button.
User's Guide Digiface Dante © RME 157.3 Dante Controller All settings related to the Dante* network, like clock, streams and routing, are done with the software Dante Controller by Audinate*. It is a free software application (registration required) for Windows and Mac, and can be downloaded here: https://www.audinate.com/products/software/dante-controller Dante Controller offers automatic device discovery, one-click signal routing and user-editable device and channel labels. It also provides device status information, real-time network monitoring including device-level latency and customized event logging. Presets can be used to quickly and easily backup, restore, move, and re-use Dante network configurations. At startup Dante Controller scans the network for connected Dante devices and shows them automatically in the Network View. Note: Dante Controller will not work as long as at least one other Dante device has been connected to the Digiface Dante. Note: The IP address of a Dante device must fit into the network environment for proper operation. The Dante Controller will mark a device entry red if the IP address does not match the network environment, thus helps resolving the issue. User guides, FAQs, Setup Documents and many more information around Dante and the Dante Controller software are available at: https://www.audinate.com/resources The Digiface Dante is basically a USB audio interface. The Dante Controller software needs a network port to communicate with the Dante network. The standard solution would have been to plug a network cable from the computer's network port into one of the four ports of the Digiface Dante - which makes you loose two network ports! Therefore the Digiface Dante also includes the functionality of a USB Ethernet adapter. After installing the additional network driver (which is done automatically by the driver packages) the computer's Device Manager will show a RME MADIface USB Ethernet device. This added device can be used directly for the Dante Controller. No cable needed, two network ports stay free. * Audinate, the Audinate logo and Dante are registered trademarks of Audinate Pty Ltd. 16 User's Guide Digiface Dante © RME
8. Operation and Usage

8.1 Playback

In the audio application being used, Digiface Dante must be selected as output device. This can
often be found in the Options, Preferences or Settings menus as Playback Device, Audio De-
vices, Audio etc.

Increasing the number and/or size of audio buffers may prevent the audio signal from breaking
up, but also increases latency i.e. output is delayed. For synchronized playback of audio and
MIDI (or similar), be sure to activate the checkbox ‘Get position from audio driver’.

Note: This is a network audio interface. In a network, clock definition is of particular importance.
Therefore neither WDM nor ASIO are allowed to influence the sample rate. That setting is done
exclusively by the Dante Controller.

8.2 DVD-Playback (AC-3/DTS)

AC-3 / DTS
Popular DVD software players can send their audio data stream to any AC-3/DTS capable re-
ceiver via the Digiface Dante.

!   The sample rate must be set to 48 kHz in the Dante Controller, or the software will only
    playback a stereo 2-channel downmix via SPDIF.

In some cases the Digiface Dante output device has to be selected in >Control Panel / Sound /
Playback< and be set as Default, or the software will not recognize it.

The DVD software's audio properties now show the options 'SPDIF Out' or similar. When
selecting it, the software will transfer the non-decoded digital multi-channel data stream to a
Digiface Dante output channel.

Warning: This 'SPDIF' signal sounds like chopped noise at highest level.

Multichannel
PowerDVD and WinDVD can also operate as software decoder, sending a DVD's multichannel
data stream directly to the analog and digital outputs of the Digiface Dante. For this to work
select the WDM playback device ’Loudspeaker’ of the Digiface Dante in >Control Panel/ Sound/
Playback < as ‘Standard’. Additionally a Multi-channel WDM device is required, whose property
of 7.1 Loudspeaker playback can be verified under >Configuration
8.4 Multi-client Operation
RME audio interfaces support multi-client operation. Several programs can be used at the same
time. The formats ASIO and WDM can even be used on the same playback channels simulta-
neously. As WDM uses a real-time sample rate conversion (ASIO does not), all active ASIO
software has to use the same sample rate.
However, a better overview is maintained by using the channels exclusively. This is no limitation
at all, because TotalMix allows for any output routing, and therefore a playback of multiple soft-
ware on the same hardware outputs.
Inputs can be used from an unlimited number of WDM and ASIO software at the same time, as
the driver simply sends the data to all applications simultaneously.
RME's sophisticated tool DIGICheck is an exception to this rule. It operates like an ASIO host,
using a special technique to access playback channels directly. Therefore DIGICheck is able to
analyse and display playback data from any software, no matter which format it uses.
8.5 Digital Recording
Unlike analog soundcards which produce empty wave files (or noise) when no input signal is
present, digital interfaces always need a valid input signal to start recording. Taking this into
account, RME added a comprehensive I/O signal status display to the Digiface Dante, showing
sample frequency, lock and sync status in the Settings dialog, and a status LED directly at the
unit.
The sample frequency shown in the Settings dialog is useful as a quick display of the current
configuration of the unit and the connected external equipment. If no sample frequency is rec-
ognized, it will read ‘No Lock’.
This way, configuring any suitable audio application for digital recording is simple. After connec-
tion the Digiface Dante displays the current and external sample frequency. This parameter can
then be changed in the application’s audio attributes (or similar) dialog.
8.6 Clock Modes - Synchronization
In the digital world, a device must be either Master (clock source) or Slave (clock receiver).
Whenever several devices are linked within a system, there must always be a single master
clock.
! A digital system can only have one master! If the Digiface Dante’s clock mode is set to
'Internal', all other devices must be set to ‘Slave’.
This also applies in a network. Typically, a single device is defined as a clock master (Grand
Clock), controlling both the network and all connected devices. The Digiface Dante can be
synchronized as slave over incoming network streams, or an attached word clock, or MADI
signal. As master, it uses its internal clock, becoming the clock master of the entire network.
RME’s exclusive SyncCheck technology (first implemented in the Hammerfall) enables an easy
to use check and display of the current clock status. Input Status indicates whether there is a
valid signal (Lock, No Lock) for the coaxial input, or if there is a valid and synchronous signal
(Sync).
18 User's Guide Digiface Dante © RME9. Operation under ASIO
9.1 General
Start the ASIO software and select ASIO MADIface USB as the audio I/O device or the audio
driver.
The Digiface Dante supports ASIO Direct Monitoring (ADM).
9.2 Channel Count under ASIO
In Single Speed Speed (44.1 and 48 kHz) 64 + 64 input and output channels each are
available. Double Speed (88.2 and 96kHz) reduces the number of available channels to 32
each. Quad Speed (176.4 and 192kHz) reduces the number of available channels to 16 each.
Note: When changing the sample rate range between Single, Double and Quad Speed the
number of channels presented from the ASIO driver will change too. This may require a reset of
the I/O list in the audio software.
User's Guide Digiface Dante © RME 199.3 Known Problems
If a computer does not provide sufficient CPU-power and/or sufficient USB-bus transfer rates,
then drop outs, crackling and noise will appear. Such effects can often be avoided by using a
higher buffer setting/latency in the Settings dialog of the Digiface Dante. Furthermore PlugIns
should be deactivated temporarily to make sure they do not cause these problems. More
information can be found in chapter 25.1.
Another common source of trouble is incorrect synchronization. ASIO does not support
asynchronous operation, which means that the input and output signals not only have to use the
same sample frequency, but also have to be in sync. All devices connected to the Digiface
Dante must be properly configured for Full Duplex operation. As long as SyncCheck (in the
Settings dialog) only displays Lock instead of Sync, the devices have not been set up properly!
The same applies when using more than one Digiface Dante. They all have to be in sync. Else
a periodically repeated noise will be heard.
Digiface Dante supports ASIO Direct Monitoring (ADM). Please note that not every program
supports ADM completely or error-free. The most often reported problem is the wrong
behaviour of panorama in a stereo channel. Also try to avoid setting the TotalMix FX hardware
outputs (third row) to mono mode. This will most likely break ADM compatibility.
10. Using more than one Interface
The current driver supports up to three RME USB devices of the MADIface series. All units
have to be in sync, i.e. have to receive valid digital sync information.
x If the Digiface Dante is set to clock mode internal, all others have to be set to clock mode
slave, and have to be synced from the master. The clock modes of all units have to be set
up correctly in the MADIface Settings dialog.
x If all units are fed with synchronous signals, i.e. all units show Sync in their Settings dialog,
all channels can be used at once. This is especially easy to handle under ASIO, as the
ASIO driver presents all units as one.
Note: TotalMix is part of the hardware of each RME unit. Up to three mixers are available, but
these are separated and can't interchange data. Therefore a global mixer for all units is not
possible.
Using more than one Digiface Dante is currently not supported.
20 User's Guide Digiface Dante © RME11. DIGICheck Windows
The DIGICheck software is a unique utility developed for testing, measuring and analysing
digital audio streams. Although this Windows software is fairly self-explanatory, it still includes a
comprehensive online help. DIGICheck 5.92 operates as multi-client ASIO host, therefore can
be used in parallel to any software, with both inputs and outputs (!). The following is a short
summary of the currently available functions:
x Level Meter. High precision 24-bit resolution, 2/8/128 channels. Application examples: Peak
level measurement, RMS level measurement, over-detection, phase correlation
measurement, dynamic range and signal-to-noise ratios, RMS to peak difference (loudness),
long term peak measurement, input check. Oversampling mode for levels higher than 0
dBFS. Vertical and horizontal mode. Slow RMS and RLB weighting filter. Supports
visualization according to the K-System.
x Hardware Level Meter for Input, Playback and Output. Reference Level Meter freely
configurable, causing near zero CPU load, because calculated from the Digiface hardware.
x Vector Audio Scope. World wide unique Goniometer showing the typical afterglow of a
oscilloscope-tube. Includes Correlation meter and level meter.
x Spectral Analyser. World wide unique 10-, 20- or 30-band display in analog bandpass filter
technology. 192 kHz-capable!
x Totalyser. Spectral Analyser, Level Meter and Vector Audio Scope in a single window.
x Surround Audio Scope. Professional Surround Level Meter with extended correlation
analysis, ITU weighting and ITU summing meter.
x ITU1770/EBU R128 Meter. For standardized loudness measurements.
x Bit Statistics & Noise. Shows the true resolution of audio signals as well as errors and DC
offset. Includes Signal to Noise measurement in dB and dBA, plus DC measurement.
x Channel Status Display. Detailed analysis and display of Channel Status data within the
MADI stream.
x Global Record. Long-term recording of all channels at lowest system load.
x Completely multi-client. Open as many measurement windows as you like, on any
channels and inputs or outputs!
To install DIGICheck, go to the \DIGICheck directory on the RME Driver CD and run setup.exe.
Follow the instructions prompted on the screen.
DIGICheck is constantly updated. The latest version is always available on our website
www.rme-audio.com, section Downloads / DIGICheck.
User's Guide Digiface Dante © RME 2112. Hotline – Troubleshooting
The input signal cannot be monitored in real-time
x ASIO Direct Monitoring has not been enabled within the DAW, and/or monitoring has been
disabled globally (TotalMix Options).
Playback works, but record doesn’t
x Check that there is a valid signal at the input. If so, the current sample frequency is
displayed in the Settings dialog.
x Check whether the Digiface Dante has been selected as recording device in the audio
application.
x Check whether the sample frequency set in the audio application (‘Recording properties’ or
similar) matches the input signal.
Crackle during record or playback
x Increase the number and size of buffers in the ‘Settings’ dialog or in the application.
x Try different cables (coaxial) to rule out any defects here.
x Check that cables/devices have not been connected in a closed loop. If so, set the system’s
clock mode to ‘Master’.
x Check the Settings dialog for displayed Errors.
Driver installation and Settings dialog/TotalMix work, but a playback or record is not possible
x While recognition and control of the device are low bandwidth applications, playback/record
needs the full USB transmission performance. Therefore, defective USB cables with limited
transmission bandwidth can cause such errors.
Where do I set the sample rate?
x In the Dante Controller, for the device that is currently the Grand Master Clock for the whole
Dante network. ASIO, WDM or Core Audio have no control over that.
Is it possible to change the sample rate when using only MADI?
x If a Dante network is not available and a pure MADI recording/playback should take place:
The Dante controller is not only active on a real Dante network, but on any network. As
soon as a network connection is detected, the Dante Controller provides access to the
Digiface Dante, and thus also to the sample rate setting.
22 User's Guide Digiface Dante © RMEUser's Guide
Digiface Dante
Mac OS X – Installation and Operation
User's Guide Digiface Dante © RME 2313. Driver and Firmware 13.1 Driver Installation Connect computer and MADIface using the supplied USB cable. Mac OS X detects the new Hardware as Digiface Dante (serial number). Install the drivers from the RME Driver CD. The driver files are located in the folder Fireface_USB Sierra. Installation works automatically by a double-click on the file Fireface USB.pkg. RME recommends downloading the latest driver from the RME website, http://rme.to/usbe. Note: The driver for High Sierra and higher, V 3.x, must also be installed if 10.11. is used as OS. Driver 2.x does not support the Digiface Dante. A double-click onto driver_usb_mac_3xx.zip expands the archive file to Fireface USB.pkg. Installation works automatically by a double-click on this file. During driver installation the programs Fireface USB Settings and Totalmix (TotalMix FX) are copied to the Applications folder. They will automatically start into the dock if a Digiface Dante is connected. A reboot of the computer is not required. The Digiface Dante includes a module (Brooklyn II) from Australian company Audinate which provides all the Dante network technology. The software to control and access the Dante network, Dante Controller, needs to be installed on at least one computer in the Dante network. It is available from Audinate directly, http://www.audinate.com. Driver Updates do not require to remove the existing drivers. Simply install the new driver over the existing one. Possible reasons why a Digiface Dante is not found after driver installation: x The USB port is not active in the system (check in System Report, USB) x The USB cable is not or not correctly inserted into the socket 13.2 Uninstalling the Drivers In case of problems the driver files can be deleted manually by dragging them to the trash bin: /Applications/Fireface USB Settings /Applications/Totalmix /System/Library/Extensions/FirefaceUSB.kext /Users/username/Library/Preferences/de.rme-audio.TotalmixFX.plist /Users/username/Library/Preferences/de.rme-audio.Fireface_USB_Settings.plist /Library/LaunchAgents/de.rme-audio.firefaceUSBAgent.plist Under the latest Mac OS the User/Library folder is not visible in the Finder. To unhide it start Finder, click on the menu item Go. Hold down the option (alt) key, then click on Library. 24 User's Guide Digiface Dante © RME
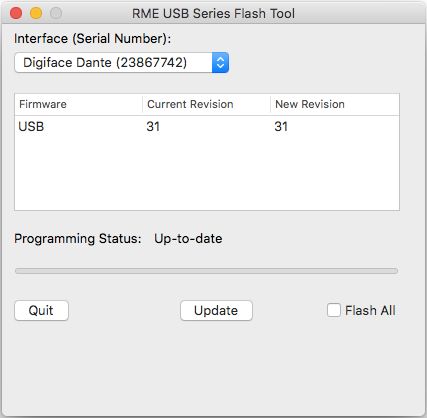
13.3 Firmware Update

The app RME USB Series Flash Tool updates the firmware of the Digiface Dante to the latest
version. It requires an already installed RME USB driver.

After its start the program displays the current revision of the Digiface Dante firmware, and
whether it needs an update or not. If so, simply press the 'Update' button. A progress bar will
indicate when the flash process is finished (Verify Ok).

After the update the unit needs to be reset. This is done by unplugging the Digiface Dante for a
few seconds. A reboot of the computer is not necessary.

To reduce the time needed for the flash process the tool updates only the parts of the firmware
that are present in a newer version. The option Flash All forces the tool to update all parts.

When the update fails (status: failure), the unit's Safety BIOS will be used from the next boot on,
the unit stays fully functional. The flash process can then be tried again on a different computer.

The manufacturer of the Dante Brooklyn II module, Audinate, also publishes firmware updates.
The current firmware version can be checked in the Dante Controller software, Device View.

There is currently no need to update the Dante module in the Digiface Dante, as they ship with
the latest 4.x firmware.

Audinate will soon be launching Dante Updater, a new free Dante firmware management appli-
cation for Windows and macOS desktops. Dante Updater allows Dante users to update entire
networks of devices from multiple manufacturers with just a couple of clicks. Please check with
Audinate's website for this new app:

https://www.audinate.com/

                                  User's Guide Digiface Dante © RME                            25
14. Configuring the Digiface Dante 14.1 Settings Dialog Configuring the Digiface Dante is done via its own Settings dialog. Start the app Fireface USB Settings. The mixer of the Digiface Dante can be configured by starting the app Totalmix. The following is available in the Settings dialog: x Configuration of digital I/Os x Hardware configuration x Current sample rate x State of input Any changes performed in the Settings dialog are applied immediately - confirmation (e.g. by exiting the dialog) is not required. Use the drop down menu Properties For to select the unit to be configured. On the right of it the current firmware and driver version is shown. Sample Rate Display of the currently active sample rate. Its setting / change takes place exclusively via the Dante Controller. Neither macOS nor apps can change the sample rate. Options Word Clock Termination Checking this option terminates the word clock input internally with 75 Ohms. MADI Format Defines the format of the MADI output signal. MADI can be a 56 or 64 channel signal. Sample rates in Double Speed range (64/88.2/96 kHz) can be transmitted by the normal 48K Frame, or using a native 96K Frame. BNC I/O The BNC input and output can be used as word clock I/O or MADI I/O. Input Status Word / MADI Indicates presence of a valid signal at the word clock or MADI input (Lock, No Lock) and whether the signal is synchronous (Sync). The third column shows the sample rate detected by the hardware (coarse recognition, 44.1 kHz, 48 kHz etc.), and the current channel format (56/64 channels). 26 User's Guide Digiface Dante © RME
Bus (USB 3 only)
The Digiface Dante uses a special transmission mode with error correction in record mode. In
case the default mode does not work Isochronous Streaming can be tried. This is the standard’s
native mode for audio transmission and should work with any USB 3 controller (chapter 25.1).

To the right USB3 transmission errors detected by the hardware will be shown.

14.2 Dante Controller

All settings related to the Dante* network, like clock, streams and routing, are done with the
software Dante Controller by Audinate*. It is a free software application (registration required)
for Windows and Mac, and can be downloaded here:

https://www.audinate.com/products/software/dante-controller

Dante Controller offers automatic device discovery, one-click signal routing and user-editable
device and channel labels. It also provides device status information, real-time network monitor-
ing including device-level latency and customized event logging. Presets can be used to quickly
and easily backup, restore, move, and re-use Dante network configurations.

At startup Dante Controller scans the network for connected Dante devices and shows them
automatically in the Network View.

Note: Dante Controller will not work as long as at least one other Dante device has been
connected to the Digiface Dante.

Note: The IP address of a Dante device must fit into the network environment for proper opera-
tion. The Dante Controller will mark a device entry red if the IP address does not match the
network environment, thus helps resolving the issue.

User guides, FAQs, Setup Documents and many more information around Dante and the Dante
Controller software are available at:

https://www.audinate.com/resources

The Digiface Dante is basically a USB audio interface. The Dante Controller software needs a
network port to communicate with the Dante network. The standard solution would have been to
plug a network cable from the computer's network port into one of the four ports of the Digiface
Dante - which makes you loose two network ports!

Therefore the Digiface Dante also includes the functionality of a USB Ethernet adapter, whose
driver is installed together with the MADIface series one. This device can be used directly for
the Dante Controller. No cable needed, two network ports stay free.

* Audinate, the Audinate logo and Dante are registered trademarks of Audinate Pty Ltd.

                                         User's Guide Digiface Dante © RME                   27
14.3 Channel Count under Core Audio
In Single Speed Speed (44.1 and 48 kHz) 64 + 64 input and output channels each are
available. Double Speed (88.2 and 96kHz) reduces the number of available channels to 32
each. Quad Speed (176.4 and 192kHz) reduces the number of available channels to 16 each.
It is not possible to change the number of Core Audio devices without a reboot of the computer.
So when the Digiface Dante changes to Double Speed (88.2/96 kHz) or Quad Speed mode
(176.4/192 kHz) all channels stay present, but are partly inactive.
14.4 Various Information
The driver of the Digiface Dante requires at least Mac OS 11.
Programs that don't support card or channel selection will use the device chosen as Input and
Output in the System Preferences – Sound panel.
Via Launchpad – Other – Audio MIDI Setup the MADIface can be configured for the system
wide usage in more detail.
Programs that don't support channel selection will always use channels 1/2, the first stereo pair.
To access other inputs, use the following workaround with TotalMix: route the desired input
signal to output channels 1/2. In the channel settings of outputs 1/2 activate Loopback. Result:
the desired input signal is now available at input channel 1/2, without further delay/latency.
Use Configure Speakers to freely configure the stereo or multichannel playback to any avail-
able channels.
15. Using more than one Interface
OS X supports the usage of more than one audio device within the audio software. This is done
via the Core Audio function Aggregate Devices, which allows to combine several devices into
one. This function is found in the Audio MIDI Setup – Audio Window. Click the + sign in the
lower left.
The current driver supports up to three RME USB devices of the MADIface series. All units
have to be in sync, i.e. have to receive valid sync information (by feeding synchronized signals).
x If the Digiface Dante is set to clock mode Master (Internal), all others have to be set to clock
mode Slave, and have to be synced from the master. The clock modes of all units have to
be set up correctly in the MADIface Settings dialog.
x If all units are fed with a synchronous clock, i.e. all units show Sync in their Settings dialog,
all channels can be used at once.
Note: TotalMix is part of the hardware of each unit. Up to three mixers are available, but these
are separated and can't interchange data. Therefore a global mixer for all units is not possible.
Using more than one Digiface Dante is currently not supported.
28 User's Guide Digiface Dante © RME16. DIGICheck Mac
The DIGICheck software is a unique utility developed for testing, measuring and analysing digi-
tal audio streams. Although this Mac software is fairly self-explanatory, it still includes a com-
prehensive online help. DIGICheck 0.73 operates in parallel to any software, showing all input
data. The following is a short summary of the currently available functions:
x Level Meter. High precision 24-bit resolution, 2/8/128 channels. Application examples: Peak
level measurement, RMS level measurement, over-detection, phase correlation measure-
ment, dynamic range and signal-to-noise ratios, RMS to peak difference (loudness), long
term peak measurement, input check. Oversampling mode for levels higher than 0 dBFS.
Vertical and horizontal mode. Slow RMS and RLB weighting filter. Supports visualization ac-
cording to the K-System.
x Hardware Level Meter for Input, Playback and Output. Reference Level Meter freely con-
figurable, causing near zero CPU load, because calculated from the MADIface hardware.
x Vector Audio Scope. World wide unique Goniometer showing the typical afterglow of a
oscilloscope-tube. Includes Correlation meter and level meter.
x Spectral Analyser. World wide unique 10-, 20- or 30-band display in analog bandpass filter
technology. 192 kHz-capable!
x Totalyser. Spectral Analyser, Level Meter and Vector Audio Scope in a single window.
x Surround Audio Scope. Professional Surround Level Meter with extended correlation
analysis, ITU weighting and ITU summing meter.
x ITU1770/EBU R128 Meter. For standardized loudness measurements.
x Bit Statistics & Noise. Shows the true resolution of audio signals as well as errors and DC
offset. Includes Signal to Noise measurement in dB and dBA, plus DC measurement.
x Completely multiclient. Open as many measurement windows as you like, on any channels
and inputs or outputs!
To install DIGICheck, go to the \DIGICheck directory on the RME Driver CD and run setup.exe.
Follow the instructions prompted on the screen.
DIGICheck is constantly updated. The latest version is always available on our website
www.rme-audio.com, section Downloads / DIGICheck.
User's Guide Digiface Dante © RME 2917. Hotline – Troubleshooting
Playback works, but record doesn’t:
x Check that there is a valid signal at the input. If so, the current sample frequency is dis-
played in the Settings dialog.
x Check whether the Digiface Dante has been selected as recording device in the audio appli-
cation.
x Check whether the sample frequency set in the audio application (‘Recording properties’ or
similar) matches the input signal.
Crackle during record or playback:
x Increase the number and size of buffers in the application.
x Try different cables (coaxial or optical) to rule out any defects here.
x Check that cables/devices have not been connected in a closed loop. If so, set the system’s
clock mode to ‘Master’.
x Check the Settings dialog for displayed Errors.
Driver installation and Settings dialog/TotalMix work, but a playback or record is not possible
x While recognition and control of the device are low bandwidth applications, playback/record
needs the full USB transmission performance. Therefore, defective USB cables with limited
transmission bandwidth can cause such an error scheme.
Where do I set the sample rate?
x In the Dante Controller, for the device that is currently the Grand Master Clock for the whole
Dante network. ASIO, WDM or Core Audio have no control over that.
30 User's Guide Digiface Dante © RMEUser's Guide
Digiface Dante
TotalMix FX
User's Guide Digiface Dante © RME 3118. Routing and Monitoring 18.1 Overview The Digiface Dante includes a powerful digital real-time mixer, TotalMix FX, based on RME’s unique, sample-rate independent TotalMix technology. It allows for practically unlimited mixing and routing operations, with all inputs and playback channels simultaneously, to any hardware outputs. The Digiface does not have a DSP, so there are no FX available. Here are some typical applications for TotalMix: x Setting up delay-free submixes (headphone mixes). The Digiface Dante allows for up to 65 fully independent stereo submixes. On an analog mixing desk, this would equal 130 Aux sends. x Unlimited routing of inputs and outputs (free utilisation, patchbay functionality). x Distributing signals to several outputs at a time. TotalMix offers state-of-the-art splitter and distributor functions. x Simultaneous playback of different programs via a single stereo output. The ASIO multi- client driver supports the usage of several programs at the same time. When done on differ- ent playback channels TotalMix provides the means to mix and monitor these on a single stereo output. x Mixing of the input signal to the playback signal (complete ASIO Direct Monitoring). RME not only is the pioneer of ADM, but also offers the most complete implementation of the ADM functions. x Integration of external devices. Use TotalMix to insert external effects devices, be it in the playback or in the record path. Depending on the current application, the functionality equals insert or effects send and effects return, for example as used during real-time monitoring when adding some reverb to the vocals. Every single input channel, playback channel and hardware output features a Peak and RMS level meter, calculated in hardware. These level displays are very useful to determine the pres- ence and routing destinations of the audio signals. For a better understanding of the TotalMix mixer you should know the following: x As shown in the block diagram (next page), the record signal usually stays unaltered. To- talMix does not reside within the record path, and does not change the record level or the audio data to be recorded (exception: loopback mode). x The hardware input signal can be passed on as often as desired, even with different levels. This is a big difference to conventional mixing desks, where the channel fader always con- trols the level for all routing destinations simultaneously. x The level meter of inputs and playback channels are connected pre-fader, to be able to visu- ally monitor where a signal is currently present. The level meters of the hardware outputs are connected post-fader, thus displaying the actual output level. 32 User's Guide Digiface Dante © RME
User's Guide Digiface Dante © RME 33
18.2 The User Interface

The visual design of the TotalMix mixer is a result of its capability to route hardware inputs and
software playback channels to any hardware output. The Digiface Dante provides 128 input
channels, 128 software playback channels, and 130 hardware output channels:

TotalMix can be used in the above view (View Options 2 Rows). However, the default is a verti-
cal alignment in three rows as known from an Inline desk, so that the row Software Playback
equals the Tape Return of a real mixing desk:

x Top row: Hardware inputs. The level shown is that of the input signal, i. e. fader independ-
  ent. Via fader and routing field, any input channel can be routed and mixed to any hardware
  output (bottom row).

x Middle row: Playback channels (playback tracks of the audio software). Via fader and routing
  field, any playback channel can be routed and mixed to any hardware output (third row).

x Bottom row (third row): Hardware outputs. Here, the total level of the output can be adjusted.
   This may be the level of connected loudspeakers, or the necessity to reduce the level of an
   overloaded submix.

Usage in mode Submix View (Default): simply click on the hardware output channel where
you want to have an audio signal. This channel turns brighter, means it is selected as current
submix. Now move the faders up from all sources - input and playback channels - that you want
to hear at the submix output.

The following chapters explain step by step all functions of the user interface.

34                              User's Guide Digiface Dante © RME
18.3 The Channels

A single channel can be switched between mono and stereo mode. The mode is set in the
channel settings panel (tool symbol).

Channel name. The name field is the preferred place to select a channel by a mouse click. A
double click opens a dialog to assign a different name. The original name will be shown when
activating the option O-Names in the View Options.

Panorama. Routes the input signal freely to the left and right routing destination
(lower label, see below). The level reduction in center position is -3 dB.

Mute and Solo. Input channels and playback channels each have a mute and
solo button.

Numerical level display. Shows the current RMS or Peak level, updated twice
per second. OVR means overload. The setting Peak/RMS is changed in the View
Options.

Level meter. The meter shows both peak values (zero attack, 1 sample is enough
for a full scale display) by means of a yellow line, and mathematically correct RMS
values by means of a green bar. The RMS display has a relatively slow time con-
stant, so that it shows the average loudness quite well. Overs are shown in red at
the top of the bar. In the Preferences dialog (F2) the Peak Hold time, the over
detection and the RMS reference can be set.

Fader. Determines the level of the signal routed to the current routing destination (lower label).
Please note that this fader is not the fader of the channel, but only the fader of the current rout-
ing. Compared to a standard mixing desk TotalMix does not have a channel fader, but only Aux
Sends, as many as there are hardware outputs. Therefore TotalMix can create as many differ-
ent submixes as there are hardware outputs. This concept is understood best in the Submix
View, but more on that later.

Below the fader the Gain is shown in a numerical display
field, according to the current fader position. The fader can
be:

¾   dragged with the left mouse button pressed

¾   moved by the mouse wheel

¾   set to 0 dB and −∞ by a double click. The same happens
    with a single click plus held down Ctrl key.

¾   adjusted in fine mode by mouse drag and mouse wheel
    when holding the Shift key down

A Shift-click on a fader adds the fader to the temporary
fader group. All faders now marked yellow are ganged, and
move simultaneously in a relative way. The temporary fader
group is deleted by a click on the F symbol in the upper right
of the window.

The arrow symbol at the bottom minimizes the channel width to that of the level meters. An-
other click maximizes it again. A mouse click with held Ctrl key causes all channels to the right
to enlarge and minimize at once.

                                  User's Guide Digiface Dante © RME                             35
You can also read