Wasi-Steam Classic II - Steam Cleaner - USER MANUAL - Wassermann Dental ...
←
→
Page content transcription
If your browser does not render page correctly, please read the page content below
Steam Cleaner
Wasi-Steam Classic II

                                174996 #CCWH#
                                Wasi-Steam Classic II
                                Stainless Steel White

 174996 #CCVA#
 Wasi-Steam Classic II
 Stainless Steel

                         USER MANUAL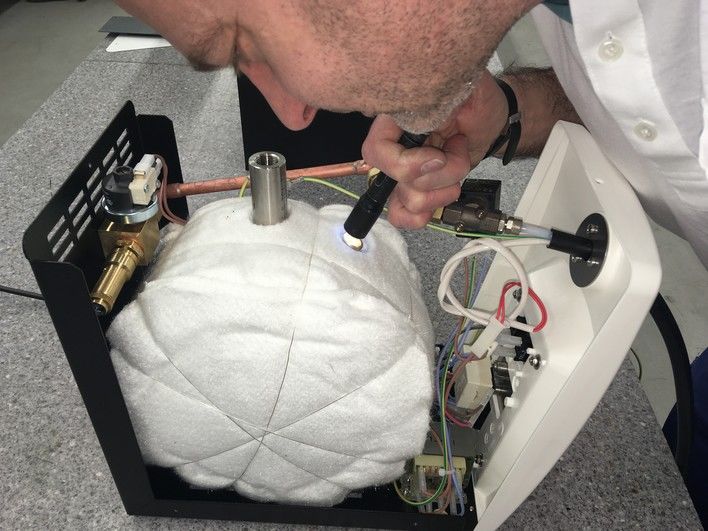
Dear customer,

Thank you for choosing a product from the Wassermann range. Wassermann Dental-
Maschinen incorporates the highest standards of quality and the latest technology.
In order to enjoy maximum performance and years of trouble-free operation, please read
this user manual carefully before you connect this unit and start work, and operate the unit
according to the recommended guidelines. The operation safety and the functionality of
this unit can only be guaranteed if you follow both the general safety guidelines and the
applying laws to prevent accidents as well as the precautions given in this user manual.
We are not liable for any damages which occur due to inappropriate usage or faulty
operation of this unit.

             Make sure that anyone using this unit has read and understood this user
             manual.
             Keep this user manual in a safe place where it can be referred to as required at
             any time.

         The unit complies with the relevant EU guidelines.

         The unit is subject to the EU guidelines 2012/19/EU (WEEE Directive).

Company address:
Wassermann Dental-Maschinen GmbH
Rudorffweg 15-17
21031 Hamburg, Germany
Phone : +49 (0)40 730 926 -20/ -24 Fax.: +49 (0)40 730 37 24
export@wassermann-dental.com
www.wassermann.hamburg
www.facebook.com/WassermannDentalmaschinen

.

    Erstellt: 06.04.21/ msc                 Version: 1                        Auftrag: 174996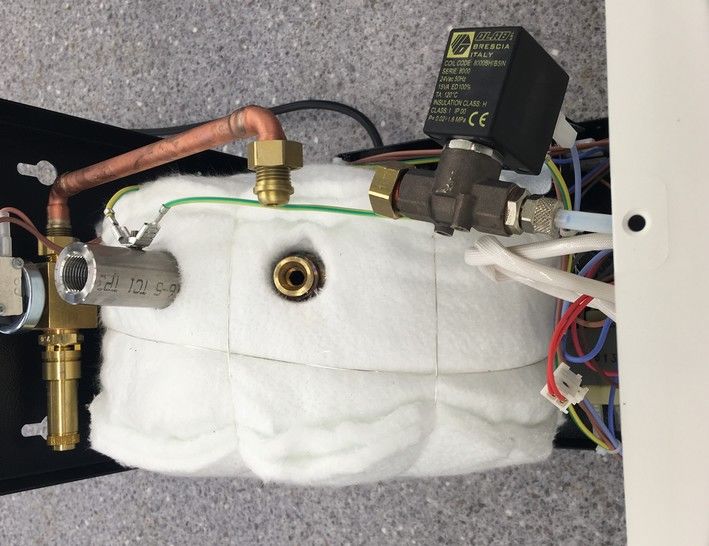
Contents
1 Features............................................................................................................................5
2 Safety Symbols used in this Manual.................................................................................5
3 Safety Guidelines..............................................................................................................6
4 Responsibility for Operation or Damage...........................................................................7
   4.1 Warranty............................................................................................................................... 7
5 Application.........................................................................................................................7
6 Before Starting..................................................................................................................8
   6.1 Transport.............................................................................................................................. 8
   6.2 Installation............................................................................................................................ 8
   6.3 Storage................................................................................................................................. 9
   6.4 Mounting Instruction Fastening Set for Wall Mounting Wasi-Steam Classic II......................9
7 Start-up/ Installation........................................................................................................13
8 Operation........................................................................................................................15
   8.1 General Operating Instructions...........................................................................................15
      8.1.1 Refill the Unit with Water...................................................................................16
9 Troubleshooting...............................................................................................................17
10 Care and Maintenance..................................................................................................18
   10.1 Repairs............................................................................................................................. 18
   10.2 Cleaning........................................................................................................................... 18
   10.3 Maintenance..................................................................................................................... 18
11 Scheduled Decalcification (at least every six months)..................................................19
   11.1 Pre-Decalcification............................................................................................................ 19
   11.2 Open the Tank Cap........................................................................................................... 20
   11.3 Open the Casing............................................................................................................... 20
   11.4 Loosen the Plastic Filler Tray............................................................................................20
   11.5 Tear off the Flat Plug (Grounding Cable)...........................................................................21
   11.6 Remove the Casing.......................................................................................................... 21
   11.7 Loosen the Distributor Block.............................................................................................22
      11.7.1 Cap Nut between Distributor Block and Copper Pipe.....................................22
      11.7.2 Cap Nut between Distributor Block and Solenoid Valve..................................22
      11.7.3 Cap Nut between Distributor Block and Tank..................................................22
      11.7.4 Remove the Brass Ingots.................................................................................22
   11.8 Cleaning the Distributor Block (Brass)..............................................................................23
   11.9 Rinse and Pour Out the Steam Boiler...............................................................................23
   11.10 Shine in the Tank............................................................................................................ 25
12 Plunger Change............................................................................................................26
   12.1 Spare Parts for Plunger Change.......................................................................................26
   12.2 Service Hotline Plunger Change: 040/ 730 92 6 - 50........................................................26
   12.3 Disassembly of the coil body / solenoid valve / plunger sleeve.........................................27
   12.4 Replace the Plunger......................................................................................................... 28
   12.5 Clean the Solenoid Valve..................................................................................................28
   12.6 The unit can be reassembled and closed by proceeding in reverse order.........................28
   12.7 Spare Parts....................................................................................................................... 29
   12.8 Service Hotline 0049 (0)40 730 926 -20/ -24....................................................................29
   12.9 Accessories for the item 174996 Wasi-Steam Classic II...................................................29
13 Technical Data...............................................................................................................29
14 Disposing of the Unit.....................................................................................................30
   14.1 Information on Disposal for Countries within the EU.........................................................30
15 EU Declaration of Conformity.......................................................................................31
1       Features

    •    Operation with distilled/ softened water is possible and is recommended

    •    Wasi-Steam Classic II: Perfect for use with limited space
    •    Offered in two colour variations:
         174996 #CCVA# Wasi-Steam Classic II Stainless Steel
         174996 #CCWH# Wasi-Steam Classic II Stainless Steel White
    •    Manual filling so the location can be flexibly selected
    •    Variable working pressure, variable up to 5 bar
    •    Short heat-up phase through 1,200 Watt-special steel heating
    •    Comfortable application through single-handed operation of the jet gun
    •    Gentle and quick to use, thorough results
    •    High safety because of protection against dry running / Thermo-safety switch with
         manual reset
    •    Tank and diverse housing parts made of stainless steel
    •    Splash protection, available as accessory
    •    Wall mounting possible, a fastening set for wall mounting is available as accessory,
         for further information please see 6.2 and 6.4 of this manual

2       Safety Symbols used in this Manual

            Warning!
            This is a warning of risk situations and dangers.
            Failure to observe this warning could be life-threatening. These warnings has to
            be observed.

         Information!
         This symbol draws your attention to specific features that has to be observed.

                                                5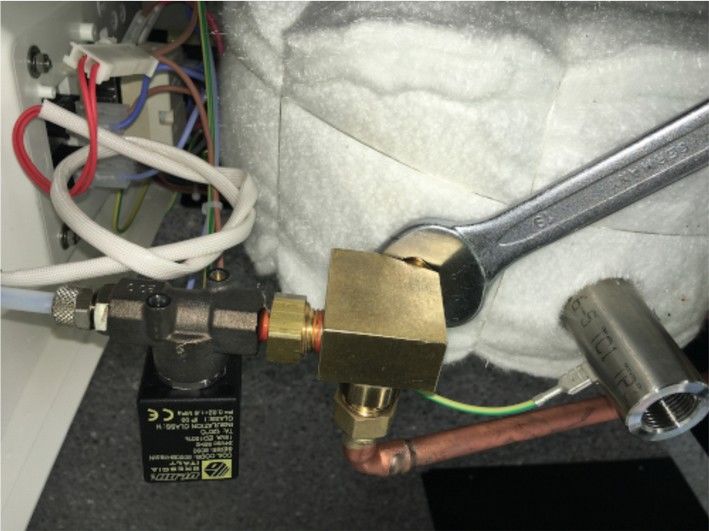
3    Safety Guidelines

Configuring and operating this equipment requires precise knowledge and observance
of the instructions in this user manual. The equipment is designed only for its intended
application.

          WARNING:
          Servicing and repairs should be carried out only by authorised specialists.
          Disconnect the power plug before starting any maintenance work.

          Make sure that the equipment is connected to the correct power source.

          Never touch the steam gun directly at the nozzle – risk of scalding!

          When refilling with water (Operation with distilled/ softened water is possible and
          is recommended.) it is imperative to note point 8 (Operation) of this user manual
          – risk of scalding!

          Never point the steam gun at people (living beings) – risk of injury!

          The unit has several safety features:
               •   Pushbutton switch 5 bar,
               •   Thermo-safety switch with manual reset 165°C degrees Celsius
               •   Adjustable thermostat max. 185°C degrees Celsius
               •   Safety valve 7 bar

          The unit can be filled manually, e.g. by means of a beaker, funnel, or the like.
          The unit must not be filled with pressure and or be attached to a tap.

          Operation with distilled/ softened water is possible and is recommended.

                                              6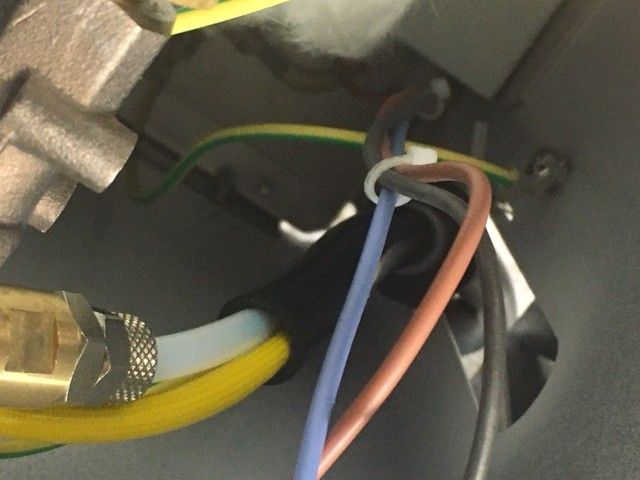
4     Responsibility for Operation or Damage

The responsibility for operating the unit lies exclusively with the owner or user if said unit is
incorrectly serviced, maintained or altered by persons not employed by an authorised
dealer or if the unit is used in a manner contrary to its specified purpose.
The unit has to be maintained and operated in accordance with this user manual.
Wassermann Dental-Maschinen GmbH is not responsible for damage arising from the
nonobservance of these instructions.
Warranty and responsibility provisions contained in the sales and supply conditions of
Wassermann Dental-Maschinen GmbH are not extended by these instructions.

4.1     Warranty

       The warranty period for our equipment is 12 months. If faults occur within the
       warranty period, contact your dental depot or get in touch directly with our service
       department.
       Your equipment should only be operated in perfect condition. If faults occur which
       could harm operators or third parties, the unit should not be used until it has been
       fixed.
       This warranty does not cover damage caused by improper use, external mechanical
       causes, transport damage or interference with the unit by unauthorized persons.

5     Application

Because of its variable work pressure of up to 5 bar it offers the user a gentle but quick
and thorough cleaning of all small parts in the dental laboratory.

Only use the unit Wasi-Steam Classic II for this type of application.

                                                7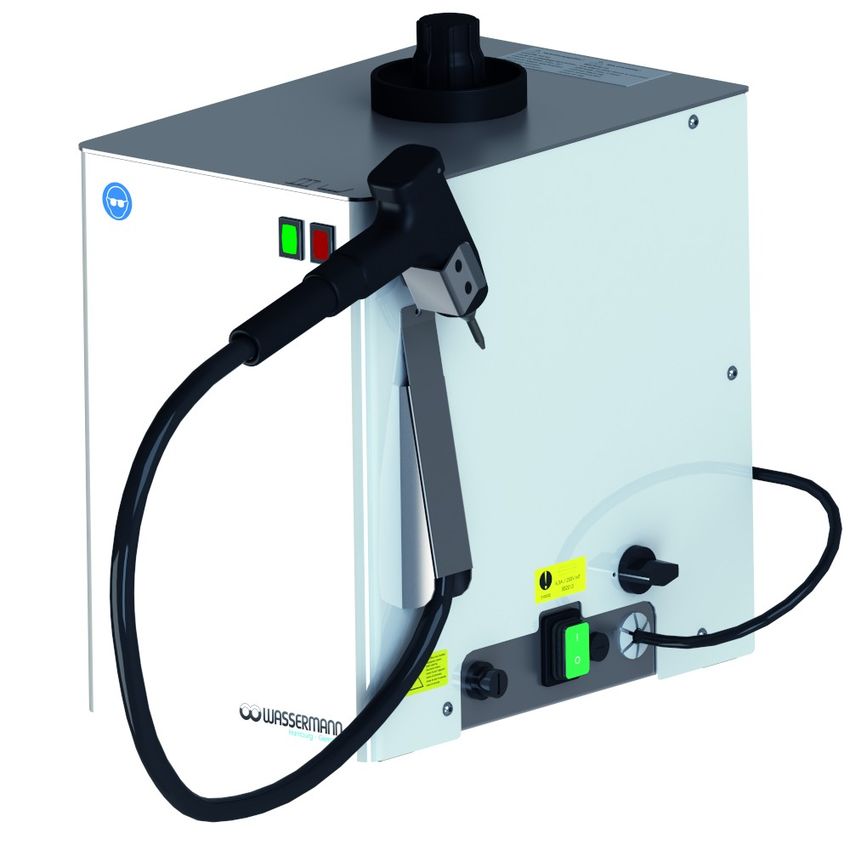
6     Before Starting

6.1     Transport

Before transporting the unit, ensure that it has been unplugged from the power socket.
Make sure that it is packed correctly in order to avoid accidental damage.

          Be sure to check for any transport damage when unpacking the goods. Note
          down any damage if found.

6.2     Installation

Open the box, remove the packing materials, and carefully lift out the unit and accessories.
Check the included accessories.
The unit must stand on a steady and even surface or may be mounted to a stable wall by
means of the mounting kit (REF. 174358 available as accessory). If mounting the unit on
the wall, make sure that the wall is strong enough to take the weight. For further
information please see 6.4 of this manual.

          Install the unit in a place where it will not block the working area and the
          functionality (take the dimensions into account).
          Please see that the louvres are not set because air circulation (heat flow) is
          absolutely necessary.

       Do not install the unit outdoors or in places without proper ventilation.
       Before start-up, be sure the unit reaches room temperature.

                                               8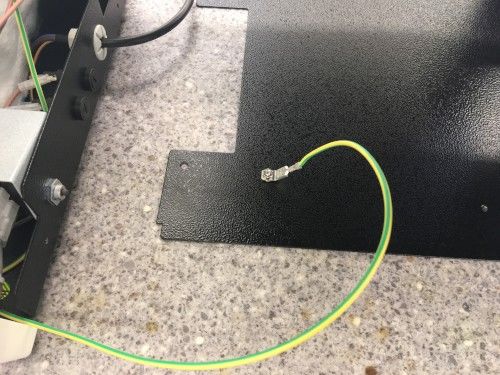
6.3    Storage

If the unit is to be stored for an extended period, protect it from moisture and dust.
The unit location is very important when it comes to workplace safety, even if it is only to
be set up there for a short period. The room should be dry, well ventilated and vibration-
free. An even temperature and wooden supports also help.
The unit should not be stored or set up outdoors.

6.4    Mounting Instruction Fastening Set for Wall Mounting Wasi-Steam Classic II

      In case of wall mounting a fastening set is necessary.
      Item.-no. 174358, available as accessory

Incl. in delivery item.-no. 174358 fastening set Wasi-Steam Classic II
Quantity Name
1          Securing bracket
1          Phillips head screw M 4x8
1          Washer D 4,3
1          Serrated washer D 4,3
1          Slotted screw 4 x 16
2          Slotted screw 6 x 50
2          Screw anchor S8
1          Screw anchor S5

                                               9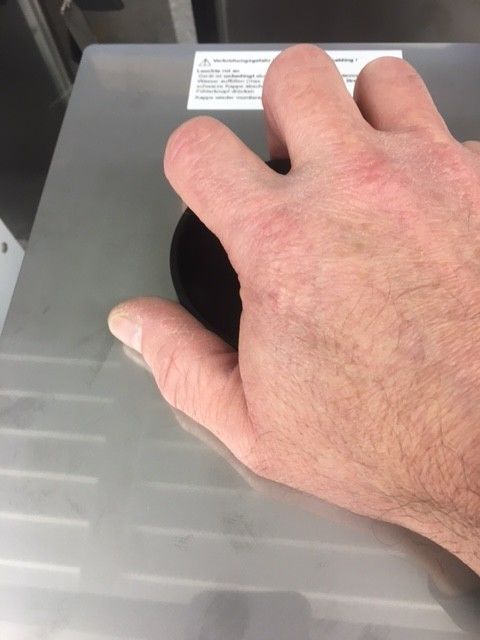
Mounting instruction:
Please drill the holes as indicated in the following drilling template. Please make sure
before that the wall is really suitable for mounting a unit (aerated concrete walls and
drywall are problematic).

Drilling template

                                    drilling

                drilling

                                               10
Secure the enclosed screw anchors as shown in Figure 1.
Screw the 6x50 screws into the two upper holes; keep a distance of 6-7 mm to the wall!
(Figure 2)
Screw
anchor S8
fig. 2
Srew 6 x 50
Screw
anchor S5
fig. 1
11Screw the securing bracket to the Wasi-Steam Classic II as shown in Figure 3.
Do not yet fully tighten the Phillips head screw, however – you still need to be able to move
the securing bracket.
Securing bracket
Washer
Serrated washer
Phillips head screw
fig. 3
12Carefully hook in the unit. Check, whether the unit hangs loosely (i.e. moving back and
forth on the screws). If this is the case tighten the 6x50 screws until the unit hangs
securely.
Finally tighten the securing bracket. First at the wall, then tighten the screw on the unit
itself. (Figure 4)
tighten
Phillips head screw
in a final step
Screw 4 x 16
fig. 4
7 Start-up/ Installation
Before you use the steam cleaner, please put on heat-resistant gloves and wear
safety goggles.
Switch the unit off if it will not be used for an extended period.
Note: Optimal and fast pressurization is carried out only if the adjusting knob is in the
"max." position, since the heater with this is activated via a push button switch, i.e.
immediately at the start of every blasting action.
However in case of the pressure choice options “less than max.”, the heater is activated
via a thermostat, i.e. even in case of a massive decrease in pressure it may take several
minutes until the heater is activated due to residual heat of the container for example.
Therefore this setting “less than max.” is preferable only in case of occasional work.
13Please note the details on the equipment and equipment stickers!
5
2
1
3
7
4
6
1 = Light red (low water)
2 = Light green (heating operation)
3 = Controller steam quantity „0 – 5 bar“ (max. = 5 bar)
4 = Main switch (unit on / off)
5 = Srew top (pressing down to unscrew)
6 = Thermo-safety switch with manual reset (please see 8.1.1!)
7 = Fuse
14• Open the screw top (5) of the container carefully while pressing down the screw top
• Fill with at most 2 litres of water
• Operation with distilled/ softened water is possible and is recommended
• Tighten container screw top (5) sturdily again (hand-screwed)
• Connect power plug
• Switch on main switch (4)
• Choose pressure range from 0 – 5 (max. = 5 bar) with adjusting knob (3)
• Heat-up phase approx. 30 minutes (full container)
• Briefly deaerate the unit after approx. 15 minutes by operating the steam gun
• If the heating light (2) turns off, the unit is ready for use. Now steam blasting via the
gun is possible by operating the pushbutton until the temperature delimiter (6)
activates (button under black cap on the right side of the unit) and the red light (1)
lights up
• Then proceed by referring to point 8.1.1 "refill water"
8 Operation
8.1 General Operating Instructions
All instructions for using the unit, whether in verbal or written form, are based on our own
experience and experimentation and can only be regarded as guidelines.
To avoid an unintentional interruption of use (cooling down period
approx. 45 min.), the unit should be refilled every morning in a cold
state (take fill level into account, or else the container will be
overfilled).
Note: Do not refill more than 2 litres of water, if the red light (water
shortage) lights up (otherwise the container will be overfilled).
Operation with distilled/ softened water is possible and is
recommended .
158.1.1 Refill the Unit with Water
● After the red light (1) lights up, wait approx. 45 min. (cooling down
period) until you refill again, or else there is a risk of scalding as long as
the temperature remains above 100°C
● Container must be pressureless; produce a pressure balance via the jet
nozzle by operating the steam gun
● Only now open the screw top (5) of the container carefully while pressing
down the screw top
● Refill water (2 litres at most)
● Operation with distilled/ softened water is possible and is recommended
● Fully tighten the screw top (5) of the container again (hand-screwed)
● Switch on the temperature delimiter (6) (button under black cap on the
right side of unit) again as follows; first unscrew the black cap, then push
in the pushbutton, the red light (1) goes out and the unit heats up to the
adjusted pressure. Finally, screw the black cap back on
● Heat-up phase (see p. 14)
● Operational; i.e. steam blasting via the gun by operating the pushbutton is
possible until the temperature delimiter (6) activates again and the red
light (1) comes on
169 Troubleshooting
Fault Cause Solution
The red light (low This is a safety Please see page 14/15.
water) lights up and feature of the
the heating turns off steamer: Thermo-
safety switch
(temperature
delimiter 165°C) with
manual reset
No function, only the Devise fuse faulty Replace fuse and investigate cause; call
main switch lights up service if necessary.
Steam escapes from Safety valve has Turn off the unit immediately (unplug power
unit opened because plug) and call service.
pressure switch is
faulty
Hot water leaks from Container is overfilled Operate gun until only steam escapes.
the nozzle instead of with water
steam
Lower amount of Nozzle of the steam Unscrew nozzle from gun and examine for
steam than usual at gun is clogged or the passage (caution risk of scalding!!) or refill
max. heating water level in the water (do not overfill!!).
container has Operation with distilled/ softened water is
reached the minimum possible and is recommended.
level
Insufficient pressure Tank cap is still loose Check or replace tank cap.
build-up or O-ring is faulty
No pressure in boiler Container empty but Check water level, refill if necessary and
red light or thermo check the thermo switch button. If still no
switch faulty or function, call service.
container not empty Operation with distilled/ softened water is
but heater or heating possible and is recommended.
regulator faulty
No steam when Solenoid valve faulty When operating the gun's pushbutton, a
operating the or clogged "clicking sound" is heard from the solenoid
pushbutton valve. If this is the case the problem could be
resolved by cleaning the valve. Otherwise call
service.
If the above recommendations do not solve the problem, contact your dental depot
or our service department.
1710 Care and Maintenance
10.1 Repairs
Servicing or repairs to the unit has only to be carried out by qualified technicians.
Only original spare parts are to be used. Responsibility for the product is voided
if unauthorised persons alter it or if inappropriate components are installed.
10.2 Cleaning
Disconnect the power plug before starting any maintenance work.
The identification plate has always to be kept in easily legible condition and has
not to be removed.
Remove external dirt from time to time with some form of cold cleaner.
Use only cold cleaners to avoid damaging the paintwork or removing the lettering.
The equipment should be cleaned at regular intervals to ensure trouble-free
operation.
It requires only normal cleaning (sponge, damp cloth, mild detergent) and no further
chemical additives.
Please see 11 „Decalcification“
10.3 Maintenance
The Wasi-Steam Classic II should, depending on frequency of use, but at least twice a
year, be decalcified in accordance with the following instructions. Depending on water
hardness a more frequent decalcification could be required. Operation with distilled/
softened water is possible and is recommended. As a basic principle, the unit must
always be kept clean.
1811 Scheduled Decalcification (at least every six months)
WARNING:
It is imperative to pour out the unit completely in order to
prevent undesirable consequences (from unpleasant smells to
damage of the plunger).
The unit must be opened as described below:
11.1 Pre-Decalcification
• Turn off the main switch and unplug the power plug
• Empty / pour out container in cold state
• Mix approx. 50 ccm lime remover with 2 litres of water and fill into the unit
• Depending on lime content, the ratio can be increased:
Max. 100 ccm lime remover with 2 litres of water
• Heating controller must be set just a little lower than 1 bar
• Close tank cap (hand-screwed)
• Insert the power plug into the socket, making sure that the mains and the unit
operate on the same voltage.
• Switch on the unit and let it heat up briefly until the green light goes out
• Turn off the unit and allow the lime remover to react for approx 8 hours (lime
remover should not react longer than 12 hours)
• Pour out the solution and rinse with clear water (approx. 1 litre) at least two times by
shaking the unit
1911.2 Open the Tank Cap
The unit must be depressurised!
11.3 Open the Casing
11.4 Loosen the Plastic Filler Tray
If necessary, briefly press the plastic filler tray at the top of the unit down to loosen the
sealing ring. Then lift the filler tray upwards with a twisting movement.
20The below pictures of the Wasi-Steam Classic are quite similar to your product
Wasi-Steam Classic II.
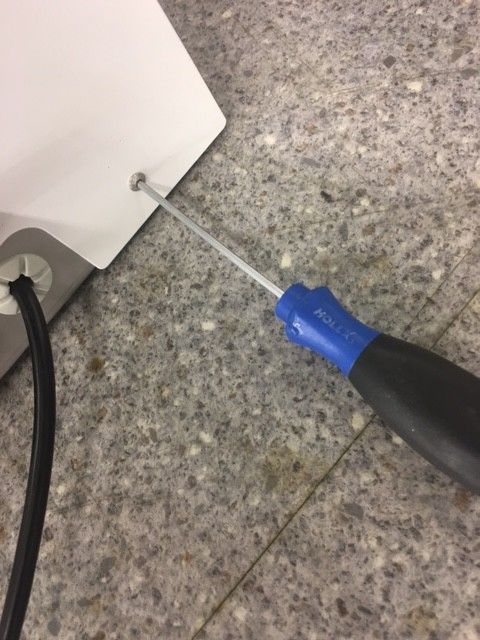
11.5 Tear off the Flat Plug (Grounding Cable)
11.6 Remove the Casing
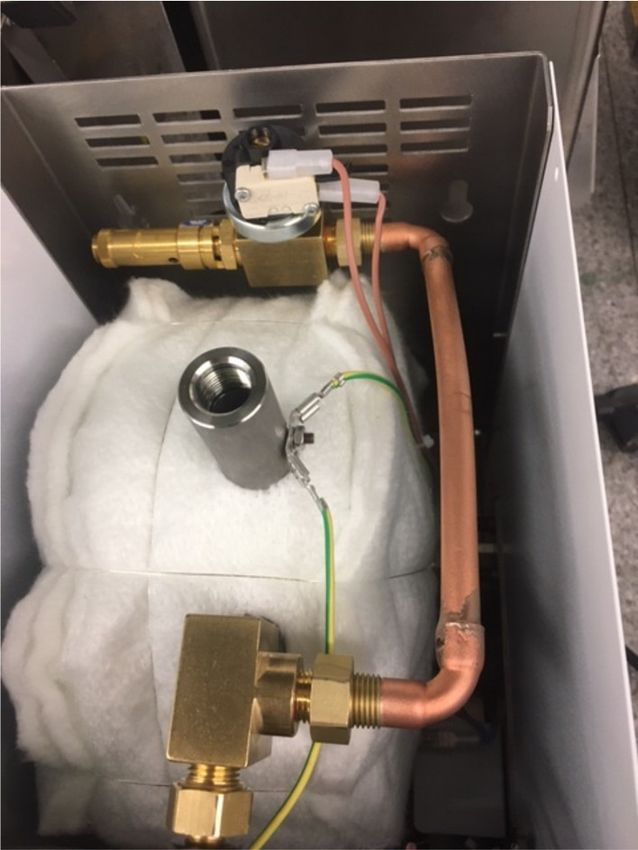
2111.7 Loosen the Distributor Block
Use a 19 mm spanner to loosen the 3 cap nuts in the following order:
11.7.1 Cap Nut between Distributor Block and Copper Pipe
11.7.2 Cap Nut between Distributor Block and Solenoid Valve
11.7.3 Cap Nut between Distributor Block and Tank
11.7.4 Remove the Brass Ingots
2211.8 Cleaning the Distributor Block (Brass)
Contamination (eg lime build-up)
• Clean the distributor block, especially the sealing surfaces.
• Carefully remove the lime build-up from the passages with a 6 mm drill.
• Rinse at the tap.
• Blow clean with compressed air.
11.9 Rinse and Pour Out the Steam Boiler
Please make sure that the pre-decalcification (see point 11.1) has
already been carried out before!
WARNING:
The water must not run over the electrical system!
23Recomended: Alternatively:
Rinse the tank using a hose and a Filling with fresh water using a funnel
fixed connection to water supply
WARNING:
The water must not run over the electrical system!
• Insert a hose with a fixed connection to water supply into the large tank opening.
• Hold the unit upside down over a sink.
• Open the tap carefully.
INLET OUTLET
Water inlet via hose (fixed water connection) Rinse water / waste water
• Rinse the boiler with a hose until no more particles can be seen from the smaller
hole (boiler / threaded connection to the distributor block).
• If there are still deposits, repeat the process.
• If necessary, allow Kalk-Ex to work again (observe max. exposure time of 12
hours).
2411.10 Shine in the Tank
• Please ensure that the tank is free of deposits.
• If necessary, repeat process 11.9 Rinse and pour out the steam boiler.
If the unit has not been cleaned for a longer period of time,
please visually check the inside of the tank for deposits
(according to 11.10). If necessary, carry out a complete
cleaning before changing the plunger.
2512 Plunger Change
Before changing the plunger, please ensure that the tank is free of
deposits (see 11.10).
12.1 Spare Parts for Plunger Change
Spare Parts Item no.
Plunger 382042
Lime remover Kalk-Ex, 1000 ccm 655002
Adhesive sealant 302-72 621022
Tank lid 390100
O-Ring 20.32 x 2.62 tank lid 380074
If necessary, please contact our service hotline.
12.2 Service Hotline Plunger Change: 040/ 730 92 6 - 50
Please inform us in any case about the serial number. The serial number allows us to
find quickly without any doubt the correct answers for the needs of your machine. The
identification plate is located on the back or right side of your unit.
Example of an identification plate at your device
Type = item number
S/N = serial number
2612.3 Disassembly of the coil body / solenoid valve / plunger sleeve
• Loosen the nut on the coil body with a size 14 wrench.
• Pull off the coil body.
Loosen the nut on the coil body
(coil body = black box)
• Then loosen the nut of the plunger sleeve with a suitable wrench (size 19/ 20/ 21)
Nut of the plunger sleeve
Loosen the plunger sleeve from the solenoid valve
2712.4 Replace the Plunger
Item no. 382042 Plunger
12.5 Clean the Solenoid Valve
Clean here
• Place very fine emery paper over the fingertip and polish the fit of the solenoid valve
with a twisting motion. Then clean thoroughly with compressed air.
12.6 The unit can be reassembled and closed by proceeding in reverse order.
2812.7 Spare Parts
If necessary please contact our service hotline phone.
12.8 Service Hotline 0049 (0)40 730 926 -20/ -24
12.9 Accessories for the item 174996 Wasi-Steam Classic II
Accessories Item no.
Splash protection entirely made of stainless steel 174460
W 250 x H 265 x D 255 mm,
open at the front and top
Splash protection, stainless steel, plastic basement 174360
W 235 x H 385 x D 294 mm,
with fixed stainless steel hood
Special spray nozzle Ø 2.5 mm 174352
(Spare basic nozzle Ø 1.2 mm, item no. 174100)
Kalk-Ex, lime remover, 1000 ccm 655002
Fastening set for wall mounting 174358
13 Technical Data
Wasi-Steam Classic II Item no. 174996
Voltage 220-240 V / 50/60 Hz
Power consumption 5.3 A (6.3 A medium-blowing-fuse)
Output 1220 W
W x H x D max. 245 x 350 x 315 mm
W x H x D (housing) 200 x 305 x 310 mm
Weight 12.5 kg
Working pressure max. 5 bar
Steam temperature approx. 151 °C
Boiler capacity 3.3 l
Safety class IP 22
Other voltages on request.
The noise level of the unit amounts to ≤ 70 dB (A).
Technical changes reserved.
2914 Disposing of the Unit
The unit has to be disposed by an authorized recycling operation. The selected company
has to be informed of all possibly health-hazardous residues in the unit.
14.1 Information on Disposal for Countries within the EU
To conserve and protect the environment, prevent environmental pollution and
improve the recycling of raw materials, the European Commission adopted a
directive that requires the manufacturer to accept the return of electrical
and electronic units for proper disposal or recycling.
Within the European Union units with this symbol should not therefore be disposed of
in unsorted domestic waste.
For more information regarding proper disposal please apply at your local authoritie.
3015 EU Declaration of Conformity
in accordance with 2014/35/EU (Low Voltage Directive) and 2014/30/EU (Electromagnetic
Compatibility Directive) and 2006/42/EC (Machinery Directive) and 2011/65/EU (RoHS
Directive) and 2014/68/EU (Pressure Units Directive)
Manufacturer: WASSERMANN Product description: Steam Cleaner for
Dental-Maschinen GmbH dental
Rudorffweg 15-17 applications
21031 Hamburg
Germany
Model: Wasi-Steam Classic II Item no. 174996
Aapplicable DIN EN 61010-1
standards: DIN EN 61000-6-3
DIN EN 61000-6-1
DIN 45635-1
DIN EN 60335-1
Hiermit wird bestätigt, dass die oben bezeichnete Maschine den genannten EU-Richtlinien
entspricht. Diese Erklärung wird ungültig, falls die Maschine ohne unsere Zustimmung
verändert wird.
This is to confirm that the above mentioned machine complies with the described EU
guidelines. This declaration becomes invalid if the machine is modified without our
approval.
Cette machine est conforme aux normes en vigueur d´Union européenne. Cet avis est
nul et non avenant si cette machine est modifiée sans notre accord.
Esta máquina, anteriormente mencionada, cumple con los limites requeridos por el
reglamento UE. Ahora bien, esta declaración quedará invalidada en caso de realizar
modificaciones al aparato sin nuestra aprobación.
Hiermee wordt bevestigd dat bovengenoemde machine voldoet aan de voorgeschreven
EU normen. Deze verklaring verliest geldigheid als er zonder onze uitdrukkelijke
toestemming wijzigen aan de machine worden aangebracht.
Place, date: Hamburg, 2021-04-06 Company stamp :
Signature: ________________________
Sven Wassermann
(Managing Director)
31You can also read