Wirecard CEE Integration Documentation - Created: 2018-10-03 15:55 - Created on: 2018-10-03 15:55 by - Online Guides
←
→
Page content transcription
If your browser does not render page correctly, please read the page content below
Created on: 2018-10-03 15:55 by
                                                                                                      -

                               Wirecard CEE Integration Documentation

                                                       () -

                                            Created: 2018-10-03 15:55

Online Guides - Integration documentation                                                           1/9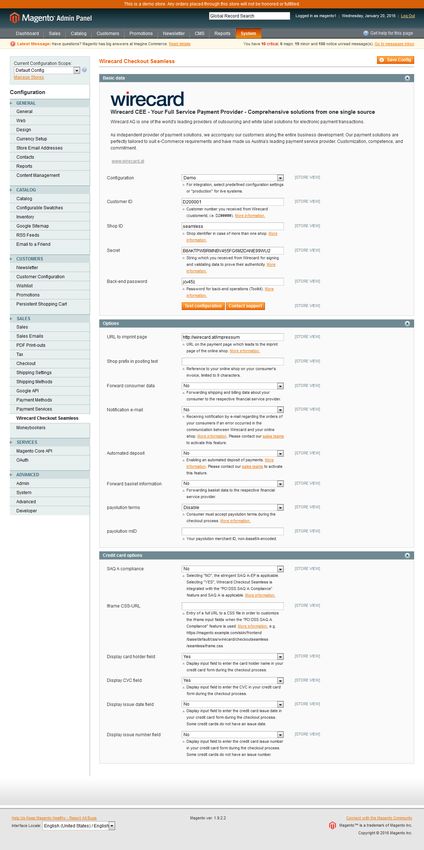
Created on: 2018-10-03 15:55 by
                                                                                                             -

Wirecard Shop Plugin for Magento Commerce
and Magento Enterprise

Installation guide for Wirecard Checkout Seamless

This installation guide shows the step-by-step installation of the plugin to your installed shop system
on your web server. Please test your online shop and the configuration of the plugin on a test system
before installing the plugin on your production system.

In general there are two ways the plugin can be installed, either via the Magento Package Manager
Magento Connect or via downloading and unpacking a zip file. Via the Magento Package Manager it is
easier to keep the plugin up to date.

If you are upgrading from a previous version, read the upgrade section first.

Step 1 - Magento Connect

To install the extension via Magento Connect please go to the back end of your Magento online shop.
Then navigate to “System” → “Magento Connect” → “Magento Connect Manager”. You need to enter
your back-end credentials again to install new packages.

1. To get the extension key please visit Magento Connect.
2. Click “Install Now” and then “Select Key” and copy and paste the key into the field “Paste
   extension key to install”. You will need your Magento Connect credentials to log in to Magento
   Connect. If you do not have a Magento Connect account you can register for free.
3. Click “Install” and after that “Proceed” to install the plugin.

If you click “Refresh”, Wirecard Checkout Seamless should be listed in “Manage Existing Extensions”.

After the installation you need to select “Return to Admin” (at the top of the page), and log out and
log in again to complete the installation.

To upgrade an existing installation go to your Magento Package Manager and click “Check for
Upgrades” in the “Manage Existing Exensions” section. A yellow background indicates that an
upgrade is available. Select “Upgrade to x.y.z.” and click “Commit Changes” to initiate the upgrade.

Step 1 - Zip File

To install the plugin via the zip file, upload the zip file containing the Wirecard Checkout Seamless
plugin to the document root of your Magento installation and unzip the file. The zip-archive

Online Guides - Integration documentation                                                              2/9
Created on: 2018-10-03 15:55 by
-
already contains the directory path allowing the plugin to be stored automatically in the right folder.
If you need to unzip the file on your own computer and then upload the plugin, please maintain the
directory structure which already exists in the zip file.
Step 2
Next you need to navigate to “System” → “Configuration” → “Wirecard Checkout Seamless” (on the
left side).
For a basic configuration enter your customer ID, shop ID and your secret and set the URL to
imprint page. You can additionally go over the settings and configure the plugin according to your
requirements. Please refer to the section advanced configuration for a more detailed description
about the configuration possibilities.
Online Guides - Integration documentation 3/9Created on: 2018-10-03 15:55 by
-
Online Guides - Integration documentation 4/9Created on: 2018-10-03 15:55 by
-
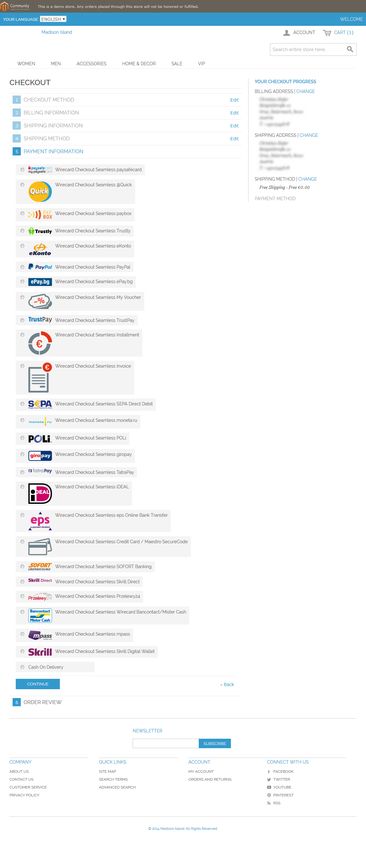
Step 3
To enable the payment methods navigate to “System” → “Configuration” → “Payment Methods”.
To verify the installation please check if all selected payment methods are shown at checkout.
Online Guides - Integration documentation 5/9Created on: 2018-10-03 15:55 by
-
Online Guides - Integration documentation 6/9Created on: 2018-10-03 15:55 by
-
Advanced configuration
As described in Step 2 the plugin allows for some additional customization.
Plugin modes
● “Demo”: Demo mode configuration. No communication with your financial service provider but only
between your online shop and the Wirecard Checkout Server.
● “Test”: During test mode there is communication between your online shop and a test bank or
demo bank provided for this purpose by the relevant financial service provider. However, the
payment process is only simulated and no money is transferred.
● “Production”: Make sure all of your tests were properly executed before you switch to production
mode. After successful testing you can change the plugin mode to “Production”.
PCI DSS SAQ A Compliance
The shop plugin fulfills the requirements for credit card payments set forth in the PCI DSS v3.0 which
is mandatory for all e-commerce merchants as of 1st January, 2015. Following this standard, a
merchant's web site(s) is not allowed to itself handle sensitive credit card specific data.
Please visit PCI DSS SAQ A Compliance for Wirecard Checkout Seamless for more information and
details.
To this effect, some new parameters need to be set in “System” → “Configuration” → “Wirecard
Checkout Seamless” → “Credit card options” (see Step 2).
“SAQ A compliance” is enabled by default, which means that the rather stringent SAQ A-EP is
applicable for your online shop and Wirecard Checkout Seamless will not be integrated with the “PCI
DSS SAQ A Compliance” feature.
Please note that for using the “PCI DSS SAQ A Compliance” feature for Wirecard Checkout Seamless,
“SAQ A Compliance” must explicitly be set to “Yes”.
To customize the iframe input fields when using the “PCI DSS SAQ A Compliance” feature, enter a full
URL to a CSS file on your server into the “Iframe CSS URL” field.
Please note that due to security reasons neither url() functions nor @import directives (e.g. external
fonts) are allowed in the CSS file. If they are used they will be ignored.
Set Display card holder field to “Yes” if you wish to display the card holder field for “PCI DSS
SAQ A Compliance” and correspondingly the other credit card fields.
Online Guides - Integration documentation 7/9Created on: 2018-10-03 15:55 by
-
Enabling input field "Date of Birth"
To use the payment methods “invoice” or “installment” you must enable the input field “date of birth”
for your consumers in your Magento configuration. For this, please proceed as follows: go to “System”
→ “Configuration” → “Customer Configuration” → “Name and Address Options” and set “Show Date of
Birth” from the “Optional” to “Required”.
“Invoice” or “installment” are only visible if the criteria defined in your contract concluded with the
relevant financial Institution (e.g. payolution or RatePAY) are met. For more information please check
the payment method specific documentation for your invoice/installment provider:
● payolution: Invoice and Installment
● RatePAY: Invoice and Installment
Additional settings
Automated deposit: To prevent the expiration of uncaptured payments you may select this feature
which enables an automated deposit and day-end closing of payments. Please contact our sales
teams to enable this feature. If you select this feature without previous enabling you will get an error
message.
Upgrading from version 3.6
There are some major changes in version 4.x. Therefore the new plugin does not replace the plugin
with version 3.6 and can be installed in parallel. Since removing payment methods in Magento leads
to a problem in displaying the orders which were made with the corresponding payment method, the
plugin with version 3.6 needs to remain installed after the upgrade.
When the plugin with version 4.x is successfully installed, disable the payment method at “System” →
“Configuration” → “Payment Methods”.
FAQ
Is the plugin compatible with the Magento Compiler?
Yes, compatibility is given starting with plugin version 3.4.0. To check the “Compiler Status” in your
Magento Administration Panel go to “System” → “Tools” → “Compilation”. The “Compiler Status”
should be enabled.
How to update from versions earlier than V3.3.0 to the current version?
Online Guides - Integration documentation 8/9Created on: 2018-10-03 15:55 by
-
When you are updating from a plugin version earlier than V3.3.0 proceed as follows:
1. Perform a backup of your online shop and the database.
2. Clear the configuration cache.
3. Remove the following files and folders only:
● /app/design/frontend/base/default/layout/qpay.xml
● /app/design/frontend/base/default/template/qpay
● /app/design/adminhtml/default/default/template/qpay
● /app/code/community/Phoenix/WirecardQPay/controllers
● /app/code/community/Phoenix/WirecardQPay/etc/system.xml
I performed an update following the steps described in “Updating from versions earlier
than V3.3.0 to the current version”, however, the former payment methods are still
displayed. How can I solve this problem?
Deleting the config of the previous plugin in the database has not succeeded. You need to delete the
config manually by executing the following SQL statement “DELETE FROM core_config_data WHERE
path LIKE '%qenta%';” and clear the configuration cache again.
When does the input field “Company Trade Registration Number” appear?
The field to enter the “Company Trade Registration Number”, which applies to B2B consumers, only
appears if the consumer to your online shop has also filled in the field “Company Name”.
Your consumer gets an error message regarding a missing CVC after entering the credit
card number, even if the option for the corresponding check is not activated?
The CVC has to be used for all types of cards where a CVC is required (like Visa or Mastercard). If you
activate that check in the back-end of your shop, only cards without CVC can be used by your
consumers (like Maestro or UATP).
Is the plugin compatible with One Page Checkout?
Since there are multiple plugins offering One Page Checkout, this functionality can't be supported.
Online Guides - Integration documentation 9/9You can also read