Teaching Effectiveness Guide 2018-2019 - Prepared by Sabri Ağırman, Perihan Çayırezmez, Sinem Kasarcı, and Didem Mutçalıoğlu - İstanbul Bilgi ...
←
→
Page content transcription
If your browser does not render page correctly, please read the page content below
Teaching Effectiveness Guide
                             2018-2019

Prepared by Sabri Ağırman, Perihan Çayırezmez, Sinem Kasarcı, and Didem Mutçalıoğlu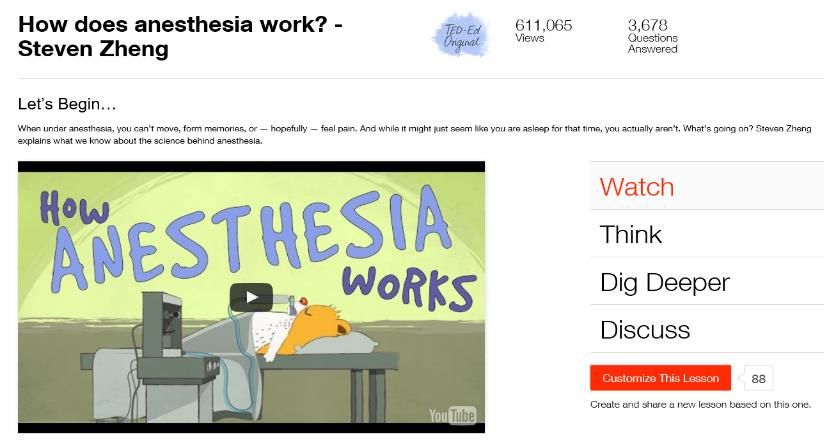
Contents
INTRODUCTION ....................................................................................................................................... 4
Student Centered Classes, Student Involvement and Active Learning ............................................... 4
COURSE DESIGN IN HIGHER EDUCATION ................................................................................................ 5
Backwards design at a glance .............................................................................................................. 5
Course Curriculum Review ................................................................................................................ 11
ENGLISH AS A MEDIUM OF INSTRUCTION (EMI)................................................................................... 12
What is EMI?...................................................................................................................................... 12
Why Do Higher Educational Institutions Prefer EMI? ....................................................................... 12
Myths about EMI ............................................................................................................................... 12
Problems that EMI Students Might Have .......................................................................................... 13
Suggestions to Make EMI Effective in the Delivery of Course Content ............................................ 13
LESSON PLANNING AND STAGES ........................................................................................................... 15
Lead-in Stage ..................................................................................................................................... 15
Lecturing Stage .................................................................................................................................. 16
Post-Lecture ...................................................................................................................................... 16
Wrap-up and Summary Stage ........................................................................................................... 16
STUDENT CENTEREDNESS AND INCREASING STUDENT INVOLVEMENT ............................................... 18
Tools to Improve Student Involvement: Bilgi Learn Blackboard ....................................................... 18
Student Centeredness ....................................................................................................................... 19
Different Uses of Simple Tools and Activities in Class....................................................................... 26
PRACTICAL AND INNOVATIVE ONLINE TOOLS AND APPLICATIONS TO SUPPORT TEACHING .............. 29
Answergarden ................................................................................................................................... 29
Kahoot! .............................................................................................................................................. 29
Quizizz................................................................................................................................................ 30
TedEd ................................................................................................................................................. 31
Prezi ................................................................................................................................................... 31
Zunal .................................................................................................................................................. 31
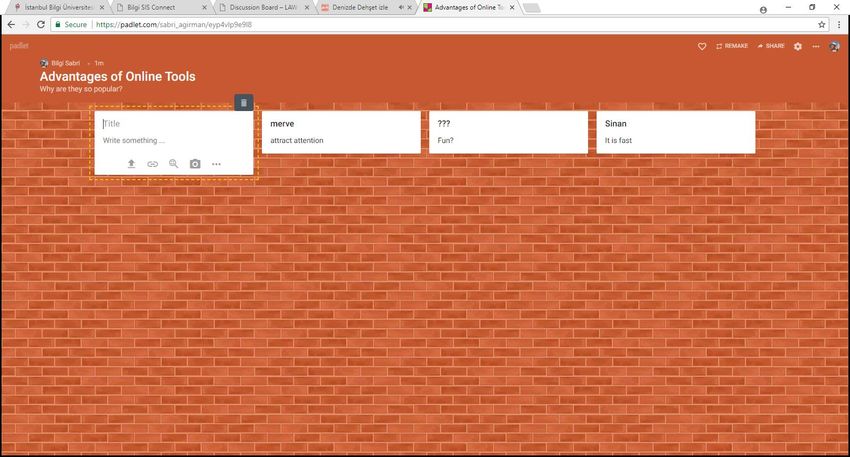
Padlet................................................................................................................................................. 32
QR Code Generator ........................................................................................................................... 33
Personal Response Systems (Clickers)............................................................................................... 33
Poll Everywhere ................................................................................................................................. 33
TEACHING LARGE CLASSES .................................................................................................................... 35
What is a Large Class? ....................................................................................................................... 35
What should I care about? ................................................................................................................ 35
Techniques and Activities to Tackle Challenges Faced in Large Classes ........................................... 36
How can I give feedback to large classes?......................................................................................... 40
How can I solve some specific problems in large classes? ................................................................ 42
GIVING FEEDBACK ................................................................................................................................. 45
What is Feedback? ............................................................................................................................ 45
Feedback for large groups during face-to-face classes: .................................................................... 45
TEACHING IN ENGLISH TO CLASSES WITH AN ENGLISH AS A SECOND LANGUAGE (ESL) PROFILE ....... 50
Field Specific Terms Glossary ............................................................................................................ 50
Delivery and Graded Language ......................................................................................................... 50
Encouraging Use of L2 ....................................................................................................................... 51
Checking understanding of content: ................................................................................................. 52
Checking understanding of instructions:........................................................................................... 53
Chunking the lecture or lesson. ......................................................................................................... 53
2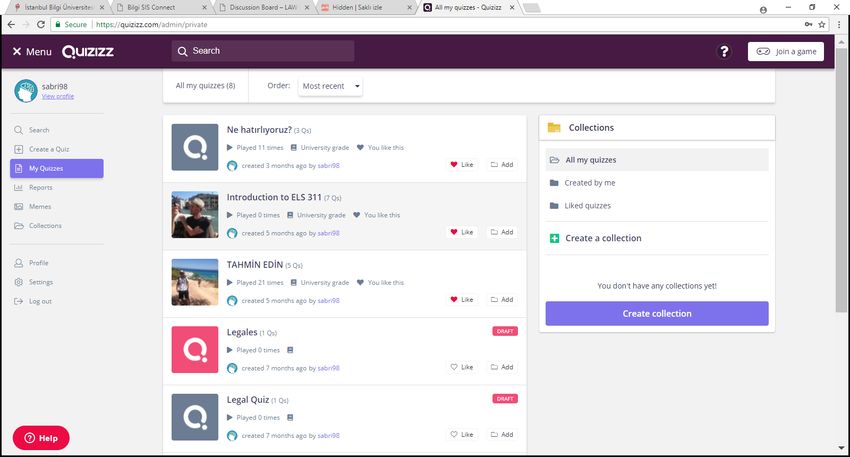
RUBRIC – WHAT, WHY, AND HOW ........................................................................................................ 54
   What is a Rubric................................................................................................................................. 54
   Components of a Rubric .................................................................................................................... 54
   Benefits of using rubrics for in-class practice.................................................................................... 55
   Four suggested steps for creating a rubric - adapted from “Creating a rubric” (n.d.) ...................... 55
   Helpful Adjectives and Adverbs to describe the Quality of Performance......................................... 56
   Tips for using rubrics ......................................................................................................................... 56
   Types of Rubrics ................................................................................................................................ 56
ONLINE TEACHING AND LEARNING ....................................................................................................... 59
   Learning Modalities in Hybridity ....................................................................................................... 59
   Things to take into consideration in Blended Courses ...................................................................... 59
   Flipped Classroom Teaching Model .................................................................................................. 60
   Online & Face-to-Face Elements of a Sample Blended Course ......................................................... 61
   Online & Face-to-Face Elements of a Sample Blended Course ......................................................... 62
   Online Teaching Activity Types.......................................................................................................... 63
   How to Design an Online Course ....................................................................................................... 66
   Principle 1: Deciding on the Learning Modality ................................................................................ 67
   Principle 2: Blending Different Expertise .......................................................................................... 67
   Principle 3: Reconsidering the Resources ......................................................................................... 67
   Principle 4: Giving Instructions & Descriptions Online...................................................................... 68
FACULTY DEVELOPMENT TRAINING OPPORTUNITIES AT BİLGİ ............................................................ 68
In-Service Trainings Provided by Bilgi Faculty ....................................................................................... 68
REFERENCES .......................................................................................................................................... 69

                                                                                                                                                      3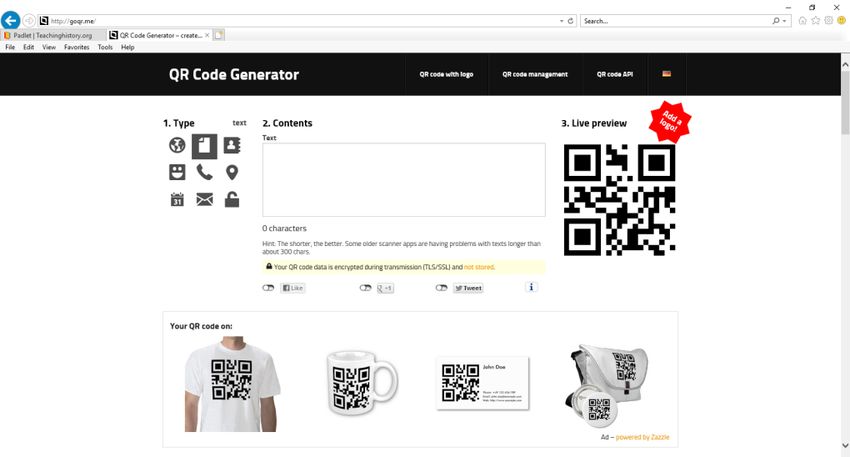
INTRODUCTION

By nature, all BİLGİ faculty members are teachers as much as they are academics. Most of our time
and energy revolves around teaching our students and finding more effective ways to educate them.
However, it is seldom the case that we receive teacher education at the outset of our careers before
we set foot into our first classes. Through experience, we usually find our own way by discovering
better teaching methods and more effective classroom management techniques.

One of the main activities at the center of a university – the classroom – has long been ignored in the
settings of higher education. It has finally become a major focus over the last decade, and higher
education institutions have started to concentrate on the classroom and learning.

The purpose of this guide is to provide you with tips and ideas on how to make your classes more
learner-focused and places where real learning occurs. While accepting such limitations like large
classes, time constraints and student profile restrictions, in this guide you will find ideas on how to
deal with such problems in a better way without sacrificing quality in your classes.

Because of the shift from a teacher and teaching-centered approach to an era where the learner and
learning is the focus, new methods and strategies have been tried out and developed. Thus, we have
endeavored to help you make your classes more learner and learning-centered, more attractive and
motivating by adapting the different models and strategies provided to you in this guide.

Student Centered Classes, Student Involvement and Active Learning

This guide is formed around the principles of a student centered education system where active
learning and student involvement are key in classroom and educational practices. The activities,
course types and delivery methods explained in this guide all aim to help you in implementing a more
student-centered approach to your teaching to ensure students are actively involved in the learning
process; thus, they are learning better.

                                                                                                          4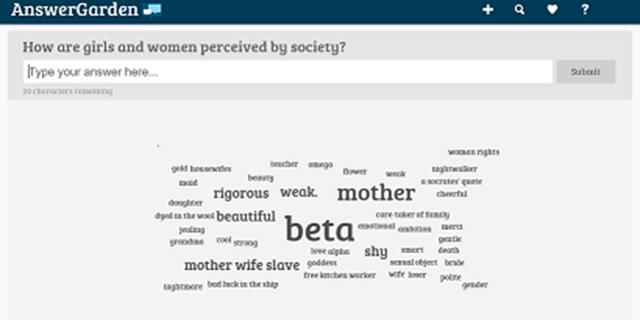
COURSE DESIGN IN HIGHER EDUCATION
Effective course design is the first and foremost step to effective classroom practices. A well-
designed course with meaningful and achievable learning outcomes and a plan to achieve these
outcomes will definitely illuminate the path to classroom pedagogy and practices. Therefore, the first
section of this guide is on Effective Course Design.

Backwards design at a glance

Backwards course design is the idea of starting to design the course by identifying the course
learning outcomes first. If you know the destination you want your students to arrive at, you will be
better able to construct a path to reach that destination, namely the course learning outcomes.
However, in constructing this path, you also need to take into consideration the contextual
limitations, the student profile, your own strengths as a teacher, and the curricular framework the
course may need to fit into.

                                                                                                  Course
  Syllabus                                                       Content                         Learning
                      Delivery            Assessment
      &                                                                                          Outcomes

    CDC                                                                                            (CLOs)

                   Student Profile / Context / Limitations / Nature of the Course

Step 1. Things to consider before writing your Course Learning Outcomes

Adapted from “Speaking of Teaching” (Center for Teaching and Learning, Stanford University, n.d.).

The student: Who are the students that will be taking this course? Will they be majors or non-
majors? Will the course be required or an elective for them? Will the students be freshmen and
sophomores? Juniors and seniors? What prior learning will they have had? What are the best ways to
find out? What assumptions about the subject might they need to unlearn? Why will the students be
taking the class (as opposed to why you hope they are taking the class)? Moreover, how will I need to
support these students based on their backgrounds, limitations and strengths?

The context: How many hours a week will I have in class and/or online? How many students will be in
each section of the course? What educational technologies can I use? How many weeks do I have?
Are there issues that might be controversial in the context, how will I deal with those?

You: What are your strengths as a teacher? Is it giving lectures, leading discussions, designing writing
assignments, and/or designing exams? How can you make use of your strengths through your course
design to help students achieve the aimed goals?

                                                                                                        5
The course: Does the course require practical application or is it a theory-based course? Will I have
small or large classrooms? Is the course part of a curricular sequence? Is this an existing course? If so,
what sort of feedback did you receive last time? What did student performance on exams and
assignments indicate about how these assignments were helping students to achieve your learning
goals for them? Alternatively, is this a new course? Then what is your vision for it? What do you hope
it will help your students to accomplish?
Step 2. Course design towards Course Learning Outcomes
In order to design your course, you need to first identify what knowledge, attitudes and skills you
hope your students will have by the end of the course you are designing. This identification will be
the base for every choice you make in your course design. Knowing the course learning outcomes
that you expect your students to achieve upon successful completion of the course will assist you in
designing your course in a way that will allow the student to accomplish the set outcomes. Your
course, the content, sequencing, course materials, assessment and delivery techniques should all be
in alignment with the course learning outcomes, and the course learning outcomes should be
reached through the course and through the activities throughout the course.
How to write course learning outcomes:
A Course Learning Outcome (CLO) is defined as particular levels of knowledge, skills, and abilities that
a student has attained because of experiences throughout a course (Ewell, 2001).
Course Learning Outcomes need to be:
specific, observable and measurable (assessable),
realistic and achievable as a result of the course,
clearly stated and well understood by students (make sense),
directing the design of curriculum, pedagogy, assignments, resources, and assessment,
visibly connected to the course elements (class sessions, assignments, readings, etc.) (Driscoll
& Wood, 2007),
in alignment with program learning outcomes (PLOs), in other words each course should be
written with the PLOs in mind to help in the achievement of the PLOs.
Learning Outcomes are not...
descriptions of learning activities,
descriptions of curriculum content.
An easy way to write course learning outcomes is to start the sentence with “Upon successful
completion of the course, students will be able to ….” and continue with an action verb and a
definition of what you expect the students to perform as a result of your course.
Some examples of CLOs:
Upon successful completion of the course, students will be able to summarize the important
features of major periods in the history of western music.
6 Upon successful completion of the course, students will be able to apply important
concepts and principles of psychology to draw conclusions about populations from samples.
Upon successful completion of the course, students will be able to describe the operations of
financial institutions and the services they provide.
Bloom’s Taxonomy of Learning and Student Learning Outcomes
In 1956, Benjamin Bloom and his colleagues published a framework for categorizing educational
goals called the Taxonomy of Educational Objectives. It has since been revised and amplified many
times, but the basic framework has stood the test of time and remains a powerful tool for classifying
levels of intellectual behavior important in learning. The taxonomy shows us both how to scaffold
learning in classrooms and how to formulate student learning outcomes at increasingly sophisticated
levels. These six categories of cognitive activity comprise the framework:
Remembering – recalling relevant terminology, facts, or different procedures related to information
and/or course topics. At this level, a student can remember something, but may not really
understand it.
Understanding – the ability to grasp the meaning of information (facts, definitions, concepts, etc.)
that has been presented.
Applying – being able to use previously learned information in different situations or in problem
solving.
Analyzing – the ability to break information down into its component parts. Analysis also refers to
the process of examining information in order to arrive at conclusions regarding cause and effect,
interpreting motives, making inferences, or finding evidence to support statements/arguments.
Evaluating – being able to judge the value of information and/or sources of information based on
personal values or opinions.
Creating – the ability to apply prior knowledge and/or skills creatively or uniquely to produce new
and original thoughts, ideas, processes, etc. At this level, students are involved in creating their own
thoughts and ideas.
Taken from “Developing Program Level Outcomes.” (n.d.)
In the next table are verbs that can be used when writing student learning outcomes for different
levels of learning as described above. Please note that the same verbs can be used at different levels
depending on the complexity of the outcome defined. In addition, the list below is just a starting
point to give you an idea, please do not feel limited to the list below.
7Remember Understand Application Analysis Evaluation Creating
copy associate apply advertise appraise adapt
define cite change analyze appraise arrange
describe classify choose appraise argue assemble
duplicate classify complete calculate assess compile
examine compare compute calculate choose compose
identify contrast construct categorize compare construct
indicate convert construct compare contrast create
know demonstrate demonstrate conclude criticize design
label describe determine contrast decide facilitate
list differentiate develop criticize defend formulate
list discuss discover debate estimate manage
locate distinguish dramatize determine evaluate modify
match explain employ diagram grade organize
memorize express establish differentiate judge perform
name extent examine distinguish measure prepare
recall infer experiment examine rate produce
recognize interpret explain experiment revise propose
record identify give examples inspect score set-up
relate locate interpret inventory select write
repeat paraphrase illustrate question summarize
reproduce recognize interpret relate value
retell relate investigate solve
select report manipulate
state research operate
underline restate organize
review practice
rewrite predict
show prepare
suggest produce
summarize relate
tell report
solve
use
Area for assessment Assessment activities may include:
classifying, categorizing and sorting information,
comparing and contrasting two events, theories and/or processes,
Skills in analysis and
analyzing, evaluating and expressing opinions,
critical thinking
investigating, collecting and analyzing data,
These skills relate to researching,
learning about ‘how’ predicting the outcome of an event and testing theories,
rather than ‘what’. debating,
participating in group discussions,
rewriting stories from a different perspective or point of view.
8Area for assessment Assessment activities may include:
paraphrasing and editing,
creating and using models,
making a diorama to illustrate an event,
Skills in application and producing a poster,
performance presenting group and individual performances,
role-playing,
These skills relate to the participating in debates,
application of
peer tutoring,
knowledge, skills and
explaining and demonstrating to others,
understanding, through
inquiry, practical and research projects,
performance.
making a video or podcast (including writing a script and film/audio
production).
concept and mind mapping to show generalizations and
relationships,
self-reflective evaluation, including journals, reflections on
processes, blogs and wikis,
Skills in evaluation participating in self-assessment, peer assessment and peer feedback
activities,
These skills relate to
creating and interpreting graphs and diagrams,
applying knowledge and
posing problems in a range of contexts,
understanding to make
evaluating research,
judgment.
writing reviews,
critiquing the value of ideas, concepts, materials and methods using
criteria,
designing a questionnaire to gather information,
making a flow chart depicting critical stages.
Taken from “Designing effective learning and assessment”. (n.d.)
Learning Outcome Checklist
____ The outcomes start with “Upon successful completion of the course, students will be able to…”
____ The outcomes have an action verb describing the desired performance of the student.
____ All outcomes are observable and measurable (assessable) (One should be able to describe ways to assess the outcomes by
looking at the statement).
____ The outcome is reached because of the course/program or work/study.
____ The statements focus on the outcomes and what the learner does, not on curricular input or what the instructor does.
____ The outcome is clear to the reader.
9Step 3. Deciding on course content and materials
Once you have written your Course Learning Outcomes (CLOs), now you can decide on the course
content, thus, choosing course material by keeping those outcomes in mind. Make sure that the
course content and materials are in alignment with the CLOs and are suitable to the student profile.
In order to ensure the alignment of CLOs and course content, a good way is to list your CLOs and
underneath each one, note the materials and the relevant content that aligns with each CLO.
Step 4. Deciding on and designing assignments and assessment tasks/methods
In order to decide on assessment methods and assignments, we suggest that you start with a list of
your CLOs and beneath each CLO, list the assignments and assessment tasks that will give your
students a chance to demonstrate that they have achieved the CLOs for the course. Making this list
will allow you to determine how well the CLOs have been achieved.
One more important point is to make sure that your assessment methods match with your CLO. To
give an example, if your CLO claims that your students will be demonstrating something, then a
multiple choice exam would not be an appropriate method to assess this outcome.
Step 5. Planning for Course Delivery
Adapted from “Speaking of Teaching” (Center for Teaching and Learning, Stanford University, n.d.)
You will find different methods and planning ideas for your course delivery in this guide. A variety of
different delivery methods will always be a motivating factor for students. If you plan your delivery
methods towards supporting your already established CLOs (instead of for the sake of providing
variety), then the structure as well as the content of our courses will have a pedagogical coherence
as well as a built-in success mechanism for students to achieve the CLOs. The delivery method should
be in alignment with and suitable for the already planned components of the course, namely the
CLOs, assessment methods, content, context and student profile.
Step 6. The syllabus and CDC (Course Data Collection) Platform
Adapted from “Speaking of Teaching” (Center for Teaching and Learning, Stanford University, n.d.)
Once you have decided on and planned all the above steps, it is now time to bring it all together to
share it with the students and others.
The syllabus and CDC are the places where you can outline the Course Learning Outcomes, the
course content, delivery methods, assessment tasks, expectations from the students as well as your
overall teaching philosophy. Since the syllabus is also an active contract with the students containing
your expectations of them as well as guidelines for succeeding in the course, be sure to include a
section in your syllabus for course and university policies (a section is already available in the CDC to
be shared with the students), such as a percentage breakdown of how graded assignments and class
participation will be factored into the final grade, an attendance and absence policy, a late papers
and revision policy, a scholar/make-up class and work policy, and a disability disclosure policy (a
ready text is available on the ECTS website).
10Course Curriculum Review
Curriculum Development is actually an endless process, after implementing all the steps above and
actually delivering the curriculum, you will be gathering data of student work throughout the term,
which will represent student achievement of the course learning outcomes you have set. Once the
term is over and probably at times during the actual delivery of the course, you might realize a
mismatch of the intended learning outcomes that you have articulated for the students and their
actual achievement. Based on evidence of such achievement (through direct evidence, which is
student performance during the course, assignments, exams etc.) and other indirect evidence like
course evaluation results, focus group meetings, grade distribution data etc., you should be revising
your course before the start of each academic year.
A desirable cycle of curriculum review both for courses and programs can be seen below.
As can be seen in the diagram above, we start our courses with the intended learning outcomes and
assumptions on how a student can achieve those, i.e. how to deliver the course. Then you have the
actual course delivery stage where you instruct and assess, in the meantime you collect evidence of
student achievement through assignments and exams, as well as through surveys and data. To plan
for the next time that you will deliver the same course, you analyze the evidence and data gathered
and revise your curriculum accordingly at the end. The cycle begins at that stage all over again.
11ENGLISH AS A MEDIUM OF INSTRUCTION (EMI)
What is EMI?
English as a Medium of Instruction (EMI) is a system that uses English as the primary medium of
instruction particularly where English is not the mother tongue of the students
(https://en.wikipedia.org/wiki/English-medium_education). In Turkey, approximately 110 out of 178
higher education institutions have EMI provision. İstanbul Bilgi University is one of those institutions
where the medium of instruction is English and it is mandatory in most of the departments and
programs.
According to CoHE (Council of Higher Education – YÖK) regulations it is a requirement for students to
be proficient in English and they have to prove it officially (e.g. TOEFL score or a score obtained from
an institutional exemption exam – Bilgi BILET) in order to study in their department / program where
English is the medium of instruction. Otherwise, it is compulsory to complete a one-year English
preparatory program (depending on the starting level).
Why do Higher Educational Institutions Prefer EMI?
The higher educational institutions use the EMI system as an opportunity to improve the quality of
education and meet students’ global needs. The following are advantages of EMI in higher education:
In today’s global world, English is the Lingua Franca and it is essential for everyone to learn
English.
Students who graduate from departments/programs that use EMI have better job
opportunities.
Students in such programs have better opportunities to attend student exchange programs
such as Erasmus.
Students can continue their academic studies abroad.
Students studying in such departments/programs can follow studies and research conducted
in English, particularly if there are no resources in their mother tongue.
Students will have the opportunity to improve their level of English.
Students will increase international communication skills and build self-confidence.
Higher education institutions aim to attract more foreign students.
Myths about EMI
Most departmental instructors might have the following misconceptions:
Instructors in departments/programs assume that the students have a good command of
English.
Departmental students must have solved language problems before they join the program.
When delivering the lecture, the instructor does not have to worry about the language
differences among students.
It is the responsibility of the English preparatory program to help students reach the
intended level of language proficiency and possess certain academic skills.
EMI instructors do not have a mission to help students improve their level of English.
12Problems that EMI Students Might Have
EMI is a new system for most students, particularly for those that had to study in a preparatory
program before they began their academic life. Therefore, they may feel frustrated and become
demotivated. The following can be regarded as some major problems for students in an EMI context:
Content-specific Vocabulary: This type of vocabulary is new even in students’ native language
(L1).
High Level of English in Authentic Materials: Such materials are not prepared for pedagogical
purposes and therefore they include complex structures and advanced vocabulary, which
hinders comprehension.
Difficulties at Maintaining Focus and Motivation in an L2 Environment: Following lectures in
L2 can be a great challenge; this can be difficult even in L1 as students learn a new content.
High Level of English as Part of Classroom Language: The lecturer’s complex instructions,
lengthy explanations and the choice of language (structure, vocabulary, formality level, etc.)
may discourage students.
Delivery of Comprehensive Content: In most cases, instructors are concerned about teaching
the curricular content in a limited period, and therefore they may give excessive input
through lengthy lectures during the class time.
Suggestions to Make EMI Effective in the Delivery of Course Content
EMI is a challenge for both students and the instructors. However, instructors can turn this process
into an advantage. The following suggestions can be helpful for EMI instructors:
Encourage your students to create a glossary for content-specific vocabulary. Start it as a
model using online tools such as Blackboard Glossary Tool and other external online tools
(see, ‘Practical Innovative Online Tools and Applications to Support Teaching’ section).
As mentioned in the above section, students are expected to read authentic materials and
listen to such lectures during the class. This may lead to comprehension problems. Assign
your students to read simpler texts in the content that you are planning to deliver so that
your students become familiar with the content to be taught in class (see, ‘Flipped Classroom
Teaching Model’ section). Remember to give a purpose and ask them to do a task to give
your students a reason to read.
Use simpler language as part of classroom language. Simplify grammar and vocabulary when
giving classroom instructions. Avoid lengthy statements and explanations. Break lengthy
instructions into shorter stages.
Attract attention using different tones of voice, audio materials and visuals.
Praise your students. Praise in L1 could be an effective tool (if you do not have a
heterogeneous class).
Help your students personalize the input you give. Your personal experience and students’
real life experiences can be more memorable.
13 Tell anecdotes in English. Share your previous learning experiences with students.
Grade your language according to the students’ language level. Stick to commonly used
vocabulary in lectures, if it is not the content vocabulary.
Give short class time breaks to help students recollect their attention, which is called ‘Me
Time’ during which the instructor gives students an opportunity to think, organize class
notes, revise, prepare and ask questions, or discuss with peers. Remember that learners’
attention span, even at this level, is limited to 25-30 minutes.
During the lecture, paraphrase and repeat when you think there might be confusion.
Stop and ask questions somewhere in the middle to check if students have understood
before you move on to the next stage.
Wrap up before moving on to the next stage/topic.
Ask a student to repeat the instruction to model other students.
Change the activity if it does not work.
Use technology to involve and engage more students particularly in large classes (see,
‘Practical Innovative Online Tools and Applications to Support Teaching’ section).
Get oral/written feedback from students on what was ‘difficult, easy, useful, etc.’ on a
regular basis.
14LESSON PLANNING AND STAGES
When learning stages are considered, students at the initial stage are not aware of what they do not
know. Therefore, when a lesson is being planned, the instructor must consider this fact. Because the
content they are supposed to study is something completely new, the aims of the lesson should be
clear. At the beginning of the lesson, the instructor needs to communicate what the students are
going to learn that day, and why they need to learn it.
Dividing a lesson into certain stages is helpful for your lesson to flow smoothly; this breakdown will
ease your life, save time and lead to a more effective learning environment. Below are parts of a
lesson, stages, and some practical ideas on what could be done at each stage to make teaching
efficient and effective:
Lead-in Stage
As the initial stage, a lead-in is an inevitable integral part/stage of lesson planning and execution. It is
the stage where the instructor can make a smooth transition between the previous lesson and the
next lesson. This stage is necessary to engage students in the lesson, attract their attention, motivate
them to participate actively, and prepare students for the next lesson.
At this stage, you need an engagement activity in order to warm up your students and prepare them
to receive your lecture/class. An engagement activity takes 5-10 minutes. It also helps people settle
down, deals with late comers and attracts the students’ attention.
One of the most useful techniques at this stage is elicitation; here are some elicitation suggestions:
Alternative 1. Reflect a picture or image that could represent the main concept of the previous
class (or, alternatively, as a prediction tool for the basic concept of the new lesson/lecture), give
students some thinking time (30 seconds) and then pair students to talk/discuss the picture and see
what and how much they remember. This will create a link with the previous lesson.
Alternative 2. Write a key word (the title of an article) on the board that might represent the main
concept of your new lecture, give students some thinking time to predict, ask students to share what
they think in pairs/groups, and let them share with the rest of the class.
Alternative 3. Write a startling statement or a quote related to the lesson content to initiate class
discussion.
Alternative 4. Write a pop-quiz question on the board, ask them to answer it on a piece of paper;
randomly choose some answers, read them aloud to the class and let them discuss.
Alternative 5. Show a short video related to the main concept of your previous (or current)
lecture/lesson, and have your students discuss a related issue; remember to give your students a
purpose to watch the video.
15Alternative 6. Link the new lesson and material to the previous class, and your students’ prior
knowledge.
Lecturing Stage
It is the main body of the lesson. Some tips, activities and techniques can be suggested:
Give two-minute pauses after every 20 minutes of your lecture. This ‘Me Time’ can be used
for taking notes or a question-answer session with classmates.
Stop and pose questions time to time to involve students.
Monitor your students (are they taking any notes, are they listening, etc.).
Assign a student as a class note-taker, and have students take turns taking notes; ask the
note-taker to organize notes and share it with all classmates (e.g. note-taker may post it
online).
Prepare a handout with key points (e.g. an outline of your lecture) and leave space for your
students to fill in their notes during the lecture.
Give a short extract from an original text of the content and ask students to think: 1) What
did the writer say before this? 2) What did the writer say after this paragraph?
Present the text of your lecture and ask your students to go over the text and write 2-3
questions that they think the text answers.
Post-Lecture
This is the stage where you can involve your students in more interaction and communication.
Students can express their personal opinions, exchange opinions with their peers and evaluate what
they have learned.
Introduce a case related to the content; divide your class into groups (of 3-5 students), assign
roles to the group members, pose guiding questions for group discussion or problem
solution.
Prepare a set of interesting pictures, images, symbols that could represent the topic/subject
of the day and give a set to a group of 3-5 students. Each group member randomly chooses a
picture and talks about the picture with the rest trying to create a link with the topic studied
that day.
Wrap-up and Summary Stage
This is the stage where the instructor summarizes the main key points and checks how much learning
has taken place.
Here are some tips, activities and techniques that could help the instructor:
Step 1. Ask students to write 3-4 things they have learned that day (it could be words, phrases,
concepts, statements. You should guide students towards your expected responses).
16Step 2. Ask students to write a 'One Summary Sentence' that could represent the main
points/ideas of the day's lesson.
Step 3. Conduct a short Kahoot quiz (5-7 multiple-choice items) to check what students have
learned.
Step 4. Ask each student (or pairs/groups) to write the muddiest point of the lesson on a post-it
and submit it to the instructor (See, Muddiest Points).
Step 5. Deliver a self-reflection sheet to help students see what they have learned. The self-
reflection sheet may include question items such as, 'What is the most
important/interesting point you have learned today?', 'What was the most difficult part in
this lesson?', 'How much did you speak in this lesson, and why?', etc.
Step 6. Start an online forum discussion to encourage students to ask at least one question about
the week's/month's lesson(s) and respond to at least 2 students' questions/responses.
Step 7. Distribute an exercise of True/False statements on the topic studied and ask students to
answer individually. Then tell students to compare their answers in pairs. For an entire
class check, you can ask students to raise their right/left hand for True/False decisions.
Kahoot can be an alternative tool to check answers.
Step 8. Prepare a set of True/False statements about the content of your lecture, read them out
and ask students to fill in a Yes/No Chart and correct the answers if they are not true
(listening activity). Have them do a peer check and randomly check the whole class.
Finally, show the answer key and give feedback on problematic items.
Step 9. Show the title/topic of the next lesson and ask students to make predictions about the
next lesson (T-P-S). This will create a link with the next lesson.
17STUDENT CENTEREDNESS AND INCREASING STUDENT INVOLVEMENT
If students do not think that their class time is being used effectively with meaningful activities,
believe that they do not need to come to class to be successful or to learn the course content, that
they can just learn everything at home by studying the readings and notes, then they will not see the
point in coming to class as they will feel it does not add to their learning or to their grades.
In order to motivate students to come to class, during class time they should be doing things and
learning in a way that they could not if they did not come to class. You can have embedded
assessment tools within your course, have activities for students in class that help them learn in a
much better way than just reading at home and create a classroom environment where students are
active and have the opportunity to show that they learn at different points in class during the term.
As a result, they will feel the desire to come, enjoy classes more and find class time much more
meaningful. We have shared samples of such activities in the guide under different sections, and
below.
Lectures are traditionally thought to be a method to present an overview of a topic and transfer
information that students lack, thus, most lectures are in the form of a ‘teacher to students’
interaction pattern. However, lectures can be engaging and students can be active participants.
What is Student Involvement?
Teachers usually associate the concept of student involvement with ‘speaking’ and they complain
that their students are not usually involved in class because only a few of them speak. Moreover,
teachers who have very large classes claim that it is impossible to involve all students. However,
student involvement is not necessarily limited to speaking only. The concept of involvement includes
other actions and cognitive notions besides speaking. Active thinking and cognitive involvement are
essential for classroom involvement. If students are thinking actively, they are involved in the lesson.
Therefore, teachers must design their activities/tasks to make them think actively. Learning is a
process not an outcome, and so is active thinking. Besides, students need to ‘make meaning’ rather
than receive meaning. The teacher is not supposed to transfer meaning. It must be the students’
responsibility to create meaning from the input. ‘Personalization’ is another aspect that promotes
increased student involvement. If students can attach what they have learned with their own real
life, they are more interested and therefore they are involved more even if they do not speak (see,
‘Personalization of Information’ section). Students may not be talking but they can be involved in
class by doing things (e.g. writing, watching, acting, thinking, reasoning etc.).
In addition, students’ involvement is not limited to classroom learning activities. It is important that
students be involved in other curricular activities and assessment.
The following Blackboard tools are useful to increase student involvement:
Tools to Improve Student Involvement: Bilgi Learn Blackboard
The following Blackboard Tools promote student involvement and student-centered classes;
Discussion Board and Forum Discussions
18 Blackboard Collaborate
Wikis
Journals
Blogs
Retention center (feedback for the instructor)
Student Centeredness
A student-centered classroom is a place where students take responsibility for their own learning. In
a student-centered classroom, students are actively involved in classroom activities and they take
responsibility for their own learning. This is particularly important for teachers who have large
classes, as they may not be able to reach every student. Characteristics of a student-centered
classroom can be summarized as follows:
Students are independent learners.
There is interaction among students.
Students ask questions and make judgements.
Students teach each other (peer learning).
Students are in charge of decision-making (choice of activity, content, assessment,
assignments, etc.).
There is collaboration among students (pair-work, group work, team projects, etc.).
The teacher reports to the students on their performance and students report to the
teacher (reciprocal feedback).
The teacher is an observer and guide.
Some in-class techniques/activities that will help make lessons (particularly in the form of lectures)
more interactive and students more engaged can be listed as follows:
The Pause Procedure
During the delivery of a formal lecture particularly in large classes, students are usually passive as
they are receivers of information, some of whom are taking notes. Actually, students’ attention span
is limited and therefore they need 2-3 minute breaks after every 20-25 minutes. However, during this
2-3 minute silent period, students are not supposed to remain passive, and they should be involved
in me-time activities during which they take notes, revise their notes, jot down any unclear points or
ask questions, etc. (Rowe, 1980; 1986; Ruhl, Hughes, & Schloss, 1980).
Such a break is also useful for slow learners and those who have missed some points. It is an
opportunity for them to get help from their friends and the instructor.
19Prediction Techniques
At the beginning of the class, while introducing the topic/content of that class, the instructor may use
prediction techniques instead of directly introducing the topic.
Alternative 1. For example, the title of a text could be displayed and students can be asked to
predict what they might be studying.
Alternative 2. Alternatively, the instructor may display some pictures, graphs, images or symbols to
elicit the topic/content. Such prediction techniques can be useful to attract students’ attention and
engage them in class.
If you teach large classes, prediction techniques could be used in a variety of ways to involve all
students during the prediction stage of your lesson.
Alternative 1. For example, students can offer predictions on online tools such as Kahoot/Padlet
(see, ‘Practical and Innovative Online Tools and Applications to Support Teaching’ section), or they
can write their predictions on flip charts in groups and explain their rationale.
Alternative 2. Alternatively, divide your students into groups, give each group a key word related to
the content/topic of the lecture, and ask them to make predictions. After that, each group chooses a
spokesperson to discuss their prediction with the rest of the class. Other groups listen to each group
and contribute according to their own key word and prediction.
It is important that the teacher confirms or rejects any prediction before the lecture. In order to
ensure that the prediction process is complete, ask students to check if their predictions were correct
after the lecture.
Think-Pair-Share (T-P-S)
As a collaborative learning strategy, T-P-S is a technique to increase student participation and involve
as many students as possible, particularly in large classes.
Step 1. The instructor poses a question or a problem. Students are given some time to consider their
responses (Think).
Step 2. Then, they are asked to discuss their responses with their partners (Pair).
Step 3. Next, pairs report their outcome and ideas to the rest (Share), which may lead to a whole
class discussion.
Please note that, in large classes it is not possible for every pair or group to share their responses
orally with the entire class. As in most cases, we do not need every student to respond to the
instructor and the whole class orally.
Sometimes, it will be reasonable if they exchange their spoken responses/answers in a smaller group.
Then, more practical tools could be used to receive and share every student's/pair's/group's
responses (e.g. Kahoot). Alternatively, they can e-mail their responses to the instructor and the
20instructor shares all responses with the entire class and uses it as a feedback tool. If you have a
considerably large class, inform the students that you will display the three quickest e-mails to make
it competitive (but ensure that you reward them - if there is a contest, there should be a reward).
Muddiest Point Paper
Step 1. Give each student a post-it, preferably towards the end of the class and ask them to write the
point that was the most unclear to them. It is advisable to display the question in writing (e.g. ‘What
was the most unclear point in today’s class?’ or ‘What was the most difficult point in today’s class?’).
Students stick their post-it paper (e.g. on the wall).
Step 2. In order not to waste class time, the instructor collects and reads all the muddiest points
after class.
The data collected from the students’ answers can lead to a quick review for the next class. This may
also serve as a good classroom assessment tool.
In large classes, it may be difficult to get such feedback from students. Alternatively, this could be
done online. Students may post their muddiest point (or their questions) to forum discussions, or use
online tools such as ‘Answer Garden’ (see, ‘Practical and Innovative Online Tools and Applications to
Support Teaching’ section).
Question-Answer Technique
This is a traditional way to engage students in class and usually the instructor poses a question to the
entire class. When this is the case, it is usually the strong students who respond to questions and
most students remain silent. One reason for this is that most students feel they have to answer
immediately, which is also difficult to do in real life. Therefore, the students will need some 'think
time and wait time'. Thus, everyone can find and organize his/her answer.
To avoid this, we can give ‘Thinking Time / Waiting Time’ before expecting an answer.
For example, before you pose the question you can say, "You'll see a question shortly. Read the
question silently, think about your answer for a minute, and write down key words for your answer.
Do not shout out your answer before the minute is up. Now, here's the question." Questions that
require judgement engage students more than information seeking students. In addition,
encouraging students to ask questions at the beginning of the lesson can be engaging.
Here are two ways to do this:
Alternative 1. A student asks the question to another student, a student asks questions to other
students, students ask questions to a student, students ask questions to the teacher, etc. Then the
class becomes more interactive and involving.
21Alternative 2. After introducing the topic/content/title of the class, ask students to write down a
question individually; then, group your students and ask them to choose the best question to pose to
the class. Either you can collect questions for further use, or students can ask their questions to the
rest of the class at the end of the lesson. You may need to check the groups’ questions for
appropriateness and meaningfulness.
Student Generated Questions
This is a useful technique if the instructor has introduced the topic/content of the class earlier and
assigned some readings related to it.
Step 1. Ask students to prepare one or two questions related to the subject of the class and stick
their questions on the walls before the class starts.
Step 2. At the end of the lesson, ask them to remove the question(s) resolved during the class and
keep those that still need answers.
Step 3. Finally, collect the rest of the questions to use as a resource for further teaching purposes.
An alternative version:
Step 1. After introducing the topic/content of the class, ask students to write one or two questions
(in pairs or groups preferably, if the class size is large) and keep them until the end of the class.
Step 2. During the wrap-up stage, check if they have an answer. If not, they pose their questions (the
instructor may choose a variety of strategies to answer those questions).
Press Conferencing
This could be done on a monthly basis as a classroom routine (or alternatively, at the end of a unit).
Step 1. Inform your students that you are going to hold a press conference (on what has been
covered so far, or a certain topic/content) next class and ask students to prepare a limited number of
questions in groups (2-3 questions).
Step 2. Students need to spend a reasonable amount of preparation time to ensure the quality of the
questions. In addition, the teacher may need to have trained students on what type of questions are
good for press conferences.
Step 3. During the press conference, give class groups a couple of minutes to go over their questions
and to choose the best question to ask.
Step 4. Assign one student as a mediator of the conference because you will act as a guest speaker.
Step 5. The mediator will assign one group to pose the question to the guest speaker (instructor).
22Step 6. Other groups listen to the question because they cannot ask the same or a similar question. If
this is the case, they will have to change their question.
Step 7. A conference secretary can also be assigned to take notes of the questions and the
instructor's answers and submit it to the instructor.
Step 8. Then, the instructor checks and revises the notes and posts them as a 'Conference Summary'.
KWL Technique
This three-stage strategy guides students through the lesson. These stages are:
“K” – Know: ‘What do I know about the topic/content?’ Do this at the beginning of the class
using elicitation techniques.
“W” – Want: ‘What do I want to know more about this topic/content?’ Do this before you
start your instruction/lecture.
“L” – Learned: ‘What have I learned about this topic/content?’ Do this after your
instruction/lecture.
In practice, you can create a KWL chart on which students record their own information at each
appropriate stage. This could be done individually, but students can compare their chart in
pairs/groups. In large classes, on the other hand, this could be done in small groups by filling out KWL
charts on flip charts on the walls. Students can also walk around and read other groups’ charts.
Below is a sample KWL Chart:
What I know What I want to know What I learned
It keeps us from floating What is gravity? Gravity is the force that
around. pulls objects towards
Earth.
It makes things fall. Why is there less gravity on
the moon? The amount of gravity
There is less gravity on the depends on the masses of
moon. How did Newton discover the objects involved. The
gravity? moon is a lot less massive
Isaac Newton discovered than the earth, so there is
gravity. less gravity on the moon
What determines how fast
than there is on earth.
something will fall to the
ground? (teacher question)
Air resistance determines
how fast something will
fall to the ground.
Taken from http://www.nea.org/tools/k-w-l-know-want-to-know-learned.html
23You can also read