2020 VAAL PRODUCT CATALOGUE - Lixil Africa
←
→
Page content transcription
If your browser does not render page correctly, please read the page content below
VAAL
PRODUCT CATALOGUE

                    2019 | 2020
DUCTION
INTRO
          With over 70 years of expertise Vaal Sanitaryware is chosen by
          discerning homeowners who consider home improvement an
          investment in their family and their future, while insisting on timeless
          quality, durability, comfort and aesthetic appeal.

          Vaal Sanitaryware is one of the most widely known and recognisable
          of all ceramic sanitaryware products on the South African market.
          Only the best raw materials go into manufacturing Vaal Sanitaryware
          products, which are expertly moulded and crafted in our Vaal factory.
          Now 100% owned by LIXIL, we have access to the knowledge,
          capabilities, product platforms and manufacturing excellence of the
          biggest and most innovative sanitaryware company in the world. This,
          combined with a wealth of local industry knowledge, experience and
          skills, will ensure we continue to make a significant impact in the
          industry.

          I would like to take this opportunity to thank all our customers, who
          have played an integral role in building our brand and look forward to
          continuing our success story with you.

          Yours sincerely
          John Westermeyer
          Chief Marketing Officer, LIXIL Africa
ABOUT US                                                                   OUR
                                                                           EXPERTISE

     Vaal Sanitaryware has been a go-to brand among South African          Technology
     homeowners and contractors for decades and has been producing
     ceramic sanitaryware since 1946. Since then, the brand has evolved    Vaal merges the intelligence and precision of German and Japanese technology
     thanks to its commitment to improvement through quality,              to produce a range of products that meet world-class quality standards, applying
                                                                           the latest in high-pressure casting, glazing and pressure testing technology to its
     human-centred design, reliability and affordability.
                                                                           manufacturing processes. Uncompromising quality control reassures users that
                                                                           their Vaal Sanitaryware products will last a lifetime.
     Known for its timeless quality, durability, comfort and aesthetic
     appeal, Vaal is the brand of choice for the most discerning           Quality/Certification
     consumers.
                                                                           Vaal Sanitaryware is known across South Africa and around the world as a
     Vaal’s wide range of basins, toilets and urinals extends beyond       brand to be trusted, with its products being one of the most widely known and
     domestic use and includes products designed for commercial and        recognisable of all ceramic sanitaryware products on the market. Only the best
     industrial cloakrooms, hotels, shopping centres, hospitals and        raw materials go into manufacturing Vaal Sanitaryware products, which are
     laboratories. Vaal also offers customised solutions to consumer and   expertly moulded and crafted in the Vaal factory.
     commercial markets.
                                                                           SABS

                                                                           All Vaal products conform to SABS 497 requirements and align with numerous
                                                                           international standards, including European Norm (EN) standards, assuring
                                                                           customers of its longstanding commitment to reliable quality and safety
                                                                           standards. The factory is also SABS ISO9001 compliant

                                                                           Vaal also offers comprehensive plumber training facilities to ensure its products
                                                                           are installed correctly every time.

                                                                           Responsibility

                                                                           Vaal has conducted extensive research into the field of water-saving, resulting in
                                                                           the development of a 4, 5-litre flushing cistern, 6/3 litre dual-flush cisterns, and
                                                                           Waterless urinals. In this way, Vaal hopes to play its part in helping conserve one
                                                                           of the world’s most precious natural resources and make a positive contribution
                                                                           towards helping the water crisis South Africa is currently experiencing.
ORGANISATIONAL 2008
Introduced
Waterless
TIMELINE
Urinals
1873 1946 1950 1971 1979 1991
Carl
Nestler, the
Vaal Sanitaryware
started
Friedrich Grohe
infiltrated the
Day-Nite Plastics
was renamed as
Libra began
manufacturing
GROHE
goes public 2015
technological manufacturing South African Plexicor and started bathroom and buys LIXIL takes over
leader for sanware market producing acrylic products in Eichelberg management
thermostats bathroom fittings Cape Town of GROHE
was founded - leading to the Dawn Water
production of baths
1943 1956 in 1974 1982 Technology
Vaal Potteries GROHE acquires The GROHE
started off by Carl Nestler, plant in
manufacturing creating the Edelburg,
ornaments, subsidiary GROHE Hemer opens
ashtrays and Thermostat GmbH
crockery
1940 1960 1980 2000 2020
1880 1950 1970 1990 2010
1954 2017
Consolidated
Brassware
1986 LIXIL wholly
acquires GROHE
changed it’s Independent Dawn Water
name to Cobra Cobra was born Technology
Water Technology
1936 1948 1980
2014
Friderich
Grohe buys
B&P was
renamed after
1951 1961 Isca was
created by Yigal GROHE
Berkenhoff &
Paschedag
Friedrich Grohe
Armaturenfabrik
Consolidated
Brassware was
GROHE expands
internationally
Yaretzkey and
Avi Schacher
1995 Dawn Water
Technology was
established by Introduced formed
Friedrich Grohe Waterless
and Paul Schults Toilets
1994 2018
Developed Introduction of
4.5L Flushing Water Efficent
Aquasave Rimless
Toilet Toilets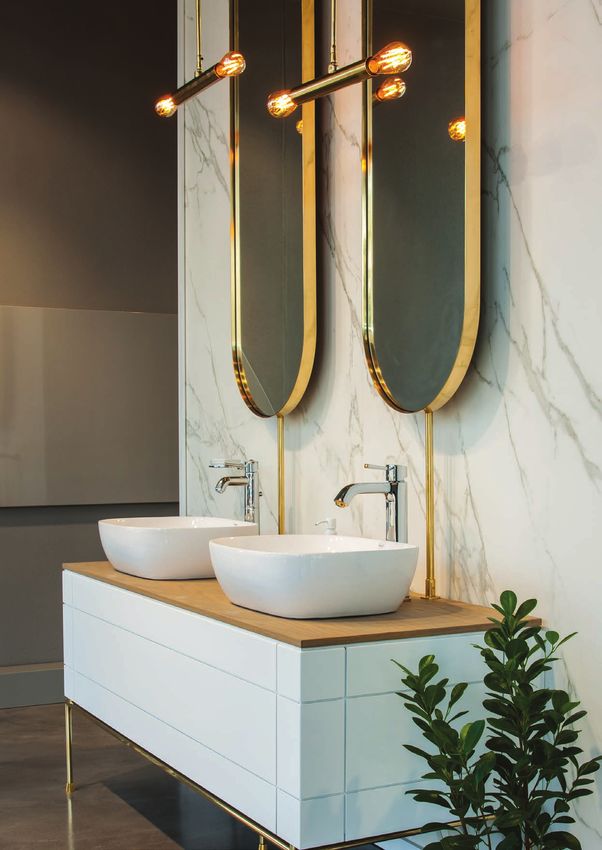
GLOSSARY +
                                                                                                                 Product Market Segments:
                                                                                                                 Vaal products are produced to satisfy the needs of a variety of market segments or project types.
                                                                                                                 The below shows the various market segments serviced by the Vaal product portfolio.

  GUIDELINE TABLE
                                                                                                                 In the catalogue section of this book, the appropriate market segments attributed to each product are denoted by the
                                                                                                                 relevant icon.
                                                                                                                            Health Facilities

                                                                                                                            This segment includes public and private hospitals, clinics, frail care facilities, veterinary hospitals and
                                                                                                                            doctors’ rooms.
                     Products bearing this mark have met all requirements of the relevant South African
                     National Standards (SANS) standard and have been certified by the South African Bureau of              Residential
                     Standards (SABS).
                                                                                                                            This includes high, medium and entry-level housing.

                     Products bearing this mark were manufactured and/or assembled in manufacturing                         Government
                     facilities where the quality management systems have been SABS ISO 9001 certified.
                                                                                                                            This segment includes the Department of Public Works and Department of Correctional Services; South
                                                                                                                            African Police Services; Departments of Human Settlements, Health, Basic Education; Department of
                                                                                                                            Higher Education and Training; Department of Defence; Department of Rural Development; South African
How to read the product catalogue:                                                                                          Revenue Services; Department of Sport and Recreation and the Department of Transport.

                                                      PRODUCT NAME                OPTIONAL ITEMS
                                                                                                                            Hospitality
                                                      Product short description   OPTIONAL ITEMS Code 1
                                                      Product code                OPTIONAL ITEMS 1 Description              This segment includes hotels, guest houses, guest lodges, inns, self-catering lodges and convention
                                                      SAP Code                    OPTIONAL ITEMS Code 2                     centres.
                                                      Barcode                     OPTIONAL ITEMS 2 Description
  Product Image           Line Drawing                Product long description
                                                                                  SPARES FOR PRODUCTS                       Commercial or Industrial
                                                                                  Spares Part Code 1
                                                                                  Spares Part 1 Description                 Included in this segment is office buildings, petrol garages, warehouses, factories, shopping centres,
                                                                                                                            shopping malls, retail outlets, sports facilities and distribution centres.

                                                         FC    VC

                            Product Finish Icon                         SABS Approval      Relevant Market
                                                                                            Segment Icon

Product Finish:                                                                         Material Composition:

                                   Bermuda                           Whisper
         White                                                                            FC        Fireclay
                                   Blue                              Grey

                                                                     Whisper                        Vitreous
         Avocado                   Beige                                                  VC
                                                                     Pink                           China
PRODUCT CARE &                                                                                    THE WARRANTY WILL BE VOIDED UNDER THE FOLLOWING CONDITIONS:

MAINTENANCE
                                                                                                  •   Products used with water pH falling outside of the guidelines set by the Department Of Water Affairs
                                                                                                      and Forestry or similar body.
                                                                                                  •   Products not installed by a registered or accredited installer.
                                                                                                  •   Products used with, or included in installations where water temperatures are outside of the
                                                                                                      temperature range stipulated for that product, or as laid down in the Standards for water supply and
                                                                                                      drainage (SANS 10252 & 10254) or an equivalent international standard.
Basins                                                                                            •   Products not installed according to manufacturer’s installation instructions or according to valid Water
Clean the basin with soap and water, as and when required. Should stubborn dirt prevail, a            Regulations and general good plumbing practice;
slightly abrasive cleaning material such as “Handy Andy” may be used.                             •   Products which have failed as a result of dirt or debris in pipe-work which has not been flushed prior to
                                                                                                      the use of terminal fittings.
Toilets                                                                                           •   Where a defect is attributable to the incorrect use or incorrect handling of the product;
Clean the ceramic pan with soap and water, as and when required. Should stubborn dirt             •   Where routine maintenance has been neglected.
prevail, a slightly abrasive cleaning material such as “Handy Andy” may be used.                  •   If spare parts other than the original spare parts are used during repairs or maintenance of the
The same applies to a polypropylene or thermoset toilet seat. Should a wooden toilet seat be          product;
used, a damp cloth must be used to clean the seat. No abrasive material must ever be used.        •   If damage was caused by transport by a third party transporter.
The inside of the cistern should be kept free of dirt, as it could hamper the performance of      •   If the surface of the product has been scratched;
the flush valve and the inlet valve. Should either of these valves malfunction, ensure that any   •   Products used or intended for display purposes.
dirt has been removed from all of the seals.                                                      •   If consumables (e.g. filters, filter cartridges, aerators or batteries) or material subject to wear and tear
                                                                                                      (such as seals or hoses) are affected;
Urinals                                                                                           •   If product damage is as a result of chemicals and cleaning agents, lime-scale build-up, aggressive
Clean the urinal with soap and water, as and when required. Should stubborn dirt prevail, a           environmental influences, or disruptions resulting in damage which are caused by freezing or lime-
slightly abrasive cleaning material such as “Handy Andy” may be used.                                 scale build-up.
                                                                                                  •   If the defect is caused by specific environmental circumstances (e.g. excess or negative pressure in the
Baths and Shower Trays                                                                                line, excess voltage or under voltage on the line);
Clean the shower tray with soap and water, as and when required. Should stubborn dirt             •   If the defect is attributable to wilful or negligent damage to the product by the user or a third party.
prevail, Brasso may be used.
                                                                                                  LIXIL reserves the right to review any specific case in order to assess the validity of this warranty. LIXIL
Maintenance                                                                                       may charge a discretionary service fee of R350-00 when called out to inspect products which are not LIXIL
The frequency and extent of maintenance required for this product varies according to             products or where there is an illegitimate claim.
prevailing site and operational conditions. No regular maintenance is required and spare
parts are available for key components.                                                           THE WARRANTY IS VALID FOR:

LIXIL Africa Service call centre contact: 0861 21 21 21                                           •   20 years Taps & Mixers, Wastes, Capillary- and Compression fittings
LIXIL Africa Service E-Mail: 		           service.africa@lixil.com                                •   5 years Showerheads
Web site:				www.lixil.co.za                                                                      •   2 years Electronic Mixers components and Valves
                                                                                                  •   2 years Valves (Geyser and Toilet)
                                                                                                  •   10 years Cobra-Safe multi-layer pipe system (must be used with Cobra compression fittings and
                                                                                                      Cobra-Safe inserts or warranty shall be void)
                                                                                                  •   10 years all baths, shower trays and vanities, except Tanya, Widestar and Scarlett baths which carry a
                                                                                                      5 year warranty

WARRANTY
                                                                                                  •   20 years on baths with Amanzonite coating
                                                                                                  •   10 years on all sanitaryware
                                                                                                  •   6 months on all toilet seats supplied by Vaal Sanitaryware

                                                                                                  MISCELLANEOUS:
LIXIL Africa warrants that their products will be clear of material and manufacturing
defects. Appraisal of the above will be done against ruling manufacturing specifications and      This warranty shall apply in the above-mentioned scope and subject to the above-mentioned prerequisites.
standards at the date of manufacture. Defective product will be repaired or exchanged at          Proof of purchase will be required.
LIXIL Africa’s sole discretion. LIXIL Africa shall not be liable for indirect or consequential
loss or damage.                                                                                   This LIXIL warranty is carried by LIXIL Please contact our Service Department on 0861 212121 for warranty
                                                                                                  enquiries or further warranty information.
TABLE OF
CONTENTS
01 03
BASINS 15 URINALS 70
Wall hung and pedestal basins 16
Vanity basins 22
Pedestals 34
04
Brackets 36 HOSPITAL AND LABORATORY 76
Accessories 38
02 WATER CLOSETS AND BIDETS
Close coupled suites
40
42
Semi-close coupled suites 50
Bidets 51
Low level pans 52
Exposed cisterns 56
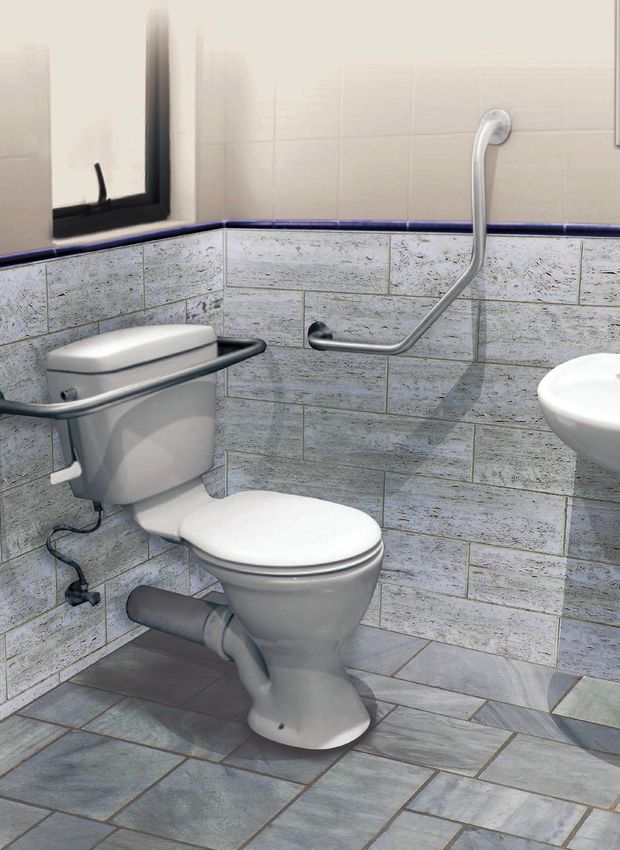
Assisted water closet suites and grab rails 58
Wall hung pans 62
Back to wall pans 67
BASINS

                                                                                          BASINS
01
      Wall hung and pedestal basins               16   			 HR Symmetry Square		 		   28
     		Amber Classic			 			                       17   			Mini Weaver					           29
            Bantam								                        17   			 Midi Weaver				           29
     		Concorde 630							                        17   			Weaver 0TH					            29
     		Daisy									                             18   			 Weaver 1TH				            30
     		Flamingo								                           18
     		Hibiscus								                           19    Semi-drop in:
     		Springbok								                          20   			Azalea 510 					           30
     		Tuscany								                            20   			Azalea 540					            30
     		Kite									                              20
     		Emerald corner							                      21    Under mount:
     		Raven								                              21   			Cardinal					              32
     		                                                			President					             32
      Vanity basins                               22   			Quail 					                32
            Drop-in:                                   			Snipe						                33
     				Cameo					                               23   			       James Butler				    33
      			Concorde 						                          23
      			             Concorde Slimline				       23   Pedestals								             34
      			Jade Art 						                          24
      			Iceberg 						                           24   Basin brackets                36
      			Zircon Art 						                        24
                                                       Accessories                   38
         Counter top:
        			Alto Art 						                        26
        			Emerald 						                         26
        			Oriele 						                          26
        			Perla							                           27
        			         Savannah Design 				          27
        			Savoy Design 					                     27
        			Swift 							                          28
        			         HR Symmetry Rectangular 			   28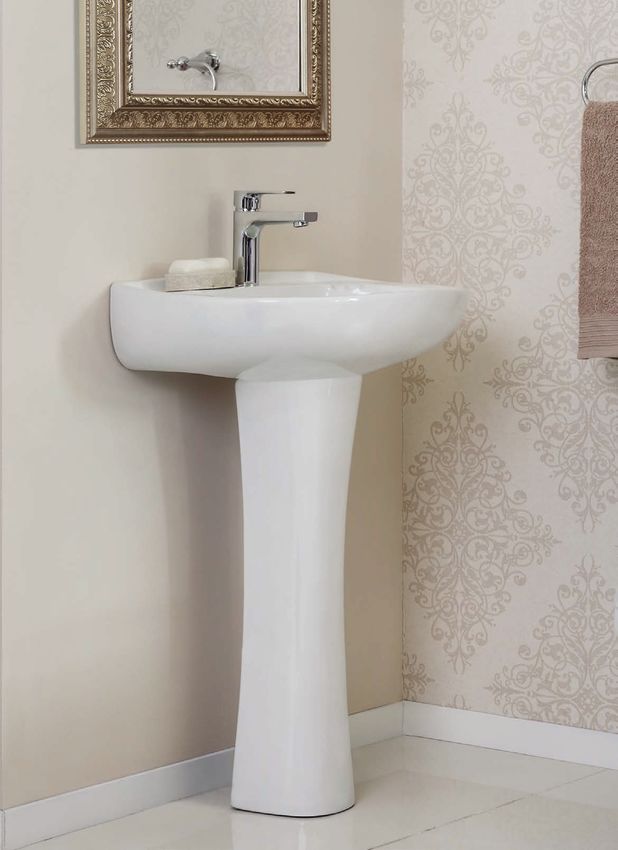
AMBER CLASSIC                                      OPTIONAL ITEMS
     WALL HUNG BASIN                                    1. 8448Z000
                                                           10mm fixing bolt set
     700303WH
     CAMBAJ31-2COO413                                   2. 715000WH
     6005826032147                                         Classic Full Pedestal
     510 x 440mm rounded basin with three
     semi-punched tapholes, (i.e. available             3. 715222WH

                                                                                                           BASINS
     in zero, one, two or three taphole                    Universal half pedestal
     configurations), integrated overflow and
     chain stay hole through the centre semi-
     punched taphole.

     INSTALLATION INSTRUCTIONS                          Option 3:
     The basin may be installed by alternative          Using half pedestal, install basin
     methods:                                           as per Option 1. Ensure wall
                                                        contact area of the pedestal does
     Option 1:                                          not foul pipework. Place pedestal
     Place basin level against finished wall            in position and mark fixing hole
     surface at correct height and mark fixing hole     positions. Remove pedestal and
     positions. Remove basin and drill holes. Attach    drill holes. Place pedestal back in
     bolts to wall, fit basin and secure.               position, insert plugs and screws.
     NOTE: Do not over tighten.                         Attach CP caps.

     Option 2:                                          SPECIAL RECOMMENDATIONS
     When installed on a Classic pedestal,              Always use silicone sealant or equivalent around
     place basin on pedestal in correct position,       basin edges and between basin and finished wall
     secure basin to the wall, then use                 surface area for a secure and neat installation.
     silicone sealant or equivalent                     Wipe off excess sealant and allow to dry.
     under pedestal foot and between
     back of basin and finished wall
     surface.

             FC      VC

     BANTAM                                             OPTIONAL ITEMS
     WALL HUNG BASIN                                    1. 8448Z000
                                                           10mm fixing bolt set
     703003WH
     CBABAJ21-2COO413
     6005826000146

     455 x 290mm basin with two semi-punched
     tapholes (i.e. available in zero, LHS, RHS
     or two taphole configurations), integrated
     overflow and chainstay hole.

     INSTALLATION INSTRUCTIONS                          SPECIAL RECOMMENDATIONS
     The basin is fixed to the wall by using two        Always use silicone sealant or equivalent around
     10 mm bolts. Place basin level against             basin edges and between basin and finished wall
     finished wall surface at correct height and        surface area for a secure and neat installation.
     mark fixing hole positions. Remove basin           Wipe off excess sealant and allow to dry.
     and drill holes. Attach bolts to wall, fit basin
     and secure.
     NOTE: Do not over tighten

             FC      VC

     CONCORDE 630                                       OPTIONAL ITEMS
     WALL HUNG BASIN                                    1. 8448Z000
                                                           10mm fixing bolt set
     702400WH
     CCO63J31-2CO0413                                   2. 715000WH
     6005826069099                                         Classic Full Pedestal

     630 x 500mm rectangular basin with three           3. 715222WH
     semi-punched tapholes                                 Universal half pedestal
     (i.e. available in zero, one, two or three
     taphole configurations), integrated
     overflow, and chainstay hole through the
     centre semi-punched taphole.

     INSTALLATION INSTRUCTIONS                          and between back of basin and finished wall
     The basin may be installed by alternative          surface.
     methods:
                                                        Option 3:
     Option 1:                                          Using half pedestal, install basin as per Option
     Place basin level against wall surface             1. Ensure wall contact area of the pedestal
     at correct height and mark fixing hole             does not foul pipework. Place pedestal
     positions. Remove basin and drill holes.           in position and mark fixing hole positions.
     Attach bolts to wall, fit basin and secure.        Remove pedestal and drill holes. Place
     NOTE: Do not over tighten.                         pedestal back in position, insert plugs and
                                                        screws. Attach CP caps.
     Option 2:
     When installed on Classic pedestal, place          SPECIAL RECOMMENDATIONS
     basin on pedestal in correct position.             Always use silicone sealant or equivalent
     Secure basin to the wall, then use silicone        between basin and finished wall surface area
     sealant or equivalent under pedestal foot          for secure and neat installation.

             FC     VC

16                                                                                                    17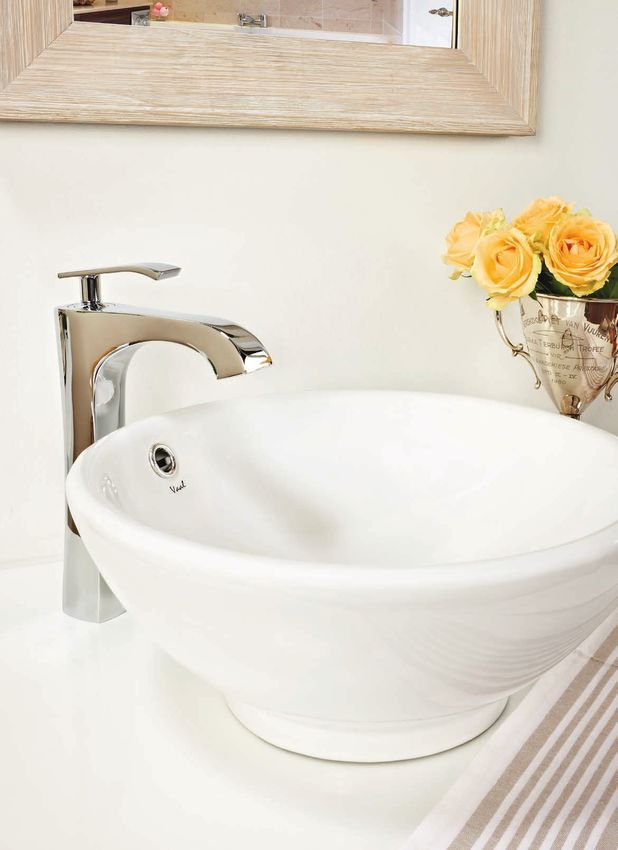
BASINS
DAISY OPTIONAL ITEMS
WALL HUNG BASIN 1. 8448Z000
10mm fixing bolt set HIBISCUS OPTIONAL ITEMS
700803WH WALL HUNG BASIN
CDA51J31-2CO0413 2. 715000WH
6005826000733 Classic pedestal 702303WH 1. 8448Z000
CHI51031-2CO0413 10mm fixing bolt set
510 x 400mm semi-rectangular
3. 715222WH 6005826001020 2. 715000WH
basin with three semi-punched tapholes
Universal half pedestal Classic pedestal white
(i.e. available in zero, one, two or three
taphole configurations), integrated 3. 715222WH
overflow, and chainstay hole through the Universal half pedestal
centre semi-punched taphole.
702303AV 1. 8448Z000
CHI51031-4TO0413 10mm fixing bolt set
INSTALLATION INSTRUCTIONS Option 3: 6005826001082 2. 715000AV
The basin may be installed by alternative Using half pedestal, install basin as per Classic pedestal avocado
methods: Option 1. Ensure wall contact area of the
pedestal does not foul pipework. Place 702303BB 1. 8448Z000
Option 1: pedestal in position and mark fixing hole CHI51031-1AO0413 10mm fixing bolt set
Place basin level against wall surface positions. Remove pedestal and drill holes. 6005826001051 2. 715000BB
at correct height and mark fixing hole Place pedestal back in position, insert plugs Classic pedestal bermuda blue
positions. Remove basin and drill holes. and screws. Attach CP caps.
Attach bolts to wall, fit basin and secure. 702303BE 1. 8448Z000
NOTE: Do not over tighten. SPECIAL RECOMMENDATIONS CHI51031-0AO0413 10mm fixing bolt set
Always use silicone sealant or equivalent 6005826001037 2. 715000BE
Option 2: around basin edges and finished wall surface Classic pedestal beige
When installed on Classic pedestal, place area for secure and neat installation.
basin on pedestal in correct position. 702303WG 1. 8448Z000
Secure basin to the wall, then use silicone CHI51031-1IO0413 10mm fixing bolt set
sealant or equivalent under pedestal foot 6005826001105 2. 715000WG
and between back of basin and finished Classic pedestal wisper grey
wall surface.
702303WP 1. 8448Z000
CHI51031-0CO0413 10mm fixing bolt set
FC VC 6005826001044 2. 715000WP
Classic pedestal wisper pink
510 x 405mm rounded basin with three
semi-punched tapholes (i.e. available
FLAMINGO OPTIONAL ITEMS in zero, one, two or three taphole
WALL HUNG BASIN 1. 8448Z000 configurations), integrated overflow, and
10mm fixing bolt set chainstay hole through the centre semi-
700703WH punched taphole.
CFM56031-2CO0413 2. 715000WH
6005826000887 Classic pedestal
560 x 405mm semi-rectangular basin 3. 715222WH
with three semi-punched tapholes (i.e. Universal half pedestal
available in zero, one, two or three taphole
configurations), integrated overflow, and INSTALLATION INSTRUCTIONS and between back of basin and finished wall
chainstay hole through the centre semi- The basin may be installed by alternative surface.
punched taphole. methods:
Option 3:
Option 1: Using half pedestal, install basin as per
Place basin level against wall surface Option 1. Ensure wall contact area of the
at correct height and mark fixing hole pedestal does not foul pipework. Place
INSTALLATION INSTRUCTIONS Option 3: positions. Remove basin and drill holes. pedestal in position and mark fixing hole
The basin may be installed by alternative Using half pedestal, install basin as per Attach bolts to wall, fit basin and secure. positions. Remove pedestal and drill holes.
methods: Option 1. Ensure wall contact area of the NOTE: Do not over tighten. Place pedestal back in position, insert plugs
pedestal does not foul pipework. Place and screws. Attach CP caps.
Option 1: pedestal in position and mark fixing hole Option 2:
Place basin level against wall surface positions. Remove pedestal and drill holes. When installed on Classic pedestal, place SPECIAL RECOMMENDATIONS
at correct height and mark fixing hole Place pedestal back in position, insert plugs basin on pedestal in correct position. Always use silicone sealant or equivalent
positions. Remove basin and drill holes. and screws. Attach CP caps. Secure basin to the wall, then use silicone between basin and finished wall surface area for
sealant or equivalent under pedestal foot secure and neat installation.
Attach bolts to wall, fit basin and secure.
NOTE: Do not over tighten. SPECIAL RECOMMENDATIONS
Always use silicone sealant or equivalent
Option 2: around basin edges and finished wall surface FC VC
When installed on Classic pedestal, place area for secure and neat installation.
basin on pedestal in correct position.
Secure basin to the wall, then use silicone
sealant or equivalent under pedestal foot
and between back of basin and finished
wall surface.
FC VC
18 19EMERALD CORNER OPTIONAL ITEMS
SPRINGBOK OPTIONAL ITEMS CORNER BASIN 1. 8448Z000
WALL HUNG BASIN 1. 8118Z000 10mm fixing bolt set
2 x semi concealed brackets 706100WH
703102WH CEMBAJCO0399
CSPBAJBA-2CO0413 SPARES FOR PRODUCT
6005826060102
6005826002485 1. 8767Z000
CP overflow ring
310x430mm rounded basin with 1 taphole
550x400mm rectangular basin with 2
BASINS
and integrated overflow.
tapholes, integrated overflow and chainstay
hole. Fitted to the wall on 2 x semi-
concealed cast iron brackets.
INSTALLATION INSTRUCTIONS is level. Mark fixing hole positions. Remove
INSTALLATION INSTRUCTIONS SPECIAL RECOMMENDATIONS Basin may be installed by alternative basin and drill holes. Attach one bolt to
Place basin level against finished wall Always use silicone sealant or equivalent
methods: wall. Fit basin then attach second bolt and
surface at correct height. Position semi- between basin and finished wall surface area
for secure and neat installation. secure.
concealed brackets and mark for fixing Option 1:
holes. Remove basin and fix brackets to Place basin on a vanity surface over pre- SPECIAL RECOMMENDATIONS
wall using rawl bolts or similar. Using cut outlet hole. Fit waste and fasten nut Always use silicone sealant or equivalent
silicone sealant or equivalent between back under the vanity surface. between basin and finished wall surface area
of basin and finished wall surface, place for secure and neat installation.
basin on brackets ensuring basin is level. Option 2:
Place basin level against finished wall
surface in the corner of the room, ensuring
FC VC that the top of splash-back on both walls
TUSCANY OPTIONAL ITEMS FC VC
WALL HUNG BASIN 1. 8448Z000
10mm fixing bolt set
700603WH
CTU56031-2CO0413 2. 715000WH RAVEN
6005826002515 Classic pedestal RECESSED BASIN
560x415mm rounded basin with 3 semi- 701201WH
punched tapholes, integrated overflow and 3. 715222WH
CRABAA4N-2CO0413
chainstay through the centre semi-punched Universal half pedestal
6005826040197
taphole.
465mmx155mm recessed basin with 1
taphole on the right hand side. No overflow
or chainstay hole.
INSTALLATION INSTRUCTIONS Option 3:
The basin may be installed by alternative Using half pedestal, install basin as per
methods Option 1. Ensure wall contact area of the
pedestal does not foul pipework. Place
Option 1: pedestal in position and mark fixing hole
Place basin level against wall surface positions. Remove pedestal and drill holes.
INSTALLATION INSTRUCTIONS Option 2:
at correct height and mark fixing hole Place pedestal back in position, insert plugs
The basin may be installed by alternative Chase out area marked as per Option 1.
positions. Remove basin and drill holes. and screws. Attach CP caps.
methods: Complete tiling then apply a liberal layer
Attach bolts to wall, fit basin and secure.
of silicon sealant or equivalent around the
NOTE: Do not over tighten.
Option 1: entire back of the basin surround. Place
SPECIAL RECOMMENDATIONS
Always use silicone sealant or equivalent
Position basin against wall at required basin into recess and position firmly against
Option 2:
between basin and finished wall surface area height and mark around recessed back tiles, ensuring that the basin is level. Wipe
When installed on Classic pedestal, place
for secure and neat installation. section of basin. Chase out the area surplus silicone off tiles.
basin on pedestal in correct position.
marked (size approximately 310 x 440mm
Secure basin to the wall, pedestal in
wide and 50mm deep). Fit basin into
correct position. Secure basin to the wall,
recessed wall, ensuring that the basin is
pedestal foot and between back of basin
level and positioned so that finished tile
and finished wall surface.
surface will line up with back of splashback
surround. Secure and grout basin into
recess. Tile around basin.
FC VC
FC VC
KITE OPTIONAL ITEMS
CORNER BASIN 1. 8126Z000
2 x pressed wall hanger brackets
700100WH
CKIBAE31-2CO0399
6005826040203
470x415mm corner basin with 3 semi-
punched tapholes, integrated overflow and
chainstay through the centre semi-punched
taphole.
INSTALLATION INSTRUCTIONS
Place basin level against finished wall
surface in the corner of the room, ensuring
that the top of splash-back on both walls SPECIAL RECOMMENDATIONS
is level. Always use silicone sealant or equivalent
between basin and finished wall surface area
Position hanger brackets and mark fixing for secure and neat installation.
holes. Remove basin and fix brackets to
wall then fit basin onto hanger brackets.
FC VC
20 21CAMEO OPTIONAL ITEMS
DROP IN BASIN 1. 8784Z000
Overflow attachment
702803WH
CRABAA4N-2CO0413
6005826000238
595x455mm oval drop-in basin with 3
semi-punched tapholes and chainstay
BASINS
through the centre semi-punched taphole.
No integrated overflow, but overflow
attachment available on request.
INSTALLATION INSTRUCTIONS SPECIAL RECOMMENDATIONS
When mounted into a bathroom cabinet Ensure basin is adequately sealed so as to
or vanity slab, ensure that the surface is prevent seepage into below vanity slab.
level and secured firmly against the wall.
Apply a liberal layer of silicone sealant or
equivalent between the contact area of the
surface and basin self-rimming surface.
Place the basin into position and wipe off
excess sealant and allow to dry.
FC VC
CONCORDE DROP IN
DROP IN BASIN
702704WH
CCOBAJBA-2CO0404
6005826060607
580x510mm rectangular drop-in basin with
3 semi-punched tapholes. Supplied without
an overflow or chainstay hole.
INSTALLATION INSTRUCTIONS SPECIAL RECOMMENDATIONS
When mounted into a bathroom cabinet Ensure basin is adequately sealed so as to
or vanity slab, ensure that the surface is prevent seepage into below vanity slab.
level and secured firmly against the wall.
Apply a liberal layer of silicone sealant or
equivalent between the contact area of the
surface and basin self-rimming surface.
Place the basin into position and wipe off
excess sealant and allow to dry.
FC VC
CONCORDE SLIMLINE SPARES FOR PRODUCT
DROP IN BASIN 1. 8767Z000
CP overflow ring
704700WH
CCODIB63-2CO0402
6005826050035
560x390mm rectangular drop-in basin
with integrated overflow. No provision for
tapholes.
INSTALLATION INSTRUCTIONS SPECIAL RECOMMENDATIONS
When mounted into a bathroom cabinet Ensure basin is adequately sealed so as to
or vanity slab, ensure that the surface is prevent seepage into below vanity slab.
level and secured firmly against the wall.
Apply a liberal layer of silicone sealant or
equivalent between the contact area of the
surface and basin self-rimming surface.
Place the basin into position and wipe off
excess sealant and allow to dry.
FC VC
22 23JADE ART SPARES FOR PRODUCT
DROP IN BASIN 1. 8767Z000
CP overflow ring
706400WH
CJABABNN-2CO0400
6005826060119
450x450mm round basin with integrated
overflow. No provision for tapholes.
BASINS
INSTALLATION INSTRUCTIONS Place the basin into position and wipe off
Basin may be installed by alternative excess sealant and allow to dry.
methods:
SPECIAL RECOMMENDATIONS
Option 1: Ensure basin is adequately sealed so as to
Place basin on a vanity surface over pre- prevent seepage into area below vanity slab.
cut outlet hole. Fit waste and fasten nut
under the vanity surface.
Option 2:
When mounted into a bathroom cabinet
or vanity slab, ensure that the surface is
level and secured firmly against the wall.
Apply a liberal layer of silicone sealant or
equivalent between the contact area of the
surface and basin self-rimming surface.
FC VC
ICEBERG
DROP IN BASIN
703400WH
CICBABNN-2CO0402
6005826001334
420x420mm round drop-in basin with
no provision for tapholes or integrated
overflow.
INSTALLATION INSTRUCTIONS SPECIAL RECOMMENDATIONS
When mounted into a bathroom cabinet Ensure basin is adequately sealed so as to
or vanity slab, ensure that the surface is prevent seepage into area below vanity slab.
level and secured firmly against the wall.
Apply a liberal layer of silicone sealant or
equivalent between the contact area of the
surface and basin self-rimming surface.
Place the basin into position and wipe off
excess sealant and allow to dry.
FC VC
ZIRCON ART SPARES FOR PRODUCT
DROP IN BASIN 1. 7058Z000
Zircon plate
705900WH
CZIBAJNN-2CO0400
6005826060089
590x390mm oval drop-in basin with
no provision for tapholes or integrated
overflow.
INSTALLATION INSTRUCTIONS SPECIAL RECOMMENDATIONS
When mounted into a bathroom cabinet Ensure basin is adequately sealed so as to
or vanity slab, ensure that the surface is prevent seepage into area below vanity slab.
level and secured firmly against the wall.
Apply a liberal layer of silicone sealant or
equivalent between the contact area of the
surface and basin self-rimming surface.
Place the basin into position and wipe off
excess sealant and allow to dry.
FC VC
24 25ALTO ART PERLA
COUNTER TOP BASIN COUNTER TOP BASIN
706800WH 706500WH
CALBAJNN-2CO0400 CPERBABA-2CO0413
6005826060225 6005826060133
475x370mm rectangular counter top basin 630x410mm oval counter top basin with
with no provision for tapholes or integrated no provision for tapholes or integrated
BASINS
overflow. overflow.
INSTALLATION INSTRUCTIONS SPECIAL RECOMMENDATIONS
Place basin on a vanity surface over pre- Ensure basin is adequately sealed so as to
cut outlet hole. Fit waste and fasten nut prevent seepage into area below vanity slab.
INSTALLATION INSTRUCTIONS SPECIAL RECOMMENDATIONS under the vanity surface.
Place basin on a vanity surface over pre- Ensure basin is adequately sealed so as to
cut outlet hole. Fit waste and fasten nut prevent seepage into area below vanity slab.
under the vanity surface.
FC VC
FC VC
SAVANNAH DESIGN SPARES FOR PRODUCT
COUNTER TOP BASIN 1. 8767Z000
CP overflow ring
EMERALD OPTIONAL ITEMS 706300WH
COUNTER TOP BASIN 1. 8111Z000 CSABAJN1-2CO0400
Emerald concealed bracket 6005826060140
703201WH
CEMBAJ11-2CO0400 2. 8448Z000 420x420mm round counter top basin
6005826004717 10mm fixing bolt set with integrated overflow. No provision for
tapholes.
415x500mm round counter top basin with 1
taphole and integrated overflow.
INSTALLATION INSTRUCTIONS SPECIAL RECOMMENDATIONS
Place basin on a vanity surface over pre- Ensure basin is adequately sealed so as to
cut outlet hole. Fit waste and fasten nut prevent seepage into area below vanity slab.
Option 2: under the vanity surface.
INSTALLATION INSTRUCTIONS Place basin on vanity surface over pre-cut
The basin may be installed by alternative outlet hole. Fit waste and fasten nut under
methods: the vanity surface.
Option 1: SPECIAL RECOMMENDATIONS
Place basin level against finished wall Apply silicone sealant or equivalent around
surface at correct height and mark fixing basin edges, and between basin and finished
hole positions. Remove basin and drill wall surface area for a secure and neat
holes. Loosely attach concealed bracket to installation. Wipe off excess sealant and
basin waste. Attach bolts to wall, fit basin allow to dry.
and secure bracket to basin waste.
FC VC
FC VC
SAVOY DESIGN
COUNTER TOP BASIN SPARES FOR PRODUCT
1. 8767Z000
706700WH CP overflow ring
CSVBAJN1-2CO0400
6005826060157
ORIELE SPARES FOR PRODUCT 415x415mm round counter top basin
COUNTER TOP BASIN 1. 8767Z000 with integrated overflow. No provision for
CP overflow ring tapholes.
704301WH
COLBAA41-2CO0400
6005826040395
INSTALLATION INSTRUCTIONS SPECIAL RECOMMENDATIONS
500x400mm rectangular counter top basin Place basin on a vanity surface over pre- Ensure basin is adequately sealed so as to
with 1 taphole and integrated overflow. cut outlet hole. Fit waste and fasten nut prevent seepage into area below vanity slab.
under the vanity surface.
INSTALLATION INSTRUCTIONS SPECIAL RECOMMENDATIONS
The basin is installed onto a vanity surface Apply silicone sealant or equivalent around
over a pre-cut outlet hole. Fit waste and basin edges for a neat and secure installation.
fasten nut under the vanity surface. Wipe off excess sealant and allow to dry.
FC VC
FC VC
26 27MINI WEAVER OPTIONAL ITEMS
COUNTER TOP BASIN 1. 8448Z000
10mm fixing bolt set
706600WH
CWEBMJ41-2CO0400
6005826060126
SWIFT SPARES FOR PRODUCT
COUNTER TOP BASIN 1. 8767Z000 335x290mm rectangular counter top basin
CP overflow ring with 1 taphole. No integrated overflow.
BASINS
704401WH
CFSBAA41-2CO0400
6005826046418
580x390mm oval counter top basin with 1
taphole and integrated overflow. INSTALLATION INSTRUCTIONS positions. Attach bolts to wall, fit basin and
The basin may be installed by alternative secure.
methods: NOTE: Do not over tighten.
Option 1: SPECIAL RECOMMENDATIONS
Place basin on a vanity surface over pre- Always use silicone sealant or equivalent
cut outlet hole. Fit waste and fasten nut. between basin and nished wall surface area for
secure and neat installation.
INSTALLATION INSTRUCTIONS SPECIAL RECOMMENDATIONS
Place basin on a vanity surface over pre- Ensure basin is adequately sealed so as to Option 2:
cut outlet hole. Fit waste and fasten nut prevent seepage into area below vanity slab. Place basin level against wall surface
under the vanity surface. at correct height and mark fixing hole
FC VC FC VC
MIDI WEAVER OPTIONAL ITEMS
COUNTER TOP BASIN 1. 8448Z000
10mm fixing bolt set
HR SYMMETRY RECTANGULAR 706601WH
COUNTER TOP BASIN CWEBXJN1-2CO0400 SPARES FOR PRODUCT
6005826050585 1. 8767Z0
704800WH CP overflow ring
CSY390NN-2CO0401 450x350mm rectangular counter top basin
6005826064452 with 1 taphole and integrated overflow.
483x393mm rectangular counter top basin
with no provision for tapholes or integrated
overflow.
INSTALLATION INSTRUCTIONS SPECIAL RECOMMENDATIONS
Basin may be installed by alternative Always use silicone sealant or equivalent
INSTALLATION INSTRUCTIONS SPECIAL RECOMMENDATIONS methods between basin and finished wall surface area
Place basin on a vanity surface over pre- Ensure basin is adequately sealed so as to for secure and neat installation.
cut outlet hole. Fit waste and fasten nut prevent seepage into area below vanity slab. Option 1:
under the vanity surface. Place basin on a vanity surface over pre-
cut outlet hole. Fit waste and fasten nut.
Option 2:
Place basin level against wall surface
at correct height and mark fixing hole
positions. Attache bolts to wall, fit basin
and secure.
FC VC NOTE: Do not over tighten.
FC VC
WEAVER 0TH OPTIONAL ITEMS
HR SYMMETRY SQUARE
COUNTER TOP BASIN 1. 8448Z000
COUNTER TOP BASIN
10mm fixing bolt set
702500WH
704900WH
CWEBXJN1-2CO0400
CSY400NN-2CO0401 2. 8131Z3000
6005826040364
6005826064278 Weaver/Sola concealed bracket with
575x455mm rectangular counter top basin 10mm bolt
405x405mm counter top basin with no
with integrated overflow. No provision for
provision for tapholes or integrated SPARES FOR PRODUCT
tapholes.
overflow. 1. 8767Z000
CP overflow ring
INSTALLATION INSTRUCTIONS SPECIAL RECOMMENDATIONS
Place basin on a vanity surface over pre- Ensure basin is adequately sealed so as to
cut outlet hole. Fit waste and fasten nut prevent seepage into area below vanity slab. INSTALLATION INSTRUCTIONS holes. Remove basin and fix bracket to
under the vanity surface. The basin may be installed by alternative wall using bolt supplied. Apply a rapid
methods: hardening compound to the flat contact
area of the bracket. Using silicone sealant
Option 1: or equivalent between back of basin and
Place basin on vanity surface over pre-cut finished wall surface, place basin on
outlet hole. Fit waste and fasten nut under bracket ensuring basin is level. Fit basin
the vanity surface. waste, and secure bracket to basin waste.
Option 2: SPECIAL RECOMMENDATIONS
Place basin level against finished wall Always use silicone sealant or equivalent
surface at correct height. Position semi- around basin edges for a secure and neat
concealed bracket and mark for Fixing installation. Wipe off excess sealant and allow
FC VC
to dry.
FC VC
28 29WEAVER 1TH OPTIONAL ITEMS
COUNTER TOP BASIN 1. 8448Z000
10mm fixing bolt set
704201WH
CWEB1TBA-2CO0401 2. 8131Z300
6005826040401 Weaver/Sola concealed bracket with
10mm bolt
575x455mm rectangular counter top basin
with 1 taphole and integrated overflow.
BASINS
SPARES FOR PRODUCT
1. 8767Z000
CP overflow ring
INSTALLATION INSTRUCTIONS hardening compound to the flat contact
The basin may be installed by alternative area of the bracket. Using silicone sealant
methods: or equivalent between back of basin and
finished wall surface, place basin on
Option 1: bracket ensuring basin is level. Fit basin
Place basin on vanity surface over pre-cut waste, and secure bracket to basin waste.
outlet hole. Fit waste and fasten nut under
the vanity surface. SPECIAL RECOMMENDATIONS
Always use silicone sealant or equivalent
Option 2: around basin edges for a secure and neat
Place basin level against finished wall installation. Wipe off excess sealant and allow
surface at correct height. Position semi- to dry.
concealed bracket and mark for Fixing
holes. Remove basin and fix bracket to
wall using bolt supplied. Apply a rapid
FC VC
AZALEA 510 SPARES FOR PRODUCT
SEMI DROP IN BASIN 1. 8767Z000
CP overflow ring
705803WH
CAZ54J54-2CO0318
6005826068207
510x500mm rectangular semi-drop-
in basin with 1 taphole and integrated
overflow.
INSTALLATION INSTRUCTIONS SPECIAL RECOMMENDATIONS
When mounted into a bathroom cabinet Ensure basin is adequately sealed so as to
or vanity slab, ensure that the surface is prevent seepage into area below vanity slab.
level and secured firmly against the wall.
Place basin into surface. Ensure basin is
level, by using wooden or plastic spacers
if required. Apply silicone sealant or
equivalent around basin edges for a neat
and secure installation. Wipe off excess
sealant and allow to dry.
FC VC
AZALEA 540 SPARES FOR PRODUCT
SEMI DROP IN BASIN 1. 8767Z000
CP overflow ring
705700WH
CAZ54J54-2CO0318
6005826060065
540x450mm rectangular semi-drop-
in basin with 1 taphole and integrated
overflow.
INSTALLATION INSTRUCTIONS SPECIAL RECOMMENDATIONS
When mounted into a bathroom cabinet Ensure basin is adequately sealed so as to
or vanity slab, ensure that the surface is prevent seepage into area below vanity slab.
level and secured firmly against the wall.
Place basin into surface. Ensure basin is
level, by using wooden or plastic spacers
if required. Apply silicone sealant or
equivalent around basin edges for a neat
and secure installation. Wipe off excess
sealant and allow to dry.
FC VC
30 31CARDINAL OPTIONAL ITEMS
UNDERMOUNT BASIN 1. 8125Z000
4 x undermount basin brackets
700200WH
CCRBAJN1-2CO0423 SPARES FOR PRODUCT
6005826040142 1. 8767Z000
CP overflow ring
470x360mm Undermount basin with
integrated overflow. No provision for
BASINS
tapholes.
INSTALLATION INSTRUCTIONS sealant or equivalent to unglazed contact
Position basin under rectangular cut-out of area of basin and place in final position.
vanity slab or under bathroom cabinet top, Slide the support bracket into place, thereby
ensuring that overhang is evenly spaced. suspending the basin. Tighten locking bolts
With basin correctly positioned, mark hole so as to ensure a watertight seal between
positions of the support brackets. Remove basin and underside of vanity top. Clean off
basin and drill previously marked bracket any surplus sealant.
screw holes. NOTE: Do not use epoxy. SNIPE
NOTE: Care must be taken to ensure that UNDERMOUNT BASIN OPTIONAL ITEMS
holes do not penetrate through slab. SPECIAL RECOMMENDATIONS 1. 8125Z000
700900WH 4 x undermount basin brackets
Ensure basin is adequately sealed so as to
CSNBAJNN-2CO0423
The support brackets may now be screwed prevent seepage into area below vanity slab.
6005826040173 SPARES FOR PRODUCT
into place. Apply a liberal layer of silicone
1. 8767Z000
510x380mm Undermount basin with
integrated overflow. No provision for CP overflow ring
FC VC tapholes.
PRESIDENT OPTIONAL ITEMS INSTALLATION INSTRUCTIONS sealant or equivalent to unglazed contact
UNDERMOUNT BASIN 1. 8125Z000 Position basin under rectangular cut-out of area of basin and place in final position.
4 x undermount basin brackets vanity slab or under bathroom cabinet top, Slide the support bracket into place, thereby
703900WH ensuring that overhang is evenly spaced. suspending the basin. Tighten locking bolts
CPRBAJNN1-2CO0423 With basin correctly positioned, mark hole so as to ensure a watertight seal between
6005826001969 positions of the support brackets. Remove basin and underside of vanity top. Clean off
basin and drill previously marked bracket any surplus sealant.
580x410mm Undermount basin with screw holes. NOTE: Do not use epoxy.
integrated overflow. No provision for NOTE: Care must be taken to ensure that
tapholes. holes do not penetrate through slab. SPECIAL RECOMMENDATIONS
Ensure basin is adequately sealed so as to
The support brackets may now be screwed prevent seepage into area below vanity slab.
into place. Apply a liberal layer of silicone
INSTALLATION INSTRUCTIONS sealant or equivalent to unglazed contact
Position basin under oval cut-out of vanity area of basin and place in final position.
FC VC
slab or under bathroom cabinet top, Slide the support bracket into place, thereby
ensuring that overhang is evenly spaced. suspending the basin. Tighten locking bolts
With basin correctly positioned, mark hole so as to ensure a watertight seal between
positions of the support brackets. Remove basin and underside of vanity top. Clean
basin and drill previously marked bracket off any surplus sealant. NOTE: Do not use
JAMES OPTIONAL ITEMS
screw holes. NOTE: Care must be taken to epoxy. BUTLER SINK 1. BO-WST-STRAINER
ensure that holes do not penetrate through
90mm basket strainer waste
slab. SPECIAL RECOMMENDATIONS 236001WH
Ensure basin is adequately sealed so as to CJBBAJN1-2CO0400
The support brackets may now be screwed prevent seepage into below vanity slab. 6005826060706
into place. Apply a liberal layer of silicone
520x425mm rectangular Butler Sink with
no provision for tapholes or integrated
overflow.
FC VC
INSTALLATION INSTRUCTIONS liberal layer of silicone sealant between
Sink may be installed by alternative the sink rim and the underside of the vanity
QUAIL methods: surface. Clean off any surplus sealant.
UNDERMOUNT BASIN OPTIONAL ITEMS
1. 8125Z000 Option 1: SPECIAL RECOMMENDATIONS
700400WH Place sink on vanity surface over pre-cut Ensure sink is adequately sealed so as to
4 x undermount basin brackets
CQLBAJNN-2CO0423 outlet hole. Fit waste and fasten nut prevent seepage into area below vanity slab.
6005826040128 under the vanity surface.
SPARES FOR PRODUCT
525x345mm Undermount basin with 1. 8767Z000
CP overflow ring Option 2:
integrated overflow. No provision for
Position sink on supporting shelf, under
tapholes.
rectangular cut-out of vanity slab, ensuring
that overhang is evenly spaced. Apply a
FC VC
INSTALLATION INSTRUCTIONS area of basin and place in final position.
Position basin under rectangular cut-out of Slide the support bracket into place, thereby
vanity slab or under bathroom cabinet top, suspending the basin. Tighten locking bolts
ensuring that overhang is evenly spaced. so as to ensure a watertight seal between
With basin correctly positioned, mark hole basin and underside of vanity top. Clean off
positions of the support brackets. Remove any surplus sealant.
basin and drill previously marked bracket NOTE: Do not use epoxy.
screw holes.
NOTE: Care must be taken to ensure that SPECIAL RECOMMENDATIONS
holes do not penetrate through slab. Ensure basin is adequately sealed so as to
prevent seepage into area below vanity slab.
The support brackets may now be screwed
into place. Apply a liberal layer of silicone
sealant or equivalent to unglazed contact
FC VC
32 33163 CLASSIC OPTIONAL ITEMS
FLOOR PEDESTAL
715000WH 1. 702303WH
CCLPEINN-2CO0413 Hibiscus Basin 510 white
6005826000344
BASINS
715000AV 1. 702303AV
685 CCLPEJNN-4TO0413 Hibiscus Basin 510 avocado
6005826000405
715000BB 1. 702303BB
CCLPEJNN-1AO0413 Hibiscus Basin 510 bermuda blue
6005826000375
715000BE 1. 702303BE
CCLPEJNN-0AO0413 Hibiscus Basin 510 beige
6005826000351
155
715000WG 1. 702303WG
CCLPEJNN-1IO0413 Hibiscus Basin 510 whisper grey
6005826000429
190 715000WP 1. 702303WP
CCLPEJNN-0CO0413 Hibiscus Basin 510 wisper pink
6005826000368
190x685mm floor pedestal.
INSTALLATION INSTRUCTIONS SPECIAL RECOMMENDATIONS
When installed ensure that pedestal is fixed Always use silicone sealant or equivalent
to floor using silicone sealant or equivalent between back of basin and finished wall surface
between base and floor surface. area for secure and neat installation.
165
FC VC
225 UNIVERSAL
1/2 PEDESTAL SPARES FOR PRODUCT
205 1. 8513Z000
104 715222WH Fixing screws
104 Ø10 CUHFPEPE2COB
6005826061017
250x440mm wall mounted pedestal. Fixed
440 onto the wall with 2 x 6mm fixing screws
336 (Included).
INSTALLATION INSTRUCTIONS SPECIAL RECOMMENDATIONS
When using half pedestal, ensure wall Always use silicone sealant or equivalent
contact area of the pedestal does not between back of basin and finished wall surface
foul pipework. Place pedestal in position area for secure and neat installation.
260 and mark fixing hole positions. Remove
20
pedestal and drill holes. Place pedestal
back in position, insert plugs and screws.
52
Attach CP caps.
11
FC VC
34 35BASIN FIXING BOLT SET 10MM OPTIONAL ITEMS
BASIN FIXING 1. 700303WH
Amber classic
8448Z000
MZ005560 2. 703003WH
6005826041569 Bantam
Fixing bolt set of 2 for use with most wall
mounted basins. 3. 702400WH
BASINS
Concorde 630
4. 700803WH
Daisy
5. 700703WH
Flamingo
6. 702303WH
Hibiscus
7. 700603WH
Tuscany
UNDERMOUNT BASIN BRACKET OPTIONAL ITEMS 8. 706100WH
BASIN FIXING 1. 703900WH Emerald Corner
President undermount basin
8125Z000 9. 703201WH
MZ005540 2. 700400WH Emerald
6005826041217 Quail undermount basin
10. 706600WH
Bracket for use with undermount basins - 4 Mini weaver
required. 3. 700900WH
Snipe undermount basin
11. 706601
4. 700200WH Midi weaver
Cardinal undermount basin
12. 702500
Weaver 0TH
13. 704201
Weaver 1TH
WALL HANGER BRACKET OPTIONAL ITEMS
BASIN FIXING 1. 700100WH
Kite corner basin
8126Z000
MZ005541
6005826041224
Pressed wall hanger bracket for use with
the Kite corner basin - 2 required.
SOLA/WEAVER BRACKET WITH BOLT OPTIONAL ITEMS
BASIN FIXING 1. 702500WH
Weaver basin 0TH
8131Z300
MZ005544 2. 702800WH
6005826070378 Sola 630 medical basin
Concealed waste support bracket including
1 x 10mm bolt. 3. 703700WH
Sola 510 medical basin
SEMI CONCEALED BRACKET OPTIONAL ITEMS
BASIN FIXING 1. 703101WH
Springbok 550 basin 2TH
81118Z000
MZ005537
6005826041187
Semi concealed cast iron bracket for use
with the Springbok basin - 2 required
EMERALD BRACKET OPTIONAL ITEMS
BASIN FIXING 1. 703201WH
Emerald basin 1TH
8111Z000
MZ005536
6005826041170
Concealed waste support bracket for use
with the Emerald 1TH basin.
36 37SINGLE SOAP DISH
ACCESSORY
71511084
MZ005368
6005826041279
Quick-fit single soap dish. Fixed onto the
BASINS
wall with glue and silicone.
OPTIONAL ITEMS
N/A
FC VC
DOUBLE SOAP DISH
ACCESSORY
71511085
MZ005369
6005826041286
Quick-fit double soap dish. Fixed onto the
wall with glue and silicone.
INSTALLATION INSTRUCTIONS
1. Using a glue gun, squeeze five spots of
glue on the back of the product in each
corner and the centre.
2. Spread a generous amount of silicone
sealant or equivalent around the four
edges.
3. Line the product up straight and hold
against the tiled surface for 15 seconds.
4. Wipe off excess sealant and allow to dry.
FC VC
TOILET ROLL HOLDER
ACCESSORY
71511086
MZ005370
6005826041293
Quick-fit toiet roll holder. Fixed onto the
wall with glue and silicone.
INSTALLATION INSTRUCTIONS
1. Using a glue gun, squeeze five spots of
glue on the back of the product in each
corner and the centre.
2. Spread a generous amount of silicone
sealant or equivalent around the four
edges.
3. Line the product up straight and hold
against the tiled surface for 15 seconds.
4. Wipe off excess sealant and allow to dry.
FC VC
FOOT REST
ACCESSORY
71511087
MZ005371
6005826041309
Quick-fit foot rest. Fixed onto the wall with
glue and silicone.
INSTALLATION INSTRUCTIONS
1. Using a glue gun, squeeze five spots of
glue on the back of the product in each
corner and the centre.
2. Spread a generous amount of silicone
sealant or equivalent around the four
edges.
3. Line the product up straight and hold
against the tiled surface for 15 seconds.
4. Wipe off excess sealant and allow to dry.
FC VC
38 39WC’S AND BIDETS
02
Close coupled suites: 42 Junior Elite 57
Orchid wall hung cc 43 Hibiscus Elite vandal proof - low level 57
Concorde 2 43 Protea low level 57
WC’S & BIDETS
Elegancia Supreme 44
Entice 45 Assisted water closet suites and grab rails 58
Ingenue 45 Pearl C/W Rails 59
Quartz 46 Protea Paraplegic 59
Refine 46 Orchid Paraplegic 60
Urban compact 47 Grab Rails 60
Hibiscus Elite front flush 48
Hibiscus Elite dual top flush 49 Wall hung pans: 62
Hibiscus Elite Vandal proof 49 Energy 63
Entice 63
Semi-close coupled suite: 50 Refine 64
Daisy scc 50 Orchid BI 64
Orchid 550 BI 64
Bidets: 51 Orchid TI 65
Concorde 51 Urban life Rimless 65
Tuscany 51 Xtacy 65
Low level pans 52 Brackets: 66
Afsan 53 Floor fixing 66
Aquasave 53 Floor bracket 66
Aquasave Slimline 53 Bolt-through-the-wall bracket 66
Junior 54 Conversion bracket 66
Klip 54
Oriental 55 Back to wall pans:
Parktown TI 67
Exposed Cisterns: 56 Parktown BI
Hibiscus Elegancia/Aquasave 56 Entice rimless 68
67
Hibiscus Elite duct 56 Refine 68
Hibiscus Elite paraplegic 56
40 41ORCHID OPTIONAL ITEMS
WALL HUNG CLOSE COUPLED SUITE 1. 8082Z000WH
Floor bracket
CORBTFTF-2CO
6005826062007 2. 8084Z000WH
Bolt-through-the wall backet
Open rim wall hung close coupled suite
with 6/3L dual flush back inlet cistern.
3. 8531Z000WH
Jazz thermoset seat
4. CORSHMNN-2CO
Cistern
SPARES FOR PRODUCT
1. 438600WH
Orchid cc pan
2. 7112BTWH
Orchid cc cistern shell
WC’S & BIDETS
3. 714900WH
Hibiscus Elite top flush lid
4. 4386Z200
Orchid cc mechanism
INSTALLATION INSTRUCTIONS 3. Place pan into position, tighten nuts and
1. Determine pan height, prepare water place c.p. dome cover over nuts.
inlet and outlet heights and adjust
threaded rods to height of pan fixing 4. Complete plumbing and flush the water
holes. Detailed installation instructions line.
supplied with the bracket.
5. Flush test to ensure that all connections
2. Fit floor bracket into recessed wall and are watertight.
floor, then complete brickwork. NOTE: Do not over tighten.
Alternatively complete brickwork then fit
bolt-through-the-wall bracket.
FC VC
CONCORDE 2 SPARES FOR PRODUCT
CLOSE COUPLED SUITE 1. 772900WH
Concorde 2 cc pan
773862WH
COCOCNOTW2CO0373B 2. 7122BTWH
6005826060423 Compact cc cistern shell
Closed rim close coupled suite with 6/3L
dual flush bottom inlet cistern, soft close 3. 709900WH
thermoset double flap seat and floor Compact lid
mounting brackets.
4. 7123Z200
Universal DTF Fiting
5. 8534Z000
Concorde 2 seat
6. 8447Z000
Pan floor mounting bracket
INSTALLATION INSTRUCTIONS 4. Fit double flap seat.
1. Attach brackets to the floor. Place pan
into position to ensure that brackets are 5. Complete all plumbing connections and
in correct position. Remove pan and flush test. Ensure that the correct water
apply thin layer of silicone sealant to level has been set and that the operating
floor surface. Place pan back into overflow tube height conforms and
position and fix screw to the bracket. operates according to local by-laws and
SABS specifications.
2. Assemble all cistern fittings, inlet valve 6. Always use silicone sealant or equivalent
on right hand side of cistern. Fit cistern between the pan and the finished floor
to pan ensuring rubber sealing ring is in and wall surfaces for a secure and neat
correct position and tighten wing nuts. installation.
NOTE: Do not use putty as sealer. NOTE: The warranty will not apply to any
product installed with cement.
3. Flush the water line.
FC VC
42 43ENTICE RIMLESS SPARES FOR PRODUCT
CLOSE COUPLED SUITE 1. 8523Z100
Entice Slimline seat
772663WH
CENT21SU-2CO0374 2. 8852Z100
6005826061178 Entice seat hinge x2
Closed rim close coupled suite with 6/3L
dual flush bottom inlet cistern, soft close 3. 8447Z000
thermoset double flap seat and floor Pan floor mounting bracket
mounting brackets.
INSTALLATION INSTRUCTIONS 6. Complete all plumbing connections and
1. Ensure plumbing is in correct position. flush test. Ensure that the correct water
Assemble all cistern fittings, inlet valve level has been set and that the operating
on right hand side of cistern. Fit cistern overflow tube height conforms and
to pan ensuring rubber sealing ring is in operates according to local by-laws and
correct position and tighten bolts. SABS specifications.
NOTE: Do not use putty as sealer.
7. Always use silicone sealant or equivalent
3. Fit a flexible pan collar to the pan outlet between the pan and the finished floor
and connect to sewer pipe. Apply thin and wall surfaces for a secure and neat
layer of silicone sealant to floor and wall installation.
surfaces, place into position. NOTE: The warranty will not apply to any
WC’S & BIDETS
ELEGANCIA SUPREME OPTIONAL ITEMS product installed with cement.
CLOSE COUPLED SUITE 1. 7373Z500 4. Flush the water line.
Elegancia Supreme seat
737301WH 5. Fit double flap seat.
CELCNONN2CO0373B 2. 8513Z000
6005826068689 Fixing screws
Open rim close coupled suite with 6/3L dual
flush bottom inlet cistern.
SPARES FOR PRODUCT
1. 773301WH
Elegancia supreme cc pan
2. 7373BTWH
Elegancia supreme TF shell
3. 737300WH
Elegancia supreme TF lid
4. 7123Z200 FC VC
Universal DTF Fiting
INSTALLATION INSTRUCTIONS 4. Complete all plumbing connections and
1. Place pan into position and mark hole test flush. Ensure that the correct water
positions. Remove pan and drill holes. level has been set and that the operating INGENUE RIMLESS SPARES FOR PRODUCT
Place pan back into position, fix screw to overflow tube height conforms to and CLOSE COUPLED SUITE 1. 8523Z100
the floor and secure. operates according to local by-laws and Entice Slimline seat
SABS specifications. 772660WH
2. Assemble all cistern fittings with inlet CINPAFSU-2CO0374 2. 8852Z100
valve on right hand side of cistern. Fit 5. Always use silicone sealant or equivalent 6005826061116 Entice seat hinge x2
cistern to pan ensuring sealing ring is in between the pan and the finished floor
the correct position and tighten wing Closed rim close coupled suite with 6/3L
and wall surfaces for a secure and neat 3. 8447Z000
dual flush bottom inlet cistern, soft close
nuts. installation. Pan floor mounting bracket
thermoset double flap seat and floor
NOTE: Do not use putty as sealer. NOTE: The warranty will not apply to any mounting brackets.
product installed with cement.
3. Flush the water line.
INSTALLATION INSTRUCTIONS 6. Complete all plumbing connections and
1. Ensure plumbing is in correct position. flush test. Ensure that the correct water
level has been set and that the operating
2. Assemble all cistern fittings, inlet valve overflow tube height conforms and
on right hand side of cistern. Fit cistern operates according to local by-laws and
to pan ensuring rubber sealing ring is in SABS specifications.
correct position and tighten bolts.
NOTE: Do not use putty as sealer. 7. Always use silicone sealant or equivalent
between the pan and the finished floor
3. Fit a flexible pan collar to the pan outlet and wall surfaces for a secure and neat
FC VC and connect to sewer pipe. Apply thin installation.
layer of silicone sealant to floor and wall NOTE: The warranty will not apply to any
surfaces, place pan into position. product installed with cement.
4. Flush the water line.
5. Fit double flap seat.
FC VC
44 45You can also read