33b Chair Massage- !
Technique Demo and Practice
←
→
Page content transcription
If your browser does not render page correctly, please read the page content below
33b Chair Massage- ! Technique Demo and Practice

33b Chair Massage- !
                   Technique Demo and Practice!
                          Class Outline
   10    Break

   5     Attendance and Breath of Arrival

   20    Lecture

   25    Demo Performed on the assistant while a student reads the protocol.

   15    Break Announce the return time and write it on the board.

   55    First Trade

   10    Break Announce the return time and write it on the board.

   55    Second Trade Refer to first trade for details.

    10   Break down, clean up, and circle up
3h 30m   Total Class Time
33b Chair Massage-                    !
                     Technique Demo and Practice!
                             Reminders
Written Exams:
! 34a Written Exam (1b, 2a, 2b, 3a, 3b, 4a, 5a, 6a, 7a, 8b, 9a, 9b, 11a, 12a, 13a, 13b,
                 14a, 15a, 16a, 17a, 17b, 20a, 20b, 21b, 22a, 23a, 24a, 24b, 25a,
                 26a, 27a, 28a, 29a, 30a, 30b, and 31b)

Assignments:
! 36b State Law Review Questions
    – RQ Packet A: 157-164

Early Warning!
     – Begin working on assignment 43a Swedish: Outside Massages (A: 57-58 and
       59-62)

Preparation for upcoming classes:
! 34a Written Exam (2.5 hours)

!   34b Chair Massage: Technique Review and Practice (2 hours)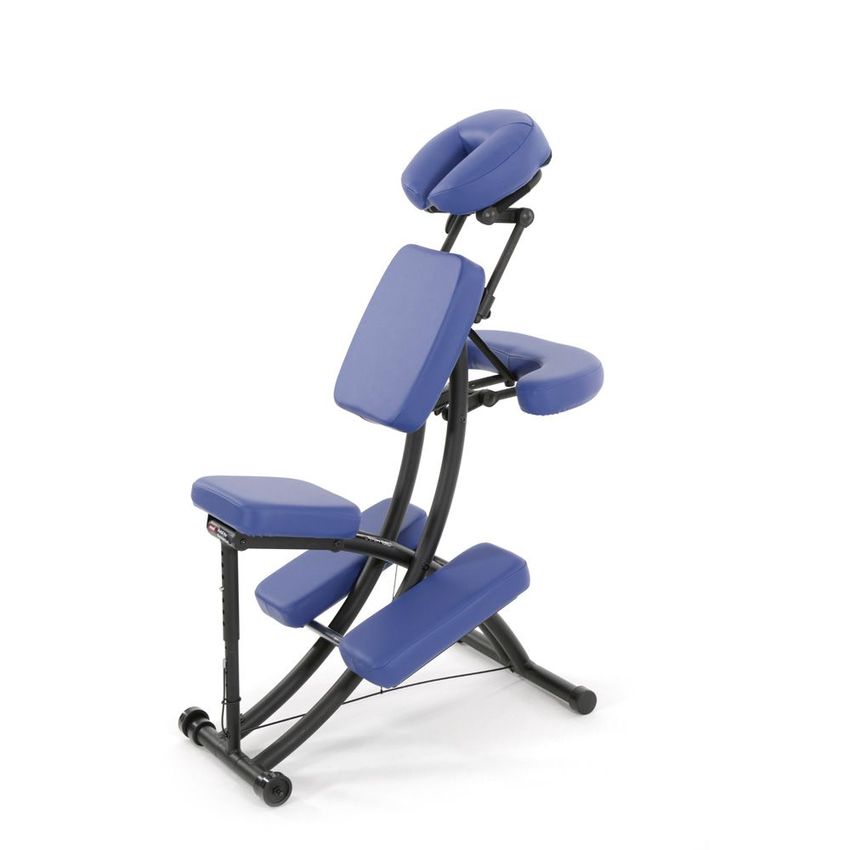
Classroom Rules
Punctuality - everybody’s time is precious
!   Be ready to learn at the start of class; we’ll have you out of here on time
!   Tardiness: arriving late, returning late after breaks, leaving during class, leaving
    early

The following are not allowed:
!   Bare feet
!   Side talking
!   Lying down
!   Inappropriate clothing
!   Food or drink except water
!   Phones that are visible in the classroom, bathrooms, or internship

You will receive one verbal warning, then you’ll have to leave the room.
Classroom Rules
Cell Phones – Turn it off!
And put it away!33b Chair Massage- !
Technique Demo and Practice!
C: 1-10Chair Massage (from Salvo Ch 15) Seated massage is massage performed on a seated, clothed individual usually in an open, public space. Seated massage, or chair massage, came to prominence through the efforts of David Palmer, who vision was to make massage convenient and affordable for anyone, anywhere, and anytime. Palmer introduced seated massage to the corporate world in the early 1980’s.
Chair Massage (from Salvo Ch 15)

Working at large corporations such as Apple, Inc. and Pacific Bell, Palmer
developed a unique chair for the client to sit on during the massage.

Techniques used during seated massage were derived from a Japanese-style
massage called amma and European-style massage which includes compression,
stretching, joint mobilizations, and percussion.

In 1986 Palmer coined the term ‘onsite massage’ and began teaching this method
 and selling the newly developed massage chair.
Chair Massage

Chair massage, although primarily therapeutic in its focus, is also an excellent
marketing tool to enhance your practice and create retention with clients. With
massage and its healing components, something should never be ignored, “The Feel
Good Factor”.

Since Chair Massage is a brief encounter with a client, make every stroke count.
While relaxing the muscles, help them to relax the mind as well, and you’ll make
that transition from chair to table and possibly have a client for a lifetime.
Chair Massage

 Relevant classes:
"   33b Chair Massage: Technique Demo and Practice (3.5 hours)
"   34b Chair Massage: Technique Review and Practice (2 hours)
"   46b Chair Massage: Technique Review and Practice (1.5 hours)
"   60b Chair Massage: Technique Review and Practice (1 hour)

"   70b Chair Massage, BMTs, Passive Stretches, and Side-lying Massage(.5 hour)
"   89b Chair Massage, BMTs, Passive Stretches, and Side-lying Massage(2 hours)
"   98b Chair Massage, BMTs, Passive Stretches, and Side-lying Massage(2 hours)
Build Your Business

Types of events that one can participate to build their business or suggest to an
employer to enhance visibility of a business:
"  Corporate
"  Charity Events
"  Marathons/Sporting events
"  Gyms
"  Malls/Airports etc…
"  Even house calls
"  Community Service via TLC (pre/post COVID)
If you already know these strokes, you already know
Chair Massage

"   Effleurage (gliding stroke)
"   Petrissage (kneading)
"   Palmar friction
"   Ulnar friction
"   ROM (range of motion)
"   Compression (using hand, forearm, and elbow)
"   Tapotement
Getting started

This class is a simple primer to chair massage utilizing the basics of what you have
already learned in massage class and applying it in a slightly different posture and
angle.

The goal is to focus on body mechanics so you can give a proficient 5-8 minute chair
massage utilizing the skills you already know with out injuring yourself.
Massage Chairs

Most massage chairs have similar adjustments, some weigh more than others, so
consider that depending on your plans for traveling with it.

Check out:
Oakworks Portal Pro
$485 (estimated)
Weighs 19lbs.
Weight capacity: 350lbs

Stronglite Ergo Pro II
$399 (estimated)
Weights 24lbs.
Weight capacity: 600lbs
Positioning your Client

For many of your clients, chair massage is their first time experiencing massage
therapy. They might not know exactly what to expect or even how to sit on a
massage chair.

Simply showing a new client how to get on the massage chair and find a
comfortable position will make the client’s experience less stressful.
Positioning your Client

While demonstrating each step, tell the client how to get on the massage chair:

"   Stand on the right side of the chair and hold on to the chair frame (just about the
    chest pad) with both hands for support. (Stand close by in case client needs your
    support)
"   Straddle your left leg over the seat and place your left knee on the left knee pad.
"   Sit down gradually and rest your right knee on the right knee pad.
"   Lean forward into the chest pad.
"   Rest your face in the headrest and your forearms on the armrest.

"   Making adjustments: Once your client is seated, you can make adjustments to
    the massage chair for a proper fit. For clients who are too short to comfortably
    reach the headrest, raise the seat height. (for those who are very short you may need
    to use a bolster on top of the seat)
Positioning your Client
" Knee Problems: Clients with knee problems may find it more comfortable to
place their feet flat on the floor. Raising the seat also reduces stress on the knees,
since the client doesn’t have to bend their knees as far.
" Headrest Adjustments: One trick to getting the headrest adjusted just right is to
have the client do it themselves. Simply loosen the adjustment knobs and have
the client grab hold of the headrest and move it until they feel comfortable. Then
tighten the knobs to secure the headrest in place.
" Prevent Fainting: Depending on your clients size and shape positioning of the
head and face in the face cradle is important. You want to avoid the padding
pressing into the sides of the neck (the carotid arteries). In some rare cases this
has resulted in client’s fainting.Contraindications and Warnings Chair massage should not be performed on a client with health concerns such as uncontrolled high blood pressure, or other illnesses or injuries which contraindicate massage (including clients under the influence of alcohol or recreational drugs). These clients should be referred to their primary care physician. Always obtain a signed release from the client, acknowledging that there are no health concerns that would contraindicate massage.
Body Mechanics

Health and comfort: biomechanics increase effectiveness and reduces strain on the
body while working, helps avoid overuse and injury, allows gravity to support the
working body, and becomes a tool in itself.

Balanced body position increases the awareness of the energetic connection, and
allows for increased quality of touch.

Be mindful of your body mechanics; apply the proper stance and hand position at
every interval and section of the body as you work around the chair. This will save
you from injury and enhance the client’s experience.
Body Mechanics

Upper Lunge-
One leg is positioned forward with knee bent and
foot flat on the ground while the other leg is
positioned behind.

Lower Lunge-
Drop to one knee, use bolster or towel
For softness.
If you already know these strokes, you already know
Chair Massage

"   Effleurage (gliding stroke)
"   Petrissage (kneading)
"   Palmar friction
"   Ulnar friction
"   ROM (range of motion)
"   Compression (using hand, forearm, and elbow)
"   Tapotement
Chair Massage Routine
Erector Spinae
"   Bilateral rhythmic loose fist compressions
"   Bilateral effleurage
"   Bilateral palmar superficial friction
"   Unilateral circular deep friction with fingertips

Shoulders
"  Unilateral ulnar friction
"  Bilateral alternating kneading
"  Unilateral circular deep friction with fingertips

Unilateral Glenohumeral Joint
"   Joint mobilization

Unilateral Rhomboids, Middle Trapezius, and Subscapularis
"   Place the client’s hand behind their back
"   Circular deep friction with fingertips
"   Return the client’s arm to the arm rest

Unilateral Deltoids, Biceps, and Triceps
"   Kneading
Chair Massage Routine
Unilateral Forearms
"   Grasp the hand and elevate the arm forward
"   Kneading
"   Alternating thumb strokes

Unilateral Hand
"   Stretch and knead the thenar and hypothenar muscles
"   Gently pull on the fingers
"   Lightly rock the arm and return it to the armrest

Bilateral Posterolateral Neck
"    Kneading (progress from light to moderate as the area softens)

Bilateral Deep Suboccipitals
"    Face the client head on from the front of the chair
"    Lateral to medial rhythmic wave-like pressure

Bilateral Scalp
"    Face the client head on from the front of the chair
"    Fingertip zig-zag friction back to front, side to side

Bilateral Erector Spinae
"    Several long gliding strokes from the lower back to the shoulders
Upper Back and Shoulders (60 to 90 seconds)

  1. Begin session with relaxing but firm rhythmic compressions (using your
  body weight) up and then down the muscles of the entire back. (Avoid
  hyper-extending wrists; use alternate tools such as forearm, or loose fist.)

  2. Then apply gliding (effleurage over the clothes) strokes through the
  lower and upper back to warm and prepare the area.

  3. Apply palmar friction to the erectors up through the rhomboids,
  switching to two-handed ulnar friction at the upper traps.

        Palmar Friction                              Ulnar Friction
Upper Back and Shoulders (60 to 90 seconds per shoulder) 4. Address the shoulders with kneading (Trap Bends). Alternate hands to enhance the stroke. 5. Apply deep pressure using circular digital strokes moving down the upper traps/rhomboids/ upper erectors (As wrist extends, while moving down conclude stroke or drop posture to meet a safe working position)
Shoulder ROM and more (60 seconds per shoulder)

6. Next apply circular digital pressure laterally
along the upper trapezius to the end of the
shoulder.

7. Feel free to move the arm off the armrest during
this phase, and create clockwise or counter
clockwise ROM of shoulder using both hands
depending on client comfort level; one hand
 holding the upper arm and the other cradling
the shoulder/head of the humerus. (Unless this
 is contraindicated to the client’s condition, always
 check in with the client).
Shoulder ROM and more (60 seconds per shoulder)
8. Next, ask client to put their arm behind their back with back of hand and wrist
    angled toward the lower back. Ask them to move the elbow forward (this
    should allow the scapula to “wing up”).

Apply circular digital pressure to the rhomboids, middle traps and part of the
   subscapularis muscle. Once completed ask client to place arm back on armrest
   and into a relaxed position.
Spend about half a minute on this area before moving to the upper arm, lower arm
   and hand.
Arm, Forearm, and Hand (2.5 minutes per side)
9. Standing at the shoulder transition to petrissage of the deltoids and muscles of the
upper arm, moving toward the lower arm.
10. Standing in front of the chair facing the client, grasp the hand and elevate the
arm forward, allowing you to move up from the wrist to the elbow with
kneading and alternating circular thumb strokes.
11. Stretch the hand, apply petrisage to the thenar and hypothenar muscles of the
hand then pull gently on the fingers before rocking the arm lightly and
returning the arm to the armrest. Maintain contact with the client as you move
to the other arm to repeat this sequence.
This should take a total of five minutes out of an 8-minute routine.
Repeat steps 4 thru 11 on the other side of the body.Head and Neck (60 to 90 seconds total)
12. Once you have completed steps 4 through 11 on the other side of the body,
maintain contact with the body as you move to the neck. Standing beside the
client, using light to moderate kneading (“C” shaped petrissage), knead the
muscles along the sides and back of the neck (create a relaxing rhythm), from
the shoulder to the base of the skull and below the ears.Head and Neck (60 to 90 seconds total)
13. Moving to the front of the chair, standing at the clients head, allow the (curled)
fingers of each hand to lie across the sub-occipitals at the ridge of the occipital
bone. With the pads of the fingers create a rhythmic alternate motion with each
hands, moving in a wave-like pattern across the occipitals.
14. Using fingertip & thumb strokes, across the scalp from the occiput through to the
top of the head. Use a rhythmic alternating motion with the fingers. This can be
done to provide extra stimulation to the scalp, as well as invigorating
(depending on the intensity of the stroke) the client, if you should choose to.
This should be one minute to 90 seconds long.Chair Routine Conclusion
15. Returning to the back of the chair complete the massage with several long
gliding strokes from the lower back to the shoulders; this is your conclusion
stroke before helping the client sit up from the chair.
Allow the clients to orient themselves prior to standing (standing beside them keep
one hand on the middle of their upper back) to avoid any dizziness or falls.Chair Massage Routine Erector Spinae " Bilateral rhythmic loose fist compressions " Bilateral effleurage " Bilateral palmar superficial friction " Unilateral circular deep friction with fingertips Shoulders " Unilateral ulnar friction " Bilateral alternating kneading " Unilateral circular deep friction with fingertips Unilateral Glenohumeral Joint " Joint mobilization Unilateral Rhomboids, Middle Trapezius, and Subscapularis " Place the client’s hand behind their back " Circular deep friction with fingertips " Return the client’s arm to the arm rest Unilateral Deltoids, Biceps, and Triceps " Kneading
Chair Massage Routine
Unilateral Forearms
"   Grasp the hand and elevate the arm forward
"   Kneading
"   Alternating thumb strokes

Unilateral Hand
"   Stretch and knead the thenar and hypothenar muscles
"   Gently pull on the fingers
"   Lightly rock the arm and return it to the armrest

Bilateral Posterolateral Neck
"    Kneading (progress from light to moderate as the area softens)

Bilateral Deep Suboccipitals
"    Face the client head on from the front of the chair
"    Lateral to medial rhythmic wave-like pressure

Bilateral Scalp
"    Face the client head on from the front of the chair
"    Fingertip zig-zag friction back to front, side to side

Bilateral Erector Spinae
"    Several long gliding strokes from the lower back to the shoulders
Community Service
Community Service- Doing for others, Together
33b Chair Massage-   !
Technique Demo and Practice
You can also read