AFC-50 Automatic French Fry Cutter Instruction Manual - Fry Factory Inc. 67 Watts Ave, Charlottetown, PEI, C1E 2B7, Canada
←
→
Page content transcription
If your browser does not render page correctly, please read the page content below

AFC-50 Automatic French Fry Cutter
                           Instruction Manual

Fry Factory Inc.
67 Watts Ave, Charlottetown, PEI, C1E 2B7, Canada
      Phone: 902-368-2900
         Fax: 902-368-8645
       Email: info@fryfactoryinc.com

   Website: www.fryfactoryinc.com                   AFC-50 User Manual – 01/2017
Guarantee
• This Machine is guaranteed by Fry Factory Inc. for 12 months from the date of purchase.
• The guarantee is limited to a “Parts Only” warranty and excludes any consequential loss
  or expense incurred by the purchasers.
• Any problems arising from the faulty installation, inadequate maintenance, connection
  to the wrong electricity supply or general wear and tear are NOT covered by the
  guarantee and would be chargeable.
• The guarantee applies in this form to installations within North America only.
• Please observe these instructions carefully.

                                    On Delivery
    Please check the contents against the following list and notify both the carrier and Fry
     Factory Inc. immediately if anything is missing or damaged.

Warning: Care when lifting. 2 person carry. Weight of machine is 120 lbs (55 kg)

                                       Contents
•   1 x AFC-50
•   1 x Hopper
•   1 x Front Chute
•   1 x Rotor
•   1 x Knife Block
•   1 x Stainless Steel Stand (Optional)

                                              2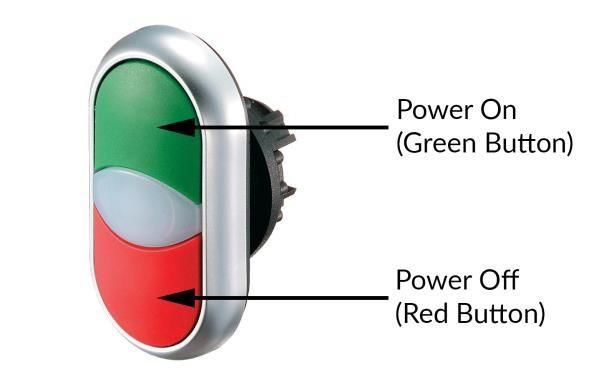
1.

                      Electrical Supply Connection
   Once the fry cutter is in the appropriate position, the adjustable feet should be adjusted
   to make the rear of the machine slightly higher than the front.
2. The electrical supply connection should be made to a power outlet, or isolator mounted
   on the wall close to the machine.
3. The outlet should be rated at 15 amps. The machine is fitted with a 8-amp circuit
   breaker.

Specifications: 120V 60Hz Single Phase. Running amps 6.4A
Recommended: It is advised that a Ground Fault Circuit Interrupter (GFCI) be fitted to the
electrical circuit.

Warning: The main power supply must be earthed.

                                            3
Using the Machine
To open the machine, unscrew the knob at the front and lift up until the hopper is fully
resting back on its hinges.
2. Check the rotor by hand to ensure that it is completely free to rotate, and that the knife
block assembly is properly in position and secured by the two fixing nuts.
3. Close the lid and tighten the nut.
4. It is now safe to power the machine on. To start the machine, press the green button at
the front, and to stop, press the red button.
5. The machine is set to have a 10-minute run time, followed by a 5-minute rest period.
There is a built in timer that will power off the machine after 10 minutes. Always allow it
to cool down for 5 minutes before operating it again.
Figure 2: Pushbutton ON/OFF switch
Note: There are safety interlock devices to prevent the user from coming in contact
with the spinning rotor or machine knives while the machine is in operation. If the knife
block is not properly screwed down, or the lid is not closed the machine will not run.
4Daily Cleaning Instructions
Unplug machine, or disconnect from power supply.
2. Fully unscrew hopper assembly.
3. Open the hopper and lift it out of its hinge seating at the rear. Clean the hopper in a sink
using a non abrasive brush with soap and water.
4. Remove the knife block by unscrewing the retaining nuts and lift it off its locating pins.
Warning: The blades are very sharp, take extra care when handling the knife block.
5. Clean the knife block with a non abrasive brush in soap and water, and carefully remove
any residual pieces of potato.
6. Remove the rotor carefully off its shaft. Clean the rotor in a sink with a non abrasive
brush using soap and water.
7. Clean out the interior of the base unit with a non abrasive brush using soap and water,
and wipe over the exterior.
Warning: Do not use bleach or abrasive cleaners.
8. Reassemble the machine. Do not force the rotor, or the center bushing could be
damaged. To ensure it is properly seated, turn it slowly until it drops into place.
9. When replacing the knife block, ensure the retaining nuts are fully screwed down so it
slips back easily onto the dowel pins.
Removing a Jam
If the machine turns off, or stops cutting potatoes, there is a possible jam.
1. If the machine is still running press the red power button to shut it off.
2. Unplug from the power source, unscrew and lift up the lid
3. Remove the obstruction or jam, taking caution to the knife block blades.
54. Close and secure the lid.
5. Check the circuit breaker on the rear of the machine. It may need to be reset by pushing
the button.
Warning: Never attempt to remove a jam while the machine is running.
Blade Maintenance
Warning: Chipper blades must be checked regularly, and replaced at the first sign of
damage or excess wear.
1. Remove the knife block from the machine by loosening the 2 thumbscrews.
Warning: The blades are very sharp, take extra care when handling the knife block.
2. Remove the large main blade by unscrewing the 2 small slotted screws. Replace if
necessary.
3. Using a 5mm (3/16”) hex key, remove the 2 long bolts holding the plastic spacers and
small blades.
4. The length of blades can now be easily removed. Replace as necessary.
5. Replacement blades are readily available from Hopkins PEI. Complete knife block
assemblies are also available.
Maintenance
There is no user maintenance required, however the machine should be regularly inspected
for damage to the electrical supply cable, knife blades, and the safety interlocks should be
periodically tested.
6Troubleshooting
If the machine ever stops working follow these steps.
1. Check for a jam in the machine (first unplugging from power source).
2. Check that there is 120V at the power supply connection.
3. Check that the hopper and knife block are fitted correctly. The safety interlocks
will automatically prevent the machine from running if the knife block, or the
hopper isn’t seated and secured properly.
4. Check the circuit breaker is in normal (reset) position.
Should the machine require repair or service, only Fry Factory Inc. or its authorized agents
should do so. Please contact our service department for assistance.
Note: Only genuine Fry Factory Inc. replacement parts should be used to service or repair
this machine.
Health & Safety Considerations
The operator should be aware of the following:
Note: This list is for guidance only. The operator must undertake their own health and
safety risk assessment prior to using this equipment. No one should use this equipment
without being fully trained in its use and its hazards.
Loss of stability
• Hazard of impact and crushing to the person’s body.
Electrical Hazard
• Hazard of electrical shock by direct or indirect contact with live parts if the main
power supply cable is damaged.
Hazards to the operator
7• Manual handling risks when moving the machine.
• Hazards from the food being processed, and from the cleaning agents used to
disinfect the machine.
• Cuts and injuries from the sharp knife blades.
• There is a severe risk of ergonomic injuries caused by heavy loads when filling the
machine with product and transporting the finished product.
Young Persons
• No person under the age of 16 should operate this machine.
Specifications
Rated Power Source 120V 60Hz Single Phase
Run Amps 6.4A
Noise Level (unloaded) 59dB
Noise Level (loaded) 71dB
Dimensions L x W x H (mm) 680 x 575 x 380
Dimensions L x W x H (inches) 26 x 22 x 14
Weight 55kg (122lbs)
8Wiring Diagram
Figure 5: AFC-50 Electrical Wiring Schematic
Spare Parts & Repairs
Should you require any spare parts, maintenance, or repairs,
please contact our service department.
. Email: info@fryfactoryinc.com
Phone: 1-902-368-2900
9You can also read