ASSEMBLY INSTRUCTIONS & OWNERS MANUAL - Pedego ...
←
→
Page content transcription
If your browser does not render page correctly, please read the page content below
ASSEMBLY INSTRUCTIONS & OWNERS MANUAL
We would like to thank you for choosing the Pedego electric bike.
We believe this technology, with the benefits of electric propulsion,
provides you with the perfect vehicle to increase your personal
mobility.

Our brushless electric motors allow you to run errands or commute
to work while saving money on gas and reducing the environmental
impact on our world. It also allows the opportunity for exercise
along the way.

All this and it is just plain fun to ride!

If you have any concerns, questions or suggestions about the
Pedego electric bike, please contact us at support.pedego.com.

Again, thanks for choosing Pedego!

           PLEASE NOTE:
 THIS MANUAL IS NOT INTENDED AS
  A DETAILED SERVICE, REPAIR OR
  MAINTENANCE MANUAL. PLEASE
SEEK ASSISTANCE FROM A QUALIFIED
 TECHNICIAN FOR SERVICE, REPAIRS
        OR MAINTENANCE.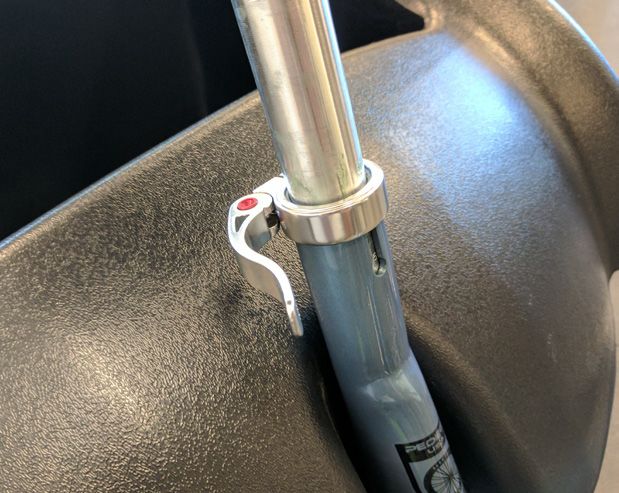
TABLE OF CONTENTS
2    Warning                                  41   Front Suspension Fork
4    Carton Contents                          43   Gears
6    Assembly Instructions                    46   Disc Brakes
     6    City Commuter Lite, Comfort
                                              50   Pedal Assist Mode & Meter
          Cruiser, Interceptor, Tandem
                                                   Programming & Use
     10   Boomerang, Boomerang
                                                   52   C500B
          Platinum, City Commuter, City
          Commuter Mid-Drive, City
                                                   55   C300U
          Commuter Platinum, Stretch,
          Stretch Dual Drive                  59   Throttle Control
     14   Element, Interceptor Platinum,      61   Lights
          Ridge Rider, Trail Tracker, Trail
          Tracker Gorilla                     63   Charger
     18   Latch                               64   Battery & Charger Care
                                              65   Battery Sleep Functions
     20   Trike
                                              67   Tires & Inner Tubes
24   Safety                                   68   Kickstand
28   Operating Procedures                     69   Keys, Appearance Care &
     28   Boomerang, Boomerang                     Maintenance
          Platinum, City Commuter, City
          Commuter Lite, City Commuter        70   Troubleshooting
          Mid-Drive, City Commuter
          Platinum, Comfort Cruiser,
                                              72   FAQ's
          Interceptor Platinum, Tandem        74   Warranty
     30   Ridge Rider, Trail Tracker, Trail        74   Pedego Care 5 Year Warranty
          Tracker Gorilla
                                                   79   Additional Limited Warranty
     32   Stretch
                                                   83   Pedego Element and Battery
     34   Latch
                                              87   Registration
     38   Trike

     40   Element

                                                                                      1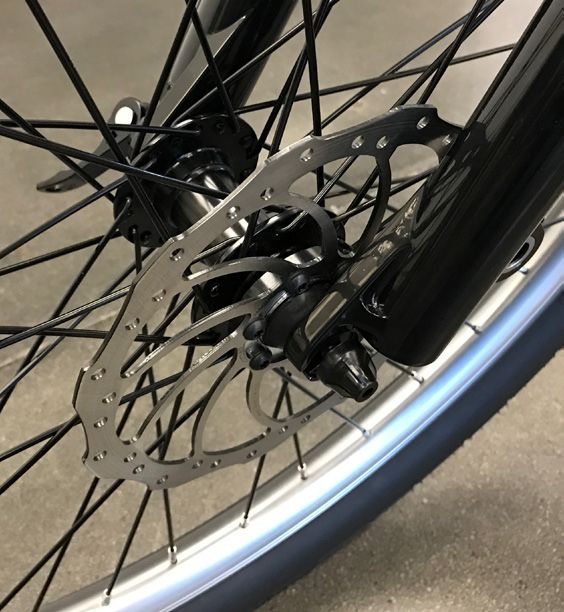
WARNING
      Electric Bikes can be dangerous to use. The user or consumer
      assumes all risk of personal injuries, damage, or failure of the bicycle
      or system and all other losses or damages to themselves and others
      and to any property arising as a result of using the bicycle.

      As with all mechanical components, the bicycle is subjected to
      wear and high stresses. Different materials and components may
      react to wear or stress fatigue in different ways. If the design life
      of a component has been exceeded, it may suddenly fail possibly
      causing injuries to the rider. Any form of crack, scratches or change
      of colouring in highly stressed areas indicate that the life of the
      component has been reached and it should be replaced.

      For replacement parts, technical information and warranty
      assistance, please contact Pedego at 888-777-2066 or
      support.pedego.com

              DO NOT DISASSEMBLE, MODIFY
              OR REPLACE ELECTRICAL PARTS.

2   Warning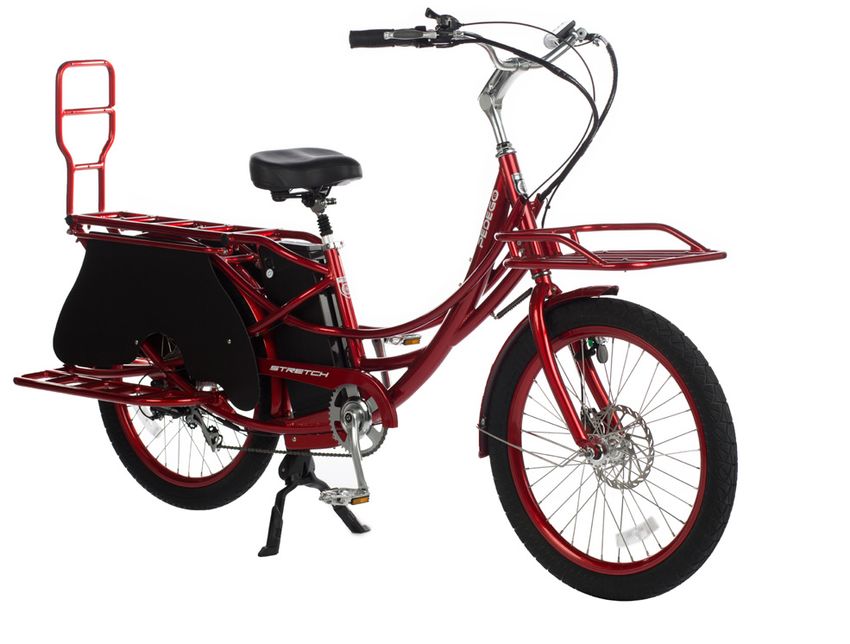
YOUR INSURANCE POLICIES MAY
   NOT PROVIDE COVERAGE FOR
 ACCIDENTS INVOLVING THE USE OF
  THIS BICYCLE. TO DETERMINE IF
COVERAGE IS PROVIDED YOU SHOULD
    CONTACT YOUR INSURANCE
       COMPANY OR AGENT.

                             Warning   3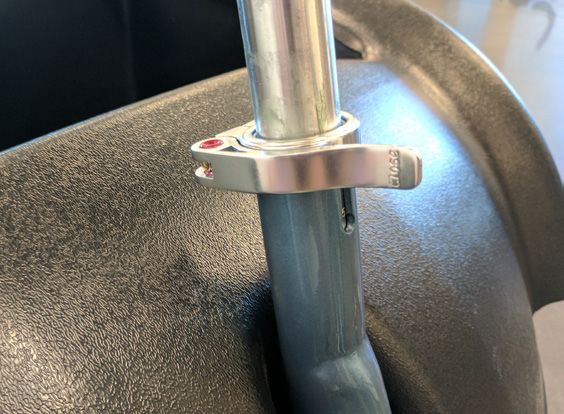
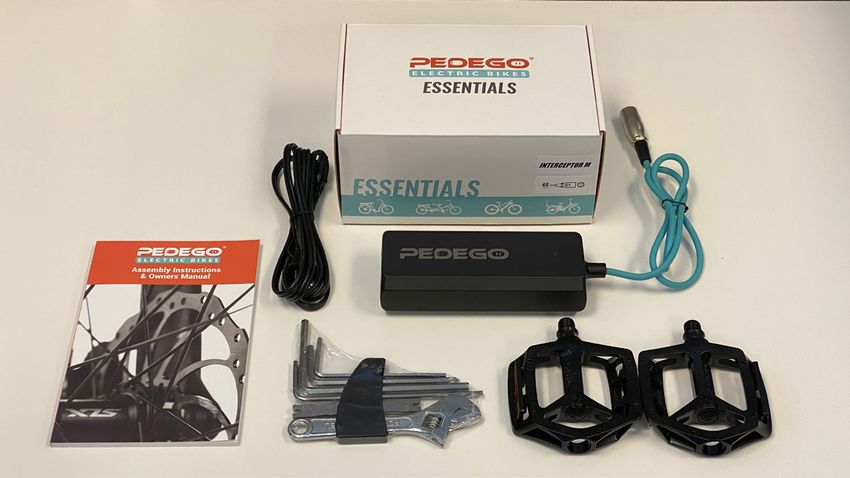
CARTON CONTENTS
       x1   Kit Box
             x2   Pedals
             x1   Owner’s Manual & Assembly Instructions
             x1   Tool Kit
             x1   Battery Charger
             x1   QR Skewer / Thru Axle (some models)
             x1   Applicable Parts Manual

       x1   Pedego Bike
       x1   Lithium Ion Battery
       x3   Keys

4   Carton Contents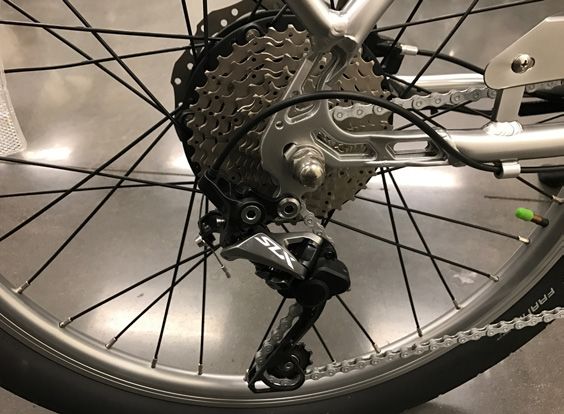
REGISTER YOUR PEDEGO TO JOIN
    THE PEDEGO OWNERS GROUP

      P L E A S E R E G IS T E R YO U R P E D E G O AT
www.pedegoelectricbikes.ca/register
          Registration information on page 87

      Registration required for warranty coverage.
   Ask your local dealer or visit PedegoElectricBikes.ca.

                                                  Register Your Pedego   5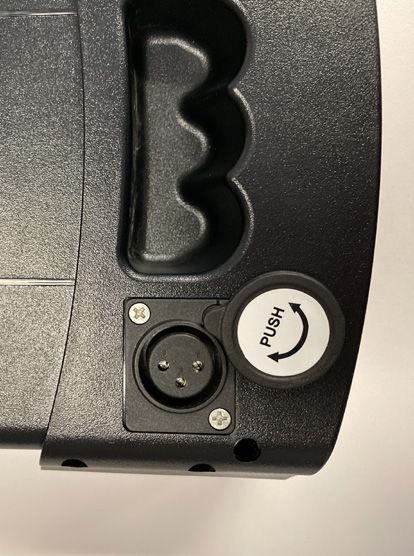
ASSEMBLY INSTRUCTIONS
      City Commuter Lite, Comfort Cruiser, Interceptor,
      Tandem

      Your bike has been pre-assembled and requires only
      a few simple steps to get it ready for you to ride:

       1   Remove the outside carton after cutting the nylon bands and
           lift off the entire box from the tray at the bottom. Carefully
           remove your bike from the bottom tray and gently rest it in
           place with the kickstand down.

       2   Remove all of the inside cardboard protection and bubble
           wrap.

       3   Please locate and set aside the kit box containing the battery
           charger, pedals, and tool kit.

       4   The handlebar must be adjusted for height and alignment.
           Remove the rubber protective cap and insert the handlebar
           stem into the frame of the bicycle (Figures 1 & 2).

       5   With the 6 mm allen wrench provided in the tool kit, tighten
           the screw on top of the stem underneath the rubber protective
           cap to secure the handlebar in place. Make sure the handlebar
           is aligned with the front wheel before tightening and that the
           stem is not set above the maximum height indicator.

                    Figure 1                           Figure 2

6   Assembly Instructions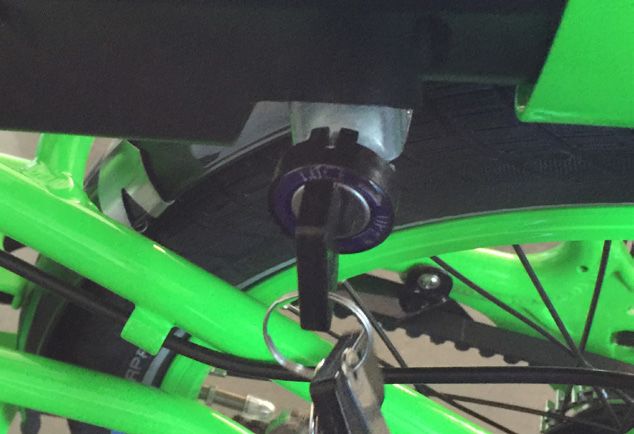
Figure 3                            Figure 4

6   If need be, the angle of the handlebar may be positioned to
    your personal preference. Loosen the front 2 bolts on the front
    stem plate and angle the handlebar to your liking (Figure 3),
    then securely tighten the 2 bolts on the front stem plate. Make
    sure that, when tightening, there is even spacing between the
    top and bottom bolts to ensure even clamping force and maxi-
    mum stability (Figure 4).

Continued on next page...

                                                   Assembly Instructions   7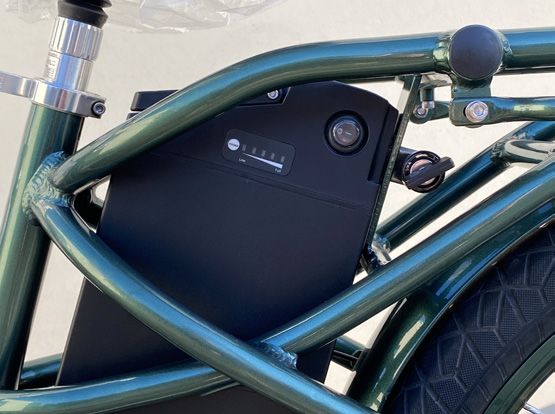
ASSEMBLY INSTRUCTIONS
      City Commuter Lite, Comfort Cruiser, Interceptor, Tandem

      Make sure the seat is tight enough so that you can’t twist it out of
      alignment. Pull the seat clamp handle away from the seat post and
      slide the seat up or down to adjust it (Figure 1). Move the clamp
      handle inward toward the seat post so it is held tight by the clamp
      (Figure 2).

                    Figure 1                             Figure 2

      This should require a fair amount of force to ensure the seat post
      is held tight. If necessary, tighten the clamp bolt with a 4 mm Allen
      wrench; turning the bolt clockwise will increase the clamping force
      and counter-clockwise will decrease the clamping force. Make sure
      the seat is not set with the vertical maximum height marks above the
      clamp.

      If the disc brakes are rubbing after installation, refer to Support
      on our website at support.pedego.com

8   Assembly Instructions
Using the 15 mm wrench provided in the tool
kit, attach and tighten the pedals. PLEASE
NOTE – The pedals are marked “L” for Left
and “R” for Right. The left pedal is attached
by turning it counterclockwise and the right
pedal is tightened by turning it clockwise.
Make sure the pedals are tightly attached to
the crank arms to prevent stripping.
Torque Specs
Item Nm
Handlebar Clamp 12-14 Nm
Handlebar Stem 20-29 Nm
Seatpost Clamp 3-4 Nm
Seat Rail Clamp 15-20 Nm
Front Axle Nuts 29-44 Nm
Rear Axle Nuts 29-44 Nm
Pedals 35 Nm
Assembly Instructions 9ASSEMBLY INSTRUCTIONS
Boomerang, Boomerang Platinum, City Commuter, City
Commuter Mid-Drive, City Commuter Platinum, Stretch,
Stretch Dual-Drive
Your bike has been pre-assembled and requires only a few simple
steps to get it ready for you to ride:
1 Remove the outside carton after cutting the nylon bands and
lift off the entire box from the tray at the bottom. Carefully
remove your bike from the bottom tray and gently rest it in
place with the kickstand down.
2 Remove all of the inside cardboard protection and bubble
wrap.
3 Please locate and set aside the kit box containing the battery
charger, pedals, and tool kit.
4 Insert the handlebar stem into the frame of the bicycle. You
may adjust the height of the handlebar by moving the stem
up or down to your comfort level. Place your thumb on the
locking mechanism on the left side of the stem, depress the
button and lift the lever up exposing the adjustment screws
(Figure 1).
5 Move the stem so that you can see directly down the hole
(Figure 2).
Figure 1 Figure 2
10 Assembly Instructions6 Insert the 6 mm allen wrench (supplied in the kit) into the
hole and tighten the screw clockwise until the stem does not
move separately from the front wheel (Figure 3).
7 Make sure the handlebar is aligned with the front wheel before
tightening, and the stem is not set above the maximum height
indicator.
In order to get the bolt securely tight, you may need to use a pair
of pliers for leverage
Figure 3 Figure 4
8 Position the handlebar to your desired comfort level and lock
them into place by pushing the lever back down. If there is
movement after pushing the lever down or if is too tight to
push down, you can tighten or loosen the screw (Figure 4)
with a 2.5 mm wrench.
Continued on next page...
Assembly Instructions 11ASSEMBLY INSTRUCTIONS
Boomerang, Boomerang Platinum, City Commuter, City
Commuter Mid-Drive, City Commuter Platinum, Stretch,
Stretch Dual-Drive
Make sure the seat is tight enough so that you can’t twist it out of
alignment. Pull the seat clamp handle away from the seat post and
slide the seat up or down to adjust it (Figure 1). Move the clamp
handle inward toward the seat post so it is held tight by the clamp
(Figure 2).
Figure 1 Figure 2
This should require a fair amount of force to ensure the seat post
is held tight. If necessary, tighten the clamp bolt with a 4 mm Allen
wrench; turning the bolt clockwise will increase the clamping force
and counter-clockwise will decrease the clamping force. Make sure
the seat is not set with the vertical maximum height marks above the
clamp.
If the disc brakes are rubbing after installation, refer to Support
on our website at support.pedego.com
12 Assembly InstructionsUsing the 15 mm wrench provided in the tool
kit, attach and tighten the pedals. PLEASE
NOTE – The pedals are marked “L” for Left
and “R” for Right. The left pedal is attached
by turning it counterclockwise and the right
pedal is tightened by turning it clockwise.
Make sure the pedals are tightly attached to
the crank arms to prevent stripping.
Torque Specs
Item Nm
Handlebar Stem 20-29 Nm
Seatpost Clamp 3-4 Nm
Seat Rail Clamp 15-20 Nm
Front Axle Nuts 29-44 Nm
Rear Axle Nuts 29-44 Nm
Pedals 35 Nm
Assembly Instructions 13ASSEMBLY INSTRUCTIONS
Element, Interceptor Platinum, Ridge Rider, Trail
Tracker, Trail Tracker Gorilla
Your bike has been pre-assembled and requires only a few simple
steps to get it ready for you to ride:
1 Remove the outside carton after cutting the nylon bands and
lift off the entire box from the tray at the bottom. Carefully
remove your bike from the bottom tray and gently rest it in
place.
2 Remove all of the inside cardboard protection and bubble
wrap.
3 Please locate and set aside the kit box containing the battery
charger, pedals, thru axle, and tool kit.
Element, Interceptor Platinum, Trail Tracker, Trail
Tracker Gorilla
4 Install the front wheel by lining up the disc brake and placing
the fork of the bike onto the front wheel.
5 With the wheel in position, retrieve the thru axle from the kit
box. Twist the end cap counter clockwise to remove, set cap
and spring (Element & Inteceptor Platinum only) aside.
6 Insert the thru axle into the fork dropouts and wheel hub from
the drive side (Right side). Once completely through, slide
the spring onto the end of the axle (Element & Inteceptor
Platinum only) and twist the adjusting nut clockwise on
the threaded end of the thru axle. Tighten the thru axle by
twisting clockwise and close the lever to secure the wheel.
14 Assembly InstructionsRidge Rider
4 Install the front wheel by lining up the disc brake and placing
the fork of the bike onto the front wheel.
5 With the wheel in position, retrieve the thru axle from the kit
box. Open the thru axle lever and align it with the cut-out.
6 Insert the thru axle into the fork dropouts and wheel hub
from the drive side (right side) of the bike. Tighten the thru
axle clockwise until it is snug against the fork leg and close
the lever to secure the wheel. The lever should take medium
pressure to close; to increase the tension, tighten the thru
axle one click at a time with a 2.5 mm Allen wrench until the
desired resistance is achieved.
If necessary, align the stem with the front wheel and tighten the
top bolt just enough to take any play out of the headset bearings.
Once the handlebars are aligned and the top bolt is snug, evenly
tighten the two side bolts. Check that there is no play between the
fork and frame. If necessary, loosen the two side bolts and tighten
the top bolt to take out any bearing play, then re-tighten the side
bolts.
Be careful to not tighten the top bolt too much as the steering will
feel rigid and sluggish.
TO P B O
LT
SIDE
BOLT
SIDE
BOLT
Figure 1
Continued on next page...
Assembly Instructions 15ASSEMBLY INSTRUCTIONS
Element, Interceptor Platinum, Ridge Rider, Trail Tracker,
Trail Tracker Gorilla
Make sure the seat is tight enough so that you can’t twist it out of
alignment. Pull the seat clamp handle away from the seat post and
slide the seat up or down to adjust it (Figure 1). Move the clamp
handle inward toward the seat post so it is held tight by the clamp
(Figure 2).
Figure 1 Figure 2
This should require a fair amount of force to ensure the seat post
is held tight. If necessary, tighten the adjusting nut by hand or
clamp bolt with a 4 mm Allen wrench while in the open position;
turning the bolt clockwise will increase the clamping force and
counter-clockwise will decrease the clamping force. Make sure the
seatpost is not set with the vertical maximum height marks above
the clamp.
16 Assembly InstructionsUsing the 15 mm wrench provided in the tool
kit, attach and tighten the pedals. PLEASE
NOTE – The pedals are marked “L” for Left
and “R” for Right. The left pedal is attached
by turning it counterclockwise and the right
pedal is tightened by turning it clockwise.
Make sure the pedals are tightly attached
to the crank arms to prevent stripping.
If the disc brakes are rubbing after installation, refer to Customer
Help on our website at support.pedego.com
Torque Specs
Item Nm
Seatpost Clamp 3-4 Nm
Seat Rail Clamp 15-20 Nm
Rear Axle Nuts 29-44 Nm
Pedals 35 Nm
Handlebar Clamp 6 Nm
Steerer Tube Clamp 8 Nm
Assembly Instructions 17ASSEMBLY INSTRUCTIONS
Latch
Your bike has been pre-assembled and requires only a few simple
steps to get it ready for you to ride:
1 Remove the outside carton after cutting the nylon bands and
lift off the entire box from the tray at the bottom. Carefully
remove your bike from the bottom tray and gently rest it in
place with the kickstand engaged.
2 Remove all of the inside cardboard protection and wrap.
3 Please locate and set aside the kit box containing the battery
charger, pedals, and tool kit.
Torque Specs
Item Nm
Handlebar Stem 12-14 Nm
Seatpost Clamp 3-4 Nm
Seat Rail Clamp 15-20 Nm
Front Axle Nuts 29-44 Nm
Rear Axle Nuts 29-44 Nm
Pedals 35 Nm
18 Assembly InstructionsMake sure the seat is tight enough so that you can’t twist it out of
alignment. Pull the seat clamp handle away from the seat post
and slide the seat up or down to adjust it (Figure 1). Move the
clamp handle inward toward the seat post so it is held tight by the
clamp (Figure 2).
Figure 1 Figure 2
If necessary, tighten the clamp by twisting the clamp handle
clockwise while in the unclamped position. Then, fold the handle
in toward the seat post.
This should require a fair amount of force to ensure the seat post
is held tight. If necessary, the clamp can be further tightened
with a 5 mm allen wrench while in the clamped position. Make
sure the seat is not set with the vertical maximum height marks
above the clamp.
If the disc brakes are rubbing after installation, refer to Customer
Help on our website at support.pedego.com
Assembly Instructions 19ASSEMBLY INSTRUCTIONS
Trike
Your bike has been pre-assembled and requires only a few simple
steps to get it ready for you to ride:
1 Remove Trike from carton after cutting the nylon bands.
2 Remove all of the inside cardboard protection and bubble
wrap.
3 Please locate and set aside the kit box containing the battery
charger, pedals, and tool kit.
4 Insert the handlebar stem into the frame of the bicycle. You
may adjust the height of the handlebar by moving the stem
up or down to your comfort level. Place your thumb on the
locking mechanism on the left side of the stem, depress the
mechanism and lift the lever up exposing the adjustment
screws (Figure 1).
5 Move the stem so that you can see directly down the hole
(Figure 2)
Figure 1 Figure 2
20 Assembly Instructions6 Insert the 6 mm allen wrench (supplied in the kit) into the hole
and tighten the screw clockwise until the stem does not move
separately from the front wheel (Figure 3).
7 Make sure the handlebar is aligned with the front wheel before
tightening and the stem is not set above the maximum height
indicator. In order to get the bolt securely tight, you may need
to use a pair of pliers for leverage.
Figure 3 Figure 4
8 Position the handlebar to your desired comfort level and
lock them into place by pushing the handle back down. Make
sure that you do not exceed 80 degrees while positioning the
adjustable stem (Figure 4) so that the locking mechanism
can securely fasten. If there is movement after pushing the
handle down or it is too tight to push down, you can tighten or
loosen the tension adjustment screw (Figure 5) with a 2.5 mm
wrench.
Figure 5
Continued on next page...
Assembly Instructions 21ASSEMBLY INSTRUCTIONS
Trike
Insert seat post into seat tube. Make sure the seat is tight enough
so that you can’t twist it out of alignment. Pull the seat clamp
handle away from the seat post and slide the seat up or down to
adjust it (Figure 1). Move the clamp handle inward toward the seat
post so it is held tight by the clamp (Figure 2).
Figure 1 Figure 2
This should require a fair amount of force to ensure the seat post
is held tight. If necessary, tighten the clamp bolt with a 4 mm Allen
wrench while in the open position; turning the bolt clockwise will
increase the clamping force and counter-clockwise will decrease
the clamping force. Make sure the seatpost is not set with the
vertical maximum height marks above the clamp.
22 Assembly InstructionsUsing the 15 mm wrench provided in the tool
kit, attach and tighten the pedals. PLEASE
NOTE – The pedals are marked “L” for Left
and “R” for Right. The left pedal is attached
by turning it counterclockwise and the right
pedal is tightened by turning it clockwise.
Make sure the pedals are tightly attached to
the crank arms to prevent stripping.
If the disc brakes are rubbing after installation, refer to Support
on our website at support.pedego.com
Torque Specs
Item Nm
Handlebar Stem 20-29 Nm
Seatpost Clamp 3-4 Nm
Seat Rail Clamp 15-20 Nm
Front Axle Nuts 29-44 Nm
Rear Axle Nuts 29-44 Nm
Pedals 35 Nm
Assembly Instructions 23SAFETY
All Pedego Models
Helmet:
Always wear an approved helmet while riding your Pedego and
follow the helmet manufacturer’s instructions for fit, use and care
of your helmet. It is your responsibility to familiarize yourself with
the laws of where you ride your Pedego and to comply with all
applicable laws.
Mechanical Safety Check:
Check the condition of your Pedego before every ride. Make sure
no nuts, bolts or accessories are loose, with particular attention
to the front axle and handlebar stem. Make sure the tires are
correctly inflated with the recommended air pressure that is
located on the side wall of every tire. Check the brakes for proper
operation.
You must take your bike in to be serviced and checked by a
qualified bike mechanic after 100 miles (161 kilometers) of riding.
This is a standard good practice for any new bike as cables will
stretch and components will ‘break in’. The service must include
spoke tensioning for both front and rear wheels.
24 SafetyYour First Ride:
When you buckle on your helmet and go for your first ride, be sure
to pick an area away from cars, other cyclists, obstacles or other
hazards in order to become familiar with the controls, features and
performance of your new Pedego.
Additional Passengers:
Most Pedego models are designed for one passenger only
(except for the Tandem and Stretch). DO NOT carry any additional
passengers on the front or rear of the bike.
Weight Capacity:
Pedego Electric Bikes are designed with a maximum weight
capacity of 250 pounds (113 kg) for most models. When bikes
are equipped with the Magnesium Wheels upgrade, the weight
capacity increases to 350 pounds (158 kg). Exceeding the
maximum weight capacity can result in damage of the bike
which can lead to serious injury. The Stretch and Tandem have a
maximum weight capacity of 400 pounds (181 kg).
Safety 25ADDITIONAL SAFETY
Stretch
Getting to Know Your Cargo Bike:
Carrying a load and riding a long-wheelbase bike both require
getting accustomed to. Practice maneuvering and braking on a
flat, hazard and traffic-free street with and without a load before
going out into the world. Carrying a seated passenger or heavy
load involves risks, foremost of which can be decreased braking
power and increased stopping distance.
Sitting on the Carrier Seat:
Standing, kneeling, or sitting backwards or sideways (both legs
on the same side of the bike) on the carrier seat while the bike
is moving or stopped can easily result in broken limbs, loss of
control of the bike, destroyed rims, a destroyed bike frame, or
worse. Do not use with passengers on the carrier seat unless the
side skirts are attached.
26 SafetyChildren:
The user of this product acknowledges both an understanding and
an assumption of the risks involved in cycling, cycling with cargo,
and cycling with a passenger. Children incapable of riding a bike
on their own or under the age of 6 should not ride on the Pedego
Stretch as passengers, unless it’s equipped with an approved
Child Seat accessory. Children should not ride as passengers
without an adult operating the Pedego Stretch. Do not use with
children unless the side skirts are attached.
Use Good Judgment:
Make sure no straps are dangling where they could get caught in
the wheels. No bags, boxes or any items are in a position where
they could be caught in the spokes, Double check your load for
security and stability. Check that your brakes are well adjusted.
Check to see that your wheels are securely fastened. Check that
your helmet is securely fastened. Make sure no components or
frame members are cracked or broken. In general, if at any time
you notice a crack or bend in your bike, stem, forks, or bars of your
bicycle, stop riding immediately; take your Pedego to your local
bike shop and have them inspect it.
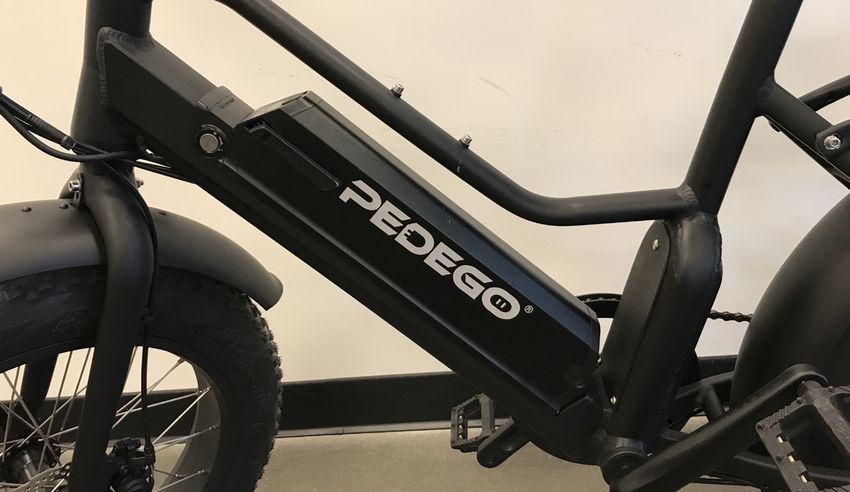
Safety 27OPERATING PROCEDURES
Boomerang, Boomerang Platinum, City Commuter,
City Commuter Lite, City Commuter Mid-Drive, City
Commuter Platinum, Comfort Cruiser, Interceptor,
Interceptor Platinum, Tandem
To be able to use the electric motor, the battery must be mounted by
sliding the fully charged battery forward into the battery holder.
The battery automatically locks into the bike when fully inserted
in the battery holder. The locking mechanism is spring loaded and
unlocks when the key is turned to the open position, allowing the
battery to slide out. The battery must be locked when riding or it
may fall out. The key does not have to be in to operate the bike.
Locked Open
28 Operating ProceduresThe on/off switch is located on the bottom of battery. After fully
inserting the battery into place, turn the battery on by flipping
the switch to the “|” position. Be sure to turn off the power when
the Pedego is not in use or is recharging by clicking the battery
switch to the off “O” position.
Off On
Operating Procedures 29OPERATING PROCEDURES
Ridge Rider, Trail Tracker, Trail Tracker Gorilla
To be able to use the electric motor, the battery must be mounted
by placing the bottom of the fully charged battery into the down
tube, then sliding the rest of the battery (using the base as a
hinge) into the down tube.
Fully Inserted
The battery automatically locks into the bike when fully inserted
in the battery holder. The locking mechanism is spring loaded and
unlocks when the key is turned to the open position, allowing the
battery to slide out. The battery must be locked when riding or it
may fall out. The key does not have to be in to operate the bike.
Locked Position Open Position
30 Operating ProceduresThe on/off button is located on the top of the battery. After fully
inserting the battery into place, turn the battery on by pushing
down the silver power button (it will light up green when powered
on). Be sure to turn off the power when the Pedego is not in use
by holding the same button for 3 seconds (the green light will turn
off.)
Off Position On Position
Your Pedego Ridge Rider or Trail Tracker battery has a deep sleep
function integrated into the battery management system or BMS.
If your battery is in deep sleep, to wake push the power down and
hold for 10 seconds, the button will flash green, wait 5 seconds
and push the button down again to power on. When battery is not
in deep sleep a single immediate push will turn the battery on. To
turn the battery off push down the power button for 3 seconds.
Operating Procedures 31OPERATING PROCEDURES
Stretch
Lift up the seat by pressing the lever on the rear of the saddle to
create room to insert and remove the battery. Line the grooves on
the back of the battery with the battery holder and insert it fully,
then turn the key switch to the “LOCKED” position to secure the
battery in place. The key switch must be in the unlock position to
slide the battery in and out.
Insert Battery Key Position
The on/off switch is located on the side of battery. After fully
inserting the battery into place, turn the battery on by flipping the
switch to the “|” position. Be sure to turn off the power when the
Pedego is not in use or is recharging by clicking the battery switch
to the off “O” position.
BACK REST TOP
PLATFORM
FRONT RACK
WHEEL
GUARD
SIDE
PLATFORM
32 Operating ProceduresUpper Side Platform
The upper attachment points
have two bolts at the rear, and
one at the front. The bolt closer
to the wheel on the rear needs
to be aligned with the hole in
the side platform tube. The
Rear Insert Front Insert remaining shorter bolts tighten
against the tube.
Lower Side Platform
The lower attachment points
have two bolts on each end. The
longer bolts closer to the wheel
need to be aligned with the holes
in the side platform tube. The
shorter bolts tighten against the
Rear Insert Front Insert
tube.
Back Rest
The back rest is secured with two
bolts which insert into holes in
the back rest tube and allow for
up and down positions. The long
bolts need to be aligned with the
holes in the back rest tube.
Up Position Down Position
Pannier Bar & Wheel Guard
The pannier bar attaches to the
frame with two bolts at the rear
and front. The skirt is attached
with Phillips head bolts to the
backside of the pannier bar, and
at two points on bike frame.
Pannier Attachment Frame Screws
Operating Procedures 33OPERATING PROCEDURES
Latch
To be able to use the electric motor, the battery must be mounted
by sliding the fully charged battery forward into the battery holder.
Partially Removed Fully Inserted
The battery automatically locks into the bike when fully inserted
in the battery holder. The locking mechanism is spring loaded and
unlocks when the key is turned to the open position, allowing the
battery to slide out. The battery must be locked when riding or it
may fall out. The key does not have to be in to operate the bike.
Locked Position Open Position
34 Operating ProceduresThe on/off switch is located on the bottom of battery. After fully
inserting the battery into place, turn the battery on by flipping the
switch to the “|” position. Be sure to turn off the power when the
Pedego is not in use or is recharging by clicking the battery switch
to the off “O” position.
On Position Off Position
Latch Belt Tensioner
Your Latch is equipped with a belt tensioner on the drive side (right
side) rear dropout. This is to ensure proper tension on the belt is
kept within a certain tolerance range. If the belt is too loose you
risk the belt falling off the crank arm or skipping. If the belt is too
tight you risk excessive resistance when pedaling and hub issues/
noises. The proper belt tension should be between 28-40lbs. To
adjust, loosen both axle nuts so that the wheel can move freely in
the dropout. To tighten, turn the locknut clockwise until you have
reached the desired tension. To loosen, turn the locknut counter-
clockwise until you have reached the desired tension. Tighten both
axle nuts affixing the wheel into the dropouts.
Operating Procedures 35FOLDING GUIDE
How to Fold the Pedego Latch
1 Lower the seat all the way down.
2 Rotate the crank arms to the 3 and 9 o’clock positions
with the non-drive side towards the front of the bike.
Lower Seatpost Position Pedals
3 Fold both pedals.
Open Position Closed Position
4 Turn the handlebar down so the brake levers
lineup with the handlebar stem.
5 Lower the handlebar stem.
Release Clamp Rotate Handlebar Lower Stem
36 Folding Guide6 Fold the entire handlebar stem down.
7 Put the kickstand up.
Release Clamp Fold Stem Put Up Kickstand
8 Open the Latch.
9 Fold the bike in half.
Undo Frame Latch Fully Open Latch Fold In Half
10 Pin the front wheel to the rear wheel where it will lock into
place.
Pin Wheels Use Seatpost As Rest
Folding Guide 37OPERATING PROCEDURES
Trike
Caution
All tricycles are susceptible to tipping at speed while turning.
The rear bucket is not approved for transporting people.
DO NOT EXCEED 20 KPM IN ANY RIDING CONDITIONS
To be able to use the electric motor, the battery must be mount-
ed by placing the bottom of the fully charged battery into the
top tube, then sliding the rest of the battery (using the base as a
hinge into the top tube.
Locked Position Open Position
The battery must be locked into place when fully inserted in the
battery holder. To do so, turn the key clockwise until it stops.
Check that the battery is locked in place by lightly pulling up on
the handle. The battery must be locked when riding or it may fall
out. The key does not have to be in to operate the bike.
Power for the Trike and battery is controlled through the LCD
screen located on the left handlebar grip. To power on the Trike,
make sure the battery is fully inserted and hold the power button
on the LCD. To power down the Trike, hold the power button again.
38 Operating ProceduresParking Brake Operation
Your Pedego Trike is also equipped with a parking brake for both
the front and rear levers. The parking brake is the silver pin located
on the brake lever body. To lock the parking brake, pull the lever
firmly, press down on the parking brake pin and release the lever. To
release the parking brake, simply pull the brake lever towards the
grips and the parking brake pin will disengage.
Parking Brake location Parking brake activated
Bucket
Your Pedego Trike is equipped with a rear bucket:
Exterior Bucket Dimensions:
25.8” L x 29.1” W x 13.8” H
Bucket Opening:
13.25” L x 20.25” W
Volume: ~6ft3
Maximum Capacity: 50lbs
Operating Procedures 39OPERATING PROCEDURES
Element
To be able to use the electric motor, the battery must be mounted
by placing the bottom of the fully charged battery into the down
tube, then sliding the rest of the battery (using the base as a
hinge) into the down tube.
40 Operating ProceduresFRONT SUSPENSION FORK
Boomerang Platinum, City Commuter Platinum,
Interceptor Platinum, Ridge Rider
Front Suspension Travel & Sag Guide
A suspension fork is effective at both absorbing bump forces and
helping the tire track the ground for improved traction and braking
control. When in active mode, a fork will rely on “SAG” to keep the
front tire in better contact with the ground during braking under
most conditions. The chart should be used as a general guideline.
Pedego Model Travel Sag % Sag (mm)
Boomerang & 80 mm 15-25% 12-20 mm
Interceptor Platinum
Ridge Rider 100 mm 15-30% 15-30 mm
City Commuter Platinum 26” 60 mm 15-25% 9-15 mm
City Commuter Platinum 28” 50 mm 15-25% 7.5 -12.5 mm
Air Pressure
As a general guide, pump the main chamber (air spring) to a
pressure equal to about 50% of your body weight for both the
Interceptor Platinum and Ridge Rider, and about 70% of your body
weight for the Trail Tracker.
Sag
Sag is a measurement of the amount of suspension fork travel
with the rider stationary in their normal riding position. The Sag
depends on the position and weight of the rider and should be
between 15% and 30% of the fork’s max travel depending on the
intended use and preferences.
The suspension is preset from the factory. Please visit your local
dealer if any adjustments are needed or to purchase a suspension
pump.
Front Suspension Fork 41Setting Air Pressure and Measuring Sag
1 Thread a suspension pump onto the valve until it is snug.
2 Pump the suspension fork up to the desired pressure.
Never exceed the recommended maximum air pressure.
Pedego Model Fork Manufact. Max Pressure
Boomerang & RST 175 psi
Interceptor Platinum
Ridge Rider RockShox 205 psi
City Commuter Platinum RST 175 psi
3 Attach a zip tie loosely, to the suspension fork stanchion and
slide it all the way down to the fork seal. Carefully mount the
bicycle and take normal riding position. Dismount the bicycle
and measure the distance between the zip tie and fork seal.
Check the sag measurement with the chart recommendation
and adjust air pressure accordingly. Remove the zip tie and
with a clean rag, wipe any grease from the stanchion prior to
riding.
Note: It may be necessary to lean against a wall when measuring sag.
Measuring Sag Fork Lockout
The Interceptor Platinum, City Commuter Black Edition and Ridge
Rider suspension forks are equipped with a lockout lever to make it
easier to ride on flat ground when you don’t need the suspension.
42 Front Suspension ForkGEARS
Boomerang, Comfort Cruiser, City Commuter, City
Commuter Lite, City Commuter Mid-Drive, Interceptor,
Stretch, Stretch Dual-Drive, Tandem, Trail Tracker, Trail
Tracker Gorilla
Your Pedego is equipped with 7 speeds. The first gear is for easier
and uphill pedaling, and the last gear is for maximum speed on
level or downhill terrain. Change gears only while pedaling. The
rear wheel contains seven chain sprockets. When the chain is
around the largest sprocket, you are in 1st gear, or the lowest
gear. The high gear will have the derailleur positioned so that the
chain is directed around the smallest gear. Every position on the
gear selector should cause a gear change. Adjustments require
fine tuning and should only b e made by a qualified technician.
Avoid changing gears very rapidly from first gear to the last gear
or vice versa. If you change multiple gears too quickly, you could
have the chain come off the front sprocket.
GEAR SENSOR
City Commuter Mid-Drive
The City Commuter Mid-Drive is equipped with a gear sensor that
allows it’s rider to shift the bike with confidence. It accomplishes
this by sensing any time the rider shifts to a different gear
and momentary pausing the motor to reduce stresses on the
drivetrain.
Thumb Shifter 7 Gears
Gears 43GEARS
Latch & Trike
Your Pedego is equipped with a 3 speed Shimano Nexus internal
hub. This system requires no derailleur, which makes for a quiet
and clean experience! The shifter for the internal system is located
on the left side of the handlebars. The gear ratio will enable you to
ride the bicycle in any of the pedal assist modes.
3 Speed Left Hand Grip Shifter Internal Nexus 3 Speed Hub and Bell Crank
Troubleshooting Tip
To adjust the 3 speed shifting system for smooth operation, twist
the shifter into 2nd gear and look through the window on the bell
crank (attached to the rear axle). The yellow mark on the shift pin
should line up between the two yellow lines on the bell crank. If
it is off slightly, turn the barrel adjuster at the bell crank or shifter
until the yellow mark lines up between the two yellow lines.
44 GearsGEARS
Boomerang Platinum, City Commuter Platinum,
Interceptor Platinum, Ridge Rider
Your Pedego is equipped with 10 speeds. The first gear is for
easier and uphill pedaling, and the last gear is for maximum speed
on level or downhill terrain. Change gears only while pedaling.
The rear wheel contains ten chain sprockets. When the chain is
around the largest sprocket, you are in 1st gear, or the lowest gear.
The high gear will have the derailleur positioned so that the chain
is directed around the smallest gear. Every position on the gear
selector should cause a gear change.
Adjustments require fine tuning and should only be made by a
qualified technician. Avoid changing gears very rapidly from first
gear to the last gear or vice versa. If you change multiple gears too
quickly, you could have the chain come off the front sprocket.
Thumb Shifter 10 Gears
Gears 45MECHANICAL DISC BRAKES
City Commuter Lite, Comfort Cruiser, Element, Latch, Trail
Tracker 20”, Trike
Your Pedego is equipped with
disc brakes for maximum reliability.
Applying hand pressure to the brake
levers will engage the brake pads
against the brake rotor, creating friction
and slowing down the wheel. The more
hand pressure applied to the brake
lever, the faster the bike will come to
a stop.
The rear brake should always be applied before and while the front
brake is applied. Applying only the front brake to slow or stop at
high speeds may result in the rider being ejected from the saddle
and continuing forward over the handlebars. It is best to apply
even pressure to both brake levers when slowing or stopping.
Bicycles equipped with disc brakes will occasionally make a slight
scraping noise when the wheels are turning without the brakes
being applied. This is normal.
Make sure that the brake lever does not contact the handle bar
when full hand pressure is applied (Figure 2). If so, then the brakes
must be adjusted by increasing the tension on the cable.
A quick adjustment may be made by screwing or unscrewing the
threaded barrel adjuster to take up any cable slack on the
brake lever until brakes are fine-tuned for safe stopping
(Figure 1). If the brakes are still not operating correctly, they
may require further adjustment by an experienced bicycle
mechanic. Note: The barrel adjusted should only be used to
take up initial cable slack, not to adjust the brake pads for wear.
46 Mechanical Disc BrakesFigure 1 Figure 2
WARNING:
• Disc brake rotors become hot during use. Do not touch
or come in contact with the disc rotor shortly after use.
• Wet weather will require a longer distance to stop. Brake earlier
and avoid sudden stops when riding in wet conditions.
New Brakes Bed-in Procedure
New brakes will require a “bed-in” procedure prior to your first ride
which will ensure the most consistent and powerful braking feel.
1 Find a safe riding area that will allow for moderate speed.
Remain seated during the entire procedure for optimal results.
Important Note: Do not lock up the wheels at any point
during the bed-in procedure.
2 Accelerate the bike to a moderate speed, then firmly squeeze
the brake levers until you are at walking speed. Repeat this
process about twenty times.
3 Accelerate the bike to a faster speed, then firmly squeeze
the brake levers until you are at walking speed. Repeat this
process about ten times.
4 Allow the brakes to cool down before your first ride.
Mechanical Disc Brakes 47HYDRAULIC DISC BRAKES
Boomerang, Boomerang Platinum, City Commuter, City
Commuter Mid-Drive, City Commuter Platinum, Interceptor,
Interceptor Platinum, Ridge Rider, Stretch, Tandem, Trail
Tracker, Trail Tracker Gorilla
Your Pedego is equipped
with hydraulic disc brakes for
maximum reliability. Applying
hand pressure to the brake
levers will engage the brake
pads against the brake rotor,
creating friction and slowing
down the wheel. The more
hand pressure applied to the
brake lever, the faster the bike
will come to a stop.
The rear brake should always be applied before and while the front
brake is applied. Applying only the front brake to slow or stop at
high speeds may result in the rider being ejected from the saddle
and continuing forward over the handlebars. It is best to apply
even pressure to both brake levers when slowing or stopping.
Bicycles equipped with disc brakes will occasionally make a slight
scraping noise when the wheels are turning without the brakes
being applied. This is normal.
Make sure that the brake lever does not contact the handlebar
when full hand pressure is applied (figure 2). The contact point
should feel firm and solid. If the lever travels all the way to the
handlebar or feels spongy, they may require service by a qualified
bicycle technician.
If the brakes are still not operating correctly, they may require
further adjustment by an experienced bicycle mechanic.
48 Hydraulic Disc BrakesFigure 1 Figure 2
WARNING:
• Disc brake rotors become hot during use. Do not touch
or come in contact with the disc rotor shortly after use.
• Wet weather will require a longer distance to stop. Brake earlier
and avoid sudden stops when riding in wet conditions.
New Brakes Bed-in Procedure
New brakes will require a “bed-in” procedure prior to your first ride
which will ensure the most consistent and powerful braking feel.
1 Find a safe riding area that will allow for moderate speed.
Remain seated during the entire procedure for optimal results.
Important Note: Do not lock up the wheels at any point
during the bed-in procedure.
2 Accelerate the bike to a moderate speed, then firmly squeeze
the brake levers until you are at walking speed. Repeat this
process about twenty times.
3 Accelerate the bike to a faster speed, then firmly squeeze
the brake levers until you are at walking speed. Repeat this
process about ten times.
4 Allow the brakes to cool down before your first ride.
Hydraulic Disc Brakes 49PEDAL ASSIST MODE (C500B)
Boomerang, Boomerang Platinum, City Commuter,
City Commuter Mid-Drive, City Commuter Platinum,
Interceptor, Interceptor Platinum, Latch, Ridge Rider,
Stretch, Stretch Dual-Drive, Trail Tracker, Trail Tracker
Gorilla, Trike
Your Pedego is equipped with an LCD meter that monitors pedal
assist, speed, odometer, trip distance, riding time, and battery energy
level. To turn the meter on, make sure the battery is fully inserted
into the Pedego and the on/off switch is in the on “|” position.
SPEEDOMETER
MPH
V
BATTERY
INDICATOR (V)
PEDAL
ASSIST TRIP
MI
CONTROLS PAS
PEDAL DISTANCE/
ASSIST RIDING TIME/
ODOMETER
Press the power button (top button) on the four button selector
located near the left grip on the handlebars to turn the meter on.
You can adjust the pedal assist power level to have more power by
hitting the [+] button (third button) and can move to a lower level
power by hitting the [-] button (fourth button).
When not riding the bike, you can turn off the meter by holding down
the power button (top button) for several seconds.
Throttle Overide Free Ride Cadence Mode
Full power on demand. Pedal just like a normal Reaches designated
Overrides pedal bicycle with all the speeds while pedaling.
assistance. display features active.
50 Pedal Assist ModeBoomerang, City Commuter, City Commuter Lite, Interceptor, Latch,
Stretch, Trail Tracker, Trail Tracker Gorilla
Throttle Overide
Throttle Free Cadence Throttle
Only Ride Mode Only
Boomerang Platinum, City Commuter Platinum, Interceptor Platinum,
Ridge Rider
Throttle Overide
Throttle Free Torque Travel Throttle
Only Ride Mode Mode Only
City Commuter Mid-Drive, Stretch Dual-Drive
Throttle Overide
Throttle Free Torque Throttle
Only Ride Mode Only
Trike
Throttle Overide
Throttle Free Torque Throttle
Only Ride Mode Only
Torque Mode Travel Mode Throttle Only
Proportional Reaches top speed Full power on demand.
assistance based on while pedaling. No automatic pedal
how hard you pedal. assistance.
Pedal Assist Mode 51METER PROGRAMMING & USE (C500B)
Boomerang, Boomerang Platinum, City Commuter,
City Commuter Mid-Drive, City Commuter Platinum,
Interceptor, Interceptor Platinum, Latch, Ridge Rider,
Stretch, Stretch Dual-Drive, Trail Tracker, Trail Tracker
Gorilla, Trike
The LCD meter on your Pedego can be programmed
to change various functions. MPH
Hold “SET” for 2 seconds to enter the setup interface. Single
press “SET” to cycle through the V following modes:
“SET 1” - Press [-] and the Trip will reset to 0.
“SET 2” - Set the
TRIP max speed.
MI
PAS
“SET 3” - Set the wheel size.
“SET 4” - Set the bike in either MPH or KPH
“SET 5” - Pedal Assist Limiter - on/off
“SET 6” - Throttle Limiter - on/off
“SET 7” - Torque Sensor - on/off
“SET 8” - Class 3 Mode - on/off
“SET 9” - Throttle Brightness
For “SET 5” and “SET 6,” turn each respective function to off to lower
the top speed.
For “SET 7”, turn the function to off to disable the torque sensor.
(Only applicable to Boomerang Platinum, City Commuter Platinum,
Interceptor Platinum and Ridge Rider.)
For “SET 8”, turn off to disable class 3 functionality, and on to enable
class 3 functionality. (Available on select models, ask your local
Pedego dealer for more information.)
52 Meter Programming UseFor “SET 9”, use numbers 1-5 to adjust the LED brightness. In level
0, the LED will be off. (Only applicable to Boomerang, Boomerang
Platinum, City Commuter, City Commuter Mid-Drive, City Commuter
Platinum, Interceptor, Interceptor Platinum, Latch, Ridge Rider,
Stretch, Stretch Dual-Drive, Trail Tracker and Trail Gracker Gorilla)
Hold “SET” for 2 seconds to exit the setup interface.
Press the set button (second button) to switch the display
information. The order is: Trip Distance (TRIP), Riding Time (TIME),
and Odometer (ODO).
Press the power button (top button)
MPH
once while the meter is on to
turn on the backlight, as well as the integrated front and rear lights
on the Pedego. Press it once more to turn the lights and backlight
off. V
TRIPEach LCD Meter comes with a USB port
MI
PAS attached to the bottom of the meter to charge
your mobile devices. Hold down the [+] and
set buttons for 2 seconds to turn on the USB
charging. Hold the same buttons again for 2
seconds to turn this feature off.
The bars are an indicator that displays the amount of power that is
being drawn from the battery. The more bars that are displayed, the
more battery power is being used to power the Pedego.
After 5 minutes of inactivity, the LCD Meter will automatically turn
off to conserve power.
Meter Programming Use 53BMS COMMUNICATION
Boomerang, Boomerang Platinum, City Commuter,
City Commuter Mid-Drive, City Commuter Platinum,
Interceptor, Interceptor Platinum, Latch, Ridge Rider,
Stretch, Stretch Dual-Drive, Trail Tracker and Trail Tracker
Gorilla
On the above models, the battery is equipped with a BMS (battery
management system) with communication features. These three
features include the SOC (state of charge) percentage( % ), number
of charging cycles ( ), and the current voltage of the battery ( V ).
To cycle through the three modes, single press both the “SET” and
[+] buttons.
54 BMS CommunicationPEDAL ASSIST MODE (C300U)
City Commuter Lite, Comfort Cruiser, Element
Your Pedego is equipped with an LCD meter that monitors pedal
assist, speed, odometer, trip distance, riding time, and battery
energy level. To turn the meter on, make sure the battery is fully
inserted into the Pedego and the on/off switch is in the on “|”
position (City Commuter & Comfort Cruiser only).
BATTERY INDICATOR (V) SPEEDOMETER
Power MPH
PEDAL
ASSIST
CONTROLS TRIP
Assist
C300U
PEDAL DISTANCE/
ASSIST RIDING TIME/
ODOMETER
Press the power button [ ] on the three button selector located near
the left grip on the handlebars to turn the meter on. You can adjust
the pedal assist power level to have more power by hitting the [+]
button (top button) and can move to a lower level power by hitting
the [-] button (bottom button).
When not riding the bike, you can turn off the meter by holding down
the power button [ ] for two seconds.
Continued on next page...
Pedal Assist Mode 55City Commuter Lite, Comfort Cruiser, Element
Throttle Overide
Throttle Free Cadence Throttle
Only Ride Mode Only
Throttle Overide Free Ride Cadence Mode
Full power on demand. Pedal just like a normal Reaches designated
Overrides pedal bicycle with all the speeds while pedaling.
assistance. display features active.
56 Pedal Assist ModeMETER PROGRAMMING & USE (C300U)
City Commuter Lite, Comfort Cruiser, Element
The LCD meter on your Pedego can be programmed to change
various functions.
Press and hold [+] & [-] for 2 seconds to enter the setup
interface.
Single press [ ] to cycle through the following modes:
“SET 1” - Press [-] and the Trip will reset to 0.
“SET 2” - Set the max speed.
“SET 3” - Set the wheel size.
“SET 4” - Set the bike in either MPH or KPH
“SET 5” - Pedal Assist Limiter - on/off
“SET 6” - Throttle Limiter - on/off
For “SET 5” and “SET 6,” turn each respective function to off to lower
the top speed.
Press and hold [+] & [-] for 2 seconds to exit the setup
interface.
Single press [ ] to switch between the display information.
The order is: Trip Distance (TRIP), Riding Time (TIME),
Maximum Speed (MAX), and Odometer (ODO).
Press and hold [+] for 2 seconds, while the meter is on, to
turn on the backlight; press and hold [+] for two seconds to
turn the backlight off.
Continued on next page...
Meter Programming Use 57Each meter has an integrated USB
port located underneath to charge
your mobile devices. Press and
hold [ ] & [+] for 2 seconds to turn
on the USB charge function; press
and hold [ ] & [+] for 2 seconds to
turn the USB charge function off.
After 5 minutes of inactivity, the LCD Meter will automatically turn
off to conserve power.
58 Meter Programming UseHAND THROTTLE CONTROL
City Commuter Lite, Comfort Cruiser, Element, Trike
When the pedal assist mode is set to “0”,
the pedal assist and throttle function(s) do
not engage. When the pedal assist mode is
set to “6” the pedal assist function does not
engage and the throttle will accelerate the
bike forward. The throttle control is operated
on the right hand side. You control the throttle by twisting it from
its resting position. The farther the throttle switch is from its resting
position, the more power is delivered to the motor to accelerate the
Pedego. When you want to slow down, you simply release the throttle
and let it return to its resting position and simultaneously apply the
brakes. The Pedego also comes with a Throttle Override function
which allows the throttle to work in pedal assist modes.
Tandem, Trail Tracker 20”
Your Pedego electric bike is equipped with a
power and throttle control on the right hand
side. To power on your bike, first make sure the
switch to your battery is in the “ON” position.
Next, press the red button on the throttle
control, if your battery is charged all three
lights (red, yellow, green) should illuminate. The three lights indicate
your battery level; green being high-SOC (state of charge), yellow
being mid-SOC, and red being low-SOC. You control the throttle by
twisting it from its resting position. The farther the throttle switch
is from its resting position, the more power is delivered to the
motor to accelerate the Pedego. When you want to slow down, you
simply release the throttle and let it return to its resting position and
simultaneously apply the brakes. To power off the bike, press the red
button and the battery indicator lights will turn off.
Continued on next page...
Hand Throttle Control 59HAND THROTTLE CONTROL
Boomerang, Boomerang Platinum, City Commuter, City
Commuter Mid-Drive, City Commuter Platinum, Interceptor,
Interceptor Platinum, Latch, Ridge Rider, Stretch, Stretch
Dual-Drive, Trail Tracker, Trail Tracker Gorilla
When the pedal assist mode is set to “0”, the
pedal assist and throttle function(s) do not
engage, and the LED on the throttle will be red.
When the pedal assist mode is set to “6” the
pedal assist function does not engage and the
throttle will accelerate the bike forward. In this
mode, the LED on the throttle will be blue. The
throttle control is operated on the right hand
side. The throttle is controlled by twisting it from its resting position.
The farther the throttle switch is from its resting position, the more
power is delivered to the motor to accelerate the Pedego. When you
want to slow down, you simply release the throttle and let it return
to its resting position and simultaneously apply the brakes. Pedego
bikes also come with a Throttle Override function which allows the
throttle to work in pedal assist modes 1-5. When the pedal assist
mode is set to 1-5, the LED on the throttle will be green.
60 Hand Throttle ControlLIGHTS
Boomerang, Boomerang Platinum, City Commuter,
City Commuter Mid-Drive, City Commuter Platinum,
Interceptor, Interceptor Platinum, Latch, Trike
Your Pedego comes equipped with an active brake light, that will
illuminate when the brakes are engaged, in addition to the stan-
dard integrated front and rear lights. To turn the lights on, push
the power button on the LCD meter. To turn the lights off, repeat
pushing down the power button on the LCD meter.
Front Light Rear Light
LIGHTS
Trail Tracker
Your Pedego comes equipped with integrated front light that oper-
ates from the battery. To turn the lights on, push the power
button on the LCD meter. To turn the front light off, repeat pushing
down the power button on the LCD meter.
Front Light Continued on next page...
Lights 61LIGHTS
City Commuter Lite, Comfort Cruiser, Tandem
Your Pedego comes equipped with an integrated rear light
that operates from the battery. To turn the rear light on, push the
“rear light” button on the top of the battery. To turn the rear light
off, repeat pushing down the “rear light” button on the battery.
Rear Light
62 LightsCHARGER
All Pedego Models
Included with your new Pedego is a lithium ion battery, along with a
charger, which plugs into a standard household electric outlet.
A lithium ion battery requires specially designed chargers. You
should never charge your battery with a substitute charger that is
not designed for this use. Use of an unsuitable charger to charge
a lithium ion battery could result in over-heating, fire or even
explosion.
36v 48v (54.6) 52V (58.8)
52v Charging Port 48v Charging Port
Recharging the Battery
The Pedego battery may be charged while on the bike or removed
and charged at a location away from the Pedego. The battery is
easily removed by turning the key lock to the open/unlock position,
grasping the underside of the battery, and sliding the battery out of
the downtube by using the bottom side as a hinge.
To charge the battery, plug the charger into an AC outlet. The LED
indication light should be green showing the charger is working
normally. Then plug the charger into the charging port located on
the bottom or side of the battery by sliding open the charger cover.
Charger 63BATTERY AND CHARGER CARE
All Pedego Models
The charger will charge a fully depleted battery in 4—5 hours.
The indicator light on the charger will be red / orange when battery
is charging and will turn green when fully charged.
Avoid subjecting the battery to high temperatures, such as directly
under the sun, for prolonged periods of time. Recharge the battery
before it becomes completely discharged. Completely discharging
will reduce the numbers of recharging cycles during the battery’s
life and limit the capacity. Never store the battery in a discharged
state. After much use, your battery’s charge-holding capacity
will decrease. If you find that your battery does not hold a
sufficient charge, you should contact your local dealer to order a
replacement.
If the battery will not be used for an extended period of time, charge
it fully and recharge it every 2 months. Store it in a cool, dry place.
Your battery is engineered with precision for high capacity and a
long, useful life. Do not use it to power other electrical devices.
Improper use of the battery will damage the battery and shorten
its useful life and may cause fire or an explosion. If you experience
unusual sounds or odors coming from the charger or the battery,
unplug charger immediately and contact Pedego customer service.
• Recharge battery after every use.
• Do not disassemble or alter the battery or battery charger.
• Do not place the battery near fire or corrosive substances.
• Do not allow any liquids on or inside the battery/charger.
• Do not expose the battery/charger to extreme weather conditions.
• Do not operate the battery/charger if damaged.
• Recharge the battery only with a charger specified by the manufacturer.
• Do not use the battery/charger for any use other than its intended purpose.
• Only use the battery/charger on Pedego approved products.
64 Battery & Charger CareYou can also read