Audi A4 1.8T Ultimate Timing Belt Kit Installation Guide - ES#8146
←
→
Page content transcription
If your browser does not render page correctly, please read the page content below
Installation Procedures

          Audi A4 1.8T Ultimate Timing Belt Kit
                   Installation Guide
                        ES#8146

                   This tutorial is provided as a courtesy by ECS Tuning.

Proper service and repair procedures are vital to the safe, reliable operation of all motor
vehicles as well as the personal safety of those performing the repairs. Standard safety
procedures and precautions (including use of safety goggles and proper tools and equipment)
should be followed at all times to eliminate the possibility of personal injury or improper
service which could damage the vehicle or compromise its safety.

Although this material has been prepared with the intent to provide reliable information, no
warranty (express or implied) is made as to its accuracy or completeness. Neither is any
liability assumed for loss or damage resulting from reliance on this material. SPECIFICALLY,
NO WARRANTY OF MERCHANTABILITY, FITNESS FOR A PARTICULAR PURPOSE OR ANY
OTHER WARRANTY IS MADE OR TO BE IMPLIED WITH RESPECT TO THIS MATERIAL. In
no event will ECS Tuning, Incorporated or its affiliates be liable for any damages, direct or
indirect, consequential or compensatory, arising out of the use of this material.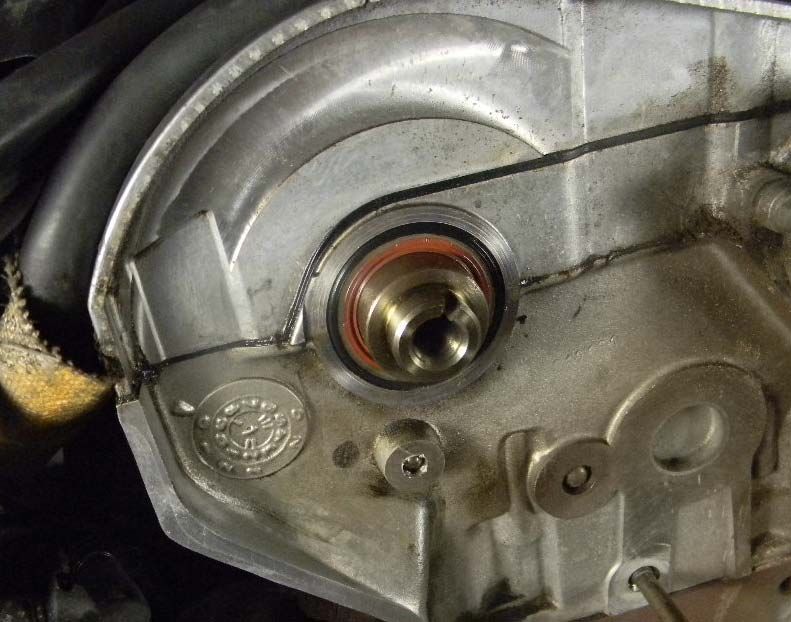
Page 1

                                  Installation Procedures
        Audi A4 1.8T Ultimate Timing Belt Kit Installation ES#8146

Procedure: Install ECS Tuning
Ultimate Timing Belt Kit - P/N ES#8146

Application Notes: This kit fits
A4 1.8T up to model year 2004 -
up to VIN# 8E 4 191 000

Kit Contents:
•   Timing belt
•   Accessory drive belt
•   Tensioner roller
•   Camshaft seal
•   Crankshaft seal
•   Hydraulic tensioner assembly
•   Metal impeller water pump
•   Replacement TTY crankshaft bolt
•   Crank pulley bolts (4)
•   2- 1.5 liter G12 coolant

This kit installation has been performed in-house at ECS Tuning, using our Ultimate Plus Timing Belt Kit,
ES#8146. Getting dirty gives us hands on experience and let’s us verify installation procedures. We experience issues
you may encounter.

This piece is not intended to replace every detail of the factory-defined procedure. It is a supplement. Should any
question arise that is not covered here, we urge you to reference the OEM-approved repair procedure.

We use common generic shop tools when possible for widest application; OEM authorized special tools are expen-
sive and less available outside dealerships and import repair specialists.
Page 2

                      Audi A4 1.8T Ultimate Timing Belt Kit
         This instructional pamphlet is provided as a courtesy by ECS Tuning. The information contained here
         is presented with no warranty or guarantees, expressed or implied. ECS assumes that the information
                           Installtion Guide ES#8146
         in this pamphlet will be used by a qualified auto technician or knowledgeable pro-sumer who has ac-
         cess to appropriate tools and has a basic understanding of recommended automotive procedures.

         Safety First
         Conventional wisdom says: Disconnect the battery before doing this repair. Our attorney agrees.

         However...
         Disconnecting the battery has a dark side you ought to know about. Doing so erases all volatile memory in
         your vehicle computer. This commonly includes electronic throttle control learned positions. Some vehicles
         will not idle following a power down until throttle position data are restored with a scan tool and the correct
         vehicle software.

            Additionally, other driver preferences, antitheft radio code, radio presets and clock, and OBD II emis-
            sions data will be erased if battery power is removed. This is an important consideration if your vehicle
            is subject to a scan tool emissions test; erasing computer memory resets all OBD II monitors to incom-
            plete, and your vehicle will not pass its emissions test until a global drive cycle completes all non-con-
            tinuous monitors.

         If you choose NOT to disconnect the battery, remove the ignition key and gather all copies of the ignition
         key and lock them away. Better still, mail them to yourself so nobody can crank over the engine or power up
         the ignition system until tomorrow’s mail arrives. If you crank the engine over with the T-belt removed, you
         will bend valves.

         Other Cautions
         Work carefully to avoid damaging wires and connectors. Avoid any test procedure that damages wire insula-
         tion or creates a short circuit—to voltage, ground, or another circuit. Failure to follow these and all other
         safety precautions and approved shop practices can result in costly vehicle damage and serious personal
         injury.

         Read the instructions completely before starting! Obtain all required tools. Reference factory repair instru-
         cions, when in doubt. If the installation procedures are beyond your tools and skills, contact a qualified
         installer for professional assistance.

Address: 1000 Seville Road, Wadsworth, OH 44281                       Phone: 1.800.924.5172                Web: www.ecstuning.com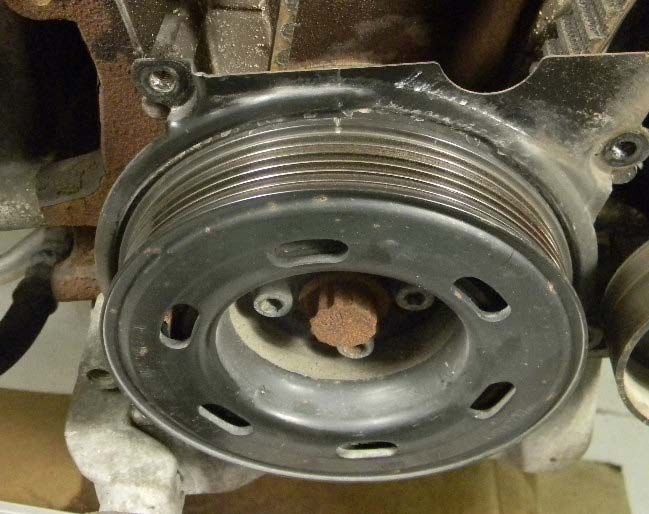
Page 3

         Audi A4 1.8T
         Ultimate Timing Belt Kit Installation ES#8146

         Preparations

         Tools Required:
         • Drain pans for coolant and power steering fluid
         • Assorted Torx® drivers
         • Assorted Allen sockets
         • Assorted sockets, including 17 mm for camshaft nut and 19 mm 12-point for crankshaft nut.
         • 17 mm open end (to rotate accessory belt tensioner)
         • Torque wrench
         • Snap ring pliers (or VW tool for tensioner pulley)

         Tightening Torques
         • Water pump bolts - 15 Nm
         • Drive belt covers - 10 Nm
         • Accessory belt tensioner to block - 23 Nm
         • Drive belt tensioner pulley retaining nut - 27 Nm
         • Camshaft sprocket bolt - 65 Nm (48 ft-lb)
         • Crankshaft sprocket bolt - 90 Nm (66 ft-lb) plus ¼ turn (TTY bolt - always replace)
         • Crankshaft pulley retainer bolts 10 Nm + 90°+ ¼ turn (TTY bolt - always replace)

         Special Notes
         No radiator drain plug - remove ECT sensor from bottom hose or pull bottom hose.
         No radiator hose clamps - release clip attachments

Address: 1000 Seville Road, Wadsworth, OH 44281                 Phone: 1.800.924.5172            Web: www.ecstuning.com
Page 4

         Audi A4 1.8T
         Ultimate Plus Timing Belt Kit Installation ES#8146

         Vehicle Overview
         This Audi A4 comes to us with 152,000 miles on the odometer. It’s hemorrhaging coolant; the recov-
         ery jug is desert dry. There’s a slow, steady trickle from the lower timing cover, directly below the water
         pump.

         We pop the top timing cover, and sure enough, the water pump is the source of our leak. The timing
         belt is way loose, and fits the cam and crank sprockets like socks on a chicken. It’s time to show the A4
         some love.

         At this mileage, we’ll go all out and use the ECS Ulimate Plus Kit (ES#8146), since it includes new
         timing and accessory belts, new cam and crank seals, a new crank sprocket bolt, four new crankshaft
         pulley bolts, timing belt tensioner assembly and roller, water pump with metal impeller, and two jugs
         of fresh Pentosin 12 coolant.

         Access is the main challenge. If this engine is on a stand, belt and pump replacement is much easier.
         But the 1.8T is a shoehorn fit in the A4 engine bay. We’re talkin’ size 12 foot in a size 10 shoe. The
         front of the engine is über close to the electric cooling fans and to the radiator/header support member
         that spans the front of the vehicle. You can get your hand in there, but forget about actually working
         on the front of the engine.

         Since this is a photo shoot (and we don’t have a camera that shoots around corners!), we’ll strip off
         everything in front of the engine: front bumper, radiator, condenser, headlight assemblies, and radiator
         fan support member.

         FYI, there is a service access compromise. Special tool hanger bolts are available for this job from the
         VW/Audi special tools people. They’re nothing more than a couple of long, hardened bolts with metal
         tube collars that let you hang the front header away from the engine. Screw the bolt hangers into spe-
         cial threaded holes in the front bumper flanges, then loosen the front end and slide it forward several
         inches. This adds wiggle room and improves visibility; a tad. First-timers may still find working in
         close quarters challenging. Flat rate techs who do these in their sleep are already draining the coolant.

         We’ll admit that removing the whole front end must seem like a LOT of work. It is, sorta. But once
         everything is exposed, it was great seeing our work. If this is your first time through this procedure, you
         may want to take the long way home; it may be the shortest route.

Address: 1000 Seville Road, Wadsworth, OH 44281                    Phone: 1.800.924.5172               Web: www.ecstuning.com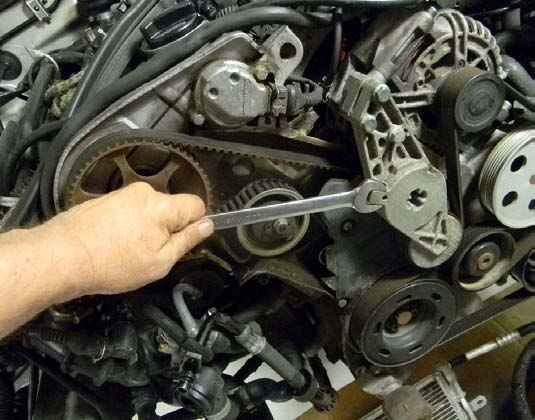
Page 5

  Section 2 - Belt Replacement

  Audi A4 1.8T Ultimate Plus Timing Belt Kit Installation ES#8146

     1                                                                 2

Our sequence starts with the front of the car removed,          Remove the accessory belt. Rotate the tensioner to leave
and the front of the engine exposed. Remove the timing          enough slack in the accessory belt to remove it. Use a
covers. The top cover is held in place by two spring clips;     17 mm open end to rotate the tensioner clockwise.
no bolts.

     3                                                                 4

With the accessory belt removed, unbolt the tensioner           Remove the three middle cover bolts. Remove the middle
assembly and remove it. Three bolts.                            cover. The bottom cover cannot be removed until we
                                                                remove the crank pulley.

Address: 1000 Seville Road, Wadsworth, OH 44281                        Phone: 1.800.924.5172          Web: www.ecstuning.com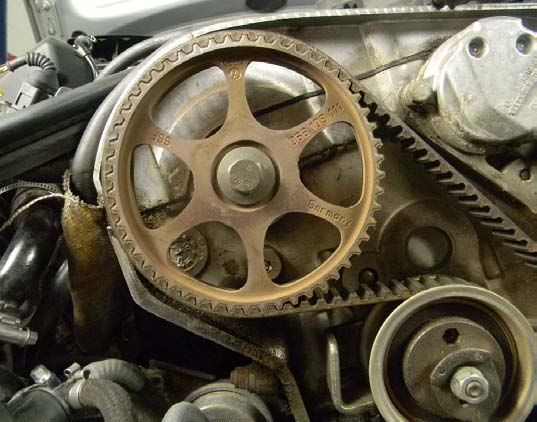
Page 6
Section 2 - Belt Replacement
Audi A4 1.8T Ultimate Plus Timing Belt Kit Installation ES#8146
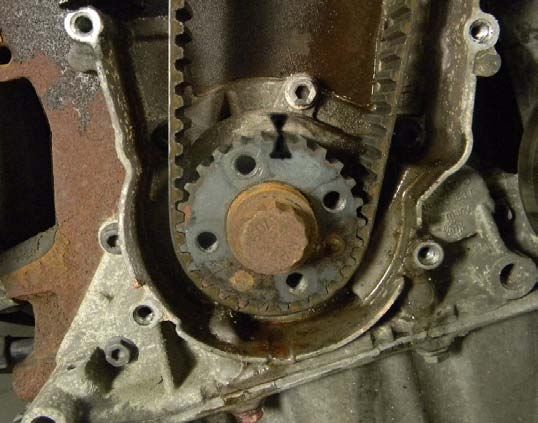
5 6
Bar the engine over by hand using a 19 mm 12-point Make sure the timing marks on the cam sprocket and
wrench or socket. Align the timing mark on the crank timing cover housing are aligned, as shown. Orange box
pulley with the mark on the bottom cover. Check the cam added for emphasis.
sprocket timing mark at the same time (step 6). If it does
not align with the match mark on the rear cam housing
cover, rotate the crankshaft clockwise 180 degrees.
7 8
Being careful not to turn the crankshaft, unscrew the Remove the two lower cover retaining bolts. Remove the
four Allen bolts holding the crankshaft pulley; remove it, lower cover.
without turning the crankshaft!
Address: 1000 Seville Road, Wadsworth, OH 44281 Phone: 1.800.924.5172 Web: www.ecstuning.com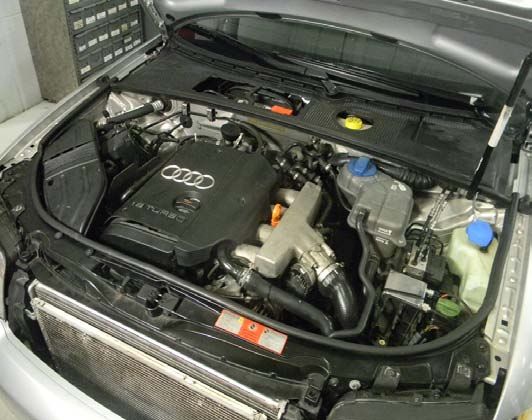
Page 7

  Section 2 - Belt Replacement

  Audi A4 1.8T Ultimate Plus Timing Belt Kit Installation ES#8146

     9                                                           10

Do this immediately: Get a black felt tip pen. Make           Remove the crankshaft sprocket retaining bolt. This may
match marks: on one tooth of the crankshaft sprocket          be a lot easier said than done. The bolt size is a 19 mm
and another on the engine. Mark the top of the tooth,         12-point. This bolt laughed at our ½ inch impact, an
too. This step is very important. We will need these marks    Ingersoll with hair on its chest that commonly takes no
later to confirm crankshaft position as we install the new    prisoners. We fired up the torches and heated the bolt to
timing belt.                                                  soften up the thread locker, and it came out.

   11                                                           12

Before we remove the old timing belt, we loosen the           There’s a small tab on the adjustment cap on the tensioner
cam sprocket retaining bolt. Loosen both crank and cam        roller. Right now, it points to 4 o’clock (bottom arrow).
sprocket bolts before removing the timing belt. We don’t      Note this position for reference and comparison to the
want the pistons moving up and down out of synch with         new tensioner after it is installed and adjusted. (A digi-
the cam. Bent valves suck.                                    tal picture is a great way to keep track of your progress.)
                                                              Loosen the roller nut (top arrow) and rotate the roller to
                                                              create slack in the timing belt.

Address: 1000 Seville Road, Wadsworth, OH 44281                     Phone: 1.800.924.5172           Web: www.ecstuning.com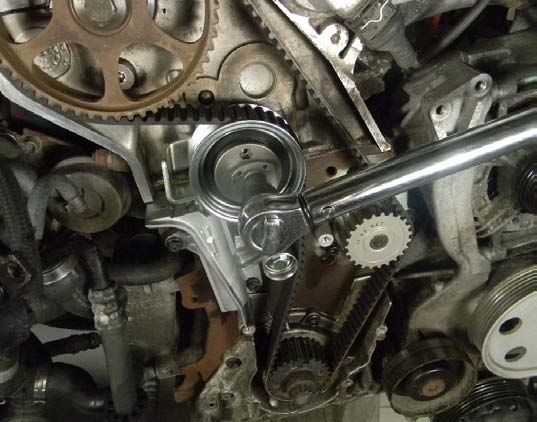
Page 8

  Section 2 - Belt Replacement

  Audi A4 1.8T Ultimate Plus Timing Belt Kit Installation ES#8146

   13                                                              14

Remove the old timing belt. Unbolt and remove the               Scrape away the scale at the hole chamfer and also inside
water pump. The pump seals to the block with an o-ring,         the hole where the o-ring will seat. Hardened scale can
and the block mating surface here is covered with heavy         damage the new water pump o-ring during pump instal-
rust scale. The old pump didn’t want to leave, so we forc-      lation, causing a leak. We clean carefully.
ibly evicted it with an enthusiastic combination of twist-
ing and prying.

   15                                                             16

We spend more time cleaning the block than it takes to          An o-ring is all that keeps the coolant inside the engine
actually install the pump. Satisfied that we have every-        (lower arrow). It’s the reason we were so careful prepar-
thing shipshape, we lube the pump o-ring with fresh             ing the water pump hole in the block. The new pump is
coolant, slide the new pump into the block, and bolt it up.     installed and ready to go (upper arrow).

Address: 1000 Seville Road, Wadsworth, OH 44281                       Phone: 1.800.924.5172            Web: www.ecstuning.com
Page 9
Section 2 - Belt Replacement
Audi A4 1.8T Ultimate Plus Timing Belt Kit Installation ES#8146
17 18
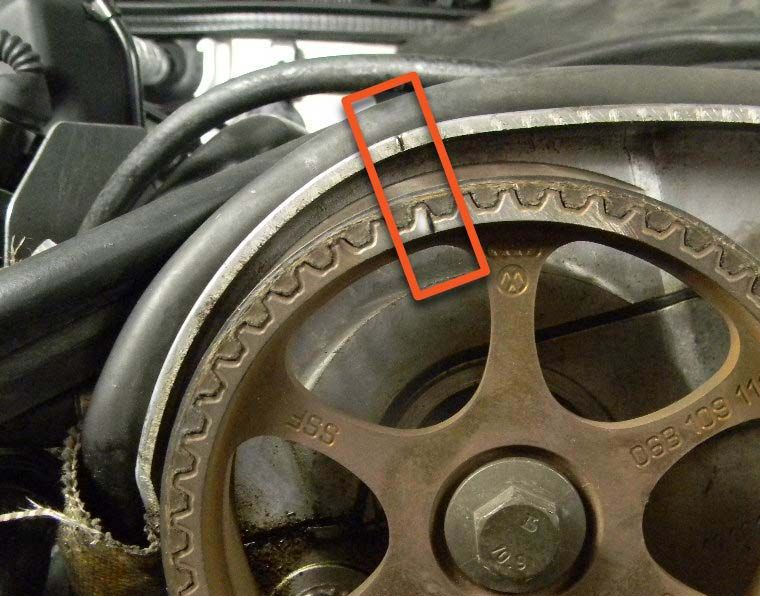
Time to install new cam and crankshaft seals. Remove the Apply a drop or two of clean motor oil to the cam sealing
cam retainer bolt loosened earlier and pull the sprocket surface and slide the seal over the cam snout. Use a seal
off the cam snout. We pry out the old seal using a ge- driver or other suitable tube (a deep socket also works),
neric seal puller that we have ground thin enough to slide and tap the seal into place. We clean away old oil residue
between the seal and cam without scarring the camshaft from the surrounding area so everything looks profes-
sealing surface. sional.
19 20
Hold the cam with a suitable holder, and torque it to 65 Second verse, same as the first. Repeat the seal replace-
Nm (48 ft-lb). The cam sprocket should slide on easily. ment sequence, only this time at the crankshaft. The old
Align the sprocket tab with the notch in the cam snout crank seal was so heat-hardened that it came out in black
before tightening the bolt. chunks. We appreciate having a new seal in the kit. A
36mm socket made a great seal driver.
Address: 1000 Seville Road, Wadsworth, OH 44281 Phone: 1.800.924.5172 Web: www.ecstuning.comPage 10
Section 2 - Belt Replacement
Audi A4 1.8T Ultimate Plus Timing Belt Kit Installation ES#8146
21 22
1
2
Reinstall the crank sprocket; replace the sprocket bolt Install the new tensioner and tensioner roller on the
with a new one, and tighten to 90 Nm (66 ft-lb), plus engine. Slide the roller over the stud and snug, but do not
¼ turn. You must hold the crankshaft to keep it from full tighten, the retainer nut (1). At this point, the lock
turning as you tighten the bolt. If this is your first T-belt plate is still installed in the tensioner (2).
replacement on this engine, see our special note at the end
of this article before proceeding. This is critical!
23 24
To better illustrate what’s going on with the tensioner, Install the timing belt. There should be no slack in the
let’s compare the old and new parts. The piston in the old belt on the tight side (yellow). Belt teeth should be fully
tensioner is fully extended. The piston in the new tension- seated in the cam, crank, and water pump sprockets. All
er is fully retracted and held in place by a retainer plate belt slack should be in the blue area, on the tensioner side.
(arrow). Do not remove the plate yet! The cam timing mark (see step 6) and the timing felt
marker match marks (see step 9), should be aligned. Now
you know why we made those marks!
Address: 1000 Seville Road, Wadsworth, OH 44281 Phone: 1.800.924.5172 Web: www.ecstuning.comPage 11 Section 2 - Belt Replacement Audi A4 1.8T Ultimate Plus Timing Belt Kit Installation ES#8146 25 26 Here’s where you can get into trouble. See the timing Now what? We can turn the cam sprocket clockwise, align marks? Even though we aligned the cam sprocket tim- the marks, and clamp it in place (somehow) while we in- ing marks before removing the timing belt, the cam has stall the belt. Or we can rotate the crank pulley counter- turned counterclockwise a tooth on its own. The cam clockwise a couple of teeth and install the belt. Then, when lobes and valve springs are responsible. This is where the we realign the crank marks after the belt is installed, the cam wants to center itself between the cam lobes. cam will be pulled back to its correct timing position. 27 28 Timing marks both aligned? Sure? Then it’s time to adjust Let’s zoom in close. There’s no gap between the roller belt tension. Insert an Allen tool into the hole in the outrigger bracket and the tensioner piston. The tensioner tensioner roller. Rotate the roller center counterclockwise piston is still fully retracted and locked in place. Remem- until the metal outrigger on the roller touches the head ber, the retainer nut on the tensioner roller stud should be of the tensioner piston (arrow). If you look just below the snug (upper arrow), not totally tight. bottom arrow, you can see that the tensioner lock plate is still installed. Address: 1000 Seville Road, Wadsworth, OH 44281 Phone: 1.800.924.5172 Web: www.ecstuning.com
Page 12

  Section 2 - Belt Replacement

  Audi A4 1.8T Ultimate Plus Timing Belt Kit Installation ES#8146

   29                                                            30

Knowing that some of you may not have the two-pin             Keep it simple. Grab something 8mm thick and use it as a
factory tool to make the final tensioner adjustment, we       fat feeler gauge to check your measurement. Here, we are
improvise, using angle head snap ring pliers in the adjust-   using an 8mm thick Allen key.
ment collar. Remove the retainer plate from the tensioner
to release the piston. Turn clockwise until there is an 8mm
gap between the tensioner body and roller bracket.

   31                                                            32

From the side you can see the 8mm gap. The tensioner          Torque the tensioner nut to 27 Nm. The belt is now
piston has expanded to make contact with the metal            installed, timed, and tensioned. Using a 19 mm 12-point
bracket on the tensioner roller.                              socket at the crank bolt, turn the engine over by hand,
                                                              two complete crankshaft revolutions. (One complete
                                                              camshaft rotation). Double check both timing marks.
                                                              Everything should line up.

Address: 1000 Seville Road, Wadsworth, OH 44281                   Phone: 1.800.924.5172            Web: www.ecstuning.com
Page 13 Section 2 - Belt Replacement Audi A4 1.8T Ultimate Plus Timing Belt Kit Installation ES#8146 33 34 Reinstall the lower timing cover and crank pulley. Use the Now we can reinstall the accessory belt and tensioner four new crank pulley bolts in the Ultra kit. Torque them (belt included in the Ultra Kit), and replace the other two to 10 Nm plus ¼ turn. timing covers. Reassemble the front header and bumper. 35 36 All buttoned up. We had no problem refilling the Audi If you end up disconnecting the lines to the power steer- cooling system. We kept the coolant jug full and ran the ing cooler in front of the radiator, don’t forget to top off engine at 2500 rpm. With the heater on low, we could the P/S reservoir. confirm that the heater core filed. Then we ran the engine again until the thermostat opened and the cooling fans Thanks for joining us. Happy wrenching! ran. Address: 1000 Seville Road, Wadsworth, OH 44281 Phone: 1.800.924.5172 Web: www.ecstuning.com
Page 14

  Section 2 - Belt Replacement
  Audi A4 1.8T Ultimate Plus Timing Belt Kit Installation ES#8146

Special Notes on Crankshaft Bolt Tightening.
Read This Carefully to Avoid Engine Damage.
In step 21 of your photo sequence, we install the crankshaft sprocket and retainer bolt. The T-belt is not yet installed,
because it cannot be installed until the sprocket is in place.

That means that unless we lock the crankshaft in place as we tighten the crank bolt, it may turn as we torque the bolt.
Problem: If you turn the crankshaft far enough with the belt off, a piston will hit an open valve. Totally undesirable.

Also: This is a Torque-to-Yield Bolt, and should be replaced. There’s a new one in your Ultra Kit. TTY bolts need to be
replaced because they stretch when tightened: once. We are paranoid and apply thread locker as well. The torque spec is
90 Nm, plus a quarter turn.

Playing It Safe
You have a few choices here if you are performing this job and do not have access to all the special tools, including the
crankshaft holder. There are many ways to do this job successfully. We want to offer one option.

1) Borrow or rent the special dealership crankshaft holder.
(Potentially impractical, but worth mentioning if your
brother or best buddy is a VW or Audi dealer tech.)

Can’t borrow the crank holder? Fabricate one. Make one                               crank
from a piece of flat iron (see image below). Drill holes to                          bolt              bolt to
                                                                                                       crank sprocket
match the ones in the sprocket, and cut a relief exposing the
crank sprocket center bolt. Bolt the holder to the sprocket
and lock it in place so the crank cannot turn.

2) Hand snug the crankshaft bolt while holding the sprock-                                   fabricate a crank holder
et to prevent it from turning.

3) Install the timing belt before you final torque the
crankshaft bolt. That way, the camshaft will turn with the
crankshaft (and the valves will not be damaged) if you turn the crank while torquing the crank sprocket bolt. Just don’t
forget to go back and torque it!

4) When you are done installing the belt, turn the engine over clockwise two complete revolutions by hand.

Turn v-e-r-y slowly.

Two complete turns equals one complete combustion cycle. This brings us back to where we started, and we know the
valves and pistons are not interfering. We can also double check our timing marks for alignment.

Double peace of mind.

Address: 1000 Seville Road, Wadsworth, OH 44281                    Phone: 1.800.924.5172                 Web: www.ecstuning.com
You can also read