CELL-LINK QUICKSTART GUIDE v.1.2 - spypoint.info
←
→
Page content transcription
If your browser does not render page correctly, please read the page content below
CELL-LINK
QUICKSTART GUIDE
v.1.2
In the box
ENGLISH

          1x CELL-LINK cellular module
          1x Memory card adapter cable
          1x Mounting strap
          1x Quickstart guide
          1x MicroSIM card (preactivated and inserted into the CELL-LINK)

              NOTE: Memory card and batteries are sold separately.

              User manual, latest firmware, and FAQ available at:
                  SPYPOINT.COM/SUPPORT
           Components
          1 Memory card adapter cable       9 STATUS LED
          2    Slot for mounting strap      10ON/OFF switch
          3    Cable lock hole              11   MicroSD card slot
          4    5 signal strength LEDs       12   ¼"-20 tripod mount
          5 SIM card slot                   13   Antenna
          6 Battery ‘‘PUSH’’ eject button   14   Memory card adapter cable port
          7 Battery compartment             15   12V jack
          8 AA battery holder               16   Locking latch

    2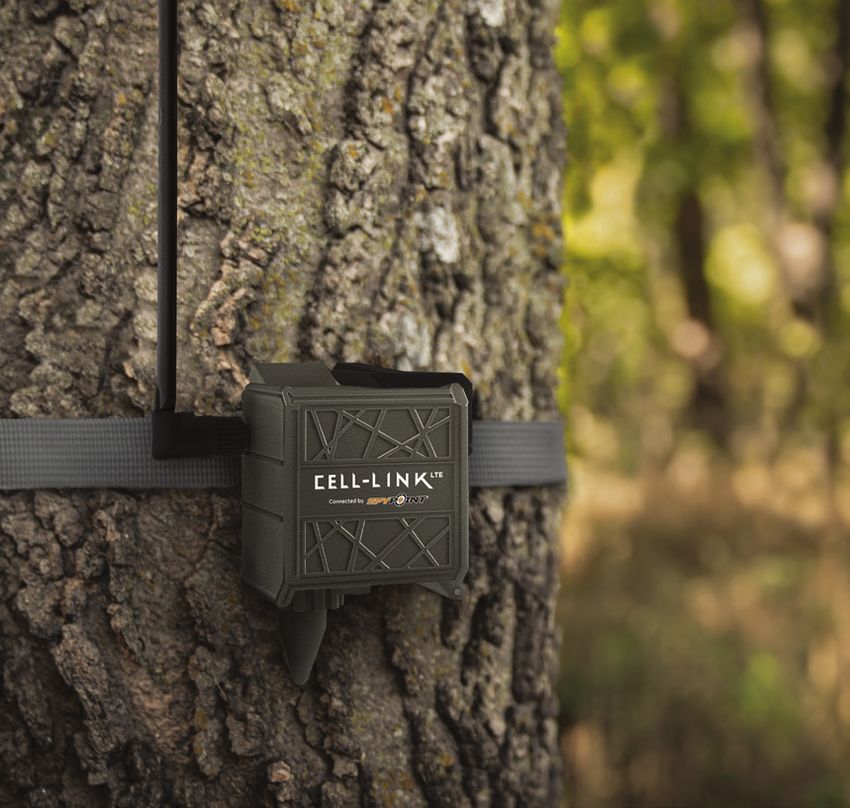
ENGLISH
       1

       2    9

            10
       3
            11
       4

       5

       6

       7

       8

                 16
port   12

       13

       14

       15

                      3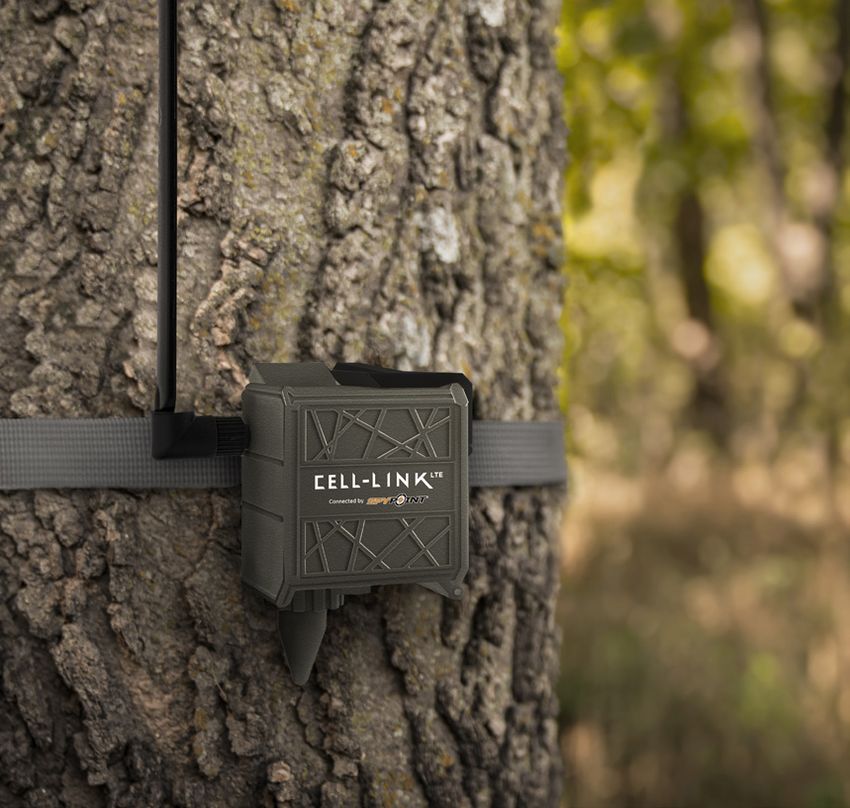
PREPARATION
ENGLISH

          SELECT A POWER SOURCE
          • Lithium or alkaline AA batteries
          • 12V rechargeable battery (#KIT-12V)
          • 3.7V rechargeable battery pack (#LIT-10)

                             We recommend using the SPYPOINT #LIT-10
             NOTE:           rechargeable lithium battery pack, sold separately.

          FOR BEST RESULTS AND NO LEAKAGE:
          • Use only new lithium or alkaline batteries.
          • Do not mix old and new batteries.
          • Do not use rechargeable AA batteries
             (their lower voltage can generate operational issues).

          HOW TO INSTALL AA BATTERIES PROPERLY
          • Unlock and open the CELL-LINK door.
          • Take the battery holder out and insert the AA batteries into the
             battery holder following polarity (+) and (-) indications.
          • Place the battery holder back into the battery compartment,
             an audible click should be heard.
          FORMATTING YOUR MicroSD CARD
          Before inserting the MicroSD card into your CELL-LINK, it must be
          reformatted via a computer to ensure proper functionality.
          Memory card is sold separately. Whether you choose to use a
          MicroSD card you previously used in another device or a brand
          new one you've just bought, its capacity must not exceed 32 GB
          and it must be reformatted. Do not use the "Quick format" option.

          INSERTING A MicroSD CARD
          • Ensure the CELL-LINK is turned off and open its door.
          • Insert a MicroSD memory card (up to 32 GB capacity) into
             the MicroSD card slot with the label facing up.
          • The card is inserted correctly when a click is heard.
    4
ACTIVATING YOUR CELL-LINK

                                                                       ENGLISH
           You must activate your CELL-LINK via the free "SPYPOINT
           app" or by logging on to the SPYPOINT.COM website.

    FINDING THE ACTIVATION CODE
    The activation code is located inside the CELL-LINK
    battery compartment door. You will need this
    unique code to activate the CELL-LINK.

SPYPOINT APP
Follow these steps:

1. On Google PlayTM or the App StoreTM, search for "SPYPOINT".
2. Download and install the app on your smartphone or tablet.
3. Start the app. Select "ACTIVATE A DEVICE". In the list, select
   "CELL-LINK" then follow the steps.
4. When complete, a confirmation email with instructions on
   how to finalize the creation of your account will be sent to you.
5. Log in to the SPYPOINT app using your email and password.
                                                                       5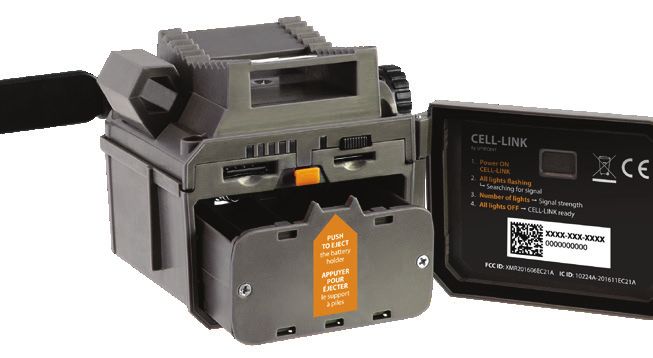
ACTIVATING YOUR CELL-LINK
ENGLISH

                    SPYPOINT website
                    Follow these steps:
          1. On the SPYPOINT website, select "LOGIN" in the top
             navigation menu. On the displayed page, select "Register",
             fill out the required fields, then log in.
          2. Select the + sign on the far right of the page;
             in the list, select "CELL-LINK" then follow the steps.
          3. When complete, a confirmation email with instructions on how
             to finalize the creation of your account will be sent to you.
          4. On the website, log in to your account using your email and password.

                         You can activate additional CELL-LINK’s for other cameras
           NOTE:         and switch between them in the SPYPOINT app or the
                         "MY ACCOUNT" section of the SPYPOINT website.

            CHOOSING A PHOTO TRANSMISSION PLAN
            Go to
            https://www.spypoint.com/en/spypoint-experience/plans
            to read the latest offers and choose the plan that suits you.

           CONFIGURING YOUR CELL-LINK
          New settings take effect every time the CELL-LINK connects with
          the SPYPOINT app or website.
          First transfer time: Allows you to choose the time
          when the CELL-LINK makes its first transfer of the day.
          Transfer frequency: Allows you to choose the number of daily transfers.
           NOTE: Photo transfers are set by default to every 4 hours from midnight.
    6
STARTING YOUR CELL-LINK

                                                                                          ENGLISH
1.    Open the CELL-LINK door
2.    Turn the CELL-LINK ON (ON/OFF switch)
3.    All lights flashing – Searching for signal
The signal search can take a few minutes to process. If only 1 bar is flash-
ing, the network test is unsuccessful. Try moving the CELL-LINK (along with
your camera) to another spot in order to maximize signal strength, then
restart the cellular module. This operation might need to be repeated as
the SPYPOINT SIM card and services are powered by multiple providers.
The network modem will maneuver to ensure the strongest signal
strength by searching for the best tower available (cellular network).
4.    Solid bars – Signal strength
Once the network test is completed, bars will stabilize showing the signal
strength. Note that signal bars displayed on the CELL-LINK can differ from
those shown on other cellular devices as there is no industry standard or
practice to label DBM values to a specific number of bars.
5.    All lights OFF – CELL-LINK ready
Shut the CELL-LINK door. The CELL-LINK has updated its status in the
SPYPOINT app and website with its latest information. The CELL-LINK
is now ready to grab the pictures taken by your trail camera and transmit
them to you via the SPYPOINT app or website upon its next transmission.
              Before starting the CELL-LINK, ensure you have successfully
 NOTE:        configured your trail camera according to your preferences and
              that you have done this by following your camera’s user manual.

HERE ARE THE RECOMMENDED CAMERA SETTINGS FOR
ENSURING OPTIMAL PERFORMANCE OF YOUR CELL-LINK:
•    A low-resolution photo format.
•    Precisely adjusted date and time
•    A delay no shorter than 1 minute between each detection.
•    In time lapse mode, a delay no shorter than 1 minute.

             The CELL-LINK doesn’t support video transfers. However, if you configure
 NOTE:       your camera for having a photo taken before each video, this photo will be
             sent out to you from the CELL-LINK.
                                                                                          7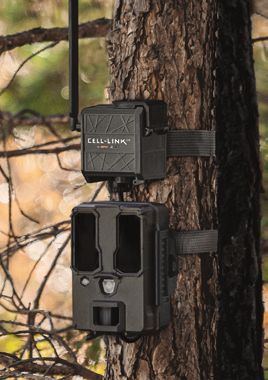
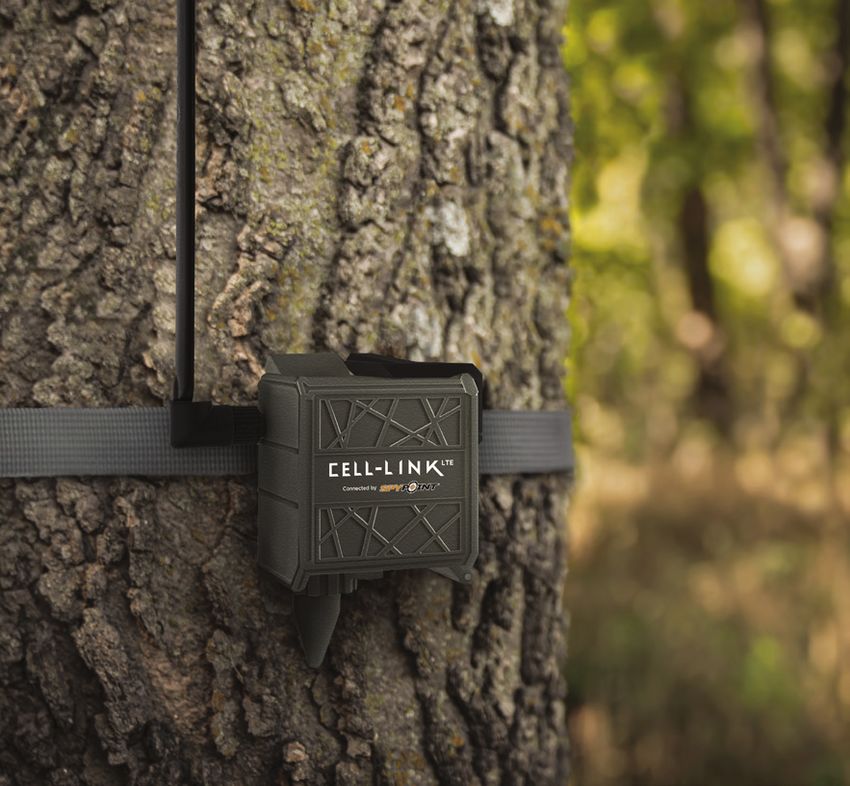
INSTALLING AND CONNECTING THE CELL-LINK
ENGLISH

          To connect the SPYPOINT CELL-LINK to your trail camera from any
          brand, follow these steps (or view our video in the Help section):
          1. Open your camera door.
          2. Take the CELL-LINK memory card
               adapter cable and insert the
               end with the SD card into your
               camera’s SD card slot.
          3.   Keeping the SD memory card
               adapter cable held tightly against
               the case, direct the adapter cable
               so that it exits from the bottom of
               the camera case. The cable should
               hang loosely below the camera.
               (Avoid bringing the cable over any
               critical components).
          4.   Shut the camera door and lock the latch.
          5.   Flip the SD cable upward, sliding it up behind the camera, so
               that the CELL-LINK connector sticks out from behind the top
               of your camera.
          6.   Mount your camera to the tree. (The CELL-LINK SD adapter
               cable should now be found between the tree and camera)
          7.   Mount the CELL-LINK cellular module as close to your camera as possible.*
          8.   Connect the SD card cable connector to the CELL-LINK.
          You can now access CELL-LINK photos, configurations, and statuses
          either via the SPYPOINT app or the SPYPOINT website.

                       It is strongly recommended to mount your CELL-LINK cellular
                       module directly above your camera leaving as little space as
                       possible between the two. Doing so will reduce the risk of
            NOTE:      having animals cause damage to the cable.
                        If your cable memory card adapter gets damaged,
                        replacement cables can be ordered separately.
    8
DISPOSAL

                                                                                            ENGLISH
ONLY USE ORIGINAL SPARE PARTS AND ACCESSORIES.
If one day your camera has been used so intensively that it has to be replaced, or if you
no longer have any use for it, you are obliged to dispose of it at a recycling center.
Information on return points for your electrical appliance can be obtained from
your local waste disposal company or from your local administrative offices.
Electrical appliances not only contain valuable recyclable raw materials,
but also substances which, if disposed of improperly, can affect public
health and the environment. Help ensure that valuable raw materials are
recycled when you return your old appliance to a central collection point.
The WEEE (Waste Electrical and Electronic Equipment Directive ) symbol represents
the obligation that the labeled camera to be sent to a separate center for the proper
recycling of electrical and electronic equipment.

  FREQUENCY
FREQUENCY RANGE:
800/ 850/ 900/ 1900/ 2100MHz
MAXIMUM TRANSMISSION POWER:
FREQUENCY         MAX.
GSM850                              33DBM±2DB
EGSM900                             33DBM±2DB
DCS1800                             30DBM±2DB
PCS1900                             30DBM±2DB
GSM850 (8-PSK)                      27DBM±3DB
EGSM900 (8-PSK)                     27DBM±3DB
DCS1800 (8-PSK)                     26DBM±3DB
PCS1900 (8-PSK)                     26DBM±3DB
UMTS 2100                           24DBM+1.7/-3.7DB
UMTS 1900                           24DBM+1.7/-3.7DB
UMTS 900                            24DBM+1.7/-3.7DB
UMTS 850                            24DBM+1.7/-3.7DB
UMTS 800                            24DBM+1.7/-3.7DB
                                                                                            9
FCC
ENGLISH
THIS DEVICE COMPLIES WITH PART 15 OF THE FCC RULES.
Operation is subject to the following two conditions:
1. This device must not cause harmful interference.
2. This device must accept any interference received,
including interference that may cause undesired operation.
THANK
YOU FOR CHOOSING FAQ, user manual & latest
firmware available at:
SPYPOINT.COM/SUPPORT
Live chat support at
www.spypoint.com service@spypoint.com
Join the community
Sit back and relax as this device is covered by the "Know you’re
covered" 2-year warranty. We strive to provide our customers
with a positive experience and an outstanding service.
10CELL-LINK
GUIDE DE DÉMARRAGE RAPIDE
v.1.2DANS LA BOÎTE
1x module cellulaire CELL-LINK
1x câble avec adaptateur de carte mémoire
FRANÇAIS
1x courroie d’installation
1x Guide de démarrage rapide
1x carte microSIM (préactivée et insérée dans le CELL-LINK)
NOTE : Carte mémoire et piles vendues séparément.
Nos manuels d’utilisation et mises à jour
logicielles ainsi que notre FAQ sont disponibles au :
SYPOINT.COM/SUPPORT
CompoSAntEs
1 Câble avec adaptateur 9 Lumière DEL STATUS
de carte mémoire
10Interrupteur ON/OFF
Fente pour courroie
2 d’installation 11 Fente pour carte microSD
12
Support pour trépied
Ouverture pour standard ¼"-20
3 câble cadenas
DEL de force de signal (5) 13 Antenne
4
Port pour adaptateur
5 Fente pour carte SIM 14
de carte mémoire
Loquet de maintien/dégagement
6 15 Prise 12 V
du compartiment à piles
7 Compartiment à piles 16 Clip de verrouillage
8 Support à piles AA
121
FRANÇAIS
2 9
10
3
11
4
5
6
7
8
oSD
16
12
13
14
15
13PRÉPARATION
CHOISIR UNE SOURCE D’ALIMENTATION
• Piles AA alcalines ou au lithium
• Source d’alimentation 12V (#KIT-12V, vendu séparément)
• Bloc-pile au lithium rechargeable 3,7V (#LIT-10)
FRANÇAIS
Nous recommandons l’utilisation du bloc-pile au
NOTE: lithium rechargeable (#LIT-10, vendu séparément).
POUR UNE PERFORMANCE MAXIMALE ET SANS
FUITE DE PILES :
• N’utilisez que des piles neuves au lithium ou alcalines.
• N’utilisez pas un ensemble de piles neuves et usagées.
• N’utilisez pas des piles AA rechargeables.
COMMENT INSÉRER LES PILES AA CORRECTEMENT :
• Ouvrez le compartiment à piles du CELL-LINK.
• Retirez le support à piles et insérez les piles AA dans le support à
piles en respectant les indications de polarité (+) et (-).
• Réinsérez le support à piles dans le compartiment à piles.
• Le support de piles est verrouillé lorsque vous entendez un clic
FORMATER VOTRE CARTE MicroSD
Avant d’insérer la carte microSD dans votre caméra, elle doit être refor-
matée à l’aide d’un ordinateur pour en assurer le bon fonctionnement.
La carte mémoire est vendue séparément. Que vous utilisiez une carte
usagée ou neuve, assurez-vous que sa capacité ne dépasse les 32 Go et
qu’elle soit reformatée. Ne choisissez pas l’option « Formatage rapide ».
INSÉRER UNE CARTE MicroSD
• Assurez-vous que le CELL-LINK soit hors tension (OFF).
• Ouvrez la porte du compartiment à piles du CELL-LINK.
• Insérez la carte microSD dans la fente pour carte microSD
(jusqu’à 32 Go), le côté de l’étiquette vers le haut.
• La carte est insérée correctement lorsqu’un clic se fait entendre.
14ACTIVER VOTRE CELL-LINK
Vous devez activer votre CELL-LINK au moyen de l’application
gratuite SPYPOINT ou en ouvrant une session sur le site
SPYPOINT.COM
FRANÇAIS
OÛ TROUVER LE CODE D’ACTIVATION
Le code d’activation se trouve à l’intérieur de la porte
du compartiment à piles du CELL-LINK. Vous aurez
besoin de ce code pour activer le CELL-LINK.
APPLICATION SPYPOINT
Suivez ces étapes :
1. Dans Google PlayTM ou le App StoreTM, recherchez « SPYPOINT ».
2. Téléchargez et installez cette application sur votre téléphone intelligent
ou votre tablette.
3. Démarrez l’application. Sélectionnez « ACTIVER UN APPAREIL ». Dans la liste,
sélectionnez « CELL-LINK », puis suivez les étapes.
4. Une fois ces étapes terminées, vous recevrez un courriel de confirmation qui con-
tiendra les instructions vous permettant de finaliser la création de votre compte.
5. Ouvrez une session dans l’application SPYPOINT en utilisant votre courriel et votre
mot de passe.
15ACTIVER VOTRE CELL-LINK
Site SPYPOINT.COM
Suivez ces étapes :
1. Sur le site SPYPOINT.COM, sélectionnez, dans la barre de navigation du haut,
FRANÇAIS
« OUVRIR UNE SESSION ». Sur la page « SPYPOINT » qui s’affiche, sélection-
nez « Inscription », remplissez les champs demandés, puis ouvrez une session.
2. Sélectionnez le signe + situé complètement à droite; dans la liste, sélection-
nez « CELL-LINK », puis suivez les étapes.
3. Une fois ces étapes terminées, vous recevrez un courriel de confirmation qui con-
tiendra les instructions vous permettant de finaliser la création de votre compte.
4. Ouvrez une session sur le site SPYPOINT.COM en utilisant votre courriel
et votre mot de passe.
Vous pouvez activer des caméras additionnelles et passer d’une
NOTE : caméra à l’autre soit dans l’application ou le site SPYPOINT.
CHOISIR UN FORFAIT DE TRANSMISSION
DE PHOTOS POUR VOTRE CAMÉRA
Rendez-vous au
https://www.spypoint.com/fr/experience-spypoint/plans pour prendre
connaissance des dernières offres et choisir le plan qui vous convient.
CONFIGURER VOTRE CELL-LINK
Tant l’application que le site SPYPOINT vous permettent, à distance, de
configurer tous les paramètres du CELL-LINK et d’en obtenir l’état de ses
principaux éléments, dont la force du signal cellulaire, le niveau d’énergie
des piles et l’espace utilisé sur la carte SD.
Vos nouveaux paramètres s’appliqueront la prochaine fois que votre
CELL-LINK communiquera avec l’application ou le site SPYPOINT.
16DÉMARRER VOTRE CELL-LINK
1. Ouvrez la porte du compartiment de piles du CELL-LINK.
2. Mettez sous tension (ON) le CELL-LINK (interrupteur ON/OFF)
3. Toutes les lumières clignotent – Recherche du signal
FRANÇAIS
La recherche du signal peut prendre quelques minutes. Si seulement 1
barre clignote, le test réseau a échoué. Essayez de déplacer le CELL-LINK à
un autre endroit de manière à optimiser la force du signal, puis redémarrez
le module cellulaire. Vous pourriez avoir à refaire cette étape plusieurs fois,
car la carte SIM et le service SPYPOINT sont alimentés par de multiples
fournisseurs réseau. Le modem cherchera par défaut à se connecter à la
tour de réseau cellulaire dont le signal (service cellulaire) est le plus fort.
4. Barres stables - Force du signal
Une fois le test réseau terminé, les barres se stabiliseront et indiqueront la
puissance du signal. Notez que le nombre de barres affichées sur le CELL-LINK
peut différer de celui d’autres appareils, puisqu’aucune norme ou pratique de
l’industrie ne définit les valeurs DBM à un nombre spécifique de barres.
5. Toutes les lumières éteintes - CELL-LINK prêt
Refermez la porte du compartiment à piles du CELL-LINK. Ce dernier a mis à jour
son état avec ses informations les plus récentes. Le CELL-LINK est maintenant
prêt à recevoir les photos prises par votre caméra de chasse, puis à les trans-
mettre à l’application ou votre compte SPYPOINT lors du prochain transfert.
Avant de démarrer le CELL-LINK, assurez-vous d’avoir réussi à
NOTE: configurer votre caméra de chasse selon vos préférences et tel
qu’indiqué dans le manuel d’utilisation de votre caméra.
VOICI LES RÉGLAGES DE CAMÉRA RECOMMANDÉS POUR
UN RENDEMENT OPTIMAL DU CELL-LINK :
• Choisissez un format de photo à basse résolution.
• La date et l’heure précisément ajustés.
• Choisissez un délai entre chaque détection d’au moins 1 minute.
• En mode intervalle (time lapse), choisissez également un délai d’au moins 1 minute.
La fonctionnalité de transmission vidéo n’est pas supportée par
le CELL-LINK. Cependant, si vous configurez votre caméra pour
NOTE: qu’une photo soit prise avant chacune de vos vidéos, cette photo
vous sera transmise chaque fois via le CELL-LINK.
17INSTALLER ET CONNECTER LE CELL-LINK
Pour connecter votre CELL-LINK de SPYPOINT à votre caméra
de chasse de n’importe quelle marque, suivez ces étapes (ou
visionnez notre vidéo dans la section Aide) :
FRANÇAIS
1. Ouvrez la porte du boîtier de
votre caméra.
2. Prenez le câble de carte mémoire
avec adaptateur du CELL-LINK et
insérez l’adaptateur avec carte
SD dans la fente de carte SD de
votre caméra.
3. En tenant le câble de carte mémoire
avec adaptateur collé sur la caméra,
diriger ce câble de manière à le faire
sortir par le bas de la caméra. Le câble
devrait alors pendre librement à
l’extérieur de la caméra (éviter de faire
passer le câble devant les lentilles ou
toute autre composante essentielle).
4. Refermez la porte de la caméra et verrouillez avec le loquet.
5. Retournez le câble SD vers le haut et faites-le passer derrière
la caméra afin que le connecteur du CELL-LINK dépasse de la
partie arrière de la caméra, soit au-dessus de celle-ci.
6. Installez votre caméra à l’arbre (le câble d’adaptateur de carte
mémoire SD devrait alors se trouver entre votre caméra et l’arbre).
7. Installez le module cellulaire CELL-LINK au-dessus de votre caméra,
et ce, aussi près que possible du connecteur de câble de carte mémoire.*
8. Branchez le connecteur du câble de carte mémoire au CELL-LINK.
Vous pouvez maintenant accéder aux photos, configurations et
états du CELL-LINK par l’application ou par le site SPYPOINT.
18Il est fortement recommandé d’installer le module cellulaire
CELL-LINK tout juste au-dessus de votre caméra – en laissant le
moins d’espace possible entre les deux. Procéder ainsi réduira le
risque de dommages causés au câble par des animaux.
NOTE:
Si votre câble de carte mémoire avec adaptateur est
endommagé, vous pouvez en commander un de rechange
FRANÇAIS
directement au SPYPOINT.COM.
ÉLIMINATION
N’UTILISEZ QUE DES PIÈCES DE RECHANGE ET
ACCESSOIRES D’ORIGINE.
Si un jour votre appareil a été utilisée de manière si intensive qu’il doit être remplacée, ou
si vous n’en avez plus besoin, vous êtes obligé d’en disposer dans un centre de recyclage.
Vous pouvez obtenir des informations sur les centres de collecte pour votre
appareil électrique auprès de votre entreprise locale d’élimination des déchets
ou au centre administratif de votre municipalité.
Les appareils électriques contiennent non seulement des matières premières de nature
précieuse et recyclable, mais aussi des substances qui, lorsqu'elles sont éliminées
incorrectement, peuvent nuire à la santé des personnes et à l’environnement. Choisissez de
contribuer à garantir le recyclage des matières précieuses et recyclables en apportant vos
vieux appareils à un centre de collecte.
Le symbole de la DEEE (Déchets d'équipements électronique et électriques) indique l’obliga-
tion d’apporter la caméra étiquetée à un centre dédié de collecte de matériel électronique ou
électrique aux fins de recyclage de façon adéquate.
FCC
CET APPAREIL EST CONFORME À LA SECTION 15
DE LA RÉGLEMENTATION DE LA FCC.
Son fonctionnement est soumis aux deux conditions suivantes :
1. Cet appareil ne doit pas créer d’interférences nuisibles;
2. Cet appareil doit tolérer les interférences reçues, ce qui
inclut les interférences qui risquent de provoquer un
fonctionnement indésirable
19FRÉQUENCE
GAMME FRÉQUENTIELLE :
800/ 850/ 900/ 1900/ 2100MHz
PUISSANCE D’ÉMISSION MAXIMALE :
FRANÇAIS
FRÉQUENCE MAX.
GSM850 33DBM±2DB
EGSM900 33DBM±2DB
DCS1800 30DBM±2DB
PCS1900 30DBM±2DB
GSM850 (8-PSK) 27DBM±3DB
EGSM900 (8-PSK) 27DBM±3DB
DCS1800 (8-PSK) 26DBM±3DB
PCS1900 (8-PSK) 26DBM±3DB
UMTS 2100 24DBM+1.7/-3.7DB
UMTS 1900 24DBM+1.7/-3.7DB
UMTS 900 24DBM+1.7/-3.7DB
UMTS 850 24DBM+1.7/-3.7DB
UMTS 800 24DBM+1.7/-3.7DB
MERCI D'AVOIR CHOISI Manuels d’utilisation, mises à jours
et FAQ sont disponibles au :
SPYPOINT.COM/SUPPORT
Service d'aide par
clavardage en direct
service@spypoint.com
www.spypoint.com
Rejoignez la communauté
Ayez l'esprit tranquille, car cette caméra est couverte par notre garantie
« Vous êtes couverts » d’une durée de 2 ans. Nous nous efforçons d’offrir
à tous nos clients une expérience positive et un service hors pair.
20CELL-LINK ANLEITUNG v.1.2
IM LIEFERUMFANG ENTHALTEN
          1x CELL-LINK Mobilfunkmodul
          1x Speicherkartenadapterkabel
          1x Montagegurt
          1x Anleitung
          1x MicroSIM-Karte (voraktiviert und in den CELL-LINK eingelegt)

          HINWEIS:         Speicherkarte und Batterien sind separat erhältlich
DEUTSCH

              Benutzerhandbuch, neueste Firmware und häufig
                      gestellte Fragen finden Sie unter
                 SPYPOINT.COM/SUPPORT
           KOMPONENTEN
          1 Speicherkartenadapterkabel         9 STATUS-LED
          2   Schlitz für Montagegurt          10EIN / AUS-Schalter
          3   Kabelschlossloch                 11   MicroSD-Kartensteckplatz
          4   Signalstärke-LEDs (5)            12
                                                    Standard ¼"-20
                                                    Stativhalterung
          5 SIM-Kartensteckplatz
              Druckknopf für die
                                               13   Antenne
          6
              Batterieverriegelung                  Speicherkartenadapterkabel
                                               14
                                                    -Anschluss
          7 Batteriefach
                                               15   12V-Buchse
          8 AA Batteriehalter
                                               16   Verriegelung

22
1
2 9
10
DEUTSCH
3
11
4
5
6
7
8
16
12
13
14
15
23VORBEREITUNG
STROMQUELLE WÄHLEN
• Lithium- oder AA-Alkalibatterien
• 12V Spannungsquelle (# KIT-12V)
• 3.7V wiederaufladbaren Lithium-Akkus (#LIT-10)
Wir empfehlen die Verwendung eines wiederauflad
HINWEIS: baren Lithium-Akkus (# LIT-10, separat erhältlich).
FÜR EINE HOHE BATTERIELAUFZEIT UND AUSLAUFEN
VON BATTERIEN ZU VERMEIDEN:
DEUTSCH
• Verwenden Sie nur neue Lithium- oder Alkalibatterien.
• Mischen Sie keine alten und neuen Batterien.
• Verwenden Sie keine wiederaufladbaren Batterien (ihre niedrigere
Spannung kann zu Betriebsstörungen führen).
SO LEGEN SIE AA-BATTERIEN RICHTIG EIN:
• Öffnen Sie das CELL-LINK-Batteriefach.
• Nehmen Sie den Batteriehalter heraus und legen Sie die AA-Batte-
rien gemäß den Polaritätsangaben (+) und (-).
• Setzen Sie den Batteriehalter wieder in das Batteriefach ein.
• Das Batteriefach ist verriegelt, wenn Sie ein Klicken hören.
FORMATIEREN IHRER MICROSD-KARTE
Bevor Sie die microSD-Karte in Ihre Kamera einlegen, müssen Sie sie
über einen Computer neu formatieren, um eine ordnungsgemäße
Funktion zu gewährleisten.
Speicherkarte ist separat erhältlich. Unabhängig davon, ob Sie eine alte
oder eine brandneue Karte verwenden, darf die Kapazität 32 GB nicht
überschreiten und muss neu formatiert werden. Verwenden Sie nicht
die Option “Schnellformatierung”.
EINLEGEN EINER SPEICHERKARTE
• Stellen Sie sicher, dass die CELL-LINK ausgeschaltet ist und öffnen
Sie die CELL-LINK-Batteriefachklappe.
• Setzen Sie die microSD-Karte mit dem Etikett nach oben in den Steckplatz
(bis zu 32 GB) ein.
• Die Karte ist richtig eingesetzt, wenn ein Klicken zu hören ist
24AKTIVIERUNG IHRER CELL-LINK
Sie müssen Ihren CELL-LINK über die kostenlose
“SPYPOINT-App” oder durch Anmeldung auf der
SPYPOINT.COM-Website aktivieren.
FINDEN DES SIM-AKTIVIERUNGS CODES
Der SIM-Aktivierungscode befindet sich auf der Innenseite
der CELL-LINK-Batteriefachabdeckung. Sie benötigen diesen
eindeutigen Code, um die CELL-LINK zu aktivieren.
SPYPOINT APP DEUTSCH
Befolgen Sie folgende Schritte:
1. Suchen Sie in Google PlayTM oder im App StoreTM nach “SPYPOINT”.
2. Laden Sie diese App herunter und installieren Sie sie auf
Ihrem Smartphone oder Tablet.
3. Starten Sie die App. Wählen Sie ‘‘NEUE KAMRA AKTIVIEREN“.
Wählen Sie in der Liste ’’CELL-LINK“ und befolgen Sie die Schritte.
4. Wenn Sie fertig sind, erhalten Sie eine Bestätigungs-E-Mail
mit Anweisungen zum Abschluss der Erstellung Ihres Kontos.
5. Melden Sie sich mit Ihrer E-Mail-Adresse und Ihrem Kennwort
in der SPYPOINT-App an.
25AKTIVIERUNG IHRER CELL-LINK
SPYPOINT website
Befolgen Sie folgende Schritte:
1. Wählen Sie auf der SPYPOINT-Website im oberen Navigationsmenü
“LOGIN”. Wählen Sie auf der angezeigten Seite “Register”, füllen Sie
die erforderlichen Felder aus und melden Sie sich an.
2. Wählen Sie das + -Zeichen ganz rechts auf der Seite. Wählen Sie in
der Liste “CELL-LINK” und befolgen Sie die Schritte.
3. Wenn Sie fertig sind, erhalten Sie eine Bestätigungs-E-Mail mit
DEUTSCH
Anweisungen zum Abschluss der Erstellung Ihres Kontos.
4. Melden Sie sich auf der Website mit Ihrer E-Mail-Adresse und Ihrem
Passwort bei Ihrem Konto an.
Sie können zusätzliche CELL-LINKs aktivieren und in der SPYPOINT
HINWEIS: App oder auf der Website zwischen CELL-LINKs wechseln
AUSWAHL EINES FOTOÜBERTRAGUNGSPLANS
Gehe zu
https://www.spypoint.com/en/spypoint-experience/plans
um die neuesten Angebote zu lesen und den für Sie geeigneten Plan
auszuwählen.
KONFIGURIEREN SIE IHRE CELL-LINK
Ihre neuen Einstellungen werden immer wirksam, wenn der CELL-LINK das
nächste Mal eine Verbindung mit der app oder der SPYPOINT Website herstellt.
Erste Übertragung: Hier können Sie auswählen, zu welcher Uhrzeit
der CELL-LINK die erste Übertragung durchführen soll.
Übertragungsfrequenz: Hier können Sie die Anzahl der Übertragun-
gen festlegen, die der CELL-LINK täglich durchführt.
26STARTEN SIE IHRE CELL-LINK
1. Öffnen Sie die CELL-LINK-Batteriefachklappe.
2. Schalten Sie den CELL-LINK EIN (EIN / AUS-Schalter).
3. Alle Lichter blinken - Suche nach Signal
Die Signalsuche kann einige Minuten dauern. Wenn nur 1 Balken
blinkt, ist der Netzwerktest nicht erfolgreich. Bewegen Sie den CELL-
LINK (zusammen mit Ihrer Kamera) an einen anderen Ort, um die Sig-
nalstärke zu maximieren, und starten Sie dann das Mobilfunkmodul
erneut. Dieser Vorgang muss möglicherweise wiederholt werden, da
die SPYPOINT SIM-Karte und die Dienste von mehreren Anbietern
DEUTSCH
bereitgestellt werden. Das Netzwerkmodem sucht und verwendet
automatisch den Mobilfunknetzturm mit dem stärksten Signal.
4. Durchgezogene Balken - Signalstärke
Sobald der Netzwerktest abgeschlossen ist, stabilisieren sich die Balken
und zeigen die Signalstärke an. Beachten Sie, dass die auf dem CELL-
LINK angezeigten Signalbalken von denen anderer Mobilfunkgeräte
abweichen können, da es keinen Industriestandard oder keine Praxis gibt,
DBM-Werte mit einer bestimmten Anzahl von Balken zu kennzeichnen.
5. Alle Lichter AUS - CELL-LINK bereit
Schließen Sie die CELL-LINK. Die CELL-LINK hat seinen Status mit den
neuesten Informationen aktualisiert. Die CELL-LINK ist nun bereit,
die Bilder von Ihrer Wildkamera abzurufen und sie bei der nächsten
Übertragung an Ihre App oder die SPYPOINT Website zu übertragen.
Vergewissern Sie sich vor dem Starten von CELL-LINK, dass Sie Ihre
HINWEIS: Wildkamera erfolgreich gemäß Ihren Einstellungen konfiguriert haben.
HIER SIND DIE EMPFOHLENEN KAMERAEINSTELLUNGEN, UM
EINE OPTIMALE LEISTUNG IHRER CELL-LINK SICHERZUSTELLEN:
• Ein Fotoformat mit niedriger Auflösung.
• Genau eingestelltes Datum und Uhrzeit.
• Eine Verzögerung von mindestens 1 Minute zwischen den einzelnen
Erkennungen.
• Im Zeitraffermodus eine Verzögerung von mindestens 1 Minute.
Die CELL-LINK unterstützt keine Videoübertragungen. Wenn Sie Ihre
HINWEIS: Kamera jedoch so konfigurieren, dass vor jedem Video ein Foto
ufgenommen wird, wird Ihnen dieses Foto vom CELL-LINK zugesandt.
27INSTALLATION UND ANSCHLUSS DES CELL-LINK
Gehen Sie folgendermaßen vor, um den SPYPOINT CELL-LINK von
einer beliebigen Marke aus an Ihre Wildkamera anzuschließen (oder
sehen Sie sich unser Video in der Hilfe an):
1. Öffnen Sie die Kamera.
2. Nehmen Sie das CELL-LINK-Speicher-
kartenadapterkabel und stecken Sie
das Ende mit der SD-Karte in den
SD-Kartensteckplatz Ihrer Kamera.
DEUTSCH
3. Halten Sie das Speicherkartenadapterk-
abel fest an der Kamera und richten Sie
das Adapterkabel so aus, dass es aus dem
Boden des Kameragehäuses austritt. Das
Kabel sollte lose unter der Kamera hängen
(vermeiden Sie es, das Kabel über kritische
Komponenten zu führen).
4. Schließen Sie die Kamera und verriegeln Sie den Riegel.
5. Klappen Sie das SD-Kabel nach oben und schieben Sie es
hinter die Kamera, sodass der CELL-LINK-Anschluss über die
Oberseite Ihrer Kamera hinausragt.
6. Montieren Sie Ihre Kamera am Baum (das CELL-LINK SD-Karte-
nadapterkabel sollte sich jetzt zwischen dem Baum und der
Kamera befinden).
7. Montieren Sie das CELL-LINK-Mobilfunkmodul so nah wie
möglich an Ihrer Kamera. *
8. Verbinden Sie den Stecker des SD-Kartenkabels mit dem CELL-LINK.
Sie können jetzt über Ihre App oder den Bereich “Mein Konto” auf der SPY-
POINT-Website auf CELL-LINK-Fotos, -Konfigurationen und -Status zugreifen.
28Es wird dringend empfohlen, das CELL-LINK-Mobilfunk-
modul direkt über der Kamera zu montieren. Lassen Sie
dabei so wenig Raum wie möglich zwischen den beiden.
Dies verringert das Risiko, dass Tiere das Kabel beschädigen.
HINWEIS:
Wenn Ihr Kabel-Speicherkartenadapter beschädigt
wird (durch Tiere oder andere), können Sie Ersatzkabel
separat von unserer SPYPOINT.COM-Website bestellen
ENTSORGUNG
NUR ORIGINAL-ERSATZTEILE UND -ZUBEHÖR VERWENDEN.
DEUTSCH
Wenn Ihr Gerät eines Tages so intensiv genutzt wurde, dass es ausgetaus-
cht werden muss, oder wenn Sie es nicht mehr verwenden können,
müssen Sie es bei einer Recycling-Stelle entsorgen.
Informationen zu den Rückgabestellen für Ihr Gerät erhalten Sie von Ihrem
örtlichen Entsorgungsunternehmen oder von Ihrer örtlichen Verwaltungsstelle.
Elektrogeräte enthalten nicht nur wertvolle recycelbare Rohstoffe, sondern
auch Stoffe, die bei unsachgemäßer Entsorgung die öffentliche Gesundheit und
die Umwelt schädigen können. Stellen Sie sicher, dass wertvolle Rohstoffe recy-
celt werden, wenn Sie Ihr altes Gerät an einer zentralen Sammelstelle abgeben.
Das Symbol der durchgestrichenen Mülltonne weist darauf hin, dass das geken-
nzeichnete Gerät zur ordnungsgemäßen Wiederverwertung von Elektro- und
Elektronikgeräten an eine separate Stelle geschickt werden muss.
FCC
DIESES GERÄT ENTSPRICHT TEIL 15 DER FCC-REGELN.
Der Betrieb unterliegt den folgenden zwei Bedingungen:
1. Dieses Gerät darf keine schädlichen Interferenzen verursachen.
2. Dieses Gerät muss alle empfangenen Störungen akzeptieren,
einschließlich Störungen, die einen unerwünschten Betrieb
verursachen können.
29FREQUENZ
FREQUENZBEREICH:
800/ 850/ 900/ 1900/ 2100MHz
MAXIMALE ÜBERTRAGUNGSLEISTUNG:
FREQUENZ MAX.
GSM850 33DBM±2DB
EGSM900 33DBM±2DB
DCS1800 30DBM±2DB
PCS1900 30DBM±2DB
GSM850 (8-PSK) 27DBM±3DB
DEUTSCH
EGSM900 (8-PSK) 27DBM±3DB
DCS1800 (8-PSK) 26DBM±3DB
PCS1900 (8-PSK) 26DBM±3DB
UMTS 2100 24DBM+1.7/-3.7DB
UMTS 1900 24DBM+1.7/-3.7DB
UMTS 900 24DBM+1.7/-3.7DB
UMTS 850 24DBM+1.7/-3.7DB
UMTS 800 24DBM+1.7/-3.7DB
VIELEN DANK ZUR AUSWAHL Benutzerhandbuch, neueste
Firmware und häufig gestellte
Fragen finden Sie unter
SPYPOINT.COM/SUPPORT
Live chat Unterstützung ist auf
www.spypoint.com service@spypoint.com
Trete der Community bei
Lehnen Sie sich zurück und entspannen Sie sich, da für dieses
Gerät die 2-jährige Garantie von «Know you are covered» gilt.
Wir bemühen uns, unseren Kunden eine positive Erfahrung
und einen hervorragenden Service zu bieten.
Bitte beachten Sie, dass der folgende Text eine maschinengenerierte Übersetzung
ist. Daher kann es Fehler enthalten.
30CELL-LINK
SKRÓCONA INSTRUKCJA OBSŁUGI
v.1.2W PUDEŁKU
1x moduł komórkowy CELL-LINK
1x kabel adaptera karty pamięci
1x pasek instalacyjny
1x przewodnik Szybki start
1x karta microSIM (wstępnie aktywowana i włożona do CELL-LINK)
UWAGA: Karta pamięci i baterie są sprzedawane osobno.
Instrukcja obsługi, najnowsze oprogramowanie
i FAQ są dostępne na stronie:
SPYPOINT.COM/SUPPORT
POLISH
SKŁADNIKI
1 Kabel adaptera karty pamięci 9 LED STATUS
2 Szczelina na pasek montażowy 10 Przełącznik ON / OFF
3 Otwór blokady kablowej 11 gniazdo karty MicroSD
4 5 diod LED siły sygnału 12 Mocowanie statywu 12 ¼ ”20
5 gniazdo karty SIM 13 antena
6 Przycisk wysuwania baterii 14 Port kabla adaptera karty pamięci
„PUSH” 15 Gniazdo 12V
7 Komora baterii 16 Zatrzask blokujący
8 uchwyt baterii AA
341
2 9
10
3
11
4
5
6
POLISH
7
8
20
16
mięci 12
13
14
15
35PRZYGOTOWANIE
WYBÓR ŹRÓDŁA MOCY
• Baterie litowe lub alkaliczne AA
• Akumulator 12V (#KIT-12V)
• Akumulator 3,7 V (#LIT-10)
Zalecamy stosowanie akumulatora litowego
UWAGA: (#LIT-10, sprzedawany osobno).
ABY UZYSKAĆ NAJLEPSZE WYNIKI I BRAK WYCIEKÓW:
• Używaj tylko nowych baterii litowych lub alkalicznych.
• Nie mieszaj starych i nowych baterii.
• Nie używaj akumulatorów
(ich niższe napięcie może powodować problemy operacyjne).
JAK PRAWIDŁOWO ZAINSTALOWAĆ BATERIE AA:
POLISH
• Odblokuj i otwórz drzwi CELL-LINK.
• Wyjmij uchwyt baterii i włóż baterie AA do uchwytu baterii
zgodnie z oznaczeniami biegunowości (+) i (-).
• Umieść uchwyt baterii z powrotem w komorze baterii,
słyszalne będzie kliknięcie.
FORMATOWANIE KARTY MicroSD
Przed włożeniem karty microSD do aparatu należy ją ponownie sfor-
matować za pomocą komputera, aby zapewnić prawidłowe działanie.
Karta pamięci jest sprzedawana osobno. Niezależnie od tego,
czy wybierzesz kartę starą, czy nową, jej pojemność nie może
przekroczyć 32 GB i należy ją sformatować. Nie używaj opcji
„Szybki format”.
WKŁADANIE KARTY PAMIĘCI
• Upewnij się, że CELL-LINK jest wyłączony i otwórz drzwiczki.
• Włóż kartę pamięci MicroSD (o pojemności do 32 GB) do
gniazda karty MicroSD etykietą do góry.
• Karta jest włożona poprawnie po usłyszeniu kliknięcia.
36AKTYWOWANIE TWOJEGO KOMÓRKA
Musisz aktywować swój CELL-LINK za pośrednictwem
bezpłatnej „aplikacji SPYPOINT” lub logując się na stronie
internetowej SPYPOINT.COM.
ZNAJDOWANIE KODU AKTYWACJI
Kod aktywacyjny znajduje się na wewnętrznej stronie
drzwi komory baterii CELL-LINK. Będziesz potrzebo-
wać tego unikalnego kodu, aby aktywować CELL-LINK.
POLISH
APLIKACJA SPYPOINT
Wykonaj następujące kroki:
1. W Google PlayTM lub App StoreTM wyszukaj „SPYPOINT”.
2. Pobierz i zainstaluj aplikację na smartfonie lub tablecie.
3. Uruchom aplikację. Wybierz „AKTYWUJ URZĄDZENIE”. Z listy wy-
bierz „CELL-LINK”, a następnie postępuj zgodnie z instrukcjami.
4. Po zakończeniu zostanie wysłany e-mail z potwierdzeniem i
instrukcjami, jak sfinalizować utworzenie konta.
5. Zaloguj się do aplikacji SPYPOINT przy użyciu adresu e-mail i hasła.
37AKTYWOWANIE TWOJEGO KOMÓRKA
Witryna SPYPOINT
Wykonaj następujące kroki:
1. Na stronie internetowej SPYPOINT wybierz „LOGIN” w górnym
menu nawigacyjnym. Na wyświetlonej stronie wybierz „Regis-
ter”, wypełnij wymagane pola, a następnie zaloguj się.
2. Wybierz znak + po prawej stronie; z listy wybierz „CELL-LINK”,
a następnie postępuj zgodnie z instrukcjami.
3. Po zakończeniu zostanie wysłany e-mail z potwierdzeniem i
instrukcjami, jak sfinalizować utworzenie konta.
4. Na stronie internetowej zaloguj się do swojego konta przy
użyciu adresu e-mail i hasła.
Możesz aktywować dodatkowe CELL-LINK dla innych kamer i
UWAGA: przełączać się między nimi w aplikacji SPYPOINT lub w sekcji
„MOJE KONTO” na stronie internetowej SPYPOINT.
POLISH
WYBIERANIE PLANU TRANSMISJI ZDJĘĆ
Iść do
https://www.spypoint.com/en/spypoint-experience/plans
aby przeczytać najnowsze oferty i wybrać plan, który Ci odpowiada.
KONFIGURACJA SWOJEGO KOMÓRKA KOMÓRKOWEGO
Nowe ustawienia obowiązują za każdym razem, gdy CELL-LINK łączy się z
aplikacją lub witryną SPYPOINT.
Czas pierwszego transferu: Pozwala wybrać czas, kiedy telefon
CELL-LINK ma wykonać pierwszy transfer w ciągu dnia.
Częstotliwość transferu: Pozwala wybrać liczbę codziennych
przelewów.
UWAGA: Przesyłanie zdjęć jest domyślnie ustawiane co 4 godziny od północy
38URUCHAMIANIE POŁĄCZENIA KOMÓREK
1. Otwórz drzwiczki komory baterii CELL-LINK.
2. WŁĄCZ CELL-LINK (przełącznik ON / OFF).
3. Wszystkie kontrolki migają - Wyszukiwanie sygnału
Wyszukiwanie sygnału może potrwać kilka minut. Jeśli miga tylko 1 pasek,
test sieci nie powiódł się. Spróbuj przenieść CELL-LINK (wraz z kamerą) w
inne miejsce, aby zmaksymalizować siłę sygnału, a następnie ponownie
uruchom moduł komórkowy. Operacja ta może wymagać powtórzenia,
ponieważ karta SIM SPYPOINT i usługi są obsługiwane przez wielu dostaw-
ców. Modem sieciowy będzie manewrował, aby zapewnić najsilniejszą siłę
sygnału, wyszukując najlepszą dostępną wieżę (sieć komórkowa).
4. Pełne słupki - siła sygnału
Po zakończeniu testu sieci paski ustabilizują się, pokazując siłę sygnału.
Należy pamiętać, że słupki sygnału wyświetlane na CELL-LINK mogą
różnić się od słupków pokazanych na innych urządzeniach komórkowych,
ponieważ nie ma standardu branżowego ani praktyki oznaczania wartości
POLISH
DBM określoną liczbą słupków.
5. Wszystkie lampki wyłączone - gotowe do współpracy z CELL-LINK
Zamknij drzwiczki obudowy CELL-LINK. CELL-LINK zaktualizował swój
status o najnowsze informacje. CELL-LINK jest teraz gotowy do pobrania
zdjęć z kamery szlaku i przesłania ich, przy następnej transmisji, do aplikacji
SPYPOINT lub strony internetowej SPYPOINT.COM/MY ACCOUNT.
Przed uruchomieniem CELL-LINK upewnij się, że pomyślnie
UWAGA: skonfigurowałeś kamerę szlakową zgodnie ze swoimi preferencjami
i postępując zgodnie z instrukcją obsługi aparatu.
OTO ZALECANE USTAWIENIA APARATU W CELU ZAPEWNIE-
NIA OPTYMALNEJ WYDAJNOŚCI TELEFONU CELL-LINK:
• Format zdjęć w niskiej rozdzielczości.
• Dokładnie dostosowana data i godzina.
• Opóźnienie nie krótsze niż 1 minuta między każdym wykryciem.
• W trybie poklatkowym opóźnienie nie krótsze niż 1 minuta.
CELL-LINK nie obsługuje przesyłania wideo. Jeśli jednak skonfigurujesz
UWAGA: aparat do robienia zdjęć przed każdym filmem, to zdjęcie zostanie
wysłane do Ciebie z CELL-LINK.
39INSTALOWANIE / PODŁĄCZANIE KOMÓRKI KOMÓRKOWEJ
Aby podłączyć SPYPOINT CELL-LINK do kamery szlakowej dowolnej
marki, wykonaj następujące kroki (lub obejrzyj nasz film w sekcji Pomoc):
1. Otwórz drzwi kamery.
2. Weź kabel adaptera karty pamięci
CELL-LINK i włóż końcówkę karty
SD do gniazda karty SD aparatu.
3. Trzymając kabel adaptera karty
pamięci mocno przyciśnięty do
aparatu, skieruj kabel adaptera
tak, aby wysunął się z dolnej części
obudowy aparatu. Kabel powinien
zwisać luźno pod kamerą (unikaj
przeciągania kabla nad krytyc-
znymi elementami).
4. Zamknij drzwi kamery i zablokuj
POLISH
zatrzask.
5. Odwróć kabel SD do góry, przesuwając go w górę za kamerą,
tak aby złącze CELL-LINK wystawało z tyłu górnej części
kamery.
6. Zamontuj kamerę na drzewie (kabel adaptera SD CELL-LINK
powinien teraz znajdować się między drzewem a kamerą).
7. Zamontuj moduł komórkowy CELL-LINK jak najbliżej aparatu. *
8. Podłącz złącze kabla karty SD do CELL-LINK.
Możesz teraz uzyskać dostęp do zdjęć, konfiguracji i stanów CELL-
LINK za pośrednictwem aplikacji SPYPOINT lub strony internetowej
SPYPOINT.
Zdecydowanie zaleca się montowanie modułu komórkowego
CELL-LINK bezpośrednio nad kamerą - pozostawiając jak najm-
niej miejsca między nimi. Takie postępowanie zmniejszy ryzyko,
UWAGA: że zwierzęta spowodują uszkodzenie kabla.
Jeśli adapter karty pamięci kablowej ulegnie uszkodzeniu (przez
zwierzęta lub inne osoby), kable zamienne można zamówić
oddzielnie na naszej stronie internetowej SPYPOINT.COM.
40SPRZEDAŻ
UŻYWAJ TYLKO ORYGINALNYCH CZĘŚCI ZAMIENNYCH I
AKCESORIÓW.
Jeśli któregoś dnia Twoje urządzenie będzie używane tak intensywnie, że trzeba je wymienić,
lub jeśli nie będziesz już z niego korzystać, musisz je zutylizować w centrum recyklingu.
Informacje na temat punktów zwrotu urządzenia można uzyskać w lokalnej
firmie utylizacji odpadów lub w lokalnych biurach administracyjnych.
Urządzenia elektryczne zawierają nie tylko cenne surowce wtórne, ale także
substancje, które w przypadku niewłaściwego ich usunięcia mogą mieć wpływ na
zdrowie publiczne i środowisko. Pomóż zapewnić, że cenne surowce zostaną pod-
dane recyklingowi po zwróceniu starego urządzenia do centralnego punktu zbiórki.
Symbol przekreślonego kosza na śmieci oznacza obowiązek wysłania oznaczonego
urządzenia do oddzielnego centrum w celu właściwego recyklingu sprzętu elektry-
cznego i elektronicznego.
POLISH
CZĘSTOTLIWOŚĆ
ZAKRES CZĘSTOTLIWOŚCI:
800/ 850/ 900/ 1900/ 2100MHz
MAKSYMALNA MOC TRANSMISJI:
CZĘSTOTLIWOŚĆ MAKS.
GSM850 33DBM±2DB
EGSM900 33DBM±2DB
DCS1800 30DBM±2DB
PCS1900 30DBM±2DB
GSM850 (8-PSK) 27DBM±3DB
EGSM900 (8-PSK) 27DBM±3DB
DCS1800 (8-PSK) 26DBM±3DB
PCS1900 (8-PSK) 26DBM±3DB
UMTS 2100 24DBM+1.7/-3.7DB
UMTS 1900 24DBM+1.7/-3.7DB
UMTS 900 24DBM+1.7/-3.7DB
UMTS 850 24DBM+1.7/-3.7DB
UMTS 800 24DBM+1.7/-3.7DB
41FCC
TO URZĄDZENIE ZGODNE Z CZĘŚCI 15 REGUŁ FCC.
Działanie podlega następującym dwóm warunkom:
1. To urządzenie nie może powodować szkodliwych zakłóceń.
2. To urządzenie musi akceptować wszelkie odbierane
zakłócenia, w tym zakłócenia, które mogą powodować
niepożądane działanie.
POLISH
DZIĘKUJĘ
CI DLA WYBORU Instrukcja obsługi, najnowsze
oprogramowanie i FAQ są
dostępne na stronie:
SPYPOINT.COM/SUPPORT
Obsługa czatu na żywo
jest dostępna na
www.spypoint.com service@spypoint.com
Dołącz do społeczności
Usiądź wygodnie i zrelaksuj się, ponieważ to urządzenie jest
objęte dwuletnią gwarancją „Wiedz, że jesteś objęty”. Staramy
się zapewnić naszym klientom pozytywne doświadczenia i
wyjątkową obsługę.
Uwaga: poniższy tekst jest tłumaczeniem generowanym maszynowo;
dlatego może zawierać błędy.
42CELL-LINK RYCHLÝ NÁVOD v.1.2
V KRABICI
        1x celulární modul CELL-LINK
        1x kabel adaptéru paměťové karty
        1x instalační pásek
        1x Průvodce rychlým startem
        1x microSIM karta (předvolená a vložená do CELL-LINK)

         POZNÁMKA: Paměťová karta a baterie se prodávají samostatně.

          Uživatelská příručka, nejnovější firmware a nejčastější dotazy
                                jsou k dispozici na

               SPYPOINT.COM/SUPPORT
         KOMPONENTY
        1 Kabel adaptéru paměťové 9 STATUS LED
          karty
CZECH

                                       10 spínač ON / OFF
        2 štěrbina pro upevnění        11 slot pro kartu microSD
          popruhu
                                       12 “20 montáž na stativ
        3 Otvor pro kabelový zámek
                                       13 Anténa
        4 5 LED diod intenzity signálu
                                       14 Port kabelu adaptéru paměťové
        5 slot pro SIM  kartu             karty
        6 Tlačítko pro vysunutí        15 12V jack
          baterie „PUSH“
                                       16 Blokovací západka
        7 Přihrádka na baterie
        8 držáků baterií AA
44
1
2 9
10
3
11
4
5
6
7
8
CZECH
16
ové 12
13
14
15
45PŘÍPRAVA
VÝBĚR ZDROJE NAPÁJENÍ
• Lithiové nebo alkalické AA baterie
• Zdroj napájení 12 V (#KIT-12V)
• Nabíjecí baterie 3.7 V (#LIT-10)
Doporučujeme používat dobíjecí lithiovou
POZNÁMKA:
baterii (# LIT-10, prodává se samostatně).
NEJLEPŠÍ VÝSLEDKY A ŽÁDNÉ ÚNIKY:
• Používejte pouze nové lithiové nebo alkalické baterie.
• Nemíchejte staré a nové baterie.
• Nepoužívejte dobíjecí baterie
(jejich nízké napětí může způsobit provozní problémy).
JAK SPRÁVNĚ INSTALOVAT AA BATERIE:
• Odemkněte a otevřete dveře CELL-LINK.
• Vyjměte držák baterií a vložte baterie AA do držáku baterií
podle polarity (+) a (-).
• Vložte držák baterie zpět do přihrádky na baterie, uslyšíte
slyšitelné cvaknutí.
CZECH
FORMOVÁNÍ VAŠE MicroSD KARTY
Před vložením karty microSD do fotoaparátu je třeba ji nafor-
mátovat pomocí počítače, aby byla zajištěna správná funkčnost.
Paměťová karta se prodává samostatně. Ať už se rozhodnete
použít starou nebo zbrusu novou kartu, její kapacita nesmí
překročit 32 GB a musí být přeformátována. Nepoužívejte
možnost „Rychlý formát“.
VLOŽENÍ PAMĚŤOVÉ KARTY
• Ujistěte se, že je CELL-LINK vypnutý a otevřete jeho dveře.
• Vložte paměťovou kartu MicroSD (až 32 GB) do slotu pro
kartu MicroSD štítkem nahoru.
• Karta je vložena správně, když uslyšíte cvaknutí.
46AKTIVACE VAŠEHO CELL-LINK
Musíte aktivovat svůj CELL-LINK prostřednictvím
bezplatné „aplikace SPYPOINT“ nebo přihlášením na
web SPYPOINT.COM.
ZJIŠTĚNÍ AKTIVAČNÍHO KÓDU
Aktivační kód je umístěn na vnitřní straně dvířek
prostoru pro baterii CELL-LINK. K aktivaci CELL-LINK
budete potřebovat tento jedinečný kód.
CZECH
SPYPOINT APLIKACE
Následuj tyto kroky:
1. V Google PlayTM nebo App StoreTM vyhledejte „SPYPOINT“.
2. Stáhněte a nainstalujte aplikaci do smartphonu nebo tabletu.
3. Spusťte aplikaci. Vyberte „AKTIVOVAT ZAŘÍZENÍ“. V seznamu
vyberte „CELL-LINK“ a postupujte podle pokynů.
4. Po dokončení vám bude zaslán potvrzovací e-mail s pokyny,
jak dokončit vytvoření účtu.
5. Přihlaste se k aplikaci SPYPOINT pomocí e-mailu a hesla.
47AKTIVACE VAŠEHO CELL-LINK
web SPYPOINT
Následuj tyto kroky:
1. Na webu SPYPOINT vyberte v horní navigační nabídce
položku „LOGIN“. Na zobrazené stránce vyberte možnost
„Register“, vyplňte povinná pole a poté se přihlaste.
2. Vyberte znaménko + v pravé části stránky; v seznamu vyberte
„CELL-LINK“ a postupujte podle pokynů.
3. Po dokončení vám bude zaslán potvrzovací e-mail s pokyny,
jak dokončit vytvoření účtu.
4. Na webu se přihlaste k účtu pomocí e-mailu a hesla.
Můžete aktivovat další CELL-LINK pro jiné kamery
POZNÁMKA: a přepínat mezi nimi v aplikaci SPYPOINT nebo
v části „MY ACCOUNT“ na webu SPYPOINT.
VÝBĚR PLÁNU PŘENOSU FOTO
Jít do
CZECH
https://www.spypoint.com/en/spypoint-experience/plans
si přečtěte nejnovější nabídky a vyberte si plán, který vám vyhovuje.
KONFIGURACE VAŠEHO CELL-LINK
Nové nastavení se projeví pokaždé, když se CELL-LINK spojí s
aplikací nebo webovým serverem SPYPOINT.
První přenosový čas: Umožňuje zvolit čas, kdy CELL-LINK
provede první přenos dne.
Frekvence přenosu: Umožňuje zvolit počet denních převodů.
Přenosy fotografií jsou ve výchozím nastavení nastaveny na každé 4 hodiny
POZNÁMKA: od půlnoci.
48ZAČÍNÁME S VAŠÍ CELL-LINK
1. Otevřete dvířka prostoru pro baterie CELL-LINK.
2. ZAPNĚTE CELL-LINK (spínač ZAP / VYP).
3. Všechna světla blikají - Hledání signálu
Zpracování signálu může trvat několik minut. Pokud bliká pouze 1
pruh, je test sítě neúspěšný. Zkuste přesunout CELL-LINK (společně s fo-
toaparátem) na jiné místo, abyste maximalizovali sílu signálu, a restartujte
celulární modul. Tuto operaci bude možná nutné opakovat, protože SIM
karta a služby SPYPOINT jsou napájeny více poskytovateli. Síťový modem
automaticky vyhledá a použije věž mobilní sítě s nejsilnějším signálem.
4. Plné tyče - síla signálu
Po dokončení testu sítě se sloupce stabilizují a zobrazují sílu signálu.
Povšimněte si, že signální sloupce zobrazené na CELL-LINK se mohou lišit
od těch zobrazených na jiných celulárních zařízeních, protože neexistuje
průmyslový standard nebo praxe označovat hodnoty DBM na určitý počet
sloupců.
5. Všechna světla nesvítí - CELL-LINK připraven
Zavřete dvířka pouzdra CELL-LINK. CELL-LINK aktualizoval svůj stav o
nejnovější informace. CELL-LINK je nyní připraven získat obrázky z vaší
kamery a přenést je při dalším přenosu do aplikace SPYPOINT nebo na
web SPYPOINT.COM/MY ACCOUNT.
CZECH
Před spuštěním CELL-LINK se ujistěte, že jste úspěšně
POZNÁMKA: nakonfigurovali svou traťovou kameru podle svých
preferencí a podle uživatelské příručky k fotoaparátu.
ZDE JSOU DOPORUČENÁ NASTAVENÍ KAMERY PRO ZA-
JIŠTĚNÍ OPTIMÁLNÍHO VÝKONU VAŠEHO CELL-LINK:
• Fotografický formát s nízkým rozlišením.
• Přesně upravené datum a čas.
• Zpoždění ne kratší než 1 minuta mezi každou detekcí.
• V režimu s časovým odstupem není zpoždění kratší než 1 minuta.
CELL-LINK nepodporuje přenos videa. Pokud však nakonfigurujete
POZNÁMKA: fotoaparát tak, aby před každým videem pořídil fotografii, bude vám
tato fotografie odeslána z CELL-LINK.
49INSTALACE / PŘIPOJENÍ CELL-LINK
Chcete-li připojit kameru SPYPOINT CELL-LINK ke kameře s
jakoukoli značkou, postupujte takto (nebo si prohlédněte naše
video v sekci Nápověda)
1. Otevřete dveře fotoaparátu.
2. Vezměte kabel adaptéru paměťové
karty CELL-LINK a vložte konec s
kartou SD do slotu pro kartu SD ve
fotoaparátu.
3. Udržujte kabel adaptéru paměťové
karty pevně u fotoaparátu,
nasměrujte kabel adaptéru tak,
aby vycházel ze spodní části pou-
zdra na fotoaparát. Kabel by měl
volně viset pod kamerou (vyhněte
se přenášení kabelu přes jakékoli
kritické komponenty).
4. Zavřete dvířka fotoaparátu a zajistěte západku.
5. Vyklopte kabel SD směrem nahoru a vysuňte jej za fotoaparát
tak, aby konektor CELL-LINK vyčníval zpoza horní části
fotoaparátu.
6. Připojte fotoaparát ke stromu (mezi stromem a fotoaparátem
CZECH
by nyní měl být kabel adaptéru SD karty CELL-LINK).
7. Připojte celulární modul CELL-LINK co nejblíže k fotoaparátu. *
8. Připojte konektor kabelu karty SD ke konektoru CELL-LINK.
Nyní můžete přistupovat k fotografiím, konfiguracím a stavům CELL-
LINK buď prostřednictvím aplikace SPYPOINT nebo na webu SPYPOINT.
Důrazně se doporučuje namontovat váš celulární
modul CELL-LINK přímo nad fotoaparát - mezi oběma
tak ponechte co nejméně místa. Tím se sníží riziko, že
POZNÁMKA: zvířata způsobí poškození kabelu.
Pokud dojde k poškození adaptéru kabelové paměťové
karty, lze náhradní kabely objednat samostatně z naší
webové stránky SPYPOINT.COM.
50You can also read