Configuring the Contactless Digital Platform for Digital Menu, Ordering and Mobile Payments - Silverware POS
←
→
Page content transcription
If your browser does not render page correctly, please read the page content below
Configuring the
                   Contactless Digital Platform for
                 Digital Menu, Ordering and Mobile
                             Payments

                                                      1|P a ge
Silverware POS Inc.
1 888 510 5102 x2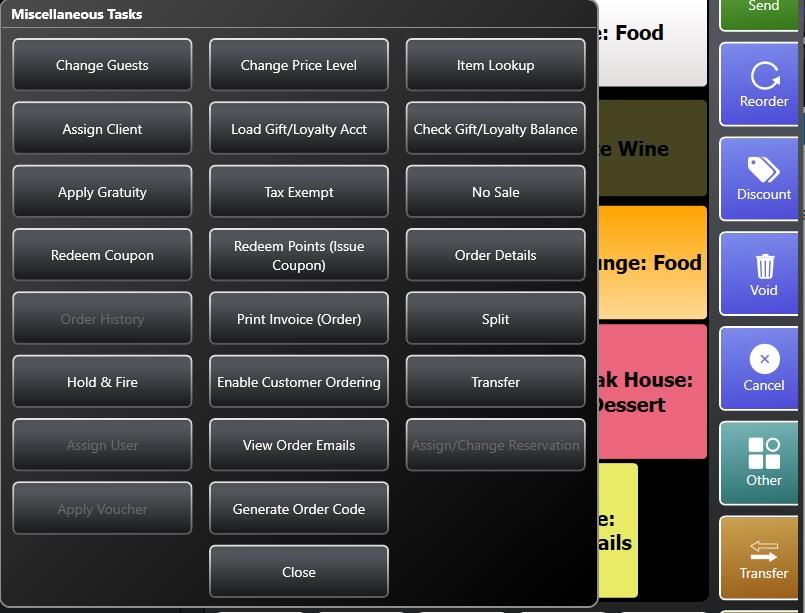
Table of Contents
Activating the Admin Panel………………………………………………………..….…………….Page 3
Building your Digital Platform……………………………..………………..………..……………Page 4
       Create a Menu Availability…………………………………………………….…………..Page 4
       Assign Major/Minor Class…………………………………………………….….…………Page 5
       Programming Menu Groups……………………………………………………..…….…Page 6
       Programming Items……………………………………………………………….…………..Page 7
       Setting Item Menu Availability…………………………………………………………..Page 7
       Programming Long Descriptions……………………………..……………….………..Page 8
       Programming Images……………………………………………………………….………..Page 9
       Programming Questions…………………………………………………………….…….Page 10
       Programming Modifiers…………………………………………………………………..Page 11
       Programming Menu Group Sequence………………………………………….…..Page 12
       How to Generate a QR Code……………………….……………………………………Page 13
       Setting Up Payments………………………………………………………………………..Page 15
Configure Admin Panel………………………………………………………………………………Page 16
Additional Features……………………………………………………………………………………Page 22
       Hold Time by Course (Chit Consolidation)…………………………………….….Page 23
       Default Courses for Items………………………………………………………………..Page 26
       Printer Center Rules…………….………………………………………………………….Page 28
       Create New Order……………………………………………………………………………Page 29
       Prompt for Description…………………………………………………………………….Page 30
       Payment Option – Property Management System (PMS)…………………Page 31

                                                               2|P a ge
Silverware POS Inc.
1 888 510 5102 x2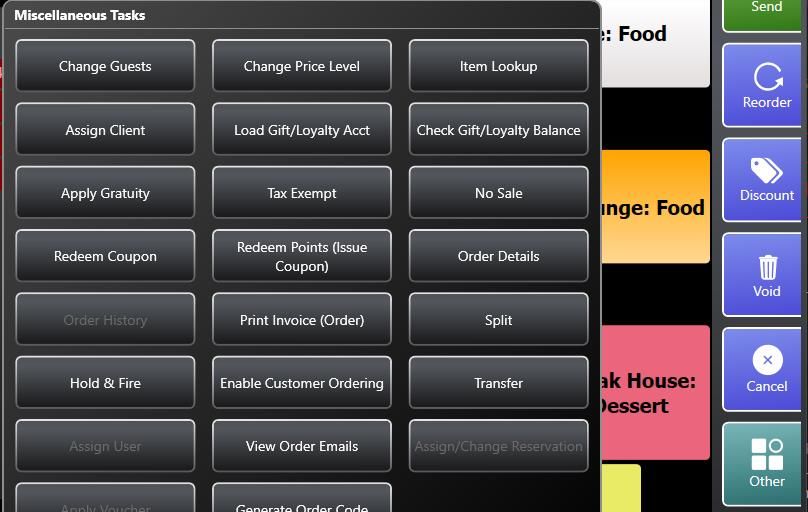
Purpose
The purpose of this document is to provide you with the steps to successfully program your Digital
Platform and some of the specific features that come along with it.

The Digital Platform was built with flexibility in mind. Silverware POS understands that not all
establishment operate that same. With the Admin Panel you can customize a wide variety of features
that will bring a unique look and feel to your platform.

The Digital Platform has three main modules to it: Menu, Ordering, Payments. These modules can be
used independent of one another or together. For example, you can activate Menu only, Menu and
Ordering, Menu and Payments, just Payments or all three for a full contactless solution.

Activate the Admin Panel
    1. Navigate to https://admin.silverwarepos.com
    2. Use your MyPass Credentials to login. These would be your Silverware Enterprise Credentials
            a. If you do not have these credentials, please reach out to your Silverware Account
                Administrator to gain access
    3. Under ‘Available Products’ you can select ‘In-Seat Digital Platform’ and select ‘Yes’
    4. An email notification will go out to Silverware Implementation to begin the backend setup of
       your platform
    5. Status updates will be automatically emailed out to keep you up-to-date with the status of your
       activation
    6. If a version update is required, a Silverware Team member will reach out to schedule a date and
       time to complete the upgrade.
    7. Once activated, navigate back to the admin panel and under ‘Active Products’ select ‘In-Seat
       Digital Platform’

    That’s it! Now you are set up to customize your In-Seat Digital Platform to deliver an on-brand
    contactless experience to your guests

                                                                                              3|P a ge
Silverware POS Inc.
1 888 510 5102 x2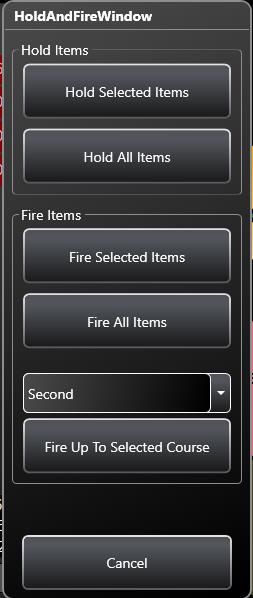
Step 1
Create a ‘Menu Availability’
A Menu Availability is the connection between a specific menu group(s), item(s), question(s) and
modifier(s) to your unique URL (alias) which your guests will browse and order from. To create this:

    1. Navigate to Avrio Menu Editor
           a. Manager Options → Configuration Tab → Menu
    2. Select the ‘Menu Availability’ tab

    3. Create a new Menu Availability and assign it a name. A recommended name for a single
       outlet/menu location would be ‘In-Seat Ordering’
    4. Back in the Admin Panel, assign the newly created Menu Availability to the appropriate Outlet

Now that you have a Menu Availability created, we can start to program the digital menu!

                                                                                              4|P a ge
Silverware POS Inc.
1 888 510 5102 x2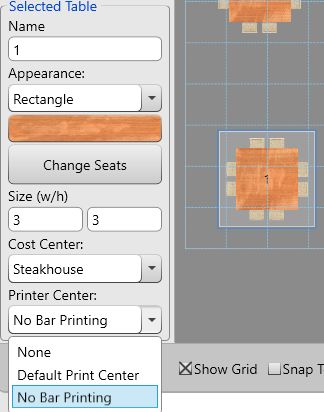
Step 2
Assign Major/Minor Classes
Assigning Major and Minor classes to be associated with your Menu Availabilities will save many clicks
when creating and managing digital menus. It will ensure everything is displayed and is tracked properly
throughout the system. The general rule of thumb is to assign all major and minor classes to your digital
menu availability.

Major Class

    1.    Still in the Avrio Menu Editor, select ‘Classes’
    2.    Select a Major Class, for this example we will use BEER
    3.    Select the Availability tab
    4.    Select all the Menu Availabilities you need this Major Class to be associated with

Minor Class

The Minor Class should auto inherit the Menu Availability you selected for the Major Class; however, it is
always best to double check. To do that:

     1.    Still in the Avrio Menu Editor, select ‘Classes’
     2.    Select a Major Class
     3.    Select a Minor Class within the major
     4.    Select the Availability tab
     5.    Make sure the Minor Class is set to ‘Inherit from parent class’

                                                                                               5|P a ge
Silverware POS Inc.
1 888 510 5102 x2
Step 3
Programming Menu Groups
For the best guest experience, it is recommended that you program the menu groups using the same
header format as your physical menu. To program your menu groups:

   1. Create new Menu Group or select an existing Menu Group
   2. On the General tab
          a. Description = the name of the Menu Group you will see within the Point-of- Sale (server
              facing)
          b. Guest Description = the name of the Menu Group the guest will see using the digital
              platform

   3. On the Availability tab, assign the Menu Group to the corresponding Menu Availability

   4. Repeat these steps for all Menu Groups that will be associated to this Menu Availability

                                                                                            6|P a ge
Silverware POS Inc.
1 888 510 5102 x2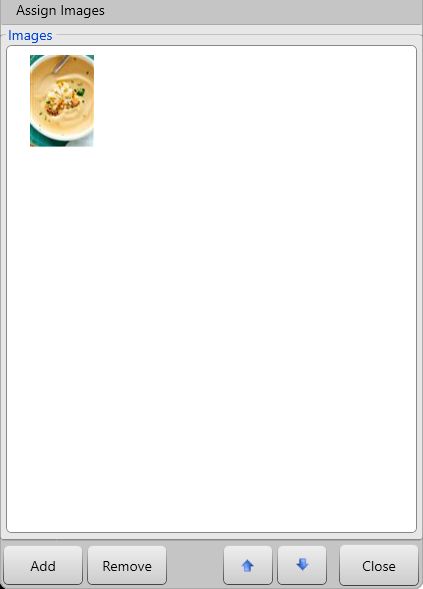
Step 4
Programming Items Names for Digital Platform
After setting up all of the Menu Groups, it is time to set up Items.

    1. Select an item
    2. On the General tab you will see the following:

Description
Button text in the Point-of-Sale
Remote Description
Kitchen printer text
Check Description
The item description on a guest check
Guest Description
The item description that will display within the Digital Platform

    3. Enter the guest facing name of the item in the Guest Description field

Step 5
Programing Item Menu Availability
    1.   Select an item
    2.   Availability tab
    3.   Item should inherit from parent class
    4.   If multiple Availabilities are present, unselect Inherit from parent class and select a specific
         availability

                                                                                                   7|P a ge
Silverware POS Inc.
1 888 510 5102 x2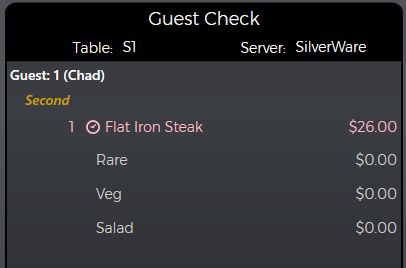
Step 6

Programming Item Long Descriptions
In the Admin Panel set the Menu Item Details to Long Description

Long Description can be used to populate long descriptions on the items to provide your guests an
authentic menu viewing experience. To do this:

   1. Navigate to the Misc tab on an item
   2. Select the 3 dots. Type or copy/paste, from your menu, the long description

   3. Press ok when done. Below is an example of a long description within the platform

                                                                                            8|P a ge
Silverware POS Inc.
1 888 510 5102 x2
Step 7
Programming Item Images
Images uploaded to a specific item to allow the guest to see the completed dish before they order.
Images are optional.
1. Save your images to a file on the Silverware Terminal you are programming the menu on
2. Select Images
3. Select Add
4. Select Import
5. Navigate to the file path where the images are saved and press OK
6. Select the image you wish to upload to the item and press Choose
7. Close the ‘Assign Images’ Screen once the desired image is there
9|P a ge
Silverware POS Inc.
1 888 510 5102 x2Step 8
Programming Questions
1. Navigate to the Questions tab
2. Select the desired question to edit
3. Set desired Description and Guest Description
4. Select the Availability tab
5. Apply the applicable Menu Availability
a. Please note that at least one of Online Ordering or POS has to be selected.
10 | P a g e
Silverware POS Inc.
1 888 510 5102 x2Step 9
Programming Modifiers and setting Questions to Items
This process of adding mods to work within the Digital Platform is the same as adding items. Please note
that the price will pull from the Price (Mod) tab.
1. Navigate to the question
2. Make sure the modifiers in the question are set to ‘Inherit from parent class’
3. If there are modifiers within the question group you do not want to display, unselect ‘Inherit
from parent class’ and it will remove the availability from the modifier
*Please refer to Programming Menu Item on Page 7 if additional guidance is required.
Once the questions and mods have been set up, it is time to apply the question to a specific item. We
will continue to use the Steak as the example.
1. Navigate to desired menu item
2. General Tab
3. Under questions, select New
4. Add desired question
5. Set the ‘Pick Quantity’
a. From 0 – X will make the question optional
b. From 1+ - X will make answering the question mandatory
This question will prompt when the item
is ordered via POS
This question will prompt when the item
is ordered via In-Seat Ordering OR Online
This question will prompt when the item
is ordered via In-Seat Ordering OR POS
11 | P a g e
Silverware POS Inc.
1 888 510 5102 x2Step 10
Programming Menu Group Sequencing
By default, the digital platform will sort your menu groups alphabetically. If you wish to change this
there are two locations you need to navigate to.
In Avrio Menu Editor
1. Navigate to the Menu Availability tab
2. Select the desired Menu Availability
3. On the left-hand side, under ‘Menu Groups’ select the menu group you wish to rearrange and
use the up/down arrows
4. Save when done
In Admin Panel
1. Log into the Admin Panel
2. Select your chain and store
3. Select your Outlet if there is more than one
4. Scroll down to Menu Availability
5. Set the ‘Sort Menu Groups by’ to Sequence
6. Save
12 | P a g e
Silverware POS Inc.
1 888 510 5102 x2How to Generate a QR Code
1. Start a table
2. Enter guest count
3. Other Options
13 | P a g e
Silverware POS Inc.
1 888 510 5102 x24. Generate Order Code
5. Select ‘Print’ to print the unique QR Code and Order code to leave with the guest
6. Select ‘Cancel’ to exit this screen
7. Select ‘Send’ to save the table
The unique QR Code and order code are now saved to that table until the table is closed. The guests can
scan the QR code at any time to go back to their order.
14 | P a g e
Silverware POS Inc.
1 888 510 5102 x2Setting up Payments
Log into the Admin Panel and Enable In Seat Payments
This will send a notification to Silverware POS Inc and the team will being the onboarding
process (2-4 business days).
Contactless Digital Payments utilises Bambora as the Payment Processor. If you do not have a
Bambora Account, a Silverware representative will be in touch to being the account creation
process.
Silverware recommends creating new payment types (BA Visa, etc) in Avrio to track the
payments being processed through Bambora vs your primary Payment Processor.
Upon completion of the Payment setup, Silverware will log into the specific Admin Panel to
ensure Payment Options are setup correctly. It is not recommended to change settings within
the Payment Option section of the Admin Panel with the exception of enabling/disabling Pay
with Credit Card or Pay with Mobile Wallet.
Refund a Payment Processed Through the Digital Platform
If you need to refund a payment made using the Digital Platform payment solution within your
check reopen day limit, please follow these steps. Otherwise log into the Bambora Portal
directly to issue a refund.
1. Manager Options
2. Reopen Check
3. Enter Check Number
4. Recall Check
5. Select ‘Pay’
6. Select the Payment on the screen you wish to refund
7. Select ‘Remove Payment’
8. System will start to process the removal of the payment, initiating the refund
9. Once complete it will take 5-7 business days for the refund to show up on the guest’s
statement
10. Close the table as per your restaurants procedures for processing a refund
15 | P a g e
Silverware POS Inc.
1 888 510 5102 x2Configuring the Admin Panel for the
Contactless Digital Platform:
Digital Menu, Ordering & Mobile Payments
16 | P a g e
Silverware POS Inc.
1 888 510 5102 x2There are various settings that will need to be enabled or configured to allow proper functionality of
menu, ordering and payments loaded from your point of sale to your website. Select the desired Outlet
you wish to modify and let’s begin.
Store Name
If your Store Name will be different than your Store Name under the details section (ie. Business name
versus Legal Name) then enter the desired Store Name in the corresponding field.
Digital Menu
Enable Digital Menu to allow your guests to view your menu online only
In Seat Ordering
Enable In Seat Ordering to allow your guests to view and order from your digital platform
Menu Item Countdown
Enable Menu Item Countdown to allow item counts to sync to and from the digital platform
Course Selection
Enable Course Selection to allow your guests to course their order. Disabled will order everything to
course 1
Kitchen Notes
Enable to activate ‘Anything Else We Should Know’ field withing the digital platform. Allows guests to
‘Special Instructions’ a custom note to the kitchen
Help Button
Enable Help Button to allow your guest to request for help from within the digital platform
17 | P a g e
Silverware POS Inc.
1 888 510 5102 x2Require Guest Name
Enable Require Guest Name to force the guest to enter their name. Default name is Guest #1,
etc. Useful for food running
Create New Order
Allows guest to place a new order to point-of-sale without an order code. This order will show up
on selected service type.
Require Payment on Order
Require payment from guest before order is sent to point-of-sale.
Must be on for Create New Order to work
Show Tip Amount
Display tip percentage amount in local currency
Prompt for Description
Allows guest to enter in a custom description if the item is set to 'Ask Desc' from the point-of-sale.
Service Type and Cost Center
Set a default service type and cost center for the digital platform to load
18 | P a g e
Silverware POS Inc.
1 888 510 5102 x2Menu Availability
Select the desired Menu Availability to load with the selected outlet that was programmed in Silverware
Avrio Point of Sale
Sort Menu Groups
Set the default sort option for menu groups
Menu Item Details
Set the desired text field for the menu item details to be loaded from within Silverware Avrio point of
sale
Region
Set the region of your Admin Panel to match the Region of your location
Order Description Settings
Set up additional questions you may need to ask the guest when they are placing their order.
Useful for when Create New Order is turned on.
19 | P a g e
Silverware POS Inc.
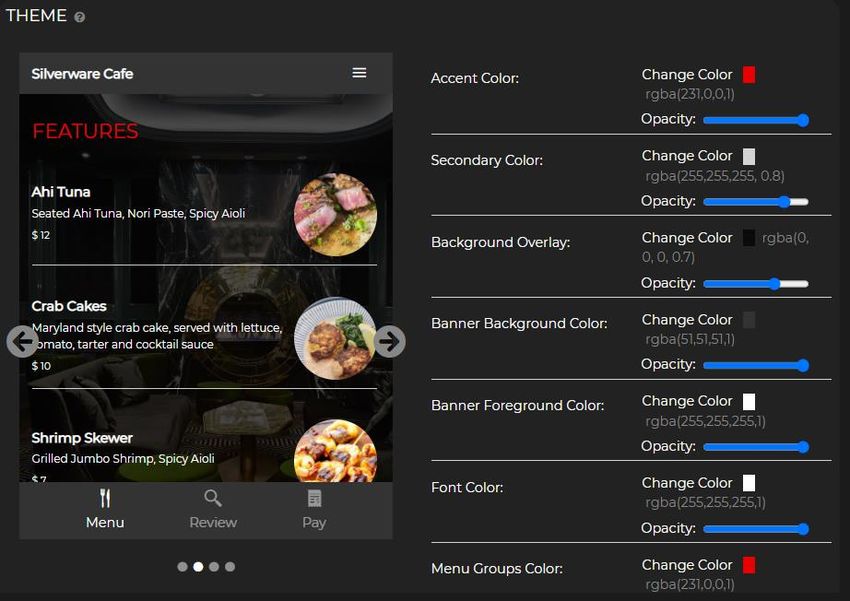
1 888 510 5102 x2Theme
Program a unique on-brand look and feel of your Digital Platform using the various style options located
within the Themes section
Upper Case Headers - Force all menu group headers to be capitalized.
Menu Item Images - Show/Hide menu item images.
Rounded Images - Change all the menu items images to rounded images.
Collapse Groups by Default - Collapse all the menu groups by default.
Logo – Upload a logo for the outlet to display. Transparent .PNG file of 570x570 pixels
recommended
Background – Upload a background for the outlet to display. The JPG file or 1500x1500 pixels
recommended
Guest Tags
Enter a custom list of Guest Tags the guest can append to their order for easy communication to the
kitchen. IE. Allergens
20 | P a g e
Silverware POS Inc.
1 888 510 5102 x2Courses
Enable or disable certain course by outlet that your guests can order to. Also program an appropriate
guest facing course name. Display hold time on course, if any.
Tips
Program desired tip percent amounts and optionally mark one as the default selection for when the tip
screen loads
Launch your Digital Platform!
You can click on the red text of the Outlet name from within the Admin Panel to launch your Digital
Platform to check our all of your hard work! You can also use this specific URL to create static QR Codes
for your table topper and other marketing material.
21 | P a g e
Silverware POS Inc.
1 888 510 5102 x2Additional / Optional Features
22 | P a g e
Silverware POS Inc.
1 888 510 5102 x2Programming Hold Time by Course
Remote (chit) printing is handled one of two ways when orders are placed using the digital platform. The
default method is an individual chit will print to the kitchen per device sending an order to a single table.
The technical explanation behind this is that the Point of Sale system sees each device that is placing an
order as an individual point of sale. Imagine the server pressing the send button for each order placed
by guests at a table – this would be the same result.
Setup Required
If you would like multi device orders consolidated chits printing to the kitchen, follow these steps to set
up Hold Time by Course (Silverware assistance required)
1. Call Silverware Helpdesk 1 888 510 5102 x 2
2. Indicate that you would like to set up hold time by course for the Digital Platform
3. They will log into Store Config 2.0
4. In Store Config 2.0 they will enable hold time by course
5. The Helpdesk Agent will require time, in minutes, to be assigned to each course as a hold time.
(as seen in the image above). You do not need to add a hold time to the Drinks course as the bar
is typically okay with multiple chits
6. The Helpdesk Agent will then activate the hold and fire module for your location in Store Config
7. Once this setup is complete, you are location is set up for multi device consolidated printing
23 | P a g e
Silverware POS Inc.
1 888 510 5102 x2How it Works
Once hold times are enabled by course, there are two ways the order will be triggered to print to the
remote printers.
Scenario 1 – Hold Time reaches 0
The Hold Time defined in the earlier setup starts when the first order hits the table. The following
example will outline this.
1. A table of 4 is seated and they scan a QR code to begin their order
2. Guest 1 places their order first and the ‘hold time’ define by each course starts (5-minute timer)
3. Guest 2 and 3 place their order 2 minutes later. These items are held with guest 1
4. Guest 4 places their order 4 minutes after guest 1 sent theirs. This order is held with the rest
5. The hold time reaches 0 or 5 minutes and all items ordered within that window are released to
the kitchen, all printing on a single chit
Scenario 2 – Server releases the order before hold time reaches 0
If you decide to set a larger than required hold time (7 to 10 minutes +) as a precaution to make sure all
orders are sent to remote printer at the same time, the server can intervene and release the order so
the table doesn’t have to wait for the timer to reach 0.
1. A table of 4 is seated and they scan a QR code to begin their order
2. Guest 1 places their order first and the ‘hold time’ define by each course starts (8-minute timer)
3. Guest 2 and 3 place their order 3 minutes later. These items are held with guest 1
4. Guest 4 places their order 5 minutes after guest 1 sent theirs. This order is held with the rest.
5. The server notices that they seem to be done ordering on their mobile device and goes to check
how everything went
6. Guests indicate their order has been send and they are done ordering for now
7. Server can review the order in the point-of-sale
8. If order looks good (no coursing mistakes, miss punches, etc) the server can ‘Fire’ the order
a. Open the table
b. You will see the item(s) being held are a different colour and have a clock beside it
24 | P a g e
Silverware POS Inc.
1 888 510 5102 x2c. Select the specific items or select all items
d. Select ‘Other’
e. Select Hold and Fire
f. Select ‘Fire Selected Items’ or ‘Fire All Items’
g. You will see the items are no longer being held and the server can ‘Send’ the order to
the kitchen
h. All items will be released to print at their remote printers in their proper format
25 | P a g e
Silverware POS Inc.
1 888 510 5102 x2Programming Default Courses for Items
Programming a default course that the item(s) to be ordered to will reduce the amount of potential
coursing mistakes guests may make while placing their order.
Default courses can be assigned at the Major/ Minor level and pushed out to all items within those
classes, then modified on a specific item(s) if needed.
For Major classes where the Minor class can inherit the course IE. Liquor, Wine, Beer as it will all be
ordered to the drinks course (4)
1. Navigate to Manager Options
2. Menu
3. Classes tab
4. Select a Major Class (BEER for this example)
5. On the general tab you will see a line called ‘Courses, set desired Major class default course and
this will push to the minor
6. Select the Minor to make sure it is inheriting the selecting from the Major
26 | P a g e
Silverware POS Inc.
1 888 510 5102 x2For Minor classes where the class cannot inherit the course IE. Food as it will contain appetizers (1),
mains (2), desserts (3) all which need to go to different courses.
1. Navigate to Manager Options
2. Menu
3. Classes tab
4. Select a major class (FOOD for this example)
a. Due to the likelihood of having unique minor classes within the FOOD Major, we will
program the minor classes specifically to print to desired courses
5. Select APPETIZER
6. On the General Tab you will see a line called ‘Course’, unselect inherit and set to desired course
(1)
7. Repeat for other minor classes within the selected Major class
27 | P a g e
Silverware POS Inc.
1 888 510 5102 x2Printer Center Rules
If your restaurant makes use of print center rules, please make sure the appropriate Print
Center Rule is assigned to the specific set of tables that need special printer routing.
1. Manager options
2. Configuration
3. Floorplans
4. Select your Floorplan to edit
5. Select a specific set of tables, or if all tables on the floorplan will use same Printer Center
Rules you can press Ctrl+A to select all
6. Set the desired Printer Center Rule to the selected table(s)
7. If your remote chits are not printing to the desired printer still, please call Silverware
helpdesk to investigate further 1 888 510 5102 x 2
Alternatively, you can call Silverware Helpdesk to assign a Printer Center Rule to a cost center
instead of tables.
28 | P a g e
Silverware POS Inc.
1 888 510 5102 x2Create New Order
Create new order will allow the user to scan a QR code and place and order directly to your point of sale.
This order will appear either on the Bar Tab screen or Room Service screen. There are a few steps
required in the Admin Panel to activate these features. Create New Order can be turned on for In Room
Dining outlets, Poolside outlets, Cabana style outlets, etc. Enabling and setting up the ordering feature is
required before this feature can be activated
Setup Required
1. log into the Admin Panel
2. Under Settings, enable ‘Create New Order’
3. Under Settings, enable ‘Require Payment on Order’
4. Set Service Type to either Bar Tab or Room Service
Order Description Settings
1. Select the + sign to create a new question to ask your guests
2. Select the question (IE Room number for ‘In Room Dining’ or Chair number for ‘pool side’) You
can create a custom question to collect information such as Phone Number if needed.
3. Fill in the Guest facing text
4. Select the type of information that will be entered into the field (IE, Numeric or Text) This will
determine the keyboard style that appears for the guest
5. Enter a short name if custom text was selected
6. Choose to show or hide short name on bar tab or room service floor plan for order description
and remote chit
Sample Order Description
This will give you an idea of how your question will display in the point of sale and remote chit
Display Message
Change the title of the order description page within the outlet to be on brand
Below is how Order Descriptions would be set up for In Room Dining
29 | P a g e
Silverware POS Inc.
1 888 510 5102 x2Prompt for Description
Enabling Prompt for Description will allow your guests to enter in custom text when they select an item
that has ‘Ask Desc’ enabled. This can be used to collect additional information for an order that will print
on remote chit and display in point of sale.
Steps Required
1. In the Admin Panel, turn on Prompt for Description
a. By default, the system will allow 20 characters to be entered. If more are required,
please call Silverware Helpdesk 1 888 510 5102 x 2
2. In the Avrio Menu Designer, program the item you wish to allow custom text to be entered on
by making sure on the Misc tab ‘Ask Desc’ is enabled
30 | P a g e
Silverware POS Inc.
1 888 510 5102 x2Payment Options – Property Management System (PMS)
If your location has an active PMS system, enabling PMS posting for your guests is straight forward.
1. Log into the Admin Panel
2. Enable Property Management System
3. Enter a Guest facing name (IE. Room Post)
4. Select the check mark
5. Save
You can now test to make sure your PMS payment option in the digital platform is posting properly. If
you receive an error please call Silverware Helpdesk for assistance @ 1 888 510 5102 x 2
31 | P a g e
Silverware POS Inc.
1 888 510 5102 x2You can also read