Corona Developers Guide - Tim Dawborn Raymes Khoury
←
→
Page content transcription
If your browser does not render page correctly, please read the page content below
Corona Developers Guide

Tim Dawborn   Raymes Khoury
2
Contents

1 Getting started with Corona development in Eclipse                                                 7

  1.1   Prerequisites . . . . . . . . . . . . . . . . . . . . . . . . . . . . . . . . . . . . . .    7

  1.2   Setting up Eclipse Libraries . . . . . . . . . . . . . . . . . . . . . . . . . . . . .       7

  1.3   Setting up Eclipse Projects . . . . . . . . . . . . . . . . . . . . . . . . . . . . . .      8

        1.3.1   Corona SPOT . . . . . . . . . . . . . . . . . . . . . . . . . . . . . . . . .        8

        1.3.2   Corona Server . . . . . . . . . . . . . . . . . . . . . . . . . . . . . . . . .      9

        1.3.3   Corona GUI . . . . . . . . . . . . . . . . . . . . . . . . . . . . . . . . . .       9

2 Code Style Guidelines                                                                             11

  2.1   Eclipse Code Formatting . . . . . . . . . . . . . . . . . . . . . . . . . . . . . . . 11

3 System Overview                                                                                   13

  3.1   The spot module . . . . . . . . . . . . . . . . . . . . . . . . . . . . . . . . . . . 13

  3.2   The server module . . . . . . . . . . . . . . . . . . . . . . . . . . . . . . . . . . 14

  3.3   The gui module . . . . . . . . . . . . . . . . . . . . . . . . . . . . . . . . . . . . 14

4 Package Outline                                                                                   17

  4.1   SPOT Module: au.edu.usyd.corona.* . . . . . . . . . . . . . . . . . . . . . . 17

  4.2   Server Module: au.edu.usyd.corona.server.* . . . . . . . . . . . . . . . . . . 18

  4.3   GUI Module: au.edu.usyd.corona.gui.* . . . . . . . . . . . . . . . . . . . . . 19

5 Adding a new Table Attribute                                                                      21

  5.1   Creating a Sensor Class     . . . . . . . . . . . . . . . . . . . . . . . . . . . . . . . 21

  5.2   Registering the Sensor . . . . . . . . . . . . . . . . . . . . . . . . . . . . . . . . 22

                                                 3
4 CONTENTS
5.3 Compile and Run . . . . . . . . . . . . . . . . . . . . . . . . . . . . . . . . . . . 22
6 Adding a new Database Type 23
6.1 Adding a “Token Grammar” Token . . . . . . . . . . . . . . . . . . . . . . . . . 23
6.2 Creating the Type Class . . . . . . . . . . . . . . . . . . . . . . . . . . . . . . . 24
6.3 Updating the Token Grammar Parser . . . . . . . . . . . . . . . . . . . . . . . . 26
6.4 Registering the Class . . . . . . . . . . . . . . . . . . . . . . . . . . . . . . . . . 27
6.5 Compile and Run . . . . . . . . . . . . . . . . . . . . . . . . . . . . . . . . . . . 27
6.6 Adding a Renderer in the Corona GUI for Your Type (Optional) . . . . . . . . . 27
7 Adding new Tasks 29
7.1 Create the Task . . . . . . . . . . . . . . . . . . . . . . . . . . . . . . . . . . . . 30
7.2 Register the Class . . . . . . . . . . . . . . . . . . . . . . . . . . . . . . . . . . . 31
8 Modifying the SQL Grammar and adding new Query Types 33
8.1 Modifying the ANTLR Grammar . . . . . . . . . . . . . . . . . . . . . . . . . . 33
8.2 Recompiling the ANTLR Grammar . . . . . . . . . . . . . . . . . . . . . . . . . 34
8.3 Writing the Corresponding Task . . . . . . . . . . . . . . . . . . . . . . . . . . . 34
8.4 Writing the Compiler . . . . . . . . . . . . . . . . . . . . . . . . . . . . . . . . . 34
8.5 Register the Compiler . . . . . . . . . . . . . . . . . . . . . . . . . . . . . . . . 35
8.6 Compile and Run . . . . . . . . . . . . . . . . . . . . . . . . . . . . . . . . . . . 35
9 Modifying the Persistence Layer 37
9.1 DAO Pattern Implementation . . . . . . . . . . . . . . . . . . . . . . . . . . . . 37
9.2 JDBC DAO . . . . . . . . . . . . . . . . . . . . . . . . . . . . . . . . . . . . . . 38
9.2.1 Configuring the DBMS Used . . . . . . . . . . . . . . . . . . . . . . . . . 38
9.2.2 Configuring DBMS SQL . . . . . . . . . . . . . . . . . . . . . . . . . . . 39
9.3 Alternative DAO Implementations . . . . . . . . . . . . . . . . . . . . . . . . . . 40
10 Modifying the RMI interface 41
10.1 Updating the RemoteSessionInterface . . . . . . . . . . . . . . . . . . . . . . 41CONTENTS 5 10.2 Updating the Ant build.xml File . . . . . . . . . . . . . . . . . . . . . . . . . . 41 10.3 Updating the Clients . . . . . . . . . . . . . . . . . . . . . . . . . . . . . . . . . 42 11 Developing a front-end using the RMI Interface 43 12 Some improvements that can be made to Corona 45 12.1 Routing and Network Improvements . . . . . . . . . . . . . . . . . . . . . . . . 45 12.2 Asynchronous Result Forwarding and Forwarding after Disconnection . . . . . . 45 12.3 Query Optimisation . . . . . . . . . . . . . . . . . . . . . . . . . . . . . . . . . . 46 12.4 User Access . . . . . . . . . . . . . . . . . . . . . . . . . . . . . . . . . . . . . . 46 12.5 Task Persistence . . . . . . . . . . . . . . . . . . . . . . . . . . . . . . . . . . . . 46 12.6 Node Efficiency . . . . . . . . . . . . . . . . . . . . . . . . . . . . . . . . . . . . 47 12.7 Language Independent Interface . . . . . . . . . . . . . . . . . . . . . . . . . . . 47
6 CONTENTS
Chapter 1

Getting started with Corona
development in Eclipse

1.1     Prerequisites

Before we can start developing for Corona, two things must happen. Firstly, the SunSPOT
SDK must be installed, as well as all the required environmental variables established as per
the instructions provided from Sun in the SunSPOT kits. Corona is developed for the Blue
SDK, so this version should be installed and used for development. Once this has happened,
you need to obtain the source code for Corona, which can be located at the downloads page on
the Corona website.

From this point onwards we assume you have the Blue SDK installed at SDK_DIRECTORY, and
the source code checked downloaded and extracted to CORONA_DIRECTORY.

See the User Guide section on “Installing Corona” for more details on running Corona.

1.2     Setting up Eclipse Libraries

Before we load the Corona source code into Eclipse, we first need to setup Eclipse to be able to
use the SunSPOT SDK. To do this, we create what is called in Eclipse, a User Defined Library
for both the SPOT environment and the basestation (host) environment.

To access the User Library settings within Eclipse, open up Eclipse Preferences -> Java
-> Build Path -> User Libraries. Here we need to create two custom libraries: “SunSPOT
Blue SPOT” and “SunSPOT Blue Host”.

Firstly, to setup the SPOT user library:

   • Click on “New” and create the “SunSPOT Blue SPOT” user library

   • Select the new library and click on the “Add JAR’s...” button

   • Browse to ${SDK_DIRECTORY}/lib

                                               7
8 Getting started with Corona development in Eclipse
• Add the following JAR files to the library:
– multihop_common.jar
– spotlib_common.jar
– spotlib_device.jar
– squawk_common.jar
– squawk_device.jar
– transducer_device.jar
Once you have done this, you can then create the “SunSPOT Blue Host” user library. To do
this, follow the same steps as above, except instead choose the following JAR files to be added
to the library:
• multihop_common.jar
• spotclient_host.jar
• spotlib_common.jar
• spotlib_host.jar
Following this, click the “Ok” button in the preferences window to save these user libraries.
Note: if you so desire, you can also setup these JARs associated source code and Javadoc within
Eclipse by clicking the arrow to the left of each of these JARs in the User Library menu, and
clicking on either the “Source attachment” or the “Javadoc location” items. The source code
JAR files are located in ${SDK_DIRECTORY}/src and the Javadoc in ${SDK_DIRECTORY}/doc/
javadoc.
1.3 Setting up Eclipse Projects
Now that Eclipse knows about the SunSPOT SDK, we can import the Corona source code and
start development. Each corona module uses the standard Java folder structure; a folder called
src containing the source code for the project, a folder lib containing JAR files of 3rd party
libraries, and a folder build which is where the project is compiled into. Eclipse will recognise
this folder structure and assist you in setting up the projects.
1.3.1 Corona SPOT
This projects contains the code that is actually executed on the SunSPOTS themselves. This
code needs use only the SunSPOT SDK as its standard library as opposed to the default Java
SDK you have installed on your local machine.
Create a Java project in Eclipse (“Corona SPOT”) that points to the folder ${CORONA_DIRECTORY
}/src/spot. Make sure that the src folder is listed as a source folder upon clicking “Next”.Setting up Eclipse Projects 9
Once this has been created, a large number of compile errors will appear; this is because we
need to tell Eclipse to use the SunSPOT SDK rather than the system default Java SDK. Right
click the project and click on properties. Under the “Libraries” tab, remove the Java SDK
library, and then click on Add Library -> User Library -> SunSPOT Blue SPOT. Once this
library has been added to the project, select the “Java Compiler” option on the side of the
properties window. Enable “Project Specific Settings”, and change the “Compiler Compliance
Level” from the default to “1.3”. Finally click on “OK” and let the project recompile; there
should now be no compile errors.
1.3.2 Corona Server
This projects contains the code that is executed on a computer connected to the basestation
node. This code needs use the Java 5 SDK, as well as the “SunSPOT Blue Host” library we
created before.
Create a Java project in Eclipse (“Corona Server”) that points to the folder ${CORONA_DIRECTORY
}/src/server. Make sure the the src folder is listed as a source folder upon clicking “Next”.
Once this has been created, right click the project and click on properties. Under the “Li-
braries” tab, click on Add Library -> User Library -> SunSPOT Blue Host. Once this li-
brary has been added to the project, select the “Java Compiler” option on the side of the
properties window. Enable “Project Specific Settings”, and change the “Compiler Compliance
Level” from the default to “1.5”. Under the “Projects” tab, tick the “Corona SPOT” project.
Finally click on “OK” and let the project recompile; there should now be no compile errors.
1.3.3 Corona GUI
This projects contains the code for the default RMI client interface we provide; a GUI written
in Swing/AWT.
Create a Java project in Eclipse (“Corona GUI”) that points to the folder ${CORONA_DIRECTORY
}/src/gui. Make sure the the src folder is listed as a source folder upon clicking “Next”. Once
this has been created, right click the project and click on properties. If there are any compile
errors upon loading up this project, it probably means that you are using Java 6 rather than
Java 5. Set the projects target compiler version to be “1.5” as described in the previous projects,
and try again.10 Getting started with Corona development in Eclipse
Chapter 2
Code Style Guidelines
2.1 Eclipse Code Formatting
During the development of Corona, we have used a common set of style guidelines to help
the code look consistent. Eclipse has a useful feature of being able to export and import a
set of style guidelines that it auto-corrects for you. We suggest that you import our Eclipse
style guidelines file also to help the codes look and feel to be consistent. The file is called
eclipse-code-style-format.xml and is located in the root directory of the Corona project
you downloaded (${CORONA_SOURCE}/eclipse-code-style-format.xml).
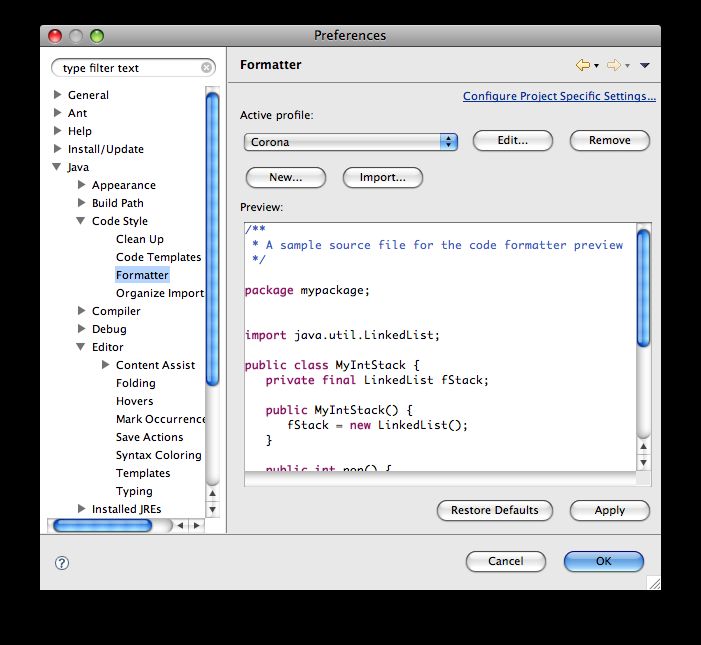
To import this file into Eclipse, open Eclipse Preferences -> Java -> Code Style ->
Formatter, and click on the Import button. Navigate to the eclipse-code-style-format.
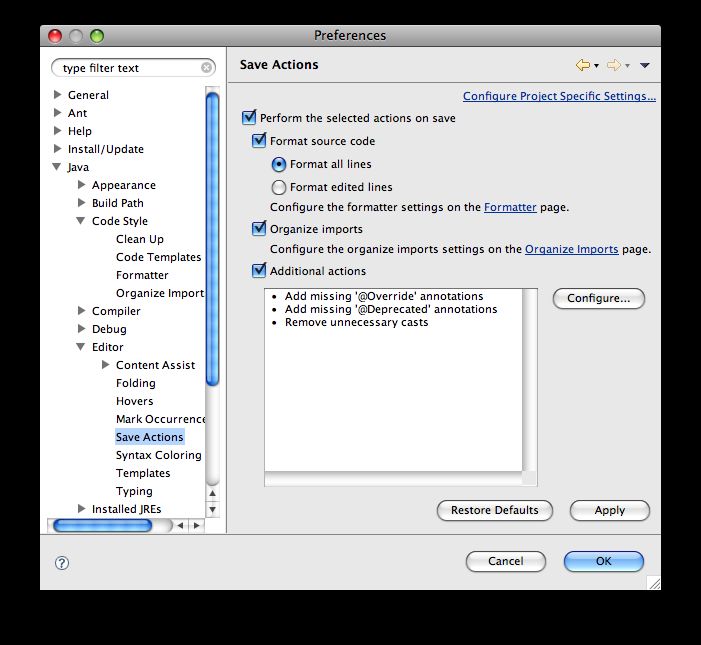
1112 Code Style Guidelines xml file, and load it in. Once you have done this, the active profile should state “Corona”. Also, you should set Eclipse to apply this style formatting upon save. To do this, still in the preferences, go to Java -> Editor -> Save Actions and make sure you have the “Format source code” option selected. Click on “Ok” to save the preferences.
Chapter 3

System Overview

Corona has three main modules; spot, server, and gui.

3.1     The spot module

The spot module is deployed to each individual SunSPOT. It runs a scheduler that manages
the execution of all tasks on the SunSPOTs. When a query is executed on the server a set
of tasks are generated to do the work of the query, which are disseminated into the network.
When a task is received by a SunSPOT, it is scheduled to execute at the specified time. Then
when the task executes, the appropriate sensors are activated which produce a single result row
on that node (with one column for each sensed value). A relational expression tree (which is
contained within the task) then executes to produce the result table that the user specified in
their query. On each node, this expression tree takes as inputs the table containing the newly
sensed row, as well as all tables from child nodes. It outputs a single table which is forwarded
onto the parent node. This result will continue to be aggregated with results further up the
tree and eventually forwarded to the server module running on the basestation which persists
the final result table for later access.

                                              13
14 System Overview 3.2 The server module The server module runs on a single computer and connects wirelessly to the SunSPOT network. The server module establishes a network topology among the SunSPOTs and coordinates time synchronization. It also disseminates queries to the wireless sensor network (which have been issued from the gui) and then collects and stores results such that the gui may access on demand. Code in this module has dependencies on code in the spot module; the server is a superset of the spot module so to speak. This module has a persistence layer (in the form of a database) to store queries, result tables and user details. It also provides access control which only allows authorized users to access the system. We introduce two levels of access, namely the privileged “administrator” and the standard “user”. The communications layer between the server and its clients (e.g. the gui) is implemented using an RMI interface, which securely exposes the functionality of the system to clients. The diagram below gives an indication of the major components of the server module. 3.3 The gui module The gui module is the users interface to the system. It connects remotely to a Corona server using the RMI interface. Multiple gui’s can concurrently access the system. The GUI provides a visual Query Builder which allows queries to be constructed by a user without the need to know SQL. It also contains features for graphing and visualising results in a more meaningful way.
The gui module                                                                       15

The code in this package can have no direct dependencies upon code in either the spot or
server modules, but can have dependencies on code in the server module which is in the
corona-rmi.jar file (see Modifying the RMI Interface and Developing an RMI FrontEnd for
more details). This GUI is designed to run on Java 5.
16 System Overview
Chapter 4

Package Outline

For the best package outline, see the package description page of the generated Javadoc for
Corona. The Javadoc for Corona can be downloaded form the Corona website, or alternatively,
viewed online here.

4.1     SPOT Module: au.edu.usyd.corona.*

The SPOT module can be broken down into three main sections; the networking layer, the
scheduler layer, and the relational database layer.

The networking layer consists of all the code needed for the sustaining of the networking tree,
the global time synchronization, and the transmitting of application layer packets between the
nodes. The packages that are involved in this are:

 Package                                           Description
 compression                                       Provides compression classes used to help
                                                   minimize the amount of data sent via wire-
                                                   less
 io                                                Stream wrappers and other misc IO related
                                                   classes used in the transporting of data
 middleLayer                                       Contains all of the code for the networking
                                                   tree and the global time synchronization

The scheduler layer consists of the code necessary for the periodic time-triggered execution
of “tasks” on the nodes in a Corona network. These tasks include things such as sensing
data from the sensors, requesting the transmitting data to other nodes, requesting that a time
synchronization occurs, etc (see the Adding New Tasks guide for mode details). The packages
involved in this layer are:

                                              17
18 Package Outline
Package Description
grammar Used for processing the token grammar lan-
guage that SQL queries are compiled down
to
scheduler The main system scheduler, as well as the
implementation of time-triggered tasks
sensing The implementation classes which obtain
data from sensors on the SunSPOT
The relational database layer contains the code required for the relational database processing
that is performed on the results of queries inside a Corona network. In network data processing
occurs on each node in the network tree as the results are transmitted back to the root (the
basestation). For more information, see the Adding a new Table Attribute and Adding a new
Type guides. The packages involved in this layer are:
Package Description
srdb Stands for SunSPOT Relational DataBase,
and contains our implementation of a rela-
tional database used throughout Corona
types The implementation of the different data
types used in srdb and throughout Corona—
4.2 Server Module: au.edu.usyd.corona.server.*
The server module can also be broken down into three logical sections; the SQL grammar
layer, the persistence layer, and the RMI layer.
The SQL grammar layer contains all of the code which deals with compiling and processing
SQL queries executed by users of the server. This process involves converting the SQL string
into the appropriate token grammar tokens and/or executable tasks to be run on the scheduler.
This process is partially handled by the ANTLR grammar file. For more information on the
SQL compiling process, see the Modifying the SQL Grammar and adding new Query Types
section. The packages involved in this layer are:
Package Description
grammar Contains the compilers for the different types
of queries, using the ANTLR generated lexer
and parser
The persistence layer is responsible for persisting the results of queries into a database, whereby
the underlying database is abstracted away from the application layer code. The persistence
.DAOInterfaces package provides the interfaces that the application layer interacts with. We
provide one default implementation of these interfaces in Corona which uses a JDBC compatible
database, and this implementations can be found in persistence.JDBCDAO. For more infor-
mation on this persistence layer, see the Modifying the Persistence Layer guide. The packages
involved in this layer are:GUI Module: au.edu.usyd.corona.gui.* 19
Package Description
persistence.* Contains the interfaces and implementation
of the objects being persisted in a database
The RMI layer contains all the code for handling clients connecting to a Corona server. This
consists of creating classes to interact with the RMI server, and providing efficient means for
connected users to obtain data from the server. For more information on the RMI interface
code, see the Modifying the RMI interface guide. The packages involved in this layer are:
Package Description
session.* Code that manages a users logged in session
via the RMI interface
user Manages the users in the Corona server
4.3 GUI Module: au.edu.usyd.corona.gui.*
The GUI is included in Corona as an example of how to write an RMI front end to a Corona
server, and to provide basic interaction with the server. We have left the GUI relatively
undocumented as we do not expect people to necessarily modify it.20 Package Outline
Chapter 5

     Adding a new Table Attribute

     If you have added your own sensors to the SunSPOT, or for what ever other reason you would
     like to support another attribute in the result tables, this is the guide for you. Here we will go
     through step by step how to add a new table attribute to the system.

     To guide us through this example, I will be adding a new sensor to the system called “random”,
     which when sensed, will return a pseudorandom integer number.

     5.1       Creating a Sensor Class

     The first step in adding a new table attribute to the system is to create a Sensor class for
     this attribute, whereby Sensor class I mean it has to implement the au.edu.usyd.corona.
     sensing.Sensor interface. So, I am going to create the class au.edu.usyd.corona.sensing.
     RandomSensor and make it implement Sensor.
 1   package au . edu . usyd . corona . sensing ;
 2
 3   import au . edu . usyd . corona . types . ValueType ;
 4
 5   class RandomSensor implements Sensor {
 6      public String getSensorName ( ) {
 7
 8       }
 9
10       public ValueType sense ( ) throws IOException {
11
12       }
13   }

     As per the Javadoc description of Sensor, the getSensorName() method should return the
     name of the sensor (case insensitive). This name is used in the “SELECT ” syntax in
     the query language, as well as in the list of results returned for a query. The sense() method
     is called every time a query which requests that sensor as part of its data is executed. This
     method should return the value that was “sensed” by the sensor. The return type should be a
     ValueType. If you need to create your own new database type to suite your needs (the provided
     ones are not enough), then see the Adding a new Database Type guide as to how to do this.

     For our example though, we are going to make the sense() method return a random integer
     number. The completed RandomSensor class thus looks like this:

                                                             21
22 Adding a new Table Attribute
1 package au . edu . usyd . corona . sensing ;
2
3
4 import java . io . IOException ;
5 import java . util . Random ;
6
7 import au . edu . usyd . corona . types . IntType ;
8 import au . edu . usyd . corona . types . ValueType ;
9
10 class RandomSensor implements Sensor {
11 private final Random random = new Random ( ) ;
12
13 public String getSensorName ( ) {
14 return " random " ;
15 }
16
17 public ValueType sense ( ) throws IOException {
18 return new IntType ( random . nextInt ( ) ) ;
19 }
20
21 }
5.2 Registering the Sensor
Once you have created your sensor class, it is time to register the class in the system. Doing
this is very simple. Open up the class au.edu.usyd.corona.sensing.SenseManager and look
in its constructor. Here you will see a list of sensor objects being created and being added to
a vector. At the end of this list, add a new instance of your sensor to this vector.
1 sensors . addElement ( new RandomSensor ( ) ) ;
5.3 Compile and Run
Thats it! Now compile the SPOT code, and then the server code, deploy it out into the network
and watch your new sensor in action.
SELECT node , time , light , random
START IN 25 seconds
EPOCH 40 seconds
RUNCOUNT 12Chapter 6
Adding a new Database Type
If the standard set of data types we provide are not enough for your needs, then you can
implement your own data type and add it into Corona simply enough. This data type can
theoretically then interact with any of the other data types in the system.
The standard set of data types that come with corona are:
• Integer (au.edu.usyd.corona.types.IntType)
• Long (au.edu.usyd.corona.types.LongType)
• Byte (au.edu.usyd.corona.types.ByteType)
• Boolean (au.edu.usyd.corona.types.BooleanType)
• Float (au.edu.usyd.corona.types.FloatType)
• IEEE Address (au.edu.usyd.corona.types.IEEEAddressType)
As as example, we will be adding a 2x2 Matrix (of integers) type into the system.
6.1 Adding a “Token Grammar” Token
Firstly, we need to modify the tokens that are used in the Token Grammar, and allocate one
of the remaining data type tokens to our new class. Open up the interface au.edu.usyd.
corona.grammar.TokenGrammarTokens. This interface provides all of the unique identifiers
for anything in the token language. Find the first unused T_DATA_TYPE_ variable, which in our
case, is T_DATA_TYPE_7. You will want to rename this constant to be something meaningful
for your type.
1 public static final char T _ D A T A _ T Y P E _ M A T R I X _ 2 x 2 = ’g ’ ;
2324 Adding a new Database Type
6.2 Creating the Type Class
The next step is to create a class for this new data type. This class has to implement the au.edu
.usyd.corona.types.ValueType interface. If you are going to place your class in that package,
there is an abstract base class there to extends from for convenience, called AbstractValueType
. The class you create must be public, and must have a default constructor. It may have
other constructors also, but it at least has to have a default constructor (no arguments).
So I will create my au.edu.usyd.corona.types.Matrix2By2 class and make it extend AbstractValueType
.
1 package au . edu . usyd . corona . types ;
2
3
4 import java . io . DataInput ;
5 import java . io . DataOutput ;
6 import java . io . IOException ;
7
8 public class Matrix2B y2Type extends A b s t r a c t V a l u e T y p e {
9
10 public Matri x2By2Typ e ( ) {
11 }
12
13 protected void _decode ( DataInput b ) throws IOException {
14
15 }
16
17 protected void _encode ( DataOutput b ) throws IOException {
18
19 }
20
21 public ValueType add ( ValueType v ) throws I n v a l i d O p e r a t i o n E x c e p t i o n {
22
23 }
24
25 public boolean equals ( ValueType v ) throws I n v a l i d O p e r a t i o n E x c e p t i o n {
26
27 }
28
29 public boolean less ( ValueType v ) throws I n v a l i d O p e r a t i o n E x c e p t i o n {
30
31 }
32
33 public ValueType multiply ( ValueType v ) throws I n v a l i d O p e r a t i o n E x c e p t i o n {
34
35 }
36
37 public ValueType divide ( ValueType v ) throws I n v a l i d O p e r a t i o n E x c e p t i o n {
38
39 }
40
41 public ValueType negate ( ) throws I n v a l i d O p e r a t i o n E x c e p t i o n {
42
43 }
44
45 public Object toJDBCObject ( ) {
46
47 }
48
49 public String toString ( ) {
50
51 }
52
53 public String toTokens ( ) {
54
55 }
56 }
The next step is to flesh out the class. See the Javadoc for au.edu.usyd.corona.types.Creating the Type Class 25
ValueType for a description of what each of these methods should be doing (however the
method names are pretty self-documenting ...)
My completed Matrix2By2 class is the following:
1 package au . edu . usyd . corona . types ;
2
3
4 import java . io . DataInput ;
5 import java . io . DataOutput ;
6 import java . io . IOException ;
7
8 import com . sun . spot . util . Utils ;
9
10 public class Matrix2B y2Type extends A b s t r a c t V a l u e T y p e {
11 private int a , b , c , d ;
12
13 public Matri x2By2Typ e ( ) {
14 }
15
16 public Matri x2By2Typ e ( int a , int b , int c , int d ) {
17 this . a = a ;
18 this . b = b ;
19 this . c = c ;
20 this . d = d ;
21 }
22
23 protected void _decode ( DataInput b ) throws IOException {
24 this . a = b . readInt ( ) ;
25 this . b = b . readInt ( ) ;
26 this . c = b . readInt ( ) ;
27 this . d = b . readInt ( ) ;
28 }
29
30 protected void _encode ( DataOutput b ) throws IOException {
31 b . writeInt ( this . a ) ;
32 b . writeInt ( this . b ) ;
33 b . writeInt ( this . c ) ;
34 b . writeInt ( this . d ) ;
35 }
36
37 public ValueType add ( ValueType v ) throws I n v a l i d O p e r a t i o n E x c e p t i o n {
38 if ( v instanceof M atrix2By 2Type ) {
39 Matr ix2By2Ty pe m = ( Matr ix2By2Ty pe ) v ;
40 return new Matr ix2By2T ype ( a + m . a , b + m . b , c + m . c , d + m . d ) ;
41 }
42 else
43 throw new I n v a l i d O p e r a t i o n E x c e p t i o n ( " Cannot add types " , this , v ) ;
44 }
45
46 public boolean equals ( ValueType v ) throws I n v a l i d O p e r a t i o n E x c e p t i o n {
47 if ( v instanceof M atrix2By 2Type ) {
48 Matr ix2By2Ty pe m = ( Matr ix2By2Ty pe ) v ;
49 return a == m . a && b == m . b && c == m . c && d == m . d ;
50 }
51 else
52 throw new I n v a l i d O p e r a t i o n E x c e p t i o n ( " Cannot compare types " , this , v ) ;
53 }
54
55 public boolean less ( ValueType v ) throws I n v a l i d O p e r a t i o n E x c e p t i o n {
56 throw new I n v a l i d O p e r a t i o n E x c e p t i o n ( " Type has no concept of ’ less than ’" , this , v ) ;
57 }
58
59 public ValueType multiply ( ValueType v ) throws I n v a l i d O p e r a t i o n E x c e p t i o n {
60 int value ;
61 if ( v instanceof M atrix2B y2Type ) {
62 Matr ix2By2Ty pe m = ( Matr ix2By2Ty pe ) v ;
63 return new Matr ix2By2Ty pe ( a ∗ m . a + b ∗ m . c , a ∗ m . b + b ∗ m . d , c ∗ m . a + d ∗ m . c , c
∗ m . b + d ∗ m . d) ;
64 }
65 else if ( v instanceof IntType )
66 value = ( ( IntType ) v ) . getVal ( ) ;
67 else if ( v instanceof LongType )
68 value = ( int ) ( ( LongType ) v ) . getVal ( ) ;
69 else if ( v instanceof ByteType )26 Adding a new Database Type
70 value = ( ( ByteType ) v ) . getVal ( ) ;
71 else if ( v instanceof BooleanType )
72 value = ( ( BooleanType ) v ) . getVal ( ) ? 1 : 0 ;
73 else
74 throw new I n v a l i d O p e r a t i o n E x c e p t i o n ( " Cannot multiply types " , this , v ) ;
75 return new Matr ix2By2Ty pe ( value ∗ a , value ∗ b , value ∗ c , value ∗ d ) ;
76 }
77
78 public ValueType divide ( ValueType v ) throws I n v a l i d O p e r a t i o n E x c e p t i o n {
79 throw new I n v a l i d O p e r a t i o n E x c e p t i o n ( " Types can not be divided " , this , v ) ;
80 }
81
82 public ValueType negate ( ) throws I n v a l i d O p e r a t i o n E x c e p t i o n {
83 return new Matr ix2By2T ype (−a , −b , −c , −d ) ;
84 }
85
86 public Object toJDBCObject ( ) {
87 final byte [ ] out = new byte [ 4 ∗ Utils . SIZE_OF_INT ] ;
88 Utils . writ eBigEndI nt ( out , 0 ∗ Utils . SIZE_OF_INT , a ) ;
89 Utils . writ eBigEndI nt ( out , 1 ∗ Utils . SIZE_OF_INT , b ) ;
90 Utils . writ eBigEndI nt ( out , 2 ∗ Utils . SIZE_OF_INT , c ) ;
91 Utils . writ eBigEndI nt ( out , 3 ∗ Utils . SIZE_OF_INT , d ) ;
92 return out ;
93 }
94
95 public String toString ( ) {
96 return " [[ " + a + " ," + b + " ] , [ " + c + " ," + d + " ]] " ;
97 }
98
99 public String toTokens ( ) {
100 return T _ D A T A _ T Y P E _ M A T R I X _ 2 x 2 + " " + T_GROUP_OPEN + a + " " + b + " " + c + " " + d + " "
+ T_GROUP_CLOSE ;
101 }
102 }
6.3 Updating the Token Grammar Parser
Open up the au.edu.usyd.corona.grammar.TokenParser file and go to the _parseValueType
() method. Here there will be a switch statement with a case for each potential data type token.
Update the token that you renamed earlier to be the new name.
Before:
1 case T_DATA_TYPE_7 :
2 throw new T o k e n P a r s e E x c e p t i o n ( " Custom data type 7 not accounted for " ) ;
After:
1 case T _ D A T A _ T Y P E _ M A T R I X _ 2 x 2 :
2 throw new T o k e n P a r s e E x c e p t i o n ( " Matrix type parsing not written " ) ;
For the minute this is fine. This method is only called if you want users to be able to hard code
items of your new type in the query language. For example with the matrix type, we could want
to allow users to have syntax like SELECT * WHERE matrix_sensor == [[1, 2], [9, 12]].
Adding this support is non-trivial and is explained in the chapter Modifying the SQL Grammar
and adding new Query Types.Registering the Class 27
6.4 Registering the Class
Open up the class au.edu.usyd.util.ClassIdentifiers. There is an instance variable in
this class called classes which is an array of java.lang.Class objects. Add the class object
for your new type into this array, and then save and close the file.
6.5 Compile and Run
That should be it in terms of writing code to get your new data type to work in Corona.
6.6 Adding a Renderer in the Corona GUI for Your
Type (Optional)
Seeing as the GUI was provided as an implementation of the server API, rather than as a
module to extend from, we normally do not offer any coding support for the inner workings of
the GUI. However if you do wish to use the Corona GUI and want to have your new data type
rendered correctly, this is a very brief set of instructions on how to do so.
Open the class au.edu.usyd.corona.gui.util.FormattingUtils. Add a new named inner
class that extends from CoronaCellRenderer.
1 public static class M a t r i x 2 B y 2 R e n d e r e r extends C o r o n a C e l l R e n d e r e r {
2 @Override
3 public void setValue ( Object value ) {
4 s e t H o r i z o n t a l A l i g n m e n t ( JLabel . LEFT ) ;
5 setText ( convert ( value ) ) ;
6 }
7
8 @Override
9 public String convert ( Object value ) {
10 byte [ ] bytes = ( byte [ ] ) value ;
11 int a = readInt ( bytes , 0 ) ;
12 int b = readInt ( bytes , 4 ) ;
13 int c = readInt ( bytes , 8 ) ;
14 int d = readInt ( bytes , 1 2 ) ;
15 return " [[ " + a + " ," + b + " ] , [ " + c + " ," + d + " ]] " ;
16 }
17
18 private static int readInt ( byte [ ] bytes , int offset ) {
19 int result = 0 ;
20 for ( int i = 0 ; i < 4 ; i++)
21 result = ( result28 Adding a new Database Type
Lastly, add a mapping from the sensor name to your newly created renderer in the static
initializer of FormattingUtils. In this case, a sensor which returns a Matrix2By2 type is
called zebra.
1 ATTRIBUTES . put ( " ZEBRA " , M A T R I X _ 2 x 2 _ R E N D E R E R ) ;
Sensed attributes which do not have a renderer defined in this map will be rendered throughout
the GUI using their toString() method instead.Chapter 7
Adding new Tasks
A “task” in Corona is something that can be executed on the Scheduler that runs on each
node. A query that is executed in the system generates one or more tasks which do the work
of that query. These tasks are generally transmitted down the network tree so that nodes can
do the work of the query. For example, executing a query such as SELECT * will cause a single
QueryTask to be generated on the server which contains the relation expression tree for that
query. This task will be transmitted from the basestation, down the network tree. When it
arrives at each node, it will be scheduled there. Scheduling the task on the node also triggers
the generation of another task on that node, a SensorTask which will activate the sensors to
produce a table with a single row which will act as input to the QueryTask.
Tasks are the only thing that the application layer of the system transmits (i.e. everything
must be encoded as a task). This means that results coming back up the network tree to the
basestation are encoded as a TransmitResultsTask which contains the result table from that
node. Execution of this task on the receiving node simply causes that table to be made available
to the corresponding QueryTask executing the relational expression tree on that node.
Because we need a way of accessing individual tasks in the Scheduler, each task must have a
unique ID. This requires the unique ID to be unique across the entire network. In order to
achieve this, we use the following ID structure for tasks:
Task ID = ( Query ID , Node ID , Local ID )
The Query ID is the ID of the query that the task is associated with. The Node ID is the IEEE
address of the node that the task originated on. The Local ID is a unique number for the task,
local to the node that the task originated on.
In this walk through we will be creating a task which either changes the colour of a given LED
to be red, green, or blue, or instead, turns off the LED. In the section Modifying the SQL
Grammar and adding new Query Types we will show you how this task can be used to turn
LEDs on or off by simply executing a SQL-like query.
2930 Adding new Tasks
7.1 Create the Task
All tasks have to be a subclass of au.edu.usyd.corona.scheduler.SchedulableTask. They
also must have a default constructor; they may (and probably will) have additional construc-
tors, but they must have a default one also. So lets create our basic subclass of SchedulableTask
that we will call LEDTask.
1 public class LEDTask extends S ch ed ul a bl eT as k {
2 public static final byte LED_RED = 0 ;
3 public static final byte LED_GREEN = 1 ;
4 public static final byte LED_BLUE = 2 ;
5 public static final byte LED_OFF = 3 ;
6
7 private byte number ;
8 private byte value ;
9
10 public LEDTask ( ) {
11 super ( ) ;
12 }
13
14 public LEDTask ( TaskID taskID , byte number , byte value ) {
15 super ( taskID ) ;
16 this . number = number ;
17 this . value = value ;
18 }
19
20 protected void _execute ( ) {
21 }
22
23 protected void _deconstruct ( ) {
24 }
25
26 protected void _reschedule ( ) {
27 }
28
29 protected void _encode ( DataOutput data ) throws IOException {
30 }
31
32 protected void _decode ( DataInput data ) throws IOException {
33 }
34
35 public void baseInit ( ) throws IOException {
36 }
37
38 public void nodeInit ( ) {
39 }
40 }
The description of all of these methods is somewhat self-documenting, but a proper description
can be found in the Javadoc for SchedulableTask. Now, we want our LEDTask to execute once
on every node apart from the base station (the base has no LEDs). This means we need to
implement the following methods:
• _execute(): called to execute the task
• _encode() and _decode(): used when the task needs to be sent via wireless to package
and unpackage the task into a byte array (a form of serialization so to speak)
• baseInit(): called when the task is first run on the base station. This is used to distribute
the task down to the spots in the network.
1 public class LEDTask extends Sc h ed ul ab l eT as k {
2 public static final byte LED_RED = 0 ;
3 public static final byte LED_GREEN = 1 ;
4 public static final byte LED_BLUE = 2 ;Register the Class 31
5 public static final byte LED_OFF = 3 ;
6
7 private byte number ;
8 private byte value ;
9
10 public LEDTask ( ) {
11 super ( ) ;
12 }
13
14 public LEDTask ( TaskID taskID , byte number , byte value ) {
15 super ( taskID ) ;
16 this . number = number ;
17 this . value = value ;
18 }
19
20 protected void _execute ( ) {
21 if ( Network . getInstance ( ) . getMode ( ) == Network . MODE_SPOT ) {
22 final ITriColorLED led = EDemoBoard . getInstance ( ) . getLEDs ( ) [ number ] ;
23 led . setOn ( ) ;
24
25 if ( value == LED_RED )
26 led . setColor ( LEDColor . RED ) ;
27 else if ( value == LED_GREEN )
28 led . setColor ( LEDColor . GREEN ) ;
29 else if ( value == LED_BLUE )
30 led . setColor ( LEDColor . BLUE ) ;
31 else if ( value == LED_OFF )
32 led . setOff ( ) ;
33 }
34 }
35
36 protected void _deconstruct ( ) {
37 }
38
39 protected void _reschedule ( ) {
40 }
41
42 protected void _encode ( DataOutput data ) throws IOException {
43 data . writeByte ( number ) ;
44 data . writeByte ( value ) ;
45 }
46
47 protected void _decode ( DataInput data ) throws IOException {
48 number = data . readByte ( ) ;
49 value = data . readByte ( ) ;
50 }
51
52 public void baseInit ( ) throws IOException {
53 Network . getInstance ( ) . send ( this , Network . SEND_MODE_CHILDREN , true , true ) ;
54 }
55
56 public void nodeInit ( ) {
57 }
58 }
7.2 Register the Class
You need to add the class you just created to the “classes” array in the top of the au.edu.
usyd.corona.util.ClassIdentifiers class. Doing this allows the class to be transmitted in
the network more efficiently.
1 private static final Class [ ] classes = new Class [ ] { /∗ e v e r y t h i n g e l s e ∗/ , LEDTask . class } ;32 Adding new Tasks
Chapter 8

Modifying the SQL Grammar and
adding new Query Types

This walk through on how to add query types presumes you already know how to use ANTLR,
and that you know how to modify an ANTLR grammar file.

For this walk through, we will be adding query syntax to support the turning on and off of the
LEDs on the SunSPOT, and setting their colour. The syntax we would like to support in the
SQL grammar is of the form
LED  =

where  is an integer in the range 0 - 7 (there are only 8 LEDs on the SunSPOT), and
 is one of RED, GREEN, BLUE, or OFF.

8.1      Modifying the ANTLR Grammar

The ANTLR grammar file is located in ${CORONA_HOME}/src/server/grammar/ and is called
CoronaQL.g. This is a plain text file, and is in the ANTLR grammar format.

The first step is to edit the list of special tokens at the top of the file, and add a new token
type for your new query type. Here I will add TYPE_LED to the list of tokens:
tokens {
   ALL_ATTRIBS ;
   AGGREGATION ;
   TYPE_KILL ; TYPE_SYNC ; TYPE_ROUTE ; TYPE_QUERY ; TYPE_SET ; TYPE_LED ;
}

Next, we scroll down to the definition of the statement2 rule, and add support for our new
query type’s rule. I am going to call my LED query types rule “led”.
statement2
   : kill
   | sync
   | route
   | set
   | led
   | data_query ;

                                                  33
34 Modifying the SQL Grammar and adding new Query Types
Now, add the definition of the syntax of your rule. Make sure that you rewrite the tree to have
the TYPE_LED token as the root of the tree, and any needed data as the children of the tree.
LED : ’ LED ’ ;
led
: LED WHITE_SPACE NUMBER_INT WHITE_SPACE ? ’= ’ WHITE_SPACE ? WORD −> ˆ ( TYPE_LED NUMBER_INT
WORD )
;
8.2 Recompiling the ANTLR Grammar
Once you are happy with your grammar definition, it is time to compile it into executable Java
source code. Open a terminal in the directory ${CORONA_HOME}/src/server. Here you want
to execute the generate_grammar.sh shell script. A successful compile will output only one
line of output as follows:
$ . / g e n e r a t e _ g r a m m a r . sh
ANTLR Parser Generator Version 3 . 1 ( August 1 2 , 2 0 0 8 ) 1989 −2008
$
If you get compile or parse errors upon compiling, to back to step 1 and edit the file until
ANTLR is happy.
8.3 Writing the Corresponding Task
Instructions on how to add Tasks to Corona is discussed in the Adding Tasks guide. This guide
has a walk through on how to add the LED task that we are going to use here.
8.4 Writing the Compiler
The next step is to write the compiler for your new query type. This compiler class should be in
the package au.edu.usyd.corona.server.grammar and should extend the abstract base class
au.edu.usyd.corona.server.grammar.QLPacketTypeCompiler. The generic parameter should be the name of the class you created in Step 3. Your compiler
class should have a 2 argument constructor as shown below, which you directly pass up to the
superconstructor.
1 class LEDCompiler extends QLPacketTypeCompiler {
2 public LEDCompiler ( Tree root , int queryId ) {
3 super ( root , queryId ) ;
4 }
5
6 @Override
7 public LEDTask compile ( ) throws Q L C o m p i l e E x c e p t i o n {
8 }
9 }
The compile method should process the Tree and validate its semantics. If there is an error,
a QLCompileException should be thrown. If the semantics are valid, a new LEDTask instance
should be created and returned.Register the Compiler 35
1 class LEDCompiler extends QLPacketTypeCompiler {
2 private final TaskID taskId ;
3
4 public LEDCompiler ( Tree root , int queryId ) {
5 super ( root , queryId ) ;
6 this . taskId = new TaskID ( queryId ) ;
7 }
8
9 @Override
10 public LEDTask compile ( ) throws Q L C o m p i l e E x c e p t i o n {
11 int number = Integer . parseInt ( root . getChild ( 0 ) . getText ( ) ) ;
12 String value = root . getChild ( 1 ) . getText ( ) . toUpperCase ( ) ;
13 byte val ;
14
15 // c h e c k t h e v a l i d i t y o f number
16 if ( number < 0 | | number > 7 )
17 throw new Q L C o m p i l e E x c e p t i o n ( " The LED number has to be in the range 0 to 7 inclusive "
);
18
19 // c h e c k t h e v a l i d i t y o f v a l u e
20 if ( value . equals ( " RED " ) )
21 val = LEDTask . LED_RED ;
22 else if ( value . equals ( " GREEN " ) )
23 val = LEDTask . LED_GREEN ;
24 else if ( value . equals ( " BLUE " ) )
25 val = LEDTask . LED_BLUE ;
26 else if ( value . equals ( " OFF " ) )
27 val = LEDTask . LED_OFF ;
28 else
29 throw new Q L C o m p i l e E x c e p t i o n ( " Unknown value ’" + value + " ’; expected ( ’ RED ’, ’ GREEN
’, ’ BLUE ’, ’ OFF ’) " ) ;
30
31 return new LEDTask ( taskId , ( byte ) number , val ) ;
32 }
33 }
8.5 Register the Compiler
Open up the the class au.edu.usyd.corona.server.grammar.QLCompiler and go to the
createCompiler method. Edit the switch statment to account for your new token type,
and return your new compiler:
1 case CoronaQLLexer . TYPE_LED :
2 return new LEDCompiler ( root , queryId ) ;
8.6 Compile and Run
Clean and deploy the code to the SunSPOTs, and then also to the base station. Fire up the
GUI and have a go at using your new syntax. For our example, firing off the query
LED 0 = red
causes the first LED to turn red. Firing off the query
LED 0 = fish
causes a compiler error message to pop up, saying that ’FISH’ is not a valid value.36 Modifying the SQL Grammar and adding new Query Types
Chapter 9

Modifying the Persistence Layer

The Data Access Object (DAO) pattern is a standard pattern from separating data sources
and their access implementations from business logic. More information about this pattern can
be found at:

    • Java blueprints

    • J2EE Patterns

    • http://www.javapractices.com/topic/TopicAction.do?Id=66

The system implements this pattern to achieve this separation and to allow new data sources
to be easily swapped in without any code modifications. First we provide a description of our
implementation of the pattern, then we provide a description of the default implementation of
the DAOFactory and finally a description of how completely custom DAO can be implemented.

9.1        DAO Pattern Implementation

Our DAO Implementation has a DAOFactory (au.edu.usyd.corona.server.persistence.
DAOinterface.DAOFactory) which gives access to DAO objects which can ultimately be used
to access the underlying data source. The DAOFactory implements the Abstract Factory and
Singleton patterns. At runtime it dynamically loads a DAO implementation that is specified
in the config/dao.properties file in the server module, e.g.:
# DAO Factory impleme ntation to use
dao . factory . class = au . edu . usyd . corona . server . persistence . JDBCDAO . JDBC DAOFacto ry

When clients of the DAOFactory call the static getInstance() method on DAOFactory, it
returns a specific implementation of that factory which provides access to the corresponding
implementations of DAO objects.

Our DAO Implementation has 3 DAO interfaces:

    • au.edu.usyd.corona.server.persistence.DAOinterface.ResultDAO

                                                          37
38 Modifying the Persistence Layer
• au.edu.usyd.corona.server.persistence.DAOinterface.QueryDAO
• au.edu.usyd.corona.server.persistence.DAOinterface.UserDAO
ResultDAO provides storage and retrieval of Result tables. QueryDAO provides storage and
retrieval of Query details. UserDAO provides storage and retrieval of User information.
9.2 JDBC DAO
We provide a single implementation of the DAO interface for use with JDBC databases. Since
we are storing tables of results from the sensor network, it is natural to store them in a DBMS.
It also means we can allow SQL queries to be re-executed over historic tables and filter out
necessary information rather than having to deal with large tables that may have been retrieved
from the network.
As mentioned, the JDBC DAO implementation is the default one and is loaded by the DAO-
Factory at runtime as long as the JDBCDAOFactory class is specified in the dao configuration
file (config/dao.properties).
9.2.1 Configuring the DBMS Used
The details of the particular DBMS that is used by JDBC are also specified in a configuration
file, located at config/jdbc-dao.properties.
The properties file looks like:
# Database settings
database . driver = org . hsqldb . jdbcDriver
database . url = jdbc : hsqldb : file : data / db ; shutdown=true
database . username = sa
database . password =
database . name = hsqldb
database . sql . filename = config / jdbc−sql . xmlJDBC DAO 39
In order to alter the DBMS used by Corona, only these properties must be changed.
Here is a description of the properties:
Property Description
database.driver The fully qualified class name of the JDBC
driver that your database vendor provides.
The library containing this class must be
linked at compile time.
database.url The JDBC url of the database to connect to.
This will depend on the DBMS you are us-
ing, check the instruction manual for further
details.
database.username The username to gain access to the specified
database.
database.password The password to gain access to the specified
database.
database.name A descriptive name for the database system.
This name can be invented by the user of the
system. It must correspond to the name of
the database used in the corresponding SQL
XML file.
database.sql.filename The filename of the XML file containing the
SQL for the specific DBMS you have chosen
(details below).
9.2.2 Configuring DBMS SQL
Unfortunately, every DBMS has slightly different SQL syntax for performing certain operations.
We account for this in the system by externalising SQL into an XML file. When a new DBMS
is specified in the jdbc-dao.properties file, an XML file must be created which contains
the SQL required to perform the DAO operations. The location of this XML file is specified
by the database.sql.filename property in the jdbc-dao.properties file. By default, we
provide SQL for HSQLDB, a lightweight in-process DBMS. Here is a sample of the structure
of the XML file:
1
2
3
4
5 SELECT count ( ∗ ) FROM ( { query } )
6
7
8
9
10
11 SELECT count ( ∗ ) FROM { table } WHERE 1=2
12
13
14
15
DAOConfiguration is the root tag.40 Modifying the Persistence Layer
DAOStatements tags specify a block of XML containing SQL for an individual database system,
in this case HSQLDB. The database property in this tag must correspond to the database.name
property specified in the jdbc-dao.properties file – “hsqldb” in this example. Following this
are SQLStatement blocks. These have a single property called “method” which specifies a name
for that particular SQL statement. Inside these blocks are SQLFragment blocks which specify
sections of the SQL which are appended to give the final executed SQL inside Corona.
Textual substitutions are made into the SQL by Corona. Markers like “{query}” denote that the
text “{query}” will be substituted by the system with an actual SQL query. This is necessary
as Corona allows certain raw SQL queries to be executed over existing databases. Note that
the utmost care is taken to prevent injection attacks (in particular we pre-parse user SQL and
check its structure before performing substitutions).
SQL fragments have an optional “excludeIfNamedParamEmpty” property which has a value
“TRUE” or “FALSE” (default). If this value is “TRUE”, that SQLFragment will not be
included in the final SQLStatement if any of the named parameters (e.g. {query}) have an
empty string value. This allows, for example, a WHERE clause to be excluded if there are no
conditions in it.
All of the SQLStatements given in the HSQLDB implementation must have equivalent imple-
mentations for an alternative DBMS.
9.3 Alternative DAO Implementations
Alternative DAO implementations can be provided as long as they implement the required
interfaces. There may be several reasons for doing this - either one wants to use a data source
other than a JDBC database (not recommended) or one wants to use a JDBC database but
the provided JDBCDAO implementation in not sufficient.
A DAOFactory implementation must be written which inherits from the abstract DAOFactory
class and implements its given methods. This means that implementations of the ResultDAO,
QueryDAO and UserDAO interfaces must also be written (as a DAOFactory gives access to
these). Once these classes have been written and compiled, they must be added to the classpath
of Corona when compiling. Furthermore, the fully qualified class name of the new DAOFactory
implementation must be specified in the config/dao.properties file.Chapter 10
Modifying the RMI interface
10.1 Updating the RemoteSessionInterface
To edit the RMI interface, you need to edit the au.edu.usyd.corona.server.session.RemoteSessionInt
interface to include your new method signature, and then also update the au.edu.usyd.corona
.server.session.RemoteSession class with the implementation of this new method signature.
As you should know from RMI basics, all objects returned from an RMI method need to either
be Serializable (implement java.io.Serializable), or be an RMI Remote Object (extends
java.rmi.server.UnicastRemoteObject).
10.2 Updating the Ant build.xml File
The naming convention we have used is that any RMI remote object classes should start with
“Remote”, and any RMI remote interfaces should start with “Remote” and end in “Interface”.
If your remote object does not fit these guidelines, or you need a new Serializable object to be
returned from a new RMI method, then you might need to modify the build.xml file, so that
these things are accounted for when creating the corona-rmi.jar file.
The -post-host-compile and -rmic targets are the ones to pay attention to. They are defined
to be as follows:
1 < !−− O v e r r i d e t o c r e a t e a Corona r e p o s JAR f i l e f o r t h e d e s k t o p p r o j e c t −−>
2
3 < !−− c r e a t e t h e s e c o n d a r y RMI i n t e r f a c e p r o j e c t j a r −−>
4
5 < f i l e s e t d i r=" ${ build . dir } " i n c l u d e s=" **/ Remote *. class " />
6 < f i l e s e t d i r=" ${ build . dir } " i n c l u d e s=" **/ _Stub . class " />
7 < f i l e s e t d i r=" ${ build . dir } " i n c l u d e s=" au / edu / usyd / corona / server / grammar / Query . class "
/>
8 < f i l e s e t d i r=" ${ build . dir } " i n c l u d e s=" au / edu / usyd / corona / server / persistence / JDBCDAO /
Jav aT oJ D BC Ty pe s . class " />
9 < f i l e s e t d i r=" ${ build . dir } " i n c l u d e s=" au / edu / usyd / corona / server / session /* Exception .
class " />
10 < f i l e s e t d i r=" ${ build . dir } " i n c l u d e s=" au / edu / usyd / corona / server / session / notifier /
NotifierID . class " />
11 < f i l e s e t d i r=" ${ build . dir } " i n c l u d e s=" au / edu / usyd / corona / server / session / notifier /
NotifierID $ NotifierType . class " />
12 < f i l e s e t d i r=" ${ build . dir } " i n c l u d e s=" au / edu / usyd / corona / server / session / notifier /
No t i f i e r I n t e r f a c e . class " />
13 < f i l e s e t d i r=" ${ build . dir } " i n c l u d e s=" au / edu / usyd / corona / server / user /*. class " />
4142 Modifying the RMI interface
14
15
16
17 < !−− c o m p i l e s rmi s t u b s −−>
18
19
20
The files listed in the -post-host-compile target are the remote objects as well as the Seri-
alizable objects used by any publicly exposed RMI method. You may need to add your new
classes here.
10.3 Updating the Clients
All clients connecting to a Corona server have a copy of the corona-rmi.jar file, which contains
the RMI stub files needed to make RMI work correctly. After you have modified the RMI
definition on the server, all clients need a copy of the new corona-rmi.jar JAR file. This file
is located in the ${HOME}/.corona_repos/ directory after an ant host-compile.Chapter 11
Developing a front-end using the RMI
Interface
Corona provides an RMI API for anyone to connect to. This RMI API is the only means of
clients connecting to the Corona server, and the GUI which we provide uses this API. These
instructions assume you know roughly how RMI works and what it is.
After you have ant host-compile’d the server module of Corona, a JAR file will be created
in your ${HOME}/.corona_repos/ directory called corona-rmi.jar. This is the only thing
you need to develop a front end to Corona.
In your new front end project, ensure that you include this corona-rmi.jar file in the classpath.
Connecting to a Corona server via RMI is very simple. The code needed to connect to a Corona
server running at example.com would be as follows:
1 import au . edu . usyd . corona . server . session . R e m o t e S e s s i o n M a n a g e r I n t e r f a c e ;
2 import java . rmi . Naming ;
3
4 R e m o t e S e s s i o n M a n a g e r I n t e r f a c e rmiManager = ( R e m o t e S e s s i o n M a n a g e r I n t e r f a c e ) Naming . lookup ( " //
example . com / Sessio nManage r " ) ;
The name “SessionManager” is important, and is the unique identifier for the RMI listener
created by the Corona server. The RemoteSessionManagerInterface interface is an interface
defined in the corona-rmi.jar file. Having an instance of this allows you to login to the Corona
server you specified in the host name part of the URL (in our case, example.com).
To log into this server with the username john and the password smith, the code would be as
follows:
1 import au . edu . usyd . corona . server . session . R e m o t e S e s s i o n I n t e r f a c e ;
2 import au . edu . usyd . corona . server . session . R e m o t e S e s s i o n M a n a g e r I n t e r f a c e ;
3 import java . rmi . Naming ;
4
5 R e m o t e S e s s i o n M a n a g e r I n t e r f a c e rmiManager = ( R e m o t e S e s s i o n M a n a g e r I n t e r f a c e ) Naming . lookup ( " //
example . com / Sessio nManage r " ) ;
6 R e m o t e S e s s i o n I n t e r f a c e rmi = rmiManager . login ( " john " , " smith " ) ;
An instance of a RemoteSessionInterface is all you need to interact with a Corona server.
This interface defines all of the API methods the Corona server exposes. For a description of
what this interface defines, look at the Javadoc for this interface.
4344 Developing a front-end using the RMI Interface
For example, if we have already logged into a server as above, and we wish to execute the query
“SELECT * RUNCOUNT 60”, this is a simple API call.
1 import au . edu . usyd . corona . server . grammar . Query ;
2
3 Query query = rmi . executeQuery ( " SELECT * RUNCOUNT 60 " ) ;Chapter 12
Some improvements that can be made
to Corona
Some modifications that we believe might be nice additions to Corona are listed below.
12.1 Routing and Network Improvements
• The routing protocol is quite tedious to debug and could undergo some furthering testing
and debugging.
• Currently when a node in the routing tree is disconnected, all child nodes will also become
disconnected. An optimisation that could be implemented is to allow subtrees to be stay
connected so that only the root of the disconnected subtree is unrouted. This, however,
requires one to be careful that loops do not form in the routing tree as we do not want
the root of the disconnected subtree to become routed to a descendant.
• Currently we base the choice of a routing parent node only on the shortest path to the
basestation. This can lead to routing trees where single nodes can have very large numbers
of children and other nodes have no children. This puts a large strain on that node. It
may be interesting to investigate this.
• Currently we do application level aggregation of results. That is, all results from children
for a single query are first collected and then combined before sending to the parent node,
which can reduce the number of transmissions. It would be interesting to investigate
aggregating unrelated results for transmission, if 2 results must be transmitted at similar
times. This may also provide an improvement to transmission.
12.2 Asynchronous Result Forwarding and Forwarding
after Disconnection
• Currently, a node will wait a set period of time for all of its children to send it results,
based on the height of the subtree rooted at that node. After this period, it will execute
the relational expression tree with the results it does have and forward them on. Any
45You can also read