Docusign - Advanced Class - Part 2 - SAS
←
→
Page content transcription
If your browser does not render page correctly, please read the page content below
Docusign – Advanced Class – Part 2
Laura Gordon

SASIT – Web Development

March 2020
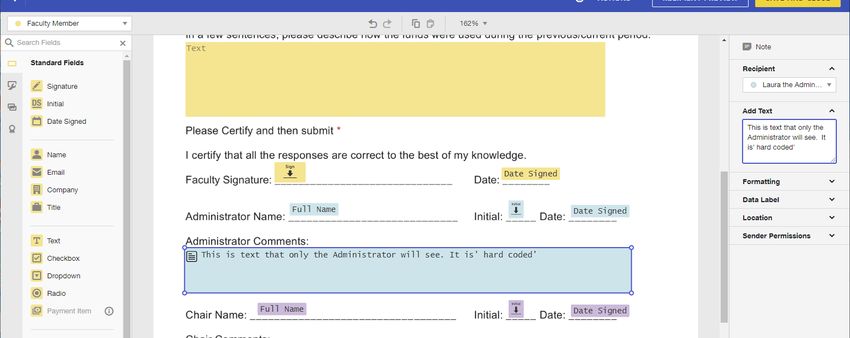
TABLE OF CONTENTS
What is Docusign?............................................................................................................................................... 3
      Request Docusign Services: ....................................................................................................................................................... 3
      Need Assistance / Documentation with Docusign? ......................................................................................................... 3
      Files needed for Class................................................................................................................................................................... 4
    Docusign Environment .................................................................................................................................................. 5
    Create Document in Docusign..................................................................................................................................... 5
      Login to Docusign (DEMO ENVIRONMENT)....................................................................................................................... 5
Independent Study Project Form .................................................................................................................. 6
    Purpose of form ............................................................................................................................................................... 6
    Goals Workshop 1 ........................................................................................................................................................... 6
    Define Roles / Recipients ............................................................................................................................................. 7
    Add a Specific Email Message to Participant ......................................................................................................... 7
    Build Template ................................................................................................................................................................. 8
      Drop Down List Field.................................................................................................................................................................... 9
    Field Validation ................................................................................................................................................................ 9
    Switch PDF .......................................................................................................................................................................10
    Create PowerForm and Test ......................................................................................................................................11
Student Employment Form .......................................................................................................................... 12
    Purpose of the Form .....................................................................................................................................................12
    Goals of Workshop 2 ....................................................................................................................................................12
    Build Roles and Set Fields for Roles .......................................................................................................................13
    Create Read Only / Default Text Field ...................................................................................................................14
    Conditional Field Values .............................................................................................................................................15
    Create Powerform and Test .......................................................................................................................................15
Research Account Renewal Form .............................................................................................................. 16
    Purpose of Form ............................................................................................................................................................16
    Goals Workshop 3 .........................................................................................................................................................16
    Assign Roles.....................................................................................................................................................................16
    Copy Fields .......................................................................................................................................................................16
    Note Field - Field for signor view only ...................................................................................................................17
    Create hidden field via asterisks .............................................................................................................................18
    Collaborative Fields......................................................................................................................................................19
New Hire Form .................................................................................................................................................. 20
    Purpose of the Form .....................................................................................................................................................20
    Goals of Workshop 4 ....................................................................................................................................................20
    Hide Personal Fields ....................................................................................................................................................22
    Align Fields ......................................................................................................................................................................22
    Create Calculated Field (Formula) ..........................................................................................................................23

2                          DocuSign – School of Arts and Sciences – Advanced Class – Part 2
WHAT IS DOCUSIGN?
https://it.rutgers.edu/docusign/

DocuSign is Rutgers’ electronic signature platform provided by the Office of Information Technology and locally
administered by department staff who complete DocuSign training.

With DocuSign, the university has moved to replace paper-intensive processes with an online tool accessible
from phones, tablets, and computers. Rutgers departments and units now have access to a secure e-signature
tool to verify, route, track, and store documents requiring signatures

    •   It is a legally defensible signature
    •   Do NOT need an official account to use
    •   Can be set to outside of Rutgers
    •   Official documents
    •   Anything needing a 'signature', Offer letter
    •   ntt, ptl (we created an app to do this and work with docusign)

REQUEST DOCUSIGN SERVICES:
If you would like to CREATE TEMPLATES, CREATE POWERFORMS, SEND ENVELOPES (Documents), please create a
WORK ORDER, requesting Docusign Permission to send forms. An SAS-IT person will create this account for you.
If you already have a ‘create’ account with docusign, but you do not see ‘SAS’ on the top left, please create a
work order and let us know, so we can move your account over and we can assist.

NEED ASSISTANCE / DOCUMENTATION WITH DOCUSIGN?
Our hope is that each person will be able to build their own forms and send out documents. If you need
assistance or if you need special customization options, please create a work order. In the work order be
specific that you need assistance with a DOCUSIGN FORM. We will have support available specifically for these
types of customizations.

Additional Training / Documentation

https://it.rutgers.edu/docusign/

Login to Linkedin Learning (using your netid)
https://www.linkedin.com/learning/search?keywords=docusign&software=DocuSign&u=76115650

    Page                                                                                                          3
FILES NEEDED FOR CLASS
https://www.sas.rutgers.edu/cms/training/images/docusign.zip
visit:

https://sasit.rutgers.edu/docusign
(Scroll to bottom of page for project materials)

SAVE this file docusign.zip onto local computer

Extract the file

File Contents:

     -   2020-powerform-test.pdf (powerform pdf file for application)
     -   independent-study-form.pdf
     -   independent-study-form2.pdf (to use for ‘replacement’)
     -   research-account-renewal.pdf
     -   sample-passport.jpg
     -   sign-doc1.pdf (document with 1 signature)
     -   sign-doc2.docx (document with 2 signatures)
     -   ssn-card.jpg
     -   student-employent-form.pdf
     -   test-signature.jpg (sample signature)

4                  DocuSign – School of Arts and Sciences – Advanced Class – Part 2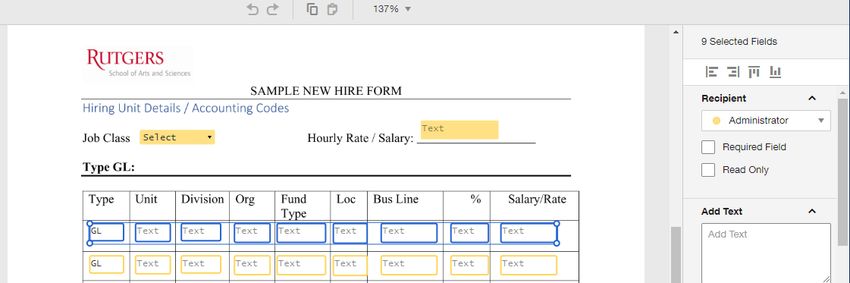
DOCUSIGN ENVIRONMENT
   •   We have been advised by OIT that the creation and testing of all DocuSign templates and powerforms
       should be done in our demo environment.

   •   The main reason for this change is that the production DocuSign environment creates legally binding
       documents.

   •   When you want to create a new Docusign process, you should begin in the demo environment.

   •   Create and test your process(es) in demo and when you are ready to go live, you will move the
       template(s) to the production environment.

   •   The demo environment operates in the same fashion as production and you will have the same level of
       access.

   •   The screen colors are different, and all emails sent out from the system have a SAS logo that clearly
       states DEMO.

   •   Additionally, completed envelopes in the demo environment state that the document is a
       “Demonstration Document Only”.

Production Environment:

CREATE DOCUMENT IN DOCUSIGN

LOGIN TO DOCUSIGN (DEMO ENVIRONMENT)
Visit: demo.docusign.net

Login: NETID@rutgers.edu

It is important to ALWAYS login as NETID@rutgers.edu (do not login as
NETID@english.rutgers.edu, for example)

   Page                                                                                                        5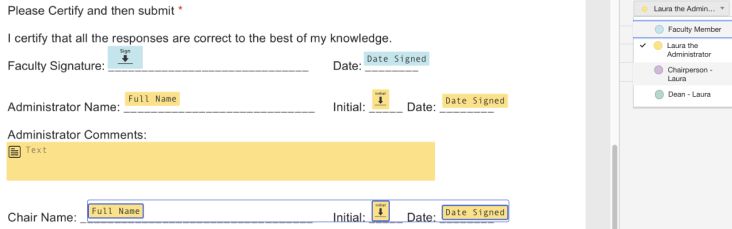
INDEPENDENT STUDY PROJECT FORM

PURPOSE OF FORM
This form is for a student to complete and have their faculty advisor approve of an Independent study project /
course. The student initiates the ‘sending’ by completing most of the information as well as the Faculty name /
email. Next the faculty member will complete with their specific details and if they approve or not.

GOALS WORKSHOP 1
    •   Use ROLES and Specify Names/Emails
    •   Private message to recipient
    •   Set Email Message (private message)
    •   Drop down field
    •   Create Custom Field
    •   Restrict field value (Year) – Validation
    •   Swap PDF for New One

Click to create a NEW Template

6               DocuSign – School of Arts and Sciences – Advanced Class – Part 2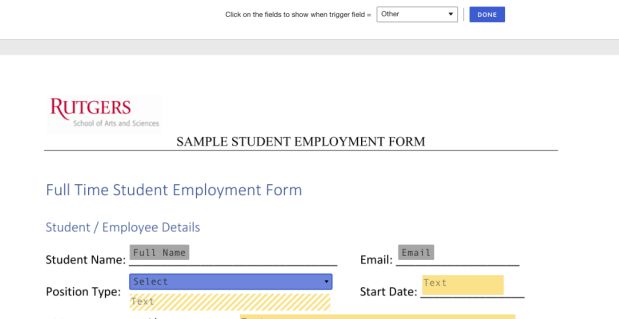
Build Template and Recipients:

   -   Template Name & Description
   -   Add Document
   -   Add Recipients

                                                                             Enter a Recipient ROLE, this
                                                                             way when you USE the
                                                                             template you can select any
                                                                             recipients that you want to
                                                                             receive this document

Document: Independent Study Form

DEFINE ROLES / RECIPIENTS
   •   Student – leave Name & Email blank
   •   Faculty Sponsor – leave Name and Email Blank
   •   Undergraduate Chair → SET THIS TO A SPECIFIC NAME and EMAIL
   •   Administration → SET THIS TO A SPECIFIC NAME and EMAIL
   •   The Student and Faculty Sponsor will get completed by the person who ‘begins’ filling out the form. So
       if the STUDENT initiates he process, they will fill in their personal name / email and complete the faculty
       member name and email

ADD A SPECIFIC EMAIL MESSAGE TO PARTICIPANT

   1. Click ‘more’
   2. Click add private message
   3. Enter specific message to go to this ‘role’

   Page                                                                                                          7
BUILD TEMPLATE Add fields for STUDENT Add fields for Faculty Member & Chair The only chair fields are: Undergraduate Chair Signature and Date 8 DocuSign – School of Arts and Sciences – Advanced Class – Part 2
DROP DOWN LIST FIELD
For the Semester set this as a ‘drop down’ type of field.

                                                    1. Specify the DATA LABEL → semester
                                                    2. Options → LIST
                                                          a. Enter: Spring, Summer, Fall,
                                                               Winter
                                                    3. Default Option → select spring
                                                    4. SAVE AS CUSTOM FIELD

                                                When it is saved as a custom field, it can be
                                                selected for another form

FIELD VALIDATION
Pre-formatted options

    -   # of Credits → select to be NUMERIC ONLY
    -   Validation = NUMBERS

Custom Option
Uses REGULAR EXPRESSIONS

    -   Require 4 digits: ^\d{4}$
    -   Requires: 20 then 0-2, then 0-9: ^[2][0][0-2][0-9]$
    -   http://regexstorm.net/tester
    -   https://www.petefreitag.com/cheatsheets/regex/

    Page                                                                                        9
SWITCH PDF If after making a template, you realize you need to change your pdf document slightly, it is possible to SWAP the pdf with another one, without losing any of your work. If you ‘EDIT’ your template, or ‘go back’ to return to the ‘main template name / description page Add Documents to the Envelope, click on the ‘3 dots’ to the right of the file name, click REPLACE. To replace the file, select the independent-study-form2.pdf, to see how the fields are saved, you can just move things around… 10 DocuSign – School of Arts and Sciences – Advanced Class – Part 2
CREATE POWERFORM AND TEST
Save / Close all changes made

Return to ‘My Templates’ listing

For form, click ‘dropdown’ next to use, select → Create PowerForm

It is possible to edit the Name, Subject, Instructions (for first SIGNER only), hit create to create the form.

Copy the URL code from the form, this can be put on a web page, or given out via email

Test out the form and see how it works.

To MANAGE power forms visit: MANAGE → Powerforms
you can DOWNLOAD results, EDIT,

    Page                                                                                                         11
STUDENT EMPLOYMENT FORM
PURPOSE OF THE FORM
This is a form that an administrator initiates and sends to the student to complete. The administrator fills out
the job details, then the student completes their personal details including uploading a pdf/jpg of their passport
and social security card. Once the student has completed their details the document goes back to the
administrator for verification then to the business office for final approval. Lastly the administrator gets the
final copy for their files.
GOALS OF WORKSHOP 2
• Add multiple Roles (some are the same role additional times)
• Create READONLY Fields
• Create Conditional Fields
• Use of Attachment Specifications
Roles to Create:
• Administrator
• Student
• Administrator
• Business Office
• Administrator
Upload file: student-employment-form.pdf
12 DocuSign – School of Arts and Sciences – Advanced Class – Part 2BUILD ROLES AND SET FIELDS FOR ROLES Assign DATA LABELS for ALL FIELDS Set fields for ADMINISTRATOR: Page 1: • Position Type (drop down field – Douglass, Livingston, Grader, Other) • Position type text (text field) – just below the drop down • Stat Date • Hiring Manager Page 2: • Pay Rate/Hour – Drop down ($11, $12, Other) • Other Pay Rate • Job Class Code: READ ONLY, value = 05100 • Org Id: READ ONLY, value = 10331 • Location Code: READ ONLY, value: 3011 Page 13
Set fields for STUDENT

Page 1:

     •    Student Reference fields:
     •    Name, Email, SSN, RU ID, Employee ID, First Name, Mdidle, Last, DOB, address, city, state, zip, phone,
          Citizenship status: drop down: Citizen, Lawful resident, Not a citizen
     •    Proof of SSN → Attachment, Proof of Birth Date → Attachment

Page 2:

     •    Employment History Details
     •    Signature: Student, date signed

Page 3:

     •    Employee Name
     •    Employee Signature
     •    Date Signed

CREATE READ ONLY / DEFAULT TEXT FIELD
     •    Check off ‘READ ONLY’ for the field to be read only
     •    Enter ‘add text’ for default text to appear.
     •    Note: a field can have DEFAULT TEXT, but not be set to READ ONLY

14               DocuSign – School of Arts and Sciences – Advanced Class – Part 2
CONDITIONAL FIELD VALUES
A conditional field values, allows you to determine if a field is displayed depending on if a specific value is in
another fields.
Set Data Labels for Fields:
Be sure to set the DATA LABEL for both Position Type fields
- Drop Down field data label = Position Type
- Text field below data label = Position Type Other
Steps to Set conditional Rule:
1. Click on the DROP DOWN POSITION
TYPE FIELD
2. Click on RIGHT for CREATE
CONDITIONAL RULE
Define Actual Rule
1. Select value = OTHER
2. Click on ‘2nd position type field
3. After you click it will turn to STRIPES
4. Click DONE
Create another Conditional Field:
If Pay Rate = Other
Allow Pay Rate to be
entered.
CREATE POWERFORM AND TEST
- Create Powerform, ‘try out’ the form and see how it works
Page 15RESEARCH ACCOUNT RENEWAL FORM
PURPOSE OF FORM
This form is for a faculty member to complete when they want to renew their research for the upcoming year.
We will have 3 people complete this form, the Faculty member starts the request, then the administrator
reviews it, the chair reviews and comments, then the dean can approve of it. When the faculty member starts
this form for sending they enter the email address for the Administrator, Chair and Dean.
GOALS WORKSHOP 3
• Copy fields and reassign
• Collaborative Text Field (multiple people can edit)
• Notes Field (hidden from others view)
ASSIGN ROLES
• Faculty Member
• Administrator → assign the name, email (assuming there is just one faculty member in dept)
• Chair → assign the name, email (assuming there is just one chair in the department)
• Dean → there is only one dean, the dean will only receive if the CHAIR approves
Pdf: research Renewal.pdf
COPY FIELDS
After entering fields (Name, Initial, Date). Hold SHIFT key down and select each field, then hit
Hit to PASTE the fields
1. Select the 3 fields
2. Click on the recipient
on the RIGHT, and
select Chair Person
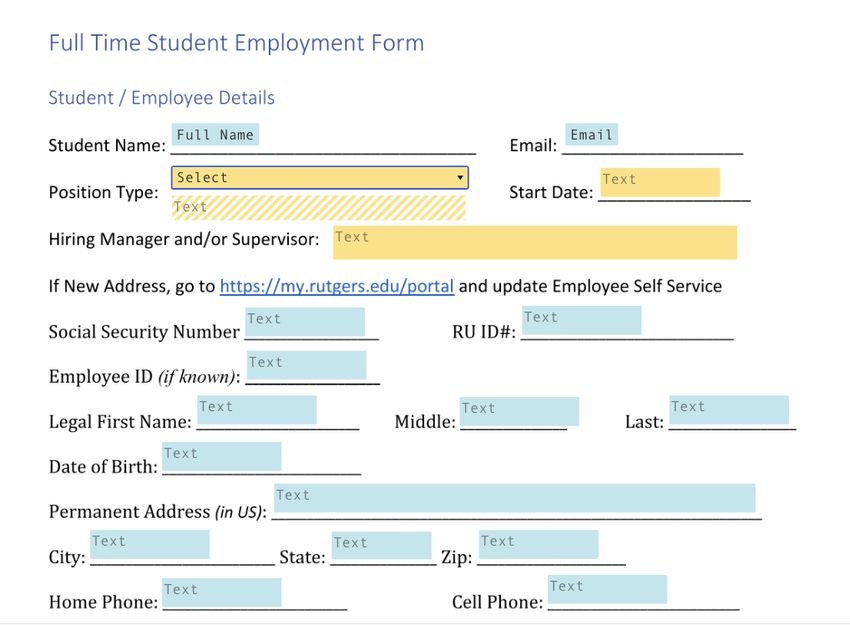
16 DocuSign – School of Arts and Sciences – Advanced Class – Part 2NOTE FIELD - FIELD FOR SIGNOR VIEW ONLY
The Note field is a free text field that you can use to enter additional information to your recipients. You can add
a Note for an individual recipient and the text that you enter appears only during the signing session. Notes are
visible only to their assigned recipient. Notes do not remain on the completed documents. However, you can
use the download form data option to recall and view the information.
For testing purposes, for the ADMINISTRATOR comments use a NOTE FIELD, for the Chair Comments use a
regular field.
In preview mode,
you can see the
administrator notes
in preview, but only
as administrator
Page 17CREATE HIDDEN FIELD VIA ASTERISKS For text fields, there is an additional formatting property to hide the text entered with asterisks, concealing the data from anyone else viewing the document. Create a field for ‘SSN’ for example, you can set the format to be ‘hide with asterisks’. The data can be viewed by the ‘owner’ of the document only. 18 DocuSign – School of Arts and Sciences – Advanced Class – Part 2
COLLABORATIVE FIELDS
With a collaborative field, all recipients on a document can make or change entries to the field. Optionally,
changes made by one recipient can be rerouted to all recipients for review and approval. Recipients that signed
a document before the changes were made are given a new opportunity to review and approve the changes
before the document is finalized.

Adjust the field to describe how the funds were used to include collaboration.

    Page                                                                                                     19
NEW HIRE FORM
PURPOSE OF THE FORM
This for is used by the administrator of a department when they have a new hire. The administrator ‘kicks off’
the signing of the form by entering in the Employee information and the supervisor information. The
administrator fills out the ‘hiring details’, then the employee fills out their personal details, then the supervisor
approves, and sends it back to the administrator for final approval. In the normal process after the supervisor
reviews it would go to the business office, but we will skip that step for now.
GOALS OF WORKSHOP 4
• Hide some fields with ‘asterisks’, so they are hidden from view
• Line up fields (horizontal and vertical)
• Create Calculated Field
Roles to Create:
• Administrator
• Employee
• Supervisor
• Administrator
Upload file: new-hire-form.pdf
Create a new template, upload the file…
20 DocuSign – School of Arts and Sciences – Advanced Class – Part 2Update document with fields Yellow → FIRST ADMINISTRATOR Purple → SUPERVISOR Blue → Employee Page 21
HIDE PERSONAL FIELDS
Set Personal fields to be ASTERISKS, select fields, click on FORMAT, click on asterisk

ALIGN FIELDS
     •   Select fields (it’s possible to drag a box around all fields)
     •   Click on RIGHT SIDE for the various alignment options (After fields are selected)

22               DocuSign – School of Arts and Sciences – Advanced Class – Part 2
CREATE CALCULATED FIELD (FORMULA)
Add FORMULA type field
On RIGHT for formula, type in field names with action, and it will calculate automatically
This sample formula will add up all of the gl percentage fields, you can add as many as you like. In my example, I
also add the project-percentage fields, fields must be named FIRST!
[gl-percentage-1]+[gl-percentage-2]+[gl-percentage-3]
Page 23You can also read