Dynamics 365 for Marketing Setup Guide - September 2018 - Coffee + Dunn
←
→
Page content transcription
If your browser does not render page correctly, please read the page content below

Dynamics 365
for Marketing
Setup Guide
September 2018
In this document, topics include:
     1.    Purchase and Add Dynamics 365 for Marketing
     2.    The Setup Wizard
     3.    Initial Configuration
     4.    Practice Scenarios
     5.    Reference

1   © 2018 Microsoft Corporation. All rights reserved.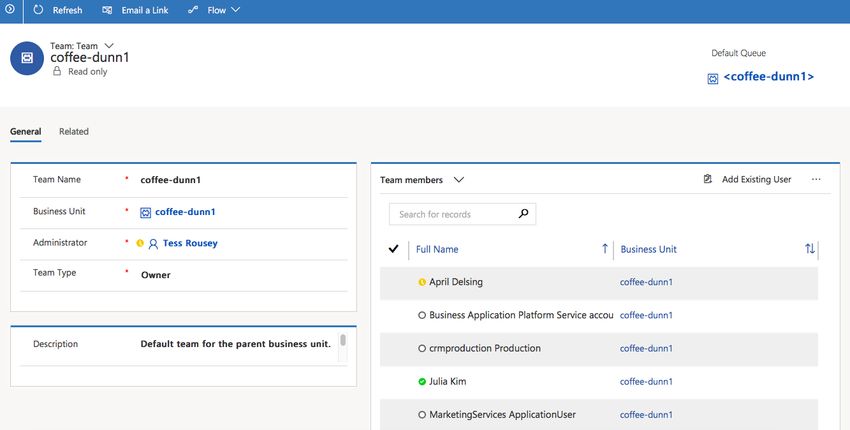
Purchase and Add
Dynamics 365 for Marketing
     •     Your Dynamics 365 (online) must be version 9.0 or higher
     •     Make sure you are located in a country/region where the product is supported

Purchase and add Dynamics 365 for Marketing
     1.    Purchase Dynamics 365 for Marketing. A few ways to purchase the Marketing
           app:
                a. Go to Dynamics 365 for Marketing overview page
                b. Go to Office 365 Admin Center > Billing > Purchase Services
                c. Contact your Microsoft sales representatives or channel partner
     2.    Add a marketing app to your Office 365 tenant (NOTE: The marketing app is
           unconfigured at this stage)

The Setup Wizard
After signing up for a trial or purchasing your license for Dynamics 365 for Marketing, your
Dynamics 365 for Marketing app is available on your tenant, but not yet configured. You
must run the setup wizard to set up and start using the application (Note: most of the
settings in the setup wizard will be permanent).

Prerequisites and requirements
     •     You must already have an Office 365 tenant
     •     You must be running Dynamics 365 (online), version 9.0 or higher (supplied
           together with most trial and stand-alone Marketing setups)
     •     You must already have a Dynamics 365 license assigned to your user account
           on your Office 365 tenant
     •     An unconfigured Dynamics 365 for Marketing app must be available on your
           tenant
     •     An unconfigured portal app must be available on your tenant. NOTE: Usually
           this is included with Marketing, provided no other free portals are already in
           use on your tenant. More information: Why do I need a new portal, and how
           can I get one?
     •     You must run the setup wizard as a Dynamics 365 user with admin privileges on
           the Dynamics 365 instance where you are installing Marketing
     •     You must be located within a country/region where the product is supported.
           To read the latest list of countries/regions where you can use Dynamics 365 for

2   © 2018 Microsoft Corporation. All rights reserved.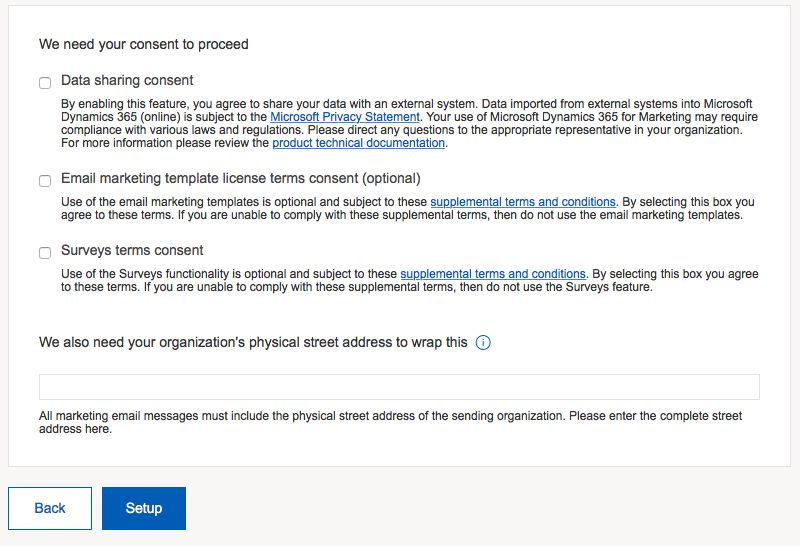
Marketing, download the Microsoft Dynamics 365 International Availability
           document (PDF)
     •     Close all other browser windows and tabs before starting
     •     Clear your browser cache before starting

Run the setup wizard

     1.    Set up an unconfigured marketing app
                a. Go to portal.office.com
                b. Sign in using your administrator account with Dynamics 365 for
                    Marketing license assigned
                c. Go to the Office 365 Admin Center
                d. Under Admin centers, click Dynamics 365. Dynamics 365 admin
                    center will open
                e. Go to the Applications tab
                f. Find a Dynamics 365 for Marketing Application (NOTE: you may have
                    several Marketing apps available for your tenant. In this case, look for
                    the Marketing app that is marked as Not configured in the Status
                    column and does not have an instance ID appended to the name)
                g. Select an unconfigured Marketing app and click Manage on the side
                    panel
                h. The setup wizard will launch
     2.    Select the Dynamics 365 organization that you want to add Dynamics 365 for
           Marketing to

                 a.  If you are not already using any other Dynamics 365 apps, you will
                     setup a new instance
                b. If you already have an instance, you will be selecting an existing one (it
                     may be already selected if you only have one instance) that you want
                     to add the Marketing app to, or you can create a new one.
     3.    Enter a prefix for your portal URL and enter it in the field provided. All your
           portals, including marketing pages, subscription centers, event portals, and
           surveys, are hosted on a Dynamics 365 server which uses a Microsoft-owned
           domain name, plus the subdomain name that you enter here. Choose a unique
           subdomain name that visitors will recognize, such as your organization’s name,
           because that is what your contacts and customers will see in the URL
     4.    Click Continue

3   © 2018 Microsoft Corporation. All rights reserved.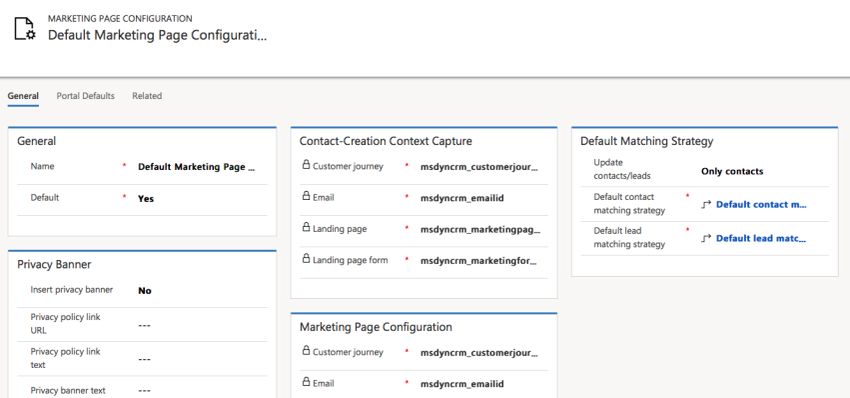
5.    Read the consent text shown for each checkbox and click in the links to read
           and understand all the relevant issues. If you agree with the terms, click in the
           checkbox to indicate your consent

     6.    Enter your full physical street address for your organization NOTE: you are
           required to have a physical street address to legally send marketing emails
     7.    Click Setup. It may take about half an hour for the setup to complete

Initial Configuration
To fully setup and utilize the system based on your business needs and requirements, you
may walk through this initial configuration section and configure some of the important
organization, business management, marketing, event, and other settings. These are
recommended initial configuration items. You may skip items or configure further system
setting items as needed or required.

Organization settings
Settings > Advanced Settings > Organization

In the organization settings, you may set up user roles, teams, fiscal year, and more. Assign
roles to users, add team and team members, and set up the fiscal year for your
organization.

4   © 2018 Microsoft Corporation. All rights reserved.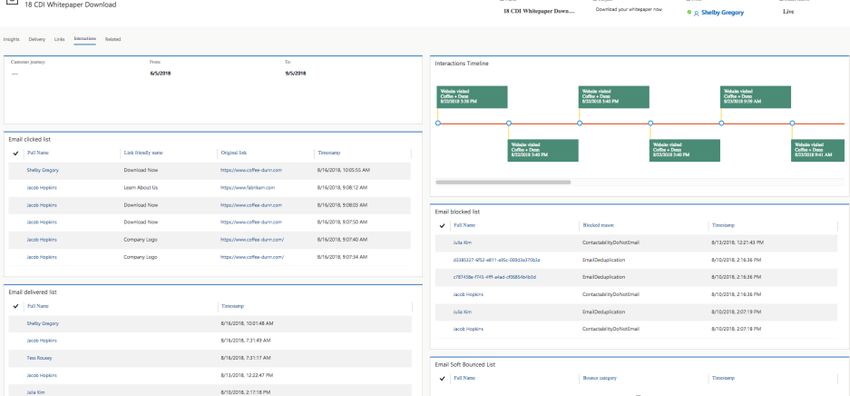
Manage users
Customization of security roles must be done in Dynamics 365

     1.    Select User management
     2.    Select the user you would like to assign a role to, and then on the command
           bar, select Manage Roles
     3.    In the Manage User Roles dialog box, select the security role or roles you would
           like for the user or users, and then select OK
     4.    You may also join a team or change the manager of a user

Manage teams
A team is a group of users who share and collaborate on business records. A user may be
associated with multiple teams.

     1.    Select Add Team
     2.    Enter the details, and then select Add
               a. Team Name
               b. Business Unit Name: This default value is your organization name
               c. Team Manager: Select a manager for the team

5   © 2018 Microsoft Corporation. All rights reserved.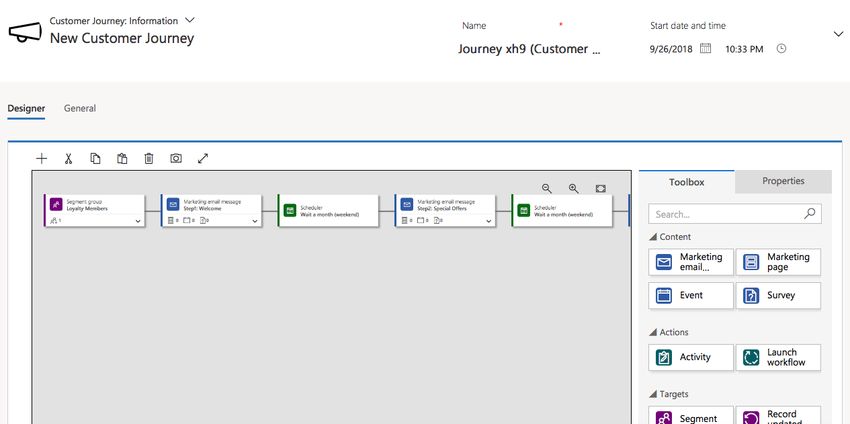
d.   Team Administrator: Select the person who will perform
                      administrative tasks for the team, such as adding or removing
                      members

Define fiscal year settings
     1.    Make sure you have the System Administrator
           security role or equivalent permissions in
           Dynamics 365 for Marketing
     2.    Enter information in the text boxes
               a. In the Start Date box, select the date
                     to start the fiscal year
               b. In the Fiscal Period Template drop-
                     down list, select how your fiscal year
                     is divided
               c. In the Fiscal Year drop-down list,
                     select how you would like to display
                     the fiscal year
               d. In the Fiscal Period drop-down list, select how you wish to display the
                     fiscal period
               e. In Name Based On drop-down list, select whether the fiscal year
                     name is displayed on the start or end of the fiscal year
               f. In the Display As drop-down list, select how you would like the fiscal
                     year abbreviation and the year to appear
     3.    Select Save

Business Management settings
Settings > Advanced Settings > Business Management

In the business management settings, you may enable or disable duplicate detection and
more. Duplicate detection is disabled by default. You must configure this setting to use the
duplicate detection feature.

6   © 2018 Microsoft Corporation. All rights reserved.
Duplicate Detection
Duplicates are not detected when a user merges two records, activates or deactivates a
record, or saves a completed activity. Dynamics 365 includes duplicate detection rules
for accounts and contacts. The rules are automatically published when duplicate
detection is enabled.

     •     Accounts with the same account name are found
     •     Contacts with the same first name and last name are found
     •     Contacts with the same email address are found

If any of these rules are deleted, duplicate detection will not work as expected

If duplicate detection is enabled, duplicates are detected when:
     •     A record is created or updated: The system checks for duplicates when a user
           enters or updates records
     •     During data import: When you use the Import Data wizard to bring in contacts
           or accounts, the wizard detects any duplicate records

Disable duplicate detection
If your system contains a large number of records, checking for duplicates may affect
performance. You might want to disable duplicate detection in certain cases.

Marketing Settings
Settings > Advanced Settings > Marketing Settings

In the marketing settings, you may configure your landing page details and matching
strategies, set up defaults for marketing emails, choose time zone for customer journey,
edit customer insights sync items, and enable data protection tools.

Marketing Pages
Marketing Settings > Landing Pages > select Default Marketing Page Configuration

This is where you set up a privacy banner, set hosting defaults, and configure defaults for
how data submitted through a landing page form is matched to existing contact or lead
records.

7   © 2018 Microsoft Corporation. All rights reserved.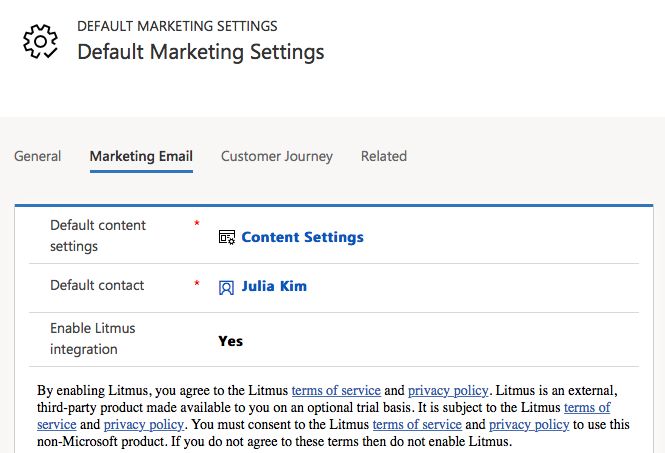
1.    Set the default (active) configuration set. There must always be exactly one
           landing-page configuration that is set as the default
     2.    Set up a privacy banner for marketing pages. It is recommended that you
           include a privacy banner on all your marketing pages. The privacy banner will
           be applied to all existing and newly created marketing pages, except for the
           published ones
     3.    The Contact creation context capture and Lead creation context capture
           sections show where various types of information about the marketing context
           are stored when a submission results in a new contact or lead record
     4.    Under the Default matching strategy section, you may set defaults for
           whether to create and update leads and or contacts, and how values are
           matched against the existing record and if not matched, to create a new record.
           Each default contact matching strategy and lead matching strategy may be
           created or edited in Matching Strategy under Marketing settings
     5.    Set matching strategies for leads and contacts. Matching strategies define
           how page submissions are matched to existing contacts or leads when deciding
           whether to update an existing record or to create a new one
     6.    Set portal defaults.
                a. Marketing Page Configuration > Portal Defaults tab
                b. If you have any other portal account, you may set that up here.
                    Otherwise, the default will be the event portal that was provisioned
                    when you signed up for Dynamics 365 for Marketing

Customer insights sync
Marketing Settings > Customer insights sync

Dynamics 365 for Customer Insights is an Azure-based service that provides analytical
tools for working with customer records. By default, some values are selected.

8   © 2018 Microsoft Corporation. All rights reserved.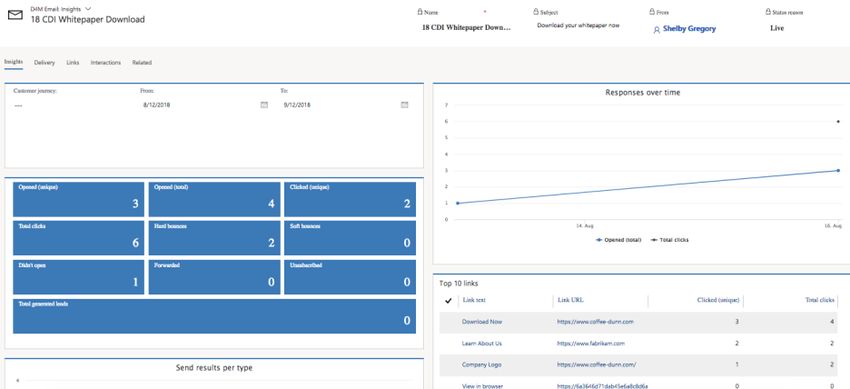
In this area, you may choose which database entities from Dynamics 365 for Marketing
to replicate to Customer Insights. This feature is resource-intensive. For optimal
performance and functionality, choose only the entities you need. Once you add a new
entity to Customer Insights, it will continue to sync and consume storage space there
and cannot be removed. You should only add those entities you are sure you will need

Matching Strategy
Refer to Marketing Pages

Default marketing settings
Marketing Settings > Default Marketing Settings > Select New
This is where you set different defaults used throughout the app. You can store as many
settings sets as you want, but like other settings, only the one marked as Default is active.

     1.    The Marketing email tab: Set defaults that apply to your marketing email
           messages. You will always be able to override these defaults for individual
           messages, but it will be more convenient for users if you set the defaults to
           their most-used values. These values appear for the preview feature

9   © 2018 Microsoft Corporation. All rights reserved.
2. The Customer journey tab: Choose the default time zone that you will use
when starting and stopping your customer journeys
Setup double opt-in
The double opt-in process helps make sure that contact’s enrollment in subscription list is
intentional and the supplied email address is legitimate and functional. When contacts
sign up for a new subscription list, the contact will be asked to confirm the request by
clicking on a link sent to the email address.
10 © 2018 Microsoft Corporation. All rights reserved.1. Create a subscription confirmation-request message
a. Navigate to the Marketing app
b. Go to Marketing Emails under Marketing Execution
c. Select New
d. In the Select an email template window, go to the Purpose tab and
choose Double opt-in, email base confirmation from the drop-down
list
e. Select the diamante template. This template includes:
Note: this template is to create a subscription confirmation-request
message. If you want to create an increase consent confirmation-request
message, choose custonaci
i. Default content that includes Handlebars expressions to
place the recommended dynamic content
ii. A confirmation button preconfigured with the required target
URL
iii. The Content type set to Confirmation request
iv. The Legal designation set to Transactional
f. Design the message as needed
g. Check for errors and Go Live
2. Create a thank-you page for each type of confirmation
a. Go to Marketing Pages under Internet Marketing
b. Select New
c. In the Select a marketing page template window, select a Thank-you
templates provided out-of-the-box or a blank page to get started
d. Design the thank you page as needed
e. Check for errors and Go Live
3. Set up and enable double opt-in on your site
a. Go to Settings > Advanced Settings > Marketing Settings >
Default marketing settings
b. Open the active default settings record
c. Open the Double opt-in tab on the Default marketing settings page
d. Make the following settings:
i. Enable double opt-in: Set to Yes to enable double opt-in on
your instance. Set to No to disable it
ii. New subscription: Identify the marketing email message you
created to send to contacts when they add themselves to a
subscription list
iii. Increase consent: Identify the marketing email message you
created to send to contacts when they submit a request to
increase their consent level
iv. Content settings: Identify the content-settings record you
chose to use for all double opt-in messages
v. Thank-you page for subscriptions: Select a marketing page
to show to contacts after they confirm a new subscription
11 © 2018 Microsoft Corporation. All rights reserved.vi. Thank-you page for consent: Select a marketing page to
show to contacts after they confirm an increase of their
consent level
e. Save at the bottom right corner of the page
Data Protection Tools
Marketing Settings > Data protection tools > Select New
Enable data-privacy features of Dynamics 365 for Marketing. These features currently
focus on helping organizations comply with GDPR regulations in the European Union.
The GDPR features are disabled by default so you need to create a new GDPR record to
enable the features
Event Management
Settings > Advanced Settings > Event Management
The Event management settings let you set up the connections to your webinar provider
accounts. You must set up at least one webinar configuration to enable the webinar
feature.
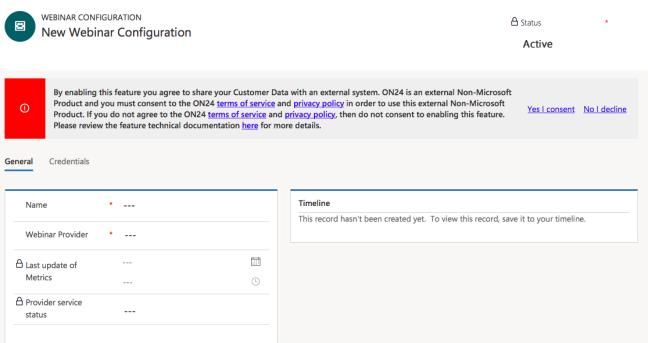
Webinar Configurations
Currently, ON24 is the only webinar provider that can be configured Out-Of-Box
12 © 2018 Microsoft Corporation. All rights reserved.1. Set up one or more accounts with a webinar provider
2. Configure Dynamics 365 to work together with each account so that it can sign
in, register attendees, and fetch the URLs that attendees can use to join the
webinar itself
3. To set up your webinar provider:
a. Go to Settings > Advanced settings > Event management >
Webinar configurations. Here you'll see a list of existing
configurations (if any), and tools for adding new ones. No
configurations are provided out of the box
b. To edit an existing configuration, select it from the list; to create a new
configuration, select New
c. Make the following settings:
i. Name: Enter a name that you and others will recognize
ii. Webinar provider: Select On24
If you are setting up a new configuration, or if you need to
update your account credentials for an existing configuration,
open the Credentials tab and set Update credentials? to Yes
and then enter your sign-in credentials for the account
Event Administration
Here you can set up auto-generate email options and templates for event registrants
Content Settings
Marketing > Templates > Content Settings
Content settings hold common values, such as subscription center and physical mailing
address, that you can place into an email message as dynamic text by using assist-edit.
Upon setting up Dynamics 365 for Marketing, a default content setting should
automatically be populated. You may either edit the existing one or create a new one. You
may create as many content settings as you need. If you want to edit an existing “Live”
content settings, you must stop and edit the content settings, then make sure to go live
again.
13 © 2018 Microsoft Corporation. All rights reserved.1. Create a new content setting or
edit an existing one
2. Fill out the required fields. Fill out
other information as needed
3. Save, Check for Errors, then Go
Live
Suggested 5 Features to Try
Try the following features to familiarize yourself with the solution. Navigate to Dynamics
365 for Marketing. Click on the hyperlink for detailed instructions.
1. Create a Marketing Email
Marketing > Marketing Execution > Marketing Emails
a. Create a new marketing email using a pre-designed template
b. Design your marketing email. Verify the proper physical address and
subscription center are included in the email using Assist Edit. Preview
your marketing email
14 © 2018 Microsoft Corporation. All rights reserved.c. Check for Errors. Make your marketing email Go Live
2. Create a Marketing Form and Marketing Page
Marketing > Internet Marketing > Marketing Forms / Marketing Pages
a. Create a new marketing form using a pre-designed template
b. Design your marketing form. Verify the fields are mapped correctly. Go
Live when ready
c. Create a new marketing page using a pre-designed template
d. Design your marketing page. Include a marketing form. Go Live when
ready
3. Create a Segment
Marketing > Customers > Segments
15 © 2018 Microsoft Corporation. All rights reserved.a. Create a new dynamic segment. Segment using Designer, Flow, or
Query. Go Live when ready
b. Create a new static segment. Find a contact with your email address
using filter. Select the Contact. Add any other contacts as desired. Go
Live when ready
4. Create a Customer Journey
Marketing > Marketing Execution > Customer Journeys
a. Create a new customer journey using a pre-designed template
b. Design your customer journey. Fill out properties of each of the
content/action/target/flow control tiles
c. Make sure to include a segment that includes a contact with your
email address
d. Navigate to the General tab
e. Fill out the Start/End date and time
f. Set the Time zone
g. Verify the appropriate content settings is applied
h. Add additional information as needed
i. Check for Errors. Make your customer journey Go Live
j. Verify you receive an email. This may take a few minutes
k. Open and click around the email you received to generate insights
5. View Insights
Customer Journey > Insights Tab
16 © 2018 Microsoft Corporation. All rights reserved.17 © 2018 Microsoft Corporation. All rights reserved.
Wait 15+ minutes to move onto next step
               a. Go to the Insights tab of the customer journey
               b. Review results of the customer journey
               c. Navigate to the Marketing homepage to view Customer Journey
                   Dashboard
               d. Verify your customer journey information is present
               e. Navigate to the marketing email that is included in the customer
                   journey
               f. Go to the Insights tab of the marketing email
               g. Review results of the marketing email
               h. If you have marketing form, marketing page, and other contents in the
                   customer journey, review the results on each entity’s insights

Update or Delete a
Marketing app
Update your Marketing app
Dynamics 365 for Marketing will have major updates available every six months. In
addition, bug fixes are released often. It is important to ensure your application is up to
date.
    1. Go to Dynamics 365 admin center
    2. Select the Application tab
    3. Select a configured Dynamics 365 marketing Application you want to update
    4. Click the Manage button
    5. Look for Update packages. If the update button is not shown, no updates are
          available

18 © 2018 Microsoft Corporation. All rights reserved.
6. Click Update packages if the button is shown
To uninstall your Marketing app…
1. If you have sample data installed, remove it
2. Remove all customer journeys that include launch-workflow and/or record-
updated tiles
3. Go to the Dynamics 365 admin center
4. Select the Applications tab
5. Choose a Dynamics 365 Marketing Application you wish to delete
6. Click the Manage button
7. Click on Uninstall Marketing from this org under Other actions
8. Follow the instructions on your screen to confirm and complete the uninstall
9. Remove Marketing solutions in Dynamics 365. Go to Dynamics 365
10. Go to Settings > Customizations > Solutions
11. Find each of the following solutions and remove them, one at a time. To
remove a solution, select its check box, and then select Delete on the
command bar
• MicrosoftDynamics_MktEmailTemplates
• MicrosoftDynamics_MktIntegration
• MicrosoftDynamics_MktPageTemplates
• MicrosoftDynamics_MktLeadGenLink
• MicrosoftDynamics_MktConsentManagement
• MicrosoftDynamics_MktQuotaInfo
• MicrosoftDynamics_MktLeadManagement
• MicrosoftDynamics_MktPortalsLink
• MicrosoftDynamics_MktVocLink
• MicrosoftDynamics_MktEvtMgmtLink
• MicrosoftDynamics_Marketing
• MicrosoftDynamics_MarketingAnchorSolution
• MicrosoftDynamics_EvtMgmtVocLink
• MicrosoftDynamics_EvtMgmtPortalsLink
• MicrosoftDynamics_EventManagement
• MicrosoftDynamics_EventManagementAnchorSolution
• LinkedInLeadGenIntegration
19 © 2018 Microsoft Corporation. All rights reserved.References Purchase a production version of marketing – https://docs.microsoft.com/EN-US/DYNAMICS365/CUSTOMER- ENGAGEMENT/MARKETING/purchase-marketing Run the setup wizard – https://docs.microsoft.com/EN-US/DYNAMICS365/CUSTOMER- ENGAGEMENT/MARKETING/purchase-setup Organization settings – https://docs.microsoft.com/EN-US/DYNAMICS365/CUSTOMER- ENGAGEMENT/MARKETING/organization-settings Business management settings – https://docs.microsoft.com/EN-US/DYNAMICS365/CUSTOMER- ENGAGEMENT/MARKETING/business-management-settings Marketing settings – https://docs.microsoft.com/EN-US/DYNAMICS365/CUSTOMER- ENGAGEMENT/MARKETING/marketing-settings Event management settings – https://docs.microsoft.com/EN-US/DYNAMICS365/CUSTOMER- ENGAGEMENT/MARKETING/events-settings Content settings – https://docs.microsoft.com/EN-US/DYNAMICS365/CUSTOMER-ENGAGEMENT/MARKETING/set- up-subscription-center#identify-a-subscription-center-in-content-settings Keep marketing up to date – https://docs.microsoft.com/EN-US/DYNAMICS365/CUSTOMER- ENGAGEMENT/MARKETING/apply-updates Uninstall marketing – https://docs.microsoft.com/EN-US/DYNAMICS365/CUSTOMER- ENGAGEMENT/MARKETING/uninstall-marketing 20 © 2018 Microsoft Corporation. All rights reserved.
This is a preliminary document and may be changed substantially prior to final commercial release of the software
described herein.

The information contained in this document represents the current view of Microsoft Corporation on the issues
discussed as of the date of publication. Because Microsoft must respond to changing market conditions, it should
not be interpreted to be a commitment on the part of Microsoft, and Microsoft cannot guarantee the accuracy of
any information presented after the date of publication.

This white paper is for informational purposes only. Microsoft makes no warranties, express or implied, in this
document.

Complying with all applicable copyright laws is the responsibility of the user. Without limiting the rights under
copyright, no part of this document may be reproduced, stored in, or introduced into a retrieval system, or
transmitted in any form or by any means (electronic, mechanical, photocopying, recording, or otherwise), or for
any purpose, without the express written permission of Microsoft Corporation.

Microsoft may have patents, patent applications, trademarks, copyrights, or other intellectual property rights
covering subject matter in this document. Except as expressly provided in any written license agreement from
Microsoft, the furnishing of this document does not give you any license to these patents, trademarks, copyrights,
or other intellectual property.

© 2018 Microsoft Corporation. All rights reserved.

The example companies, organizations, products, domain names, e-mail addresses, logos, people, places, and
events depicted herein are fictitious. No association with any real company, organization, product, domain name,
e-mail address, logo, person, place, or event is intended or should be inferred.

Microsoft, list Microsoft trademarks used in your white paper alphabetically are either registered trademarks or
trademarks of Microsoft Corporation in the United States and/or other countries.

The names of actual companies and products mentioned herein may be the trademarks of their respective owners.

21 © 2018 Microsoft Corporation. All rights reserved.
You can also read