ESSENTIAL RANGE KITCHEN CATALOGUE & INSTALLATION GUIDE - Freedom Kitchens
←
→
Page content transcription
If your browser does not render page correctly, please read the page content below
ESSENTIAL RANGE
KITCHEN CATALOGUE & INSTALL ATION GUIDE
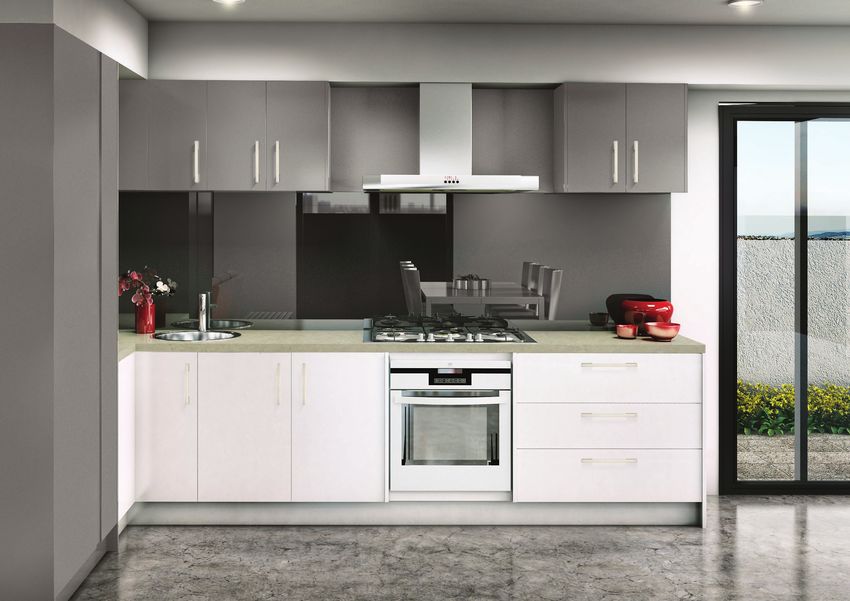
WHITE CATHERINE (D)

CAL ACUTTA GREY (B)
READY TO ASSEMBLE
                                                    save with

Welcome to style in the fast lane. The Essential Kitchen Range is an exciting new collection of ready to assemble flat pack
kitchens from Freedom Kitchens, perfect for those looking for a fast and affordable solution - without compromising style.

Offering exceptional value, at a range of affordable price points, you’ll be delighted to receive your new flat pack kitchen
ready for assembly and installation, just 10 working days after final payment.

Stylish. Fast. Affordable. Essential.

3 | THE ESSENTIAL RANGE
SAHARA (D)

CAL ACUTTA GREY (B)

      5-F-08
ESSENTIAL RANGE                                  new
                                                                                                                                                                                                                 READY TO
6 CABINET KITCHEN FROM $4399                                                                                                                                                                          *
                                                                                                                                                                                                                 ASSEMBLE
Your design decisions made simple! Combining inspiring elements with quality
features, we've created a value-packed kitchen solution designed to impress.

INCLUDES                                                                         • Dowel and screw construction

• Australian made cabinets                                                       • 7 year warranty on all cabinetry

• Soft full extension drawer runners                                             • Cutlery tray and bin

• Handles & kickboard                                                            • Measure and site check

• Laminate benchtop                                                              • Delivery to your home

• Flatpack solid 16mm construction
   including back panel                                                          EXCLUDES
• Soft close drawers                                                             • Any trades or installation
• DIY friendly instruction booklet                                               • Appliances, sink and tap

                                  Wall Fridge                                             Pantry                                                                     Under Bench   4 Drawer   Dishwasher space     Floor
        Wall Filler                                          Tall Panel                                            Tall Panel              Floor 500mm                                                                     Floor Panel
                                   900mm                                                 600mm                                                                       Oven 600mm    450mm          600mm          1000mm

*Disclaimer: The price quoted is for the kitchen design shown above and includes the supply of all ‘The Essential Kitchen Range ’ cabinets, doors, hinges, drawer runners,
handles, bins and cutlery drawer, laminate benchtop. The price excludes appliances, sinks, taps, delivery, installation, glass splashbacks and stone benchtops.

5 | THE ESSENTIAL RANGE
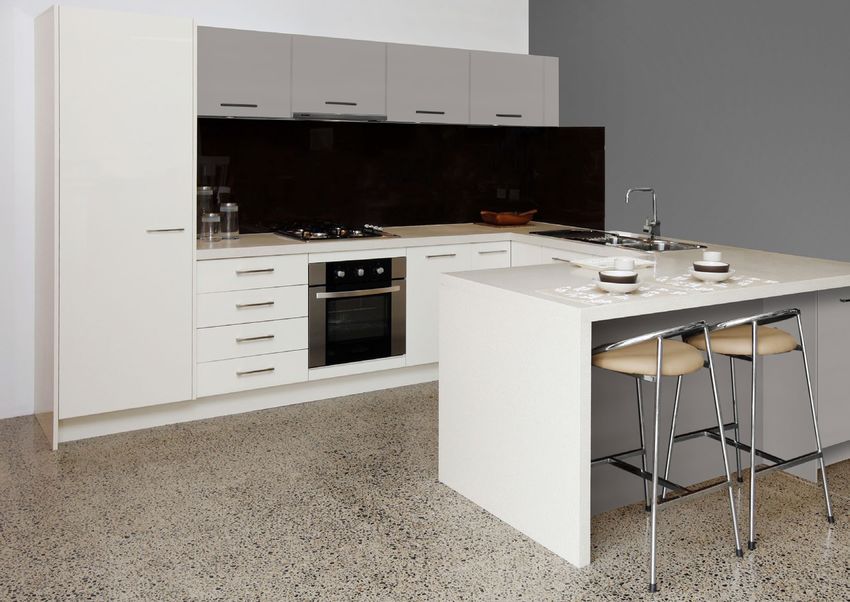
PARIS (D)

    SNOW (D)

BLANCO MATRIX (B)

     7-F-15
our process
       6 S T E P S T O C R E AT E Y O U R N E W K I T C H E N
                          1. DESIGN APPOINTMENT
                          One of our expert kitchen designers will visit you in your home to work through your measurements, style, needs and budget.
                          You’ll be shown colours and material swatches to make selections and receive on the spot pricing.

                          2. DEPOSIT
                          Simply pay the 10% deposit to get started.

                          3. SITE CHECK
                          Once we receive all your appliance details a check measurer will come to your home to measure the site against the plans
                          and chosen appliances, ensuring all details are accurate.

                          4. PROGRESS PAYMENT
                          The site checker can collect payment of your 30% progress payment or payment can be made through our on-line portal.

                          5. F INAL PLANS AND COSTING APPROVAL
                          After the progress payment is received, the final plans and price will be supplied for your sign-off.
                          You can view your final plans and communicate with us at any time via ‘my kitchen’, our online communication portal.

                          6. DELIVERY
                          After final payment (60%) is made, you can expect your Essential Kitchen to be delivered to your door in 10 days.
                          A beautiful new kitchen doesn’t get any simpler than this!

7 | THE ESSENTIAL RANGE
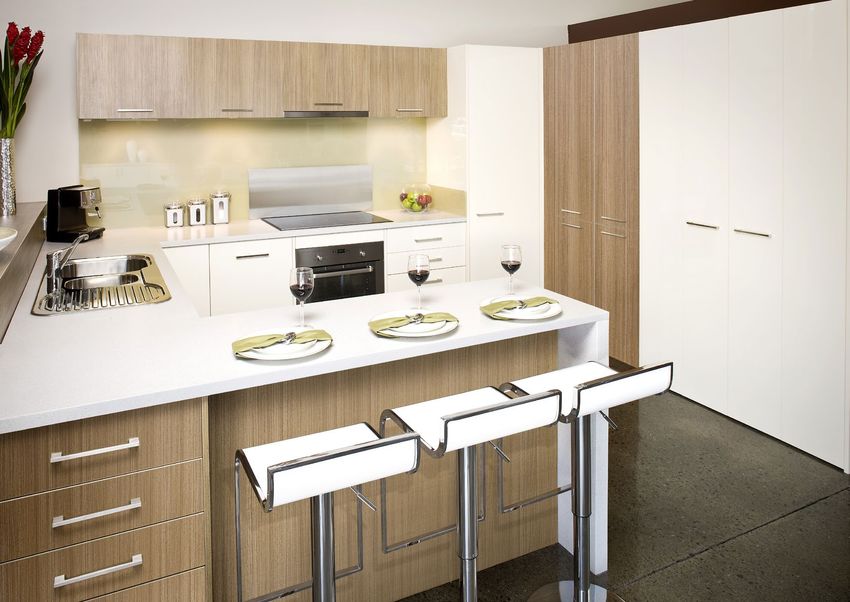
SL ATE (D)

       PARIS (D)

ATHENA STONE MATERA (B)

        5-F-14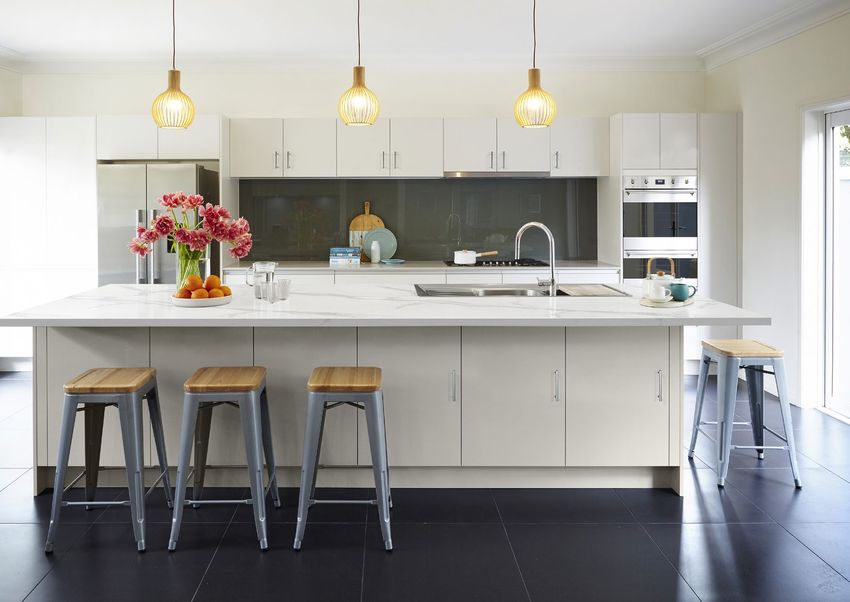
all i n t h e det a i l s
ESSENTIAL RANGE KITCHENS HAS YOU COVERED
All cabinets, laminated benchtops and         Soft close drawers as standard.                    1mm ABS edging.                                  Flexible with your design.
selected doors are manufactured from          You will be buying a superior local product.       No old-fashioned tape edging here. Our ABS       Whether your kitchen is big or small, we have
Moisture Resistant Material.                  Full extension - allows full access to each        edging provides an impact resistant surface      cabinet sizes designed to suit. This flexibility
High moisture resistant board provides        drawer. Double metal sides and back.               that won’t chip or delaminate.                   allows for a wide range of options when
maximum resistance to moisture.               Ball bearing runners - allows automatic                                                             designing your kitchen layout.
It prevents delaminating of surfaces,         self-cleaning which ensures tracks are             Wall cabinet height 605.
and cleaning is a breeze.                     maintenance free. Soft close mechanism for         Achieve a sleek handle-less look with our 592    Adjustable commercial grade
                                              smooth operation.                                  door carcass and 605 door hanging.               polymer legs.
Hinges are clip on/clip off and adjustable.                                                                                                       Fully waterproof, our adjustable legs give
Easy to remove for cleaning or adjusting      Solid 16mm bases on all drawer units.              Top of all floor cabinets have                   full support to the most uneven floor. Keeps
shelves, aligning is only two turns of a      Able to support heavier loads, as well as long     double vertical rails.                           cabinets away from moisture which could
screwdriver (no need for a tradesman).        life construction.                                 Provides maximum strength and durability &       otherwise be transferred through the board.
                                                                                                 supports the top side of the cabinetry.          140mm in height, pre-drilled locations for
110 degree, 3 way adjustable metal            Solid 16mm construction including                                                                   feet in cabinet base & click on kickboards.
hinges fitted to all cabinets.                back panel.                                        Installation assistance.
Enables better access to all cabinets and     Promotes stability of cabinetry and ease           See the Installation Guide section of this       All cabinets are fully lined and
accurate door adjustment, and comes with a    of installation.                                   booklet to give to your tradesperson for         shelves front edged.
lifetime guarantee.                                                                              assembly and installation guidance . Further     Hygienic and easy cleaning, our ABS edging
                                              Adjustable shelves.                                assistance is available if needed, simply call   will not discolour or chip.
Australian Made cabinets.                     605h wall cabinets 2 adjustable + 1 fixed.         Freedom Kitchens.
Feel good knowing you will be buying a        720h floor cabinets 2 adjustable + 1 fixed.                                                         Appliances.
superior local product that meets our high    2064h pantry cabinets 5 adjustable + 1 fixed.      Everything included to build                     See our range of InAlto appliances that will
Australian standards, supporting Australian                                                      cabinets in 1 box.                               accommodate your Essential Kitchen.
jobs. Australian based means fast and         Dowel and screw construction.                      Banish your fear of missing parts.
effective service.                            Provides maximum strength and durability           Your Essential cabinets are boxed with an
                                              with fully rigid cabinets.                         all in one fit.
Pre drilled doors and drawer fronts.
The Essential flatpack arrives ready to       Soft close doors as standard.                      Warranty.
assemble, with pre drilling already done to   Say goodbye to slamming, and hello to              Your kitchen comes with a 7 year
save time and money. Ready, set, drill.       smooth and silent. Soft close doors add            manufacturer’s warranty on the laminate
                                              sophistication and extend the life of your         benchtops, and on all drawers and hinges.
                                              kitchen, with less stress on the hinges over the   A 2 year manufacturer’s warranty applies to
                                              years. Also an essential safety feature, they      kitchen accessories.
                                              prevent fingers being slammed in doors.

9 | THE ESSENTIAL RANGE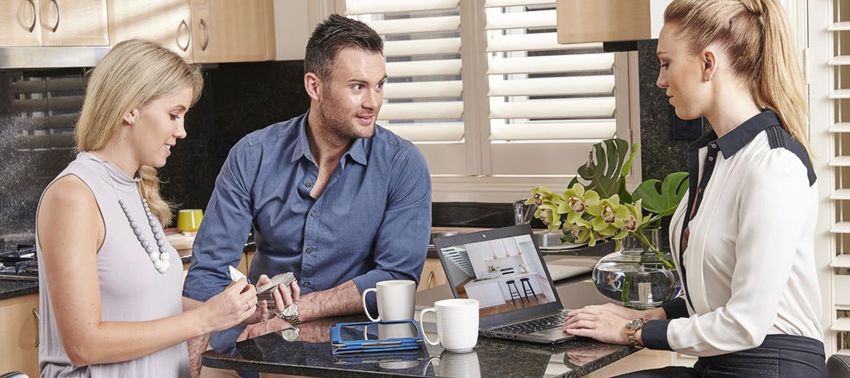
SLATE (D)

CORSICA GLOSS (B)

     7-F-15
let’s talk
DESIGNER VISIT
Getting started is simple. Essential range includes a free design consultation either at your home or in one of our
showrooms with plans, at a time that suits you. Whether you’re brimming with ideas or just lots of questions, we’ll work
with you to plan the perfect kitchen for your needs.
AT YOUR APPOINTMENT, YOUR DESIGNER WILL:
• Discuss your needs and ideas around style and functionality
• Share the latest in international and local kitchen design trends
• Show you colour options and material swatches
• Measure your kitchen space and note any special requirements
• Provide on the spot pricing based on your kitchen preferences and discuss a range of
finance options.
When you're ready to go ahead, we'll start drawing up your kitchen plans,
to make sure you're 100% happy with the final design.
11 | THE ESSENTIAL RANGESLATE (D)
CORSICA GLOSS (B)
7-F-15a layout to love
M A K I N G T H E M O S T O F Y O U R S PA C E
GET TO KNOW SOME CLASSIC KITCHEN LAYOUTS.
When you’re planning a kitchen, keep in mind the ‘Working Triangle’. It’s the distance between the kitchen spaces you use
most, such as the stove, sink and fridge areas. See which one works best for you.
THE STRAIGHT LINE THE GALLEY
Pressed for room? This design makes the Want more workspace? Two long counters give
most of your bench space, making it ideal for you ample room for food prep, serving and
apartments and smaller houses. Appliances storage. You have the option to add bar stools
are tucked away under the counter. Ample at one end of the island, creating a breakfast
shelving sits above. It’s compact, neat and area for the kids or a space for guests to mingle
yet roomy enough to accommodate even the in while you’re busy in the kitchen.
most creative cook.
THE L-SHAPE THE U-SHAPE
Open plan area? This popular layout gives Loads of space? This layout gives you more
you bench space on two adjoining walls, bench space and cupboard storage. Ideal for
freeing up room for a dining table or larger rooms, bigger families and budding
open-plan entertaining. chefs who enjoy a larger bench area and want
extra storage for kitchen gadgets.
13 | THE ESSENTIAL RANGESL ATE (D)
SNOW (D)
BLANCO MATRIX (B)
7-F-15cabi n et r y
E N D PA N E L S A N D C AV I T I E S
PANELS
There are five types of panel you can install to give your new kitchen a clean finish. Each panel serves a different purpose.
BASE END PANEL ISLAND BACK PANEL FRIDGE CAVITY
Finishing exposed sides of base cabinets: or can be placed either Finishing the cabinet backs of an island bench. If your fridge is adjacent to a wall, allow sufficient space for
side of the dishwasher cavity. the fridge door to open fully. Use wall panel provided to make
860(h) x 1200(w)
space wider if required.
860(h) x 580(d)
You can also choose to mount an overhead fridge cabinet
FILLERS between two pantry end panels.
WALL END PANEL Filler panels are also included. Depending on your design, these
Finishing exposed sides of wall cabinets; used as filler can be cut down to suit a space where a void is required. These
panels (after cutting). are provided as end panels and will need to be cut to suit the space
NEED ASSISTANCE?
320(d) x 605/720(h)
720(h)/605(h) x 320(d)
KICKBOARD FOR FURTHER DETAILS, CHECK OUT
THE CABINET MATRIX ON THE FREEDOM
Hides adjustable feet of the base and pantry cabinets. KITCHENS WEBSITE.
PANTRY END PANEL 140(h) x 2400(w) IF YOU STILL NEED FURTHER ASSISTANCE,
Finishing exposed sides of pantry cabinets to create a fridge box PLEASE CONTACT OUR CUSTOMER
(the sides of the fridge wall cabinet); used as filler panels. SERVICE TEAM ON 1300 553 748
For the benchtop to sit flush with the front of the pantry, allow
TALL UNITS SERVICE@FREEDOMKITCHENS.COM.AU
a 20mm void between wall and pantry. Remember to move When installing tall units, if you require a benchtop to sit flush
adjustable legs 20mm back so the kickboard lines up with the you will need to pull it off the wall 20mm to align with your
adjacent cabinet. Note the panel can be cut down in height if benchtops and end panels.
your preference is for the kickboard to run under, creating a
streamline look.
2204(h) x 600(d)
DISHWASHER CAVITY
Leave a space of 605mm or more between two base cabinets.
15 | THE ESSENTIAL RANGEimportant to know
APPLIANCES
Your designer can offer a range of appliances to fit your Essential Kitchen. Should you choose to keep your existing appliances or purchase elsewhere,
they will need to fit the requirements below.
APPLIANCE REQUIRED MAX DIMENSIONS (mm) APPLIANCE REQUIRED MAX DIMENSIONS (mm)
600mm Slideout Motor (Exact height required) 560w x 176h x 281d 60CM Cut out - 498w x 260d
Yes / No Fascia – 599w x 40h Undermount Yes / No Rim - 600w x 296d
Rangehood
900mm Slideout Motor (Exact height required) 860w x 176h x 281d 90CM Cut out - 865w 260d
Yes / No Fascia – 899w x 40h Undermount Yes / No Rim - 900w x 296d
Rangehood
600mm Canopy 600w 900mm Canopy 900w
Yes / No Yes / No
60cm Oven 595w x 595h x 560d 60cm 888h x 594w x 560d,
1202 Wall Oven Yes / No Double Oven Yes / No NOTE: 1000h if no fascia panels used
720 Wall Oven
90cm Oven 895w x 590h x 552d Fridge Fit within
Yes / No NOTE: if using 2 Oven Fascia panels max oven Yes / No .................................................................... wide space
height is 465h .................................................................... high space
600mm Cooktop 600w 900mm Cooktop 900w
Yes / No Yes / No
600mm Stove 600w 900mm Stove 900w
Yes / No Yes / No
Microwave Sink To suit ................................................................ wide cabinet
(Floor cabinet) Yes / No Yes / No NOTE: Butler sink cannot be accommodated.
568w x 584d Internal space.
Undermount sink for stone benchtops only (not laminate).
NOTE: Floor cabinet is not rear vented so
convection or trim kit not recommended.
Microwave Dishwasher Space 870 x 600 Freestanding space
(Wall Oven) 568w x 470h Internal space.
Yes / No Dishwasher Yes / No 600w x 720h Integrated panel size only
Integratedst y li s h select
DOORS & BENCHTOPS
i o ns
DOORS
SNOW SAHARA SLATE LILY PARIS CATHERINE FROST ALUMINIUM FRAME
LAMINATE BENCHTOPS
PRIME OAK MATT TUNISIA STONE MATERA CORSICA GLOSS ATHENA STONE MATERA GREY CEMENT MATERA CALACUTTA GREY
17 | THE ESSENTIAL RANGEf i n i s hi n g
HANDLES & ACCESSORIES
t o uches
HANDLES
The right handles make all the difference. Your choice of handle can complete the style and overall look of your kitchen. Choose from our wide selection below:
5-F-08 4-F-04 5-F-13
5-F-12
7-F-15 5-F-14 5-F-09
5-F-10
4-F-07 7-F-16 4-F-06 5-F-11 4-F-05
ACCESSORIES
Sometimes it’s the things that you don’t see which make the biggest difference to how well your kitchen works for you.
Ask our designers about our range of accessories including cutlery drawers, pantries and bins that will transform your kitchen space.
18 | THE ESSENTIAL RANGEr e ad t h i s
I N S TA L L AT I O N G U I D E
Read through this guide to get an
overview of the installation process.
It will give you an idea of the job
that your qualified installer will be
doing with your Essential range
kitchen, and the prep you will need
to do before their first day on site.
Also supply this Installation Guide
to your tradesperson ahead of time,
so they know what to expect.
lets get
S TA R T E Dbef o r e
I N S TA L L AT I O N
You’ve put the finishing touches on your plan. You’ve chosen your appliances.
And you can’t wait to get to work on your new kitchen. ARE YOUR
But before you organise your installation, be aware of the process. TRADESPEOPLE
QUALIFIED?
DO YOUR HOMEWORK Bumping out an old kitchen and installing
Kitchen installation requires a lot of prep, and it pays to understand the process before a new one requires a certain level of skill.
you lock in your trades. The best place to start is right here – reading this guide from Any plumbing, gas and electrical work
front to back. If you’re in doubt about anything, call us or contact a licensed professional. such as disconnecting a sink and installing
cooktops and ovens, must be done by a
qualified tradesperson. Make sure you
use licensed electricians and plumbers
FURTHER ASSISTANCE who can supply you with a certificate of
OUR CUSTOMER SERVICE TEAM CAN POINT YOU IN THE RIGHT compliance. That way, you’ll know the
DIRECTION FOR ASSISTANCE. work meets Australian regulations and
CONTACT US ON 1300 553 748 OR SERVICE@FREEDOMKITCHENS.COM.AU your insurance won’t be at risk.
20 | THE ESSENTIAL RANGEbef o r e i n st a
P R E P T H E S PA C E
llat i o n
LET’S GET PREPPING!
Review our pointers to prepare your kitchen area - you can do this part yourself or hire a tradesperson.
CHECK THE WALLS AND FLOORS FOR PLUMB AND LEVEL
To properly install an Essential Kitchen, your floors must be flat and level. If you find some areas that are significantly uneven, hire a professional tradesperson
to fix these problem areas first. They’ll let you know how much work is required.
LOCATING WALL STUDS
BEFORE YOU REMOVE YOUR OLD KITCHEN Be aware that your tradesperson will need to use your
wall studs as anchor points for your base and wall
• Make sure you’ve had the electricity, gas and water disconnected by a
cabinets, so make sure the walls are clear of hangings
licensed professional.
or clutter. To find the wall studs, they should use an
• Hire a skip. eletronic studfinder, which works on all kinds of walls.
• When dismantling the old kitchen, remove the base cabinets and benchtops first.
This makes it easier to take down the wall cabinets.
• Get a pull bar (or crowbar), hammer and screwdriver to make removal easier.
21 | THE ESSENTIAL RANGEinstaller’s gui de
C H E C K & M E A S U R E T H E S PA C E
1. CHECK THE WALLS 2. C HECK ANY
Use a spirit level to check the walls. Mark any RIGHT-ANGLED
uneven spots or holes. When you mount the
wall cabinets, you might need a packer to fill the CORNERS
gap so that the cabinet and wall line up straight. Use your set square to check what should be
Wood or masonite pieces make ideal packers. right-angled corners. If there’s a gap between
the wall and the set square greater than 6mm,
you may need to call for professional assistance.
If you have walls opposite each other, measure
the distance between them at multiple points to
check whether the walls are parallel.
3. CHECK THE FLOOR 4. M EASURE
Using your spirit level, check the parts of the AND MARK
floor where you plan on installing the base
cabinets. Make a mark on the wall with a pen or Refer to your kitchen plan and measure the
pencil, indicating the highest and lowest sections position of your cabinets. Mark their location
of the floor. with a pen or pencil. This will help you work out
how everything’s going to fit together.
22 | THE ESSENTIAL RANGEinstaller’s gui de
T H E B A S E A N D PA N T R Y C A B I N E T S
HOW TO ASSEMBLE THE BASE AND PANTRY CABINETS
In each pack you’ll find step-by-step instructions. Be sure to read them before you start, then follow each instruction to
assemble the cabinets. If you get stuck at any point, call our customer service team during work hours Monday-Friday.
2. I NSTALL THE
CORNER
CABINET FIRST
TIP
SAVE TIME, DON’T
If your kitchen has a corner, start there.
Position the cabinet and adjust the legs until PAINT WHERE YOUR
the cabinet matches up with the line you CABINETS WILL BE
marked out in Step One.
Check the position with a spirit level. If you have
plaster walls, measure out from the corner to
the wall studs and mark where they line up onto STUCK ON SOMETHING?
the base cabinet. You’ll notice that the ends of
the corner cabinet extend past the back panel. Call us on 1300 553 748 or email
This is to take into account that your walls may service@freedomkitchens.com.au
1. SET THE HEIGHT not be square.
3. L EVELLING &
If your walls are not square, you can plane the
Earlier on, you marked the highest point of the
end panels to ensure the front of the cabinet is SECURING THE
kitchen floor(refer to Prepping your space, Step
3). Now mark the wall from that point at 860mm.
square. If planing isn’t required, there will be an
insignificant gap between the wall and the cabinet.
CABINETS
Draw a level line from this new point to where Position the cabinet back into the corner,
you’ll be putting in your base cabinets. This line will If there’s no corner cabinet in your kitchen design, keeping it level. Using the supplied 60mm
be used to see the heights of the cabinets. then start with an end cabinet. Using a small drill screws, fix the cabinet into the wall studs. Two
bit (2-3mm), drill pilot holes into the cabinet at screws should be enough to hold each cabinet in
Adjustable legs and uneven floors the points you have marked that line up. place. Check with the spirit level and if necessary,
Set your adjustable legs to a maximum of 140mm, reposition the cabinet before moving on.
as kickboards are 140mm high. If your floors are
uneven, cut your kickboards to suit.
23 | THE ESSENTIAL RANGEinstaller’s gui de
T H E B A S E A N D PA N T R Y C A B I N E T S
4. S ECURING 5. P REPARING THE
THE CABINETS BASE CABINET
As before, mark, drill and line up the cabinet and The base cabinet that will contain the kitchen
fix with screws. Temporarily fasten the cabinets sink should be prepared prior to installing. Holes
together with clamps. Use the small drill bit to for water pipes and the drain can be cut in either
make two pilot holes in the inside of the cabinet, the cabinet base or back panel. You can do this
top and bottom as shown in the image. 30mm in one of two ways: you can either use a holesaw
screws (supplied) can then be used to join the drill bit, or you can use a jigsaw.
two cabinets together.
6. D ISHWASHER 7. ATTACH THE
CAVITY HINGE AND
If you’re installing a dishwasher, make sure you MOUNTING PLATES
leave enough space for this. The standard space
in width is 600mm. In the packs that came with each cabinet,
you should find the hinge mounting plates.
Press them into the pre-drilled hole, then
tighten the screws.
THAT’S THE BASE INSTALLATION DONE.
24 | THE ESSENTIAL RANGEinstaller’s gui de
T H E WA L L C A B I N E T S
ASSEMBLING THE WALL CABINETS
In each pack you’ll find step-by-step instructions. Once again, read them before you start. Follow each instruction to
assemble the cabinets.
1. SET THE HEIGHT
Start by affixing a timber strip to the wall. The piece of timber
needs to be about 18x90mm. This is going to give you an accurate
guide for positioning and fixing the cabinets, and will even make it
easier to hold them in place.
To find the correct position to put your timber strip, start by marking
the wall 1344mm from the top of the base cabinets. Once you have
your line marked, mark a second line below the first which will be the
height of your wall cabinet (592/720). Fix your strip directly below
the line ensuring you use the spirit level to check the strip is level.
The strip is now the bottom line of your wall cabinets and will help
support the cabinets during fitting. Your first line will also ensure your
wall cabinets align with any pantries used.
An important number
2. S TART THE CORNER 3. S ECURE THE CABINET
Keep this in mind when setting the kitchen height. Australian
regulations state that the distance between the bottom of your If your kitchen has one, it’s really going to make the installation Position the cabinet on top of the timber strip. Then, using
rangehood and the top of your cooktop must be a minimum of easier. If you have plaster walls, measure out from the corner to the supplied 60mm screws, fix the cabinet into place. In most
600mm (electric) and 650mm (for glass). your marked studs, and then make the equivalent measurements cases, the screws per cabinet should be enough. Check the
on your assembled wall cabinet. cabinet’s placement with the spirit level and if you need to,
make any adjustments.
Then, using a 2-3mm drill bit make pilot holes at the marker points
aligned with the wall studs. At all times use the spirit level to check the cabinets for plumb
and level before securing the cabinet to the walls.
25 | THE ESSENTIAL RANGEinstaller’s gui de
T H E WA L L C A B I N E T S
4. RANGEHOOD 5. H ANG THE NEXT CABINET
If installing an integrated box canopy into a cabinet, cut out Now you have a process to follow, mark, drill and line up the cabinet, and fix with screws.
the motor shape starting from the back, then raise the shelf
to sit above the rangehood. If you use a slide-out rangehood cabinet
You will need wall end panels either side. Also, remember the cabinet is shorter and should align with the other wall cabinets at the top.
6. S ECURING THE CABINETS
Temporarily fasten the cabinets together with clamps. Then, using a 2-3mm drill bit, drill two pilot holes from the inside of the cabinet
out (one top and one at the bottom). Use the 30mm screw supplied to join the two cabinets together.
7. REPEAT STEP 5
Repeat the process until you’ve installed all the cabinets, making sure to align each cabinet with the last one.
8. ATTACH THE HINGE AND MOUNTING PLATES
In the packs included with each cabinet, you should find the hinge mounting plates. Press them into the pre-drilled hole,
Rangehood motor Rangehood then tighten the screws.
Cut out base shelf to suit rangehood Take down the timber strip, and that’s it. You should be looking at a set of correctly aligned and secured kitchen wall cabinets.
motor size and raise shelf to sit above
the rangehood body
THAT’S THE WALL CABINETS DONE.
26 | THE ESSENTIAL RANGEinstaller’s gui de
THE BENCHTOPS AND SINK
LAMINATE BENCHTOPS
These instructions refer to the installation of The Essential Kitchen Range laminate benchtops. If you’re installing benchtops
of a different type, consult the instructions supplied by their manufacturer.
1. C UTTING 2. P
OSITION YOUR 3. SINK FITTING 4. C OOKTOP FITTING
BENCHTOPS TO FIT BENCHTOPS To help you fit the sink into place, you will have This process will be almost exactly the same as
been provided with a sink template to mark out the way you installed the sink, making your cut
(IF NEEDED) Make sure everything is straight before you start the area to cut. The template is slightly smaller based on the template or instructions that have
If you’ve bought benchtop blanks and are cutting fixing them to the cabinets. than the actual sink, both to stop the sink from been supplied with your cooktop. Take your time
them to fit your kitchen then start by measuring Screw the benchtops into place with the supplied pulling through the bench and to hide the cut by when using the jigsaw to ensure an even cut.
and marking the benchtops, based on your 30mm screws. Screw up and through the front and allowing the edges of the sink to sit over it.
And that’s your benchtops, sink and cooktop
kitchen cabinet measurements. back rail within the base panels (see image above). Once you have marked out the cutting space installed. Only the finishing touches to go.
If space permits, you can choose to leave your If you have two benchtops meeting at a corner using your template, take a drill with a 10mm
NB: The front and back rails will need to be cut
benchtops with a slight over-hang (or line them with a mitre cut join, benchtop connectors can bit and make a hole somewhere within the area.
before fitting your sink and cooktop.
flush with the end panels). be used to pull the tops together so you can fix From that hole, slowly cut out the required shape
them in place with screws. with a jigsaw.
Your benchtops may need to be scribed to suit
your walls to ensure your benchtops are parallel Make sure your benchtops are joined before From there it’s just a matter of fitting the sink
to the front of your cabinets. fixing to the cabinets into place with the supplied clips and tape. If
you need to make any adjustments, make them
27 | THE ESSENTIAL RANGE
before tightening the clips.preparing for
STONE BENCHTOPS
When you order stone benchtops for your Essential Kitchen we request that you follow the guidelines below to ensure
that the benchtop supplier can correctly install your new benchtop ensuring the stone warranty will apply to your tops.
A fabricator will visit your home to measure once the kitchen cabinetry has been installed.
• The top of cabinets need to be level; special attention is required if stone tops meet window areas to ensure tops will fit in these areas.
• Cabinetry should be installed so that the front of cabinetry is in a straight line and square at any corners if an L-shape kitchen.
• All cabinets need to be fixed to adjacent cabinets and to walls or the floor securely prior to stone templating.
• All panels, fillers and doors need to be fitted to cabinetry prior to stone templating.
• Sinks and hotplates need to be on site and checked for fit in cabinetry any adjustment required should be done. Your sink and hotplate position will be
recorded at stone templating; note that a minimum distance of 50mm from edge of stone to any cut out is required.
• Please ensure that openings for upright stoves or dishwashers are correct and that cupboards are in a straight line across these openings.
• Any void areas may need cleats on walls to support and carry stone tops; these will need to be fitted level with cabinetry prior to stone templating.
• Any appliance or other type of cupboard that sits on top of the stone tops should be left off, and installed after the stone tops go in.
• If the above points are not met the site checker will explain to you the issues and why site check cannot happen on that day. This will incur another site
check fee once adjustments have been made.
• Installation of your stone benchtop will occur 10 days from check measure.
THAT’S THE BENCHTOPS DONE.
28 | THE ESSENTIAL RANGEinstaller’s gui de
FINISHING THE KITCHEN
NEARLY THERE
You've covered the hard work - well done! Now it's time to move to the finishing and fitting steps of the installation process. In this section,
we detail how to install the kickboards and handles plus we share some tips for installing other items, including doors.
Some of these items will have been supplied with their own instructions, but if you misplace the instructions, or get stuck at any point,
please call/email our customer service team during work hours Monday-Friday on 1300 553 748 or service@freedomkitchens.com.au.
ACCESSORIES, DOORS AND DRAWER FRONTS
Install any accessories before installing the doors and drawer fronts. These could be items like pull out bins, tea towel holders, and soft close fittings for
doors and drawers. Door and drawer front installation instructions will have been supplied as a separate document to this one. Refer to them for installation
guidelines. While installing doors, leave the protective film on the doors. Remove it after drilling the holes for the handles/knobs.
29 | THE ESSENTIAL RANGEinstaller’s gui de
FINISHING THE KITCHEN
INSTALLING KICKBOARDS
1. MEASURE AND CUT 2. FASTER AND PRESS
You may need to cut the kickboards to suit Adjustable leg clips will have been supplied
your cabinet widths and height or the lie of the in the hardware packs. Position these in line
floor. Kickboards are 140mm high, so measure with the cabinets’ leg and then screw these to
the height of the adjustable legs (including the the kickboards. Once all the clips are securely
glide) and if necessary, scribe your kickboards fastened, line the kickboard up and press them
to ensure a snug fit. into place.
INSTALLING HANDLES & KNOBS
2. M
ARK THE 3. D RILL AND FIX
POSITION INTO POSITION
Use your handle template for quick installation, Double check your measurements before you
if not take your tape measure and measure from begin. Use a small drill bit, only slightly larger
the top of the door or drawer to where you want than the screws, to make the hole then screw
the first hole. Mark with a horizontal line and handles into place with a screwdriver.
then repeat with the second hole. Repeat until all handles are fixed into place.
Make sure these marks line up with the exact Make any adjustments to the alignment
centre of where the hole needs to be. according to the assembly instructions included
with your door and drawers.
With your set square mark the measurement from
the edge of the door. Run your set square down to
1. F IND THE your marked handle position of the holes.
IDEAL POSITION When done correctly, the horizontal and vertical
marks should intersect at the exact drilling point.
Handle positioning is largely a personal
preference. Some like their handles vertical,
whilst others prefer them horizontal.
30 | THE ESSENTIAL RANGElet’s go
TA K E T H E N E X T S T E P
BOOK YOUR KITCHEN
DESIGN APPOINTMENT NOW
1800 113 733
A kitchen designer will visit you in your home, at a time
that suits you, including after hours or on the weekend.
During your appointment your kitchen designer will:
• Measure your kitchen
• Discuss your style, needs and budget
• Show you colours and material swatches
• Provide on the spot pricing, special offers and interest
free finance options.
ASK ABOUT OUR Apply for interest free finance online before you plan your kitchen and enjoy:
• Rapid approval — standard applications can be made during the design appointment
36 MONTH INTEREST • Flexibility – borrow up to $30,000
FREE OFFER!* • 24/7 online account access
*Annual fee and T&Cs apply.
31 | THE ESSENTIAL RANGEYou can also read