Fix for Canon Pixma IP4000R Error Code 5C00
←
→
Page content transcription
If your browser does not render page correctly, please read the page content below
Fix for Canon Pixma IP4000R Error Code 5C00
                                              By Bret A. Bennett, July 2011

A couple weeks ago my Canon Pixma IP4000R would make a loud clicking or popping noise when it was either done or
staring a print job. Another way to describe the sound was like plastic gear teeth stripping. Trying to print double sided
would also induce the sound. Immediately after the noise which would last perhaps 4 to 5 seconds, a printer dialog error
would pop up and say there was a problem with the printer, the job was canceled, and to turn the printer off and on
again.

My first step was to disassemble the printer so I could determine exactly where the clicking noise was coming from.
Druckerchannel has a very nice disassembly instructional for removing the sides, top and bottom panels at
http://www.druckerchannel.de/artikel.php?ID=1831&seite=1&t=panic_waste_ink_tank_full . Thank you
Druckerchannel.

The 5C00 error is well documented on the web as a “purge tank” error. The purge tank is the absorbent sponges (or
pads) in the bottom of the printer that absorbs ink from normal print head maintenance and cleaning jobs. Error 5C00 is
usually seen when the tank (ie. pads) starts to get somewhat full and prevent the “purge unit” from being able to
vacuum a little ink from the print head. The purge unit consists of several moving parts (including a pump) that sit under
the print head when it is parked on the right side of the printer. Before I begin to discuss individual parts, here is an
unmarked top view of the purge unit area: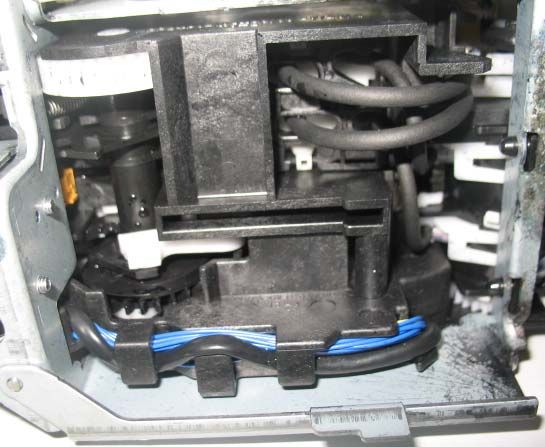
Here is the marked-up top view of the purge unit area that I will use for further discussion:

Incidentally, Figure 1 shows a top view of the purge unit outlined in red:

Figure 1

Also: I am not always sure of the exact name of the parts. I hope the names I chose are good enough for this
instructional.

When I operated the printer with the covers off, the loud clicking noise was clearly coming from a gear (see the yellow
box in Figure 1). This gear moves the print head “wiper” (green boxes in Figure 1) forward across the print head when
the purge vacuum pads (blue box in Figure 1) drop down. Fortunately, there was no apparent damage to the gear’s
teeth.

To make a long story short, the print head wiper’s guides (orange boxes in Figure 1) had become coated with semi-solid
ink (thick like auto grease). These guides are simply black plastic flats that are part of the purge tank assembly case. The
clicking noise was occurring because the wiper (which is spring loaded from the rear) was not snapping back rearward
fast enough during the print head priming/wiping process. Again, the wiper is the green boxed area in Figure 1. Please
read on . . .

When the wiper moves to its rearward position, it also has a lower extension “lever” that can be seen under the printer.
See the red box in Figure 2 below:
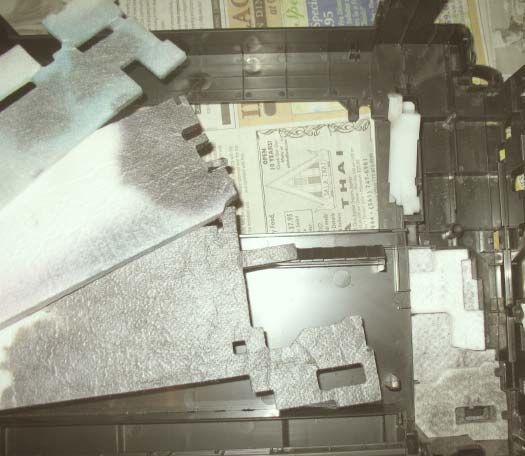
Figure 2

This lever has some sort of molded-in protrusion/pin that interfaces with the right side of the “clicking gear” (that I show
in the yellow box in Figure 1). When this lever is not moving back in tandem with the print head wiper (ie. btw, they’re
actually the same solid piece of white plastic/nylon), you get the loud clicking noise and the on-screen 5C00 error. Now
the fix:

Notice: The following fix requires physical dexterity. Additionally, it’s possible to ruin your printer or stain your
sink/clothing/skin by improper execution of my procedure. If you don’t want stained skin (only lasts a couple days),
where suitable gloves. Now that you have been advised and warned, we’ll happily proceed:
1) Remove the ink cartridges (store them in a bowl in case some ink wants to run out). Remove the print head (lift
the lever and lift out). Make sure the AC cable is not plugged or even near water (just had to say that in case an
idiot is trying to do this). Now place the printer “engine” in a sink with the right purge unit side an inch or so
lower than the left side of the printer. I laid the right side of the printer on the sink edge and used a plastic bowl
upside down in the sink to rest the left side of the printer. We want the left side of the unit lower for draining
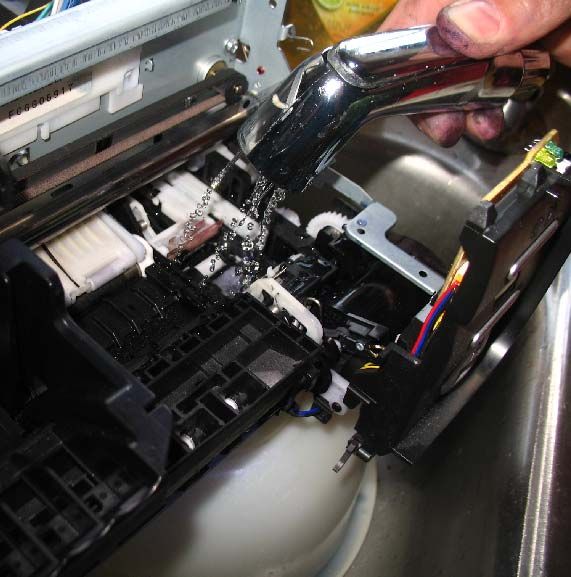
purposes. See Figure 3 below:
Figure 3
2) Position a kitchen sink sprayer an inch or two exactly over the purge unit guides and wipers. Starting out with no
water pressure at the sink’s valve or in the sprayer valve, depress the sprayer valve all the way (see my thumb is
pressed down in Figure 3) and very slowly increase the water pressure on the sink’s valve until it begins to trickle
out the sprayer as seen in Figure 3.
At this point you are probably thinking water and raw electronics don’t usually mix well, and you are generally
correct. Fortunately, the only electronics very near the purge unit are the pump (in front of it), some blue wires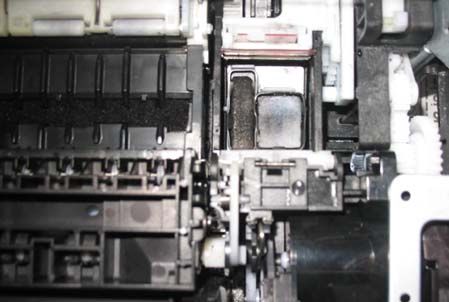
(running under it), and a photo sensor on a small stand-alone pc board (see yellow box in Figure 2).

3) Use a brush suitable for electronics and brush off the old ink mess. Slowly flush it straight down through the
   printer with the water sprayer. I used an IBM printer “typewriter ball” brush that has medium stiff plastic
   bristles don’t fall off the brush (ie. you don’t want any bristles to remain in the assembly). Note that all the
   Figures in this document are “post repair” and show that I thoroughly removed all ink residue (except from
   normal staining) from the purge unit.

4) If you can be equally as careful and agile with the sprayer, you can also flush through old ink that accumulates in
   the foam under the print head carriage area (see the red box in Figure 4 below). I did not brush that foam, only
   flushed it.

    Figure 4

    Note above in Figure 4 that my brushing had moved the left black ink pad slightly forward out of its soft rubber
    basin (see yellow box). Now see Figure 5 below where I have made sure that the ink pads are centered in place
    and have the little rubber “clamps” over top of the pads, thus securing the pads.

    Figure 5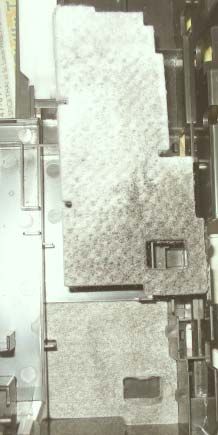
5) Although not pictured in Figure 4, all the way on the left side of this print head carriage foam area, there is a
   little clear plastic ink “drain chute” (that drains forward and down) that you can clean up while you’re there.

6) When done with steps 1 – 5, stop the flow of water and carefully remove the sprayer making certain not to drip
   any water whatsoever into areas of the print engine that have electronic circuitry (ie. logic board, switches, etc.).

7) If you have the strength (or a helper), you can tilt the print engine about 45°up on the plastic bowl in the sink
   and slowly spray off any significant ink runoff that may be still clinking to parts under the purge or carriage units
   unit. Again, with the exception of that photo sensor (see yellow box in Figure 2), keep the water off the
   electronics

8) With all the top and bottom flushing done, use a pressurized air duster can and get the purge unit and carriage
   drain areas dried off. Use common sense and do not blow the water upwards though the printer engine or
   towards any electronics. I gave some extra attention to blowing off that that photo sensor and its wire
   connector (see yellow box in figure 2). After the air can, and just for good measure, I also used an air compressor
   on it and let it sit for 24 hours to completely dry out. The compressor might have been overkill, but I had it and
   used it.

9) Before you reassemble the printer covers, plug the printer in the utility AC and press the switch where your
   printer power button would normally be found. Verify here is no more gear “clicking”. I suppose that if your
   5C00 error was only due to a clogged purge unit or overflowed purge tank pads, now would be a good time to
   plug the printer engine into a PC, put print heads and ink tanks in temporarily, and see if your purge tank
   “overflow” problem was resolved.

10) Since the bottom case is already off, clean the stained waste tank absorbent pads. I had already done this a
    couple years ago after I tested a new external “continuous” ink tank product. Unfortunately, it leaked about ten
    ounces of ink into the printer. For reassembly reference, the pads are stacked in Figure 6 and Figure 7 below to
    show you their correct order:

    Figure 6                                                                   Figure 7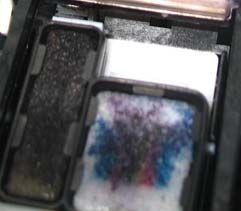
Although not shown in Figure 6, there is a white pad that runs from front to back on the left side. Could be
    considered pad# 1. It has never seen one drop of ink. Perhaps it’s just an overflow pad for the longer “left-right
    oriented” pads shown in Figure 6 that are on top of it.

    Still looking at Figure 6, you see the longer “left-right oriented” pads. I have shown them in a staggered fashion
    to show how they are stacked.

    On the far right in Figure 6, we see the top three of the smaller pads. There are two small ones that sit on top of
    a larger one. In Figure 7, I have removed the two smaller pads. Now you see larger one (that I moved towards
    the top of the picture). You can also see the almost square pad (in place at the bottom of the picture) that is at
    the bottom of the tank. Do not miss removing this one at the bottom tank! Before removal and cleaning, it is
    solid black and is very easy to overlook.

    How to clean these pads is well documented on the web, but basically you carefully remove them from the
    bottom cover, then hold them and run cool water over/through them until no ink comes out (about 15 minutes
    per pad). Do not attempt to wring them out or squeeze the life out of them. To dry them, I laid them out on an
    old towel for a couple hours until most of the water (and some residual ink) had wicked out into the towel. Then
    I let them air dry for a couple days (a breeze and sunshine helps too). A web post I saw says they put them in a
    100°F oven for a couple hours, but I haven’t tried that method (ie. don’t want to melt or burn what I can’t
    replace).

11) Reassemble the printer cover cases and plug it back in to the utility AC and network (or USB cable).

12) Since we’ve thoroughly cleaned the waste tank pads, reset the “waste ink counter” per Druckerchannel’s “Step
    6” (see my 2nd paragraph at the beginning of this document).

                                 DID THIS FIX-IT HELP YOU SOLVE A PROBLEM?

                                       DID IT SAVE YOU TIME OR MONEY?

      If yes, please offer a small paypal contribution that you think is fair to bret@bretabennett.com at
                                      https://www.paypal.com/sendmoney

                 Thank You For Supporting “Shareware” Technical Authoring And Publishing!

                          Copyright © 2011 by Bret A. BENNETT. All rights reserved.
                     Reprints by permission only: Please contact bret@bretabennett.com .
                             (Reprints for personal use do not require permission)
                                   (Comments and corrections are welcome)
You can also read