FORD F150 2004- UP LSD INSTALLATION
←
→
Page content transcription
If your browser does not render page correctly, please read the page content below

FORD F150
   2004– UP
LSD INSTALLATION


Einbauanleitung                                     Installation Instructions
       LamboStyleDoors                                         LamboStyleDoors
   (Die Anleitung bezieht sich auf eine Fahrzeugseite –   (The instruction are to be used as a reference. Please repeat
                gültig aber für beide Seiten)                                     for both doors)

        Einbauvoraussetzungen:                                     Pre installation check list:
- Gutachten mit Fahrzeugdaten überprüft.                  - Double check vehicles data with TUV certificate
- Batterie abgeklemmt.                                    - Battery disconnected
- Vordere Stossstange demontiert.                         - Front bumper removed
- Vorderen Kotflügel demontiert.                          - Front fender removed
- Unfallfreies Fahrzeug.                                  - Vehicle must be accident free
- Radhausverkleidung vorhanden.                           - Vehicle must have inner fender cover

               Vorbereitungen:                                               Preparations:
    (Demontage nach Fahrzeughersteller-Richtlinien)          (Disassemble parts according to vehicle manufacturer
                                                                                specifications)

- Türfangband demontieren                                 - Disassemble the door stopper.
- Kabelsteckverbindung zwischen Tür                       - Disconnect the cable connector between chassis
  und A-Säule trennen                                       and door

- Tür demontieren.                                        - Disassemble the door.

- Türkabelbaum mit beigelegtem Kabelsatz verlängern - Extend the factory door wire harness with the en-
  (siehe Anlage „Kabelverlängerung“)                  closed extension kit (please see enclosure “wire har-
                                                      ness extension”)
- Kotflügelbearbeitung                                    - Modify the fender
  (siehe Anlage „Kotflügelbearbeitung“)                     (please see enclosure “modifying the fender”)
Safety Information:                                        !    Attention!

LSD door kits must be installed according to the vehicle-specific       An additional inside handle must be installed to simplify opening
instructions provided by LSD-Doors. The installation should be          and closing of the doors from seated position.
performed by an authorized dealer.
                                                                        White door lights must be disabled via removal of light bulbs or
When extending factory wire harness, follow the vehicle                 bulb sockets in accordance with Fig. 5.22 of ECE Reg. No. 48.
manufacturer's guidelines for cable repairs. When extending
CAN-bus, pay attention to the processes of rerouting, screening,        After installation of the LSD hinge system, reinstall original inner
and twisting (check vehicle manufacturer's specifications). Be          fender cover to keep LSD hinges free from debris.
careful not to damage any systems.
                                                                        Functionality of the vehicle comfort systems, e.g., central locking
After installation of the kit, side airbags (if any) should be tested   system (if any), must be checked at an authorized body shop.
for proper operation by an authorized dealer.

                                                                        Check functionality of all other systems and components
Performing final adjustments of the doors, make sure they close
                                                                        (loudspeakers, anti-theft systems, CAN-bus, window rollers,
and lock according to the OEM specifications (check original
                                                                        crash-sensors, driver seat memory, mirror heating/adjustment,
closing angles, locking positions, gaps, etc.).
                                                                        etc.) at an authorized body shop.

Be careful while working in the operating area of the doors and
                                                                        When adjusting the doors, be careful to place them in the proper
hinge system (be especially careful when working with a
                                                                        door openings not to cause any damage to other components.
partner or when there are other people in the working area).
                                                                        The processes of adjustment and testing must be performed
                                                                        with great attention.
All doors must be securely closed before setting vehicle into
motion. Driving with open doors is prohibited.
                                                                        If A-pillar or doors have been modified, use supplied chassis
                                                                        glue (if specified in the list and included in the set) for tight joint.
Do not mount heavy loudspeakers without increasing pressure
                                                                        Make sure that sealed surfaces are free from dust and grease
of the gas spring.
                                                                        before applying chassis glue. Proper door sealing will guarantee
                                                                        safety.
Adjust horizontal opening angle of the doors to the possible
maximum.
                                                                        Note: gas springs have been tested on standard doors. If your
                                                                        doors come with additional equipment, it may slightly modify their
The gas spring should hold your door at the maximum height              weight and you may need to order stronger or lighter gas spring
under all operating conditions. To guarantee that, choose gas           (additional costs may arise).
spring with the appropriate pressure level.
                                                                        Please note that the gas spring pressure may vary due to
Empty door storage compartments, otherwise all the objects              temperature, which will influence opening and closing force.
placed in there will fall as the door opens and the weight of the       Warranty claims will not be honored unless there is defect in
door will change, which may influence the gas spring operation.         material or workmanship.

WARNING: gas spring is under extreme pressure! Make sure
                                                                        When body work is performed, apply anti-corrosion covering
all mounting brackets are securely fastened in the right places.
                                                                        to all the modified surfaces according to the manufacturer’s
                                                                        guidelines.

               General instructions:                                    After the LSD kit installation, the doors opening angle is limited.
                                                                        The doors must be first carefully opened outwards and then
                                                                        upwards. When too much force is applied to the limiters/stop
A properly instructed partner will make the installation process
                                                                        points body parts may damage.
easier.

                                                                        The warranty does not cover damages caused by improper use,
Regular servicing of the doors and gas springs at a specialized         improper installation, or application of excessive force to the
body shop will expand their service life.                               limiters/stop points.

                                                                        All guidelines can be changed without prior notice. Editions can
                                                                        be found at w w w . l s d - d o o r s . c o m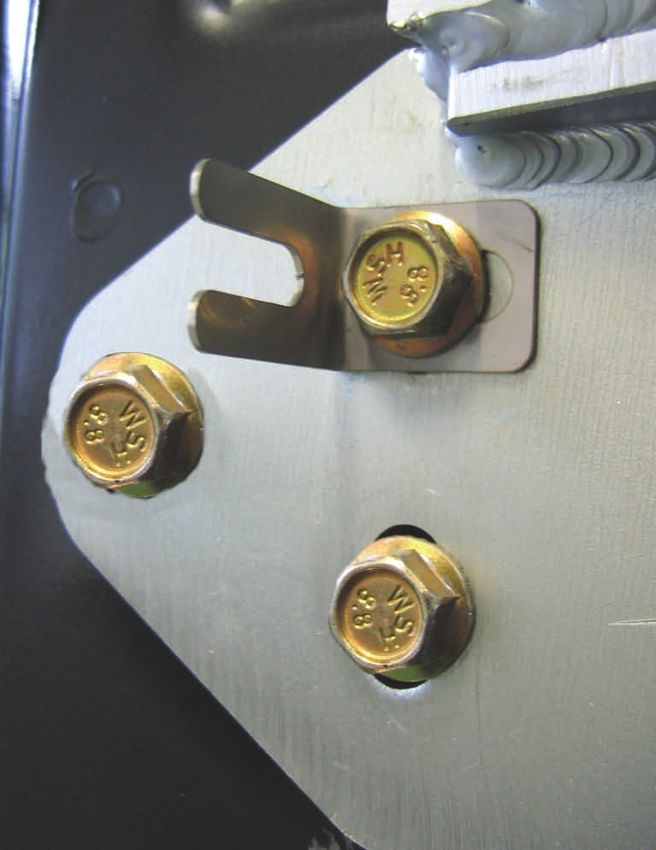
Stückliste (pro Fahrzeugseite)                         Hardware list (per vehicle side)

1x   A                     7X B                          1x C                        3x D

Sicherungsring /           Kabelbinder /                 Kabelbinder /               Unterlage /
Snap ring                  Cable ties                    Cable ties long             Shim

1x E                       1x F                          2x G                        1x H

                                                                                     2x Dünn /       1x Dick /
                                                                                     fine            flat

Unterlage /                Abdeckplatte A-Säule /        Unterlegscheibe /           Unterlage /
Spacer                     A-Pillar cover plate          Flat washer                 Shims

5x I                       1x J                          1x K                        4x L

                   M8x30                       M6x20                         M8x20                          M8
Sperrzahnschraube /        Sperrzahnschraube /           Sperrzahnschraube /         Sperrzahnmutter /
Serrated bolt              Serrated bolt                 Serrated bolt               Serrated nut

1x M                       2x N                          1x O                        3x   P

                                                    M6
Befestigungswinkel /       Sperrzahnmutter /             Befestigungswinkel /        Blechschraube /
Angle Bracket              Serrated nut                  Fender clip                 Self tapping srew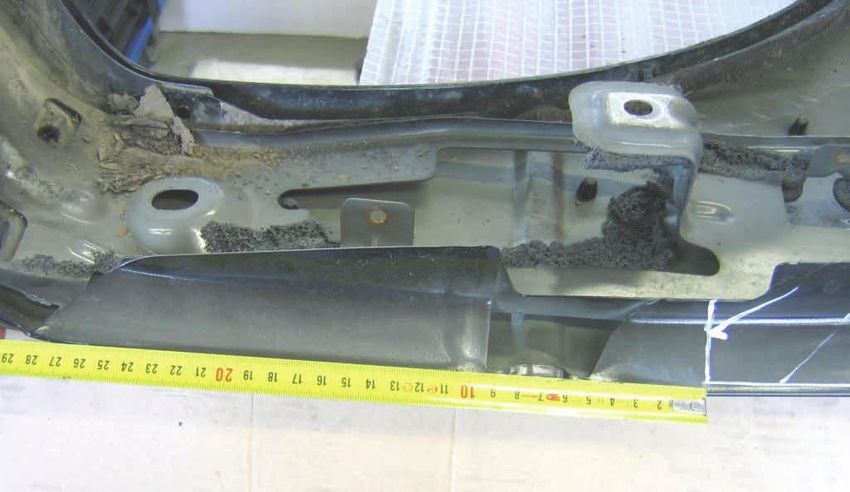
Stückliste (pro Fahrzeugseite)                      Hardware list (per vehicle side)

1x Q                           1x R                 1x S                        2x T

LSD-Türbeschlag /              LSD-Schwingarm /     LSD-Grundplatte /           Aufkleber /
LSD door system                LSD swing arm        LSD ground plate            Sticker

1x U                           1x V                 1x W

       Nr. 50050003 = 3100 N
       Nr. 50050013 = 2450 N
                                                                        M6x12
Gasdämpfer /                   Karosseriekleber /   Inbusschraube /
Gas damper                     Chassis glue         Allen srew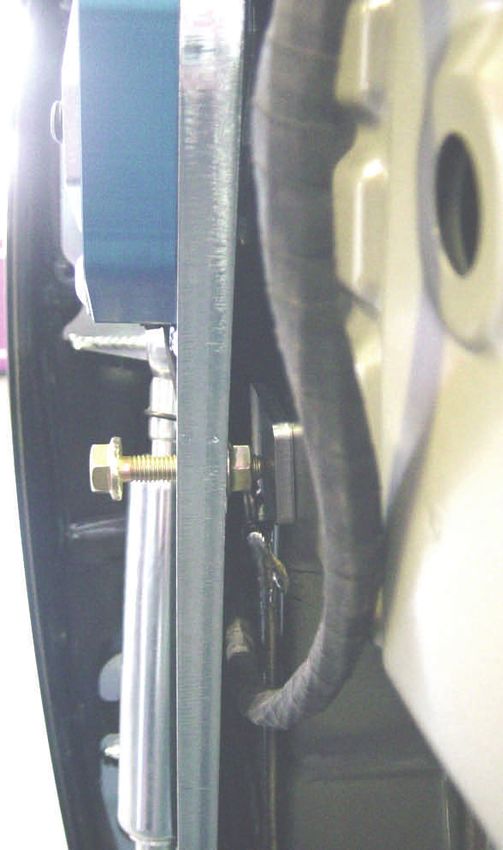
7
                                      9                                                   J+M+N
                                                                        2

                                                                                          3
             OEM
                                                    I
                                                                                     5
                                                4

                                            A

                                                                        8

                                                            A
                                           1

                                                            6
           OEM
                                                        I
                                  I
1. Einstellschraube - MAGIC STICK                               1. MAGIC STICK - lower adjustement screw
2. C-Profil                                                     2. M.A.R.A (Multiple - Axis - Rotational - Assembly)
3. 3. Befestigungspunk                                          3. 3rd ground plate mounting point
4. Gleitrolle                                                   4. Slide roller
5. Einstellschraube Begrenzung Öffnungswinkel                   5. Limiting adjustment screw
6. Unterer Kotflügelhalter                                      6. Bottom fender holder
7. Oberer Kotflügelhalter                                       7. Bottom fender holder
8. Obere Einstellschraube - MAGIC STICK                         8. MAGIC STICK - upper adjustement screw
9. Obere Fixierung                                              9. Top fixing
1.) Kotflügelhalter an der A-Säule entfernen.   1.) Remove the fender bracket at the a-pillar.

2.) Schwingarm (R) von der                                    2.) Disassemble the swing arm
Grundplatte (S) demontieren.                                  (R) off the chassis plate (S).

Abbildung nur symbolisch                                        Picture only for reference

                             R
                                                      S
Diese Schrauben entfernen!

Remove this screws!
3.) Nun kann die LSD-Grundplatte (S) an den         3.) Mount the LSD ground plate (S) to the origi-
originalen Befestigungspunkten mit den mitge-       nal hinge mounting holes /points on the chassis.
lieferten Schrauben (I) befestigt werden.           Use supplied bolts (I).

                                                I

  A-Säule /             S
  A-pillar

       L

                                I
    2xG
                                                I
Bei Fertigstellung:
Anzugsdrehmoment 27 Nm.

On completion: tightening
torque 20 ft - lb (27Nm).

Auf den Kabelverlauf achten.                                  I
(Siehe Punkt 22)

Please consider the wire harness
route. (See point 22)

Die Anzugsdrehmomente entnehmen Sie bitte            Please refer to the vehicle manufacturer for
den Unterlagen des Fahrzeugherstellers.              torque specifications.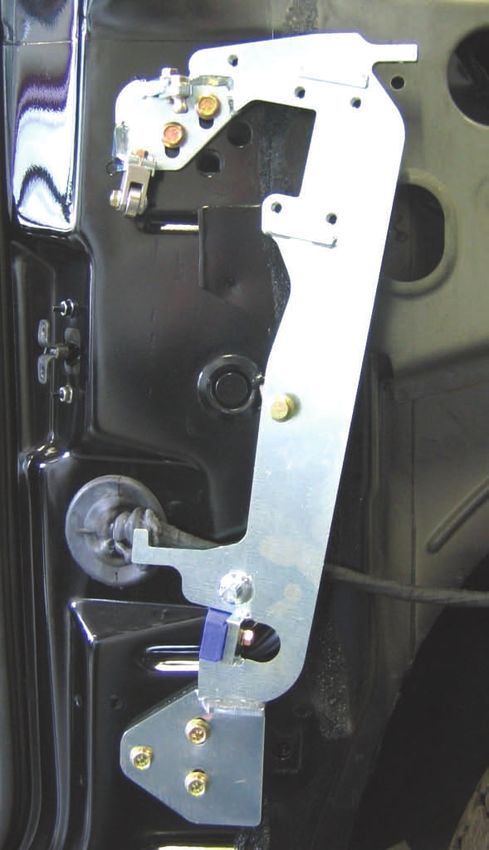
4.) Türkabelbaum einstecken und Original Kabel-   4.) Connect the door wire harness and close the
baumdurchführung mit der Abdeckung (F) und        extended cable harness lead-through hole with
Schrauben (P) verschließen (erforderliche Boh-    the supplied cover plate (F), and screws (P)
rung: Ø 2 mm) und zusätzlich mit Karosseriekle-   (required drilling: Ø 2 mm / 0,08 inches) and seal
ber (V) abdichten.                                it with chassis glue (V).

         P

                                       F

         P                                                         Fahrzeugforderseite

                                                                   Vehicle front side

     P

Auf den Kabelverlauf achten.                                   Please consider the wire harness
(Siehe Punkt 22)                                               route. (See point 22)
5.) LSD-Schwingarm (R) an den Original Schar- 5.) Now the LSD swing arm (R) has to be in-
nieraufnahmen mit den Original Schrauben oder stalled in the original mounting points on the
Original Muttern (OEM) befestigen. door with the original bolts or original nuts
(OEM).
OEM
Kabel
Cable
B
OEM
Die Anzugsdrehmomente Please refer to the vehicle manu-
entnehmen Sie bitte den facturer for torque specifications.
Unterlagen des Fahrzeug-
herstellers.6.) Türe an KFZ anbringen und 6.) Place the door back on the
sie dabei komplett schließen. car, and close the door com-
pletely.
TIPP: Dabei den Kugelkopf des
Magic Sticks (Einstellschraube) TIP/ADVISE: Use the lower
(1) als Führungspunkt verwen- adjustment screw, MAGIC
den, um die Frontseite der Türe STICK (1) as a point to guide
in die richtige Position zu füh- the front of door in the correct
ren. position.
7.) Schwingarm an der Grund- 7.) Attach the swing arm to the
platte mit den zuvor entfernten ground plate with the 4 included
Schrauben (4x) montieren und bolts and adjust the door via
mittels Verschieben des C- moving the swing arm to chas-
Profil (2) die Türe in Längsrich- sis plate adjustable (2) connec-
tung ausrichten. tion mount with horizontal door
gap adjuster (2) in the right or
left direction until gap measure-
(Spaltmaße wie Original) ment is like original.
Bei Fertigstellung: On completion: tightening
Anzugsdrehmoment 27 Nm. torque 20 ft - lb (27Nm).
8.) Magic Stick (Einstell- 8.) Position the lower adjustment
Schraube) (1) so einstellen, screw, MAGIC STICK (1) in that
dass Tür mittig ins Türschloss way, which the door closes in the
schließen kann. center position.
Bei Fertigstellung:
Anzugsdrehmoment 14 Nm.
On completion: tightening
torque 10 ft - lb (14 Nm).9.) Türenhöhe durch vertikales 9.) Adjust the height of the door
verschieben der Grundplatte I by moving the ground plate (S)
(S) ausrichten. Hierzu bitte die vertically. You might have to
Schrauben (I) an der Grund- loosen bolts (I) on the ground
platte lösen. plate to do this.
OEM
Türtiefe durch horizontales ver- Adjust the depth of the door by
schieben des Schwingarms (R) moving the swing arm (R) hori-
ausrichten. Hierzu bitte die zontal.
Schrauben (Muttern) (OEM) an You might have to loosen the
dem Schwingarm lösen. bolts (nuts) (OEM) on the swing
arm to do this.
OEM
I
10.) Nur bei Bedarf 10.) Only if required
Tür wieder vorsichtig öffnen und
durch die Einstellschraube (5) Carefully reopen the door and
den Öffnungswinkel und somit adjust the opening angle with the
die Begrenzung einstellen. Kot- limiting adjustment screw (5).
flügelabstand beachten. Consider the fender distance.
Die Einstellschraube (5) sollte Then lock adjustment screw (5)
nach der Einstellung mit again.
Schraubensicherungsmittel wie-
der gesichert werden.
Wichtig: Bei Verstellung der
Einstellschraube (5) muss die Important: When you adjust
Gleitrolle (4) entsprechend an- screw (5) you also have to read-
gepasst werden. Dabei die Ein- 5 just slide roller (4). They need to
stellschrauben so einstellen, be adjusted that the LSD swing
dass der LSD-Schwenkarm arm has slight tension at pivoting.
beim hoch- bzw. runterschwen-
ken unter leichter Vorspannung
geführt wird.11.) Nun den Dämpfer (U) am 11.) Hang in the gas spring (U)
Befestigungspunkt des on the fitting point of the swing
Schwingarms einhängen und arm. Secure it with the supplied
mit dem beigelegten Siche- security ring, by means of needle-
rungsring mit Hilfe einer nosed pliers.
Spitzzange sichern.
Use the security ring carefully.
Sicherungsring vorsichtig
benutzen (anbringen).
Der Gummi (O-Ring) muss zwischen LSD The rubber (o-ring) has to be mounted
Schwingarm und oberes Kugelgelenk des between the LSD swing arm plate and
Dämpfers montiert werden. top ball joint of the gas spring.
Neue Position des O-Rings.
New position of the o-ring,
after assembly
Die Dämpferkennzeichnung muss sichtbar sein / The signification on the gas spring must be visible
12.) Tür vorsichtig nach oben 12.) Carefully pivot the door up,
schwenken, den unteren Teil place in the gas spring (U) on the
des Dämpfers (U) am Be- according mounting point on the
festsungspunkt der Grundplatte chassis plate. Secure it with the
einhängen und ebenfalls mit supplied security ring.
dem beigelegten Sicherungs-
Ring sichern.
Danger: Gas spring is under ex-
WARNUNG: Dämpfer steht
treme pressure! Please make
unter sehr hohem Druck. Es ist
sure the security rings are in-
darauf zu achten, dass die Si-
stalled correctly and are snapped
cherungsclips richtig montiert
their respective guides.
sind und ordentlich in der vor-
gesehen Führungen sitzen!13.) Nur bei Bedarf 13.) Only if required
Ist der Magic Stick (Einstellschraube) (1) beim Her- If the Magic Stick—lower adjustment screw (1) is not
unterschwenken nicht mittig in der Führung, so ist in the correct middle position when the door is
das C-Profil (2) mit der Unterlage (D) zu unterle- closed, shim (D) has to be installed under the
gen. Hierzu Türe nach oben öffnen. M.A.R.A. (2) as shown. For this opening the door up.
1 1
2
D D
2
2
D
D
214.) Erweiterung zu Punkt 13 14.) Additional for point 13
Ist der Magic Stick (Einstellschraube) (1) beim Her- If the Magic Stick - lower adjustment screw (1) after
unterschwenken nach Einstellung Punkt 13 nicht the adjustment at point 13 not in the correct mid-
in der Führung, so ist die Schraube (8) hineinzu- dle position when the door is closed, turn in the
drehen. Unterlage (E) an die A-Säule mit dem mit- screw (8) and fix the supplied spacer (E) on the A-
gelieferten Kleber (V) ankleben. Anschließend Mut- pillar with chassis clue (V). After adjustment lock
ter kontern. Hierzu Türe nach oben öffnen. the screw with the serrated nut. For this opening
the door up.
1
8 V
E15.) Die Gleitrolle (4) muss so eingestellt werden, 15.) Please adjust the slide roller (4) so the LSD
dass der LSD-Schwenkarm beim öffnen und schlie- swing arm has initial contact and preload while
ßen und beim hoch bzw. runterschwenken unter opening and closing.
leichter Vorspannung geführt wird. Evtl. ist die Gleit- Use a shim(s) if applicable (H).
rolle mit einer Unterlage(n) (H) zu unterlegen. Please lubricate the slide roller (4) with grease from
Bitte die Gleitrolle (4) gelegentlich fetten. time to time.
Unterlage /
Washer
4
5
16.) Einstellung der oberen 16.) Adjust the top stabilizer (9).
Fixierung (9). Carefully pivot the door up open
9.1 9.2
Hierbei die Schrauben (9.1, the screws (9.1, 9.2 ) for the
9.2 ) lösen und Türe vorsich- adjusting the stabilizer.
tig nach oben schwenken. After the adjustment torque se-
Nach der Einstellung vorsich- curely.
tig festdrehen.17.) Tür schließen und ins Türschloss 17.) Close the door again and let the door
einrasten. lock and set in place.
18.) Für einen Freigängigkeitstest bitte nun 18.) Now reassemble the previously modified
den bearbeiteten Kotflügel am Fahrzeug fender back on the car to see if there are any
fixieren. obstructions.
19.) Kotflügel wieder entfernen und Türe 19.) Remove the fender again and close the
schließen. door
20.) Nach erfolgten Einstellarbeiten bitte für 20.) After adjustments are finalized, drill an 9
die an Position (3) vorgesehene Sperrzahn- mm / 0.35 inch hole in the chassis, use hole
schraube (J), Mutter (N), Befestigungswinkel (3) in the LSD chassis plate as a guide. Then
(M) und Mutter (L) ein Loch bohren (Ø 9 place in the included serrated bolt (J), nut (N),
mm). angle bracket (M) and nut (L) and torque se-
curely.
J
L
N
K
Bohrung 9 mm
Borehole 9 mm / 0,35 inch21.) Tür vorsichtig nach oben schwenken, 21.) Pivot the door carefully up and make sure
auf Freigängigkeit an Kotflügel, A-Säule und there is sufficient clearance on the fender, A-pillar
Motorhaube achten und ggf. LSD- and hood. If necessary adjust the LSD chassis
Grundplatte bzw. LSD-Schwingarm neu plate or the LSD swing arm again.
ausrichten.
22.) Kabel verlegen und mit Kabelbinder 22.) Lay the wire harness on and attach it to the
(B) an den markierten Punkten befestigen. marked points, then secure with included cable ties
(B).
B
B
B
CB
B
C
B23.) Danach den Halter (O) für den Kotflügel 23.) After that install the fender holder (O).
montieren.
O
I
24.) Nun den bearbeiteten Kotflügel am 24.) Now reassemble the modified fender back on
Fahrzeug montieren. the car.COMMON TROUBLESHOOTING QUESTIONS and ANSWERS
Q1: WHY DOES THE BOTTOM OF THE DOOR NOT SIT FLUSH, AT THE FRONT OR REAR?:
A1: LSD door hinges are engineered and designed to compensate for this issue. They are designed to be
installed in the center location of all mounting slots. Some vehicles are different however; adjusting
the location of the swing arm mounts on the door will fix this problem. Mounting the swing arm to-
wards the interior of the door, top or bottom will move the door out; mounting the swing arm towards
the exterior of the door will move the door in. In some cases, the mounting will be slightly different be-
tween top and bottom mounts.
Q2: WHY DO THE DOORS “SPRING” A-JAR WHEN OPENING THE DOOR?:
A2: LSD door hinges are engineered and designed to compensate for this issue. It is common on vehicles
that the left and the right sides are not quite the same. When a door “springs” open there is a misalign-
ment between the swing arm and the ground plate. This can be remedied by increasing the distance
of the “third” point on the ground plate. The “third” point is usually located towards the front of the ve-
hicle. Increasing the distance and angle of the ground plate to the vehicle will release any pressure
and/or contact between the swing arm and the ground plate.
Q3: WHY DOES THE DOOR HITS/RUBS AGAINST THE FENDER WHEN OPENING?:
A3: LSD door hinges are engineered and designed to compensate for this issue. Attaching the LSD hinge
in the center location of the slots and adjusting the magic stick such that the tuff lock is centered is the
optimum desired installation. Making minor adjustments to the “MARA”/“C” profile, the “third” point,
and/or the “Magic stick” should alleviate this problem.
Q4: WHY IS THE WIRING HARNESS TOO LARGE FOR THE ROUTE SHOWN IN THE INSTRUC-
TIONS?:
A4: LSD door hinges are engineered and designed to compensate for this issue. LSD wiring kits are de-
signed for the MAXIMUM wires installed on vehicles. If additional wires are added or modified that
are larger than original, wiring routing might have to be modified. Vehicle owners are responsible for
this modified routing.
Q5: WHY DOESN’T THE GAS SPRING HOLD THE DOOR UP?:
A5: LSD door hinges are engineered and designed to compensate for original door weight, i.e. speakers
and electronics. NOTE: As temperature fluctuates, the gas pressure in each shock increases or de-
creases. Example; in the heat, the gas pressure will expand, in the cold; it has a tendency to contract.
Any modifications to the speakers or electronics may require a larger gas spring. Vehicle owners are
required to purchase these larger gas springs from their local dealer. If you have not modified your
door, your gas spring may be faulty. Vehicle owners are required to contact their local dealer for re-
placement(s).Kabelverlängerung Extending the wire
harness
Recommend :
Empfehlung:
Extend the cable always 43,30 inch / 1,1 m
(Kabel immer 1,1m verlängern)
Bsp.: Nissan Z350
Kabelbaum kann abweichen.
Nissan Z350 shown, your wire
harness may look different.
Originaler Türkabelbaum.
Original door wire harness.
Ummantelung des Türkabel-
baums entfernen.
Remove the insulation from
the wire harness.Um Verwechslungsgefahr auszu-
schließen, bitte jedes Kabel des
Türkabelbaums separat trennen
und Enden der Kabel abisolieren.
Kabel versetzt durchrennen.
Siehe unten.
To avoid confusion please cut and
uninsulate each wire off the wire
harness separately at various
lengths. This will ensure a reduced
size when completed.
Nun jedes einzelne Kabel des Tür-
kabelbaums mit den mitge-
lieferten Kabeln + Löt-Schrumpf-
verbindern verlängern.
Now extend (braze) every wire
with the supplied wire kit &
shrinkable solder connectors.
Falsch. Kabelbaum wird nach
dem ummanteln viel zu dick.
Incorrect. The wire harness is
very large after the wrap
Richtig. Kabelbaum kann gut
verlegt werden, da er sehr dünn
ist.
Correct. Off set connectors for
minimum size and flexibility.Mit Hilfe eines Heißluftfönes die Löt-
Schrumpfverbinder von außen nach in-
nen erwärmen. Darauf achten damit das
Lötzinn, im inneren des Löt-
Schrumpfverbinders, das Kabel komplett
umschließt (verläuft).
Please use a hot air dryer to heat up the
solder shrink connectors from outside to
inside. Heat up the solder shrink con-
nectors until the tin-solder (inside the
connector) is becoming liquid and sur-
rounding the core ends completely.
Please avoid the damage of the cables
by too strong heating.
HINWEIS: Abdeckblech wird nicht
bei jedem Fahrzeug benötigt!
REFERENCE: Cover plates are not
needed for every vehicle!
Jetzt das Kabel durch das Ab-
deckblech führen und die Enden wie-
der mit einem Schrumpfverbinder
verbinden.
Now lead the wires through the cover
plate and join the ends with the
shrinkable connectors.Die vorangegangen Schritte nun mit
allen Kabeln wiederholen.
Please repeat the earlier steps to all
wires.
Bei Verlängerungen am CAN- Datenbus
ist besonderst auf die Schirmung und
Verdrillung zu achten.
When working with Share-data bus sys-
tem please take special care to reroute
the wires correctly and not to damage
the wire insulation.Die Schrumpfverbinder sollten
zusätzlich jeweils einzeln mit
dem mitgelieferten Gewebeband
ummantelt werden.
The shrinkable connectors can
now be wrapped with the sup-
plied waterproof insulation tape.
Am Schluss dann den kompletten Kabelbaum mit
Hilfe des Gewebebandes wieder ummanteln. Ach-
tung: Kabel beim ummanteln gerade halten.
Finally wrap the extended wire harness completely
with the supplied waterproof insulation tape.
Attention: Hold wires straight when applying tape.Kotflügelbearbeitung / Modifying the fender
Folgende Schritte sind Empfehlungen und Steps below are to be used as a reference.
für beide Kotflügelseiten zu wiederholen. Please repeat for both fenders.
Empfohlenes
Werkzeug:
Recommended tool:
Pressluftsäge
Pneumatic air saw
A2 Dieser Bereich muss ausgeschnitten werden /
A1
This part must be cut out
Max. 5 mm entlang dieser Kante stehen lassen.
Leave max. 0,2 inch (5 mm) along this edge.
Max. 5 mm entlang dieser Kante stehen lassen.
Leave max. 0,2 inch (5 mm) along this edge.A1.)
8,5
c m/
3,3
4 inc
h
/ 11, 4 inch
29 cm
h
cm / 3,9 inc
10A2.)
28 cm / 11 inc
h3.)
Beide Halterungen entfernen.
Remove both holder.
1 - 2 cm /
0,4 - 0,8 inch4.)
Anschließend Kotflügelblech mit dem mitgelieferten Karosseriekleber (L) verkleben.
Glue the fender sheet with the supplied chassis glue (L).
L5.)
Kotflügel an den Halter (O) mit der Schraube (L) und Mutter (N) befestigen.
Install the fender on the holder (O) with the supplied bolt (L) and nut (N).
N
W
Bohrung Ø 6,5 mm.
Drill a Ø 6,5 mm / 0,26
inch hole in the fender.
VERTICAL DOORS CAR ACCESSORIESYou can also read