Getting Started - Informatica Cloud Application Integration July 2021
←
→
Page content transcription
If your browser does not render page correctly, please read the page content below
Informatica® Cloud Application Integration
July 2021

2. Getting Started
Informatica Cloud Application Integration 2. Getting Started
July 2021
© Copyright Informatica LLC 1993, 2021

This software and documentation contain proprietary information of Informatica LLC and are provided under a license agreement containing restrictions on use and
disclosure and are also protected by copyright law. Reverse engineering of the software is prohibited. No part of this document may be reproduced or transmitted in any
form, by any means (electronic, photocopying, recording or otherwise) without prior consent of Informatica LLC. This Software may be protected by U.S. and/or
international Patents and other Patents Pending.

Use, duplication, or disclosure of the Software by the U.S. Government is subject to the restrictions set forth in the applicable software license agreement and as
provided in DFARS 227.7202-1(a) and 227.7702-3(a) (1995), DFARS 252.227-7013©(1)(ii) (OCT 1988), FAR 12.212(a) (1995), FAR 52.227-19, or FAR 52.227-14 (ALT III),
as applicable.

The information in this product or documentation is subject to change without notice. If you find any problems in this product or documentation, please report them to
us in writing.

Informatica, Informatica Platform, Informatica Data Services, PowerCenter, PowerCenterRT, PowerCenter Connect, PowerCenter Data Analyzer, PowerExchange,
PowerMart, Metadata Manager, Informatica Data Quality, Informatica Data Explorer, Informatica B2B Data Transformation, Informatica B2B Data Exchange Informatica
On Demand, Informatica Identity Resolution, Informatica Application Information Lifecycle Management, Informatica Complex Event Processing, Ultra Messaging,
Informatica Master Data Management, and Live Data Map are trademarks or registered trademarks of Informatica LLC in the United States and in jurisdictions
throughout the world. All other company and product names may be trade names or trademarks of their respective owners.

Portions of this software and/or documentation are subject to copyright held by third parties, including without limitation: Copyright DataDirect Technologies. All rights
reserved. Copyright © Sun Microsystems. All rights reserved. Copyright © RSA Security Inc. All Rights Reserved. Copyright © Ordinal Technology Corp. All rights
reserved. Copyright © Aandacht c.v. All rights reserved. Copyright Genivia, Inc. All rights reserved. Copyright Isomorphic Software. All rights reserved. Copyright © Meta
Integration Technology, Inc. All rights reserved. Copyright © Intalio. All rights reserved. Copyright © Oracle. All rights reserved. Copyright © Adobe Systems Incorporated.
All rights reserved. Copyright © DataArt, Inc. All rights reserved. Copyright © ComponentSource. All rights reserved. Copyright © Microsoft Corporation. All rights
reserved. Copyright © Rogue Wave Software, Inc. All rights reserved. Copyright © Teradata Corporation. All rights reserved. Copyright © Yahoo! Inc. All rights reserved.
Copyright © Glyph & Cog, LLC. All rights reserved. Copyright © Thinkmap, Inc. All rights reserved. Copyright © Clearpace Software Limited. All rights reserved. Copyright
© Information Builders, Inc. All rights reserved. Copyright © OSS Nokalva, Inc. All rights reserved. Copyright Edifecs, Inc. All rights reserved. Copyright Cleo
Communications, Inc. All rights reserved. Copyright © International Organization for Standardization 1986. All rights reserved. Copyright © ej-technologies GmbH. All
rights reserved. Copyright © Jaspersoft Corporation. All rights reserved. Copyright © International Business Machines Corporation. All rights reserved. Copyright ©
yWorks GmbH. All rights reserved. Copyright © Lucent Technologies. All rights reserved. Copyright © University of Toronto. All rights reserved. Copyright © Daniel
Veillard. All rights reserved. Copyright © Unicode, Inc. Copyright IBM Corp. All rights reserved. Copyright © MicroQuill Software Publishing, Inc. All rights reserved.
Copyright © PassMark Software Pty Ltd. All rights reserved. Copyright © LogiXML, Inc. All rights reserved. Copyright © 2003-2010 Lorenzi Davide, All rights reserved.
Copyright © Red Hat, Inc. All rights reserved. Copyright © The Board of Trustees of the Leland Stanford Junior University. All rights reserved. Copyright © EMC
Corporation. All rights reserved. Copyright © Flexera Software. All rights reserved. Copyright © Jinfonet Software. All rights reserved. Copyright © Apple Inc. All rights
reserved. Copyright © Telerik Inc. All rights reserved. Copyright © BEA Systems. All rights reserved. Copyright © PDFlib GmbH. All rights reserved. Copyright ©
Orientation in Objects GmbH. All rights reserved. Copyright © Tanuki Software, Ltd. All rights reserved. Copyright © Ricebridge. All rights reserved. Copyright © Sencha,
Inc. All rights reserved. Copyright © Scalable Systems, Inc. All rights reserved. Copyright © jQWidgets. All rights reserved. Copyright © Tableau Software, Inc. All rights
reserved. Copyright© MaxMind, Inc. All Rights Reserved. Copyright © TMate Software s.r.o. All rights reserved. Copyright © MapR Technologies Inc. All rights reserved.
Copyright © Amazon Corporate LLC. All rights reserved. Copyright © Highsoft. All rights reserved. Copyright © Python Software Foundation. All rights reserved.
Copyright © BeOpen.com. All rights reserved. Copyright © CNRI. All rights reserved.

This product includes software developed by the Apache Software Foundation (http://www.apache.org/), and/or other software which is licensed under various
versions of the Apache License (the "License"). You may obtain a copy of these Licenses at http://www.apache.org/licenses/. Unless required by applicable law or
agreed to in writing, software distributed under these Licenses is distributed on an "AS IS" BASIS, WITHOUT WARRANTIES OR CONDITIONS OF ANY KIND, either express
or implied. See the Licenses for the specific language governing permissions and limitations under the Licenses.

This product includes software which was developed by Mozilla (http://www.mozilla.org/), software copyright The JBoss Group, LLC, all rights reserved; software
copyright © 1999-2006 by Bruno Lowagie and Paulo Soares and other software which is licensed under various versions of the GNU Lesser General Public License
Agreement, which may be found at http:// www.gnu.org/licenses/lgpl.html. The materials are provided free of charge by Informatica, "as-is", without warranty of any
kind, either express or implied, including but not limited to the implied warranties of merchantability and fitness for a particular purpose.

The product includes ACE(TM) and TAO(TM) software copyrighted by Douglas C. Schmidt and his research group at Washington University, University of California,
Irvine, and Vanderbilt University, Copyright (©) 1993-2006, all rights reserved.

This product includes software developed by the OpenSSL Project for use in the OpenSSL Toolkit (copyright The OpenSSL Project. All Rights Reserved) and
redistribution of this software is subject to terms available at http://www.openssl.org and http://www.openssl.org/source/license.html.

This product includes Curl software which is Copyright 1996-2013, Daniel Stenberg, . All Rights Reserved. Permissions and limitations regarding this
software are subject to terms available at http://curl.haxx.se/docs/copyright.html. Permission to use, copy, modify, and distribute this software for any purpose with or
without fee is hereby granted, provided that the above copyright notice and this permission notice appear in all copies.

The product includes software copyright 2001-2005 (©) MetaStuff, Ltd. All Rights Reserved. Permissions and limitations regarding this software are subject to terms
available at http://www.dom4j.org/ license.html.

The product includes software copyright © 2004-2007, The Dojo Foundation. All Rights Reserved. Permissions and limitations regarding this software are subject to
terms available at http://dojotoolkit.org/license.

This product includes ICU software which is copyright International Business Machines Corporation and others. All rights reserved. Permissions and limitations
regarding this software are subject to terms available at http://source.icu-project.org/repos/icu/icu/trunk/license.html.

This product includes software copyright © 1996-2006 Per Bothner. All rights reserved. Your right to use such materials is set forth in the license which may be found at
http:// www.gnu.org/software/ kawa/Software-License.html.

This product includes OSSP UUID software which is Copyright © 2002 Ralf S. Engelschall, Copyright © 2002 The OSSP Project Copyright © 2002 Cable & Wireless
Deutschland. Permissions and limitations regarding this software are subject to terms available at http://www.opensource.org/licenses/mit-license.php.

This product includes software developed by Boost (http://www.boost.org/) or under the Boost software license. Permissions and limitations regarding this software
are subject to terms available at http:/ /www.boost.org/LICENSE_1_0.txt.

This product includes software copyright © 1997-2007 University of Cambridge. Permissions and limitations regarding this software are subject to terms available at
http:// www.pcre.org/license.txt.

This product includes software copyright © 2007 The Eclipse Foundation. All Rights Reserved. Permissions and limitations regarding this software are subject to terms
available at http:// www.eclipse.org/org/documents/epl-v10.php and at http://www.eclipse.org/org/documents/edl-v10.php.
This product includes software licensed under the terms at http://www.tcl.tk/software/tcltk/license.html, http://www.bosrup.com/web/overlib/?License, http://
www.stlport.org/doc/ license.html, http://asm.ow2.org/license.html, http://www.cryptix.org/LICENSE.TXT, http://hsqldb.org/web/hsqlLicense.html, http://
httpunit.sourceforge.net/doc/ license.html, http://jung.sourceforge.net/license.txt , http://www.gzip.org/zlib/zlib_license.html, http://www.openldap.org/software/
release/license.html, http://www.libssh2.org, http://slf4j.org/license.html, http://www.sente.ch/software/OpenSourceLicense.html, http://fusesource.com/downloads/
license-agreements/fuse-message-broker-v-5-3- license-agreement; http://antlr.org/license.html; http://aopalliance.sourceforge.net/; http://www.bouncycastle.org/
licence.html; http://www.jgraph.com/jgraphdownload.html; http://www.jcraft.com/jsch/LICENSE.txt; http://jotm.objectweb.org/bsd_license.html; . http://www.w3.org/
Consortium/Legal/2002/copyright-software-20021231; http://www.slf4j.org/license.html; http://nanoxml.sourceforge.net/orig/copyright.html; http://www.json.org/
license.html; http://forge.ow2.org/projects/javaservice/, http://www.postgresql.org/about/licence.html, http://www.sqlite.org/copyright.html, http://www.tcl.tk/
software/tcltk/license.html, http://www.jaxen.org/faq.html, http://www.jdom.org/docs/faq.html, http://www.slf4j.org/license.html; http://www.iodbc.org/dataspace/
iodbc/wiki/iODBC/License; http://www.keplerproject.org/md5/license.html; http://www.toedter.com/en/jcalendar/license.html; http://www.edankert.com/bounce/
index.html; http://www.net-snmp.org/about/license.html; http://www.openmdx.org/#FAQ; http://www.php.net/license/3_01.txt; http://srp.stanford.edu/license.txt;
http://www.schneier.com/blowfish.html; http://www.jmock.org/license.html; http://xsom.java.net; http://benalman.com/about/license/; https://github.com/CreateJS/
EaselJS/blob/master/src/easeljs/display/Bitmap.js; http://www.h2database.com/html/license.html#summary; http://jsoncpp.sourceforge.net/LICENSE; http://
jdbc.postgresql.org/license.html; http://protobuf.googlecode.com/svn/trunk/src/google/protobuf/descriptor.proto; https://github.com/rantav/hector/blob/master/
LICENSE; http://web.mit.edu/Kerberos/krb5-current/doc/mitK5license.html; http://jibx.sourceforge.net/jibx-license.html; https://github.com/lyokato/libgeohash/blob/
master/LICENSE; https://github.com/hjiang/jsonxx/blob/master/LICENSE; https://code.google.com/p/lz4/; https://github.com/jedisct1/libsodium/blob/master/
LICENSE; http://one-jar.sourceforge.net/index.php?page=documents&file=license; https://github.com/EsotericSoftware/kryo/blob/master/license.txt; http://www.scala-
lang.org/license.html; https://github.com/tinkerpop/blueprints/blob/master/LICENSE.txt; http://gee.cs.oswego.edu/dl/classes/EDU/oswego/cs/dl/util/concurrent/
intro.html; https://aws.amazon.com/asl/; https://github.com/twbs/bootstrap/blob/master/LICENSE; https://sourceforge.net/p/xmlunit/code/HEAD/tree/trunk/
LICENSE.txt; https://github.com/documentcloud/underscore-contrib/blob/master/LICENSE, and https://github.com/apache/hbase/blob/master/LICENSE.txt.

This product includes software licensed under the Academic Free License (http://www.opensource.org/licenses/afl-3.0.php), the Common Development and
Distribution License (http://www.opensource.org/licenses/cddl1.php) the Common Public License (http://www.opensource.org/licenses/cpl1.0.php), the Sun Binary
Code License Agreement Supplemental License Terms, the BSD License (http:// www.opensource.org/licenses/bsd-license.php), the new BSD License (http://
opensource.org/licenses/BSD-3-Clause), the MIT License (http://www.opensource.org/licenses/mit-license.php), the Artistic License (http://www.opensource.org/
licenses/artistic-license-1.0) and the Initial Developer’s Public License Version 1.0 (http://www.firebirdsql.org/en/initial-developer-s-public-license-version-1-0/).

This product includes software copyright © 2003-2006 Joe WaInes, 2006-2007 XStream Committers. All rights reserved. Permissions and limitations regarding this
software are subject to terms available at http://xstream.codehaus.org/license.html. This product includes software developed by the Indiana University Extreme! Lab.
For further information please visit http://www.extreme.indiana.edu/.

This product includes software Copyright (c) 2013 Frank Balluffi and Markus Moeller. All rights reserved. Permissions and limitations regarding this software are subject
to terms of the MIT license.

See patents at https://www.informatica.com/legal/patents.html.

DISCLAIMER: Informatica LLC provides this documentation "as is" without warranty of any kind, either express or implied, including, but not limited to, the implied
warranties of noninfringement, merchantability, or use for a particular purpose. Informatica LLC does not warrant that this software or documentation is error free. The
information provided in this software or documentation may include technical inaccuracies or typographical errors. The information in this software and documentation
is subject to change at any time without notice.

NOTICES

This Informatica product (the "Software") includes certain drivers (the "DataDirect Drivers") from DataDirect Technologies, an operating company of Progress Software
Corporation ("DataDirect") which are subject to the following terms and conditions:

1. THE DATADIRECT DRIVERS ARE PROVIDED "AS IS" WITHOUT WARRANTY OF ANY KIND, EITHER EXPRESSED OR IMPLIED, INCLUDING BUT NOT LIMITED TO,
   THE IMPLIED WARRANTIES OF MERCHANTABILITY, FITNESS FOR A PARTICULAR PURPOSE AND NON-INFRINGEMENT.
2. IN NO EVENT WILL DATADIRECT OR ITS THIRD PARTY SUPPLIERS BE LIABLE TO THE END-USER CUSTOMER FOR ANY DIRECT, INDIRECT, INCIDENTAL,
   SPECIAL, CONSEQUENTIAL OR OTHER DAMAGES ARISING OUT OF THE USE OF THE ODBC DRIVERS, WHETHER OR NOT INFORMED OF THE POSSIBILITIES
   OF DAMAGES IN ADVANCE. THESE LIMITATIONS APPLY TO ALL CAUSES OF ACTION, INCLUDING, WITHOUT LIMITATION, BREACH OF CONTRACT, BREACH
   OF WARRANTY, NEGLIGENCE, STRICT LIABILITY, MISREPRESENTATION AND OTHER TORTS.

Publication Date: 2021-07-07
Table of Contents
Preface . . . . . . . . . . . . . . . . . . . . . . . . . . . . . . . . . . . . . . . . . . . . . . . . . . . . . . . . . . . . . . . . . . . . . . 6
Chapter 1: Application Integration. . . . . . . . . . . . . . . . . . . . . . . . . . . . . . . . . . . . . . . . . . . . 7
Chapter 2: Quick Start. . . . . . . . . . . . . . . . . . . . . . . . . . . . . . . . . . . . . . . . . . . . . . . . . . . . . . . . 8
Chapter 3: System Requirements. . . . . . . . . . . . . . . . . . . . . . . . . . . . . . . . . . . . . . . . . . . . . 9
Enabling CORS in Internet Explorer 11. . . . . . . . . . . . . . . . . . . . . . . . . . . . . . . . . . . . . . . . . 9
Modifying Browser History Settings. . . . . . . . . . . . . . . . . . . . . . . . . . . . . . . . . . . . . . . . . . 13
Chapter 4: Installing Secure Agents. . . . . . . . . . . . . . . . . . . . . . . . . . . . . . . . . . . . . . . . . 14
Secure Agent installation on Windows. . . . . . . . . . . . . . . . . . . . . . . . . . . . . . . . . . . . . . . . 14
Secure Agent requirements on Windows. . . . . . . . . . . . . . . . . . . . . . . . . . . . . . . . . . . . 14
Downloading and installing the Secure Agent on Windows. . . . . . . . . . . . . . . . . . . . . . . . 15
Configure the proxy settings on Windows. . . . . . . . . . . . . . . . . . . . . . . . . . . . . . . . . . . 17
Configure a login for a Windows Secure Agent Service. . . . . . . . . . . . . . . . . . . . . . . . . . . 17
Secure Agent installation on Linux. . . . . . . . . . . . . . . . . . . . . . . . . . . . . . . . . . . . . . . . . . . 18
Secure Agent requirements on Linux . . . . . . . . . . . . . . . . . . . . . . . . . . . . . . . . . . . . . . 18
Downloading and installing the Secure Agent on Linux. . . . . . . . . . . . . . . . . . . . . . . . . . . 19
Configure the proxy settings on Linux. . . . . . . . . . . . . . . . . . . . . . . . . . . . . . . . . . . . . . 20
Chapter 5: Connectors for Application Integration. . . . . . . . . . . . . . . . . . . . . . . . . . . 21
Types of Connectors. . . . . . . . . . . . . . . . . . . . . . . . . . . . . . . . . . . . . . . . . . . . . . . . . . . 21
Informatica Cloud Connectors. . . . . . . . . . . . . . . . . . . . . . . . . . . . . . . . . . . . . . . . . . . . . 22
Listener-Based Connectors. . . . . . . . . . . . . . . . . . . . . . . . . . . . . . . . . . . . . . . . . . . . . . . 23
Chapter 6: Application Integration Home Page. . . . . . . . . . . . . . . . . . . . . . . . . . . . . . . 24
Chapter 7: Project setup. . . . . . . . . . . . . . . . . . . . . . . . . . . . . . . . . . . . . . . . . . . . . . . . . . . . . 26
Creating Projects and Project Folders. . . . . . . . . . . . . . . . . . . . . . . . . . . . . . . . . . . . . . . . . 26
Creating Assets. . . . . . . . . . . . . . . . . . . . . . . . . . . . . . . . . . . . . . . . . . . . . . . . . . . . . . . 27
Chapter 8: Editing your user profile. . . . . . . . . . . . . . . . . . . . . . . . . . . . . . . . . . . . . . . . . . 28
Chapter 9: Switching to a different organization. . . . . . . . . . . . . . . . . . . . . . . . . . . . . 29
Chapter 10: Informatica resources. . . . . . . . . . . . . . . . . . . . . . . . . . . . . . . . . . . . . . . . . . . 30
Informatica Intelligent Cloud Services web site. . . . . . . . . . . . . . . . . . . . . . . . . . . . . . . . . . . 30
Informatica Intelligent Cloud Services Communities. . . . . . . . . . . . . . . . . . . . . . . . . . . . . . . 30
Informatica Intelligent Cloud Services Marketplace. . . . . . . . . . . . . . . . . . . . . . . . . . . . . . . . 30
Informatica Intelligent Cloud Services Trust Center. . . . . . . . . . . . . . . . . . . . . . . . . . . . . . . . 31
4 Table of ContentsInformatica Global Customer Support. . . . . . . . . . . . . . . . . . . . . . . . . . . . . . . . . . . . . . . . . 31
Informatica Knowledge Base. . . . . . . . . . . . . . . . . . . . . . . . . . . . . . . . . . . . . . . . . . . . . . 31
Legal. . . . . . . . . . . . . . . . . . . . . . . . . . . . . . . . . . . . . . . . . . . . . . . . . . . . . . . . . . . . . 31
Index. . . . . . . . . . . . . . . . . . . . . . . . . . . . . . . . . . . . . . . . . . . . . . . . . . . . . . . . . . . . 36
Table of Contents 5Preface
Refer to Getting Started for information about how to begin using Informatica Intelligent Cloud Services℠
Application Integration. Getting Started also provides information about system requirements, installation of
Secure Agents, and Application Integration connectors.
6Chapter 1
Application Integration
With Application Integration and Application Integration Console, you can perform the web service based
integration of processes, applications, and systems in real time.
Informatica Intelligent Cloud Services℠ offers the Application Integration and Application Integration Console
services that allow you to design, integrate, and implement business processes spanning different cloud and
on-premises applications. Informatica's event-driven and service-oriented application integration capabilities
encompass event processing, service orchestration, and process management. You can expose business
services at cloud or on-premises service endpoints that are accessible by using SOAP, REST (XML or JSON),
or MOM services.
You can access Application Integration if your organization has licensed this set of features. No additional
installation is required. However, you may also need to configure a runtime environment with a Secure Agent.
To access Process Developer help, go to
https://network.informatica.com/onlinehelp/process-developer/en/index.htm?
7Chapter 2
Quick Start
You can create an Application Integration project in just a few steps.
Step 1. Check System Requirements
Be sure you're using a compatible browser when you're designing your projects, and check the Informatica
Cloud Product Availability Matrix for operating systems, databases, and other systems that Application
Integration supports.
Step 2. Configure a Runtime Environment
A runtime environment is the execution platform for running tasks. A runtime environment consists of one or
more Secure Agents. A Secure Agent is a lightweight program that runs tasks and enables secure
communication across the firewall between your organization and Application Integration. You must have at
least one runtime environment in each organization so that users in the organization can run tasks.
Secure Agent Groups
When you need to access data on-premises or when you want to access SaaS data without using the
Hosted Agent, use a Secure Agent group. A Secure Agent group contains one or more Secure Agents.
The agents in a group run within your network or in a cloud computing services environment such as
Amazon Web Services or Microsoft Azure.
To create a Secure Agent group, download and install the Secure Agent. You can install one Secure
Agent on each physical or virtual machine. Each agent that you install is added to its own group by
default. Based on your license, you can add multiple agents to a group to balance workloads and
improve scalability.
Step 3. Create a Connection
Before you can use Application Integration processes, you need to create a connection. When you configure
the connection, you specify the connector that enables the exchange of data between Application Integration
and the application you want to connect to. For example, if you want to create a task that uses Salesforce
data, you create a Salesforce connection. The Salesforce connection uses the Salesforce connector which
enables the exchange of data between Salesforce and Application Integration.
Step 4. Create your Project
Organize your Application Integration projects in folders that contain assets such as mappings, tasks, and
taskflows. Create a project folder and folders to contain the assets you need for your project.
After you set up folders, create your project assets. Assets include the following objects:
• Processes
• Connections
• Process objects
• Service Connectors
8Chapter 3
System Requirements
You can find information about system requirements in the Product Availability Matrix (PAM) for Informatica
Intelligent Cloud Services. The PAM indicates the versions of browsers, operating systems, databases, and
other types of data sources and targets that a product release supports. You can access the PAM on
Informatica Network at
https://network.informatica.com/community/informatica-network/product-availability-matrices/.
Note: To use Microsoft Internet Explorer 11, you must perform the following tasks:
• Enable cross-origin support (CORS) in the browser
• Modify the browser history settings
Enabling CORS in Internet Explorer 11
Informatica Intelligent Cloud Services requires that cross-origin support (CORS) be enabled in Internet
Explorer 11. In Internet Explorer 11, CORS is not enabled by default.
Note: Some company security policies restrict the ability of users to enable CORS in a web browser. Before
you update these settings, verify that your company or IT department allows you to change the CORS
settings.
1. Open Internet Explorer 11.
2. On the Tools menu, select Internet Options.
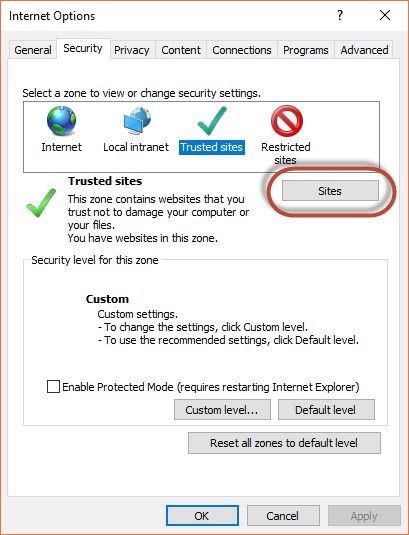
93. On the Security tab, click Trusted sites, and then click Sites as shown in the following image:
4. In the Trusted Sites dialog box, add the Informatica Intelligent Cloud Services domain to the zone, and
click Add.
10 Chapter 3: System RequirementsFor example, the following image shows the domain https://*.informaticacloud.com added to the
zone:
5. Click Close.
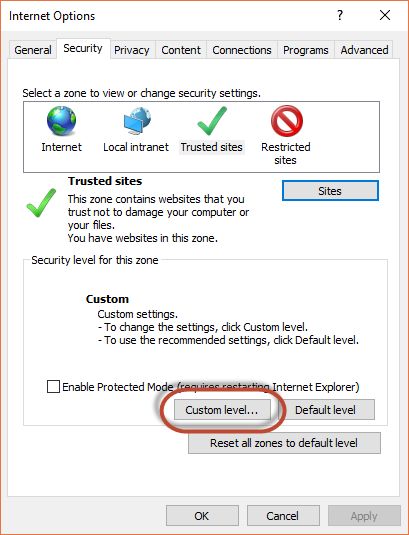
Enabling CORS in Internet Explorer 11 116. In the Security level for this zone area on the Security tab, click Custom level as shown in the following
image:
12 Chapter 3: System Requirements7. In the Security Settings - Trusted Sites Zone dialog box, scroll down to the Miscellaneous heading, and
enable Access data sources across domains as shown in the following image:
8. Click OK.
9. If prompted, confirm that you want to change the settings for the zone.
10. Click OK.
11. Restart Internet Explorer and re-open Informatica Intelligent Cloud Services.
Modifying Browser History Settings
Ensure that the browser checks for a new page version each time you visit a page.
Perform the following steps to change browser history settings:
1. In Microsoft Internet Explorer, go to Tools > Internet Options.
The Internet Option windows appears.
2. In the General tab, click Settings under the Browsing history section.
3. Under Check for newer versions of stored pages, select Everytime I visit the webpage.
4. Click OK > OK.
Modifying Browser History Settings 13Chapter 4
Installing Secure Agents
You can install Secure Agents on Windows or Linux.
Note: On the Secure Agent machine, if you install third-party tools that utilize the Java Virtual Machine (JVM)
agents for byte code injection, you might encounter issues. Informatica will not provide support for such
issues that arise due to the usage of third-party tools.
Secure Agent installation on Windows
On Windows, the Secure Agent runs as a Windows service. When you install the Secure Agent, you also install
the Informatica Cloud Secure Agent Manager.
By default, the Secure Agent starts when you start Windows. You can stop and restart the Secure Agent using
the Secure Agent Manager or Windows Services. If you install the Secure Agent on a different volume than
you use to run the installation program, you must start and stop the Secure Agent from Windows Services.
You can also use the Secure Agent Manager to check the Secure Agent status and configure proxy
information.
You can launch the Secure Agent Manager from the Start menu or desktop icon. When you close the Secure
Agent Manager, it minimizes to the Windows taskbar notification area for quick access.
When you install a Secure Agent, you perform the following tasks:
1. Verify that the machine where you install the Secure Agent meets the minimum requirements.
2. Download the Secure Agent installer files.
3. Install and register the Secure Agent.
Secure Agent requirements on Windows
You can install the Secure Agent on any machine that has internet connectivity and can access Informatica
Intelligent Cloud Services.
Verify the following requirements before you install the Secure Agent on Windows:
• Verify that the machine on which you install the Secure Agent uses a supported operating system. For the
list of supported operating systems for the Secure Agent, see the Product Availability Matrix (PAM) for
Informatica Intelligent Cloud Services on the Product Availability Matrices page on Informatica Network.
• Verify that the machine where you install the Secure Agent has at least 5 GB of free disk space.
• Verify that the account you use to install the Secure Agent has access to all remote directories that
contain flat source or target files.
14• Verify that no other Secure Agent is installed on the machine. If another Secure Agent is installed on the
machine, you must uninstall it first.
For more information about Secure Agent requirements, contact Informatica Global Customer Support.
Configure the firewall
If your organization uses a protective firewall, include the Informatica Intelligent Cloud Services domain
name or IP address ranges in the list of approved domain names or IP addresses. You should also enable the
port that the Secure Agent uses. This ensures that the Secure Agent can perform all necessary tasks through
the firewall.
The Secure Agent uses port 443 (HTTPS) to connect to the internet. Configure your firewall to allow traffic to
pass over port 443.
The whitelists of domains and IP addresses can vary according to your data center, which is also called a
POD (Point of Deployment). You can identify your POD through the URL that appears when you open any
service in Informatica Intelligent Cloud Services. The first few characters of the URL string identify the POD.
For example, if the URL starts with usw3.dm-us.informaticacloud.com, your POD is USW3.
You can find the whitelists of Informatica Intelligent Cloud Services domains and IP addresses for different
PODs in this Knowledge Base article on Informatica Network or by clicking the link at the top of the Runtime
Environments page in Administrator.
Secure Agent permissions on Windows
A Secure Agent requires certain permissions to transfer data between sources and targets.
When you install a Secure Agent on Windows, the Secure Agent must be part of the local Administrators
group.
Configure Windows settings
Before you use the Secure Agent on Windows, configure proxy settings and a Windows Secure Agent service
login.
You can configure proxy settings in Secure Agent Manager. Configure a login for the Windows Secure Agent
service on Windows.
Note: If you use the Secure Agent for Informatica Cloud Data Wizard, you do not need to configure proxy
settings or a Windows service login for the Secure Agent.
Downloading and installing the Secure Agent on Windows
To install the Secure Agent on a Windows machine, you must download and run the Secure Agent installation
program and then register the agent.
Secure Agent registration requires an install token. To get the install token, copy the token when you
download the agent or use the Generate Install Token option in Administrator. The token expires after 24
hours.
Before you download and install the Secure Agent, verify that no other Secure Agent is installed on the
machine. If there is, you must uninstall it.
1. Open Administrator and select Runtime Environments.
2. On the Runtime Environments page, click Download Secure Agent.
3. Select the Windows 64-bit operating system platform, copy the install token, and then click Download.
Secure Agent installation on Windows 15The installation program is downloaded to your machine. The name of the installation program is
agent64_install_ng_ext.exe.
4. Run the installation program:
a. Specify the Secure Agent installation directory, and click Next.
b. Click Install to install the agent.
The Secure Agent Manager opens and prompts you to register the agent as shown in the following
image:
5. If you did not copy the install token when you downloaded the agent, click Generate Install Token on the
Runtime Environments page in Administrator, and copy the token.
6. In the Secure Agent Manager, enter the following information, and then click Register:
Option Description
User Name User name that you use to access Informatica Intelligent Cloud Services.
Install Token Token that you copied.
The Secure Agent Manager displays the status of the Secure Agent. It takes a minute for all of the
services to start.
7. If your organization uses an outgoing proxy server to connect to the internet, enter the proxy server
information.
8. Close the Secure Agent Manager.
The Secure Agent Manager minimizes to the taskbar and continues to run as a service until stopped.
16 Chapter 4: Installing Secure AgentsConfigure the proxy settings on Windows
If your organization uses an outgoing proxy server to connect to the internet, the Secure Agent connects to
Informatica Intelligent Cloud Services through the proxy server. The Secure Agent installer configures the
proxy server settings for the Secure Agent based on settings configured in the browser. You can change the
proxy server settings through the Secure Agent Manager.
Contact your network administrator for the correct proxy settings.
1. In the Secure Agent Manager, click Proxy.
2. To enter proxy server settings, click Use a Proxy Server.
3. Enter the following information:
Field Description
Proxy Host Required. Host name of the outgoing proxy server that the Secure Agent uses.
Proxy Port Required. Port number of the outgoing proxy server.
User Name User name to connect to the outgoing proxy server.
Password Password to connect to the outgoing proxy server.
4. Click OK.
The Secure Agent Manager restarts the Secure Agent to apply the settings.
Configure a login for a Windows Secure Agent Service
On Windows, configure a network login for the Secure Agent service. The Secure Agent can access the
network with the privileges and permissions associated with the login.
Configure a login for the machine on which the Secure Agent is installed to allow the Secure Agent to access
directories to configure and run tasks. When you configure connections, configure tasks, and run tasks that
use Flat File or FTP/SFTP connection types, the Secure Agent might require read and write permissions on
the related directories.
For example, to browse to a directory to configure a Flat File or FTP/SFTP connection, the Secure Agent login
might require permission to access the directory. Without a Secure Agent login with the appropriate
permissions, Informatica Intelligent Cloud Services cannot display the directory in the Browse for Directory
dialog box.
1. Go to the Services window from the Windows Administrative tools.
2. In the Services window, right-click the Informatica Cloud Secure Agent service and choose Properties.
3. In the Properties dialog box, click the Log On tab.
4. To configure a login, select This Account.
5. Enter an account and password.
Use an account with the required privileges and permissions for the network security defined for the
domain. By default, the account format is \.
6. Click OK.
7. In the Services window, restart the Secure Agent service for the changes to take effect.
Secure Agent installation on Windows 17Secure Agent installation on Linux
On Linux, the Secure Agent runs as a process. You can use a shell command line to install, register, start,
stop, and uninstall the Secure Agent.
You can also use the shell command line to check the Secure Agent status.
When you install a Secure Agent, you perform the following tasks:
1. Verify that the machine where you install the Secure Agent meets the minimum requirements.
2. Download the Secure Agent installer files.
3. Install and register the Secure Agent.
Secure Agent requirements on Linux
You can install the Secure Agent on any machine that has internet connectivity and can access Informatica
Intelligent Cloud Services. Before you install the Secure Agent on Linux, verify the system requirements.
Verify the following requirements before you install the Secure Agent on Linux:
• Verify that the machine on which you install the Secure Agent uses a supported operating system. For the
list of supported operating systems for the Secure Agent, see the Product Availability Matrix (PAM) for
Informatica Intelligent Cloud Services on the Product Availability Matrices page on Informatica Network.
• Verify that the machine where you install the Secure Agent has at least 5 GB of free disk space.
• The account that you use to install the Secure Agent must have access to all remote directories that
contain flat source or target files.
• If you use PowerCenter, install the Secure Agent using a different user account than the account you used
to install PowerCenter.
Informatica Intelligent Cloud Services and PowerCenter use some common environment variables. If the
environment variables are not set correctly for Informatica Intelligent Cloud Services, your jobs might fail
at run time.
For more information about Secure Agent requirements, contact Informatica Global Customer Support.
Configure the firewall
If your organization uses a protective firewall, include the Informatica Intelligent Cloud Services domain
name or IP address ranges in the list of approved domain names or IP addresses. You should also enable the
port that the Secure Agent uses. This ensures that the Secure Agent can perform all necessary tasks through
the firewall.
The Secure Agent uses port 443 (HTTPS) to connect to the internet. Configure your firewall to allow traffic to
pass over port 443.
The whitelists of domains and IP addresses can vary according to your data center, which is also called a
POD (Point of Deployment). You can identify your POD through the URL that appears when you open any
service in Informatica Intelligent Cloud Services. The first few characters of the URL string identify the POD.
For example, if the URL starts with usw3.dm-us.informaticacloud.com, your POD is USW3.
You can find the whitelists of Informatica Intelligent Cloud Services domains and IP addresses for different
PODs in this Knowledge Base article on Informatica Network or by clicking the link at the top of the Runtime
Environments page in Administrator.
18 Chapter 4: Installing Secure AgentsSecure Agent permissions on Linux
A Secure Agent requires certain permissions to transfer data between sources and targets.
When you install a Secure Agent on Linux, the Secure Agent must have read/write/execute permissions for
the installation directory.
Downloading and installing the Secure Agent on Linux
To install the Secure Agent on a Linux machine, you must download and run the Secure Agent installation
program and then register the agent.
Secure Agent registration requires an install token. To get the install token, copy the token when you
download the agent or use the Generate Install Token option in Administrator. The token expires after 24
hours.
Before you download and install the Secure Agent, verify that no other Secure Agent is installed on the
machine using the same Linux user account. If there is, you must uninstall it.
1. Open Administrator and select Runtime Environments.
2. On the Runtime Environments page, click Download Secure Agent.
3. Select the Linux 64-bit operating system platform, copy the install token, and then click Download.
The installation program is downloaded to your machine. The name of the installation program is
agent64_install_ng_ext.bin.
4. Save the installation program to a directory on the machine where you want to run the Secure Agent.
Note: If the file path contains spaces, the installation might fail.
5. From a shell command line, navigate to the directory where you downloaded the installation program
and enter the following command:
./agent64_install_ng_ext.bin –i console
6. When the installer completes, navigate to the following directory:
/apps/agentcore
7. To start the Secure Agent, enter the following command:
./infaagent startup
The Secure Agent Manager starts. You must register the agent using the user name that you use to
access Informatica Intelligent Cloud Services. You must also supply the install token.
8. If you did not copy the install token when you downloaded the agent, click Generate Install Token on the
Runtime Environments page in Administrator, and copy the token.
9. In the /apps/agentcore directory, enter the following
command using your Informatica Intelligent Cloud Services user name and the token that you copied:
./consoleAgentManager.sh configureToken
You can check the registration status of a Secure Agent using the following command:
./consoleAgentManager.sh isConfigured
Secure Agent installation on Linux 19Configure the proxy settings on Linux
If your organization uses an outgoing proxy server to connect to the internet, the Secure Agent connects to
Informatica Intelligent Cloud Services through the proxy server.
The Secure Agent installer configures the proxy server settings for the Secure Agent based on settings
configured in the browser. You can update the proxy server settings defined for the Secure Agent from the
command line.
To configure the proxy server settings for the Secure Agent on a Linux machine, use a shell command that
updates the proxy.ini file. Contact the network administrator to determine the proxy settings.
1. Navigate to the following directory:
/apps/agentcore
2. To update the proxy.ini file, enter the following command:
./consoleAgentManager.sh configureProxy
3. Restart the Secure Agent.
20 Chapter 4: Installing Secure AgentsChapter 5
Connectors for Application
Integration
Application Integration offers multiple connectors designed to work with the connections and processes you
configure for integration with web services and applications. All the supported connectors allow you to
interact with services or data sources outside Informatica Intelligent Cloud Services℠. You can also run
specific operations against an API, web service, or database.
Types of Connectors
You can use the following types of connectors:
Application Integration Connectors
Application Integration connectors are designed to access data to and from the cloud for each of your
applications. Connectors for JDBC, Workday, SAP, OData, and Salesforce are in this category.
Message-Based Connectors
Message-based connectors are designed so you can configure queue-based message brokers like
ActiveMQ and JMS. The AMQP and Amazon SQS connectors are in this category.
Listener-Based Connectors
Listener-based connectors are designed to perform the following tasks:
• Monitor file-based systems for files or objects on a file system or other type of storage. You can
retrieve files and process the contents of the files or perform file operations like moving or reading
file metadata. For example, you can parse comma-delimited file, make the file contents available in a
process object as XML, and archive the processed file in another directory. The file or object
metadata, such as the number of rows or time stamp, is also available in a process object. The File,
FTP, and Amazon S3 connectors are in this category.
• Access event services to perform tasks like reading XML from a process object and creating comma-
delimited files or reading binary files from a process stream and writing that binary content to the
target file system.
Service Connectors
Service connectors are designed with Process Designer to specify the parameters and actions that
associate with a specific service that you want to make available in a process.
21Event Sources and Event Targets
With the listener-based connectors, you also define:
• Event Sources, which act as consumers or start events to trigger processes.
• Event Targets, which act as event services that you can use to invoke external systems.
Informatica Cloud Connectors
Informatica certifies that the following connectors work with Application Integration. If you want to certify a
connector that is not in this list, contact your sales representative.
JDBC
JDBC (Java Database Connectivity) is a Java API that enables Java programs to execute SQL
statements and interact with any SQL-compliant database. JDBC makes it possible to write a single
database application that can run on different platforms and interact with different DBMS systems.
Ensure that you use the latest database driver version that your database supports.
Note: Informatica provides two JDBC connectors: JDBC and JDBC_IC. Only the JDBC_IC connector is
used by Application Integration.
OData
OData Connector helps you to integrate systems like SharePoint and Team Foundation Server that are
OData compliant with other on-premise or cloud applications. It is a standardized protocol for creating
and consuming data APIs. OData builds on core protocols like HTTP and commonly accepted
methodologies like REST.
Salesforce
Salesforce Connector lets you create guides and processes that read information from and write
information to Salesforce. Outbound messages from Salesforce can trigger processes that perform
background processing of information and write information back to Salesforce.
SAP
You can use SAP BAPI Connector to integrate with SAP BAPIs and read, create, change, or delete data in
SAP. SAP BAPI Connector is available as a service call in Informatica Cloud Application Integration. For
example, to update the sales order data in SAP, you can configure an SAP BAPI connection to access the
BAPI_SALESORDER_CHANGE function.
Workday
Workday Connector allows you to integrate data with Workday applications. For example, you can
retrieve information about an employee and th employee's dependents or onboard a new hire.
Cloud Application Integration Connectors
Application Integration provides several connectors. For more information, see the documentation for the
specific connector (such as Amazon S3 Connector or File Connector).
22 Chapter 5: Connectors for Application IntegrationListener-Based Connectors
Application Integration supports several types of listener-based connectors that can be used for event-based
processing of messages and files. Process Designer exposes a wide range of attributes in the connectors so
you can use many file listener properties when you configure a listener-based connection.
These connectors, like the AMQP Connector (message-based) and File Connector (file/storage-based), act as
message brokers or file monitors that can be reused to make data objects, service calls, and events available
to the Process Designer.
Listener-Based Connectors 23Chapter 6
Application Integration Home
Page
The Application Integration Home page provides shortcuts to easily create assets, navigate to the most
recently updated projects, folders, and assets, and view tags and unpublished assets. When you select
Application Integration from the My Services page, the Application Integration Home page appears.
The following image shows the Application Integration Home page:
The Home page displays the following panels:
Shortcuts
Use the quick links in the Shortcuts panel to easily create an asset such as a process, guide, app
connection, service connector, or process object. To create a service connector or process object, you
can choose to create the asset by using a form or by importing WSDL and Swagger files.
Recently Updated Projects / Folders (Top 10)
Use the Recently Updated Projects / Folders (Top 10) panel to view and navigate to the top 10 projects
or folders that contain the top 100 most recently modified assets.
Note: You might see fewer than 10 projects or folders in the panel if the top 100 most recently modified
assets reside in fewer than 10 projects or folders. For example, if the top 100 most recently modified
assets reside in 5 folders, the panel displays only 5 folders. If a recently created project or a folder does
not contain any asset, the project or folder does not appear in the panel.
The Updated On field displays the last updated time of the most recently modified asset within the
project or folder.
24Click a project or folder to navigate to it.
Unpublished Assets
Use the Unpublished Assets panel to view the number of unpublished processes, guides, app
connections, and service connectors in the organization. The count includes the following types of
assets:
• Assets that were never published at all
• Assets that were published but unpublished later
• Assets that are outdated, which means that they were published but modified later and the changes
were not published again
Click View All to go to the Explore page and view all the assets in the organization.
Tags
Use the Tags panel to view all the tags that have been added to assets in the organization along with the
number of assets that use the tags.
Click a tag name to view the assets that use the tag.
Recently Updated Assets (Top 10)
Use the Recently Updated Assets (Top 10) panel to view the top 10 assets that were most recently
modified in the organization. You can also view the last updated time, name of the user who last updated
the asset, asset location, and the tags that the asset uses.
Click an asset name to view the asset.
25Chapter 7
Project setup
Create projects and project folders on the Explore page to organize your assets. After you have set up the
runtime environment and connections that are required for a project, you can create the assets for the
project.
The following characters cannot be used on the Explore page:
# ? ' | { } " ^ & [ ] / \
Do not use these characters in project, folder, asset, or tag names.
Creating Projects and Project Folders
Projects can contain multiple folders that you can use to organize the assets used in the project. Create
projects using the Explore page.
To create a project, go to the Explore page and select to explore by projects, and then click New Project.
To create a project folder, go to the Explore page and open the project, and then click New Folder.
You can create one level of folders in a project. You cannot create folders within folders.
For more information about working with projects, see Asset Management.
26Creating Assets
Create integration assets and assign them to projects.
You can create custom assets or create assets from a template. To create a custom asset, click New and
then select the asset type.
To create an asset from a template, click New, select the asset type, and then select the appropriate
template.
The following image shows the dialog box that appears when you create an asset:
1. Select the type of asset that you want to create. In this image, Service Connectors is selected.
2. Select one of these options to create a custom asset. Since Service Connectors is selected on the left, this area
lists the service connector types that you can create.
For more information on working with assets, see Asset Management.
Creating Assets 27Chapter 8
Editing your user profile
Your user profile contains the details of your Informatica Intelligent Cloud Services user account.
You can update the following information in your profile:
• Email address
• Time zone (used in the job execution time stamps on the All Jobs, Running Jobs, My Jobs, Import/Export
Logs, and My Import/Export Logs pages)
• Password
• Security question
Note: If you sign on to Informatica Intelligent Cloud Services using SAML single sign-on, you cannot update
any information in your user profile except the time zone.
1. Click the User icon in the top right corner of the Informatica Intelligent Cloud Services window and then
select Profile.
2. On the Profile page, add or edit personal information such as your name, job title, phone number, email
address, and time zone.
3. Optionally, change your password or security question.
4. Click Save.
28Chapter 9
Switching to a different
organization
If you are an administrator in a parent organization or a user in a parent organization that has privileges to
view sub-organizations, you can switch among organizations. You do not have to log out and log back in to
Informatica Intelligent Cloud Services.
Note: If you switch from a parent organization to a sub-organization, you can't perform the following
operations in the sub-organization:
• Create or import data transfer tasks
• Create or import dynamic mapping tasks
• Validate or run taskflows
To switch to a different organization:
u From the Organization menu in the upper right corner, select the organization that you want to view.
29Chapter 10
Informatica resources
In addition to the online help, you can find information about Informatica Intelligent Cloud Services using the
following resources.
Informatica Intelligent Cloud Services web site
You can access the Informatica Intelligent Cloud Services web site at http://www.informatica.com/cloud.
This site contains information about Informatica Cloud integration services.
Informatica Intelligent Cloud Services Communities
Use the Informatica Intelligent Cloud Services Community to discuss and resolve technical issues. You can
also find technical tips, documentation updates, and answers to frequently asked questions.
Access the Informatica Intelligent Cloud Services Community at:
https://network.informatica.com/community/informatica-network/products/cloud-integration
Developers can learn more and share tips at the Cloud Developer community:
https://network.informatica.com/community/informatica-network/products/cloud-integration/cloud-
developers
Informatica Intelligent Cloud Services Marketplace
Visit the Informatica Marketplace to try and buy Data Integration Connectors, templates, and mapplets:
https://marketplace.informatica.com/
30Informatica Intelligent Cloud Services Trust Center
The Informatica Intelligent Cloud Services Trust Center provides information about Informatica security
policies and real-time system availability.
You can access the trust center at https://www.informatica.com/trust-center.html.
Subscribe to the Informatica Intelligent Cloud Services Trust Center to receive upgrade, maintenance, and
incident notifications. The Informatica Intelligent Cloud Services Status page displays the production status
of all the Informatica cloud products. All maintenance updates are posted to this page, and during an outage,
it will have the most current information. To ensure you are notified of updates and outages, you can
subscribe to receive updates for a single component or all Informatica Intelligent Cloud Services
components. Subscribing to all components is the best way to be certain you never miss an update.
To subscribe, go to https://status.informatica.com/ and click SUBSCRIBE TO UPDATES. You can then
choose to receive notifications sent as emails, SMS text messages, webhooks, RSS feeds, or any
combination of the four.
Informatica Global Customer Support
You can contact a Customer Support Center by telephone or online.
For online support, click Submit Support Request in Informatica Intelligent Cloud Services. You can also use
Online Support to log a case. Online Support requires a login. You can request a login at
https://network.informatica.com/welcome.
The telephone numbers for Informatica Global Customer Support are available from the Informatica web site
at https://www.informatica.com/services-and-training/support-services/contact-us.html.
Informatica Knowledge Base
Use the Informatica Knowledge Base to find product resources such as how-to articles, best practices, video
tutorials, and answers to frequently asked questions.
To search the Knowledge Base, visit https://search.informatica.com. If you have questions, comments, or
ideas about the Knowledge Base, contact the Informatica Knowledge Base team at
KB_Feedback@informatica.com.
Legal
This software and documentation contain proprietary information of Informatica LLC and are provided under
a license agreement containing restrictions on use and disclosure and are also protected by copyright law.
Reverse engineering of the software is prohibited. No part of this document may be reproduced or
transmitted in any form, by any means (electronic, photocopying, recording or otherwise) without prior
consent of Informatica LLC. This Software may be protected by U.S. and/or international Patents and other
Patents Pending.
Informatica Intelligent Cloud Services Trust Center 31Use, duplication, or disclosure of the Software by the U.S. Government is subject to the restrictions set forth
in the applicable software license agreement and as provided in DFARS 227.7202-1(a) and 227.7702-3(a)
(1995), DFARS 252.227-7013©(1)(ii) (OCT 1988), FAR 12.212(a) (1995), FAR 52.227-19, or FAR 52.227-14
(ALT III), as applicable.
The information in this product or documentation is subject to change without notice. If you find any
problems in this product or documentation, please report them to us in writing.
Informatica, Informatica Platform, Informatica Data Services, PowerCenter, PowerCenterRT, PowerCenter
Connect, PowerCenter Data Analyzer, PowerExchange, PowerMart, Metadata Manager, Informatica Data
Quality, Informatica Data Explorer, Informatica B2B Data Transformation, Informatica B2B Data Exchange
Informatica On Demand, Informatica Identity Resolution, Informatica Application Information Lifecycle
Management, Informatica Complex Event Processing, Ultra Messaging, Informatica Master Data
Management, and Live Data Map are trademarks or registered trademarks of Informatica LLC in the United
States and in jurisdictions throughout the world. All other company and product names may be trade names
or trademarks of their respective owners.
Portions of this software and/or documentation are subject to copyright held by third parties, including
without limitation: Copyright DataDirect Technologies. All rights reserved. Copyright © Sun Microsystems. All
rights reserved. Copyright © RSA Security Inc. All Rights Reserved. Copyright © Ordinal Technology Corp. All
rights reserved. Copyright © Aandacht c.v. All rights reserved. Copyright Genivia, Inc. All rights reserved.
Copyright Isomorphic Software. All rights reserved. Copyright © Meta Integration Technology, Inc. All rights
reserved. Copyright © Intalio. All rights reserved. Copyright © Oracle. All rights reserved. Copyright © Adobe
Systems Incorporated. All rights reserved. Copyright © DataArt, Inc. All rights reserved. Copyright ©
ComponentSource. All rights reserved. Copyright © Microsoft Corporation. All rights reserved. Copyright ©
Rogue Wave Software, Inc. All rights reserved. Copyright © Teradata Corporation. All rights reserved.
Copyright © Yahoo! Inc. All rights reserved. Copyright © Glyph & Cog, LLC. All rights reserved. Copyright ©
Thinkmap, Inc. All rights reserved. Copyright © Clearpace Software Limited. All rights reserved. Copyright ©
Information Builders, Inc. All rights reserved. Copyright © OSS Nokalva, Inc. All rights reserved. Copyright
Edifecs, Inc. All rights reserved. Copyright Cleo Communications, Inc. All rights reserved. Copyright ©
International Organization for Standardization 1986. All rights reserved. Copyright © ej-technologies GmbH.
All rights reserved. Copyright © Jaspersoft Corporation. All rights reserved. Copyright © International
Business Machines Corporation. All rights reserved. Copyright © yWorks GmbH. All rights reserved. Copyright
© Lucent Technologies. All rights reserved. Copyright © University of Toronto. All rights reserved. Copyright ©
Daniel Veillard. All rights reserved. Copyright © Unicode, Inc. Copyright IBM Corp. All rights reserved.
Copyright © MicroQuill Software Publishing, Inc. All rights reserved. Copyright © PassMark Software Pty Ltd.
All rights reserved. Copyright © LogiXML, Inc. All rights reserved. Copyright © 2003-2010 Lorenzi Davide, All
rights reserved. Copyright © Red Hat, Inc. All rights reserved. Copyright © The Board of Trustees of the Leland
Stanford Junior University. All rights reserved. Copyright © EMC Corporation. All rights reserved. Copyright ©
Flexera Software. All rights reserved. Copyright © Jinfonet Software. All rights reserved. Copyright © Apple
Inc. All rights reserved. Copyright © Telerik Inc. All rights reserved. Copyright © BEA Systems. All rights
reserved. Copyright © PDFlib GmbH. All rights reserved. Copyright © Orientation in Objects GmbH. All rights
reserved. Copyright © Tanuki Software, Ltd. All rights reserved. Copyright © Ricebridge. All rights reserved.
Copyright © Sencha, Inc. All rights reserved. Copyright © Scalable Systems, Inc. All rights reserved. Copyright
© jQWidgets. All rights reserved. Copyright © Tableau Software, Inc. All rights reserved. Copyright© MaxMind,
Inc. All Rights Reserved. Copyright © TMate Software s.r.o. All rights reserved. Copyright © MapR
Technologies Inc. All rights reserved. Copyright © Amazon Corporate LLC. All rights reserved. Copyright ©
Highsoft. All rights reserved. Copyright © Python Software Foundation. All rights reserved. Copyright ©
BeOpen.com. All rights reserved. Copyright © CNRI. All rights reserved.
This product includes software developed by the Apache Software Foundation (http://www.apache.org/),
and/or other software which is licensed under various versions of the Apache License (the "License"). You
may obtain a copy of these Licenses at http://www.apache.org/licenses/. Unless required by applicable law
or agreed to in writing, software distributed under these Licenses is distributed on an "AS IS" BASIS,
WITHOUT WARRANTIES OR CONDITIONS OF ANY KIND, either express or implied. See the Licenses for the
specific language governing permissions and limitations under the Licenses.
32 Chapter 10: Informatica resourcesYou can also read