GETTING STARTED WITH RASPBERRY PI - Workshop Handout Created by Furtherfield Commissioned by Southend Education Trust
←
→
Page content transcription
If your browser does not render page correctly, please read the page content below
GETTING STARTED WITH RASPBERRY PI

          Workshop Handout
            Created by Furtherfield
   Commissioned by Southend Education Trust
                September 2013
GETTING STARTED
WITH RASPBERRY PI
INTRODUCTION
AIM Introduce Raspberry Pi and answer some of the most basic questions.
WHAT IS RASPBERRY PI?
A card-sized computer
Introduction to its ports and components
WHAT’S GOOD ABOUT RASPBERRY PI?
It’s portable, affordable, and it is less GUI oriented.
WHY CAN’T WE USE THE SCHOOL’S PCs?
You can! It just runs a different operating system: Linux based.
WHY DO WE WANT LINUX? Isn’t it more complicated?
Linux makes it easier to understand how a computer actually works.
WHERE TO GET IT?
Rs Components, Farnell, Maplins.
WHAT TO BUY?
Check out our list of accessories: tinyurl.com/cfytxku
HOW TO INSTALL THE OS ON AN SD CARD?
Download the OS from: raspberrypi.org/downloads
Burn on an SD card following the instructions on that page.
GETTING STARTED
Assemble all the peripherals you’ll need and power up your RP.
Login.
RASPBERRYPI LOGIN: pi
PASSWORD: raspberry
RESOURCES
Raspberry pi Education Manual - http://tinyurl.com/anvhs6o
Techno Teacher - http://about.me/alanodonohoe
Raspberry Pi Youtube Tutorials Channel - http://www.youtube.com/user/RaspberryPiTutorials
Instructables, cool things with RP - http://www.instructables.com/id/Raspberry-Pi-Challenge/
Getting started with the Raspberry PI - http://tinyurl.com/bbm4um7
Quick start guide - http://tinyurl.com/carjbos
What to buy - http://tinyurl.com/cfytxku
GETTING STARTED WITH RASPBERRY PI / 2THE COMMAND LINE
& NETWORKING
THE COMMAND LINE CHEAT SHEET
AIM The command-line allows us to completely control our RaspberryPi simply by writing text instructions.
Click up and down arrows to display previously written commands.
Show history of written commands: $ history
Run one of the commands listed in history: $ !123 (changing 123 with the actual number)
Change directory: $ cd
Make directory: $ mkdir NewDirectoryName
Create file: $ echo “some text for the file...” > NewFileName.txt
Show manual/help for any application: $ man mkdir OR $ man ls etc (press ‘q’ to quit)
List contents of current directory: $ ls
Manage sound: $ alsamixer (press ‘ESC’ to exit)
Reboot: $ sudo reboot
Shutdown: $ sudo poweroff
Install new application: $ sudo apt-get install NewApplicationName
Search for text string: $ grep “string to search”
Check a website is available: $ ping www.google.com (press ‘Contr + z’ to quit)
To ensure SSH is switched on:
1. $ sudo raspi-config
2. Using the up/down arrow keys select “Advanced Options” then highlight “select” with the left/right
arrow keys.
3. Click return.
4. Select “SSH”, click return and select “Enable”.
5. The SSH service should now start.
GETTING STARTED WITH RASPBERRY PI / 3SETUP NETWORK CONNECTION
AIM Connect your Pi to the Internet
Ethernet: If you have an ethernet connection, simply unplug any WiFi dongles then plugin an ethernet cable
and restart the RaspberryPi.
WIFI: Follow the instructions below
1. Unplug any Wifi dongles and startup the RaspberryPi & login using:
Username: pi
Password: raspberry
2. Edit the interfaces file with the nano text editor: $ sudo nano /etc/network/interfaces
And make sure it contains the following text:
auto lo
iface lo inet loopback
iface eth0 inet dhcp
auto wlan0
iface wlan0 inet dhcp
wpa-conf /etc/wpa.conf
Save and exit nano by clicking ‘Ctrl+o’, ‘return’, then ‘Ctrl+x’.
3. Edit the network configuration file with: $ sudo nano /etc/wpa.conf
And make sure it contains the following text (replace password and ssid text strings):
network={
ssid=”wifiHotspotName”
proto=RSN
key_mgmt=WPA-PSK
pairwise=CCMP TKIP
group=CCMP TKIP
psk=”password”
}
Then save and exit nano by clicking ‘Ctrl+o’, ‘return’, then ‘Ctrl+x’.
4. Now restart your Rpi with: $ sudo reboot
GETTING STARTED WITH RASPBERRY PI / 4ESPEAK
AIM Learn how to download, install and then run a program just using the command line.
Test audio is working:
$ speaker-test -t sine -f 600 > /dev/null
(You should hear a sound frequency being played through an attached speaker/headphone).
Quit the ‘speaker-test’ application by clicking ‘ctrl+c’.
Make sure the Raspberry Pi is plugged into a working Ethernet connection.
Install the espeak application:
$ sudo apt-get install espeak
Now make the computer speak:
$ espeak “Hello World”
ADVANCED: NETWORKED ESPEAK
AIM Learn how to log in to someone else’s computer and remotely run espeak.
Figure out your IP address with the ‘ifconfig’ application. It might start 192.168…. or 10.10...:
$ ifconfig
Write your IP on a bit of paper. Ask for the IP address of someone else in the class.
Now get someone elses IP address and check if you can access them on the network by using the ping ap-
plication: $ ping 192.168.1.64
You should receive an output like:
64 bytes from 192.168.1.64: icmp_seq=90 ttl=64 time=0.067 ms
64 bytes from 192.168.1.64: icmp_seq=91 ttl=64 time=0.041 ms
64 bytes from 192.168.1.64: icmp_seq=92 ttl=64 time=0.051 ms
If you don’t receive this output then their network connection needs to be checked.
Connect and login to someone else’s computer via ssh (Secure SHell), replacing ?? with the actual number:
$ ssh pi@??
Now make someone else’s computer speak:
$ espeak “Well hello there!”
When done remember to exit: $ exit
GETTING STARTED WITH RASPBERRY PI / 5MORE ADVANCED: ONE-LINE CHAT ROOM
AIM Learn about opening a port on your computer and using the Netcat (nc) application
To set-up a chatroom just type: $ nc -l -p 3333
Your Rpi is now listening on port 3333 for a connection, the port number “3333” can be changed to anything
you want, though keep the number above 1024 so as to avoid ports already in use.
Now find a friend and get them to login to your chatroom with: $ nc 192.168.1.88 3333
Make sure they write your IP address & not “192.168.1.88” used in the example.
To exit ‘cntr + c’
GETTING STARTED WITH RASPBERRY PI / 6PROGRAMMING:
PYTHON
WRITE SOME CODE IN THE PYTHON SHELL
AIM To get a sense of what the Python programming language looks like and learn how to do simple operations
via the Python shell.
Enter the python shell by typing:
$ python
Now write the following and press return:
>>> print “hello world”
(You should see the string “hello world” printed below)
Now write the following and press return:
>>> w=10
Then this:
>>> print w*10
(You should see “100” printed below)
Now exit from the python shell by clicking ‘Ctrl+d’
RESOURCES
Hello World! (http://tinyurl.com/cbtdmt9)
Raspberry pi Education Manual (http://tinyurl.com/anvhs6o)
GETTING STARTED WITH RASPBERRY PI / 7ADVANCED:
CREATE, SAVE AND RUN A PROGRAM VIA THE TERMINAL
AIM Write a programme that includes variables, strings and loops on a text file and run it from the terminal.
First list the content of the current directory:
$ ls
Then ‘move’ to the ‘Desktop’ directory:
$ cd Desktop
Create and open a new file to edit using the nano text editor:
$ nano testpython.py
In nano write the following and be sure to be very exact with the indentation. You don’t have to copy the text
preceded by a ‘#’ as these are comments and are not required to run the code:
print “Start Loop”
w=20
for i in range(w):
# Repeat the following command ‘w’ number of times
start = “>” # The start
spaces = “ “*(w-i) # Generate the spaces
dots = “.”*i*2 # Generate the dots
end = “THE DESKTOP
INTRO TO THE DESKTOP
AIM Learn how to launch the desktop in Raspberry Pi (realising it’s an application) and familiarise with the envi-
ronment (browser, text editor, terminal etc.)
Launch Desktop:
$ startx
Find the browser, terminal, text editor, scratch, Python Integrated Development Environment (IDLE)
PYTHON PROGRAMMING ON THE DESKTOP
AIM There is an application called IDLE (Integrated Development Environment) on the desktop which provides a
slightly easier means to edit and test your python code.
Double click on the IDLE icon on the desktop to start up the application.
(this takes you into the python shell where you can test commands)
Create a new window to write your program, click on File, then New Window
(this is where you write your python program)
Type:
Print “hello world”
Save the file to the desktop, click on File, then Save.
Run the code, click on Run, then Run Module. (You should see its output in the python shell)
You can a see and run other people’s source code’ by opening .py files in the ‘python_games’ folder. Or there
are millions of examples on the internet!
RESOURCES
Hello World! (http://tinyurl.com/cbtdmt9)
Raspberry pi Education Manual (http://tinyurl.com/anvhs6o)
A great website that introduces the ‘pygame’ library: www.pygame.org/wiki/tutorials.
This cheat sheet is very helpfull: http://inventwithpython.com/pygamecheatsheet.png
GETTING STARTED WITH RASPBERRY PI / 9INTRO TO SCRATCH
AIM Get your head around the logic of programming & animation with this graphical programming application.
With scratch you write a set of instructions for a character to execute.
1 HELLO WORLD
• Click on a character (aka a sprite) from the sprites list (bottom right) to select it.
• Click on Blocks Palette, click on the Looks button.
• Drag the block labelled “say [Hello] for [2] seconds” to the Scripts tab
• Replace “Hello” with “Hello World”. Double-click the block.
* Whether we are writing in Python or creating a script with Scratch using different blocks, the logic is the
same: we are writing instructions that the computer can understand and execute.
2
MAKE YOUR CHARACTER MOVE
• Click on a character (aka a sprite) from the sprites list (bottom right) to select it.
• Click on Blocks Palette, click on the Motion button.
• Drag the block labelled “turn [15] degrees” to the Scripts tab. Then write 90 degrees instead of 15.
• Click on Blocks Palette, click on the Looks button.
• Drag the block labelled “say [Hello] for [2] seconds” to the Scripts tab and snap it to the previous one.
• Write “I can turn.”
• Click on Blocks Palette, click on the Control button.
• Drag the block labelled “Repeat [10]” and place it around all the previous two blocks.
• Drag the block labelled “When [Green Flag Icon] Clicked” to the top of these blocks.
• Now add one more block, at the bottom of your script, outside the repeat structure: From the Looks
palette, drag the block labelled “say [Hello] for [2] seconds” to the Scripts tab, edit the text to say “I no
longer want to move.”
• Click on the green flag to execute the script you’ve created.
• Experiment with different options!
RESOURCES
Raspberry pi Education Manual (http://tinyurl.com/anvhs6o)
Scratch Site (http://scratch.mit.edu/)
Video Tutorials (http://scratch.mit.edu/)
GETTING STARTED WITH RASPBERRY PI / 10PHYSICAL COMPUTING
SWITCH AN EXTERNAL LED ON AND OFF
AIM Raspberry Pi can be used to read sensors (to measure light, temperature, pressure, distance, etc) and to
drive actuators (for instance, switch ON and OFF LED lights and small motors)
Open a terminal window.
Then ‘move’ to the ‘Desktop’ directory:
$ cd ~/Desktop
Create and open a new file to edit using the nano text editor:
$ nano gpio.py
In nano write:
import RPi.GPIO as GPIO
pin = 14
GPIO.setmode(GPIO.BCM)
GPIO.setup(pin, GPIO.OUT)
state = False
while 1:
GPIO.output(pin, state)
command = raw_input(“wait for key”)
state = not state
5V
Then save and exit nano by clicking ‘Ctrl+o’, ‘return’, then ‘Ctrl+x’.
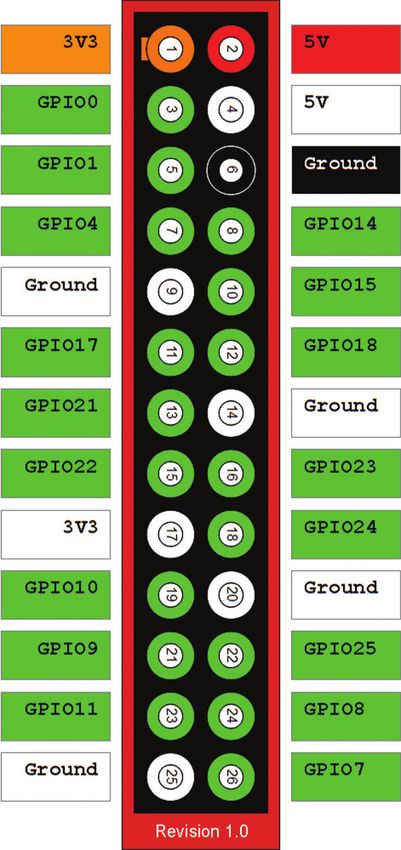
Run the program (as the root user) from the terminal: PIN GPIO 24
$ sudo python gpio.py GND
Attach an LED to pins 6 (ground, short leg) and 8 (GPIO14, long leg).
Press return. GND
PIN GPIO 14
To stop the programme press “cntr+c”.
GETTING STARTED WITH RASPBERRY PI / 11READ A SENSOR
AIM Learn how to find out whether a switch is ON or OFF using python.
Open a terminal window.
Then ‘move’ to the ‘Desktop’ directory:
$ cd ~/Desktop
Create and open a new file to edit using the nano text editor:
$ nano sensor.py
In nano write:
import RPi.GPIO as GPIO
import time
pin = 24
GPIO.setmode(GPIO.BCM) 5V
GPIO.setup(pin, GPIO.IN)
PIN GPIO 24
while 1:
GND
sensorValue = GPIO.input(pin)
print sensorValue
time.sleep(0.1)
Then save and exit nano by clicking ‘Ctrl+o’, ‘return’, then ‘Ctrl+x’.
GND
Attach the sensor to 5V, pin 18 (GPIO24) and ground. PIN GPIO 14
Run the program (as the root user) from the terminal:
$ sudo python sensor.py
Press return.
To stop the programme press “cntr+c”.
RESOURCES
http://www.raspberrypi-spy.co.uk/2012/06/simple-guide-to-the-rpi-gpio-header-and-pins
GETTING STARTED WITH RASPBERRY PI / 12ADVANCED
NETWORKING
PARSE DATA FROM WEB
AIM Learn a method of parsing data from data obtained from the web by combining the functionality of multiple
applications by using a pipe ‘|’ so that the output of one program is sent to another program for further pro-
cessing. We will be using the following programs: wget, python, grep, awk and tr.
This command will return the current temperature in london using the Open Weather Map (http://api.
openweathermap.org) Application protocol Interface (API):
$ wget -qO- ‘http://api.openweathermap.org/data/2.5/weather?q=London,uk&units=metric’ | python -m json.
tool | grep ‘”temp”’ | awk ‘{print $2}’ | tr -d ‘ \t\r\f,’
It can be broken down into the following programs, try each one in turn so as to understand how they each
affect the output:
1. $ wget -qO- ‘http://api.openweathermap.org/data/2.5/weather?q=London,uk&units=metric’
wget ‘gets’ the content of a URL from the internet. The -qO- flags tell wget to output this json (Javascript
Object Notation) data to the next command.
2. wget -qO- ‘http://api.openweathermap.org/data/2.5/weather?q=London,uk&units=metric’ | python -m
json.tool
The output of ‘wget’ is piped to ‘python’ which formats the JSON data so each value is on a new line.
3. wget -qO- ‘http://api.openweathermap.org/data/2.5/weather?q=London,uk&units=metric’ | python -m
json.tool | grep ‘”temp”’
The output of ‘python’ is piped to ‘grep’ which searches for the text string “temp”.
4. wget -qO- ‘http://api.openweathermap.org/data/2.5/weather?q=London,uk&units=metric’ | python -m
json.tool | grep ‘”temp”’ | awk ‘{print $2}’
The output of ‘grep’ is piped to ‘awk’ which return the second column of text.
5. wget -qO- ‘http://api.openweathermap.org/data/2.5/weather?q=London,uk&units=metric’ | python -m
json.tool | grep ‘”temp”’ | awk ‘{print $2}’ | tr -d ‘ \t\r\f,’
Finally the output of ‘awk’ is piped to ‘tr’ which replaces all; white spaces “ “, tabs “\t”, returns “\r”, and
commas “,”.
GETTING STARTED WITH RASPBERRY PI / 13DISCOVER RASPBERRY PI’s ON YOUR NETWORK
AIM To learn about using two applications in one command-line “nmap” and “grep” using the the pipe “|” instruc-
tion. nmap is a tool that allows you to search a network looking for connected devices. grep enables you to
search for text for a specific string. You can combine the functionality of these two applications by ‘piping’ the
output of one to the other.
First install nmap with: $ sudo apt-get install nmap
Now find your IP address with: $ ifconfig
If your IP address is “192.168.43.22” then replace “22” with “0/24” to create an IP address that looks like
“192.168.43.0/24”.
Now scan the network: $ sudo nmap -sP 192.168.43.0/24 | grep -i ‘Nmap scan report’
You should revive an output that looks something like this:
Starting Nmap 6.40 ( http://nmap.org ) at 2013-08-26 13:57 BST
Nmap scan report for 192.168.43.1
Host is up (0.0045s latency).
MAC Address: 44:A7:CF:B8:16:DB (Murata Manufacturing Co.)
Nmap scan report for raspberrypi (192.168.43.36)
Host is up (0.064s latency).
MAC Address: 48:02:2A:C5:A8:56 (B-Link Electronic Limited)
Nmap scan report for archant (192.168.43.138)
Host is up.
Nmap done: 256 IP addresses (3 hosts up) scanned in 2.17 seconds
To make the output more readable pipe the output of nmap to grep with the “|” character:
$ sudo nmap -sP 192.168.43.0/24 | grep “Nmap scan report”
And you should receive an output that looks like this:
Nmap scan report for 192.168.43.1
Nmap scan report for raspberrypi (192.168.43.36)
Nmap scan report for 192.168.43.222
Nmap scan report for archant (192.168.43.138)
“192.168.43.1” will be the IP address of the wifi router and all the others are devices connected to the
network.
GETTING STARTED WITH RASPBERRY PI / 14PYTHON SERVER & PHYSICAL COMPUTING
AIM To create a web server using python that controls the GPIO pins.
1. Save the script on the following page as “server.py”.
2. Run it with: $ sudo python server.py
3. Find your IP address with: $ ifconfig
4. Then in a web browser of a computer connected to the same network (including the same Rpi), type the IP
address followed by “:9997” i.e. something like: 192.168.43.36:9997
5. You should see a web page that enables you to turn the GPIO pin on and off.
6. If you are unable to run the script because you get a “Address already in use” message, then you may have
failed to close the server properly with “ctrl + c” in which case the command “fg” will bring the server process
to the foreground enabling you to cleanly close it.
GETTING STARTED WITH RASPBERRY PI / 15import SocketServer
import RPi.GPIO as GPIO
class MyTCPHandler(SocketServer.BaseRequestHandler):
pin = 14
GPIO.cleanup()
GPIO.setmode(GPIO.BCM)
GPIO.setup(pin, GPIO.OUT)
def handle(self):
# CONNECTION VARIABLES
connectiondata = self.request.recv(1024).strip()
getUrl = connectiondata.splitlines()[0]
print “Machine: “+format(self.client_address[0])+” accessed server URL: “+getUrl
# SET LED
onoff = “”
if ‘/?on’ in getUrl:
GPIO.output(self.pin, True)
onoff = “ON”
elif ‘/?off’ in getUrl:
GPIO.output(self.pin, False)
onoff = “OFF”
# SPECIFY HTML
html = ‘Hello World’
html += ‘ON / OFF’
html += ‘LED is: ‘+onoff+””
html += “”+connectiondata+””
# FORMAT RESPONSE
header = ‘HTTP/1.0 200 OK\n’
header += ‘Content-Type: text/html\n’
self.request.sendall(header+’\n\n{}’.format(html))
if __name__ == “__main__”:
HOST, PORT = “0.0.0.0”, 9997
SocketServer.TCPServer.allow_reuse_address = True
server = SocketServer.TCPServer((HOST, PORT), MyTCPHandler)
server.serve_forever()
GETTING STARTED WITH RASPBERRY PI / 16ADVANCED PYTHON
WITH GRAPHICS
GRAPHICS PROGRAMMING IN PYTHON
AIM Learn how to draw circles using python.
With IDLE create a new file called “graphics.py”
Write the following code:
# Set stuff up
import pygame, sys
from pygame.locals import *
print “start game”
pygame.init()
blue = (26,0,255)
cream = (254,255,250)
position = (250,250)
linewidth = 2
size = (500,500)
radius = 50
window = pygame.display.set_mode(size)
# Draw stuff
while 1:
window.fill(blue)
pygame.draw.circle(window, cream, position, radius, linewidth)
# Register user actions (allow the user to close the programme)
for event in pygame.event.get():
if event.type == QUIT:
pygame.quit()
sys.exit()
# Keep displaying my drawing
pygame.display.update()
GETTING STARTED WITH RASPBERRY PI / 17GRAPHICS AND INTERACTIVITY IN PYTHON
AIM Learn how to draw circles using python.
With IDLE create a new file called “graphics-mouse.py”
Write the following code:
# Set stuff up
import pygame, sys
from pygame.locals import *
print “start game”
pygame.init()
blue = (26,0,255)
cream = (254,255,250)
mousex, mousey = 0,0
size = (500,500)
radius = 50
linewidth = 2
window = pygame.display.set_mode(size)
# Draw stuff
while 1:
window.fill(blue)
position = (mousex,mousey)
pygame.draw.circle(window, cream, position, radius, linewidth)
# Register User Actions (quit, mouse movements)
for event in pygame.event.get():
if event.type == QUIT:
pygame.quit()
sys.exit()
elif event.type == MOUSEMOTION:
mousex, mousey = event.pos
# Update my drawing
pygame.display.update()
GETTING STARTED WITH RASPBERRY PI / 18ADVANCED PYTHON
WITH PHYSICAL
COMPUTING
SWITCH BACKGROUND COLOUR
AIM Building on the programme you just wrote (“graphics-mouse.py”), create a new programme called “graphics-
sensor.py” that changes background colour when you touch a sensor.
# Set stuff up
import pygame, sys
from pygame.locals import *
import RPi.GPIO as GPIO
import time
print “start game”
pygame.init()
pin = 24
GPIO.setmode(GPIO.BCM)
GPIO.setup(pin, GPIO.IN)
blue = (0,0,255)
red = (255,0,0)
cream = (254,255,250)
mousex, mousey = 0,0
size = (500,500)
radius = 50
linewidth = 2
window = pygame.display.set_mode(size)
>>>> Code continues on the next page.
GETTING STARTED WITH RASPBERRY PI / 19# Draw stuff
while 1:
sensorValue = GPIO.input(pin)
print sensorValue
if sensorValue == True:
window.fill(blue)
else:
window.fill(red)
position = (mousex,mousey)
pygame.draw.circle(window, cream, position, radius, linewidth)
# Register User Actions (quit, mouse movements)
for event in pygame.event.get():
if event.type == QUIT:
pygame.quit()
sys.exit()
elif event.type == MOUSEMOTION:
mousex, mousey = event.pos
# Update my drawing
pygame.display.update()
MODULATE BACKGROUND COLOUR
AIM Building on the programme you just wrote (“graphics-sensor.py”), create a new programme called “graphics-
sensor-2.py” that changes background colour progressively every time you touch a sensor.
# Set stuff up
import pygame, sys
from pygame.locals import *
import RPi.GPIO as GPIO
import time
print “start game”
pygame.init() >>>> Code continues on the next page.
GETTING STARTED WITH RASPBERRY PI / 20pin = 24
GPIO.setmode(GPIO.BCM)
GPIO.setup(pin, GPIO.IN)
x = 255
cream = (254,255,250)
mousex, mousey = 0,0
size = (500,500)
radius = 50
linewidth = 2
window = pygame.display.set_mode(size)
# Draw stuff
while 1:
blue = (0,0,x)
sensorValue = GPIO.input(pin)
if sensorValue == True:
if x < 255:
x=x+5
window.fill(blue)
print x
else:
x = 10
window.fill(blue)
else:
window.fill(blue)
position = (mousex,mousey)
pygame.draw.circle(window, cream, position, radius, linewidth)
# Register User Actions (quit, mouse movements)
for event in pygame.event.get():
if event.type == QUIT:
pygame.quit()
sys.exit()
elif event.type == MOUSEMOTION:
mousex, mousey = event.pos
# Update my drawing
pygame.display.update()
GETTING STARTED WITH RASPBERRY PI / 21ADVANCED SCRATCH
CREATE A MAZE GAME
AIM Learn how to use if statements and loops to create a maze game using scratch.
1. Open scratch from the Desktop
2. Click on ‘Stage’ on right hand.
3. Navigate to the ‘Backgrounds’ tab
4. Edit your background: click ‘edit’
5. Draw a maze using one colour for the background and one colour for the path.
6. Click ok
7. Now click on your sprite so that it’s selected.
If you need to, right click on your sprite and change size so that it fits the path you drew.
Start programming:
1. Chose the Control palette.
2. Add arrow control to your sprite
3. On the Control palette choose the block “When space key pressed”
4. Drag 4 of them to your scripts.
5. Click on the little arrow and select a different key for each of them: up, down, left and right arrow.
6. On the Motion palette choose “Point in direction” and drag it 4 times under each of the previous blocks.
Change each of them so that the up arrow point up, the left points left, etc.
7. On the Motion palette choose “Move 10 steps”. Drag 4 of them again.
8. Now try to move your character using the arrows.
9. Choose a way to start your game:
“Green flag” or “when spacebar key pressed”
GETTING STARTED WITH RASPBERRY PI / 2210. Using the Motion palette send your sprite to the beginning of your maze.
Pick the “Go to X and Y” block and drag it to your scrip under the first block.
Now change the x and y coordinates so that they match the position at the beginning of your maze. (You
can find those out by placing your mouse in that position and looking at the x and y that appear at the
bottom right of the game screen)
11. Back to Control palette.
12. Chose the “forever” block
13. Choose the “if” block and add it inside the “forever” block.
14. Go to Sensing palette and pick the “touching colour ?” block. Place it in the gap of the “if” block.
15. Now click on the colour square to get the colour picker tool. Go to your background and click on the
background colour so that it is selected. Now your “if” block should show your background colour.
16. Inside the “if” block place a motion order so that your sprite is sent back to the start every time it
touches the walls of your maze.
Use the “go to x and y” block again.
17. Keep experimenting: add sounds for when the maze is completed, add sounds for when you are sent
back to the beginning, etc.
GETTING STARTED WITH RASPBERRY PI / 23RESOURCES
Raspberry pi Education Manual - http://tinyurl.com/anvhs6o
Hello World! - http://tinyurl.com/cbtdmt9
Techno Teacher - http://about.me/alanodonohoe
Raspberry Pi Youtube Tutorials Channel - http://www.youtube.com/user/RaspberryPiTutorials
Instructables, cool things with RP - http://www.instructables.com/id/Raspberry-Pi-Challenge/
Getting started with the Raspberry PI - http://tinyurl.com/bbm4um7
Quick start guide - http://tinyurl.com/carjbos
A great website that introduces the ‘pygame’ library - www.pygame.org/wiki/tutorials.
A helpfull cheat sheet - http://inventwithpython.com/pygamecheatsheet.png
Scratch Site - http://scratch.mit.edu
Scratch Video Tutorials - http://scratch.mit.edu
GPIO pins - http://www.raspberrypi-spy.co.uk/2012/06/simple-guide-to-the-rpi-gpio-header-and-pins
What to buy - http://tinyurl.com/cfytxku
Created by Furtherfield, www.furtherfield.org
Commissioned by Southend Education Trust
Written by Tom Keene and Olga Panadés Massanet
Inspired by “The Raspberry Pi Education Manual” and the Raspberry Pi Education Wiki
This work is licensed under the Creative Commons Attribution-ShareAlike 3.0 Unported License. To view a copy of this
license, visit http://creativecommons.org/licenses/by-sa/3.0/.
GETTING STARTED WITH RASPBERRY PI / 24You can also read