Gingerbread House Allergy-Friendly, Gluten-Free - By Laurie Sadowski
←
→
Page content transcription
If your browser does not render page correctly, please read the page content below
Allergy-Friendly, Gluten-Free
Gingerbread House
                    By Laurie Sadowski
Developed for Allergic Living magazine and Allergicliving.com
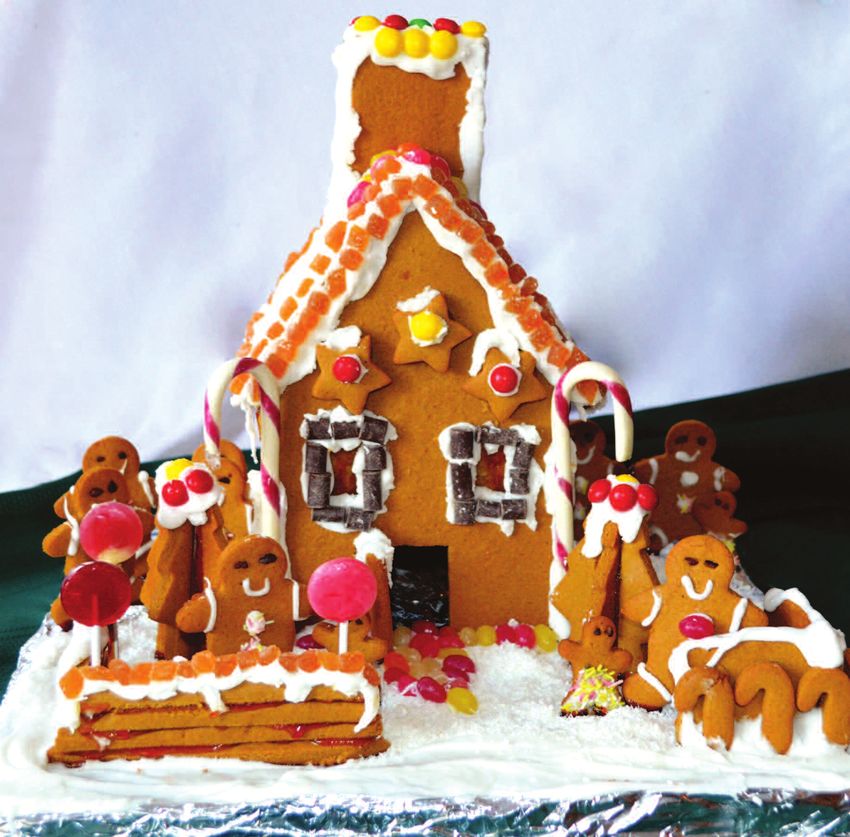
Allergic Living’s Gingerbread House
Makes: 1 house with all the trimmings
Free of: Gluten and all top allergens

Building a gingerbread house (without gluten or top allergens) is a holly jolly way to enjoy
the holiday season.

You will need to make two batches of the gingerbread dough for this recipe. (Making a double
batch is typically too large for most mixers to handle.)

Once baked, assembled and decorated, the gingerbread house will stay fresh and sturdy
at room temperature for up to five days. –Laurie Sadowski

Gluten-Free Gingerbread Ingredients
Need to make 2 batches of the following

2 cups (475 mL) sorghum flour
3
 ⁄4 cup (175 mL) quinoa flour
3
 ⁄4 cup (175 mL) tapioca flour
21⁄2 tsp ground ginger
13⁄4 tsp xanthan gum
11⁄2 tsp ground cinnamon
1 tsp baking soda
1
 ⁄2 tsp ground nutmeg
1
 ⁄2 tsp salt
1
 ⁄4 tsp ground cloves
1
 ⁄2 cup (120 mL) packed brown sugar
1
 ⁄2 cup (120 mL) dairy-free, soy-free buttery spread (such as Earth Balance)
1
 ⁄2 cup (120 mL) unsulphured molasses (not blackstrap)
1
 ⁄4 cup (60 mL) crushed allergen-free hard candies (for “stained glass” windows)

Edible Sugar Glue
11⁄2 cups (350 mL) white sugar

Royal Icing
4 cups (950 mL) powdered confectioners’ sugar
1 tbsp cornstarch*
1
 ⁄2 tsp xanthan gum
Pinch salt
 ⁄4- ⁄2 cup (60-120 mL) water
1 1

House Decorations
See page 6 for allergy-friendly decorating ideas

*Cornstarch produces the best results. Tapioca starch can be substituted, but the icing won’t be as firm when dry.

                                                         2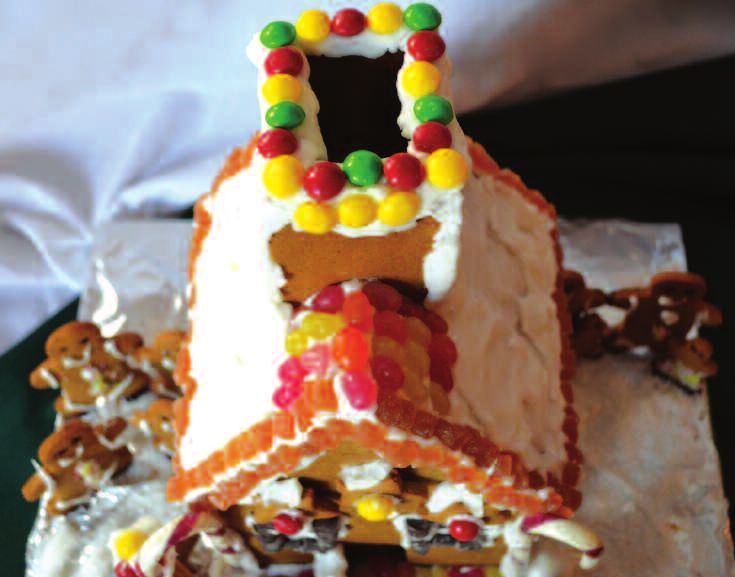
Allergic Living’s Gingerbread House
Gluten-Free Gingerbread Method
1.   To make gingerbread dough, whisk flours, ginger, xanthan gum, cinnamon, baking soda,
     nutmeg, salt and cloves in a medium bowl to combine.

2.   To the mixing bowl of a large stand mixer, add brown sugar and buttery spread. Beat on high
     with mixer until light and fluffy, about 2 minutes. Mix in molasses.

3.   With mixer on low speed, gradually beat in dry ingredients, scraping down bowl sides
     as needed, until dough begins to come together into a ball.

4.   Divide dough in half and flatten each piece into a disk. Wrap in plastic wrap and refrigerate
     for at least 2 hours.

5.   Repeat steps 1-4 to make second batch.

6.   While dough is chilling, make Templates. See page 5.

7.   Preheat oven to 350º F.

8.   Roll out first dough disk to 1/8- to 1/4-inch thickness on parchment paper. Place template
     pieces on top of dough. Following the template, cut 1/2-inch away from the template edges
     (try not to cut through the parchment). The extra border allows for shrinkage and trimming
     of cooked gingerbread. Reroll scraps and repeat with other templates.

9.   Gently transfer parchment paper with dough shapes to baking sheet. Refrigerate for 10 minutes.

10. On house FRONT, sprinkle crushed candy into each window opening. (It will harden in cooling
    to create window.) Bake 10-14 minutes, until edges are brown and center is firm (but soft)
    to touch. Cool on baking sheet for 5 minutes then carefully remove gingerbread pieces
    to a wire rack using a large spatula.

11. Repeat steps 8-10 with remaining dough disks, using cookie cutters to make trees
    (see page 4, cut 2 tree shapes for each standing tree), gingerbread men, snowmen,
    and other desired shapes for décor once the template is complete.

12. While gingerbread is still warm, gently transfer to a cutting board. Place original templates
    on top of pieces, and carefully trim any excess to fit template (do not trim the chimney yet).
    If dough is cooled too much, use a serrated knife. Keep your trimmings for a fence.

13. To make sugar glue, place sugar in a wide saucepan over medium heat. Cook for 5 minutes,
    stirring occasionally, until the sugar melts into thin syrup. If it thickens up at any time, warm
    over low heat.

14. Assembling gingerbread house: Line a flat, moveable work surface with aluminum foil.
    Adults should be in charge of assembly (2 people, if possible) as the sugar glue is quite hot.

15. Lay FRONT (with the door) of gingerbread house on work surface, face down. Dip edge of
    one SIDE into sugar glue, and immediately adhere it to a backside edge of the FRONT, lining
    up the bottoms for a sturdy base. The glue will set-up in about 30 seconds. Repeat with
    second SIDE on opposite side of the FRONT.

More great baking at Allergicliving.com

                                                3
Allergic Living’s Gingerbread House
Gluten-Free Gingerbread Method continued

16. To affix the BACK, carefully and quickly drizzle sugar glue onto SIDE edges, and immediately
    affix the BACK, lining up the base. Once dry, stand the structure upright.

17. Carefully and quickly drizzle sugar glue onto slanted edges of one ROOF piece, and affix
    to a top edge of the structure, lining it up with the peak. With a steady hand, hold the piece
    until set. Repeat with other ROOF piece.

18. Check to see if CHIMNEY FRONT/BACK pieces line up with the roof peak. If not, trim to fit
    with a serrated knife. Then trim CHIMNEY FRONT/BACK and CHIMNEY SIDE pieces to
    evenly fit together. Carefully and quickly drizzle sugar glue onto side edges and adhere
    to one another to create a box shape. Drizzle sugar glue on the slanted edges of chimney,
    then affix chimney to the roof peak.

19. To secure the house, place it on foil and mark where the four corners hit. Move structure
    and dollop sugar glue onto foil where corners are marked. Immediately align the house atop
    sugar glue corners.

20. To attach DOOR (see template for creating), drizzle sugar glue on one long side edge,
    and affix to a side edge of the house doorway so the door is “open”.

Decorating
•    To make a fence, dip long edges of rectangular gingerbread scraps into sugar glue. Affix long
     edges together to form a picket-style fence. Dip base of fence in sugar glue and place on foil
     in the “front lawn”.

•    To make a 2-dimensional standing tree, cut one tree shape in half lengthwise. Dip cut edges
     in sugar glue, and affix one half to middle of front side of an intact tree shape, and the other
     half to middle of backside. Once set, it should stand on a crisscross base.

•    For the royal icing, sift the powdered sugar, starch, xanthan gum and salt together into a
     large mixing bowl. With mixer on low speed, slowly beat in 1/4 cup water. Mix in additional
     water, 1 tablespoon at a time, until icing just starts to come together into thick paste. Scrape
     down sides of bowl then beat on high for 2 minutes.

•    Scrape icing into a piping bag or large plastic storage bag with a small piece of a lower
     corner snipped off. Pipe icing to decorate house edges and cut-outs and create snow on
     fences, “ground” and roof. Immediately apply allergy-friendly candy décor, as desired,
     before icing sets up.

•    For additional gingerbread décor, such as stars and candy canes, decorate them first then
     adhere to the “ground” or house with sugar glue.

More great baking at Allergicliving.com

                                                4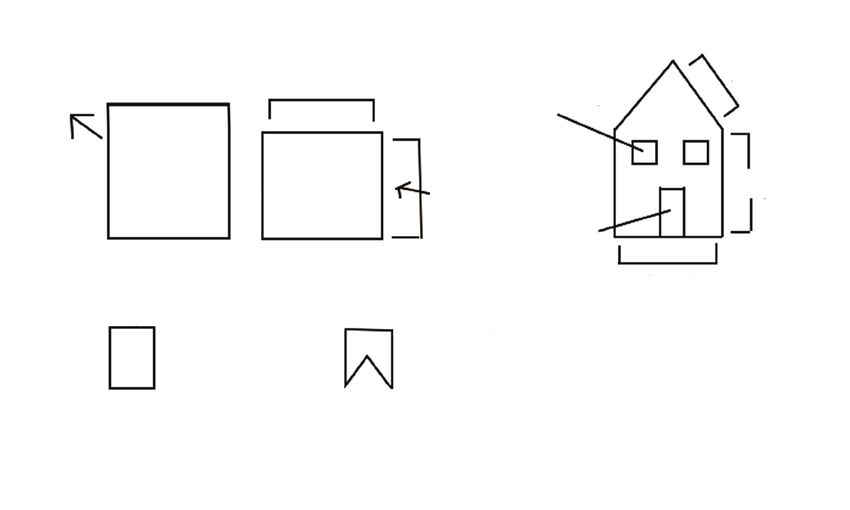
Allergic Living’s Gingerbread House Template
  The house template can be made in advance or while the dough is chilling.
  On clean paper, measure and cut as directed below:

  • ROOF (cut 2): Rectangle, 5 inches wide (base) x 6 inches long (sides).

  • SIDES (cut 2): Rectangle, 5 inches wide (base) x 51⁄4 inches long (sides).

  • BACK: Pentagon, 5 inches wide (base) x 51⁄4 inches long (vertical sides), and triangle
    top with 41⁄2-inch slants.

  • FRONT: Same as BACK, but cut a rectangular doorway from the bottom edge that is
    11⁄2 inches wide (base) and 21⁄2 inches long (sides) and cut two 2-inch square windows,
    one on each side of door.

  • CHIMNEY SIDES (cut 2): Rectangle, 21⁄2 inches wide (base) x 3 inches long (sides).

  • CHIMNEY FRONT/BACK (cut 2): Same as CHIMNEY SIDES but cut a triangle out
    starting at the bottom edge to accommodate slanted roof. Measure triangle cutout using
    the pointed slant from FRONT/BACK template.

  • DOOR: Rectangle, 11⁄2 inches wide (base) x 21⁄2 inches long (sides).

            roof (cut 2)          side (cut 2)                                                front

            5-inch                5-inch                                                                 41⁄2-inch
6-inch                                                                    2-inch square

                                                                                                          51⁄4 inch
                                                              51⁄4 inch
                                                                             11⁄2-inch
                                                                                 by
                                                                             21⁄2-inch
                                                                                             5-inch
            2 ⁄2-inch
             1
                                              2 ⁄2-inch
                                               1
                                                                                         back is the same as
                        chimney                           chimney                        front without the doors
   3-inch               sides        3-inch               front/back                     and windows
                        (cut 2)                           (cut 2)

  For more recipes visit Allergicliving.com

                                                          5
Allergic Living’s Gingerbread House
Allergy-Friendly Decorating Ideas*
• Candy Tree Organic: licorice laces, twists, bites, lollipops
• Divvies: jelly beans, gum balls, superstars
• Dried fruit: such as raisins, cranberries, sliced figs
• Enjoy Life Foods for safe chocolate: Mini Chips,
Mega Chunks and Morsels
• Indie Candy: natural Christmas tree gummies,
Christmas light lollipops
• Florida’s Natural Nuggets: sticks, sour string
• Gimbal’s Fine Candies Gourmet Jelly Beans: sour,
cherry, cinnamon
• Let’s Do… Sprinklez organic confetti
• Pure Fun: candy canes, pops, meltdowns
• Skittles: candy, various flavors
• Surf Sweets: watermelon and peach rings,
gummy worms, swirls, jelly beans, sour worms
or bears
• Trujoy Sweets: organic candy canes
• Yummy Earth: lollipops, drops, gummies, snacks,
and sour beans
*Always check labels for your or your child’s specific allergens or gluten.
Visit Allergicliving.com for many great allergy-safe, gluten-free recipes.
Laurie Sadowski is a cookbook author, gluten-free baking expert and contributor to
Allergic Living magazine. Laurie’s books include The Allergy-Free Cook Bakes Bread and
The Allergy-Free Cook Bakes Cookies and Cakes. Visit her at www.theallergyfreecook.com
and www.lauriesadowski.com.
6You can also read