BUILDING A GINGERBREAD HOUSE - with Susan Reid
←
→
Page content transcription
If your browser does not render page correctly, please read the page content below

BUILDING A GINGERBREAD HOUSE
with Susan Reid

  What You’ll Need

   CONSTRUCTION GINGERBREAD                                      ROYAL ICING
   FROM SCRATCH                                                   3 egg whites*
      3/4 cup (6 oz.) buttermilk                                  1/2 tsp. cream of tartar
      6 tbsp. (3 oz., 3/4 stick) butter or margarine              4 cups (1 lb.) unsifted confectioners’ sugar
      1 cup (8 oz.) brown sugar                                   Food coloring (optional)
      1/2 cup (6 oz.) molasses                                    Vanilla, lemon, peppermint or other extract
      1 large egg                                                   (optional)
      5 cups (21 1/4 oz.) King Arthur Unbleached                  *Meringue powder works just as well; use 1/4 cup meringue powder
                                                                   combined with 1/2 cup of cold water in place of the fresh egg whites.
        All-Purpose Flour
      1 tsp. baking soda
      1 tsp. ginger
      1 tsp. cinnamon
      1/2 tsp. salt

   CONSTRUCTION GINGERBREAD
   FROM OUR KING ARTHUR MIX
      Construction Gingerbread
      For each bag of mix, combine:
      contents of the mix
      1/4 cup (1 oz.) vegetable oil
      3 to 4 tbsp. hot water

FIRST YOU NEED GINGERBREAD
Dough for gingerbread construction projects is perfectly edible; it just has more flour in it to make it
sturdier than gingerbread cookie dough. It’s simple to put together, and should chill for an hour before
being rolled out for baking.

CONSTRUCTION GINGERBREAD FROM SCRATCH
In a large saucepan, heat the butter in the buttermilk until it is just melted and remove from the heat. Add
the brown sugar and molasses and beat in the egg. Whisk the spices, salt and baking soda together with
one cup of flour. Add this to the wet mixture and mix until incorporated. Add flour one cup at a time until
you have a smooth, stiff dough. It should be stiff enough to be flexible, but not crumbly or sticky. Divide
the dough in half, wrap it in plastic and flatten it out before chilling in the refrigerator for at least an hour.

This is the consistency the dough should have once it’s mixed.      An easy way to wrap your dough for chilling is to put it in a plastic bag
                                                                    and press it out flat. The texture of the dough will change and become
                                                                    more malleable as it rests.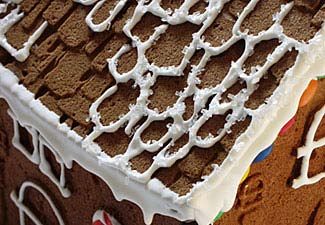
CONSTRUCTION GINGERBREAD FROM OUR KING ARTHUR MIX
In a medium-sized mixing bowl, combine the contents of the mix with the vegetable oil. Stir until evenly
blended—the mixture will be crumbly. Add the egg and 3 tablespoons of hot water, kneading until dough
becomes cohesive. Add the last tablespoon of water if the dough seems dry—it should be stiff enough to be
flexible, but not crumbly or sticky. Divide the dough in half, wrap it well and refrigerate it for one hour
or longer.

Bake the cookies in a preheated 350°F oven for 15–18 minutes; they’ll be slightly soft when you remove the
pan from the oven. Allow the cookies to cool for 5 minutes, then transfer them to a wire rack to finish cool-
ing. Two bags of mix will yield enough dough for an 8 1/2 x 5 1/4-inch tall house, with about 1/4 of the dough left
over for people, trees and other decorations.

CUT AND BAKE THE PIECES
If you have an embossed plaque for a gingerbread house, you can use it to bake your pieces. If you want
to make a design of your own, you can print the templates below and use them as a starting point. Or you
can print out the pages and attach them to some rigid cardboard. Use a utility knife or scissors to cut out
templates. These can be placed on the dough and used as a guide to cut out the shapes for your pieces.

Take one of your bags of dough out of the refrigerator, and preheat the oven to 350°F. Divide the dough
into two pieces. Put one of the pieces back in the refrigerator while you work with the other half. If you
have a cookie sheet with no sides, you can roll your dough out directly on it. If your cookie sheets have
edges on them, turn them over and roll out the dough on the back. You can also roll out the dough on
a piece of parchment paper, and use the paper to transfer the dough to your baking sheet.

Checklist of Pieces for Housebuilding
 • 2 long side walls, with windows cut out
 • Cut a door out of one of these walls between the windows; save the cutout piece or use
   scrap dough to cut another with your template
 • 2 gable end walls, with the point on top
 • 2 roof panels
 • People
 • Trees
 • Architectural details of your choice, such as chimney pieces or shutters

GINGERBREAD HOUSE TEMPLATE
Roll out the dough into a rectangle that’s about 1/4-inch thick. Roll your dough as evenly as possible, cover-
ing as much of the baking sheet as possible. Cut out two side walls, and put windows and a door in one
of them. Pull the cutout piece up off the baking sheet carefully and collect all the scraps. You can use them
to roll out more pieces or people later. Take the reserved piece of dough out of the refrigerator and roll it
out. Cut two roof panels into that piece. Take the reserved scraps of dough and roll out, cutting two end
panels from it. You can cut a window into these if you want. Use any remaining dough to cut out people and
trees to decorate your scene. If you have a cookie cutter for a snowman or sleigh, those would work too.

Bake the gingerbread pieces at 350°F for 15–18 minutes, until the edges just begin to brown. Remove them
from the oven and place the pan on a cooling rack. After 10 minutes, run a spatula under the pieces to free
them up from the baking sheets. Allow the pieces to finish cooling on the cookie sheets completely.

Make sure you leave at least half an inch between the pieces you cut,   Just be sure to leave at least 3/4" of dough intact on all sides of the
because they’ll expand during baking.                                   window opening you cut.

BUILDING A GINGERBREAD HOUSE                                                                                                               Page 2
ASSEMBLING YOUR HOUSE
To put everything together, your mortar/paint/primary tool is royal icing. It’s made of egg whites, confection-
ers’ sugar and an acidic ingredient (you can use either lemon juice or cream of tartar.) Meringue pow der
Makes this recipe very easy to do, without the hassle of separating eggs.

Royal Icing
Royal icing needs to be kept covered, because it will dry quickly and become lumpy if exposed to the air.
The easiest way to store the icing for long periods of time is in a plastic pastry bag or zip-top food storage
bag. If you have disposable pastry bags, using an uncut bag as a sleeve for the bag you are piping from is
an easy way to keep everything from drying out.

In a large bowl, whip the egg whites with the cream of tartar until foamy. Sprinkle in the sugar gradually,
whipping all the while. The more you whip the icing, the stiffer it’ll be and the faster it will harden up. If
you want to “paint” with the icing, you can use food coloring to create different colors and thin the icing
with a few drops of water so it will flow.

When properly whipped, this is how the icing should look.                     Pastry bags can be awkward to fill. Use a tall,
                                                                              narrow measuring cup or vase to hold the top of
                                                                              the bag open, then pour the icing into the bag.

ASSEMBLY
You’ll need a stiff piece of cardboard to use as a foundation for your house, a pastry bag to pipe
the royal icing, and some props to hold the pieces in place while the “mortar” is drying. If you
want to do any detailed outlines on the walls, it’s often easier to do so before putting the walls up. See
the “Outlines” section.

BUILDING A GINGERBREAD HOUSE                                                                                          Page 3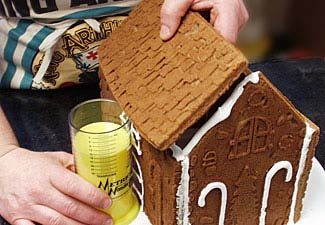
PUTTING UP THE WALLS
First, take a serrated knife and trim the edges of the walls, so any bumpy parts are squared off.
This will allow for better contact between the surfaces that are going to be joined together. Next,
pipe a generous line of icing along the bottom of one of the side walls. Place it on your board,
and use a prop to hold it upright. Pipe another wide band of icing along the bottom inside edge
of the wall to reinforce it. Repeat this process with one of the end walls, making sure to put some
icing on the vertical edge where the walls meet. Check to make sure the two walls are at right
angles before the icing starts to set.

Figure 1

Figure 2

Figure 3                                     Figure 6

                                             Figure 1: When you trim your pieces, don’t press down so much as saw back and forth,
                                             letting the knife do the work; you don’t want to crack or chip the walls.

                                             Figure 2: Cut a 1/4- to 3/8-inch hole in the bottom of the pastry bag, and move slowly up
                                             the bottom of the wall as you squeeze out the icing.

                                             Figure 3: Putting another band of icing along the inside bottom edge of the wall will help
                                             it to stay in place and make the house sturdier.
Figure 4
                                             Figure 4: Place the end wall so its thickness is inside the side wall’s length, for a stronger
                                             house. This will also allow you to have nice eaves when the roof panels are put on.

                                             Figure 5: A cereal box is a handy tool to check that your walls are at right angles to
                                             each other.

                                             Figure 6: Depending on the weather and how much icing you used, it can take between 4
                                             hours and 12 hours before the house is ready to have its roof put on.

Figure 5

BUILDING A GINGERBREAD HOUSE                                                                                                       Page 4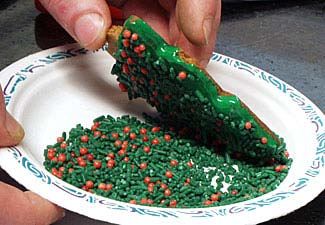
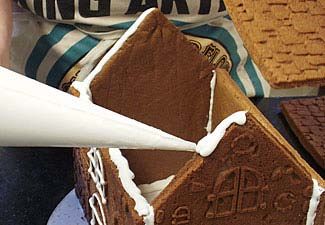
INSTALLING THE ROOF
Use a prop to keep the roof panel from sliding down and place the first half of the roof in place.
Pipe more icing along the inside seam where the pieces meet, to reinforce the joint. Let the first
roof panel dry in place for at least an hour, then repeat the process with the second half of the
roof.

Pipe a thick line of frosting along the top of the side wall
and up the points of the gable end.

An adjustable measuring cup is handy to make a support         Putting more icing along the seam will help to hold the roof panel in place.
that’s just the right height.                                  Wipe away any stray drips with a damp cloth.

DECORATING
The only rule here is that everything you use should be edible. What better treat can there be than to go to
the candy aisle of your favorite store, and buy anything that looks good? Gumdrops, fruit rollups, string
licorice, mini marshmallows, green and red starlight mints, M&Ms, Necco wafers, Lifesavers, cotton candy,
nonpareils, dragees—they all have a place in the palette of treats you can use. Colored sugars are good for
landscaping help. Use anything you like; the candies shown here are only suggestions.

Before you begin, it’s helpful to have some inexpensive art brushes and water on hand. Tweezers can be
helpful for placing dragees and cotton swabs are handy for wiping up spills or correcting mistakes before
they dry. You can use food coloring to tint some of the royal icing; you’ll want some small containers with
lids to mix them in. The lids are important to keep the icing from drying out.

BUILDING A GINGERBREAD HOUSE                                                                                                                  Page 5
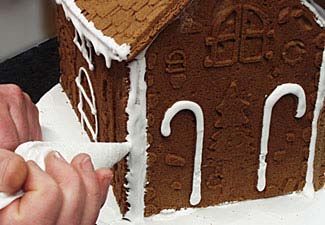
OUTLINES
If you’ve used an embossed gingerbread house pan that makes panels with raised features, you may want
to outline those features with royal icing. This is easier to do before assembling the house, since you can lay
the sides down flat. Cut a very small hole in the end of your plastic or piping bag, and simply trace the out
line of the windows and doors.

                                                                                      Highlight the embossed designs: windows, doors, big
                                                                                      candy canes.

Make sure you cut a very small hole in the end of the pastry bag—                     A small paintbrush is helpful to spread the icing evenly
remember, you can always make it bigger if you need to!                               over the wall’s features.

ACCENTING THE HOUSE’S CONTRUCTION FEATURES
The four corners of the house where the walls are joined together are a natural place to decorate. Any
candy you choose can be cemented to the seam where the two walls connect. Colored candies make great
Christmas lights, and you can drape some royal icing off the eaves to make snow.

Put some wet royal icing on the seam where the two walls are joined.   Place candy into the icing, starting at the bottom and working your
                                                                       way up to the roof.

BUILDING A GINGERBREAD HOUSE                                                                                                          Page 6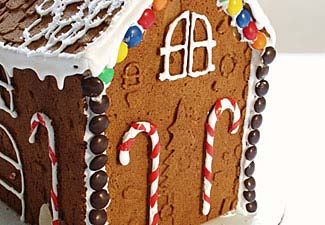
TREES
For colorful trees, color some royal icing a deep green, and thin it with a little water so it flows freely. Coat
the tree shape with the help of a paintbrush; be sure to spread the frosting down over the edges for a more
finished appearance (Figure 7.) Finish the tree by dipping it in green and red sprinkles (Figure 8.)

Figure 7                                                        Figure 8

ANOTHER TREE IDEA
Sugar-style ice cream cones are good foundation forms for making trees. Cut green gumdrops in half, and
press or roll them flat. Starting at the bottom, glue them to the cone with royal icing, working your way
around the base and up to the top. Dragees make good decorations to finish.

GINGERBREAD PEOPLE
You can attach mini-marshmallow “kickstands” to the back of your people, to help them stand up.

BUILDING A GINGERBREAD HOUSE                                                                                  Page 7
WINDOWS
You can glaze your windows with melted hard candies, which can look like stained glass when you com
bine different colors. To do this, cut different colors of hard candy into pieces, and arrange them next to
each other on a parchment-lined baking sheet. Bake the candies at 250°F for 6–8 minutes, until they melt
and run together. To install the gelatin, simply cut it to size with scissors and glue it into place with royal
icing. Just a hint: it’s much easier to install window “glass” before putting the roof on!!!

Gelatin cuts to size easily with scissors.

                                                      Combining different flavors of hard candies can give you a multicolored window pane.

Pipe icing around the overlapping edge of the
window’s pane. and press into place.

Press window into place.                              Use a brush to paint muntins on a sheet of gelatin, or to color the windowpanes with food coloring
                                                      for stained glass.

SILLS & SHUTTERS
To truly look finished, windows should have sills underneath and shutters on either side. Use whatever
candy you like to make these. Here we’ve used licorice and fruit leather.

Cut fruit leather to size to make shutters.     The point of a paring knife is useful to help             The fruit leather presses into place with ease.
                                                place the candy under the window.

BUILDING A GINGERBREAD HOUSE                                                                                                                      Page 8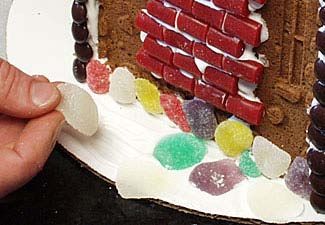
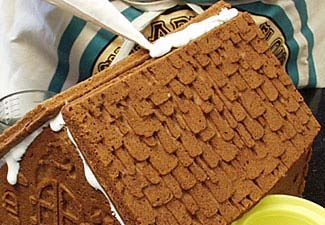
DOORS
Trim the pretzels to size, and lay them on top of a line of icing (Figure 9.) Tweezers are helpful to place the
cross pieces (Figure 10.) A dragee is just the right size for a doorknob (Figure 11.)

Figure 9                                                     Figure 10                             Figure 11

ROOF PANELS
Anything that can be shingled can be used to give texture to the roof of your house. Just remember to start
at the bottom edge of the roof and overlap the rows as you go up. Put the panels on the house before you
get to the top two rows. Once they’re installed, you can finish the last rows at the roof peak. Here are some
roof treatments we like:

This roof is shingled with frosted cereal squares and finished            If you have an embossed pan, the design it makes can be outlined with
with gumdrops.                                                            royal icing and sprinkled with sparkling sugar to suggest snow.

Frosted shredded wheat squares make wonderful roof tiles. Place them      Wafer candies in assorted colors make a Hansel and Gretel-style roof.
on the roof panel, starting at the bottom edge and working your way up.

Bran cereal sprinkled on top of a pool of icing gives the look of a       Nonpareils are an appropriate choice for chocolate lovers.
thatched roof. Allow the icing to set before installing the roof panel.

BUILDING A GINGERBREAD HOUSE                                                                                                             Page 9
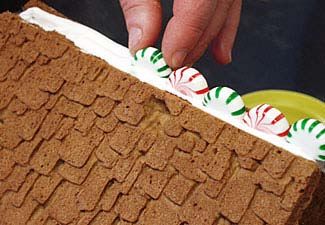
THE ROOF’S RIDGELINE
Since the ridgeline of the roof is a seam, it's a natural location to highlight with candy decorations. We’ve
decided to use starlight mints in red and green to show off this house's roof, but gumdrops, chocolate kisses,
or mini marshmallows are good candidates, too.

Use a sharp knife to cut the mints in half.      Pipe a line of frosting down the roof’s                     Place the mints into the frosting, alternating
                                                 ridgeline seam.                                             red and green.

LANDSCAPING
There are a number of things you can do to make your gingerbread house look more finished. It should be
connected to the ground, by having a path up to the door and some form of landscaping to show texture
on the surface of the cardboard. Cotton candy or coconut can serve for snow, as well as colored sugar sprin-
kled over wet royal icing. Cobblestones can be made out of all kinds of candies, as this page demonstrates.
Placing people (or snowmen, angels or reindeer) and Christmas trees nearby completes the scene.

                                                                                    For snow, paint the cardboard surface with thinned royal icing, and
                                                                                    sprinkle colored sugar on top.

Flattened gumdrops can serve as paving stones.                                      Chocolate buttons flanked by gumdrop borders form the path
                                                                                    to this house.

BUILDING A GINGERBREAD HOUSE                                                                                                                        Page 10
PHOTO GALLERY
Here are some more pictures of the assembled houses, to give you more ideas. The circular gable window is
outlined with miniture coated candies (Figure 12.) A gingerbread house becomes a home when there’s a gin-
gerbread person to live there (Figure 13.)
White chocolate chunks are used here for masonry. Figure 12
Figure 13
Small strips of fruit leather placed over royal icing form the candy canes on this house.
BUILDING A GINGERBREAD HOUSE Page 11BUILDING A GINGERBREAD HOUSE
BUILDING A GINGERBREAD HOUSE
You can also read