Guide to Bats Massachusetts Homeowner's - Mass.gov
←
→
Page content transcription
If your browser does not render page correctly, please read the page content below
Massachusetts Homeowner's

Guide to Bats
PRODUCED BY:

                         1 Rabbit Hill Road | Westborough, MA 01581

        Front cover image of little brown bats by Troy Gipps/MassWildlife
           Back cover images by Bill Byrne and Troy Gipps/MassWildlife
Illustrations by Matt Burne, Laszlo Meszoly, and Bat Conservation International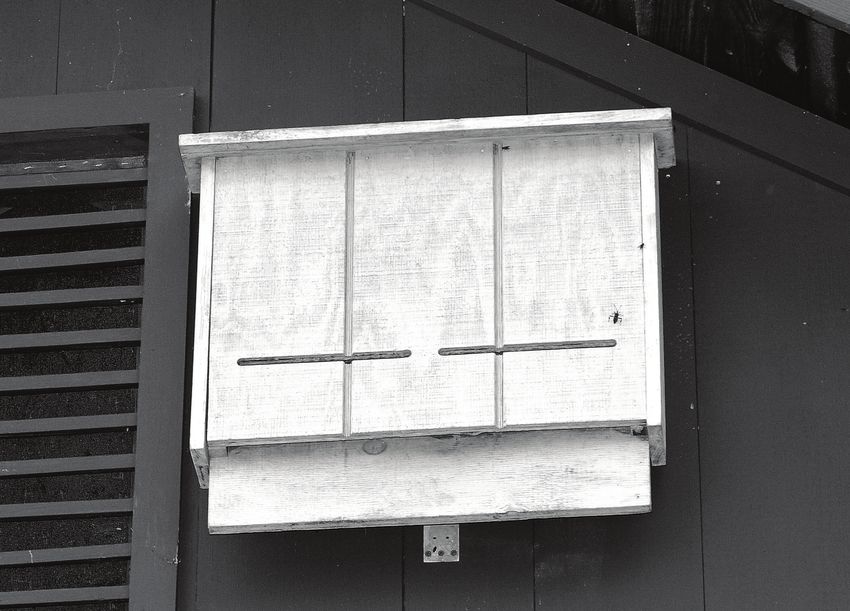
Massachusetts
 Homeowner's
Guide to Bats
     7th Edition
        2020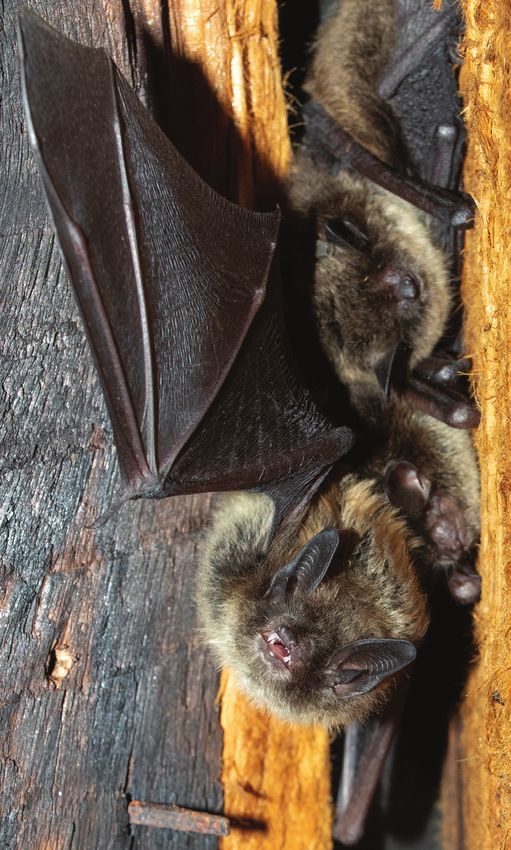
Table of Contents
The sudden and unexpected decline of Massachusetts bats .  .  .  .  .  .  .  .  .  .  .  .  .  .  .  .  .  .  . 1
Bat conservation .  .  .  .  .  .  .  .  .  .  .  .  .  .  .  .  .  .  .  .  .  .  .  .  .  .  .  .  .  .  .  .  .  .  .  .  .  .  .  .  .  .  .  .  .  .  .  .  .  .  .  .  .  . 1
Natural history .  .  .  .  .  .  .  .  .  .  .  .  .  .  .  .  .  .  .  .  .  .  .  .  .  .  .  .  .  .  .  .  .  .  .  .  .  .  .  .  .  .  .  .  .  .  .  .  .  .  .  .  .  .  .  . 2
Common myths debunked .  .  .  .  .  .  .  .  .  .  .  .  .  .  .  .  .  .  .  .  .  .  .  .  .  .  .  .  .  .  .  .  .  .  .  .  .  .  .  .  .  .  .  .  .  . 3
Beneficial aspects  .  .  .  .  .  .  .  .  .  .  .  .  .  .  .  .  .  .  .  .  .  .  .  .  .  .  .  .  .  .  .  .  .  .  .  .  .  .  .  .  .  .  .  .  .  .  .  .  .  .  .  .  . 3
Bats in the home .  .  .  .  .  .  .  .  .  .  .  .  .  .  .  .  .  .  .  .  .  .  .  .  .  .  .  .  .  .  .  .  .  .  .  .  .  .  .  .  .  .  .  .  .  .  .  .  .  .  .  .  .  . 4
 How to evict a single bat  .  .  .  .  .  .  .  .  .  .  .  .  .  .  .  .  .  .  .  .  .  .  .  .  .  .  .  .  .  .  .  .  .  .  .  .  .  .  .  .  .  .  .  .  .  . 5
 A colony in the house .  .  .  .  .  .  .  .  .  .  .  .  .  .  .  .  .  .  .  .  .  .  .  .  .  .  .  .  .  .  .  .  .  .  .  .  .  .  .  .  .  .  .  .  .  .  .  .  . 6
 Signs that a bat colony is in the house  .  .  .  .  .  .  .  .  .  .  .  .  .  .  .  .  .  .  .  .  .  .  .  .  .  .  .  .  .  .  .  .  .  .  . 6
 Best times of year to remove a bat colony .  .  .  .  .  .  .  .  .  .  .  .  .  .  .  .  .  .  .  .  .  .  .  .  .  .  .  .  .  .  .  . 7
 How to evict a bat colony .  .  .  .  .  .  .  .  .  .  .  .  .  .  .  .  .  .  .  .  .  .  .  .  .  .  .  .  .  .  .  .  .  .  .  .  .  .  .  .  .  .  .  .  .  . 7
 Designs for one-way excluders  .  .  .  .  .  .  .  .  .  .  .  .  .  .  .  .  .  .  .  .  .  .  .  .  .  .  .  .  .  .  .  .  .  .  .  .  .  .  .  .  . 9
 Preventative maintenance .  .  .  .  .  .  .  .  .  .  .  .  .  .  .  .  .  .  .  .  .  .  .  .  .  .  .  .  .  .  .  .  .  .  .  .  .  .  .  .  .  .  .  .  . 9
 Disease and public safety .  .  .  .  .  .  .  .  .  .  .  .  .  .  .  .  .  .  .  .  .  .  .  .  .  .  .  .  .  .  .  .  .  .  .  .  .  .  .  .  .  .  .  .  .  . 10
 Using netting to exclude bats .  .  .  .  .  .  .  .  .  .  .  .  .  .  .  .  .  .  .  .  .  .  .  .  .  .  .  .  .  .  .  .  .  .  .  .  .  .  .  .  .  .  . 11
 Using PVC pipe or empty caulking tubes to exclude bats .  .  .  .  .  .  .  .  .  .  .  .  .  .  .  .  .  .  .  . 12
 Bats roosting on porches at night .  .  .  .  .  .  .  .  .  .  .  .  .  .  .  .  .  .  .  .  .  .  .  .  .  .  .  .  .  .  .  .  .  .  .  .  .  .  . 14
Bat houses .  .  .  .  .  .  .  .  .  .  .  .  .  .  .  .  .  .  .  .  .  .  .  .  .  .  .  .  .  .  .  .  .  .  .  .  .  .  .  .  .  .  .  .  .  .  .  .  .  .  .  .  .  .  .  .  .  .  . 15
 The importance of bat houses .  .  .  .  .  .  .  .  .  .  .  .  .  .  .  .  .  .  .  .  .  .  .  .  .  .  .  .  .  .  .  .  .  .  .  .  .  .  .  .  .  . 15
 Buy a bat house .  .  .  .  .  .  .  .  .  .  .  .  .  .  .  .  .  .  .  .  .  .  .  .  .  .  .  .  .  .  .  .  .  .  .  .  .  .  .  .  .  .  .  .  .  .  .  .  .  .  .  .  .  . 15
 Build a bat house  .  .  .  .  .  .  .  .  .  .  .  .  .  .  .  .  .  .  .  .  .  .  .  .  .  .  .  .  .  .  .  .  .  .  .  .  .  .  .  .  .  .  .  .  .  .  .  .  .  .  .  . 15
Build a four-chamber bat house .  .  .  .  .  .  .  .  .  .  .  .  .  .  .  .  .  .  .  .  .  .  .  .  .  .  .  .  .  .  .  .  .  .  .  .  .  .  .  .  .  . 16
 Materials and tools .  .  .  .  .  .  .  .  .  .  .  .  .  .  .  .  .  .  .  .  .  .  .  .  .  .  .  .  .  .  .  .  .  .  .  .  .  .  .  .  .  .  .  .  .  .  .  .  .  .  . 16
 Construction .  .  .  .  .  .  .  .  .  .  .  .  .  .  .  .  .  .  .  .  .  .  .  .  .  .  .  .  .  .  .  .  .  .  .  .  .  .  .  .  .  .  .  .  .  .  .  .  .  .  .  .  .  .  .  . 21
 Optional modifications .  .  .  .  .  .  .  .  .  .  .  .  .  .  .  .  .  .  .  .  .  .  .  .  .  .  .  .  .  .  .  .  .  .  .  .  .  .  .  .  .  .  .  .  .  .  .  . 21
 Tips for installing a bat house  .  .  .  .  .  .  .  .  .  .  .  .  .  .  .  .  .  .  .  .  .  .  .  .  .  .  .  .  .  .  .  .  .  .  .  .  .  .  .  .  .  . 23
More information  .  .  .  .  .  .  .  .  .  .  .  .  .  .  .  .  .  .  .  .  .  .  .  .  .  .  .  .  .  .  .  .  .  .  .  .  .  .  .  .  .  .  .  .  .  .  .  .  .  .  .  .  . 24
Key to bats of Massachusetts .  .  .  .  .  .  .  .  .  .  .  .  .  .  .  .  .  .  .  .  .  .  .  .  .  .  .  .  .  .  .  .  .  .  .  .  .  .  .  .  .  .  .  . 25
Massachusetts bat species .  .  .  .  .  .  .  .  .  .  .  .  .  .  .  .  .  .  .  .  .  .  .  .  .  .  .  .  .  .  .  .  .  .  .  .  .  .  .  .  .  .  .  .  .  . 26
The sudden and unexpected decline of
            Massachusetts bats
    White-nose syndrome (WNS) is the descriptive term given to a condition first observed
in bats hibernating in a cave near Albany, New York in February 2006. The term comes
from the fact that some of the bats with this condition look as if they had dipped their
faces—as well as ears and forearms—in powdered sugar. The white powdery substance
on their faces is a fungus. The fungus was described as a newly discovered species in
2009, and is known as Pseudogymnoascus destructans, or Pd for short. This fungus
grows in cold, dark, damp places—like caves and mines—and attacks the bare skin of
bats while they are hibernating.
    Some species of bats hibernate in caves and mines over the winter. Ordinarily, bats
have enough fat to last them through the winter. When they emerge in late April and May,
there are ample numbers of insects to eat, so they can replenish their energy reserves.
However, in areas with WNS, Pd causes some of the hibernating bats to become more
active than usual, causing them to run out of body fat by early February. The largest bat
hibernation site in Massachusetts housed roughly 10,000 bats in early winter 2007/08.
By the end of winter 2008/09, nearly every bat had been killed by WNS.
    White-nose syndrome has spread rapidly and has caused a catastrophic mor-
tality of bats that spend the winter in New England caves and mines. By 2012, over
6 million bats had died from WNS. By 2019, WNS had been found in 33 US states
and seven Canadian provinces, spreading as far west as Texas and Wyoming—with
a surprise outbreak in Washington. At this point no one knows how to stop, cure,
or even slow the continuing spread of WNS. No one can predict how many more
bats will die in the process. For more information on white-nose syndrome, visit
whitenosesyndrome.org.

                              Bat conservation
    Help MassWildlife with bat conservation efforts! To help assess where bat colonies
are during the summer, report observations of bat colonies (10 or more bats) to natural.
heritage@mass.gov or online at bit.ly/batcolonies. Please include the address, location,
type of structure where the colony was found, approximately how many bats are in the
colony, and how long the bats have been there. Your observations help MassWildlife
better understand the bat populations that persist post-WNS, and will be used to guide
conservation and management efforts in the future. Your help is greatly appreciated!
    As the benefits of bats and the important ecological roles they fill in a healthy environ-
ment have come to be understood, so has the importance of conserving these beautiful
and interesting animals. Many individuals and organizations are now actively involved in
helping bats survive in our increasingly altered landscape. One of the best ways an individ-
ual can support bat conservation is to put up one or more bat houses in a location that bats
will find attractive. Bat houses can be very useful in providing secure roosting sites for bats,
and may be especially helpful in providing habitat for bats that are displaced from
dwellings. A wide variety of designs are available. See pages 15–23 for suggestions for
building and installing bat houses and a simple bat house design.

                                               1
Natural history
Bats are among the most numerous and diverse groups of
vertebrates inhabiting the planet, occurring on every continent except
Antarctica. Among the mammals, they are second only to rodents in
number of species worldwide. They perform many critical ecological func-
tions—particularly as pollinators and seed distributors in tropical rainforest and
desert ecosystems, and consume immense numbers of insects. Of the more
than 1,200 species of bats in the world, only 47 occur in the United States, and
of those, only 9 occur in Massachusetts.
Bats can easily be distinguished from all other animals by their wings. Each wing
is composed of a membrane of skin stretched between four elongated fingers and a
thumb (see below). A similar membrane—called the interfemoral membrane—stretches
between the hind limbs and tail of all North American bats. It is supported in part by a
flexible spur, called the calcar, on the heel of each hind foot.
The nine species of bats that live in Massachusetts are all insectivores (insect eat-
ers) in the family Vespertilionidae. All bats within this family are active at night, and
occasionally at dawn and dusk. They locate their insect prey by means of a sonar-like
echolocation system. This ability permits them to capture tiny insects and avoid flying
into objects in complete darkness. During the winter when insects are not available,
bats either hibernate or migrate to warmer regions farther south.
thumb
fingers
interfemoral
membrane
calcar
Illustration of a bat showing the thumb and four elongated fingers in the wing, the interfemoral membrane,
and the calcar. At rest, bats typically hang upside down from the claws on their feet.
keel
Examples of an unkeeled (left) and keeled (right) calcar on the feet of two bats. This characteristic is im-
portant in identifying certain bat species.
2Common myths debunked
Bats make a lot of people uneasy. Most are active at night, a time when shadows
and strange noises awaken the imagination. Throughout history, bats have collected a
bad reputation based on folk lore and feeding on fear. Below are some common myths
about bats, followed by truths that counter those myths. Learning a little bit about bats
may help alleviate fear and anxiety towards these highly misunderstood and rather
extraordinary animals.
Myth: Bats are blind.
Fact: Bats can see as well as most other mammals. Many bats have small eyes and sensi-
tive vision, so they use echolocation to navigate and hunt for insects in the dark, making bats
incredibly agile.
Myth: All bats have rabies.
Fact: Any mammal can contract rabies. Less than half of 1% of bats have rabies, which is a
much lower rate of incidence than other mammals. Bats that do contract rabies are unlikely to
come into contact with you and die fairly quickly from the virus.
Myth: Bats get tangled in your hair.
Fact: Bats are not interested in human hair and they do not build nests. Bat echolocation is
highly sophisticated, enabling bats to detect obstacles as find as human hair and easily avoid
your head.
Myth: Bats attack people.
Fact: Bats do not attack people and are not purposely aggressive. Bats are afraid of humans
and avoid people as best they can.
Myth: All bats suck blood.
Fact: Most bats are insect-eaters and help get rid of bloodsucking mosquitoes. Only three
of the more than 1,200 bat species in the world are vampire bats. Vampire bats live in Mexico,
Central America, and South America. They lick—not suck—blood from non-human animals.
Myth: Bats are dirty.
Fact: Bats are very clean and groom themselves regularly like cats. Some bats even groom
each other.
Myth: Bats are just flying mice.
Fact: Bats are not rodents. They are classified as their own unique order of mammals called
Chiroptera, which means hand-wing. Bats are more closely related to humans than they are to
mice. Bats also do not nest, chew, or claw their way into a structure like mice do.
Beneficial aspects
Bats are of immense benefit to people. Among vertebrates, bats are the greatest
nocturnal predators of flying insects, consuming great quantities of noxious insects,
such as mosquitoes. Dr. Merlin Tuttle of Bat Conservation International reports that the
gray bat—which is closely related to several species in Massachusetts—can consume
as many as 3,000 small insects in a single night. In the Boston area, Dr. Thomas Kunz of
Boston University estimated that 14 to 15 tons of insects are consumed each summer
by the 50,000 big brown bats living within the bounds of Route 128.
3Bats in the home
During the warmer months, most bats found in buildings in Massachusetts are either
little brown bats or big brown bats. Two other species will occasionally be found inside
buildings in th summer: northern long-eared bats, and very rarely tricolored bats. Big
brown bats are the only bats in Massachusetts that commonly inhabit buildings during
the winter season.
The presence of any wild animal in a home is an obvious indication that the house
is not weather-tight. Finding the sites where bats enter the house may be as simple as
locating an open chimney flue or cellar hatch, or as difficult as finding a narrow crack
between a wall and a chimney or an eave. The attention of a carpenter is often required
to repair damaged wood or flashing that allows bats to enter a house. The following
few pages describe how to evict and keep out these unwanted house guests in a safe
and harmless manner.
The most common ways for bats to enter a home include: (1) an unscreened attic vent; (2) a space where the
chimney meets the house; (3) a space under a rotted eave; (4) rotted window sills or loose-fitting screens;
(5) chimney flues; and (6) an open cellar hatch (bulkhead). Other possible entrances include pipes or wiring
access to the house and gaps in loose or warped siding.
4How to evict a single bat
The discovery of a bat flying through the house can create anything from excitement
to hysteria within a family. Fortunately, a single bat can usually be dealt with quite easily.
It will not become tangled in your hair or attack you, although it may flutter by close
enough for you to feel the light breeze from its wing tips. The best action is to put away
the broom or tennis racket and open a window or door so the bat can fly out. If possible,
close off the room containing the bat and open a window and screen in that room. A
flying bat will usually circle the room several times until it locates the open window or
door with its echolocation, whereupon it will immediately fly out. If possible, stay in the
room with the lights on and watch to be sure the bat leaves. For some people, leaving
the bat alone to find its way out may be the preferred plan. It is usually only a matter
of a few minutes before the bat leaves the house.
A bat that flies into a room and then disappears has probably landed behind a curtain,
picture frame, or another nook or cranny. In this event, open a window, turn out the
lights, close the door, and block the space under the door with towels. If it is nighttime,
the bat should find its way out through the window almost immediately. If it is daytime,
the bat will probably leave within an hour after dark. As long as the weather outside is
not too cold, rainy, or windy, this method typically works.
A bat that has landed can be assisted out of a house in several ways. If it has landed
on a curtain or wall, place a jar or coffee can over the bat. Carefully work the animal into
the container, then slip the lid on quickly. A small box—with a sheet of cardboard for a
temporary cover—can be used in a similar manner. A bat on the floor can be covered with
a towel and picked up within the towel. No species of bat that occurs in Massachusetts
can bite through a thick towel.
A typical bat colony entrance can often be recognized by a stain or build-up of guano below it.
5Another method is to use leather gloves and simply pick up the bat. Do not use thin
cotton gloves and never pick up a bat with bare hands. Whatever method is used, the
bat will likely open its mouth and squeak loudly when touched. Don’t worry. After you
have captured the bat, take it outdoors and release it. Do not call the local police or
fire departments; they have more important duties to perform. Have a neighbor assist
if you need moral support. All evictions must be non-lethal.
A colony in the house
The attic is the area of a house in which bats are most likely to gather in a colony. In
the summer, little brown bats and big brown bats commonly use buildings to raise their
young. The heat of an attic keeps the pups warm and allows them to grow and develop
more rapidly. In late summer, an attic may become too hot for bats, forcing them into
the living quarters of a house as they search for cooler places to roost. On hot summer
days, they may be found near the attic door trying to escape the heat. At such times,
you might also see them flying around the yard in the daylight. Late summer is also the
time of year when young bats are learning to fly. You might find these inexperienced
young when they fall down a chimney, travel down the attic stairway, fly through an
open window, or land on the ground.
As cold weather approaches, little brown bats travel great distances to caves and
mines in which they spend the winter. Prior to the onset of white-nose syndrome, one
Massachusetts mine contained 8,000–10,000 bats each winter; another mine in New
York had about 150,000. Bats come from all over the Northeast to use these sites. The
big brown bat, however, often spends winter in closely packed colonies within the un-
heated areas of buildings.
Signs that a bat colony is in the house
The most obvious sign that a bat colony resides in your home is seeing bats flying in
and out of a hole in the house. If they become a nuisance, discovering the entrance-
way(s) to the colony is the most important step in solving the problem.
Other signs that indicate a bat colony is present include:
• a single bat found in the living quarters on more than one occasion
• squeaking and rustling noises, particularly at dusk or on hot summer days, in the
ceiling or walls—although mice or flying squirrels may also be responsible for such
noises
• a hole in the eaves with a dirty stain below it (see illustration on page 5). As bats enter
and leave a colony, they often urinate, creating a stain on the wall. Their droppings
may also be splattered on the siding below the entrance hole. Make note that not
all entrance holes will display a stain or splatters.
• a stain forming on the ceiling of older houses accompanied by an offensive odor.
This generally occurs only with larger colonies and when there is no insulation
protecting the attic floor. The problem is caused by a build-up of guano (feces) and
urine under roosting bats.
• feces (guano) on the steps, sidewalk, or patio beneath the exit hole. Guano is often
pushed out of crevices and other openings where bats exit each evening.
6Best times of year to remove a bat colony
With few exceptions, attempts to evict a colony of bats from a building should be
made only during the month of May, or from the first of August to mid-October. The
only long-term solution once the eviction is accomplished is to bat-proof the entire
building by blocking all possible entrances when all of the bats are out. Even if the bats
are removed, others will soon inhabit the space if openings to the house are not closed.
During spring and fall, you can install one-way doors over entrances. These allow
bats to leave a space, but prevent them from being able to get back in (see page 8).
At times other than early spring and late summer, it is unlikely that all of the bats will
be away from the colony at the same time. During the summer, a colony may contain a
large number of baby bats that are too young to fly. These young animals are left alone
in the colony while their mothers are out feeding. From late fall through winter, some
or all of the bats in a colony will be dormant because they hibernate through the cold
months. If the entrances to a colony are blocked while bats are inside, they will search
for ways out of the house and may end up in the living quarters. If they can't get out,
they will eventually die and may create an offensive odor in the house.
WARNING
Bat colonies in Massachusetts homes are usually composed of either big brown bats
or little brown bats. While little brown bats leave buildings to hibernate in caves and
mines during the winter, big brown bats often hibernate right in buildings. Very seldom
does a homeowner know for certain if a colony is occupied by little brown bats or big
brown bats. Therefore, it is important to follow the guidelines for removing bat colonies
only in the early spring and late summer.
How to evict a bat colony
The most important step in removing a bat colony is to discover where the bats are
entering and exiting. There may be one or more such entrances in a house, and they may
be quite small. A little brown bat can squeeze through a hole 5/8 x 7/8 of an inch wide. A
big brown bat can squeeze through a hole 1/2 x 1 1/4 inches wide! Since most bats leave
their roost about 15 minutes after sunset, you should watch the outside of your house
from 30 minutes before to 30 minutes after sunset. If possible, position yourself so that
you can silhouette flying bats against an open view of the sky. Bats may be difficult to
see if the area around the house is dense with foliage.
Once you have located all of the entrances, close each one except the primary en-
trance using a good sealing material such as: caulking, screening, polyurethane foam,
fiberglass insulation, polypropylene rope, or flashing. Next, install a one-way door over
the remaining hole so that bats are permitted to exit only. Many effective designs are
available; a good example is shown on page 8.
Since not all bats leave the roost every night, one-way doors should be left in place
for 5–7 nights, including at least 3 consecutive nights of good weather. During this
time, watch the bats as they leave. If the door is functioning properly and the weather
is favorable to bats, there should be no bats exiting after the third night. When you no
longer see bats leaving the house, seal the last entrance. If you have sealed all of the
entrances, you will have no further problems.
7bat
piece of cardboard or aluminum
flashing,
bent at 45°
hole
small-mesh screen
or plastic garbage bag
exterior interior of house
This highly effective, one-way bat excluder can be constructed with nothing more than a sheet of
cardboard, a plastic garbage bag, and a couple of screws or nails. This simple design is best for
small entrances, but can be adapted to function on even large cracks or openings.
8If you discover that the bats are using another entrance, move the one-way door to
that entrance, seal the original hole that had the one-way door, and repeat the process.
During the first few days, returning bats that cannot get back into the attic may roost
under the eaves or on the side of the house, but they should soon abandon the area.
Designs for one-way excluders (doors)
Many designs for one-way bat excluders have been created and tested, and new
designs could certainly be devised with a little imagination. In general, try to avoid using
large mesh (greater than 1/6 inch mesh) and wire screen material in exclusion devices, as
these types of screening can injure bats. Fine, plastic mesh works best when screening
is required, and clear or translucent plastic material—such as that used to make garbage
or grocery bags—can often be substituted for applications requiring screening.
The easiest way to make a one-way door over a bat entrance is to use a plastic garbage
bag. Slit the bottom of the bag open so it creates a large plastic tube. Tape or staple one
of the open ends around the hole that the bats are using. As the bats fly out of the hole
at night, they will enter the plastic bag, flutter around, and fall out of the bottom. Since
the bag is hanging limp, there is no way they can fly back inside and re-enter the house.
If the bag hangs flat against the hole, the bats may not be able to get out of the
house. To avoid this problem, tape or staple a bent piece of cardboard or aluminum
flashing just above the hole (see page 8) to hold the plastic slightly away from the hole.
This technique uses inexpensive materials that are readily available, and is easy to install
over holes of various shapes and locations. It works well on an entrance in the form of a
hole or a short crack, but it can also be adapted to cover a long, open crack under eaves
or along a chimney. In these situations, most of the crack can be covered with a strip of
fine mesh plastic screening, and the bag can be used to cover the short length of the
crack which is left open. Designs and instructions for other simple excluder devices that
can be adapted for almost any bat entryway can be found on pages 11–14.
Preventive maintenance
Working to keep your house weather-tight and energy-efficient is the best way to
prevent bat problems. Cracks, separations, rotted eaves, rusted ventilation screens, and
other openings should be repaired as soon as they are noticed.
Chimneys are another common avenue of entrance. Bats and many other animals,
including flying squirrels, gray squirrels, starlings, screech owls, wood ducks, and rac-
coons, frequently enter houses through the chimney. This can be prevented by covering
the chimney top with a commercially available chimney cap.
Summary
• If you strive to maintain a weather-tight home by insulating your attic and caulking
all exterior cracks and holes as soon as they are detected, your house will be both
more energy-efficient and bat-proof.
• If a bat colony causes a nuisance in your home, discovering the entranceway(s) is
the most important step in solving the problem.
• Bat colonies should be evicted from buildings only in the spring (May) and late sum-
mer (first of August to mid-October), when all individuals can be excluded.
9• The best method for excluding a colony from a building is to seal all but the main
entrance hole, place a one-way door over the main hole for several days so that
bats can leave but not re-enter, then seal the last hole.
• Poisons are illegal to use against bats (and most other wildlife) and repellents have
not been shown to be effective in evicting bats. All evictions must be non-lethal.
Disease and public safety
Two diseases that are associated with bats and can be a concern for human health
under certain circumstances are rabies and histoplasmosis. In Massachusetts, the first
rabid bat was documented in 1961. Between 1961 and the end of 2016, a total of 686
bats were found to be rabid by the Massachusetts Department of Public Health—this
averages to 25 rabid bats per year over the last 25 years. The frequency of rabies in wild
bats has been variously estimated from 0.1 to 0.5 percent, meaning one bat in 1,000 to
one in 500 might be expected to have rabies. If we consider only bats that are found on
the ground (and thus more likely to be sick), the percentage of diseased bats is higher.
During a recent 11-year period, about one in 19 bats submitted to the Massachusetts
Department of Public Health for testing was found to be rabid. In the United States
and Canada, there have been 72 human cases of rabies acquired from bats since 1950.
Human infection with bat rabies remains rare; the only New England cases occurred in
Greenwich, Connecticut in 1995 and in Barnstable, Massachusetts in 2011.
Even though the proportion of infected bats in a population is low, any individual
bat can be carrying the rabies virus. The rabies virus is spread to a person if saliva from
an infected bat gets through a person's skin by a bite or scratch. Because of this, no
bat should be handled without gloves or other protection and special care should be
taken to avoid bites. The teeth and claws of bats are so small that a bite or scratch may
leave only a very small mark and the wound may not bleed or hurt. This means that in
specific circumstances, a person can be bitten or scratched by a bat and not realize it. If
a bat is physically present and it cannot be ruled out that a person is bitten or otherwise
exposed (e.g. a sleeping person awakens to find a bat in the room; an adult witnesses
a bat in the room with a previously unattended child or mentally impaired adult, etc.),
or if you or someone else is ever bitten by a bat, make sure that the bat is captured and
submitted for rabies testing. Testing is done at the Massachusetts Department of Public
Health in Jamaica Plain, Massachusetts (call (617) 983-6800, available 24/7) and submis-
sion is usually coordinated by the person's municipality. If the bat cannot be captured,
contact your healthcare provider. Rabies in people can be prevented, even following
an exposure, through the prompt administration of rabies post-exposure prophylaxis,
which consists of a passive antibody and a series of 4–5 vaccinations.
Histoplasmosis is a fungus that grows particularly well in the droppings of bats and
birds. If dust containing the fungal spores is stirred and consequently inhaled, a lung
infection may result. Symptoms of histoplasmosis include fever, congestion, and spots
on the lungs that are visible on x-rays. Mild cases are common and often go unnoticed;
severe cases are rarely fatal. Although histoplasmosis is uncommon in Massachusetts,
to help protect yourself against the disease, never sweep or vacuum guano from an
attic floor or stir up guano dust unless wearing adequate respiratory protection, such
as an N95 mask.
Bats are protected by law in Massachusetts and may not be killed or captured,
10except under permit when they are creating a risk to public health or when they are
damaging property. Although most bats should be evicted in an unharmed way (see
page 5), any individual bat found in the house that might have had contact with a pet
or person—particularly children and mentally impaired adults—should be turned in to
the Department of Public Health for rabies testing.
Using netting to exclude bats
Bats sometimes enter buildings through openings on smooth surfaces of exterior
walls or through louvers. In such cases, plastic or lightweight, flexible netting with 1/6
inch mesh or smaller, should be secured to the building along the top and sides of the
opening as shown in the below diagram. It should extend 18–24 inches below the bottom
edge of the opening and remain in place for a minimum of five to seven days to ensure
all bats have exited.
The openings should then be permanently sealed with silicone caulking, caulk backing
rod, hardware cloth, or heavy-duty netting. In some cases, sealing the area may require
repair or replacement of old, deteriorated wood.
When bats are using
multiple openings to exit
and enter, exclusion ma-
terial should be placed on
each opening unless it can
be determined with cer-
tainty that all areas used by
the bats are connected. If
so, some openings can be
sealed as described above,
and netting can be placed
over the openings used
by the most bats. Even
when all roosting areas
are connected, bats will
sometimes refuse to use
alternative exits. In this
case, exclusion devices
must be installed over all
exits.
Af ter this has been
done, watch to make sure
the bats are able to exit
safely. If they do not ap-
pear to be exiting, or ap-
pear to be having trouble
Illustrations © BCI
doing so, make adjust-
ments or add netting areas
as needed.
11Using PVC pipe or empty caulking tubes to exclude bats
There are a number of situations
in which tubes work best as bat ex-
clusion devices. Examples include
openings used by bats on buildings
constructed from materials that do
not create smooth exterior walls—
such as those found on brick or
stone houses, and log cabins. Tubes
also work best for holes located at
corners where walls meet and on
horizontal surfaces such as soffits.
Exclusion tubes should have a
2-inch diameter and be approxi-
mately 10 inches in length. Exclusion
devices can be made from PVC pipe
or flexible plastic tubing. According
to Laura Finn of Fly by Night, Inc.,
empty caulking tubes work well for
this purpose.
When using caulking tubes, both ends must be cut out. Use of a flexible plastic tube
makes it easy to either squeeze one end of the tube so that it fits into a crevice, or cut
one end of the tube into flaps that can fit over an opening and stapled, nailed, or taped
to the building (see diagram below). Bats are unable to cling to the smooth surface of
these tubes. Do not let the tube project more than 1/4 inch into the opening, ensuring
that bats can easily enter the tube to exit.
Caulking tubes must
be thoroughly cleaned
before use to prevent bats
from sticking to wet caulk.
Cleaning also ensures no
rough caulk is left, which
creates a roughened sur-
face, making it possible
for bats to re-enter. Once
the tube has been inserted
over the hole, a piece of
clear, light-weight plastic
can be taped around the
end of the tube that proj-
ects to the outside (see
diagram to the right) to
Illustrations © BCI
further reduce the likeli-
hood of bats reentering,
though this is typically not
necessary.
12Plastic sleeves collapse on themselves, preventing bats from reentering once they
have crawled out through the tube. After the tube has been inserted into or over the
opening used by bats, any spaces between the outer rim of the tube and the building
must be sealed shut. Be sure to also seal shut any other openings in the building that
bats could use to reenter. Leave the tube in place for a minimum of five to seven days
to ensure all bats have exited. After the bats have been excluded, the tube should be
removed and the opening permanently sealed.
Some concrete parking garages have lengthy crevices used by bats. Multiple exclu-
sion tubes should be placed every few feet along the length of each crevice; spaces
between the tubes should be closed with heavy-weight (1/6 inch mesh) netting (see
diagram below). Fold the netting so that it fits into the crevice and caulk it in place as
shown. The same procedure can be used in lengthy crevices created where flashing has
pulled away from a wall.
Bats may also enter a building through spaces beneath corrugated or galvanized
roofing sheets. These roofs can be sealed with a variety of materials—such as a caulk
backing rod—during months when bats are not present, or after they have been excluded
from a building by use of exclusion tubes.
Special modifications may be needed when bats roost in chimneys or in separations
between chimneys and roofs. If bats are roosting inside a chimney, construct a wire
cage from 1/4-inch hardware cloth lined with window screen.
A section of PVC pipe can be cut and then inserted through holes cut into the sides
of the wire cage as shown on page 14. Although bats are able to simply drop down and
out of a vertically placed tube that extends below the roost, they are not able to grip
the slick surface to crawl out if the tube extends upward above the roost. Therefore,
the tubes should project horizontally or down. A collapsible plastic sleeve should be
placed over the ends of all exclusion tubes used on chimneys. Once the bats have been
excluded, a chimney cap should be installed.
Illustrations © BCI
13Illustrations © BCI
Bats roosting on porches at night
Bats sometimes roost on porches or under overhangs briefly during the night while
they digest the insects they have eaten. Non-toxic aerosol dog or cat repellents may
be used to discourage bats from roosting in these areas. The spray should be applied
by day when bats are not present. Aerosol repellents are not an adequate substitute
for exclusion in the case of day roosts and should never be applied when bats are in a
roost. Strips of aluminum foil hung from the porch ceiling and allowed to move in the
breeze may also discourage bats from roosting in that area.
14Bat houses
One of the best ways you can support bat conservation is to put up an artificial
roost, like a bat house. Since bat populations have decreased significantly since 2008,
bat houses are useful in providing secure roost sites where bats can rest. The structures
are also good locations for females to birth and raise young bats safely.
The importance of bat houses
• Bat houses are particularly helpful in providing alternative roosting habitat for bats
that are excluded from homes. In turn, this reduces the chance of human contact
with bats.
• Installing a bat house on your property can provide a safe environment for bats,
while protecting your yard from pest insects, like mosquitoes, moths, and beetles.
• Bat houses give females a safe, warm place to raise their young. Since most female
bats only have one pup each year, bat populations grow very slowly. Additionally,
due to habitat loss and degradation, it is becoming harder for bats to locate roost
sites to raise their young. By installing a bat house, you can provide mothers and
their pups with a safe home.
Buy a bat house
Bat houses range in size from single-chamber to larger multi-chamber bat condos.
There are many kits available that provide all of the materials for you to build a bat house
yourself, as well as ready-to-install preassembled bat houses. You can purchase bat
houses online through a variety of retailers or at your local home improvement store.
Bat Conservation International (BCI) has a Bat Approved Certification Program with
specific certification criteria for bat house design and construction. You can view a list
of certified bat house vendors on the BCI website at batcon.org. Additionally, Bat Con-
servation & Management has bat house do-it-yourself kits, as well as preassembled bat
houses, in a variety of sizes available for purchase on their website (batmanagement.com).
Build a bat house
Bat houses can be expensive to purchase, especially ones designed with multiple
chambers for larger colonies. Building a bat house yourself can be a less-expensive
alternative. The cost of materials can be dictated by the quality of wood and hardware
you choose to use, as well as the size of bat house you choose to make. The following
pages describe how to build a simple four-chamber bat house. All of the materials on
page 16 can be purchased at your local home improvement store. For best results, use
outdoor-grade plywood. Never use pressure-treated wood for projects that involve
wildlife. Please email natural.heritage@mass.gov or visit mass.gov/bathouses for an-
swers to questions you have regarding materials, building, or installing a bat house on
your property.
15Build a four-chamber bat house
Materials (makes two houses)
• 1/2 sheet (4' x 4') 1/2" AC, BC, or T1-11 (outdoor grade) plywood*
• 1/2 sheet (4' x 4') 3/8" AC or BC (outdoor grade) plywood
• 2 pieces 1" x 6" (3/4" x 51/2" finished) x 8' pine or cedar
• 1 lb. coated deck or exterior-grade screws, 15/8"
• 20–25 coated deck or exterior-grade screws, 11/4"
• 20–25 exterior-grade screws, 1"
• 1 qt. dark, water-based stain, exterior grade
• 1 qt. water-based primer, exterior grade
• 2 qt. flat water-based paint or stain, exterior grade
• 1 tube paintable latex caulk
• Black asphalt shingles or galvanized metal
• 12–20 roofing nails, 7/8"
Recommended tools
• Table saw or circular saw
• Variable-speed reversing drill
• Screwdriver bit for drill
• Tape measure or yardstick
• Caulking gun
• 11/2" hold saw or spade bit
• Paintbrushes
Optional tools
• Hammer
• Tinsnips
• Bar clamp
• Sander
*Do not use pressure-treated wood, as this can harm bats and other wildlife.
16These two pages show the dimensions to cut the materials to for each piece of the bat house.
Note that the gray portions are extra materials and the dotted lines indicate 250 bevel.
4" x 4" x 1/2" plywood
171/2" 171/2" 61/2" 61/2"
20"
(make 19" if
mounting between
roof
roof
31" back back 2 poles)
17" front front 171/2"
(lower)
(lower)
(upper) (upper)
front
front
51/2" 51/2"
3"
157/8" 157/8" 157/8"
4" x 4" x 3/8" plywood 3"
22"
partition 1 partition 2 partition 3
11/2" diameter
passage hole
22"
partition 1 partition 2 partition 3
1741/8"
1" x 6" x 8' 1" x 6" x 8'
1/2" 5"
board divided board
into spacers
6"
25"
side
20"
side
1/2"
23"
6"
157/8"
5" 250 bevel
20"
5"
1/2" 5"
6"
157/8"
20" 25"
roof
side
supports
10" 157/8"
side
20" 1/2"
23"
6" 157/8"
5" 250 bevel
11/4"
18Top: assembly diagram of a four-chamber bat house.
Right (page 20): view of an assembled bat house from the side.
Bottom: view of an assembled bat house from the bottom.
roof overhanging
front
back
19roof supports
3/4" spacers
1/2" side vent
front vent
landing area
20Construction
1. Measure, mark, and cut all wood pieces, including passage holes, according to the
diagrams on pages 17 and 18. Passage holes should be 3" in from the top and sides.
2. Roughen interior and landing surfaces by cutting horizontal grooves with a sharp
object or saw. Space the grooves roughly 1/2" to 1" apart and about 1/16" deep.
3. Apply 2 coats of dark, water-based stain to the interior surfaces.
4. Attach side pieces to the back, caulking first. Make sure the top angles match. Use
the 15/8" screws to secure.
5. Attach the 5" and 10" spacers to the inside corners using the 1" screws. This will
create roost chamber spacing of about 3/4". Do not block the side vents.
6. Place the first roosting partition on the spacers even with the bottom edge of the
roof using the 15/8" screws.
7. Place the 20" spacers on the partition and screw into the first spacers through the
partition using the 15/8" screws.
8. Repeat the last 2 steps for the remaining spacers and partitions.
9. Attach the front to the sides, top piece first, by caulking the seams. Sand the top
angles so they match, if necessary. Leave 1/2" vent space between the top and
bottom front pieces. A bar clamp may help to keep the pieces in place as they set.
10. Attach roof supports to the top inside of front and back pieces with the 1" screws.
Be careful to not let the screws protrude into the roosting chambers; this could
injure bats that use the house.
11. Caulk all of the top surfaces, sanding first if necessary to make sure all of the sides
are level.
12. Attach the roof to the sides and roof support with the 11/4" screws. Caulk around the
roof and side joints to further guard against leaks and drafts. Don't let the screws
protrude into the roosting chambers; this could injure bats that use the house.
13. Paint or stain the exterior surface 3 times using a primer for the first coat.
14. Cover the roof with roof shingles or galvanized metal for added protection.
Optional modifications
• These nursery-house dimensions were chosen to permit construction of two bat
houses per half-sheet of plywood. Increasing the house width to 24" or more, or
adding partitions may attracts larger colonies. Additional spacers are needed to
prevent warping of roost partitions for houses more than 24" wide.
• Taller bat houses provide improved temperature gradients and may be especially
useful in climates where daily temperatures fluctuate widely. Bat houses 3' or taller
should have the horizontal vent slot 12" from the bottom of the roosting chambers.
• Two bat houses can be placed back to back mounted on poles.
• Before assembly, a horizontal 3/4" slot should be cut in the back of each house
about 10" from the bottom edge of the back piece to permit movement of
bats between houses.
21• Two pieces of wood, 1" x 4" X 103/4" screwed horizontally to each side will join
the two boxes. Leave a 3/4" space between the two houses and roughen the
wood surfaces or cover the back of each with plastic mesh. One 2" x 4" x 40"
vertical piece, attached to each side, over the horizontal pieces, blocks light
but allows bats and air to enter.
• Use a 2" x 6" vertical piece if securing houses with U-bolts to metal poles.
• A galvanized metal roof that covers both houses protects them and helps
prevent overheating. Eaves should extend about 3" in front in southern areas
and about 11/2" in the north.
• Ventilation may not be necessary in cold climates. In that case, the front of the bat
house should be a single, 23"-long piece. Bat houses in more northern areas may
also benefit from a partial angle of 450 or greater to reduce guano build-up. Leave
a 3/4" entry gap at the back and be sure the bottom does not interfere with access
to the front crevices. A hinged bottom is required to permit annual cleaning.
• Durable plastic mesh can be substituted for roughening. Attach mesh to backboard,
landing area, and one side of each partition after staining the interior, but prior to
assembly. Use 1/8" or 1/4" HDPE plastic mesh and attach every two inches with stain-
less steel staples.
• Make partitions removable by attaching small cleats with thumbscrews to the bottom
of side pieces for support. Spacer strips are unnecessary if grooves for partitions
are cut in the side pieces with a router or dado saw blade.
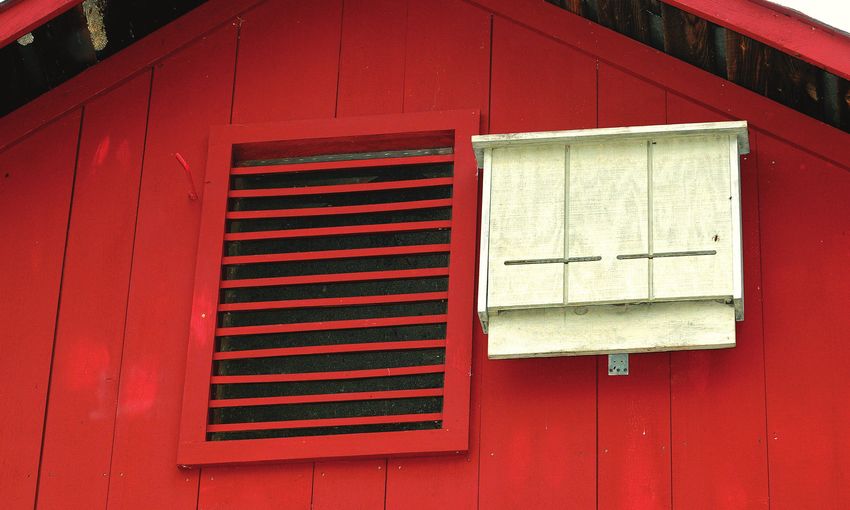
Photo by Bill Byrne/MassWildlife
A large, multi-chamber bat house on the side of a barn.
22Tips for installing a bat house
Once you have purchased or built a bat house, the next step is to install it! The design,
location, and temperature are all key factors in bat house occupancy. Below are some
installation recommendations for the best chances of bats occupying your new bat house.
• Bat houses can be mounted on wooden posts, steel posts, or on the sides of buildings.
They should never be mounted on trees. Trees receive less sun, make the bats more
vulnerable to predators, and have branches that make it difficult for bats to drop into
flight. Bat houses mounted under eaves on buildings are ideal locations. Here, bat
houses are still exposed to the sun while being protected from rain and predators.
• If mounting to a wooden pole, a metal predator guard is suggested. Poles can be
wrapped with an 18 inch piece of sheet metal 3 feet above the ground.
• The side of a house, garage, or barn is the best location for a single-chamber bat
house. These buildings eliminate drafts on one side, provide a buffer from cool
nighttime temperatures, and help the bat house heat up more quickly than when
installed on a pole. Single-chamber bat houses should not be mounted to poles
unless two are mounted back-to-back. If mounting two back-to-back, place the
houses 3/4 of an inch apart and cover both with a galvanized metal roof to protect
the space in-between from rain.
• Bat houses should be 20–30 feet from tree branches, vegetation, and wires.
• Make sure bat houses are 12–20 feet above the ground for clearance when bats
swoop into and out of the bat house.
• Bat houses located close to a source of water (i.e. along streams, creeks, ponds,
rivers, lakes, etc.) are the most successful.
• Do not place a bat house on the top of a hill where it may be exposed to excessive
winds.
• Install bat houses away from bright lights and avoid shiny and reflective objects on
the ground under the bat house, as they may disorient bats.
• Bat houses can be installed at any time of the year, but they are more likely to be
occupied during the summer if they are installed before bats emerge from hiber-
nation in the spring.
• Warm temperatures are favorable to bats, so the temperature of your bat house
will greatly affect whether bats take up residency. Bat house temperatures are influ-
enced by a variety of factors, including exterior color, compass orientation, amount
of sun exposure, how well the house is caulked and vented, and the mounting and
construction materials. Below are a few recommendations to help maintain an ideal
temperature inside your bat house.
• Internal temperatures should be 80–100 0F in the summer for mothers to raise
their young.
• Mount your bat house in an area that gets 6–8 hours of direct sunlight every day.
• Make sure your bat house faces south, east, or southeast to catch the heat of
the sun as it rises.
• If you live in the northeastern United States, paint your bat house black, dark
brown, or a similar dark color to absorb heat from the sun.
23More information
For help in identifying a captured bat, please send a photo to MassWildlife's Natural
Heritage and Endangered Species Program at natural.heritage@mass.gov. You can also
send a photo by mail or bring the bat with you to MassWildlife Field Headquarters at 1
Rabbit Hill Road, Westborough, Massachusetts 01581. Please make sure to secure the
bat in a clear, plastic bag if bringing a specimen in person. Mailed specimens will not
be processed.
Visit MassWildlife's website to learn more about bats, our conservation work with
them, and how you can help. Below is a quick reference to our different website pages.
General information about bats mass.gov/bats
Specific information about bat houses mass.gov/bathouses
MassWildlife's Natural Heritage & Endangered Species mass.gov/nhesp
Program
Information on how you can support MassWildlife's mass.gov/supportnhesp
work with bats
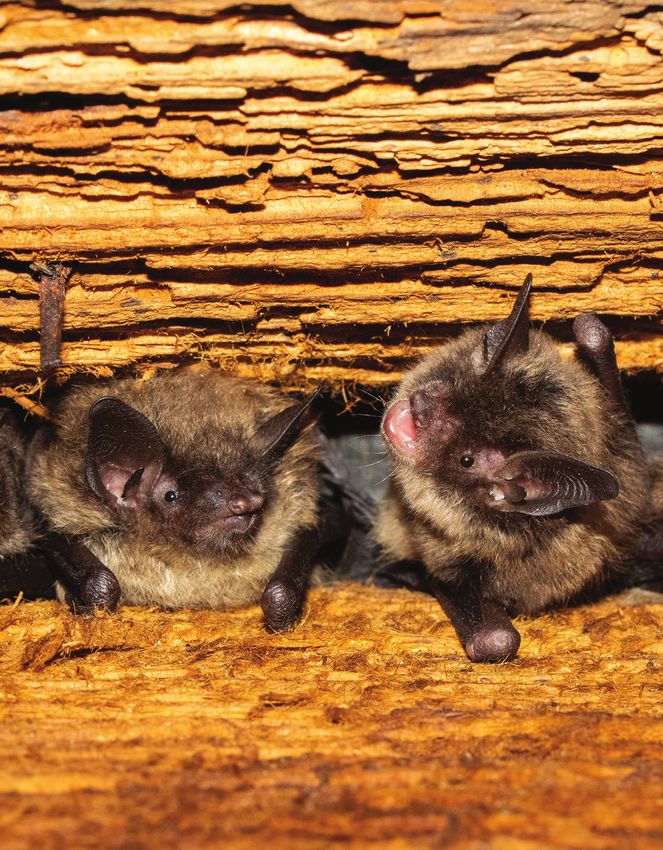
Photo by Troy Gipps/MassWildlife
Little brown bats roosting in the eaves of a barn in Massachusetts.
24Key to the bats of Massachusetts
A key is the most effective tool for identifying a plant or animal, in this case a bat. If you have never used taxonomic keys, be assured that
they are easy to use. Each number offers you a choice. Begin with Number 1. If the bat does not fit the description for 1a, then it will fit the
description for 1b. If, for instance, it matches 1b, follow the directions which state “go to 4a.” Continue determining which description fits, 4a
or 4b, etc., until you discover the common name of your particular bat.
1a. Upper surface of interfemoral membrane (see image on page 5) either completely or half covered with hair; tips of many body hairs
white, causing frosted appearance............................................................................................................................................................... go to 2a
1b. Upper surface of interfemoral membrane without hair; body hairs do not have white tips................................................................. go to 4a
2a. Except for white tips, hair is rusty in color................................................................................................................................................ red bat
2b. Except for white tips, hair is dark brown or black................................................................................................................................... go to 3a
3a. Interfemoral membrane completely covered with hair; forearm 13/4 to 21/4 inches long..................................................................... hoary bat
3b. Only 1/2 of interfemoral membrane (nearest the body) covered with hair; forearm 11/2 to 13/4 inches long............................. silver-haired bat
25
4a. Hairs on back tricolored—dark at base and tip, but lighter in the middle..................................................................................... tricolored bat
4b. Hairs on back bicolored—dark at base and light at tip........................................................................................................................... go to 5a
5a. Forearm greater than 13/4 inches long............................................................................................................................................ big brown bat
5b. Forearm less than 13/4 inches long.......................................................................................................................................................... go to 6a
6a. Face with black mask; ears black; forearm less than 13/8 inches long...........................................................................eastern small-footed bat
6b. Face with no black mask; ears not black; forearm longer than 13/8 inches long.....................................................................................go to 7a
7a. Ears very long, when laid forward extend 1/16 inch beyond nose.................................................................................. northern long-eared bat
7b. Ears relatively short, when laid forward do not extend beyond nose or as much as 1/16 inch................................................................ go to 8a
8a. Hair glossy; calcar (see image on page 5) not keeled.................................................................................................................. little brown bat
8b. Hair dull; calcar keeled....................................................................................................................................................................... Indiana batMassachusetts bat species
Species of bats that occur in Massachusetts with their habitats, distribution and status of the uncommon species noted.
This list was updated in 2019. For current listing information, visit www.mass.gov/dfw/mesa.
Habitat
Common name Species Range in Massachusetts Summer Winter Status
Big brown bat Eptesicus fuscus Statewide Buildings, trees Buildings, caves, Common
mines
Little brown bat Myotis lucifugus Statewide Buildings Caves, mines State endangered
Northern Myotis Statewide Trees, building Caves, mines State endangered,
long-eared bat septentrionalis exteriors, rarely federally threatened
inside buildings
26
Indiana bat Myotis sodalis Last recorded in 1939, Caves, mines, hollow Caves, mines State endangered,
Berkshire and Hampden trees, beneath tree federally endangered
counties bark
Eastern Myotis leibii Hampden and Berkshire Beneath tree bark, in Caves, mines State endangered
small-footed bat counties rock talus and deep
fissures
Tricolored bat Perimyotis Statewide Trees, rarely in Caves, mines, rock State endangered
subflavus buildings crevices
Silver-haired bat Lasionycteris Probably statewide Trees, rock crevices Buildings, trees, Common
noctivagans migratory
Eastern red bat Lasiurus borealis Statewide Tree foliage Migratory Common
Hoary bat Lasiurus cinereus Statewide Tree foliage Migratory CommonHOW YOU CAN
H E L P B AT S
Bats are among 400 different species of
animals and plants that are protected
within Massachusetts under the Mas-
sachusetts Endangered Species Act.
Without your help, these species could
disappear forever. Help comes in many
forms: make a donation, report rare
species observations, or continue the
conversation about the rare species of
Massachusetts with your friends and
neighbors. Thank you for your support!
MassWildlife Natural Heritage &
Endangered Species Program
(508) 389-6360
mass.gov/supportnhesp
1 Rabbit Hill Road | Westborough, MA 01581
p: (508) 389-6300 | e: mass.wildlife@mass.gov
MA SS.GOV/MA SS W ILDLIFEYou can also read