Hands on, Minds on Periodic Table: Visualizing the Unseen
←
→
Page content transcription
If your browser does not render page correctly, please read the page content below
Hands on, Minds on Periodic Table:
                        Visualizing the Unseen
                             High School and College version
     Jodye Selco, Center for Education and Equity in Mathematics, Science and
       Technology, California State Polytechnic University, Pomona, CA 91768
                                jiselco@csupomona.edu
      Mary Bruno, Bemis Elementary School, Rialto Unified School District, CA
                                mbruno@rialto.k12.ca.us
           Sue Chan, Kolb Middle School, Rialto Unified School District, CA
                                 schan@rialto.k12.ca.us
Materials:
  • 4 (s, p, d, f) blocks of the periodic table, laminated (computer files available at
      http://www.csupomona.edu/~ceemast/science/scienceLessonPlans.htm
  • 120 (10 dozen) ping pong balls1
  • Small push pin
  • 5/8” sticky back Velcro dots, one for each ping pong ball
  • 9-10 different acrylic paint colors, 1 choice being a metal color (preferably silver)
  • Chenille stems (pipe cleaners): 2 different colors (66 12” stems of color 1; 98 12”
      stems of color 2, each cut into 2 inch pieces)
  • One 6” Styrofoam ball cut in half
  • Two pkgs. beads of 2 different colors (one of each)
  • Beading wire or thread and needle (for stringing beads)
  • 1 pkg. quilting pins
  • Chart paper and markers or overhead sheets or handouts
  • 1 class set (one per pair or small group) of illustrated periodic charts, laminated
      (Periodic Table of the Elements (11 x 18 inches), 100 pk available at
      http://www.acs.org)2
  • Bags of assorted buttons - enough for each student group (see Final
      Assessment)

4 class periods of 1 hour.

                                       Pre-lesson preparation:
Periodic Table:
You will need to print (or make) a huge periodic table whose boxes are 5-6 inches
square. Each block of the periodic table [s (left two columns), p (right hand 6 columns),
d (10 columns across the middle), and f (14 columns at the bottom)] is on a separate
sheet of paper. Each square contains the elemental number, but no other information.
We used butcher paper and then laminated the separate parts. Once laminated, you
1
  You will need to poke holes in the ping pong balls with a small push pins in order to insert the chenille
stems. We recommend wrapping the pin with several layers of masking tape to reduce the chance of
injury.
2
  Navigation instructions: choose “Natl Chem Week” under “quick finds” in left hand column of the page.
Click on “Online Store” in left hand column, then click on “Search” in left hand column. Type “periodic
table” into keyword box.

                                                                                                              1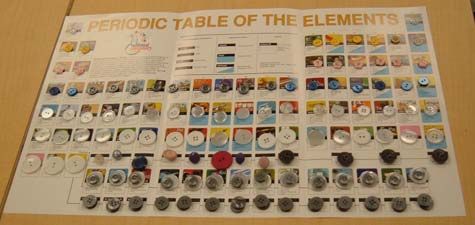
can write on them with water soluble markers. Computer files of the Periodic Table
“skeleton” are available in both Corel and MSWord formats at
http://www.csupomona.edu/~ceemast/science/scienceLessonPlans.htm

Atoms:
Painting the Atoms -
Ping pong balls are used to represent atoms. The different atoms belonging in each
column of the s- and p-blocks (main group elements) are painted a different color.
(There are “extra” alkali metal and halogen atoms so that it is easier for students to
make binary compounds with the atoms in this set.) For the d-block, silver balls are
used for each atom regardless of “family” (column or number of electrons). You will
need a total of 10 colors; unpainted white works for one of the choices. See Table 1 for
the numbers of Styrofoam balls of each color needed.

Table 1: Numbers of Styrofoam Balls of Each Color
     Number of Balls Needed Color Column # or # valence electrons Block
                  22                  1                      1                     s
                   6                  2                      2                     s
                   6                  3                      3                     p
                   6                  4                      4                     p
                   6                  5                      5                     p
                   6                  6                      6                     p
                  21                  7                      7                     p
                   6                  8*                     8                     p
                   1                  9*                     2                     s
           40 (metal color)          10           3-12 (See Table 2)               d
*We suggest that color 9 be a variation of color 8 (e.g. a lighter shade of the same
color). The one “atom” that is painted color 9 represents He; the atoms painted with
color 8 will be the rest of the noble gases.

Adding the Electrons -
Each “atom” has its valence electrons explicitly displayed. We’ve used one color of
chenille stems for unpaired electrons and another for the paired electrons. After
inserting the chenille stems into the balls, you want to bend the ends over into “hooks”.
The purpose of creating hooks is to enable quick formation of chemical bonds between
atoms. You also want to twist the two chenille stems together that represent lone pairs
of electrons. [Using two different colors of chenille stems is a “teacher trick” to enable
rapid spot-checking of student work. In reality, all electrons are the same no matter how
they are represented in this model. Be sure students understand that all electrons are
exactly the same regardless of how they appear in this model.]

The H and He atoms have only one orbital containing electrons; the two electrons of He
are paired. The rest of the atoms in the s- and p-blocks have four electron orbitals.
Take care to make the geometries of the electrons on the atoms “anatomically” correct.
Students will be using them to build compounds. We recommend using the VSEPR
hybridized(1) geometries for these atoms. In this model, we are representing all d-block

                                                                                        2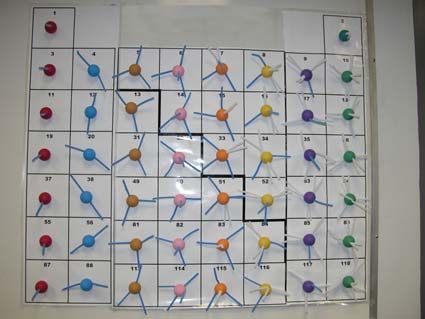
atoms as having six electron orbitals, where the base geometric orientation of the
electrons is octahedral when there are at least 6 electrons. Table 2 informs you how
many chenille stems are needed for each atom.

Table 2: Number of Chenile Stems For Each Styrofoam Ball
                       # Chenile    # Chenile
 Number of    Paint
   Balls      Color       Stem        Stem          Anglec                  Geometry
                                a            b
                         Color 1     Color 2
             Main Group (s- and p-block) Elements
    22          1           1           0
     6          2           2           0            180°                      linear
     6          3           3           0            120°                     trigonal
                                                                               planar
     6            4            4             0              109.5°          tetrahedral
     6            5            3             2              109.5°          tetrahedral
     6            6            2             4              109.5°          tetrahedral
     21           7            1             6              109.5°          tetrahedral
     6            8*           0             8              109.5°          tetrahedral
     1            9*           0             2

                Transition Metals (d-block) Elements
     4            10          3             0                120°             trigonal
                                                                               planar
     4            10           4             0                109.5°        tetrahedral
                                                           two at 180°;       trigonal
      4            10            5             0             three on        bipyramid
                                                        “equator” at 120°
      4            10            6             0                90°          octahedral
      4            10            5             2                90°          octahedral
      4            10            4             4                90°          octahedral
      4            10            3             6                90°          octahedral
      4            10            2             8                90°          octahedral
      4            10            1             10               90°          octahedral
      4            10            0             12               90°          octahedral
a
  Chenille stem color 1 is used to represent unpaired electrons; each occupies one
“space” on the Styrofoam ball. bChenille stem color 2 is used to represent paired
electrons; two are used in each “space” on the Styrofoam ball. cIt is not necessary to
measure the angles exactly; “eyeballing” the angles should be sufficient.

Adding the Velcro Dots -
Place a sticky backed 5/8” Velcro dot (loops) onto each “atom”; the hook half (scratchy
side) gets put onto the periodic table.

Now, divide the main group atoms into bags, one for each group of students. Each bag
should have a variety of atoms with different numbers of valence electrons. Do the

                                                                                          3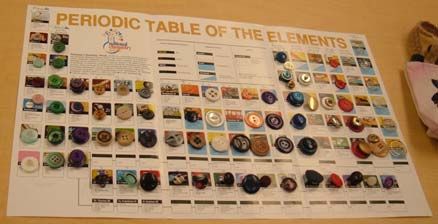
same for the transition metal atoms making sure that each bag has an assortment of
atoms with different numbers of valence electrons. You should now have two sets of
bags - one with the main group atoms (all different colors) and another set with T-metal
atoms of just color 10.

Atomic Nuclei -
You will need a class set of atomic nuclei. Use beads to represent the nucleus. We
made C nuclei by stringing 6 beads of each color, alternately, while drawing the string or
wire through beads multiple times to end up with a ball of beads. The two colors of
beads represent protons and neutrons. At least one of the nuclei should have an “extra”
neutron; thus including a C “isotope” in the set of nuclei. Also, make one larger 12C
nucleus with the last dozen Styrofoam balls. You probably want half of them to a
different color so that it is clear to students which ones are protons and which are
neutrons.

6” Styrofoam Ball -
Cut in half the 6” Styrofoam ball. Use one half to make a cut-away model of an oxygen
atom, and the other half to make another model of a different element with more inner
electrons (e.g. bromine). Make two nuclei (one of oxygen and another to match your
chosen second element) out of beads for these cut-away models leaving extra wire on
the ends to push into the Styrofoam ball. Then add quilting pins to represent the core
electrons. The valence electrons then need to be added to the outside surface of both
halves of the ball using chenille stems.

Lesson construction –
This lesson is written as a series of questions instead of as a lecture so that students
are more actively engaged in thinking during the lesson(2). This way, students are
more likely to really understand the principles, and therefore, retain the “big idea” long
after the details have faded from memory(3). The collection of questions throughout
this script resemble a verbal guided inquiry lesson(4). This set of lesson differs in that
the students also construct their own understanding with the use of the manipulatives
(atoms) in this lesson.

In this script, we present sample questions for use with students, so you can get a
sense of how the lesson would proceed in the classroom. Throughout this lesson,
questioning is used to facilitate student thinking. Feel free to add your own questions to
both lead student thinking and probe student understanding. Please share additional
questions or areas of exploration with us so we can add them to subsequent revisions
of this script.

We have made use of different fonts to make visible the teacher voice, explanations
and background commentary for teachers and/or students, and what the teacher does.
We have also placed boxes around things you might want to post or put onto an
overhead.

                                                                                             4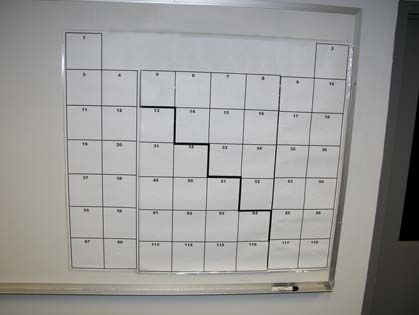
Lastly, we have included embedded assessments (ongoing, informal, or formative
assessments) that allow you to determine whether or not the students understand along
with helpful hints (usually in the form of a question) to help your students along in the
thought process.
Lesson 1: Atoms and Molecules
Lesson Concepts:
• Atoms combine to form molecules according to the number of valence electrons
available on each atom.
• Chemists use a specific form of notation to record chemical reactions.
• Atoms have structure and are composed of protons, neutrons and electrons.
• The atomic number (number of protons) defines the element.
• Isotopes are atoms of a given element that have different numbers of neutrons in
their nuclei.
Teacher Preparation:
4 s-, p-, d- and f-blocks are laminated and hanging on the wall of the classroom
to make a periodic table
Illustrated periodic tables (ACS) are laminated and ready for students to use
Main group atoms are divided and in bags, one bag per student group
There are a series of questions that the students will be asked to respond to.
You can have them respond verbally, on chart paper, or on transparencies.
Distribute illustrated periodic tables to small groups of students. Ask them to think for a minute
or two and then discuss with each other the following questions. Then ask student pairs of
students to share their answers. [This is referred to as a think-pair-share.]
1 What is the title of what you are seeing on the wall? (periodic table)
2 What do you see on this table? (boxes, numbers, letters, names, etc.)
3 Do you notice any patterns? (increasing atomic numbers, mass numbers,
group numbers) – Are there any exceptions to these general patterns?
4 What do the letters in the boxes represent? (elemental symbols)
5 What information do the boxes contain? (atomic number = number of protons,
elemental symbol, weight = weighted average of all isotopes)
6 What do you know about elements? (Element = a collection of atoms that all
have the same number of protons in their nucleus – even if they do not have the
same number of neutrons)
7 Do you see any familiar elements on this table?
8 What differences can you see on the table between the different elements?
(different elements have different atomic numbers)
9 If elements are made of atoms, what are atoms made of? (atoms, the
smallest part of matter that cannot be broken down further by chemistry, are
made of protons, neutrons, and electrons)
510 Where are the parts of the atom located? (protons and neutrons are located
in the central nucleus while the electrons are on the outside of the nucleus)
Pass out the atomic nuclei to the students.
1. What do you notice? (mostly 6 beads of one color and 6 of a different color)
2. If you think you have something different, please check again.
3. So, you are sure that you have a different number?
4. What does this mean?
5. If all of the nuclei I passed out are C nuclei, what must this mean? (6
protons, but number of neutrons can vary)
6. This illustrates what an isotope is – an atom that has the same number of
protons as all the rest, but a different number of neutrons.
7. Where is most of the mass of the atom?
8. Most of the mass of the atom is in the nucleus (an electron weighs 1/1800 the
mass of a proton – and the mass of protons and neutrons are approximately
equal), so the mass of the atom is different if it is a different isotope
9. Has anyone ever heard of carbon-12 or carbon-13 or carbon-14?
10. What do you suppose those terms refer to? (sum of protons and neutrons in
nucleus)
11. How large is this nucleus? What is its approximate diameter? (approximately
6 mm)
12. How big would the atom be if this were a real atomic nucleus? (105 times
larger or approximately ¾ of a mile in diameter!)
13. In that atom that is ¾ of a mile in diameter, the nucleus is 5 mm in diameter.
What occupies the rest of the atom? (for a carbon atom – 6 electrons!)
14. So, how would you describe the inside of am atom? (mostly empty space!)
Whole group:
During the discussion from the think-pair-share, define technical terms (e.g. element, atom, mass
number, etc.), reinforce vocabulary, discuss any trends in periodic chart, any other information
which is shared.
You should note any misconceptions that students might have(5). At the beginning of
the lesson, the most common misconceptions will be the definitions of scientific and
technical terms (e.g. most students do not know the difference between the terms atom,
molecule, compound and element). [Note that misconceptions are difficult to dislodge.
One of the best ways is to introduce new information that may not fit into their idea of
how the world works (discrepant events). These lessons as a whole are designed to
address many of the misconceptions that your students may have.] You may need to
clarify and define terms, discuss atomic structure, etc. It is important to know what your
students know before launching into a lesson that may be well below or beyond them at
6the moment. Please take the time to make sure that all students understand the basics
before moving on to another topic.
Show cut-away model of oxygen atom.
1. Can you find oxygen on the periodic table? (#8)
2. What is the symbol for oxygen? (O)
3. Where is it? (third column from right edge, second row)
4. How many electrons does it have? (8)
5. protons? (8),
6. What is the mass of oxygen? (16 g/mol)
7. How many neutrons does 16O have? (8)
8. How do you know? (mass number = protons + neutrons)
9. Where is most of the mass of an atom located? (99.9% is in the nucleus)
10. What can you predict about the mass of electrons? (they are negligible)
11. Do some atoms have more or less protons and electrons than others? (yes)
12. What if oxygen did not have 8 protons, but had 7 protons instead? Would it
still be oxygen? (no it would be nitrogen; the number of protons defines the type
of atom.)
13. Can someone count the electrons in this model?
14. Are all electrons at the same distance from the nucleus? (no)
Right, we can think about the atoms as if they were onions, with sets of electrons
in each onion layer.
Showing the oxygen atom model, ask the students to notice the inner layer of electrons, and the
outer layer of valence electrons.
1. How many outer electrons does it have? (6)
2. How many inner electrons? (2)
3. How are the 6 outer electrons arranged? (2 are alone, two are pairs of
electrons)
This oxygen atom is NOT to scale – the nucleus is too large for this atom. The
nucleus would be too small to see if were the correct size for this sized atom –
about 1.5 µm or 1/50 the width of a hair! In this model, core electrons are
“hidden” inside and are not visible from the outside. All electrons are equal
regardless of position and how they are represented.
7Today we’ll focus on the behavior of the electrons on the outside of the atom.
These electrons are called the valence electrons. They are the only ones available
for doing chemistry.
Here is another cut-away model of an atom. Show it to everyone.
1. What do you notice about this model? [6 inch Styrofoam ball cut in half with a
nucleus (bead ball) and core electrons depicted by quilting pins.] (Not to scale –
nucleus is too large for atom, all electrons are equal regardless of position, core
electrons are “hidden” inside and are not visible from the outside.)
Ask students to compare and contrast oxygen atom model to the model of the other atom.
2. How are they different? (different nucleus and number of core and valence
electrons)
3. What is similar between the two atoms? (they have nucleus + core electrons
+ valence electrons)
4. What type of atom is this? How do you know? (count the number of protons;
the atomic number (number of protons) determines the element)
Small group:
Distribute bags of main group (s- and p-block) atoms to student groups: Each group should
now have a collection of atoms on their desks.
In this model, only the valence electrons on the outside of the atoms are known.
Nothing about what is inside the atom is known. (You may need to remind students
of this later!)
Ask students to examine the atoms they have.
1. What do you notice about these atoms? (We used yellow for paired electrons
and green for unpaired electrons. Responses include: yellow electrons are
internally paired, green are unpaired electrons, atoms have between 1 and 8
electrons, they have different colors, they are spherical, they have Velcro dots, all
balls are same size [Note that although two different colors of chenille stems are
used to represent paired and unpaired electrons, all electrons are exactly the
same. Note also that real atoms are not all the same size, are not colored, and
do not have Velcro dots or chenille stems on them.])
2. What do you think the chenille stems represent? (valence electrons)
3. Why are the valence electrons spread away from each other? (negative
charges repel)
4. Count the valence electrons; how many are there? (1-8)
5. Where are the rest of the electrons? (cannot see them they are inside!)
8But these atoms only have 4 orbitals, each of which can hold a maximum of 2
electrons.
1. So what do electrons do if an atom has 5 electrons and only 4 spaces? (2
must pair up! Don’t worry though, each has a different spin which allows them to
“occupy” the same orbital.)
2. Why are some of the valence electron hooks twisted together? (pairs!)
3. Do you think electrons on the same atom want to be paired up? (not unless
they have to, they have the same charge and like charges repel each other)
Make sure all of your paired electrons are connected.
1. How many pairs of electrons are there?
2. How many lone electrons are there?
3. How many total electrons are there?
4. Where are the remaining electrons of these atoms? (hidden inside!)
The electrons are represented by hooks so they can hook-up with other atoms that
also have hooks on them. Making these new electron-electron connections are what
happens when “chemistry” occurs. Since only two electrons can interact, only the
electrons by themselves can do chemistry. (Core electrons are all paired and
therefore, do not do any chemistry.)
Electron Behavior:
• To be most stable, electrons must ultimately be paired. However, they only
pair internally when forced to do so.
• Unpaired electrons (lone electrons) are “reactive”. In order to become more
stable, they need to find external electron partners since they do not have
internal partners. Atoms can no longer do chemistry when there are no more
unpaired electrons – they want to look like noble gases.
• Making new electron-electron between atoms is what we call chemistry or a
chemical reaction. Atoms and molecules do this to become more stable.
Before we do any chemistry, we need to be sure we are safe! (Put on goggles!)
So, now we can do some chemistry and make some new bonds (or new electron-
electron connections) between two atoms
Working with others in your group, or multiple groups:
Make new molecules (chemicals that have one or more atoms bonded together)
from only two types of atoms, or binary compounds (binary compounds = molecules
with 2 different types of atoms).
9Rules for Making Binary Compounds:
• Use only two differently colored (or two types of) atoms to connect the
unpaired electrons - use as many as you need borrowing from other groups as
necessary.
• You are all done when all unpaired electrons have a single partner and none
are left unpaired.
Ask the small groups of students to see what sorts of binary compounds their group can make
1. What combinations did you make?
2. How many of each type of atom did you have to use?
3. What atomic ratios did you find in your binary compounds?
Whole class shares, you chart responses: (save charted responses for Lesson 3)
2 yellow + 3 green ⇒ 2Y+3G ⇒Y2G3 Using subscripts is “expert” chemical writing.
Write down all of the responses in “long hand” (i.e. 2 yellow + 3 green) first. Then go
back and “abbreviate” each step along the way so they can follow the “train of thought”
of how you can get to subscript form. This is the shorthand way chemists use to
describe chemicals/compounds/chemical formulae/combining ratios.
Students usually ask if double and triple bonds/connections between atoms allowed?
The answer is yes – just not quadruple bonds because it is physically/geometrically
impossible to do so. (If you have made your atoms so that they are “anatomically”
correct, you can instruct the students to try to make a quadruple bond between two
atoms having 4 electrons. They will find that they can physically make a triple bond, but
then the two remaining electrons are at 180° from each other making another bond
between them impossible.)
Using the atom set, the chemical reactions listed below can be used to demonstrate conservation of matter and
stoichiometry. Note that not all can be done at once – the limiting factor is the atom set only has 6 atoms with 6
valence electrons.
AlCl3 + NH3 → AlN + 3 HCl
2 H2 + O2 → 2 H2O
H2 + I2 → 2 HI
COH2 + O2 → CO2 + H2O
CH4 + 2 O2 → CO2 + 2 H2O
2 NI3 → N2 + 3 I2
HCN + NaOH → NaCN + H2O
102 Al + 3 Br2 → 2 AlBr3
CaS + 2 HCl → H2S + CaCl2
AlN + 3 HCl → AlCl3 + NH3
Ca2C + 4 HCl → 2 CaCl2 + CH4
Have the students “break apart the bonds” and put the atoms back into the bags, and collect the
bags of main group atoms. You will need them again for the next lesson.
Big Ideas or Take Home Messages:
The nucleus of the atom is very small and contains more than 99.9% of the
atom’s mass
Electrons are indistinguishable regardless of how the model represents them,
or their distance from the nucleus.
• To be most stable, electrons must ultimately be paired. However, they only
pair internally when forced to do so.
Chemistry involves the outer layer of electrons only, called the valence
electrons. The number of valence electrons is a chemical property.
• Unpaired electrons (lone electrons) are “reactive”. In order to become more
stable, they need to find external electron partners since they do not have
internal partners. Atoms can no longer do chemistry when there are no more
unpaired electrons – they want to look like noble gases.
Making new electron-electron connections between atoms is what we call
chemistry or a chemical reaction. Atoms and molecules do this to become
more stable.
During a chemical reaction, matter is conserved.
Lesson 2: Organization of the Periodic Table
Lesson Concepts:
• The periodic table is organized with elements arranged in columns based on the
number of electrons available for chemical reactions (only the valence electrons
are available to do chemistry). Therefore, the elements in any column have
similar chemical behavior because they have the same number of valence
electrons.
• Electrons are added to the atoms (not the same atom, but atoms with increasing
numbers of protons) in layers - each row of the periodic table representing a
different layer. [This ignores for the moment that the 3d elements are embedded
in the 4th row of the periodic table. It is easier for students to learn the general
rule and then the details later.] Elements in lower rows have more total
electrons, but the same number of valence electrons as those above them in the
column.
11• Elements in lower rows react faster than those above them in the column
because the electrons are further away from the nucleus, and the core electrons
shield the valence electrons from some of the nuclear charge.
Preparation:
4 s-, p-, d-, and f-blocks are laminated and hanging up in the classroom to make
a periodic table
Illustrated periodic tables are laminated and available for students use
Main group atoms are divided and in bags, one bag per group
There are a series of questions that the students will be asked to respond to.
You can have them respond verbally, or on chart paper or transparencies.
Begin by asking students which topics are now understood and which new questions have arisen.
Remind students of previous lesson take home messages. Review previous topics where
necessary.
Pass out bags of main group atoms, one bag per small student group.
You have a bunch of data in hand – different atoms! Remember, you do not know
what is inside each one. Chemists are only concerned with the valence electrons,
since they are the only ones that do chemistry. Examine the atoms - they are your
data for the day!
You might have noticed the periodic table on the wall. This is just an organizing
chart for the data you have in front of you - the atoms!
Ask small groups of students:
1. How might you organize (categorize and/or classify) your data on this
organizing chart?
WAIT! Only a part of the Periodic Table is needed for this task.
So let’s remove the parts we are going to ignore for this part [since the students
have only main group elements, remove the f- and d-blocks from your periodic table].
RIPPPPPP!!! Now move the p-block over so that it is next to the s-block – 8 squares
across. See Figure 1.
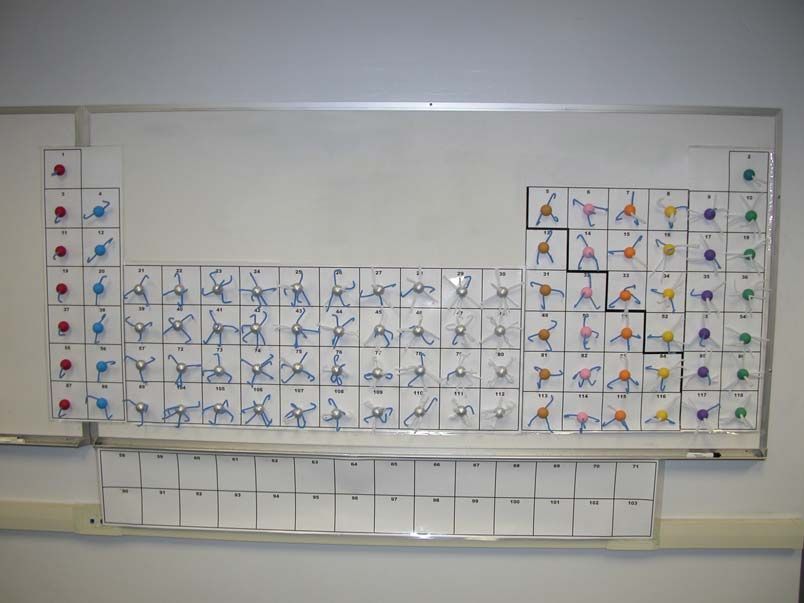
12Figure 1. Blocks of periodic table (s- and p-blocks) onto which students will place the
main group atoms.
• These atoms fit onto the parts of the periodic table on the wall in front of
the room. Your job is to organize the atoms so that they fit into the boxes
of the periodic table.
• What are you going to use to as the basis of the organization? How will you
do it?
• Talk among yourselves in a small group for a couple of minutes about how you
might organize your data.
• Come place your atoms on the periodic table as your group chose to organize
them. (Have them use the Velcro on the atoms to stick to the Velcro on the
periodic table).
Whole group:
1. Did you all agree with the placement?
2. Does the data look organized to you?
3. What would you like to change?
Come on up and make changes.
Figure 2. What the s- and p- blocks look like when the data (atoms) are placed correctly
onto the main group portions of the periodic table.
13There are several misconceptions that will probably appear during this exercise. The
first one is that student groups confuse the difference between the total number of
electrons with the number of valence electrons. Demonstrating this, they will place the
main group atoms into the boxes representing atomic numbers 1-8. At this point, we let
them know that all boxes need to have data in them. [The only data that will not fit onto
the table are the “extra” alkali metals and halogens.]
1. Do all of the groups agree with the placement of the atoms?
2. Does the data look organized to you?
3. Compare/contrast the basis of each groups’ placement of data.
4. Can you think of other ways of organizing the data that would make more
sense?
5. Is one way of organization better than the others?
6. Do any groups want to come up and make changes?
Ask students to go make changes in the organization of the data.
If the students still fail to organize the data appropriately (number of valence electrons
indicates the main group column in which they belong), provide hints in the form of
questions. Some leading questions that might help students organize the data
appropriately:
1. Does that look organized to you?
2. Do you see a repeating pattern?
• A hint may be to let them know which data is in the correct place.
3. How many rows do I have on my organizing chart?
4. How many columns do I have on my organizing chart?
5. How many different types of data to you have?
1. How did you decide how to organize the data this way?
2. What do you notice about the organization of the atoms? Or, What
similarities do you see in each column? (atoms in each column are all the same
color and have the same number of valence electrons)
3. What can you predict about the properties of the elements in each column?
(same # of valence electrons, so each column has similar chemistry)
4. Do you see any trends? (increasing number of valence electrons across the
periodic table – repeats in each row)
5. What does this remind you of? (a calendar or TV schedule throughout the
week – both have repeating patterns that appear in grid formats.)
6. If there is an increasing number of valence electrons as you go across the
table, what do you know about the number of protons as you move across
each period?
147. Are there other possible arrangements that might make sense? (yes - for
instance atoms could be arranged 8-1 valence electrons from left to right)
8. How do you think you could decide which might be the correct one? (perhaps
the numbers in the boxes provide a clue?)
9. What sorts of information might you need in order to decide?
10. Do you think that these atoms are placed correctly? What do you base your
opinion upon?
11. Can you predict the general size of the atoms? (size increases as you go
down any column due to the increasing number of total electrons – even though
the number of valence electrons remains constant)
Remember, you do not know just how many electrons are inside the model atoms,
and that the valence electrons are wholly responsible for the chemistry.
1. What do the atoms in any given column have in common? What does this
mean? (all have the same number of valence electrons. Without knowing how
many electrons are in the “center” of the atoms, we do not know which one it
actually is. In reality, it is easy to tell them apart because they have different
masses and total number of electrons)
2. If the electrons are responsible for the chemistry, which electrons do you
think are the ones doing the chemistry? (valence - and only those valence
electrons that are unpaired)
3. So, what can you say about the chemistry of the atoms in any given column?
Give a reason for this conclusion. (If only valence electrons are responsible for
the chemistry, their chemical behavior should be similar. Be sure to point out
that chemical behavior refers to combining ratios. For further information about
the data Mendeleev had to work with while developing the periodic table during
the 1860s, see for example Gordin(5).)
4. What are the differences between the atoms in a column? (different total
number of electrons)
5. What happens to atoms as you move down through the column? (they get
bigger, valence electrons are further from the nucleus, atoms get heavier)
Anything else?
6. Why would the atoms react faster? (atoms in lower rows have more total
electrons, more protons and more neutrons. They will react faster because the
electrons are further from the nucleus and more likely to be attracted to an
external partner, additionally the core electrons shield the valence electrons from
some of the nuclear charge. An analogy: think about your “unfocused” students.
Would you rather have them sit up front close to you or at the back of the room?
Why? Another analogy: if you are sitting in the back of a room during a meeting,
aren’t you more likely to get distracted and possibly work on something else than
if you are sitting right in front of the speaker? An analogy students might
understand: As you get further away from your parents, are you more likely to
15take a risk? How about if you are further from a teacher in a classroom? Isn’t it
easier to goof off?)
Point out the sawtooth line which divides metals from non-metals
Then let the students know that they can even make predictions! Examine the combining ratios
between the atoms of various columns. (Here is where mathematics comes into play! Look
for least common denominators!)
Have students explain (could be in a journal) the different ways chemists read data on the
periodic chart.
Across a row
Down a column
Linear as in the atomic number
Metals are found in different areas of the periodic table than non-metals
Big Ideas or Take Home Messages:
Periodic behavior: Moving across the periodic table, each row or layer
begins with one valence electron being added to each orbital; once each
orbital has one electron the rest of the electrons form pairs of electrons until
all the orbitals are filled with paired electrons.
In each new layer (row) the outer electrons are further away from the
nucleus.
When all electrons are paired, the atom is “stable”.
Repeating pattern as you go across = periodic behavior.
Similar chemical behavior in a column or family.
Note that these ideas are built upon the big ideas from the previous lesson. You may
wish to review those ideas here.
Class Period 3: Bonding
Concepts:
Periodic table can be used to make some predictions about chemical compounds
(e.g. atoms from column 1 combine with atoms from column 7 in a one to one
ratio to make a salt).
The periodic table can be used to make predictions about types of bonds found
in compounds including covalent, polar, and ionic bonds
The periodic table can be used to make predictions about chemical reactions
(e.g. the combining ratios of atoms in compounds in order to write balanced
reactions).
Materials:
• s- and p-blocks of large periodic table
• main group atoms
16 There are a series of questions that the students will be asked to respond to.
You can have them respond verbally, or on chart paper or transparencies.
s- and p-blocks of the periodic table should be up on the wall and filled with atoms
where all atoms in a column have the same number of valence electrons. Begin with
review of previous lesson.
Have students share what they wrote about the different ways chemists read data on the periodic
table.
Students can share in small groups their journal entries and then share out to the larger group.
Chart organizational patterns of periodic chart. Check with all groups for any additional trends
not mentioned previously. Add to chart.
We can make predictions about the chemical behavior of atoms by examining their
placement on the periodic table. Let’s go back and examine the combining ratios of
atoms from different columns. (This was already done when the students made
binary compounds with the atoms before they placed the atoms on the periodic table.
Bring out the charting of binary compounds that you made during lesson 1)
What would you expect the atomic ratios to be in binary compound formed from:
Column 1 (alkali metals) with column 7(halogens) 1:1
Column 1 (alkali metals) with column 6 (oxygen family) 2:1
Column 2 (alkali Earth metals) with column 6 (oxygen family) 1:1
Column 3 (boron family) with column 5 (nitrogen family) 1:1
Have students make some of these binary compounds using atoms from the periodic table with
atoms on the wall. Relate these combining ratios to the chart from Lesson 1.
1. Can you can find a binary compound with a combining ratio that is 2:3 or 3:4?
2. Which types of atoms are involved? (N family with O family; C family and B or
C family)
Covalent, polar and ionic bonding:
1. If the atoms in the right hand column (noble gases) do not do any chemistry,
what does this tell you about atoms that have nothing but paired electrons?
(they are stable)
So, in order to be “stable”, all atoms need to have the same electron configuration
as noble gases. Atoms can do this in one of two ways. They can gain or lose
electrons to become ions (atoms that do not have the same number of protons and
electrons), or they can share electrons with other atoms so that all available
orbitals have two electrons. Interact with the atoms (by demonstrating ion formation-
chenille stems are easy to pull out of or add to the Styrofoam balls) on the Periodic Table as
students answer the following questions.
172. If we were able to add or subtract electrons to or from other atoms, do you
think the atoms in the left hand column (alkali metals) would rather take in
more (7!) electrons or lose the one that they have? (lose the one they have to
become a positive ion. Alternatively, they could gain 7 electrons. The general
rule is that making fewer changes takes less energy and is most likely. An
example is Na → Na+ + e-)
3. Why? (because then they would have the same number of electrons as the
noble gases)
4. How about the atoms in column 7 (halogens)? (They would take in one electron
to make a negative ion. Alternatively, they could lose 7 electrons. Taking in an
electron requires fewer changes and is thus more likely. An example of this is Cl
+ e- → Cl-. Please point out that electrons do not just vanish or appear. The
loss and gain of electrons occurs in pairs of reactions.)
5. Why? (because then they would have the same number of electrons as a noble
gas)
6. So, which atoms do you think might want electrons more than others? Is
there a trend? (atoms on the right side of the periodic table “hog” the electrons
more because they get closer to having the stable arrangement of electrons that
the noble gases have (higher electronegativity), while the atoms on the left side
of the periodic table are fairly likely to give up their electrons (they are
electropositive or they have a lower electronegativity) so that they too attain the
same stable electron arrangement that the noble gases have)
7. In a compound, the atoms from which columns would share electrons most
unevenly? (those from column 1 (alkali metals) and those from column 7
(halogens). These are termed ionic compounds - compounds where the electron
actually “defects” from the alkali metal atom to the halogen atom)
8. Which atoms share the electrons exactly equally? (two identical types of
atoms like Cl-Cl. These are covalent bonds where the electrons are shared
equally)
9. What happens when the atoms share the electrons unevenly, but there is not
a complete defection from one atom to another? (a polar bond results -
uneven sharing, but not a complete defection to form ions)
Let’s explore these three types of bonding, and the results in more detail. Model
the following process using atoms from the Periodic Table.
Covalent bonding:
• When two identical atoms form chemical bonds, neither is “hogging” or
“pulling” on the shared electrons more than the other.
• The result is that the shared electrons are shared exactly equally.
18Ionic bonding:
• When Na combines with Cl, the electron from Na is removed and added to
unpaired electron on Cl to form an electron pair.
• The defection of the electron from one atom to the other changes the
charges on both atoms. Remember that Na has 11 positively charged
protons, but now has only 10 negatively charged electrons resulting in a net
charge of +1; Cl on the other hand has 17 positively charged protons and
now has 18 negatively charged electrons resulting in a net charge of –1.
Polar Bonds:
1. What do you suppose happens when the electrons are not shared exactly
equally, but do not completely defect to another atom? (shared unequally)
When electrons form a bond where the electrons are shared unequally, this is
referred to as a polar bond. The atom that is more electronegative (e.g. O in CO)
has a “partial” charge. A partial charge results from the shared electrons spending
more time around one atom involved in a bond than the other.
Water is a molecule with polar bonds.
2. Which atom do you expect to be more electronegative, H or O? (O. Note
that H is an exception – it is not as electropositive as the rest of the elements in
column 1. The origin of this behavior lies in the fact that it only has one electron
orbital.)
3. So, do the electrons in each bond spend more time around the H or the O?
(O)
4. Which atom(s) in water have a partial negative charge? (O)
5. Which atom(s) in water have a partial positive charge? (H)
Make a model of water (H2O) and show it.
In addition, the oxygen atom in water has two lone pairs of electrons. The result is
that there is much more negative charge around the oxygen atom in water making
the molecule itself polar (but it is not ionic!). This means that water acts like a
magnet with the more negative oxygen “end” being attracted to positive ions and
positive sides of other polar molecules, and the more positive hydrogen “end” being
attracted to negative ions and the negative sides of other polar molecules.
Interactions of salts with water:
Salts are compounds with ionic bonds. NaCl is table salt. Let’s examine what
happens when NaCl dissolves in water.
1. Which atom in positively charged? (Na)
192. Which atom is negatively charged? (Cl)
3. Which end of water is negatively charged? (O)
4. Which end of water is positively charged? (H)
Collect the remaining “extra” alkali metal and halogen atoms and make a salt crystal. Then
demonstrate using your water molecule model that the oxygen end of water begins to solvate a
Na (it takes a minimum of 4 water molecules to completely solvate either Na or Cl and cart them
off into the bulk liquid), while the hydrogen end of water will approach and begin to solvate a Cl.
Once the ions are surrounded by at least 4 water molecules and distributed in the bulk liquid, the
salt has “dissolved”. [A reasonable animation of water dissolving NaCl is available at:
http://www.mhhe.com/physsci/chemistry/essentialchemistry/flash/molvie1.swf or
http://www.chem.iastate.edu/group/Greenbowe/sections/projectfolder/flashfiles/thermoc
hem/solutionSalt.html]
The fact that there are ions in solution results in two other properties of NaCl –
one is that it tastes “salty”, the other is that the solution can carry a current
(moving charges are a current – it is not just electrons that can do this).
Big Ideas or Take Home Messages:
Combinations of a metal atom with a non-metal atom make an ionic
compound.
The periodic table can be used to make predictions of which molecules and
compound will have ionic bonds.
A salt is an ionic compound that when dissolved in water becomes ionic and
tastes salty. However, not all ionic compounds dissolve in water.
Combinations between atoms in columns 1 & 7 make ionic compounds that
are salts. There is a complete defection of the electron from the atom in
column 1 to the atom in column 7.
Combinations between atoms in columns 2 & 7 also make ionic compounds
that could be a salt. Not all combinations of column 2 and column 7 will
dissolve in water. Remember to be a salt, it must be ionic and dissolve in
water.
Atoms on the right side of the periodic table have higher electronegativities,
while the atoms on the left side of the periodic table are electropositive.
Atoms will gain or lose electrons to form ions, or bond with other atoms to
share electrons in order to attain the same stable electron arrangement that
the noble gases have and become more stable in the process. Atoms will
form ions with the smallest charge in order to become isoelectronic with a
noble gas.
20Class Period 4: Transition Metals
Lesson Concepts:
Metals have a special set of physical properties because they share their
electrons differently (communal sharing of electrons) than main group elements
do.
Transitions metals are organized on the periodic table in a similar way as the
main group elements (as are f-block metals).
What it means to be malleable and ductile.
Preparation:
• Have available the d- and f-blocks of your large periodic table on the wall.
• Place a variety of metallic atoms into bags to pass out to student groups (these
have 3-12 electrons and are painted color 10)
• There are a series of questions that the students will be asked to respond to.
You can have them respond verbally, or on chart paper or transparencies.
• (You may want to have a variety of metals available along with magnets and
circuits to test their magnetism and electrical conductivity.)
Suggested Pre-lesson Activities:
¾ Review organization of atoms on s- and p-blocks of periodic table.
¾ Review types of bonding.
¾ (Explore and discuss physical properties of metals.)
Add the d-block (10 across) portion to the Periodic Table. Pass out transition-metal balls (the
ones with 3-12 electrons and metallic colored).
The new atoms you have in front of you belong on the part of the Periodic Table
that I’ve just added.
Discuss in your groups how to organize this new data….
Come place your atoms on the newly added portion of the periodic table. See Figure
3 for what to expect at this point.
21Figure 3: A picture of the full periodic table with s-, p-, and d-block atoms.
1. Do you all agree with the placement of the data?
2. Does the data look organized to you?
If not, come make changes.
3. How did you decide on the organization?
4. What do you notice about the organization of the data? (3 through 12 across
the d-block. These atoms begin with 3 electrons because they are placed after
the s-block)
5. How many electron “houses” do these atoms have?
6. How do you know? (12 total electrons, first pair of electrons appears for atoms
with 7 electrons)
All of these new atoms are metals.
1. In what ways are metals different from other materials? (They conduct
electricity, they have metallic luster, they are ductile, and they are malleable)
The reason metals have these special physical properties is that they share their
electrons communally – instead of having electrons in localized bonds between
atoms. (To demonstrate this, we include a kinesthetic activity we call:)
People Movers Activity: A kinesthetic demonstration of malleability and ductility.
A “dance” in three parts:
221) Demonstration of ductility - This is the ability to draw materials (metals) through a
small hole to make a wire. You will need to make an “orifice” through which you will
“draw” the students. You can do this by laying down tape so that students can only
pass through in single file. Line up the students in rows and columns to simulate a
metal crystal. Ask them to “touch” those around them, but they will be free to move
when they are “pushed” or “pulled” by you as long as they maintain touch. Explain that
they cannot pass through a solid wall and must stay in the “open space” of the orifice
you have laid out. Take one student by the hand and “pull” (or “push” from the back)
them through the “orifice”. Since the other students need to maintain “touch” contact,
this will eventually draw all students through the “orifice” in single file as if they were a
wire.
2) Demonstration of malleability - Do this “dance” against a “wall” or place tape on the
ground and explain that this is a wall through which they cannot pass. Then arrange
students in rows and columns. Now hold a large circle (paper, Frisbee, etc.) and
explain that you are the hammer that is going to pound on them - the piece of metal. As
you gently “push” at some part of the metallic crystal, the students should move out of
the way by spreading out against the “wall”, while maintaining touch contact. Since they
cannot go through the wall, all they can do is “spread”. A material that can change its
shape upon pounding without breaking is malleable.
3) How are salt crystals different from metals? “Reset” your crystal of rows and
columns of students. This time the bonding is different. The students in every other
row places their hands on the students in front of and behind them while the other
students place their hands on the students beside them in both direction. Now, they are
not allowed to “let go” of those they are touching. What happens as you try to “hammer”
them? The only thing that can happen is that the crystal (if it reacts at all) it to cleave or
shatter.
Metals communally share their electrons (unlike ionic or molecular substances).
This different way of sharing electrons is responsible for the special physical
properties of metals, namely: malleability, ductility, conductivity, and luster. In
other materials, electrons are shared between specific atoms in localized bonds or
“monogamous” pairs. It is these localized bonds that result in the fracturing or
shattering of the material when an attempt is made to change its shape without
melting the material.
There is still another part of the Periodic Table!
Now add the f-block to the bottom of your periodic table.
2. What do you suppose the pattern is here? (14 squares across; starts with 3
electrons goes through 16 electrons, 8 electron houses or orbitals)
3. What belongs in each box?
(This part is done without the benefit of actual atomic models to place on the periodic
table.)
234. So, what is the organizing principle for this portion of the periodic table? (8
electron orbitals, 3 through 16 valence electrons, all atoms in each column are
the same)
Big Ideas or Take Home Message:
Metal to metal bonds are where the electrons are shared communally.
Because of this metals have the special physical properties of ductility,
malleability, magnetism, thermal conductivity, and electrical conductivity.
Metallic bonding is different from covalent, polar, and ionic bonding in that the
metal atoms communally share the electrons. (Covalent, polar, and ionic
bonds result from electrons being shared between the two atoms involved in
that specific bond; the electrons are localized.)
Atoms in the d- and f-blocks of the periodic table are also organized according
to the number of valence electrons each has.
The periodic table overall is organized by the number of valence electrons of
each type of element.
Elements having the same number of valence electrons and the same number
of electron orbitals are organized on the periodic table so that they appear in
the same column.
Final Assessment:
A culminating exercise (either now or later):
This is a group project. Have the students use their illustrated periodic tables. Provide them
with a bag of buttons. Ask the students to use the buttons to represent something they know
about the data represented on the periodic table by placing buttons on your periodic table. To
debrief the students, have the groups do a museum walk (student groups go see the work of other
groups) to see what others have done. Below are a couple of samples.
What do you notice about how another group chose to place their buttons?
What were they representing?
Did any group have something they represented that has not been pointed out?
(Everyone go on over and see if you can spot it!)
TAKE HOME MESSAGE:
Periodic chart organizes the elements in a variety of ways. Chemists use the
chart to make predictions about chemical properties and reactions.
24Student Standards:
California High School -Chemistry
Atomic and Molecular Structure
1. The periodic table displays the elements in increasing atomic number and shows how
periodicity of the physical and chemical properties of the elements relates to atomic
structure. As a basis for understanding this concept:
a. Students know how to relate the position of an element in the periodic table to its atomic
number and atomic mass.
b. Students know how to use the periodic table to identify metals, semimetals, nonmetals,
and halogens.
c. Students know how to use the periodic table to identify alkali metals, alkaline earth
metals and transition metals, trends in ionization energy, electronegativity, and the
relative sizes of ions and atoms.
d. Students know how to use the periodic table to determine the number of electrons
available for bonding.
e. Students know the nucleus of the atom is much smaller than the atom yet contains most of
its mass.
f.* Students know how to use the periodic table to identify the lanthanide, actinide, and
transactinide elements and know that the transuranium elements were synthesized and
identified in laboratory experiments through the use of nuclear accelerators.
g.* Students know how to relate the position of an element in the periodic table to its
quantum electron configuration and to its reactivity with other elements in the table.
h.* Students know the experimental basis for Thomson’s discovery of the electron,
Rutherford’s nuclear atom, Millikan’s oil drop experiment, and Einstein’s explanation of
the photoelectric effect.
i.* Students know the experimental basis for the development of the quantum theory of
atomic structure and the historical importance of the Bohr model of the atom.
Chemical Bonds
2. Biological, chemical, and physical properties of matter result from the ability of atoms to
form bonds from electrostatic forces between electrons and protons and between atoms
and molecules. As a basis for understanding this concept:
a. Students know atoms combine to form molecules by sharing electrons to form covalent or
metallic bonds or by exchanging electrons to form ionic bonds.
b. Students know chemical bonds between atoms in molecules such as H2, CH4, NH3,
HCCH2, N2, Cl2, and many large biological molecules are covalent.
e. Students know how to draw Lewis dot structures.
Conservation of Matter and Stoichiometry
3. The conservation of atoms in chemical reactions leads to the principle of conservation of
matter and the ability to calculate the mass of products and reactants. As a basis for
understanding this concept:
25a. Students know how to describe chemical reactions by writing balanced equations.
Nuclear Processes
11. Nuclear processes are those in which an atomic nucleus changes, including radioactive decay
of naturally occurring and human-made isotopes, nuclear fission, and nuclear fusion. As a
basis for understanding this concept:
a. Students know protons and neutrons in the nucleus are held together by nuclear forces
that overcome the electromagnetic repulsion between the protons.
c. Students know some naturally occurring isotopes of elements are radioactive, as are
isotopes formed in nuclear reactions.
National Science Content Standards:
Standard A: (Scientific Inquiry) - develop abilities necessary to do scientific inquiry;
understandings about scientific inquiry
Standard B: (Physical Science) – understanding of properties and changes of
properties of matter
National Science Teaching Standards:
Teaching Standard A: Teachers of science plan an inquiry-based program for their
students. In doing this, teachers
• Select science content, adapt and design curricula to meet the interests,
knowledge, understanding, abilities, and experiences of students.
• Select teaching and assessment strategies that support the development of
student understanding, and nurture a community of science learners.
Teaching Standard B: Teachers of science guide and facilitate learning. In doing this,
teachers
• Focus and support inquiries while interacting with students.
• Orchestrate discourse among students about scientific ideas.
Teaching Standard C: Teachers of science engage in ongoing assessment of their
teaching, and of student learning. In doing this, teachers
• Use multiple methods and systematically gather data about student
understanding and ability.
• Guide students in self-assessment.
Teaching Standard E: Teachers of science develop communities of science learners
that reflect the intellectual rigor of scientific inquiry, the attitudes, and social values
conducive to science learning. In doing this, teachers
• Nurture collaboration among students.
Acknowledgements
This lesson was originally developed for a professional development workshop for
Rialto Unified School District 5th grade teachers sponsored by CaMSP grant . We
26thank the Rialto Unified School District teachers and students for helping us refine the
original lesson, and Dr. Ed D’Souza for having the wisdom to make us a teaching team.
References
1. Consult a General Chemistry textbook, for example – Raymond Chang,
Chemistry, 8th edition, McGraw-Hill, 2004.
2. M.S. Donovan, J.D. Bransford, and J.W. Pelligrini, 2000, “How People
Learn: Brain, Mind, Experience and School, NSTA press; “Inquiry and the
National Science Education Standards: A Guide for Teaching and
Learning, 2000, NSTA press.
3. J.E. Penick, R.L. Harris, 2005, “Teaching with Purpose: Closing the
Research Practice Gap”, NSTA press.
4. R. Bybee, editor, 2002, “Learning Science and the Science of Learning:
Science Educators’ Essay Collection, NSTA press; California Journal of
Science Education, Volume V, Issue 2 – Spring, 2005
5. M. Gordin, 2004, “A Well Ordered Thing”, Basic Books.
27You can also read


