HEALTHROSTER MANAGERS USER GUIDE - EMAIL: WEBSITE: ...
←
→
Page content transcription
If your browser does not render page correctly, please read the page content below
Email: e-rostering@bfwhospitals.nhs.uk
Website: http://www.bfwh.nhs.uk/working-for-the-trust/e-rostering-and-corporate-bench
Phone: 01253 953690

                           HealthRoster
                        Managers User Guide

       People Centred                  Positive                    Compassion           Excellence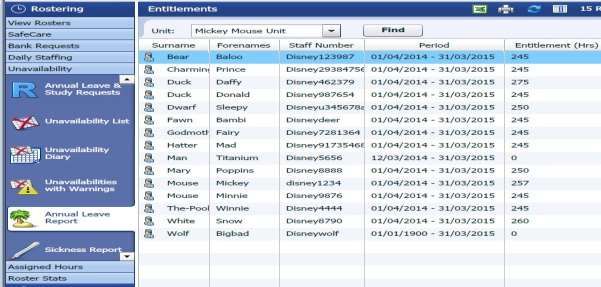
Accessing HealthRoster

  1. Click onto the e-Rostering
     homepage

  2. Select the ‘HealthRoster’ link

  3. Enter your username and
     password

  4. Select ‘Login’

       If you have forgotten your password, to re-set it, click on the forgotten password link.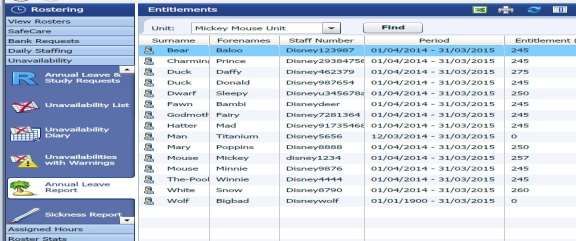
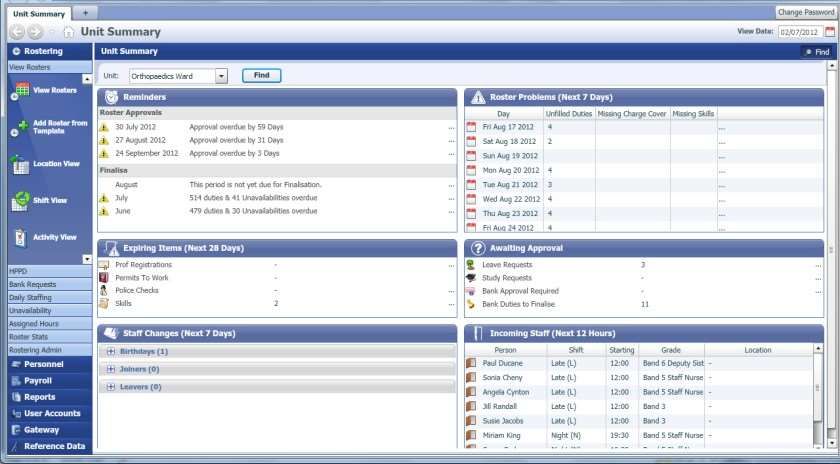
Unit Summary
   The unit summary page gives you an overview of your roster and any tasks which need completing

Roster Approval and                                                                                 Mandatory duties which
                                               Unit Name
Finalising Reminders                                                                                are unfilled

                                                                                                                        Outstanding
                                                                                                                        Leave and
                                                                                                                        Study Requests

           Expiring Skills to be reviewed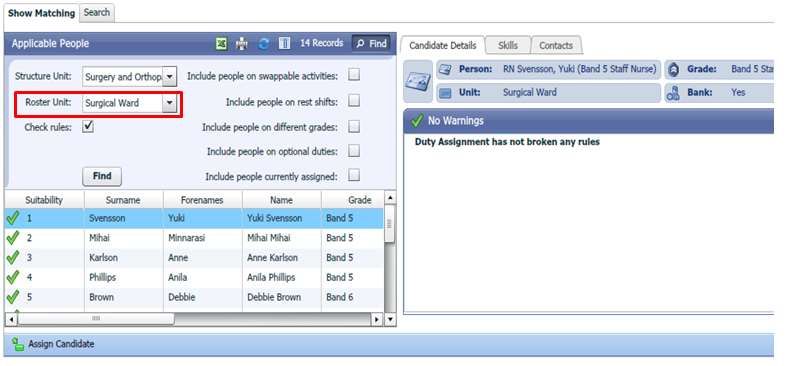
Assigning Shifts Manually

Assigning Shifts Manually

  1. Your vacant duty window should automatically
     appear at the top of your roster. If it is not
     showing select ‘Show Vacancies’ from the top
     tool bar

  2. Select the correct staff group from the selection
     on the left hand side of the vacant duty window
     (i.e. here we have selected RNs)

  3. Select duty (red square) from the vacant duty
     window by clicking on the duty

  4. Drag and drop duty onto the roster

TIP: You can multi select duties using the CTRL key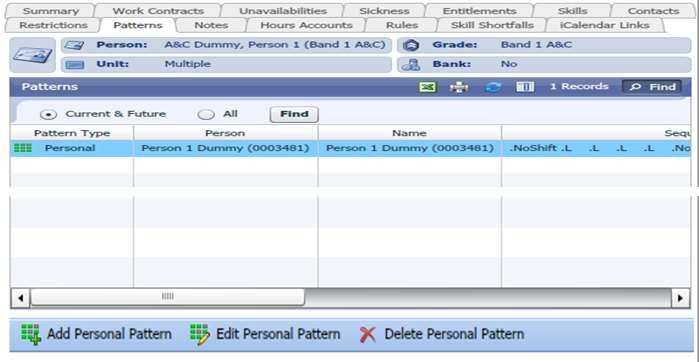
Adjust Shift Times

 Modifying Shift Times

   1. Select duty/duties

   2. Select adjust times or right click and select
      from the drop down list

   3. Edit start and end times

   4. Click ok

TIP: You can change the time of many duties at
once by using the CTRL key
Assigning Overtime / Excess Hours

Entering Overtime / Excess Hours

     1. Manually assign the extra duty and/or adjust
        the duty times to reflect hours worked

     2. Right click on the duty and select ‘Assign
        Overtime’

     3. Select the rate from the drop down list

     4. Type the amount of overtime hours to be paid

     5. Select Reason for overtime

     6. Click ‘OK’

     7. A gold coin symbol indicates that overtime is
        assigned

     8. When you have assigned Overtime or Excess
        hours it shows in the OT hours column (right
        hand side) how much has been assigned in the
        roster period on the screen
Assigning Call Out

Assigning Call Out for On Calls

   1. Right click on the relevant On Call Shift

   2. Select ‘Assign Callout’

TIP: ‘Assign Callout’ option is not available for
shifts other than on-call and cannot be assigned
until after the On call has been worked.

   3. Select the rate from the drop down list

   4. Type the start time and the hours
      (duration) of the call out

   5. Select reason from drop down box

   6. Click ‘OK’

   7. When call out is assign the following
      symbol will appear on the shift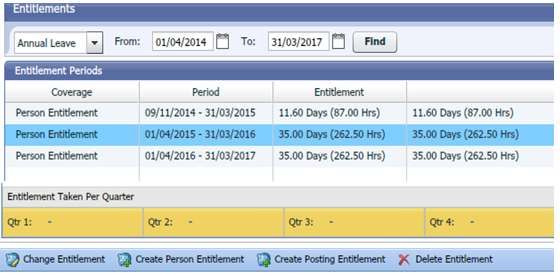
Adding A Full Day Unavailability
Unavailability includes Annual Leave, Sickness, Study Days, Maternity, TOIL etc.

     1. Click on a person’s name or date

     2. Click on ‘Add unavailability’ (bottom blue bar)

     3. An unavailability form will appear

     4. Enter the group, reason & dates

     5. Check the ‘Work Time’ calculated, amend if
        necessary

     6. Click ‘OK’

 TIP: A note can be added to the annual leave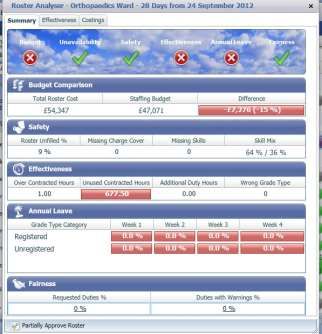
Adding Part Day Unavailability
Adding part day Unavailability

   1. Select duty/duties

   2. Click ‘Add unavailability’ button (bottom blue
      tool bar)

   3. Enter Leave Group & Reason

   4. Enter exact start and end times

   5. Check that the correct amount of Work Time
      is assigned (minus breaks)

   6. Select ‘ok’

   7. The shift is adjusted to show hours worked
      prior to Unavailability. Unavailability is added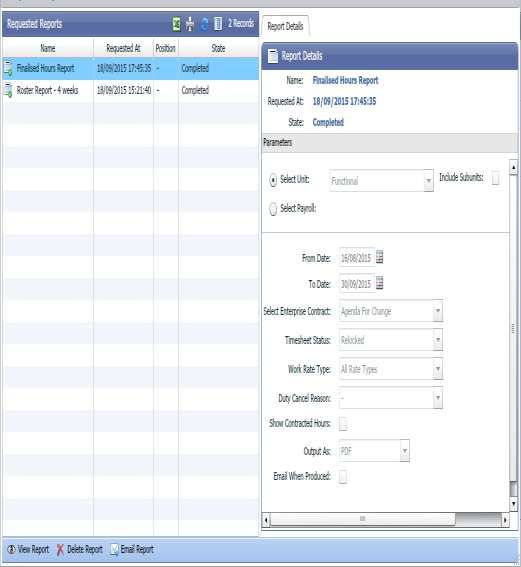
Auto Roster
Auto Rostering

   1. Select the purple Roster Bar

   2. Click on the Auto Roster button located
      at the bottom of the screen

   3. A selection of settings will be displayed

   4. Select the setting you wish to run the
      auto-roster on
NOTE: Personal Patterns will only lay down
duties which are specified to be worked by
specific individuals within fixed Shared and
Personal Patterns

TIP: When run on full, auto-roster will try to
allocate as any duties as possible in accordance
with rules and restrictions

   5. Select ‘ok’

   6. The status of the roster will change to
      Auto Roster Requested, and the roster
      bar will change from purple to yellow

   7. The screen will need to be refreshed to
      view the progress of the auto-roster
Approving the Roster (Page 1 of 2)
Approving the Roster (Part 1)
Approving the roster should be completed at least 12 weeks prior to the roster being worked. By approving the roster you are verifying
that this is what you are currently expecting staff to work. Approving the roster allows staff to see what they have been rostered to
work in Employee Online.
1. Click on the roster bar
2. Click on the Roster Analyser button
(bottom blue tool bar)
3. Summary tab provides an overview
of the roster
4. To find out more information about
a field. Click on the highlighted field
and details will appear in a new
windowApproving the Roster (Page 2 of 2)
Approving the Roster (Part 2)
5. Once the data has been reviewed and you are
satisfied with your roster, click ‘Partially
Approve Roster’
6. A message will appear asking if you wish to
approve this roster
7. To fully approve the roster select ‘Fully
Approve Roster’
8. The status of the roster will be updated on
the roster bar
TIP: You will only be able to fully approve the roster
if you are a Roster Approver. If you are a Roster
Creator you will only be able to partially approve
the roster.
NOTE: All leave requests for the roster period must be dealt with prior to the roster being approved. If you have not approved leave you will
receive an error message. If this happens please follow the guide to Approving Annual Leave and then repeat the approval
process.Printing the Roster
1. Click on the roster bar
2. Select the printer icon (top right hand side
screen)
3. Select the number of weeks to print
4. Select options as necessary
5. Select ‘Run Report’
6. Select print
TIP: Mandatory Fields are highlighted orangeManaging Sickness
Extending Sickness Episodes
TIP: Sickness episodes should always
be extended and not added as
1. Select the unavailability you need to separate incidents. Recording sickness
extend episodes separately will impact
sickness warnings for the member of
2. Click on ‘Edit Unavailability’ (bottom blue staff
tool bar)
3. Adjust the end date as required
4. Check the work time information has
updated to reflect the correct number of
hours the person would have worked
5. Select ‘OK’
Example of a correctly input Example of an incorrectly input
two day sickness episode two day sickness episodeSwapping Duties
Swapping Duties
1. Select the duties to be swapped
by clicking on one duty, holding
down the CTRL key, and clicking
on the other duty to be swapped
2. Click on ‘Swap Duties’ (bottom
blue tool bar)Moving a Member of Staff
Moving a Member of Staff from another Roster
1. Right click on the vacant duty and
select ‘Show Matching People’
2. Select ‘Roster Unit’ to locate the
member of staff
3. Click ‘Find’
4. Select the member of Staff
5. Click ‘Assign Candidate’
6. Close window
7. Scroll to the bottom of your
roster to see the assigned duty
under ‘External Staff’How to record Time off in Lieu (TOIL)
NB: Toil can only be claimed when a person has previously worked over their contracted hours. This will be demonstrated by
their net hours showing as a negative figure i.e. -7:30.
1. Click on the cell when the TOIL was
taken
2. Select ‘Add Unavailability’ from the
bottom of the screen/roster
3. Select the ‘Other Leave’ from the
Group box
4. Select ‘Time Owing’ from the
Reason box. You will note that when
time owing is selected the hours
per day default to 00:00
Do not adjust this, it must remain
as zero
5. Check dates, start and end times
6. Click OK
7. You will now see that the negative
net hours has been reduced
TIP: If the person is taking TOIL for the
entire shift remember to remove any
shifts previously assignedFinalising a Roster
Finalising the roster for Payroll
Finalising is completed on a monthly basis. Finalising is confirming what hours your staff have worked; informing payroll of
any excess hours/overtime/enhancements etc. to be paid. It also confirms the sickness record for the team.
1. Click on the roster bar
2. Select ‘Finalise’ (bottom blue TIP: You will need to check all
tool bar) leave is approved prior to
finalisation. If you have not
approved leave you will receive
an error message. Please follow
3. Check dates to finalise the guide for Approving Annual
Leave and then repeat the
finalisation process.
4. Using the Finalisation
Summary check you are
happy with the duties, OT NOTE: You are unable to finalise
and Call Out being sent to your own duties. Approvers who
payroll finalise will need to ensure that
they have a secondary approver
who can finalise their duties.
5. If you are happy select ‘OK’
Once finalised padlocks will
appear on all the shiftsAdding a Skill
1. Click on the person’s name
2. Select ‘Add Skill’ (bottom blue
tool bar)
3. Select ‘Skill’ from drop down
box
4. Enter Valid From, Valid To and
Date Gained using the
calendar icons
TIP: Mandatory Fields are
highlighted orange
5. Click OKAdding Leave Entitlements (Page 3 of 2)
Inputting Leave Entitlements for New Starters to the Trust
TIP: To calculate a member of staff’s
annual leave entitlement please use
1. To Add Leave entitlement go to the annual leave calculator available
Personnel (Blue tab on the left through Southern Health Intranet
hand side) and Person Search
2. Enter the persons surname and
click FIND
3. Select the ‘Entitlements’ tab on
the right hand side
4. If the person does not have an
entitlement select ‘Create Person
Entitlement’Adding Leave Entitlements (Page 2 of 2)
Inputting Leave Entitlements for New Starters to the Trust (continued from previous page)
5. Enter Annual Period Start 1st April
6. Hours Per Year:
Entitlement for that person for
a full annual leave year
7. Effective From:
For New starters to the Trust
the effective from date will be
their start date
8. Initial Balance:
The part year entitlement is for
New members of staff to the
Trust Showing their entitlement
from their start date for the
current leave year
9. Select ‘OK’Updating Leave Entitlement
1. To Update Leave entitlement, go to
Personnel (Blue tab on the left hand
side) and Person Search
2. Enter the persons surname and click
FIND
3. Select the ‘Entitlements’ tab on the
right hand side
4. Click on the current leave entitlement
or select the ‘from/To’ date of the
leave year and click find
5. Select ‘Change Entitlement’
6. Enter the number of hours leave the
person is due for the year
7. Select the date you want the change in
leave entitlement to be effective from
(for Agenda for Change Employees this
should be 1st April)Personal Patterns (Part 3 of 4)
Adding a Personal Pattern
TIP: Personal patterns should only
be added for members of staff who
1. To Add a Personal Pattern go to work a set pattern
Personnel (Blue tab on the left hand
side) and Person Search
Enter the persons surname and click FIND
2. Select the Patterns tab on the right
hand side. Add Personal pattern down
the bottom of the screen
3. Select ‘Add Personal Pattern’ down
the bottom of the screen
TIP: If the staff member already has a
pattern, click on their current pattern and
select ‘Edit Personal Pattern’ located at the
bottom of the screen
4. If the staff member has more than 1
week personal pattern then select the
number of ‘lines’ (weeks) the pattern
is for
Continue Personal Patterns on next page….Personal Patterns (Part 2 of 4)
TIP: To add regular unavailability to a personal pattern, select
Adding a Personal Pattern (Continued from previous page) the ‘unavailability’ button
5. The only box you need to complete is the ‘Shift’.
Select the Shift type in the drop down box
6. Select the day you wish to add the shift on
7. To adjust times from the standard. Click on the
shift and Edit the Start and End time
8. Click ‘Add’. Repeat steps 5 & 6 until you have
completed the person’s pattern
TIP: Changing someone’s personal pattern will not change anything that has already been auto rostered. You may need to go back and
make adjustments for these shifts. Personal patterns will take effect next time the auto roster is runPersonal Patterns (Part 3 of 4)
Adding a Personal Pattern Continued…..
9. To set up a monthly recurring pattern
select ‘Monthly Recurring Activities’
10. The only box you need to complete is the
‘Shift’. Select the Shift type in the drop
down box you wish to add
11. To adjust times from the standard. Click on
the shift and Edit the Start and End time
Click ‘Update’
12. Select the Recurrence criteria and the From
date that the pattern commences
13. Click ‘Add’
TIP: Changing someone’s personal pattern will not change anything that has already been auto rostered. You may need to go back and make
manual adjustments for these shifts. Personal patterns will take effect next time auto roster is runPersonal Patterns (Part 4 of 4)
Editing a Personal Pattern
14. To Edit a Personal Pattern go to
Personnel (Blue tab on the left hand
side) and Person Search
15. Enter the person’s surname and click
FIND
16. Select the ‘Patterns’ tab on the right
hand side
17. Highlight the current Personal Pattern
18. Click on ‘Edit Personal Pattern’
19. Update the personal pattern using
steps 5-8 in the guide to adding a
personal pattern
20. Select ‘OK’Reset EOL Passwords (Page 3 of 2)
Resetting Employee Online Passwords
1. Click on the ‘User Accounts’ master
group
2. Select ‘User Accounts’ short cut
3. Use the filters to search for the user
account and click on ‘Find’
Alternatively, leave the filters blank
and click on ‘Find’ to return a list of
all User Accounts
4. Highlight/click on the person’s name
5. Use the scroll bar at the bottom of
the screen to check if the staff
member has an email address in the
system.
If an email is incorrect click on the staff
members name and on the right hand side
update the email address in the box
required and click ‘SAVE’ at the bottom
If an email address is in the system follow
steps 6 & 7Reset EOL Passwords (Page 2 of 2)
Resetting Employee Online Passwords Continued
6. Select ‘Auto Password Reset’
(located on the bottom blue tool
bar)
7. Click ‘OK’ to confirm you wish to
proceed
To Manual Password Reset:
8. Right click on the staff members
name
9. Select ‘Manual Password Reset’
10. Enter a temporary password for the
member of staff (in both boxes)
11. Select ‘OK’
TIP: The new password will be emailed directly to the member of staffReports (Page 1 of 4)
Generating Reports
1. Click on the ‘Reports’ master
group to show list of reports
available
2. Click on the reports you would
like to view
3. Then click on the report you
would like to run
4. Complete the required fields
TIP: All fields that are outlined in orange
are mandatory fields
5. Select ‘Run Report’Reports (Page 2 of 4)
Generating Reports Continued
6. Once you have click run report, to
view the report click on the Green
Arrow which is located top right
hand side of the screen next to the
home icon
7. All reports requested will be listed.
Select the reports you would like
to view
8. Click ‘View Report’
9. Select ‘open’
TIP: All reports requested are saved for 7
days and can be viewed by clicking on the
Green ArrowReports (Page 3 of 4)
Exporting Data to Excel
1. Click in the report
2. Click on the Excel icon
3. Your Excel report will open in
another tab
TIP: The export to Excel icon appears in
many screens throughout HealthRosterReports (Page 4 of 4)
Changing Visible Columns
1. Click in the report
2. Select the Visible Columns
icon
3. Select the columns to be
made visible by placing a
tick in the box or untick the
columns to hide them
4. Click OK
TIP: To re-order the columns click
and drag the column heading
TIP: The change visible columns icon appears in many screens throughout HealthRosterYou can also read