Honda Ridgeline Installation Instructions
←
→
Page content transcription
If your browser does not render page correctly, please read the page content below
Honda Ridgeline Installation Instructions
READ THIS . . . If you read these instructions from beginning to end before starting you will probably not need to
look at them again during the installation, but feel free to lf you must.
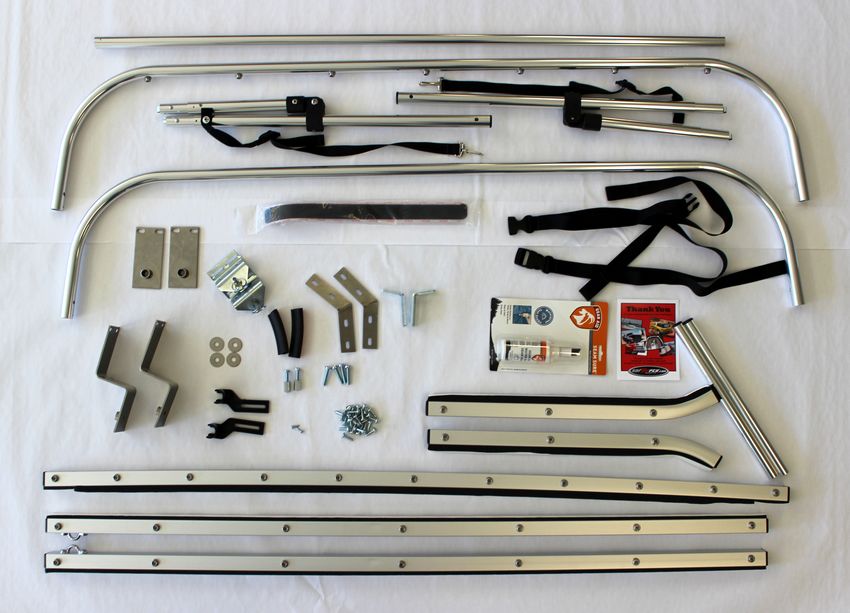
Tools Needed: Contents:
T-40 TORX Driver 2-pieces of weather bulb seal 3- inches long
10 MM socket 2- Z shaped steel brackets
#3 Phillips Screwdriver 2- Flat steel brackets
Scissors 2- V shaped brackets
1/8-inch drill bit 2-pivot point brackets
Drill 2 - “L” brackets
2- Bedrails, Weather seal attached, (one will be
marked as drivers side)
2- rails 20” with weather seal attached
26- #12 screws ¾” long
4- M6 steel screws 1-3/16” (30mm) long
2- M6 screws 1-3/8” (35mm) long
4- large flat washers
2- coupler nuts ¾ “ long
1-cab cross-bar with weather bulb seal 50”
long
2-Bow-shaped cross-bars
2-hinged frame assemblies
2- 43-inch long Black Webbing Straps
2- black plastic parts with 4 # 12 screws and 2
small #20 self drilling screws
2- 12-inch ¾-inch diameter aluminum tube
1- 44-inch 7/8-inch diameter aluminum tube
1-800-810-7227 www.softopper.com Page 1
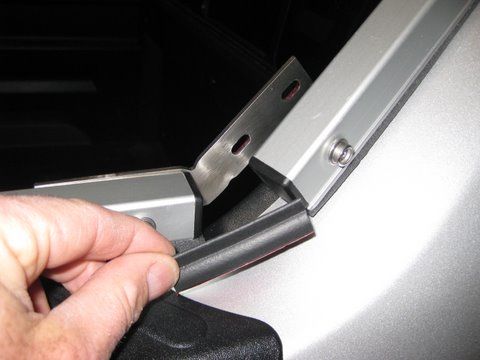
Important note: All mounting brackets have oval slots which allow for minor adjustments after initial installation.

Step 1. Attach the V-shaped brackets to front ends of the main bedrails
with the #12 screws provided. Holes are pre-drilled. They should be
pointing forward, upward and inward. (See photos) Do not attach the
small rails yet!

Step 2. Using a TORX T-40 driver remove the 4 factory bolts that hold
on the truck box side panels (2 on each side). (Loosely) Install the Z-
brackets and the flat brackets with the M6 screws and large flat
washers. (See photo).

Step 3. Remove the white strip from the bottom of the main bedrails.
Note: The weather stripping does not have adhesive and will not stick
to your truck.

Place the Bedrails into position and using the #12 screws and loosely
attach the bedrails to the steel brackets. Don’t forget to include and
center the pivot point bracket with the flat steel bracket. (See Photo)

Step 4 . Hold the
smaller rails in
position lining up the
holes as if you were
going to join them to the main
bedrails. Measure the gap between
the small rail and the plastic
molding edge below the front of the
main bedrail. The gap is
approximately 2” long. These gaps
need to be dammed up with the
two small pieces of bulb seal. Cut
to shorten if necessary, remove the
backing and install in place. (See
photo)

1-800-810-7227                                www.softopper.com                                  Page 2
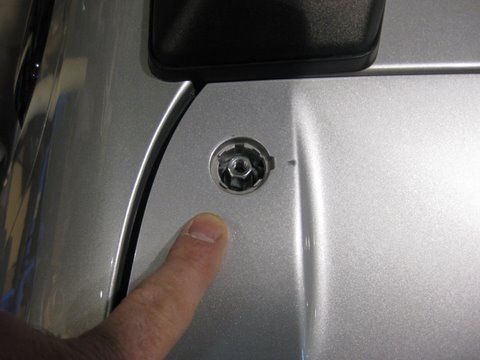
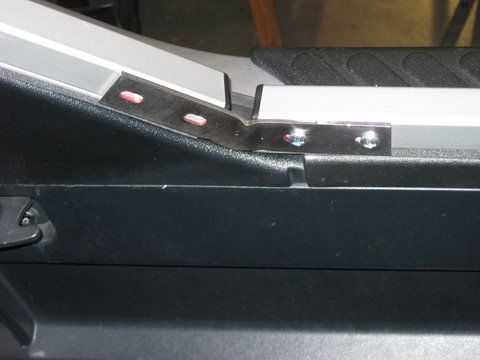
Step 5. While pressing down hard on a bedrail tighten the bedrail to the brackets and the steel brackets to the vehicle.
This will compress the weather seal. Do the other side.

Step 6. Using a small flat screwdriver or similar remove the 2 small plastic tabs from the rear left and right cab area.
Now remove the 2 nuts with a 10 mm wrench. (Retain these parts for future use) Now install the Coupler nuts securely
onto the threaded posts. (See photo) Using the M6 screws, install one end of the 50” cross-bar (loosely for now, just a
couple of threads in). Note: Weather bulb is compressed against cab, and the snap studs face forward. Now while
pressing down firmly on the other end of the crossbar, attach the other side. (See photo)

Step 7. Position the flat weather-sealed upper portion of the small rails under the last inch of the cab cross-bar (snaps
facing out). Force the lower end of the small rail down towards its attachment point on the main bedrail. Note: It may
take a little trial and error to create a tight fit to the vehicle but it is quite easy to bend the flat bar around your knee and
then reposition. Using the #12 screws, attach the small rail to the main bedrail. Tighten down the cab cross bar and all
other screws and bolts securely. (See photo)

Step 8. Install the black plastic parts to the rear of the bedrails with
the #12 screws provided. The part marked with an ‘A’ should be on
the passenger side. The part marked with a ‘B’ should be on the
driver’s side (See photo).

1-800-810-7227                                  www.softopper.com                                       Page 3

Step 9. The round aluminum bows and their pivoting counterparts are
color coded to match up with each other. Caution: Try not to pinch
your fingers when fitting these parts together. This is a good time to
place the two 1” adjustable straps on the rear bow (See photo). The
bar with the snap studs on it will be to the rear of the vehicle when
installed. Place the Bow frame assembly up onto the rear of the vehicle
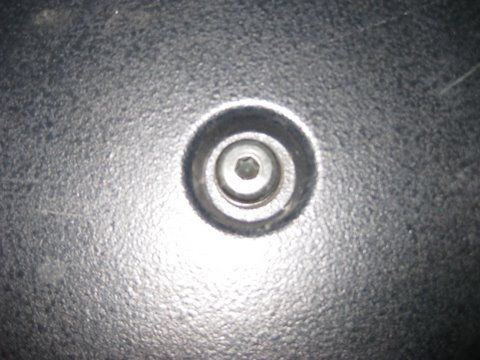
and remove the circular clips from the pivot pins on the bedrails.
Position the frame onto the pivot pins and replace the circular clips.
Step 10. Unfold the Softopper canopy and place it on the tailgate.
Attach the snaps to the rear bow section. Place the 1-inch webbing
support straps between the 2nd and 3rd snap on each end of the rear
bow. Now pull the rest of the canopy forward and attach the snaps to the front/cab cross-bar - just the 11 horizontal
snaps for now. Attach the support straps around the remaining forward bow. Adjust the webbing straps to a loose
position for now and tighten later.
Now you are ready to attach the remaining snaps to the bedrails working your way from the front towards the rear, snap
after snap. The straps on the rear of the frame can be attached to the bedrails and pulled tight to help. Pull down on the
rear bow if you need to. Note: New tops can be quite taut. Loosen the straps a little after the fabric is snapped in place
so the fabric is under tension. This will help it to stretch and set. Now do the other side.
Step 11. Insert a 12-inch tube into each end of the longer 44-inch tube, with the plastic end caps out. Press the bar
assembly into the black snap-fit plastic parts on the
bedrail, adjusting the total length as necessary for a tight
side-to-side fit. The idea is to have the larger tube
centered and have as little side-to-side movement as
possible once secured in the plastic parts and have equal
lengths of the smaller tubes protruding from each end.
Mark the location of where the smaller tubes enter the
larger tube. The longer tube has pre-drilled holes in each
end. These holes will be used to guide a 1/8 inch drill bit
into the smaller tube. Hold the smaller tube securely in
the larger tube at the correct location and drill through.
Install the #20 screw and repeat on the other end. Insert the finished tube assembly into the window panel sleeve, press
into snap-fit parts on both sides and check fit.
VELCRO - Take the 3 pieces of Velcro Tape.
With the rear window panel installed pull down the zippers and adjust so that the back flap sits nicely along the rear of
the vehicle. Tug gently on the back flap and find the place where it seems to sit easily. There is Velcro (loop) sewn along
the bottom inside edge of the back flap. This is where the Velcro tape must line up once installed on the tailgate. The
underside of the plastic protector works well for the Ridgeline. Note: Be sure to clean the area (remove any wax or dirt)
where the Velcro will be installed. Install one dead-center, and the other two on opposite ends of the tailgate.
Note: Velcro tape will reach maximum holding strength after 24 hours.
NOTE: To retract the Softopper, unsnap the side panels and flip them up onto the roof, then retract to the front. When
driving with the top in the forward retracted position, you must attach the webbing straps from the rear Softopper bar to
the factory anchors at the upper front of the bed. This will ensure that your topper stays in place, and wind gusts will not
raise the canopy.
Please call or email with any questions
1-800-810-7227 www.softopper.com Page 4
Warranty
We warrant our Softopper products to be free from defects in material and workmanship for a period of
one year, with the exception of vinyl windows and zippers, provided there has been normal use and
proper maintenance.

Vinyl Windows are warranted for a period of 6 months from the date of purchase.

Zippers are guaranteed to be in perfect working condition when leaving the factory. Due to
atmospheric conditions, dirt, sand, road grime, dust, and abrasive cleaners, etc., zippers are warranted
for a period of 6 months from the date of purchase.

Returns must be pre-approved and have Softoppers issued RGA number attached. Any defective items
must be returned with proof of purchase to Softopper 4750 Nautilus Ct S Unit B Boulder CO 80301,
freight pre-paid. Items returned must be carefully packed, in clean condition, with plastic windows
protected from scratching and creasing. This warranty does not cover damage resulting from abuse,
misuse, alteration, accident or damage in transit. Softoppers obligations under this warranty are limited
to the aforementioned repair or replacement of warranty defects for which return authorization has
been received during the warranty period, and Softopper SHALL NOT BE LIABLE FOR ANY
INCIDENTAL OR CONSEQUENTIAL DAMAGES ARISING FROM BREACH OF THIS OR ANY
IMPLIED WARRANTY. This warranty applies to the original purchaser only. All remedies under this
warranty are limited to repair or replacement of any item or items found to be defective by the factory
within the time period specified.

For further information or request for repair work, please contact:
Softopper LLC, customer service
(800) 810-7227 or (303) 304-0533

1-800-810-7227                                www.softopper.com                      Page 5
Softopper Care and Maintenance

Your top is made of the finest materials available. To keep it looking new and for product
longevity and durability, it will need periodic cleaning and maintenance.

Washing: The fabric should be washed from time to time using a mild soap and warm water. Be sure
to rinse all soap off the top when washing is complete.

Vinyl Windows: Windows should be kept clean to avoid scratching. Wash with a water-soaked sponge
or cloth and a mild dishwashing detergent. Do not use a coarse brush on the windows and never
wipe the windows when they are dry. Be careful when clearing snow and frost from the vinyl
windows since they are easily scratched. NOTE: Do not use any cleaning agents containing alcohol or
silicone.

Cold weather: As with all automotive and marine clear vinyls, extreme care must be taken when
rolling up or folding in cold temperatures. This point cannot be stressed enough! Clear vinyl becomes
stiff in cold temperatures and may crack. Retracting the Softopper in cold temperatures is not
recommended. When opening the rear of the Softopper in cold weather, be sure to raise the zippers as
high as possible so that any folding will occur to the topper fabric and not to the clear vinyl window.

Zippers: Keeping the zippers clean and lubricated with a silicone lubricant will help prevent damage
and keep the zippers in smooth working condition.

Leakage: As with any sewn automotive top there is always a slight risk of leakage. Right out of the
box the Softopper will not be waterproof. Water seeping through at the seams may be stopped by
applying Seam Sure (supplied), on the inside of the affected seams. Shake Seam Sure well and apply
liberally to the inside seams concentrating on areas where needle and thread penetrated the fabric.

Snaps: Keep snaps clean and lubricated with a silicone lubricant to help prevent snaps from sticking to
the studs. If a snap does become stuck to a stud, use a screwdriver and gently pry apart to prevent
damage to the snap or top fabric. If any snaps need to be replaced due to sticking or damage please call
Softopper and we can send out a small do-it-yourself repair kit.

For further information please contact:
Softopper LLC, customer service
(800) 810-7227 or (303) 304-0533

1-800-810-7227                            www.softopper.com                        Page 6


You can also read