Horse Ownership A general guide for the first-time horse/pony owner - Teagasc
←
→
Page content transcription
If your browser does not render page correctly, please read the page content below
Rural Economy
                                              & Development
                                              Programme

Horse Ownership
A general guide for the first-time horse/pony owner
HORSE OWNERSHIP
             A General Guide for the First-Time Horse/Pony Owner

TABLE     OF   CONTENTS

Introduction                                                             4

Buying your horse/pony                                                   5

Facilities                                                               7

General care                                                            11

Feeding                                                                 18

Foot care                                                               25

General health                                                          27

Parasite control                                                        30

Laminitis                                                               36

Tack                                                                    38

Riding out                                                              41

Travelling and loading                                                  43

Contacts                                                                46

                                                             Contents    3
HORSE OWNERSHIP
            A General Guide for the First-Time Horse/Pony Owner

INTRODUCTION

Looking after a horse is exciting but requires considerable time and energy.

Owning your first riding horse or pony is very exciting. However, looking after
your new mount properly requires lifestyle changes and a considerable amount of
time commitment and energy. Horses and ponies must be cared for every day of
the year. New owners should be aware of the time, financial and other
commitments involved.

This handbook is intended as a guide to looking after a riding horse or pony.

4     Introduction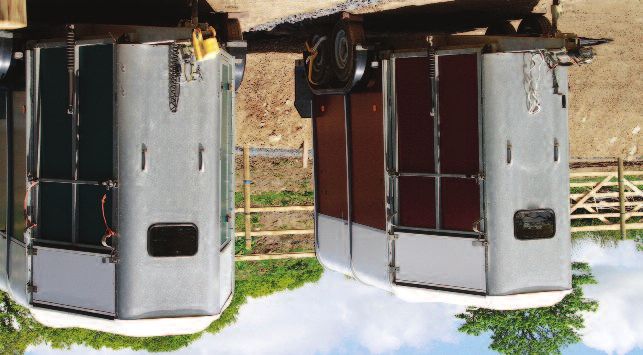
HORSE OWNERSHIP
            A General Guide for the First-Time Horse/Pony Owner

BUYING     YOUR HORSE/PONY

Make sure that you choose a horse that suits your requirements.

Before you buy
Before buying a horse, decide what you intend to do with him. How much
experience with horses do you have? What size and type of horse/pony will suit
you best? Consider what you hope to achieve with your mount. Finally, you and
your horse/pony should match each other well.

Further advice for buying your first horse/pony
1. Seek professional advice.
2. Have a clear idea of what you want from your horse.
3. Buy a horse/pony with experience in the discipline you wish to pursue.
4. Be realistic about your current level of expertise (don’t take on a horse you’re
   not ready for).
5. Above all, make sure that your horse has a good temperament.

Where to buy
Horses can be bought either privately or at public sales. Both methods have
advantages and disadvantages.

                                                     Buying your horse/pony      5
HORSE OWNERSHIP
            A General Guide for the First-Time Horse/Pony Owner

Private sales
Approximately 75% of sport horses in Ireland are sold privately.

Advantages:
• you can try the horse out more than once;
• you do not have to make a decision there and then; and,
• sometimes a home trial may be possible.

Disadvantages:
• you are trying a horse in his home environment, but he may react differently
  in a strange environment;
• you have less choice, so you may have to travel many miles to see a selection
  of animals; and,
• the purchaser pays for vetting.

Public sales
The main venues are at Goresbridge in Co. Kilkenny and at Cavan Equestrian
Centre in Cavan.

Advantages:
• you can choose from a large selection of animals;
• horses are vetted before the sale and can be re-vetted immediately after
  purchase; and,
• stable vices, such as weaving, box walking, or crib biting, must be declared
  (these generally devalue the horse and, if they are discovered, the horse can
  be returned within seven days of sale, following confirmation of the vice by
  either a vet or other expert nominated by the sale company).

Disadvantages:
• it can be difficult to choose the right animal;
• there is no trial of the horse; and,
• the horse may react differently at home.

6     Buying your horse/pony
HORSE OWNERSHIP
            A General Guide for the First-Time Horse/Pony Owner

FACILITIES

Post and rail fencing.                      The stable must be safe for the horse.

Before buying a horse, ensure that you have adequate facilities to maintain him.
You will need land, a stable, a manure pit, a soiled water tank, a feed store, and
facilities for tack. You will also need a safe area to exercise your horse in. Keep in
mind that during the winter months, with shorter daylight hours, it may be unsafe
to exercise your horse on the road before or after school/work.

Stable and land
The stable must be safe for the horse, free from hazards, strongly constructed and
properly maintained. The recommended size is 3.6m x 3.6m (12ft x 12ft) for a
horse and 2.7m x 2.7m (9ft x 9ft) for a pony. Poor housing is stressful to all
animals and may result in a build-up of respiratory disease.
A minimum area of approximately 0.6 hectares (1.5 acres) of grazing land is
needed for each horse.

Fencing
Security and safety are priorities when leaving your livestock out in fields. Make
sure that the boundaries are well fenced and secure. Post and rail is preferable as
a means of securing paddocks, though horse-friendly electric fencing is also a good
choice. Barbed wire should be avoided, as it can cause serious injuries to your

                                                                       Facilities   7
HORSE OWNERSHIP
             A General Guide for the First-Time Horse/Pony Owner

animal. Ensure that paddocks are free from any harmful objects, such as broken
machinery and broken glass.

Bedding

Straw bedding.                             Wood shavings.

Correct bedding for your horse is important for the following reasons:
• it encourages the horse to lie down and there is less risk of injury on a concrete
  floor;
• it encourages the horse to pass urine and assists in drainage and absorption; and,
• it helps to keep the horse clean.

The different types of stable bedding available include:
• straw;
• wood shavings;
• shredded paper;
• sawdust; and,
• rubber mats.

Straw is the most common type of bedding material. There are three types: wheat
straw, oat straw and barley straw.
Wheat straw is generally considered to be the best type of bedding straw, as it is

8     Facilities
HORSE OWNERSHIP
            A General Guide for the First-Time Horse/Pony Owner

harder and therefore lasts longer. It is not as palatable as oat or barley straw, and
horses are not so tempted to eat it. Straw must be clean and free of dust and
mould, as these could lead to your horse developing respiratory problems.

Wood shavings are becoming more common because:
• good quality shavings are fairly dust free; and,
• horses are not inclined to eat them.
However, they are expensive to buy and take longer to rot down.

Shredded paper:
• is not easy to compost; and,
• is heavy when it gets wet, so needs to be well maintained.

Sawdust:
• requires a large area for storage; and,
• can be very dusty when dry.

Rubber matting:
• is cheap to maintain; and,
• requires a sprinkling of shavings on top.

Mucking out
There are three main methods of managing your horse’s bed:
• daily mucking out;
• deep littering; and,
• semi-deep littering.

Safety first – the horse should be tied up or moved to another stable when
mucking out.

Daily mucking out
The stable is cleared of soiled bedding and droppings every day, with a full cleaning

                                                                      Facilities   9
HORSE OWNERSHIP
             A General Guide for the First-Time Horse/Pony Owner

in the morning and a second minor cleaning in the evening. This will help to:
• keep the stable clean and fresh;
• make the bedding last longer; and,
• contribute to better hygiene levels.

Deep littering involves:
• putting in a good bed (approx. 45-50cm in depth) and adding a small amount
  every day;
• picking up droppings regularly;
• leaving urine to drain and be absorbed by the bedding; and,
• making a solid warm bed.

A disadvantage of deep littering is that when the stable needs to be cleaned out, it
is a major job and hard work. A build of ammonia smells can have a negative
impact on the horse’s respiratory system and furthermore, deep littering can
attract flies.

Semi-deep littering:
• is a compromise between daily mucking out and deep littering; and,
• takes out the wettest areas of bed.

Whatever type of bedding you choose, make sure that there is a good bed
underneath the horse and throw extra bedding up around the walls so that the horse
will be less likely to get ‘cast’ or stuck against the wall and unable to get to his feet.

Livery
If you do not have a stable or land, you will need to put the horse or pony on
livery in a nearby yard. Livery options available include do it yourself (DIY),
half livery and full livery.

10    Facilities
HORSE OWNERSHIP
A General Guide for the First-Time Horse/Pony Owner
GENERAL CARE AND HANDLING
Regular grooming promotes good health and builds a rapport with the horse.
Approaching the horse
• Always speak to your horse before approaching or touching him. Some horses
are likely to jump and may kick out when startled;
• always approach your horse quietly from the side. If the horse is turned away
from you, call to him and encourage him to turn towards you. Never approach
your horse directly from the rear;
• touch the horse by first placing a hand on his shoulder or neck; the touch should
be a rubbing action; and,
• never tie your horse by the reins as he may pull back and injure himself. Always
use a headcollar.
Handling the horse
• When working around your horse, wear boots or hard-toed shoes to protect
General care 11HORSE OWNERSHIP
A General Guide for the First-Time Horse/Pony Owner
your feet. Never wear runners, soft shoes or go barefoot;
• when working around your horse, tie him securely with a quick-release knot, or
have someone hold him with a lead rope. Use cross-ties when possible, but be
sure that they have panic snaps or are secured with a breakable tie, such as
baling twine;
• always work close to your horse. If you are near his shoulder, you won’t be
struck with the full force of his feet, nor will you receive the full force of a kick
if you stay close to the body when you work about the haunches or pass behind
your horse;
• know your horse and his temperament and reactions;
• be firm and control your temper at all times;
• always let a horse know what you intend to do. When picking up the feet, for
example, do not grab the foot hurriedly as this will startle the horse and may
cause him to kick. When lifting the foot, touch the shoulder or hindquarter, and
then run your hand down the leg to pick it up;
• work around a horse from a position as near to the shoulder as possible;
• never stand directly behind a horse or directly in front of him. To work with the
tail, stand to the side, near the point of the buttock, facing towards the rear.
Grasp the tail and draw it around to you;
• be calm and confident around horses. A nervous handler makes a nervous
horse;
• do not tease your horse. Teasing may cause the horse to develop dangerous
habits for the rest of his life. Avoid feeding the horse treats from your hand
frequently;
• punish a horse only at the instant of disobedience. If you wait, even for a minute,
the horse will not understand why he is being punished. Punish without anger,
or your punishment may be too severe. Never strike a horse about the head;
• check the turnout area for old machinery, broken boards and nails, and
poisonous plants and trees. Check fences frequently for loose nails, broken
sections and loose wire;
• if leaving a headcollar on a loose horse, the headcollar must be the breakaway
type. Leather, though more expensive, is always preferable;
12 General careHORSE OWNERSHIP
A General Guide for the First-Time Horse/Pony Owner
• if the headcollar is too loose, the horse may catch a foot in it, especially if the
horse is trying to scratch his head with a hind foot. A loose headcollar may
catch on fence posts or other pasture objects. Some headcollar materials will
shrink when wet, so be sure to check the fit regularly; and,
• check headcollars on young stock daily. As a horse grows, his head grows too,
and if the headcollar gets too tight it can cause extreme pain and discomfort.
Leading the horse
When leading, walk beside your horse. Well-fitting headcollar.
• When leading your horse, walk beside him – not ahead or behind. A position
at the horse’s shoulder is considered safest. Never pull the horse behind you: he
may jump forward on top of you;
• always turn the horse away from you and walk around him;
• use both hands when leading. If the horse rears up, release the hand nearest to
the headcollar so your feet stay on the ground. Do not try to pull the horse;
• it is customary to lead from the left (near side), using the right hand to hold the
lead rope and the left hand to take the slack;
• when leading, extend your right elbow slightly towards the horse. If the horse
makes contact with you, his shoulder will hit your elbow first and move you
away from him;
• a horse should be workable from both sides, even for mounting and dismounting;
• the horse is stronger than you; do not try to out-pull him;
General care 13HORSE OWNERSHIP
A General Guide for the First-Time Horse/Pony Owner
• never wrap the lead rope or reins around your hand, wrist, or body;
• never drape a lead rope or reins across your shoulders or neck;
• do not wear jewellery around horses. Rings can cut deeply into fingers, and
bracelets can get caught in the reins or lead rope. Dangling earrings are
particularly dangerous;
• exercise extreme caution when leading a horse through a narrow opening such
as a door. Be certain that you have firm control and step through first. Step
through quickly and get to one side to avoid being crowded;
• the stirrup irons on a saddle should always be run up when dismounted or
leading the horse;
• use your judgment when turning a horse loose. Lead completely through the gate
or door, and turn the horse around, facing the direction from which you have just
entered. Then unclip the lead rope or remove the headcollar or bridle. Avoid letting
a horse bolt away from you when released. Good habits prevent accidents; and,
• avoid using excessively long lead ropes – they can become entangled. Watch the
coils when using lunge ropes and do not allow them to become entangled.
Tying the horse
• A quick-release knot should be used to tie a horse up. This knot allows the
release of the horse quickly and easily should he get into trouble;
• tie the horse far enough away from strange horses so that they cannot fight;
• tie the horse with a rope long enough to allow comfortable movement but
short enough to avoid becoming tangled or allowing the horse to get a foot
over the rope;
• never tie your horse by the reins as he may pull back and injure himself. Always
use a headcollar;
• never tie a horse directly to a fixed object such as a gate, fence, metal ring or
trailer. If a horse pulls back he can panic and do a lot of damage to himself; and,
• always tie the lead rope to a piece of string attached to the fixed object. This
way, if the horse does pull back, the string will break under the strain.
14 General careHORSE OWNERSHIP
A General Guide for the First-Time Horse/Pony Owner
Tying the quick-release knot
Practice tying this knot without your 3. Pull a loop through using the release
horse until you can do it correctly and end, then pull the knot closed so it
release it just by pulling on the free end. looks like picture No. 4.
This is the ONLY knot you should use to 4. Now, if your horse pulls back in a
tie horses. panic, you untie the knot by pulling on
1. Put your lead rope over the post. the release end – the whole thing
2. Bring the release end over and around should come undone easily.
the tie end.
1. 2. 3. 4.
This is the
end you pull
for quick
release
This end
tied to horse
This end This end This end
tied to horse tied to horse tied to horse
Grooming your horse/pony
Daily grooming of your horse is important for several reasons:
• regular grooming promotes good health – dust and dirt can cause skin diseases
and infections;
• during grooming, the handler has the opportunity to inspect the horse for any
wounds or injuries;
• grooming improves the horse’s appearance; and,
• grooming helps the handler to develop a rapport with the horse.
A basic grooming kit consists of: hoof pick, rubber curry comb, dandy brush, body
brush, metal curry comb, mane comb, scissors, sweat scraper and tail bandages.
The sequence for a full groom is:
1. Pick out the feet, as there may be stones or other foreign objects stuck in the
General care 15HORSE OWNERSHIP
A General Guide for the First-Time Horse/Pony Owner
Hoof pick Rubber curry comb Dandy brush Body brush
Mane comb Scissors Sweat scraper Tail bandage
horse’s foot.
2. Brush the body. Start at the shoulder/neck area and work your way back along
the body, making sure the horse is safely tied or held.
3. Brush out the mane. Tease out the tail with your fingers or a soft body brush.
Never use a mane comb as this breaks the hair and will result in the horse having
a light tail.
4. Clean the head. Never use a dandy brush on the horse’s head as the bristles are
too rough; use a body brush and be firm but gentle.
5. Sponge the eyes, nostrils and dock with separate sponges, colour-coded to
ensure that there is no cross infection.
6. Finish off with a cloth to remove the dust that has risen from grooming and is
lying on top of the coat.
Never give a full groom when the horse/pony is living out. Instead, pick out the
feet and use a rubber curry comb with circular motion and a dandy brush with the
16 General careHORSE OWNERSHIP
A General Guide for the First-Time Horse/Pony Owner
lie of the hair to remove caked mud. Do not use a body brush on the horse’s body
as it takes out the natural oils in the coat, which provide heat and act as a barrier
to the rain. It is important to remove mud and sweat marks from the areas that
are covered with tack (bridle and saddle/rollers and boots) before exercising to
avoid sores developing when the horse sweats and the tack rubs against the skin.
forelock
poll mane
crest
neck
croup
forehead withers back loins quarters
dock
throat point of hip
windpipe shoulder
muzzle
point of shoulder flank tail
breast thigh
brisket
stifle joint
forearm belly
sheath hamstring
point of
elbow gaskin
chestnut
hock joint
knee point of
back tendons hock
cannon
fetlock ergot
coronet pastern heel
wall of hoof
Safety while grooming
• Never stand directly behind the horse. Always work close to the horse or pony
and a little to the side so he can see you;
• never sit or kneel beside the horse when grooming the lower parts. Always
bend or squat;
• never crawl under the horse to get at the other side; and,
• do not leave grooming tools underfoot while grooming. Put them where you
will not trip over them and the horse will not step on them.
General care 17HORSE OWNERSHIP
A General Guide for the First-Time Horse/Pony Owner
FEEDING
There are many factors to consider when feeding your horse.
Correct feeding is essential for the health of the horse. A well-balanced diet should
provide all the necessary nutrients required to maintain the horse in good
condition. A number of simple rules apply:
1. Allow access to fresh, clean water at all times.
2. Feed concentrates ‘little and often’.
3. Feed according to the temperament and condition of the horse.
4. Feed plenty of fibre for healthy gut function.
5. Feed by weight, not volume of feed: weigh a scoop and a typical hay net.
6. Feed at the same time each day. Horses are creatures of habit and like a
settled routine.
7. Use high quality feeds. Do not use dusty or mouldy feeds.
18 FeedingHORSE OWNERSHIP
A General Guide for the First-Time Horse/Pony Owner
8. When changing the diet, do so gradually to reduce the risk of digestive upset.
9. Don’t exercise the horse immediately after feeding: allow at least one hour after
feeding before working the horse and do not feed until one hour after working.
Remember
Not every horse can be fed the same amounts or types of feed. When deciding what
to feed your horse, ascertain the total amount of food he should be getting, the correct
percentage of concentrate to roughage, and the right type of food.
Along the neck
Withers
Crease down back
Tailhead
Ribs
These calculations will vary according to:
• the horse’s weight;
• the horse’s breed and temperament;
• the amount and type of work the horse is doing;
• the rider’s experience (feeding a horse a high energy diet could prove detrimental
for a novice rider);
• whether the horse is stabled or at grass;
• the time of year and climatic conditions (in winter, horses require extra food
for warmth);
• the type of pasture;
• the horse’s age; and,
• the horse’s body condition. (Excess fat should not be carried in the areas
highlighted in the picture above. Also, the bony structures beneath the
highlighted areas should not be distinctly visible/prominent.)
Feeding 19HORSE OWNERSHIP
A General Guide for the First-Time Horse/Pony Owner
Feeding tactics for new horses
• Find out what the horse was fed by the previous owner. Ask the make and the
type of feed, the amounts offered, and if there was any particular reason why
that feed was used;
• make sure that you have some hay and feed for your new charge upon arrival
at his new home;
• keep the rules of good feeding uppermost in your mind;
• feed at maintenance or light work levels until you get to know your horse.
While it may be very tempting to lovingly feed scoopfuls of mix to your new
friend, his behaviour will be better if hard feeds are used according to the
manufacturer’s guidelines;
• start with a diet of 80–100% forage, and 0–20% low energy, high fibre hard
feed, preferably a cube or mix. Amounts depend on the body condition of the
horse; and,
• don’t overcomplicate the feeding programme, and if in doubt phone one or
more of the feed company helplines.
Always feed with a balanced diet. Hay should be analysed for feed value.
Steps to good feeding practice
Step one: estimate the horse’s bodyweight using:
• weight tape;
• table of weight (Table 1); or,
20 FeedingHORSE OWNERSHIP
A General Guide for the First-Time Horse/Pony Owner
• weighbridge (weigh vehicle and horsebox at a weighbridge and record the
weight, then make a return trip with the horse loaded and subtract the first
weight from the second weight to establish the horse’s weight).
TABLE 1: Table of weights. TABLE 2: Estimating feed intake.
Height (hands) Bodyweight (kg) Height (hands) Estimated intake (kg)
12 230–290 12 6.5
13 290–350 13 8
14 350–420 14 10
15 420–520 15 12
16 500–600 16 13.5
17 600–72 17 13.5
Step two: estimate the horse’s appetite
An adult horse’s appetite is about 2.5% of his bodyweight. This figure is intended
as a guide only and must be adjusted according to the individual horse.
The height of the horse is measured on level ground to the highest point of the
wither. It is measured in hands or centimetres. A hand equals four inches. Table
2 shows a simple rule of thumb for estimating intake.
For horses that are half a hand higher (two inches), an extra 1kg is added. Also,
consider the build of the horse (heavy or light) and whether the horse is at
grass. If the horse is of fine build he can be fed 1kg less, and if of a heavier
build, 1kg more.
Formula: Appetite (kg) = bodyweight/100 x 2.5
Example: Appetite of 500kg horse = 500/100 x 2.5 = 12.5kg of dry matter/day
(total amount of food to be fed including both concentrate and roughage)
Feeding 21HORSE OWNERSHIP
A General Guide for the First-Time Horse/Pony Owner
TABLE 3: Forage-to-concentrate ratio.
Maintenance 0-10% concentrate 90-100% roughage
Light work 4–6 hours/week 25% concentrate 75% roughage
Medium work 6–10 hours/week 30% concentrate 70% roughage
Hard work 10 hours +/week 40% concentrate 60% roughage
Step three: forage-to-concentrate ratio
Using Table 3, we can calculate how the energy is divided between forage (hay,
haylage, grass) and concentrates.
Step four: deciding the ration
The energy value of food must be matched with the horse’s energy requirements
(i.e., how much work he is doing). It can be a complicated process and, if in
doubt, the first-time horse owner should seek help from an experienced owner,
or a professional from one of the feed companies.
Different feeds have different feed values. Hay varies in feed value and should
be analysed. The energy and protein content of proprietary feed is printed on
the bag.
Also evaluate:
The work you are going to do
Is the animal a first pony for a child, a hack for an adult, a hunter, or an amateur
competition horse? Your chosen activity will affect the amount and type of feed
your horse requires.
Stabled, at grass, at home, or at livery?
Keeping a horse outside in winter means that the horse needs more supplementary
food to help keep warm and to prevent weight loss. In spring and summer, when the
grass is growing, less supplementary feed is required.
22 FeedingHORSE OWNERSHIP
A General Guide for the First-Time Horse/Pony Owner
What is the horse’s temperament, and how does he hold his weight and body
condition?
The horse’s breed often dictates his temperament, which in turn affects whether a
horse loses or gains weight easily.
Age and tooth quality
For horses aged four years old and under, have their teeth checked every six
months by a vet or equine dental technician. For horses older than four years, a
check every twelve months is sufficient.
Does the horse suffer from any specific diet-related issues?
There are a number of possible diet-related disorders which the horse or pony may
suffer from. It is important to consult with your vet if the horse is not behaving
normally, losing body condition, or is overweight.
Watering
Water is an essential requirement for the horse’s well-being. A horse that is
deprived of water for more than a few days will become dehydrated and may die.
The average intake of water per day is 36 litres. A number of factors influence the
horse’s water intake, including:
• diet;
• ambient temperature (a horse will drink more in warm weather);
• workload (horses working hard drink more); and,
• health.
As with feeding, certain rules apply:
• ensure a constant supply of clean, fresh water;
• keep all water storing containers clean;
• regulate water intake before and after hard work (take away water supply); and,
• monitor the horse’s intake (this is easier to do if the horse is watered by bucket,
and more difficult with an automatic water drinker).
Feeding 23HORSE OWNERSHIP
A General Guide for the First-Time Horse/Pony Owner
Dehydration test
A horse that does not drink water for any length of time will become dehydrated.
The ‘pinch’ test is a simple way to determine hydration status. With your thumb
and index finger, pinch a fold of skin on the horse’s neck. When released, the skin
should fold back flat quickly. If it does not, and remains longer than a few seconds
(five at most), the horse is likely to be dehydrated.
Water is usually given in one of two ways:
1. Buckets
Advantages:
• the exact amount of water intake is known; and,
• they are easy to clean.
Disadvantages:
• this method is labour intensive;
• buckets can be heavy to carry; and,
• buckets can be knocked over by the horse.
2. Automatic water drinkers
Advantages:
• there is a constant supply of fresh, clean water; and,
• this method saves time and labour.
Disadvantages:
• bowls can be small and the horse may not be able to get a good draught of water;
• it can be difficult to monitor the horse’s intake; and,
• in winter months, the pipes to the drinkers can freeze, resulting in no supply.
24 FeedingHORSE OWNERSHIP
A General Guide for the First-Time Horse/Pony Owner
FOOT CARE
There is an old saying – ‘no foot no horse’. Think of the size of the horse
bearing down on four small feet: it is no wonder that the likelihood of
problems arising is great. It is therefore essential that the horse’s feet are cared
for properly.
Horses at grass and not in work
Horses with good strong horn growth should not require shoes. Have the feet
trimmed by a farrier every four to six weeks, so that the foot does not grow out
of shape. If a horse has poor horn growth or is subject to slits and cracks in the
hoof, then it may be better to put front shoes on.
Horses in work
Working horses generally need to be shod for the following reasons:
• for protection (working on hard surfaces, hacking out on roads);
• for grip;
• to reduce concussion;
• to improve the condition of poor or neglected feet; and,
• to improve conformational defects.
When to attend to feet
You should attend to your horse’s feet:
• every four to six weeks;
• when the shoe is cast (falls off) or sprung (only a nail or two holding it on);
• when clenches (top of nail, which holds the shoe on the hoof wall) arise, which
could injure the horse;
• when the shoe has worn thin;
• when the hoof has grown too long; and,
• when the shoe is too tight, causing a nail bind (similar to having a stone in
your foot, causing lameness) or nail prick (the nail pricks the sensitive part of
the foot, causing lameness).
Foot care 25HORSE OWNERSHIP
A General Guide for the First-Time Horse/Pony Owner
Recognising a well-shod foot
In a well-shod foot:
• clenches are all level;
• the foot has a regular, even shape; and,
• the horse is sound.
Toe
Wall of hoof
Sole White line
Point of frog
Lateral cleft
Central cleft Frog
Seat of corn Bar
Bulb of heel
Heel
Have feet trimmed regularly. Diagram of the horse’s foot.
Picking the horse’s feet
Get into the habit of picking out your horse’s feet every day to keep the frog healthy
and to keep an eye on general foot health. The frog plays a major role in the
circulation of the leg, as it acts as a pump when in contact with the ground. It also
has a role as an anti-slipping and anti-concussion device. If it is infected with thrush
(a foul-smelling frog with moisture in the cleft, which is caused by standing in dirty
bedding and failure to pick out the feet regularly), this can sometimes cause lameness.
Picking out feet removes any stones that may be lodged, avoiding discomfort and
the possibility that the horse might go lame through a stone bruise. If a sharp stone
damages the sole of the foot, infection can develop under the sole, which, if
untreated, travels up through the foot and breaks out at the coronary band or at the
heel. The horse will usually show signs of lameness and the foot will need to be
pared back to allow the pus to escape and poulticed to draw out the infection. It is
best to treat early before it travels upwards. This can be prevented through regular
picking out of the feet.
26 Foot careHORSE OWNERSHIP
A General Guide for the First-Time Horse/Pony Owner
GENERAL HEALTH
A healthy horse has a good shine off his coat, eats all his feed, has an interest in
his surroundings and shows no sign of injury or lameness. Horses must be
checked daily for signs of abnormal health. Any unusual behaviour should be
noted and checked. If in doubt, always call your veterinary surgeon.
Procedure for checking horse health and welfare
Watch out for:
• behavioural abnormalities: is the horse behaving in a way you consider abnormal?
For example, a lively horse that is suddenly quiet should arouse suspicion;
• eating problems: quidding (dropping unchewed food from the mouth) points to
teeth problems. Not eating concentrate feed may indicate another underlying
problem. Also note drinking habits;
• coat: is the coat dull and listless? This is a reliable sign of trouble;
• eyes: bright alert eyes are a sign of good health. Eyes that look dull, or with a
discharge, indicate that something is wrong;
• respiration: breathing difficulties or coughing should be acted upon
immediately;
• dung: any abnormalities in dung should be noted (normal dung resembles
round balls, which break on landing); and,
• any increase or decrease in temperature relative to normal.
General health 27HORSE OWNERSHIP
A General Guide for the First-Time Horse/Pony Owner
Checking vital signs
It is important to note the horse’s normal TPR (temperature, pulse and
respiration) so that you have something to compare readings with if you feel that
the horse is off form. Take pulse and respiration readings first, before taking the
temperature reading. This is important because placing a thermometer in the
rectum can raise the horse’s pulse and respiration rates.
Temperature
You will need a clinical thermometer, some vaseline and a piece of cotton wool.
Tie the horse up securely or have someone hold him. Remove the thermometer
from its case and shake it so that the mercury is below the scale. Lubricate the bulb
of the thermometer with vaseline. Approach the horse at the shoulder and work
back to the hindquarters. Stand close to the side of the hindquarters and raise the
tail. Slide the bulb of the thermometer through the anus into the rectum to lie
against the rectal wall. Do not prod the rectum wall with the thermometer and do
not push it into a ball of faeces. Hold it in place for a minute and then remove,
wipe clean and read the temperature from the scale. Clean the thermometer in
cold antiseptic solution, dry it, shake it and return it to the case. Normal rectal
temperature is 37.6–38.2 degrees Celsius or 99–100.5 degrees Fahrenheit.
(Alternatively, you can buy a digital thermometer.)
Pulse rate
To take the pulse, you will need a watch with a second hand. Find the facial artery,
which is close to the skin surface on the bottom jaw. Locate the tubular vessel on
the lower edge of the jaw with your fingertips. Press gently until you feel the pulse.
Count the number of beats in 15 seconds and multiply by four to obtain the pulse
rate per minute. The normal resting rate is 35 to 45 beats per minute depending
on the size, age and fitness of the horse.
Respiratory rate
Breathing is barely noticeable at rest in a healthy horse. Stand back from the horse
28 General healthHORSE OWNERSHIP
A General Guide for the First-Time Horse/Pony Owner
and watch the movement of the rib cage or the flanks. Count the number of
breaths in or out over 15 seconds and multiply by four. The normal respiratory
rate at rest is eight to 16 breaths per minute.
The capillary refill test
The horse’s gums should be pink and moist. Press gently on the gum above one of
the top incisor teeth until it whitens. The colour should return immediately when
you remove your finger. A delay suggests a reduction in blood volume or blood
pressure due to shock, haemorrhage or dehydration.
Riding health indicators
Any behavioural problems that crop up while you are riding your horse/pony may
also indicate ill-health:
• headshaking may be a sign of the onset of an allergy or problems in the mouth,
while a dislike of being bridled points to teeth and mouth trouble;
• reluctance to go forward can mean that the horse has problems in his back or
that his tack is not fitting well; and,
• horses run away from pain; if the horse starts to get strong and pull it may be
a sign of a health problem.
Mental health
Horses can suffer from stress. Don’t overlook the impact a horse’s social interaction
with other horses can have on his health. A stressful environment – such as a bully
stabled next door or sharing a field, or even a busy stable yard – can leave a real
impression on a sensitive horse. Also, moving yards, leaving an equine friend or such
a friend moving on, competitions and unusual happenings in and around the yard
can all influence a horse’s health – just as stressful situations can affect humans.
Vaccination
The horse or pony should be up to date on essential influenza and tetanus
vaccinations. Antibody protection levels can be measured simply where there is
any concern. Discuss with your vet.
General health 29HORSE OWNERSHIP
A General Guide for the First-Time Horse/Pony Owner
PARASITE CONTROL
All horses and ponies suffer from internal parasites, the most common being small
redworms, tapeworms, bots and roundworms. External parasites such as lice can
also be an issue. The life cycle of parasites is such that horses become re-infested
regularly, with some parasites having a straightforward life cycle relying solely on
the horse, and a free-living stage on pasture or bedding. Other parasites, like bots,
have a secondary host, in this case the bot fly. Tapeworms rely on the forage mite
as well as the horse for survival.
Redworm. Tape worm. Bot fly larvae.
The effects of untreated parasite infestation can include weight loss, reduced
performance, anaemia, diarrhoea, dull coat, pot belly, poor appetite, tail rubbing
and even death if left untreated.
The goal of an effective de-worming programme should never be to eradicate any
given parasite completely, but rather to minimise the risk of disease, control egg
shedding, maintain effective anthelmintic (chemical wormer) control, and avoid
development of anthelmintic resistance as much as possible. Faecal egg count tests
assist in monitoring the effectiveness of a parasite control programme and permit
the treatment only of horses with high worm burdens. This form of treatment
should only be in place for horses over three years of age, and should still include
targeted treatment of encysted small redworm in the autumn, and against
tapeworm every six months, at the end of the housing season and at the end of the
grazing season.
Faecal egg counting is where a sample of dung is sent to the laboratory to
determine the presence and volume of eggs present. It is not possible to determine
if there is an issue with tapeworm or with encysted small redworm in this way.
30 Parasite controlHORSE OWNERSHIP
A General Guide for the First-Time Horse/Pony Owner
It is extremely important to read the product instructions with regard to suitability
for use in pregnant and lactating mares and youngstock, and the effectiveness of
the product against various parasites. Parasite control is complex and should be
discussed with your vet.
Good grassland management, stable hygiene, not overstocking, dosing by weight,
and treating new arrivals before turnout with existing stock all have a role in an
effective parasite control programme.
Example: life cycle of large/small redworms
1. The horse ingests larvae from pasture or from bedding on the stable floor.
2. The larvae migrate through various parts of the body, reach maturity and lay
their eggs in the horse’s intestines.
3. The eggs are passed out with the horse’s dung.
4. The larvae emerge from the eggs and migrate to the grass, so the cycle begins
again.
Having a good worming programme will keep infestation numbers to a minimum.
Parasite control is two-fold: grassland management; and, use of anthelmintics
(worming medication).
Eggs on the grass
Mature worms
lay eggs
The horse eats
the eggs
Larvae mature
into adult worms
The eggs hatch
in the gut Life cycle of the redworm.
Parasite control 31HORSE OWNERSHIP
A General Guide for the First-Time Horse/Pony Owner
Grassland management
As a horse grazes they can eat immature adult parasites which have attached
themselves to blades of grass. The horse’s own dung maintains the supply of
worms for himself and other horses on the same pasture. Several techniques are
used to lower the amount of faecal contamination and reduce the likelihood of
exposure to the horse.
1. Rotate the grazing area. Move horses from one field to another every month
to maintain adequate grass cover. Electric fencing can subdivide pastures into
smaller areas. In this way, the horse eats grass that does not contain excess
larvae. The life cycle of the parasite can be broken where the host is removed
frequently from contaminated pasture, as some eggs mature in six weeks.
2. Graze younger animals separately from older horses. Certain parasites survive
primarily in horses less than two years old. The increased volume and variety
of parasites associated with young horses simply expose adults to more
worms. Also, put younger horses out on clean pasture where possible.
3. Do not overgraze and overstock pastures (stocking rate 1.5 horses/ha), as this
forces horses to eat any remaining weeds, dirt, parasites, and wood.
Overgrazed pastures mean that the few living plants left in the field are heavily
contaminated with larvae.
Mixed grazing.
32 Parasite controlHORSE OWNERSHIP
A General Guide for the First-Time Horse/Pony Owner
4. Topping pasture or tight grazing exposes the base of grass blades to sunlight,
which also helps to kill off a degree of the parasite population in prolonged
hot weather.
5. Manually picking up droppings or using a pasture vacuum cleaner is very
beneficial.
6. Mixed grazing with cattle or sheep can clean pastures too, as they have
different eating and digestive patterns and most equine internal parasites
cannot survive in the digestive systems of sheep and cattle. Besides the benefit
for parasite control, it makes the most economical use of the pasture.
Stable sanitation
The stable is a potential site for ingesting parasites. If a horse is confined to a
stable the manure is just as alive with hatching eggs as that found in the field.
Daily picking and weekly stripping of bedding is desirable to decrease
contamination.
Compost the solid waste cleaned from the stables for several months. The heat
generated by the compost kills parasite eggs and some larvae. Store the bedding
away from the stable area to discourage flies. Spreading manure on pasture
immediately after stripping the bedding simply moves the parasites from the stable
to pasture.
Don’t feed horses on the ground, as this is a primary source for parasite ingestion.
Keep clean water available at all times and remove any standing water. Scrub
water bucket or drinkers daily. Empty water tanks and brush algae from the sides.
Horses that defecate in their water bowls or buckets require extra attention.
Chemical control of internal parasites
Unfortunately, no single wormer controls all parasites. Different chemical groups
of wormers vary in their efficacy in targeting different parasites. Different
products also vary in the duration of their effectiveness. It is best to discuss the
choice of parasite control products with your vet if you are unsure.
Parasite control 33HORSE OWNERSHIP
A General Guide for the First-Time Horse/Pony Owner
Dosing guidelines:
• before worming, read the manufacturer’s instructions carefully;
• weigh the horse to ensure accurate dosing or use a weigh tape;
• use faecal egg count testing at least twice a year to guide your choice of
anthelmintic product in consultation with your vet;
• select a product that has activity against encysted small redworms in
October/November and again in January/February;
• select a product that has activity against tapeworm at the end of the housing
season and at the end of the grazing season;
• target bots after the first frost;
• rotate the chemical group of anthelmintics used on an annual basis;
• treat all new arrivals and keep them indoors for at least 24 hours after worming
so that worms are not transferred onto clean pasture;
• record the date of dosing and the product used;
• treat all horses on the farm at the same time and with the same product;
• check products are suitable for use in young foals, pregnant mares and lactating
mares; and,
• the two main methods of administering wormers are either through a paste
given directly into the horse’s mouth from a syringe, or in a powder form mixed
through the field, although in some cases the vet may administer using a
stomach tube.
34 Parasite controlHORSE OWNERSHIP
A General Guide for the First-Time Horse/Pony Owner
Lice
Louse.
The louse is a parasite. There are two types: the sucking louse, which feeds on
blood and tissue; and, the biting louse, which feeds on scurf from the coat.
Main signs:
• the horse is irritated, rubbing and biting himself;
• the coat looks scurfy and dull;
• the horse loses condition; and,
• cream-coloured eggs are found in the coat.
Treatment and prevention:
• apply louse powder to the coat; and,
• practice good stable management: lice are spread through grooming kits and
clothing (numnahs) – clean these regularly.
Parasite control 35HORSE OWNERSHIP
A General Guide for the First-Time Horse/Pony Owner
LAMINITIS
Laminitis can be a devastating disease to a horse/pony. It is usually, but not
exclusively, associated with over-fat ponies on grass.
What to look for
Mild cases
The horse seems a little uncomfortable, shuffling from one foot to another when
standing still. Lameness may be intermittent.
More severe cases
The horse is reluctant to walk at all or may even be lying down, sweating and
in some distress. You may see a depression in the coronary band, which
indicates movement of the pedal bone (inside the hoof). In most cases the feet
will be hot and the digital pulse just underneath the side of the fetlock will be
pounding.
Main signs of laminitis
The horse may:
• rest his weight on his hind feet;
• stretch out his front legs to reduce pressure on the front feet;
• be in obvious pain and reluctant to move; and,
• have heat in his feet.
Causes of laminitis
A number of situations may lead to the condition:
• too much rich grass: typically this is grass high in soluble carbohydrate in the
spring and autumn;
• too much concentrated feed, which can occur when a horse breaks into a feed
bin, or is given very large concentrate meals;
• obesity: overweight animals are more susceptible to laminitis;
• toxaemia: literally ‘blood poisoning’, where undesirable metabolic compounds
36 LaminitisHORSE OWNERSHIP
A General Guide for the First-Time Horse/Pony Owner
circulate in the blood stream (can be caused by diarrhoea, peritonitis or metritis
from a retained placenta after foaling);
• some drugs, particularly corticosteroids;
• stress may make horses more prone to developing laminitis because, when
stressed, horses release higher levels of corticosteroid hormones that may have
a similar effect to administered steroids;
• irregular shoeing;
• associated with horses suffering from Cushing’s disease (hormonal imbalance);
• associated with horses suffering from high insulin levels, as seen in equine
metabolic syndrome (EMS); and,
• less common causes include riding on hard surfaces and excessive weight
bearing by one leg due to severe injury or lameness in the opposite leg.
What to do if a horse/pony has laminitis
1. Remove the suspect cause.
2. Call the vet immediately and follow their advice,
To prevent laminitis:
• trim feet regularly;
• restrict grazing, especially in spring;
• reduce exposure to causes of laminitis;
• do not allow the horse/pony to become obese;
• provide hay if the pony is stabled or in a bare paddock;
• use a muzzle for short periods if you are unable to strip graze or manage the
pasture;
• feed a low carbohydrate, high fibre diet, and consider using a mineral and
vitamin supplement to provide a balanced diet where the animal is being fed
less than the recommended quantities of compound feed;
• increase workload before increasing feed;
• feed little and often, so as not to overload the stomach;
• do not turn the horse out on frosted paddocks; and,
• restrict grazing, especially in spring, of animals prone to laminitis.
Laminitis 37HORSE OWNERSHIP
A General Guide for the First-Time Horse/Pony Owner
TACK
Comfortable and well-fitting tack results in a happy, contented animal that can
perform at its best. Get professional advice on buying and fitting tack before you
purchase, as it is expensive.
The first-time owner needs the following:
• bridle – complete with bit and reins;
• saddle – complete with stirrup leathers, irons and girth;
• numnah; and,
• a breastplate may be required.
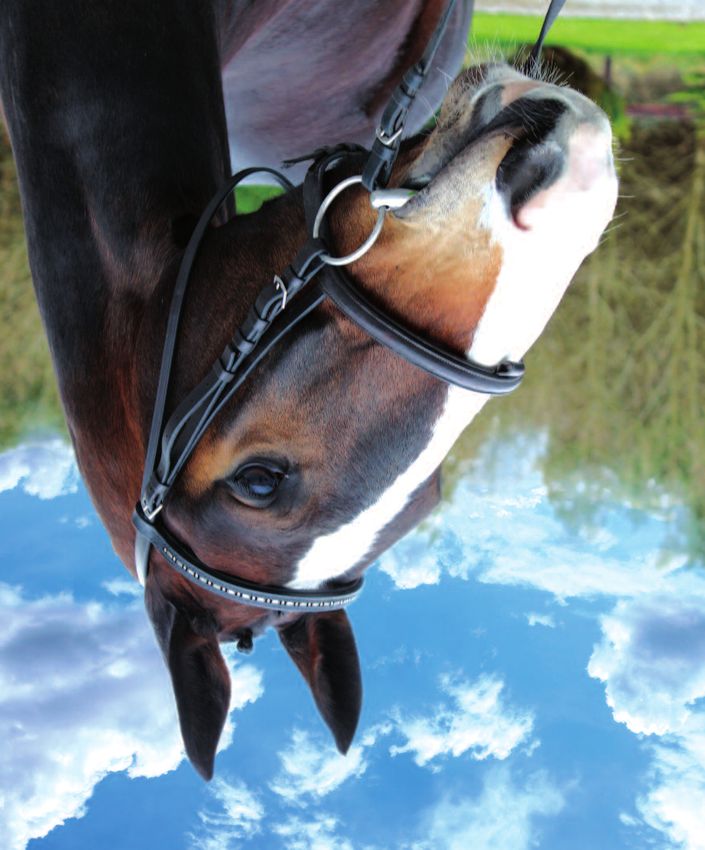
Fitting the bridle
• Always untie the horse before removing the headcollar;
• place the reins of the bridle over the horse’s head;
• keep control of the horse when bridling by re-fastening
the headcollar around the neck (he should not be retied
but the lead rope left hanging through the piece of string
to prevent injury in case the horse decides to pull back);
• stand in close, just behind and to one side (preferably on
the left side) of the horse’s head;
• put your right hand under the horse’s head and
around to the offside approximately halfway down
the horse’s face; Parts of the bridle.
• pass the bridle to your right hand and hold both the
mid-sections of both cheek pieces;
• hold the bit with your thumb and first two fingers and open the horse’s mouth
by placing your thumb in the side of the mouth. This is the space where the bit
lies as there are no teeth in this area and this prevents you from getting injured;
• when the horse opens his mouth, guide the bit in (be careful not to knock
against the horse’s teeth) by raising the bridle with the right hand;
• handle the ears carefully when slipping the headpiece over; and,
38 TackHORSE OWNERSHIP
A General Guide for the First-Time Horse/Pony Owner
• Be sure that the bridle is properly adjusted to fit the horse before you ride.
If the bridle is correctly fitted you should be able to:
• fit one finger between browband and ear;
• fit two fingers between cheek bone and noseband;
• see two wrinkles in the horse’s lips when the bit is in the mouth (the horse
should appear to be smiling); and,
• fit four fingers’ width between cheek and throatlash.
When deciding on a bit, consider the bit that was used by the horse’s previous
owner, and the strength of the horse when riding. Ideally, all riders prefer to ride
in a snaffle; however, certain horses do require stronger bits. Always get advice
from a professional when choosing alternatives.
4
1 1. Pommel
2. Stirrup iron
3. Stirrup leather
6 4. Cantle
5. Numnah
6. Girth
5 7. Girth straps
2 7
3
Parts of the saddle.
Saddlery
If you intend to use your horse for a variety of disciplines, or have yet to decide on
a particular discipline, the general purpose saddle is the one to choose. It can be
used for all disciplines: jumping, hunting, dressage, cross country, and hacking out.
When buying a saddle, it is advisable to bring your horse to the tack shop if
possible, or to have a member of staff call to you with a number of saddle options
to get the one best suited to your horse. It will be better in the long run even if extra
cost is incurred.
Tack 39HORSE OWNERSHIP
A General Guide for the First-Time Horse/Pony Owner
If you are buying a secondhand saddle, make sure to check the stitching and check
that the leather is neither split nor has holes in it. There should be three girth straps.
When fastening the girth, use either the first and the second or the first and the third
straps. This is important in the event of one strap breaking.
Buy good stirrup leathers (buffalo hide), steel irons and make sure the stirrup bars are
open when riding. This is extremely important in the event of a fall, as the stirrup can
break free from the saddle and the rider will not be dragged with one foot stuck in a
stirrup iron.
Before saddling:
• carefully check the horse and tack;
• make sure all stitching on the stirrup leather, billet straps and girth buckles
is secure;
• run up the stirrups before placing the saddle on the horse’s back;
• position the girth across the seat;
• place the numnah high on the withers, and then slide it backwards onto the
back (this smoothes the horse’s hair); and,
• check the girth three times – after saddling, just before mounting, and after
riding for a short distance.
Cleaning tack
It is important to keep your tack clean, as this prevents skin sores and helps to
prevent tears in the leather.
Get into the habit of:
• cleaning the bit after every use;
• cleaning the saddle, bridle and girth (if leather) daily with a little warm water
and saddle soap;
• oiling both the bridle and the saddle weekly;
• washing the numnah and girth (if not leather) regularly; and,
• checking the stitching of the bridle, reins, saddle and stirrup leathers when
cleaning tack.
40 TackHORSE OWNERSHIP
A General Guide for the First-Time Horse/Pony Owner
RIDING OUT
Choosing the right headgear
Medical studies show that the most
common riding-related injuries are to
the head. Many of these could be
prevented or be less severe if
protective headgear is worn.
Protective headgear is a hat that
stays on during a fall (not one that
hits the ground before the rider).
Protective hats cannot be pierced by
a sharp object, and they also have
extra padding inside to protect riders Appropriate headgear is essential.
from concussion.
Wear protective headgear that carries the appropriate approval rating, which
can be checked with the governing body, Horse Sport Ireland, to ensure that you
are wearing the headgear proven to be most effective in preventing head injuries.
Mounting and dismounting
• Never mount or dismount a horse in a barn or near fences, trees, or
overhanging projections. Sidestepping and rearing mounts have injured
riders who failed to take these precautions;
• a horse should stand quietly for mounting and dismounting. To ensure that
the horse stands, lightly control his head with the reins;
• run up the stirrups immediately upon dismounting. The dangling stirrup
may startle or annoy the horse. A dangling stirrup can catch in doorways
and other projections while the horse is being led; and,
• after running up the stirrups, immediately bring the reins over the horse’s
head. In this position, the reins can be used for leading.
Riding out 41HORSE OWNERSHIP
A General Guide for the First-Time Horse/Pony Owner
Riding
• When riding, wear boots with proper heels to prevent your feet from
slipping through the stirrups. Always wear protective headgear, properly
fitted and fastened;
• wear a back protector when riding an unfamiliar horse or jumping;
• keep the horse under control and maintain a secure seat at all times. Horses are
easily frightened by unusual objects and noises;
• until you know your horse, confine riding to an arena or other enclosed area. Ride
in open spaces or unconfined areas only when you are familiar with the horse;
• if the horse becomes frightened, stay calm, speak to him quietly, steady him,
and give him time to overcome his fear;
• hold your mount to a walk when going up or down a steep hill;
• do not fool around. Horseplay is dangerous to you, your friends and to those
nearby;
• never ride your horse with just a headcollar; headcollars do not give enough
control. Use a bridle;
• when riding on the road, ride on the shoulder and follow the rules of the road;
• never rush past riders who are riding at a slower gait. It startles both horses and
riders and frequently causes accidents. Instead, approach slowly, indicate a
desire to pass, and proceed cautiously;
• ride abreast of or stay a full horse’s length from the horse in front to avoid the
possibility of being kicked;
• you should be able to see the hind heels of the horse in front of you;
• never allow a horse to run to and from the stable. Walk the last distance home;
• when using spurs, be sure that your legs are steady enough so that you don’t
touch the horse with the spurs by mistake. If you are not sure, do not wear them;
• when your horse is frightened and tries to bolt, turn him in a circle and tighten
the circle until he stops; and,
• dogs and horses are not always good companions. Keep your dog under
control at all times.
42 Riding outHORSE OWNERSHIP
A General Guide for the First-Time Horse/Pony Owner
TRAVELLING AND LOADING
Always make sure your horsebox is in good condition.
The horsebox
Check your horsebox regularly for the following:
• check the couplings and brakes;
• check that there are no protruding objects;
• check for rusted and weakened door hinges;
• make sure that the lights and indicators are working;
• ensure that the tyres are within the legal requirement and that the pressure
is correct;
• check for rotting or weakened floor boards – regularly pull up mats to check
the floor underneath; and,
• ensure that the towing hitch is the correct height for the box, and that the
trailer can be towed level.
Travelling and loading 43HORSE OWNERSHIP
A General Guide for the First-Time Horse/Pony Owner
At servicing, ask the mechanic to check the springs and wheel bearings. The trailer
should be of sufficient height to give the horse ample neck and head room.
Driving
When driving, always observe the following:
• secure all doors and the ramp;
• double-check all the connections (lights, brakes, hitch and safety chains);
• drive carefully, turn slowly, and start and stop slowly and steadily; and,
• look far ahead to avoid emergencies.
Loading and unloading
• Make sure the ground area behind and around the ramp gives safe footing
before loading or unloading a horse;
• be sure that the ramp is level and steady, and doesn’t move as the horse steps on it;
• use a headcollar and lead rope (at least five feet long) made of cotton rope. Do not
use nylon ropes – they can be dangerous if the horse pulls back;
• always protect the horse’s legs. Ensure that bandages/travelling boots extend over
the coronary bands onto the hoof, and that they cover the heel area as well as the
knees and hocks;
• put a tail bandage on your horse to protect from rubbing;
• if a horse is difficult to load, use a bridle, as this gives more control;
• if you have trouble loading or unloading, get experienced help;
• always stand to the side when closing and opening the ramp in case the horse has
become free and backs out hurriedly;
• secure the rear chain or bar as soon as the horse is in the trailer and always before
tying the horse. Be careful when doing this and stand to the side;
• always tie with a quick-release knot, or use panic snaps on the ties;
• when hauling only one horse in a two-horse trailer, load the horse on the driver’s
side. Try to distribute the weight of the load evenly. When hauling two horses in
a two-horse trailer, load the heavier horse on the driver’s side;
44 Travelling and loadingYou can also read