Tangerine Full User's Guide
←
→
Page content transcription
If your browser does not render page correctly, please read the page content below
Tangerine®
                                 Full User’s Guide
                                      v. March 2015

                                        Authors:
                 Scott Kipp, RTI International skipp.Contractor@rti.org
                   Carmen Strigel, RTI International cstrigel@rti.org
                 Sarah Pouezevara, RTI International spouez@rti.org
                                                     ®
                                 About Tangerine :
   Tangerine is open-source electronic data collection software designed for use on
Android mobile devices. Its primary use is to enable recording of students’ responses in
oral early grade reading and mathematics skills assessments. Tangerine is also used to
           capture interview responses from students, teachers, and principals.

This work is licensed under a Creative Commons Attribution-ShareAlike 4.0 International
License.

                                             1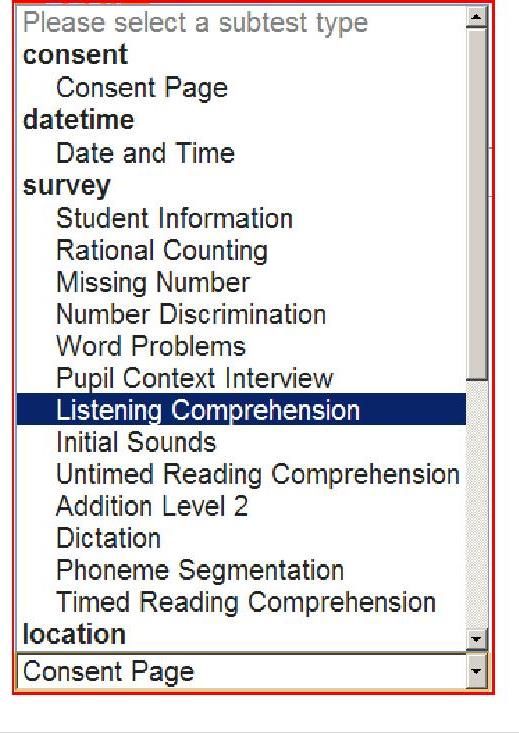
Table of Contents
Overview............................................................................................................................... 4
Tangerine Icon Library ........................................................................................................... 5
A. The Tangerine Wizard ....................................................................................................... 6
   1. Logging in and Entering a Group ................................................................................................. 6
   2. The Tangerine Group Homepage ................................................................................................ 7
      2.1 Changing your Group’s Language ................................................................................................... 7
   3. Importing an Assessment ........................................................................................................... 8
   4. Creating a New Assessment ....................................................................................................... 8
   5. Building an Assessment ............................................................................................................. 9
   6. Editing Individual Subtests (Subtest Editor) .............................................................................. 10
      6.1 The Date and Time Subtest ...........................................................................................................12
      6.2 The Location Subtest .....................................................................................................................13
      6.3 The Student ID Subtest .................................................................................................................13
      6.4 The Consent Subtest .....................................................................................................................14
      6.5 Grid pages or Timed Subtests .......................................................................................................14
      6.6 Survey pages (Untimed and Question and Answer Subtests) ......................................................18
      6.7 Validation and Skip Logic ..............................................................................................................23
      6.8 Subtest Skip Logic and ‘Action on Display’ ...................................................................................27
      6.9 Randomizing Subtests ...................................................................................................................29
   7. Duplicating and Deleting Assessments ..................................................................................... 30
   8. Accessing, Downloading and Interpreting Data ......................................................................... 31
      8.1 Interpreting Data..........................................................................................................................31
      8.2 Default and Automatic Variables .................................................................................................32
      8.3 Data from Instruments with Non-Latin Characters......................................................................32
   9. The Tangerine Results Dashboard ............................................................................................ 33

B. Tangerine on Mobile Devices – the “app” ........................................................................ 34
   1. Hardware Selection and setup of Tangerine software ............................................................... 34
   2. Installing Tangerine on your tablet ........................................................................................... 36
   3. Logging into Tangerine on mobile devices................................................................................ 38
   4. Managing Instruments on Tablets ............................................................................................ 39
   5. Training and Data Collection .................................................................................................... 41
   6. Entering data on tablets .......................................................................................................... 43
   7. The Student/Participant Identifier ........................................................................................... 46

Annex 1: Training Topics and Example Agenda ..................................................................... 50
Annex 2: Tangerine Tipsheet................................................................................................ 51
Annex 3: Guide to Supervisor Responsibilities during Data Collection................................... 52
Annex 4: Tips for keeping Tablets Charged ........................................................................... 53
Annex 5. Additional Examples of Skip Logic Commands ....................................................... 56

                                                                          2
Note: This user’s guide assumes some knowledge of EGRA/EGMA/SSME
survey methodology and is not a methodological guide to conducting these
types of oral assessments and surveys. For further information on
administering the content of the assessments themselves, please refer to the
toolkits at www.eddataglobal.org.

                                           3
Overview
Whether you are using Tangerine for educational assessments, surveys, or both, the process
for using the software involves the configuration of your instruments in Tangerine’s online
environment (the “Wizard”) and thereafter using your instruments on an Android device (the
“app”). This manual is structured in the two components making up the Tangerine Platform:

       1.) The Tangerine Wizard, and

       2.) The Tangerine application (app) on mobile data collection devices.

The Tangerine Wizard, is the web-based environment where data collection instruments are
managed, that is developed, edited, tested, and deleted; and where assessment data is
accessed and exported.

The Tangerine application is the device-level environment in which data is being collected, and
from which data is being sent to the server (and then accessed via the web-based
environment).

RTI International is proud to offer Tangerine’s software code as an open source piece of
software under a GNU General Public License. To access the software’s code base, please visit
our Github page. While we will make every effort to ensure a productive and seamless
Tangerine experience for you, we cannot guarantee that the software will function perfectly at
all times. Please be sure to check your Tangerine instruments and data files regularly and
report any issues to RTI International so that we may assist.

A note on browsers: the Tangerine Wizard at this time works best in Google Chrome or Mozilla
Firefox, both available as free web downloads. The Wizard will not function in Internet
Explorer, and may experience problems in other browsers. The Tangerine Application on
Android tablets is actually running through the device’s browser, so be sure not to delete or
disable your device’s browser. If your device can be equipped with Google Chrome, we
recommend this.

                                               4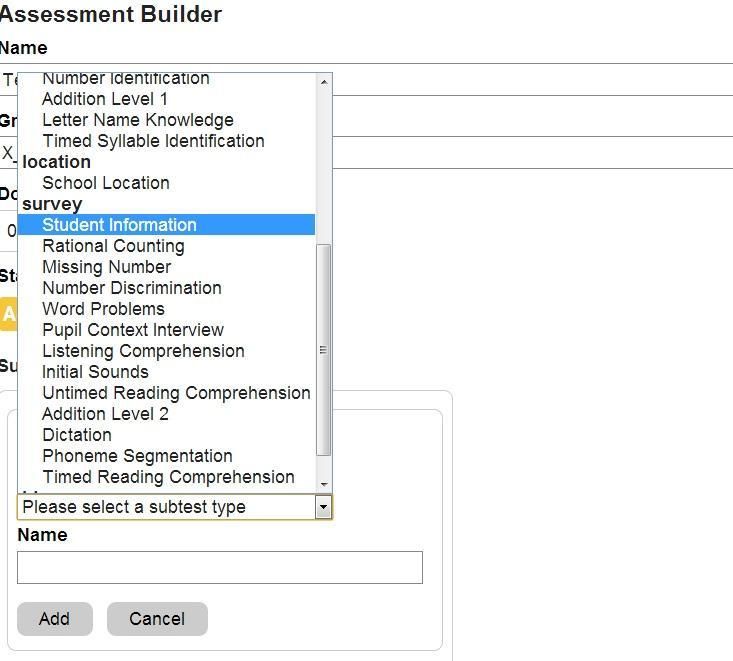
Tangerine Icon Library

          Tangerine icon. In the Wizard and on the Tangerine App, tapping this icon will bring
          the user back to the main landing page. If this icon is spinning, this indicates that the
          application or webpage is performing.

          This button will return the user to the main landing screen, where all the user’s groups
          are visible.

          This button will produce an Android Package (.apk) file, which contains Tangerine and
          all of the active instruments in a group. This will generate a link to download your
          group’s application file to install onto Android devices.

          This displays the Results Dashboard, not to be confused with the raw data itself (see
          graph icon below.

          The ‘Run’ button launches an assessment, whether being used to collect data or
          simulate an instrument for quality control testing.

          The ‘Data Entry’ mode for an instrument can be used to enter results through the
          online Wizard.

          The ‘Data’ button. In the Wizard, this will bring the user to the results download. On
          tablets, this button will display the register of complete and incomplete assessments.

          The ‘Edit’ button is used to enter into an assessment for modification and/or adding
          new subtests.

          The ‘Sync’ button on the Wizard is used to synchronize instruments built offline with
          instruments built offline (see ‘Tangerine Satellite’ section). On tablets, this button is
          used to update instruments, synchronizing tablet versions with edits from online.

          The ‘Print’ button in the Wizard displays options for viewing the content of all subtests
          in an assessment.

          The ‘Duplicate’ button in the Wizard will create a new copy of an assessment. Doing
          this will clear away any trace of removed variables from your instrument’s data file.

          The ‘Copy to’ button in the Wizard can be used to copy questions between subtests
          and subtests between assessments.

          The ‘Delete’ key will remove an assessment from the Wizard. On tablets, this button is
          visible only when logged in as admin.

                                            5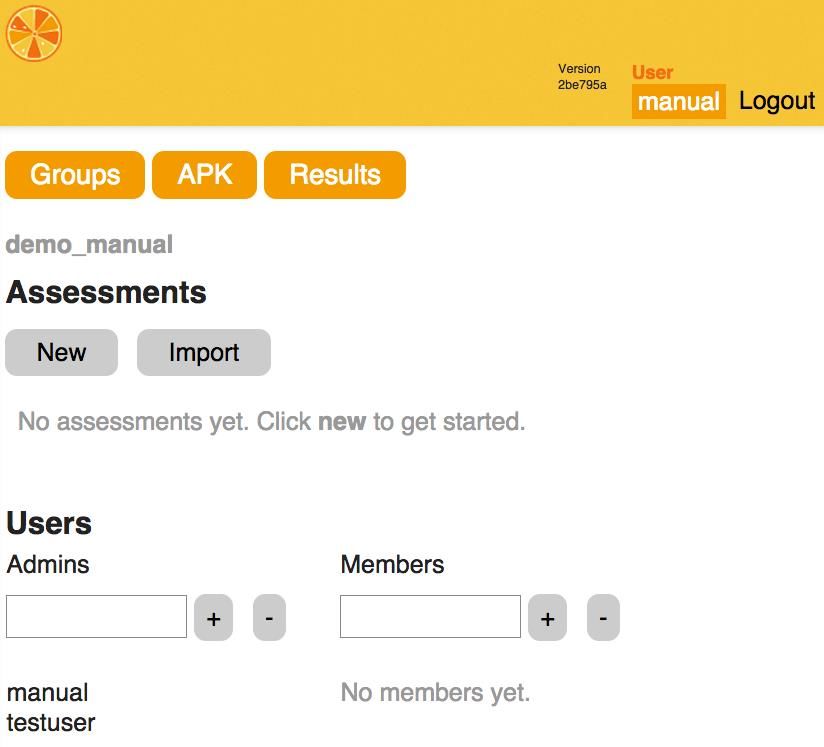
A. The Tangerine Wizard
To begin building instruments in Tangerine, you must establish a user name and password at
the Tangerine Ojai website. Both your username and password are case-sensitive. Once
logged in, your user name will appear in the top right-hand corner of the browser window.
1. Logging in and Entering a Group
Instruments and accompanying data in Tangerine are organized by ‘Groups.’ After you have
chosen a user name and password, you will see the landing screen indicating that your user is
not part of a ‘Group.’ Once you have logged into Tangerine, you can either:
1. Join an existing group; or
2. Create a new Group.
If you would like to join an existing group, please contact the person who has created the
group you would like to join and request that your user name be added to that group.
If you would like to create a new group, click the “Account” button shown in the image above
and then select “Join or create group” on the page that follows. You will be asked to re-enter
your password in order to create a new group. Once you have done this, you should now see
your new group appear in the Wizard landing screen. In this example, the group
“demo_manual” now appears as an option.
Try to create group names that are unique to your work and thus identifiable. Consider including the
name of your organization and/or the country and date where your instruments will be used. You may
also wish to create a “Sandbox” group where you experiment with instrument building.
6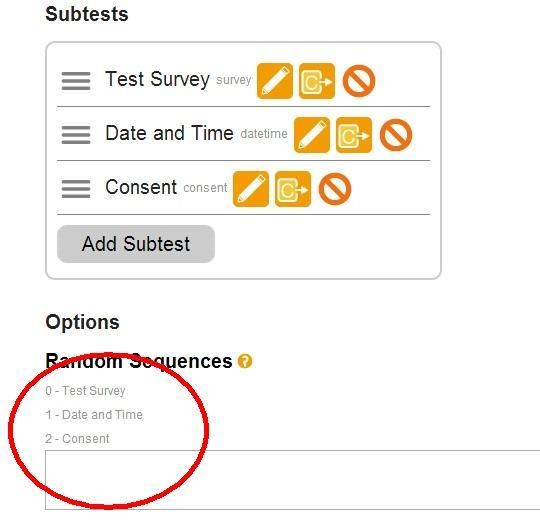
2. The Tangerine Group Homepage
Once you have joined or have been given access at least one group, you will see buttons
representing each group. Click a group button to work in it. Once you are inside a group, your
screen (as in the example below) will present several options:

In Tangerine, all instruments are referred to as Assessments. You can either:

                       1. Create a new assessment; or
                       2. Import an assessment.

You can add users by entering their account names into the text fields under ‘Admins’ and
‘Members.’ Admin users have all privileges for editing, deleting and duplicating instruments.
Member users, also known as ‘readers’, can only simulate (run) assessments, download their
results files (.csv files), and print contents. To add a user into either role, enter the user’s name
in the text field and click the ‘+’ button. Enter your password to confirm.

2.1 Changing your Group’s Language
English is the default language of both the Tangerine Wizard and the Tangerine app that is
produced by the Wizard. At this time it is also possible to change your group’s language to
French. We hope to provide additional languages in the future.
To change your group’s interface language:
        1. Login to your group.
        2. Hover your mouse over your username (in the top right-hand corner of your
            browser).
        3. Select ‘Settings’.
        4. In the field titled, ‘Language’, change the value from ‘en’ to ‘fr’ to have the group in
            French. Click ‘Save’ at the bottom of the ‘Settings’ page.
                                                  7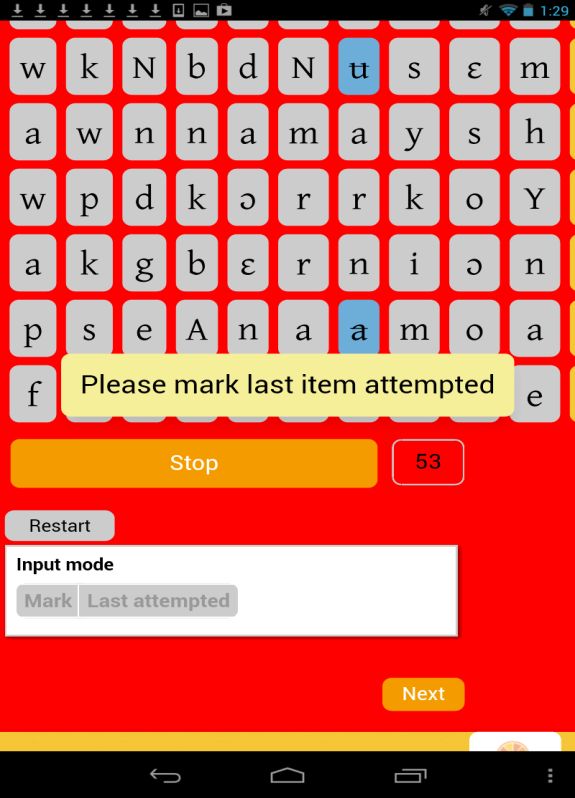
3. Importing an Assessment
If you have instruments developed in another group which you would like to repurpose in a
new group, you can import them by clicking the ‘Import’ button found at the top of your
group’s main page:

       1.   You must be an Admin of the group you are importing from;
       2.   In the original group, copy the desired instrument’s download key;
       3.   In the target group (where you want the new copy), click ‘Import’.
       4.   Select the original group and enter the download key in the box.
       5.   Return to the new group’s main page and you will see the import.

Note that the new copy of the imported instrument does not include any results data that may
have been uploaded to the original copy. Any results uploaded to any instrument will only
appear in the group from which the copy of the instrument came. If you try to import an
instrument that is archived in the original group, it will appear as archived also in the new
group.

4. Creating a New Assessment
In Tangerine, assessments are comprised of subtests. Each subtest in the Wizard will
become its own screen on the tablet application. This section will walk you through the
process of setting up a new assessment with multiple subtests.

   1. Click the “New” button just below the ‘Groups’ button on the Group homepage and a
       box will appear for you to name your new assessment, as shown below:
   2. Name your assessment, then click “Save.” Your assessment will now appear in the
       “Group assessments” section of the homepage, which is categorized alphabetically.
   3. Once named, you can edit your assessment by clicking on the orange arrow to the
      left of its title. Options will then drop down from there, as shown below:

Carefully select the name for your assessment. Make sure to include the name of the project or
country, month of data collection, assessment target group and potentially some other unique
details. We expect that you will be using Tangerine several times in a specific project (e.g. for
baseline, midterm and final data collection or annual data collection activities). You will want
to make sure that you are using appropriate instruments and that these are clearly identified.

                                                8
5. Building an Assessment

To start building your assessment, click on the edit icon (   ) and you will arrive at the
Assessment Builder page, as shown below:

Change “Name” by typing into this field. The download key and ‘Group’ are not changeable.
The ‘Status’ of an assessment will be highlighted in yellow as either “Active” or “Archived” –
which you can change by clicking on the button (when the button is yellow, it is selected). This
setting only affects whether an assessment is included into an APK file. An assessment’s status
has no effect on data – both Active and Archived instruments can receive data being uploaded
from tablets. Your ability to edit subtests is also unaffected by the assessment’s status.

Click ‘Add Subtest’ to create a new subtest, which will generate the ‘Name’ prompt and ‘Type’
menu:

                                                 9
Subtest Type and Name: See the sections below for distinctions on the various subtest types.
The “Name” is what will appear in the application when you send it to a device, and as such
can be where you enter the local language title for each subtest.

Usually, each assessment begins with four standard subtests capturing basic data:

       1.   The date and time subtest;
       2.   The location subtest, used to identify locale;
       3.   The student id subtest, used to create a unique data point record; and
       4.   The consent subtest.

Additional subtests will be made up of “survey” or “grid” pages, the page formats most often
chosen for the various EGRA/EGMA assessments and surveys. Subtests will appear in the
sequence in which they were added. To reorder your subtests, simply click on the left-hand
icon of three gray bars to drag pages/subtests into a different order:

               Click and drag the handlebars to reorder subtests and questions.

6. Editing Individual Subtests (Subtest Editor)
Click on the edit (pencil) icon next to the subtest in which you wish to work, as shown below:

To the right of each subtest, you will notice four things:

       1. Type of subtest: this is the system-generated name of the prototype you selected
          for each subtest (e.g. ‘grid’ from the above screenshot).

       2. The edit button,        , which you will click to edit subtest content.
       3. The “Copy to…” button,      , which you can use to send a copy of a given subtest
          to any other assessment in your group.

       4. The delete button,        , which can be used to remove subtests from your
          assessment. You will be prompted to confirm this choice.

After clicking the edit icon,     , you will land on the Subtest Editor page. At the top of this

                                                10
page, you can edit the name of your pages/subtest as needed. Below the field showing the
name of your subtest you will note the subtest’s “Prototype” – this is system information on
the type of page template you have chosen; this cannot be edited.
Subtest Editor Terms and Settings:
The following fields and configurations appear in all types of subtests. Other settings and
options are unique to certain types of subtests (such as grid subtests, survey subtests).
Language Code: here you can indicate the language to apply to this subtest. This refers to the
system text that appears on the tablets (e.g. buttons like “Help”, “Next”, “Start” and “Stop”).
When left blank, the subtest’s system text will appear in English. At present, only French is an
option for subtest system text language. To apply French to a subtest, enter ‘fr’ into the
language code field.
Skippable: you can indicate whether this subtest is required or not. The default setting of ‘No’
means that all items will be required before a user can advance to the next subtest. Not
allowing your enumerators to skip a subtest will avoid missing values in your dataset (provided
individual questions are also kept with ‘Skippable’ set to ‘No’). When set to ‘Yes’, a button
labeled ‘Skip’ will appear on the bottom left of the tablet screen.
Display Back Button: you can allow a ‘Back’ button to appear. Enabling this will allow users to
navigate back and forth between subtests. When left at the default ‘No’, users should be
instructed to only press ‘Next’ when they have confirmed that all data entered is accurate.
Enumerator help: you can include a description of the subtest assessment procedure for the
enumerator’s benefit, or any other instruction that may not always need to be visible. This
information can be collapsed/expanded by the enumerator with one touch on a “Help” button
during data collection to avoid taking up screen space on devices. This ensures that the
information is easily accessible in case there is doubt as to how to administer the subtest and
can provide helpful reminders.
Student Dialogue: typically used to display the dialog that your data collector says to the
student/participant (i.e. the actual instructions they read out loud). The text editor is used to
bold, italicize, underline, or accent in any way a piece of information. Usually, the words that
are to be read out directly to the participants are bolded, while instructions to the enumerator
are in normal typeface.
Transition Comment: here you can add text that will appear at the bottom of the subtest
screen in Tangerine, just above the “Next” button that advances the user to the next subtest
screen. It can be used to enter reminders or further instruction, such as “Take the reading
11passage away from the student before proceeding” or “Remember to confirm that all
information on this screen is correct before pressing ‘Next.”
Preferred Font: here you can instruct Tangerine to apply (embed) a Unicode UTF-8 font of
your choosing. This is important for some languages and scripts whose characters may not be
contained within the character libraries of the tablet you are using. At present, embedded
font options include: andika, gentium, padauk, zwekabin, and rabiat. If you need support for
additional font libraries to be embeddable options, please contact RTI or your Tangerine host
provider.
Note that though some characters may display properly when viewed on a computer’s
browser, an Android tablet may not contain the same character library, and so may hide or
distort some characters – always verify your instruments’ fidelity of display on your tablets.
When pasting text into the Enumerator Help, Student Dialog or Transition comment boxes, first
click on the icon marked “Paste as plain text” in the top row of the editor, the fifth icon from
the left (see above screenshot for Student Dialog). Paste the text into the box that appears,
click “OK”, and the text will appear in the Tangerine Wizard. If you copy text directly from a rich
text program such as Microsoft Word, your copied text will likely be accompanied by additional
formatting which will distort the text in the kinds of wizards (aka “WYSIWYG’s) used by
Tangerine. This additional markup formatting may cause other errors in your instruments; if
you begin to see odd formatting or text displaying incorrectly on screens, check that your dialog
texts do not contain additional formatting by copying all text into a plain text editor (such as
Notepad or TextEdit), deleting it from the dialog box in Tangerine, and re-copying back in from
the plain text editor.
6.1 The Date and Time Subtest
This subtest is used to generate date and time variables in your data set. When this subtest
appears on the tablet screen, it will auto-populate the date and time variables with the current
settings from the tablet. Typically, data collectors should just press the “Next” button if the
data should reflect the time that the data collection actually occurred. The Date and Time page
cannot be edited beyond its title. Although there is provision for Enumerator help and
instructions, these are usually not needed. If desired, data collectors can manually adjust the
date and time which appear on the screen (e.g. such as when entering into Tangerine data
which was originally collected on paper at an earlier time/date).
The Tangerine app will pull the date and time information from the device on which it is
installed. To ensure accurate time stamps for your data, verify that the date and time is
configured properly and consistently on all of your devices prior to data collection.
126.2 The Location Subtest
The Location page allows assessment creators to customize location labels (variables) for
the country/region of data collection. You can create multiple fields for specifying your
data location sites. These are what you enter into the field labeled, ‘Geographic Levels.’ In
the example below, the labels are ‘Province’, ‘District’, ‘Name’ and ‘ID.’ The default option
for separating these fields is by the use of a comma, as indicated by the highlighted
“Comma” button. Each of these geographic level labels will be its own field for your data
collectors to enter site-specific location info:
In the field for “Location Data” you can enter the site location details for the collection points
in your sample. Once you have loaded the Geographic Levels and respective data, the data
collectors filling out this subtest in the field will be prompted to select site location details
from the list you have entered in this subtest.
6.3 The Student ID Subtest
The Student ID subtests is used to generate a unique ID code for your data record. The page
cannot be edited beyond its title. Although there is provision for Enumerator help and
instructions, these are usually not needed. Data collectors simply press the ‘Generate’ button
as shown below, then ‘Next’ to proceed, once a code has appeared in the box below ‘Random
Identifier.’
If you intend to track specific survey participants across multiple assessments, multiple
enumerators or over a span of time, it will be important for the enumerator or the participant
to retain their ID number. You cannot assign numbers ahead of time to participants, such as
“ABCDEF”, as the Tangerine system follows an algorithmic pattern to generate ID numbers. You
have two options in using this type of subtest: either click “Generate” to execute a new ID
number, or enter an ID number that has been previously created by the Tangerine system.
136.4 The Consent Subtest
The consent subtest is used to show in your data that the assessment participant or survey
responder agreed to proceed. This subtest generates a “Yes / No” question. If “Yes” is marked
as the answer, the instrument will proceed. If “No” is marked, this indicated non-consent, and
the instrument will automatically skip to its end.
At the bottom of the Subtest Editor page for Consent, you will find a box titled “Consent
prompt” - this is where you can customize the phrasing and language of the consent prompt to
the specific assessment target group (e.g., “Does Student consent?”, or “Does the Principal
consent to participate in the interview?”).
As you will see with other subtests, a similar process of filling out a “prompt” will occur. A
“prompt” in Tangerine indicates the text that will be seen by the data collector asking the
questions or collecting information from participants. Almost all of the other subtests are either
of the “survey” format (question and answer, or untimed assessment formats) or “grid” format
(timed subtests). Only one “Consent” subtest type will function properly in each instrument.
For options on additional consent cut-offs, see section 6.8.
6.5 Grid pages or Timed Subtests
Grid subtests are most commonly used for timed subtests. In addition to the standard fields
for Enumerator Help, Student Dialog and Transition Comment, there are fields and settings
unique to these timed tests that will appear in the Subtest Editor for any grid subtest
prototype.
The Variable name you choose, such as “letters”, will be the prefix added to each grid item
in your results file. In this case, each grid item (each letter) in your results file will be listed as
“letter_1”, “letter_2”, etc., based on their sequential position in the Grid items box.
In the field for “Grid Items”, simply paste in the items (letters, words, numbers) you have
selected for this subtest. Delimit each item with a single space (if you have extra space breaks
the system will remove these); Tangerine will generate grid buttons based on this spacing. For
example, if you want the equation “5+3=(8)” to appear on one grid button, enter the equation
with no spaces between its characters, adding spaces in between equations to indicate a new
14button. After entering your variable name and grid items, you can alter several configuration
settings for how your grid will look and behave:
Right-to-Left direction: This setting will reverse the default order of scoring for grid tests.
Randomize Items: will shuffle the order of your grid items for each assessment case.
Layout mode: ‘Fixed’ will stabilize the grid’s settings irrespective of the tablet’s screen
orientation, ‘Variable’ will attempt to adjust to screen optimization. ‘Fixed’ is the default and
recommended setting.
Grid font size: Medium is the default. Select “small” if you have particularly wide grids. When
testing on tablets, it is important that your users have enough blank space in the margins next
to the grid to scroll without tapping assessment items.
Capture item at specified number of seconds: This option allows you to take a
‘snapshot’ of a student’s progress at a specific time point.
Capture last item attempted: Ensures that your enumerators will be forced to indicate the
end point of the student’s progress through the grid items.
Mark entire line button: For all but the first line of grid items, if this setting is left at ‘Yes’, a
button with an asterisk “*” will appear to the right of each grid row, allowing assessors to
quickly mark incorrect an entire line of items.
Columns: Indicate in how many columns you want to display the items (for letters we usually
select 10 columns of 10 items each, for familiar words 5 columns of 10 items each);
Autostop: the number of consecutive incorrect items after which the subtest stops
automatically. The autostop calculation will only activate if the first grid item is marked
incorrect. For example, with an autostop value of 10, if a child has the first 4 items correct and
then the following 10 items incorrect, the test will not autostop. It will only autostop if the first
10 items are all incorrect.
Timer: The number of seconds you would like to allow for grid items to be attempted.
If you would like to use the grid test setup, but not the timer, set the Timer value to
zero and the “Capture last item attempted” setting to “No.”
Last Item Attempted Bracket in Timed Tests: The last item attempted by the student
is critical in marking the speed and progress of an assessment. The bracket itself is a
red outline that will be placed around the final grid item attempted. When using a
timed test, there are 3 possible scenarios for how the bracket will be placed:
1. It will be placed automatically if the test has been autostopped (if Autostop
activated). Once the final incorrect item needed to trigger the autostop has
15been selected, the screen will flash red to cue the assessor to stop the child,
and the bracket will appear over that item.
2. Time expires. The screen will flash red to cue the assessor to stop the child,
and the user will be prompted to place the bracket over the last item
attempted.
3. The assessor presses the ‘Stop’ button. This should only happen if the child
has attempted the final item of the grid (or if the test needs to be restarted
due to an error or for practice). As such, the screen will not flash red as the
assessor will know to stop the child. As the assessor should only be stopping
time when the final item has been attempted, the red bracket will
automatically appear over the final grid item.
To save your changes in the Subtest editor, click “Done,” to save and return to the Assessment
Builder, where you can then edit the next subtest or add a new page/subtest to your
assessment or go back to the Wizard home screen to run and verify your rendering work.
When you “Run” this subtest you will see a Start button and a grid of empty grey cells. The
enumerator will hit “Start” to start the timer counting backwards from 60 seconds (or
whatever time you have designated) and to see the items in the grid appear. The default result
for each grid item is “correct”. To identify an item as “incorrect”, the enumerator simply
touches whichever item was incorrect (to self-correct, they just touch the same item again to
de-select it). If a child has completed all items before the time is up, the enumerator will hit the
“Stop” button to stop the timer and for the system to record the remaining time (12 seconds in
the example below).
16The enumerator then selects the last item attempted (shown below with red border) and
then moves on to the next subtest by hitting “Next”:
17Input Mode: When an enumerator starts a grid test, the “Input Mode” shown at the bottom of
the grid is set by default to “Mark” – meaning that the enumerator is marking the test results.
When the test is stopped (either by autostop, the time running out, or by the enumerator
clicking “Stop”), the “Input Mode” switches automatically to “Last attempted” as shown by this
button’s highlighted state in the screenshot above. After the test, the enumerator can
manually switch the “Input Mode” back to “Mark” in the event that he or she needs to make
corrections onto the test results after the time has been stopped. This should only be used in
cases of an erroneous click or difficulty in marking a grid item during the timed test – it is not
recommended to have enumerators rely on this mode regularly to score their results. No
changes to test marks can be made to items positioned sequentially after the grid item marked
“Last attempted” – this is a logic built into Tangerine to avoid confusing results (i.e. item 10 is
marked as “last attempted” and item 13 is marked “incorrect”).
6.6 Survey pages (Untimed and Question and Answer Subtests)
There are two levels of editing survey pages: the “top” level identifies the survey subtest’s
name and instructions and the “lower” level involves editing the separate questions that
comprise the survey itself. To begin, click on “Add Subtest” at the bottom of the Assessment
Builder page and select an option from the ‘Survey’ category of subtest types. In the example
below, we have chosen the “Student Information” prototype, which is perhaps the most
common and generic form and can be customized to suit many types of survey needs.
18Once you have selected and named your survey type, clicking “Add” will create this subtest and
attach it to your assessment. You should now see your new survey subtest appear in the list of
subtests within your assessment. Click on the edit icon to begin adding survey questions.
You will already be familiar with the fields for “Skippable”, “Enumerator help”, “Student
Dialogue” and “Transition Comment”, which you can adjust to your needs. The other settings
fields available in the Subtest Editor are as follows:
Preferred Font: If you need to embed a specialized font not supported by a Unicode
library, you can request that the font be loaded into Tangerine (email:
contact@tangerinecentral.org ); the font name would then be entered here. At
present, the loaded fonts are: gentium, andika, padauk, zwekabin, and rabiat.
Action on Display: Command line logic for skipping an entire subtest (if entered on
Subtest Editor) or question (if entered on Question Editor). See section 6.8 for more
details.
Autostop After N Incorrect: In some instances, you might need to configure a survey-
type test instrument to stop automatically after a specified number of consecutively
incorrect responses. This option will “autostop” the subtest by skipping the remaining
questions without requiring skip logic commands entered for each question. This
feature is used in the ‘Initial Sounds’ subtest of the EGRA, shown below, which consists
of 10 survey-type questions, each of which has three response options: Correct /
Incorrect / No response. To be considered an “incorrect” response that counts towards
the consecutive errors needed to trigger this type of autostop, incorrect response
options must be assigned a value of 0 or 9.
Focus Mode: If you would prefer that your survey questions appear on the screen one
at a time (as opposed to the normal view showing the entire subtest), activate Focus
Mode. This will generate two additional buttons allowing users to move between
each survey question: Previous Question and Next Question.
Linked to grid: If your survey question subtest is tied to a grid subtest (e.g. reading
comprehension), you would then identify specific that linkage by selecting the
appropriate subtest in this drop-down menu. If your survey subtest is linked to a
grid which has been autostopped, the linked survey subtest will be skipped over
automatically.
By clicking “Add Question,” you will be taken through adding questions as per the process
outlined below. Under the “Prompt” box, you will indicate the question the enumerator will
ask the student (e.g., “What language do you speak at home?”). The “Variable name” is what
you will name your question, and which will be included in your database (e.g. s_q1 – for
student questionnaire question 1).
19Once you have added a question, you can edit it in further detail by clicking the edit button
next to the question itself. Note that, similarly to the Assessment Builder, once you have a
number of questions added in the Subtest Editor, you can drag and drop them around by
selecting, holding, and dragging the three horizontal grey bars to their left. The following
screenshot provides the view of the Question Editor, where all remaining information for each
question can be provided.
As can be seen above, the ‘high level’ data on the question has already been prefilled in the
appropriate text fields for ‘Prompt’ and ‘Variable name’. You will now add additional
information, including hints, answer formats and answer categories for non-open questions.
Note to Enumerator: This is information for the enumerator and will not be read out
to the participant as part of the question. This is helpful when answer categories are of
the Correct, Incorrect, No Response format and the enumerator is to score, and also
when you want to provide format instructions such as “Please write the answer as a
number” or “Please write the date as month-day-year”. When the answer options are
set to “correct / incorrect / no response”, we strongly advise supporting the
enumerator by providing the correct answer as a hint, e.g., for a reading
comprehension question, the question prompt may be “What is Modou's little
brother's name?”, the note provided may be “Samba”.
Skip Logic, Custom Validation, and Action on Display: These fields are used to
define conditions and rules for when your question will be skipped, and what kind
20of responses you will allow. For taking advantage of Skip Logic and the conditional
formatting fields located, see section 6.7 on Validation and Skip Display Logic.
Items attempted required on linked grid: This setting automatically determines the
feasibility of asking Reading Comprehension questions based on the number of words
attempted in the Oral Passage Reading subtests (i.e. the participant is only answering
questions related to portions of the test which he/she has attempted). The timed grid
page with short story items is typically followed with the Reading Comprehension
Subtest, which is a series of survey questions. To link the two, select the Oral Passage
Reading grid subtest from the drop down box “Linked to grid” in the Subtest Editor for
the Reading Comprehension Subtest.
To link individual questions to grid locations: For each survey question, you need to
specify the cut-off for the number of words attempted in order for each survey question
to appear. That is, provide the number of words a child will need to have attempted in
order to be presented each comprehension question. For example, imagine we are
creating survey questions, which are tied to a previous Reading Comprehension grid
whose first sentence is, “Charlie has two brothers and three dogs” and our first survey
question is “How many dogs does Charlie have?” We would only want to ask this first
question if the last item attempted on the Reading Comprehension grid is at least 7, as
“dogs” is the 7th word on that grid subtest. Enter this number in the field for “Items
attempted required on linked grid” “ in the Question Editor (see below). As noted
above, be sure to include a hint to show your enumerator what the correct response
should be:
Question Type: Next, you will want to select the answer format and type of question.
You have three options for this:
a. Single: You can present as many options as necessary; users will be allowed to
select only one response.
b. Multiple: You can present as many options as necessary; users will be allowed to
select as many responses as appropriate.
c. Open question. If you select open question, Tangerine will automatically insert a
text field underneath the question in the enumerator view for the enumerator
to type in the participant’s response. These can be accompanied by hint text in
order to help standardize response types and formats, as shown in the screen
shot below.
21For single and multiple choice questions you will need to define the answer options and
assign values to these. To do so, select the single or multiple button, and then select “Add
Option” which will generate fields for “Label” and “Value” as shown below. For each answer
option, provide the Option Label (e.g., Correct, Incorrect, No Response, English, Kiswahili,
French, etc.) depending on question, as well as the Value (e.g. “0” for Incorrect, “1” for
Correct and “99” for No Response [without quotation marks]).
Fill from template: Under the drop-down menu “Fill from template” visible in the above
screenshot, we have provided several common examples of question answer (read “option”)
types, such as Binary Agreement for “Yes / No” questions, and a “Month” template which
currently provides 12 options with month labels and sequential values. These are meant to be
illustrative and helpful but each of these can be tailored to suit your specific needs.
When scripting long surveys, break the survey down into sets of 10-15 questions and start a
new survey subtest (select e.g. the “student information” subtest from the dropdown – (see 6.6
Survey Pages) for each set of questions. Reason: Tangerine will automatically save results and
responses collected each time the Next button was hit to move from one subtest to the next.
Should the assessment get interrupted or the application freeze for whatever reason,
enumerators will be able to resume (see Completing an Assessment) on the subtest page
following the completed set of questions for which results were saved by hitting Next.
226.7 Validation and Skip Logic
When designing any subtest or survey question in Tangerine, you are presented with the option
of having that component be “Skippable.” This is represented by an option labeled, “Skippable”
with “Yes / No” buttons adjacent to this field. As noted, this option is set to “No” by default so
as to force an enumerator to validate each subtest or question before proceeding (i.e. to
validate by not allowing any unintentional or purposeful skipping of any portion of the
assessment).
In some instances, however, you may
wish to ask questions that are not
relevant for all participants. Consider an
example, “Which class were you in last
year?”, for which answer options could
be something like those presented in
the screenshot on the right, each
assigned its own value:
In order to capture further details for those who answer with “Other”, we would add a follow-
on question and use skip logic to define when it should be asked. Thus in order to capture
additional information from the example above, “What class were you in last year?” these are
the steps we would take:
1. Create a second question designed to capture details on for those who responded with
“Other”. In this case, the follow-up question is “If ‘other’ please specify:”
2. Enter a command in the Skip If field tying this question to the preceding question.
23In Tangerine, questions are identified by their variable name and answers by their
assigned values.
3. As such, in the screenshot above, we have told Tangerine to skip asking this question if
the answer to our first question, “What class were you in last year?” was not “other.”
4. Remember to set this question type to “open” so that your enumerators can freely
enter text to capture information.
5. Test out your skip logics to ensure that your enumerators are able to capture detailed
information and to ensure that they are not being required to answer questions for
which there may not be a response (e.g. forcing an open field response for “other”
when this was not the answer selected from the first question).
Example Skip Logic commands
The following are examples of texts you could enter into the “Skip If” field for questions of the
“Single” or “Multiple” type. For questions of the “Open” type, please see the section below on
Custom Validation. Note that you can enter more than one piece of logic for each question by
using the “or” command to tie your question to more than one answer or more than one
previous question. For each answer or question you want to incorporate into your skip logic,
you will need to repeat the “ResultOf…” command in order to have Tangerine recognize your
instruction.
In the following examples, the variables are those inside the parentheses (e.g. "ht_13"), and
the response option values are those outside of the parentheses (e.g. "4"). Each of these
command scripts would be entered into ‘Skip If’ field, with the spacing exactly as shown:
For Skip Logic responding to “single” type questions:
ResultOfQuestion("ht_13 ") is "12" or ResultOfQuestion("ht_13 ") is "4 "
ResultOfQuestion("ht_4 ") isnt "2"
24For Skip Logic responding to “multiple” type questions:
"5" in ResultOfMultiple("t_13") or "4" in ResultOfMultiple("t_13")
not ("2" in ResultOfMultiple("m_fav")) and not ("1" in ResultOfMultiple("m_fav"))
For Skip Logic responding to questions on previous Sub-tests:
ResultOfPrevious("ht_1") is "1" or ResultOfPrevious("ht_2") is "2"
ResultOfPrevious("ht_5") is "2" and ResultOfPrevious("ht_6") is "0"
ResultOfPrevious("ht_1") isnt "3"
For Skip logic responding to a range of acceptable answers in Open questions:
parseInt(ResultOfPrevious("s_8" ) ) < 10 (for connecting to a variable from a previous subtest)
parseInt(ResultOfQuestion("s_8" ) ) < 10 (for connecting to a variable from the same subtest)
For additional examples, please see Appendix 5 - Sample Skip Logic Commands.
Please Note: If you are having trouble configuring your skip logics but still wish to capture
follow-up information, you might consider switching the “Skippable” default from “No” to
“Yes.” Making any subtest or question “Skippable” can provide ample opportunity for your
enumerators to collect information; however there are risks associated with this as you might
not know if your enumerators skipped questions because they were not relevant to the
participants or if they simply made a mistake in their data collection.
The Skip Logic commands used in Tangerine are case-sensitive and space-sensitive.
Therefore, you must type precisely the name of the variables which you want to reference,
and you must pay attention to the capital and lower-case letters of all portions of your
commands. Similarly, the quotation marks used in your commands cannot be “hooked” but
should be straight up and down, such as in the examples above. You can write skip logic
commands using either “is” or “isnt” – where possible, try to use commands that use “isnt” as
these questions will only appear once the response option they depend on is selected.
Commands using “is” will result in follow-up questions that initially appear on the screen but
only disappear when the response option(s) they depend on is not selected.
25Custom Validation
For “open” type questions, which provide a text box for enumerators to type in their responses,
Tangerine provides you some control over the range of responses you will accept. To include
Custom Validation for an open question, find the box below in the Question Editor:
In the above example, the text entered into the “Valid when” field is written to ensure that
enumerators are only allowed to enter numerical values of a certain range (i.e. no written
words like, “three” and no numbers outside of the range are allowed). The “Error message”
field is the text that will be shown to your enumerator should he or she enter characters
that do not satisfy the validation requirements.
You can also specify text strings as allowable answers in open fields. Here are some additional
examples for the Valid when field:
@answer > 0 and @answer < 50 or @answer == "0" or @answer == "NA"
@answer > 50 and @answer < 100 or @answer == "refused"
@answer.length is 3
Note that any text string which is identified as allowable is case-sensitive. Applied to the above
examples, responses of “Refused” or “na” would not be accepted by the software, as the
custom validation has been set to allow “refused” and “NA”.
“Save” regularly by pressing ‘Done’ to avoid losing your work, and before adding another
answer option or going “Back” to the Subtest Editor with the list of questions you have already
added for this page of your assessment.
266.8 Subtest Skip Logic and ‘Action on Display’
Tangerine can be configured to deliver more sophisticated survey flows, including
automatically skipping entire subtests, automatic survey early stop logic, and dynamic
question prompts.
These settings make use of CoffeeScript and, to be used beyond the examples below, may
require some programming expertise to fully utilize. The examples and in the Sample Skip
Logic table found in the Appendix, however, are basic enough to be copy-pasted and edited to
fit other surveys, and can tremendously cut down on enumerator error and interview times. In
the Tangerine Wizard, there are two places to enter this script; the “Action on Display” (AOD)
field that can be found on both the Subtest Editor and the Question Editor screens.
Automatically skipping entire subtests
To skip an entire subtest based on the results of a previous question, you will need to know the
variable name of the “independent question”, and the data value of the “independent answer”
– both of which will be located in a prior subtest of your assessment. In the example below, the
subtest is skipped when the answer option value was 0 in variable B28. This AOD script would
go into the AOD field on subtest level (recall that commands are case- and space-sensitive):
@skip() if ResultOfPrevious("B28") is "0"
Assume the subtest we want to skip contains several questions about a student’s classroom
experience. Assume B28 refers to the question “Are currently going to school?”, where answer
options are “Yes”, with data value “1”, or “No” with a data value of “0”. The above skip logic,
entered into the ‘Action on Display’ field of the Subtest Editor, would skip the entire subtest
with the classroom questions for students who answered “No” (when data value was “0”, in
B28).
The inverse operation can also be applied, that is, the subtest is skipped for any answer option
chosen – except for the one with data value 0:
@skip() if ResultOfPrevious("B28") isnt "0"
Other examples include:
@skip() if ResultOfPrevious("age") > 5
In this scenario, the variable “age” refers to the age of the child. The data value “5” can either
be a simple number entry in an open question format, or a selected age from answer options
provided for, say, ages 0-10. This would skip the entire subtest if the child is older than 5.
27Dual-condition statements are also possible, e.g.:
@skip() if ResultOfPrevious("B28") ) is "0" or ResultOfPrevious("age") ) < 7
In this case the subtest could be skipped for two reasons: first, if, using our examples from
above, the child is not going to school (B28=0), or if the child is below the age of 7 (ageSubsequent questions can be personalized by customizing the following script into the Action
on Display (AOD) field for every applicable question. Assume one of the next questions is
about the age of the girl. Then the prompt for the question in the Tangerine Wizard may read
“What is the age of [girl’s name]?”, and the following should be inserted into the AOD field of
this same question:
@setPrompt “What is the age of #{ResultOfPrevious("name")}?”
Remember, if the dynamic question is referring to an earlier question from within the
subtest use the command “ResultOfQuestion.” If the command is referring to a question
from a separate subtest, use the command “ResultOfPrevious”. When conducting the
interview on the tablet, Tangerine will automatically pull the entry that was made for the
question with variable “name”, and plug it into the above question prompt for the
enumerator to read out: “What is the age of Ana?” Note that the AOD command will
replace any other text you have entered into the ‘Prompt’ field.
In another example, we may ask about the grade level the girl is in. In the Tangerine Wizard, the
prompt for the question may read “What grade level is [girl’s name] enrolled in?”, and the AOD
script for this question would read:
@setPrompt “What grade level is #{ResultOfPrevious("name")} enrolled in?”
Using the above example when conducting the interview, the enumerator would
automatically see the question prompt as “What grade level is Ana enrolled in?”
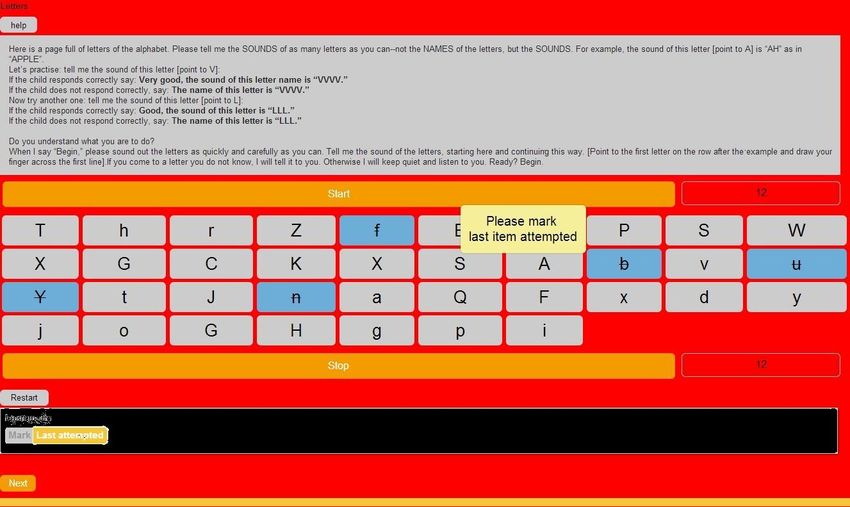
6.9 Randomizing Subtests
In certain circumstances you may wish to
consider randomizing some or all of the
subtests in your assessment. This can be
helpful in trying to minimize the order
(fatigue) effects of having assessment
subtests consistently appear in the same
order. Tangerine automatically assigns a
number to each of your subtests, based on its
order in your Assessment Builder page. As
you can see in the example to the right, the
numbering starts at zero from the top of the
list of subtests and sequences down the list,
with numbers appearing below “Random
Sequences:
29In this example, “Test Survey” = 0, “Date and Time” = 1, and “Consent” =2. In order to
randomize the order of appearance for these three subtests, enter all of the possible sequences
for these components into the text box appearing just below the list of subtests. In this
example, to randomize subtests 0, 1, and 2, we would enter into the text box all of the possible
variations for this sequence, namely:
0, 1, 2
0, 2, 1
1, 0, 2
1, 2, 0
2, 0, 1
2, 1, 0
Tangerine will cycle through the order of subtests as your enumerator performs assessments.
If you are working with long lists of subtests, consider visiting www.random.org to have that
website generate random integer sequences for you, tailored to your needs in Tangerine.
Verify that your assessment is randomizing properly by running through several assessments.
7. Duplicating and Deleting Assessments
To create a copy of an existing assessment, e.g., when conducting a mid-term assessment using
the same instrument as for the Baseline, the quickest way is to use the “Duplicate” function for
the specific assessment in the Tangerine Wizard home screen. While at the home page, click
the orange arrow next to the assessment you want to duplicate, and then hit “Duplicate”
A second assessment will appear titled “Copy of…” and the name of the assessment
duplicated (but with a different Download Key). You can now edit the new assessment, change
its name, and keep it as a separate assessment (with a separate database) without having to
create a new assessment from scratch.
Please Note: If you have already loaded instruments onto your devices and then use the
Wizard to create additional questions and subtests, you should always create a duplicate
assessment and add your new questions and subtests there. Once you have made your edits,
re-load your devices with the updated duplicate version so as to ensure a fresh data file for
your results.
30You can also read