HOW TO BUILD AND INSTALL A C# APPLICATION - BUSINESS LOGIC TRANSFORMATION ENGINE TRANSACTIONAL C#.NET 2.0
←
→
Page content transcription
If your browser does not render page correctly, please read the page content below
HOW TO BUILD AND
     INSTALL A C#
     APPLICATION

BUSINESS LOGIC TRANSFORMATION
ENGINE TRANSACTIONAL C#.NET 2.0

                       Last update: March 2008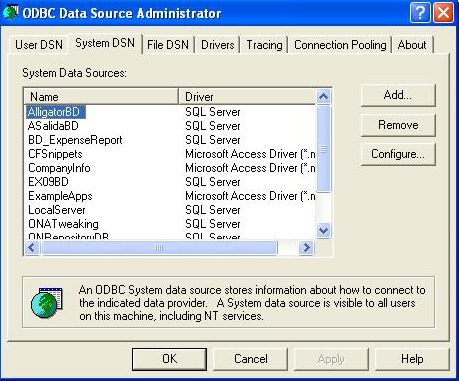
Build and Install a C# application BLT_TRCS2

Table of Contents

1 DOCUMENT PURPOSE_______________________________________________________2
 1.1 WHAT IS THE PURPOSE OF THIS DOCUMENT _______________________________________2
 1.2 PREREQUISITES ______________________________________________________________2
 1.3 STEPS TO BUILD _____________________________________________________________2
   1.3.1 Adding a C# client_____________________________________________________2
   1.3.2 Building the Server ____________________________________________________3
   1.3.3 Generating the Strong Name __________________________________________5
 1.4 STEPS TO PUT INTO PRODUCTION _______________________________________________6
   1.4.1 Create Database and ODBC____________________________________________6
   1.4.2 Registering the Server_________________________________________________8
   1.4.3 Set an identity to the COM+ ___________________________________________9
   1.4.4 Create a Proxy of the application _____________________________________10
 1.5 EXECUTION PROBLEMS _______________________________________________________12
   1.5.1 Problems with XP SP2 or Windows 2003 and Transactions ____________12

                           © Integranova, S.A. 2011                                    1
Build and Install a C# application BLT_TRCS2

1 Document purpose

1.1 What is the purpose of this document
This document explains how to install and put in production a C# generated application.

1.2 Prerequisites
The prerequisites to run a C# generated server are:

       1. Operative System: Windows XP. Windows NT or Windows 2000 SP4 Rollup 1
       2. MSXML 3.5 or MSXML 4.0 (recommended).
       3. Microsoft: NET Framework 2.0.

1.3 Steps to Build
After receiving the server file from the STAR system the very first step is to decompress it
in the correct directory.
Now we can open the solution in Visual Studio .NET. Before we can compile the server, we
have   to  implement    every     user   function   that   there   is in    the   model
(Others\ONUserFunctions.CS).

1.3.1 Adding a C# client
Additionally, if we have the client application in C#, we can add it to the same solution, so
that it is possible to run the client and debug the server. Right-click the solution in the
Solution Explorer and choose Add, or choose Add Project in the File menu, and then click
Existing Project. Select the client project file (.csproj) in the dialog box. Now the Solution
Explorer displays both projects. Right-click the client project in the Solution Explorer and
select the Set as Start Up Project from the context menu. Take note that the client project
appears in bold text and the server project appears in normal text.

                                  © Integranova, S.A. 2011                                       2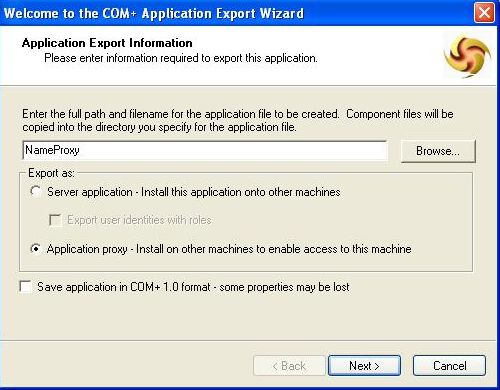
Build and Install a C# application BLT_TRCS2

                                   Figure 1 Solution Explorer

1.3.2 Building the Server
For versions from BLT_TRCS2 1.0.3.4 to 1.1.3.5 the XML_Listener component declares the
isolation level, which is supported only under COM+ version 1.5, so if the application is
built to be run under a Windows 2000 or COM+ 1.0 is needed to check whether is declared
and delete it before building the application.
To check it, open the file XML_Listener.cs in the XML folder, and look for the line

[Transaction(TransactionOption.Supported,                          Isolation                   =
TransactionIsolationLevel.Any)]

and change it for:

[Transaction(TransactionOption.Supported]

                                  © Integranova, S.A. 2011                                         3
Build and Install a C# application BLT_TRCS2
Now it is possible to build the application. Click Configuration Manager in the Build menu
and choose one of the two modes, Release or Debug in the Active Solution Configuration
List.
The server is generated in the directory FolderServer\bin\Debug for the debug version,
and FolderServer\bin\Release for the release version (where FolderServer is the folder
where the server is installed).
Figure 2 Configuration Manager
Once the build mode is selected, the next step is to generate the .dll of the server. Open
the project, choose the generation menu and press the “generate project” option.
© Integranova, S.A. 2011 4Build and Install a C# application BLT_TRCS2
Figure 3 Build menu
1.3.3 Generating the Strong Name
Assemblies are the main part of programming with the .NET Framework. An assembly
performs several functions: version control, reuse, activation scooping, security
permissions, etc. An assembly provides the common language runtime with the
information it needs to be aware of type implementations.
A strong name consists of the assembly’s identifier. So if we want to take advantage of its
features, we can use the script GenerateStrongName.bat in the Script directory, which
signs the assembly with the strong name.
This script calls to the sn.exe tool, so in order to ensure the correct execution we have to
check if the directory of this utility is in the system PATH variable. If is not, follow these
steps to set the new path:
1- Right-click on My Computer desktop icon.
2- Select Properties in the context menu.
3- Click on the Advanced tab.
4- In System Variables select the Path entry and click Edit.
5- Scroll to the end of the Variable Value text, add a semi-colon and enter the complete
path of one of the utilities (For example:
“;C:\WINDOWS\Microsoft.NET\Framework\v2.0.50727”). (If you don’t know the path
of the sn.exe file, use the Windows Find File utility).
6- Click Ok until you exit all dialogues.
© Integranova, S.A. 2011 5Build and Install a C# application BLT_TRCS2
Figure 4 Setting environment variable: Path
This script should not be run under a UNC path (exp. \\volume\server\scripts), so in order
to execute it correctly the network drive or folder must be mapped to a drive letter in
Windows (exp. G:\volume\server\scritps).
1.4 Steps to put into production
1.4.1 Create Database and ODBC
In order to save and load data it is needed to create the database in the chosen
management system. Then use the scripts, in the Scripts directory from the server, to
create the tables, primary and foreign keys and the indexes.
© Integranova, S.A. 2011 6Build and Install a C# application BLT_TRCS2
Figure 5 Scripts folder
The next step is to create the ODBC (in case the ODBC is the database connection type
selected) by selecting the database and with the name written in the ODBC Name field of
the STAR client.
© Integranova, S.A. 2011 7Build and Install a C# application BLT_TRCS2
Figure 6 ODBC configuration
1.4.2 Registering the Server
We need to register the Server in the GAC (Global Assembly Cache) and in COM+ before
we can work with it. In the Scripts directory we have scripts to register and un-register
the server, both for Release and for Debug. Also in these scripts some system registry
tools (gacutil.exe and regsvcs.exe) are called, so we have to follow the same steps above
to set the paths of these tools if they are not already set.
rem Register in Global Assembly Cache
gacutil.exe /u Project
gacutil.exe /i ..\bin\Release\Project.dll
rem Register in COM+
RegSvcs.exe ..\bin\Release\Project.dll Project ..\bin\Release\Project.tlb
If the folders that has the commands is not in the environment variables, it is necessary to
add them either to the environment variables or to the script, or execute them manually.
Choose “Execute...” in the Start menu and execute the command “cmd”.
When the console appears execute these instructions:
“folder\gacutil.exe” /u Project
“folder\gacutil.exe” /i ..\bin\Release\Project.dll
“folder\RegSvcs.exe” ..\bin\Release\Project.dll Project ..\bin\Release\Project.tlb
© Integranova, S.A. 2011 8Build and Install a C# application BLT_TRCS2
“Folder” is the folder that contains the command (Use the search option to look for this
folder). Normally the commands are situated in different folders. Project is the Name of
the Project that has been created.
The gacutil.exe application is installed within the .NET Framework SDK, so if it is not
installed in the machine, the gacutil lines in the script can be commented adding the word
rem in the beginning.
rem Register in Global Assembly Cache
rem gacutil.exe /u Project
rem gacutil.exe /i ..\bin\Release\Project.dll
rem Register in COM+
RegSvcs.exe ..\bin\Release\Project.dll Project ..\bin\Release\Project.tlb
Nevertheless there are three more ways to register the server into the Global Assembly
Cache (for more information:
http://msdn2.microsoft.com/en-us/library/dkkx7f79(VS.80).aspx):
Using Microsoft Windows Installer 2.0.
Using a Windows shell extension called the Assembly Cache Viewer (Shfusion.dll).
Using the .NET Framework Configuration Tool (Mscorcfg.msc)
After all these steps, you are able to execute the server or any other application that calls
to this server.
1.4.3 Set an identity to the COM+
When we put the Business Logic in production we need to assign an identity to the COM+
component to be able to access the other resources like Databases, the File System ... To
achieve this, we have to define this identity, this is set on the shape of user name and
password, in the following window:
© Integranova, S.A. 2011 9Build and Install a C# application BLT_TRCS2
Figure 7 COM+ identity configuration
Once it has been set, every time the Presentation layer calls the Business logic layer,
COM+ will check out the user account above indicated to allow access to the resources.
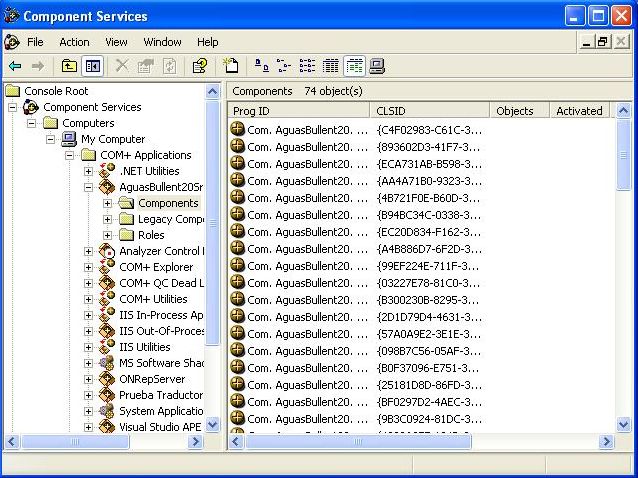
1.4.4 Create a Proxy of the application
It is possible to access to the server side from other computer, in this case is necessary to
create a proxy. Access to Component Services in the Control Panel.
© Integranova, S.A. 2011 10Build and Install a C# application BLT_TRCS2
Figure 8 Component services
Right click on the application to create the proxy and select Export...
© Integranova, S.A. 2011 11Build and Install a C# application BLT_TRCS2
Figure 9 Proxy creation Wizard
Select the folder and write the name of the proxy and select the option Application Proxy.
To access to the application install the proxy created in the computer, this will enable the
possibility to connect remotely. To be able to connect to the Server via a proxy is
important that the current system user have the right permissions.
1.5 Execution problems
1.5.1 Problems with XP SP2 or Windows 2003 and
Transactions
When you install Windows XP SP2 or Widows 2003 Server, all network MSDTC will be
disabled, even if network transactions had been previously enabled. This means that if you
are using COM+ or Enterprise Services to flow transactions from or into the box, you will
need to follow the steps defined below to re-enable your scenarios.
To test if it is going successfully, you can execute the DTCTester application.
This test is successfully…
C:\>DTCTester Prueba sa sa
© Integranova, S.A. 2011 12Build and Install a C# application BLT_TRCS2
Executed: dtctester
DSN: prueba
User Name: jjorge
Password is assumed to be NULL.
Connecting to the database
tablename= #dtc19307
Creating Temp Table for Testing: #dtc19307
Warning: No Columns in Result Set From Executing: 'create table #dtc19307
(ival int)'
Initializing DTC
Beginning DTC Transaction
Enlisting Connection in Transaction
Executing SQL Statement in DTC Transaction
Inserting into Temp...insert into #dtc19307 values (1)
Warning: No Columns in Result Set From Executing: 'insert into #dtc19307
values (1) '
Verifying Insert into Temp...select * from #dtc19307 (should be 1): 1
Press enter to commit transaction.
Commiting DTC Transaction
Releasing DTC Interface Pointers
Successfully Released pTransaction Pointer.
Disconnecting from Database and Cleaning up Handles
Step 1: Changing the Register
The DTC uses RPC when communicating between processes on different systems. So in
order to enable the communication between the server and data base systems is needed
to enable the RPC (Remote Procedure Call) in the Registry
(http://technet2.microsoft.com/WindowsServer/en/Library/8836be57-597b-4cda-bcf1-
eb124ae5d49a1033.mspx,
http://www.microsoft.com/technet/prodtechnol/winxppro/es/maintain/sp2netwk.mspx#EH
AA, http://support.microsoft.com/kb/841893/es).
To activate this service, in the Server system you have to enable RPC calls to use
authentication
(http://msdn.microsoft.com/security/productinfo/XPSP2/networkprotection/enable_authep
_resolution_devimp.aspx):
1. Run regedit.exe
2. Open the HKEY_LOCAL_MACHINE\SOFTWARE\Policies\Microsoft\
Windows NT folder in the left tree.
3. Create a RPC key if it does not exist.
4. Create two DWORD values in the RPC folder:
a. EnableAuthEpResolution with the 1 value.
© Integranova, S.A. 2011 13Build and Install a C# application BLT_TRCS2
Figure 10 Registry EnableAuthEpResolucion value edition
And in the data base system you have to:
1. Run regedit.exe
2. Open the HKEY_LOCAL_MACHINE\SOFTWARE\Policies\Microsoft\
Windows NT folder in the left tree.
3. Create a RPC key if it does not exist.
4. Create two DWORD values in the RPC folder:
b. RestrictRemoteClients with the 0 value.
© Integranova, S.A. 2011 14Build and Install a C# application BLT_TRCS2
Figure 11 Registry RestricRemoteClients value edition
Step 2: Changing the configuration of COM+
The second step is to enable network transactions in the Security Configuration dialog for
MSDTC (http://support.microsoft.com/?kbid=899191#XSLTH4153121124120121120120 ,
http://www.microsoft.com/technet/prodtechnol/winxppro/es/maintain/sp2otech.mspx#EC
AA).
In the Server system witch makes the calls to the database system you have to:
1. Open the Control Panel\Administrative tools\Component Services.
2. Select Component Services\Computers\My Computer in the left tree.
3. Right-click and choose Properties.
4. On the MSDTC tab, press Security Configuration... button.
5. Select Network DTC Access
6. Select Allow Outbound checkboxes.
7. Select the radio button No Authentication Required.
© Integranova, S.A. 2011 15Build and Install a C# application BLT_TRCS2
Figure 12 Server system MSDTC configuration
And in the database system you have to:
1. Open the Control Panel\Administrative tools\Component Services.
2. Select Component Services\Computers\My Computer in the left tree.
3. Right-click and choose Properties.
4. On the MSDTC tab, press Security Configuration... button.
5. Select Network DTC Access
6. Select Allow Inbounds checkboxes.
7. Select the radio button No Authentication Required.
© Integranova, S.A. 2011 16Build and Install a C# application BLT_TRCS2
Figure 13 Database system MSDTC configuration
Step 3: Enabling network transactions through Firewall
The third step is to enable network transactions pass through firewall. By default, after
installing XP SP2, the Windows Firewall will be on.
DTC uses Remote Procedure Call (RPC) dynamic port allocation. By default, RPC dynamic
port allocation randomly selects port numbers above 1024. By modifying the registry, you
can control which ports RPC dynamically allocates for incoming communication. You can
then configure your firewall to confine incoming external communication to only those
ports and port 135 (the RPC Endpoint Mapper port).
You must provide one incoming dynamic port for DTC. You may need to provide additional
incoming dynamic ports for other subsystems that rely on RPC.
Follow these steps to control RPC dynamic port allocation. You will have to do this on both
computers. Note also that the firewall must be opened in both directions for the specified
ports (http://support.microsoft.com/default.aspx?scid=kb;en-us;250367):
1. Click Start, click Run, type regedt32, and then click OK. This will star de
Registry Editor.
2. In Registry Editor, click HKEY_LOCAL_MACHINE in the Local Machine
window.
3. Expand the tree by double-clicking the folders named in the following path:
HKEY_LOCAL_MACHINE\Software\Microsoft\Rpc
© Integranova, S.A. 2011 17Build and Install a C# application BLT_TRCS2
4. Click the RPC folder, and then click Add Key on the Edit menu.
5. In the Add Key dialog box, in the Key Name box, type Internet, and then
click OK.
6. Click the Internet folder, and then click Add Value of type REG_MULTI_SZ
on the Edit menu.
7. In the Add Value dialog box, in the Value Name box, type Ports.
8. In the Multi-String Editor dialog box, in the Data box, specify the port or ports
you want RPC to use for dynamic port allocation, and then click OK. (Microsoft
recommends that you open up ports from 5000 and up, and that you open a
minimum of 15 to 20 ports, so write 5000-5020).
9. Follow steps 6 through 8 to add another key for Internet, by using the
following values (This signifies that the ports listed under the Ports value are
to be made Internet-available):
Value: PortsInternetAvailable
Data Type: REG_SZ
Data: Y
10. Follow steps 6 through 8 to add another key for Internet, by using the
following values (This signifies that RPC should dynamically assign ports from
the list of Internet ports):
Value: UseInternetPorts
Data Type: REG_SZ
Data: Y
11. Now configure your firewall to allow incoming access to the specified dynamic
ports and to port 135 (the RPC Endpoint Mapper port).
© Integranova, S.A. 2011 18Build and Install a C# application BLT_TRCS2
Figure 14 Network Transactions Registry configuration
Step 4: Enabling DTC
The fourth step, after checking if the current user system has the right permissions to
access the server through COM+ or proxy and also permissions to access the database, is
to enable the DTC coordinator. By default, it is disenabled, and you need to start.
To start the DTD you need to:
1. Double click the button in the taskbar
2. Select Distributed Transaction Coordinator in the Services combo.
3. Press Start/Continue button
© Integranova, S.A. 2011 19Build and Install a C# application BLT_TRCS2
Figure 15 SQL Server DTC service activation
Step 5: Restarting the computer
After modify all these things it is recommended to restart the computer.
© Integranova, S.A. 2011 20You can also read