How to Paint Furniture - 19 Upcycled Furniture Projects CHALKY FINISH
←
→
Page content transcription
If your browser does not render page correctly, please read the page content below
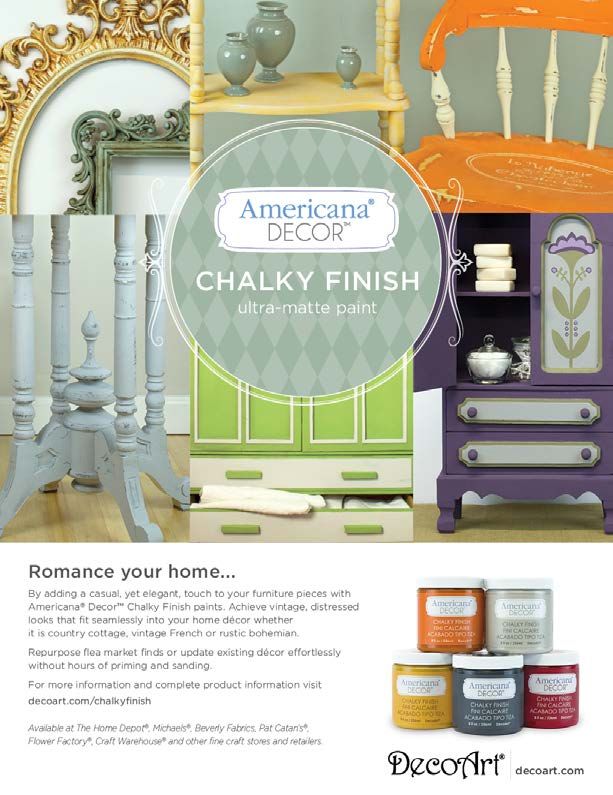
How to Paint Furniture

       19 Upcycled
     Furniture Projects
           featuring
       Mark Montano &

       CHALKY FINISH
        ultra-matte paint

                            1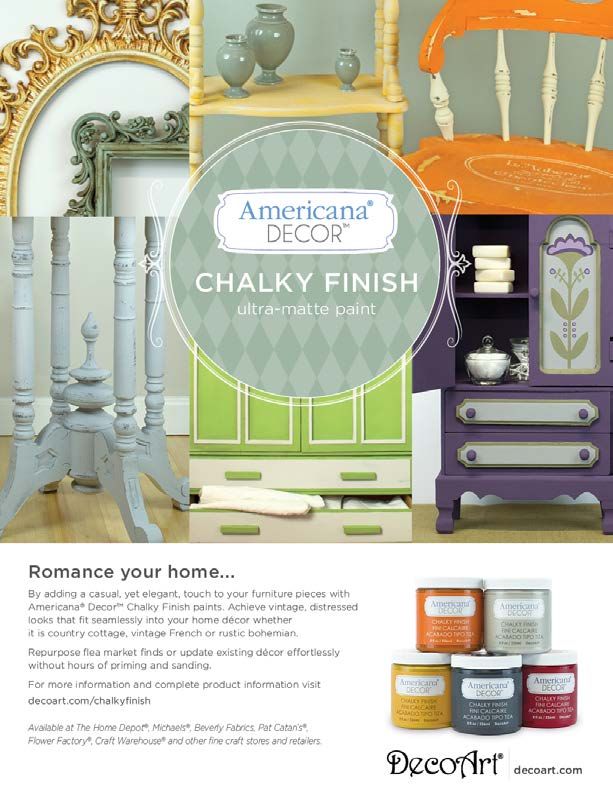
Letter from Stan Clifford, DecoArt’s CEO and President

I want to invite you to learn more about the newest member of the DecoArt product family,
Americana Decor Chalky Finish Ultra-Matte Paint. We took more than a year to carefully
formulate Chalky Finish paint to offer you the highest possible quality chalk paint available.

We know there are many paints available in the store for you to choose from for finishing
furniture pieces or decorative items. So why choose Americana Décor Chalky Finish Paints?
Because they are the easiest product to use to achieve a distressed, shabby chic look with any
flea market find or even newly bought discount store items. Creating that beautiful, vintage
European look doesn’t take a lot of special skills or hours of training. By the time you finish
reading this eBook, you will be the flea market find refurbishing expert in your neighborhood,
and visitors to your home will want to know where you curated all of your unique pieces.

THE PAINTS
Americana Decor Chalky Finish Paints are specially formulated to provide excellent adhesion
to wood, metal, laminate, decorative glass, terra cotta, ceramics, and more. There’s no need to
prep the surface with time-consuming stripping or sanding…you just clean it and go!

•   No prep: No priming or prep needed (Unless the surface has an old finish that may bleed
    when painted; then Stain Blocker should be used before painting.)
•   Excellent coverage: One-coat coverage with most colors and on most surfaces
•   Very matte, chalky finish
•   Durable: Due to the unique cross-linking feature of the paint resin system
•   Easily distresses for a vintage appearance
•   Can be buffed to a smooth, shiny finish
•   Water-based for easy clean-up

Besides the paint, available in 29 intermixable colors, the line also includes waxes, varnishes,
brushes, stencils, stain blocker, as well as image transfer and crackle mediums.

Thank you for taking the time to learn more about our Americana Decor Chalky Finish products.
We hope the projects in this eBook will inspire you. We would love to see what you create.
Share your pictures with us by tagging us through our social media channels or emailing us.

Stan Clifford

                                                             Connect with DecoArt®

                                                                  Follow DecoArt® on Pinterest

                                                                  Like DecoArt on Facebook

                                                                  Follow DecoArt on Twitter

                                                                  Follow DecoArt on Instagram

                                                                                                   2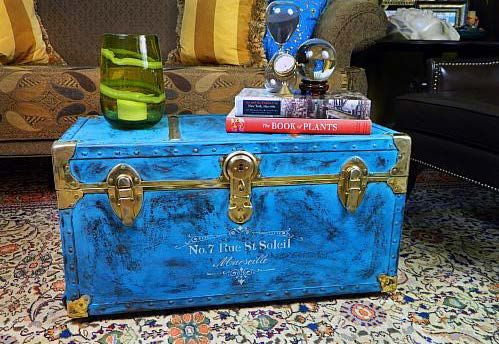
How to Paint Furniture:
19 Upcycled Furniture Projects from DecoArt®

Table of Contents

Why Use Chalky Finish?..................................................................................... 5

Chalky Finish in Three Easy Steps.................................................................... 6

PROJECTS
Treasured Dining Table - Mark Montano for DecoArt................................................. 9

Thrifty Chevron Bookcase - Katie Cleveland for DecoArt..........................................11

Gorgeous Side Table - PLA Schneider for DecoArt................................................... 13

Fancy Bulletin Board - PLA Schneider for DecoArt....................................................15

Distressed Decoupaged Cabinet - Alison Craig for DecoArt................................... 17

Vintage Numbered Tray - Alison Craig for DecoArt................................................. 19

Must-Make French Chair - Alison Craig for DecoArt................................................. 22

Blue Ombre Whale Dresser - PLA Schneider for DecoArt......................................... 24

Outstanding Stationery Box - Katie Blevins for DecoArt.......................................... 26

Simple but Striking Modern Breadbox - Alison Craig for DecoArt.......................... 29

Stylish Planting Shelf - Mark Montano for DecoArt................................................... 32

Farmhouse Cupboard - Linda Dresselhaus for DecoArt.............................................. 35

Perfect Storage Shelf - Katie Blevins for DecoArt..................................................... 37

Boho Bangles - Mark Montano for DecoArt.............................................................. 39

Amore Oval & Rectangular Frames - Alison Craig & Micaela Spiggle for DecoArt ....... 42

Irresistible Telephone Table - Margot Potter for DecoArt.......................................... 44

Tropical Teal Shimmery Dresser - Margot Potter for DecoArt................................... 46

Beautiful Coffee Table - Mark Montano for DecoArt................................................ 48

French Country Kitchen Stool - Mark Montano for DecoArt.................................... 51

Product Descriptions....................................................................................... 53

                                                                                                                 3
Why Use Chalky Finish?

Get the trendy, ultra-matte look and easily refurbish flea market finds
 with Americana Decor® Chalky Finish paint. From boho to shabby
  chic cottage to contemporary, Americana Decor® Chalky Finish is
  versatile enough to achieve all looks. Layer paints, tint waxes, and
 more to customize a piece that would have otherwise been headed to
the curb. It is also easy to use. No prep is needed, and the paint flows
 on almost any surface with excellent coverage, distresses easily, and
             produces-professional looking results every time.

                                                                           4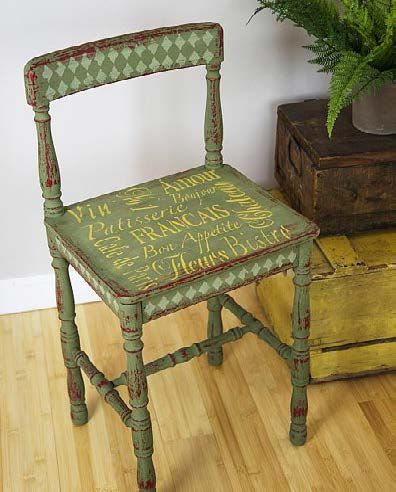
Chalky Finish in 3 Simple Steps
STEP 1 - PREP:
1.     Thoroughly clean the project’s surface.
2. Is it a flea market find or an older piece?
   You never really know what might be hidden on the surface of the piece. There are many different stains
   and oils that may have been applied or naturally accumulated on the surface over the years (such as
   kitchen grease on cabinets or tables). In addition, some surfaces may have finishes that have worn
   away or contain deep scratches, which may expose old stains or natural tannins found in many types
   of wood. These unforeseen surface conditions can interfere with the performance and appearance of
   Americana Decor® Chalky Finish paint, waxes and varnishes. To prevent natural tannins, stains, oils, and
   other unknowns from penetrating and bleeding through the newly-painted surface, we recommend
   applying one or two basecoats of Americana Decor® Stain Blocker prior to painting for best results.

STEP 2 - PAINT:

1.     Choose a color. Americana Decor®                                                      Timeless
                                                   Everlasting   Lace          Whisper
       Chalky Finish paints are available in 29    ADC01         ADC02         ADC03         ADC04
       intermixable designer colors.
2. Choose a brush and apply. Most colors
   only require one coat for coverage.
                                                   Innocence     Romance       Rouge         Smitten
                                                   ADC05         ADC06         ADC07         ADC08

                                                   Heritage      Cameo         Delicate       Inheritance
                                                   ADC09         ADC10         ADC11          ADC12

                                                   Refreshing    New Life      Fortune        Enchanted
                                                   ADC13         ADC14         ADC15          ADC16

     Option 1: Americana Decor® Brushes -
     The high quality synthetic bristles result
     in a smoother, finished appearance. . . or
                                                   Vintage       Serene        Treasure       Escape
     dampening brush before painting will also     ADC17         ADC18         ADC19          ADC20
     deliver a smoother finish.

     Option 2: Inexpensive Chip Brush - The
     natural rough hog bristles result in a more
                                                   Legacy        Promise       Remembrance    Heirloom
     textured/weather-finished appearance.         ADC21         ADC22         ADC23          ADC24

3. Leave finish as is, or it can be buffed to a
   satin or glossy sheen.
4. Apply a decorative technique: Many              Rustic        Primitive     Yesteryear    Relic
   techniques can be applied depending on          ADC25         ADC26         ADC27         ADC28

   the desired look (see page 8 for details).
•      Distressed Finished Technique
•      Layered Color Technique                                                               Carbon
                                                                                             ADC29
•      Dry Brush Technique

                                                                                                            5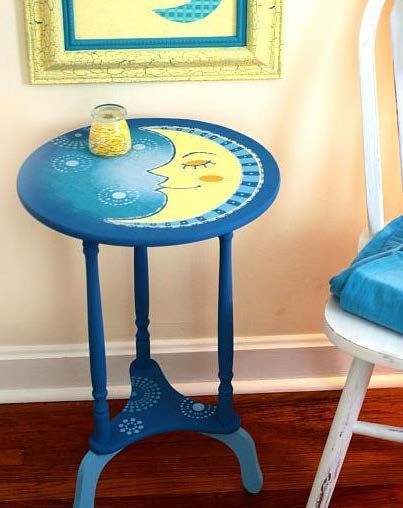
STEP 3 - FINISH:
Should I use Crème Waxes or Varnishes?
Use one of the Americana Decor® Chalky Finish Varnishes if the piece is going outside or you want one of the
following finishes: Soft-Touch, Ultra-Matte, or Light Satin.

 Soft-Touch Varnish delivers a luxuriously soft, yet
 durable, polyurethane finish. The Light Satin offers
 just a hint of sheen, and the Ultra-Matte delivers a
 zero-sheen, no-glare finish.

 Tips When Using Varnishes:

 •   Outdoor Use: Always use a varnish for outdoor
     pieces. Simply brush two to three coats of desired
     varnish directly over dry Chalky Finish paint.
 •   Indoor Use: Use either wax or varnish.                 Crème Waxes - Available in Clear, Golden
                                                            Brown, or Deep Brown. Our water-based waxes
                                                            are available in three shades and have a creamy
                                                            consistency unlike other solid waxes on the
                                                            market. Due to the porous nature of Americana
                                                            Decor® Chalky Finish paints, our Crème
                                                            Waxes literally fuse with the paint to provide a
                                                            super-strong layer of protection against daily
                                                            use. Waxes offer a greater range of finishing
                                                            options than varnishes. However, be sure to
                                                            use an Americana Decor® Varnish for outdoor
                                                            pieces.

                                                            Tips When Using the Crème Waxes:

                                                            •   Layer tinted waxes over Clear Wax for more
                                                                control of the color.
                                                            •   Apply with the waxing brush or a lint-free
                                                                cloth.
                                                            •   Buff to a high-gloss sheen or leave it matte.
                                                            •   To achieve a washed look, Clear Crème Wax
                                                                can be tinted with a color before applying.

      •   Find more information about DecoArt products by visiting the Product Description page.

                                                                                                             6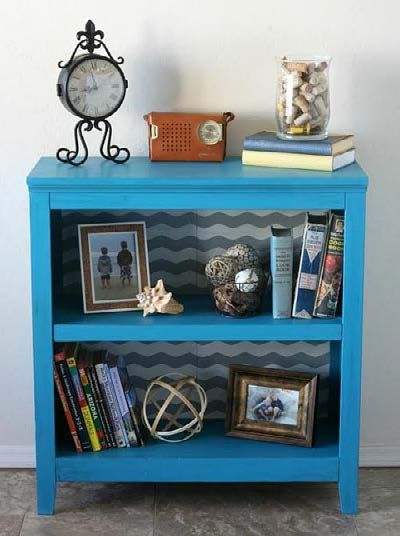
Chalky Finish Techniques
           Distressed Finish
           Using Water:
           Within 15 minutes of applying the color, take a damp
           cloth and rub over desired areas to expose surface
           below.

           Using Sandpaper:
           Using sandpaper: Wait until paint is completely dry.
           Use heavy-grit sandpaper for a rough finish or
           light-grit sandpaper for a more subtle distressed look.

           Layered Color
           Using Paraffin Wax:
           Apply the base color. Let dry completely. Apply
           paraffin wax on desired areas. Apply contrasting
           color. Let dry completely. Sand areas where wax was
           applied to remove top layer of color allowing the base
           color to show through.

           Using Petroleum Jelly:
           Apply the base color. Let dry completely. Apply jelly
           on desired areas. Apply contrasting color. Let dry
           completely. Use a cloth or sandpaper to rub off the
           top layer of paint where the jelly was applied, allowing
           the base color to show through.

           Dry-Brush
           Apply base color. Let dry completely. Load a low
           quality chip brush with a contrasting paint color.
           Remove excess paint on a paper towel. Lightly drag
           brush across surface.

                                                                  7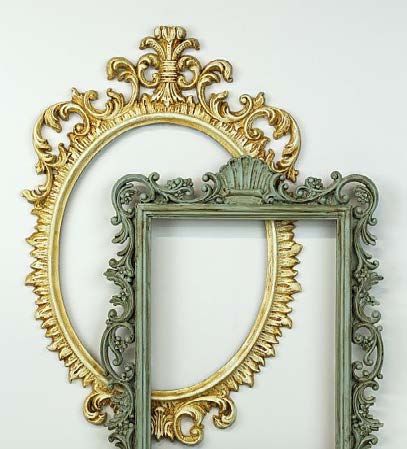
Treasured Dining Table
                      watch the step-by-step video

                                                       by Mark Montano

Outdoor seating isn’t always comfortable, let alone elegant. This Treasured
Dining Table is both. Learning how to paint a dining table is easy with this
  classy tutorial. This lovely chalk paint dining table is made from a thrift
  store find. One man’s trash is another man’s treasure with this beautiful
dining table. Allow the indoor comforts of home into the outside and have
  a dinner gathering as elegant as a castle feast. All you need is a stencil,
       some paint, and a steady hand to decorate your new creation.

                                                                                8
Treasured Dining Table
by Mark Montano

MATERIALS:                                               2.   Use a 2” flat brush to basecoat the entire table with
                                                              Enchanted. Rinse brush. Let dry
Americana Decor® Chalky Finish Paint
• Enchanted (ADC16)

Americana® DecorTM Crème Waxes
• Deep Brown (ADM07)

Americana® DecorTM Stencils
• Fleur de Lis Tile (ADS04)

Americana® DecorTM Varnishes
• Light Satin Varnish (ADM05)

Dazzling Metallics®
• Glorious Gold (DAO71)
                                                         3.   Use a pencil and ruler to find the center of the table
                                                              and then make a giant X going to the
Other supplies
• Water container                                        4.   Use the painter’s tape to attach the Fleur de Lis Tile
• Palette or plastic plate                                    Stencil to the center of the table.
• Paper towels
• Ruler                                                  5.   Use a stencil brush with Glorious Gold to fill in the
• White cloth                                                 Fleur de Lis Tile Stencil at the table center. Place the
• Painter’s tape                                              stencil at each of the table’s four corners and fill in
                                                              with Glorious Gold on a stencil brush.
• 2” flat brush
• #12 stencil brush
   (Americana Stencil Brushes - DABK20)
• Pencil
• Wooden dining table - thrift store find

INSTRUCTIONS:
NOTE: Let dry completely between painting steps.
                                                         6.   Use a 2” flat brush to seal the entire table with Light
1.   Clean table with a damp paper towel to remove any        Satin Varnish. Rinse brush. Let dry completely.
     dust or residue.
                                                         7.   Use a 2” flat brush to coat the entire table with Deep
                                                              Brown Crème Wax and immediately wipe back with a
                                                              clean white cloth.

                                                                                                                       9
Thrifty Chevron Bookcase

                                                   by Katie Cleveland

   Learn how to decorate bookcases so that they look brand new with this
  Thrifty Chevron Bookcase tutorial. All you need to do is add a little bit of
color and an exciting pattern to make a boring piece of furniture really stand
  out. Decorating a bookcase on your own is much more inexpensive than
   purchasing one already decorated, and you might have a little bit of fun
 roaming about flea markets and imagining what old bookcases would look
                        like with a fresh coat of paint.
                                                                                 10
Thrifty Chevron Bookcase
by Katie Cleveland
MATERIALS: 3. Remove shelves from bookcase.
Americana Decor® Accessories 4. Use 2” flat brush to basecoat the backing of shelves
• Waxing & Finishing Brush (ADB01) with Yesteryear. Rinse brush.
5. Apply FrogTape across the backing of shelves. Wipe
Americana Decor® Chalky Finish Paint
down with damp paper towel to remove the powdery
• Everlasting (ADC01) residue.
• Treasure (ADC19)
• Yesteryear (ADC27)
Americana Decor® Crème Waxes
• Clear (ADM01)
Other supplies
• Paper towels
• White cloth
• 2” flat brush
• Bookshelf (flea market find)
• FrogTape® Shape TapeTM in chevron pattern
• Pencil
• Ruler
6. Use 2” flat brush with Everlasting to paint the chevron
pattern on. Remove tape.
INSTRUCTIONS:
7. Use 2” flat brush and Treasure to basecoat the entire
NOTE: Let dry completely between painting steps. bookshelf except for backing of shelves. Rinse brush.
Let dry completely.
1. Wipe down bookcase thoroughly with damp paper
towels to get any dust or residue off. 8. Use Waxing & Finishing Brush to apply Clear Crème
Wax over entire piece to seal. Optional: Use white
cloth to buff to a satin sheen.
2. Use a pencil and a ruler to draw a straight line down
the exact center of the two 17” long boards on both
sides.
11Gorgeous Side Table
by PLA Schneider
There are so many painted table ideas for children’s rooms and nurseries that
it’s hard to find one that truly stands out and is uniquely yours. This Gorgeous
Side Table, however, is a DIY chalk paint table that can be the perfect touch to
a bare room. The moon is so soothing in a bedroom, and this Gorgeous Side
Table will give it such an element of enchantment that you may want it for
your own room. Grab the paintbrushes and capture the magic of the nighttime
sky right onto an old piece of furniture.
12Gorgeous Side Table
by PLA Schneider
MATERIALS: 2. Starting from the center of the tabletop, use a sea
Americana Decor® Chalky Finish Paint sponge to dab on these colors: Serene, Escape,
• Delicate (ADC11) Treasure, and Legacy, in a circular motion. Repeat for
• Escape (ADC20) fuller coverage.
• Inheritance (ADC12)
• Legacy (ADC21)
• Serene (ADC18)
• Treasure (ADC19)
Americana Decor® Varnishes
• Soft-Touch Varnish (ADM03)
Americana® Stencils
• Kaleidoscope Accent (5” x 7”) (AS09)
Other supplies
• Palette or plastic plate
• Paper towels
• Pencil
• 2” flat brush
• #8 round brush
• 3/4” flat brush 3. Trace the moon pattern onto the tabletop with a
• Sea sponge pencil. Using a #8 round brush, paint the perimeter of
• Cosmetic sponge the moon in Delicate and switch to a 3/4” flat brush
• Round wooden table (flea market find) to fill it in.
• Pattern
INSTRUCTIONS:
NOTE: Let dry completely between painting steps.
1. Using the 2” flat brush, paint the table legs with
Legacy. Using the same brush, paint the bottom
portion of the legs in Escape.
4. Add details to the moon using a #8 round brush.
Refer to photo for color placement of Legacy,
Inheritance, Delicate, Escape, and Serene. Optional:
Add dotted lines and dots around the perimeter of
the moon (Refer to photo for placement.)
5. For the accents, use the Kaleidoscope Accent Stencil
and dab on Serene with a cosmetic sponge to the
tabletop. (These can be placed randomly or refer to
the photo for placement.)
6. Repeat the above step to the bottom section of the
table.
7. Using a 2” flat brush, seal the table with two coats of
Soft-Touch Varnish.
13Moon & Stars Bulletin Board
by PLA Schneider
This bulletin board is far from boring. In fact, this Fancy Bulletin Board tutorial
will show you how to decorate a bulletin board that is out of this world. With a
crackle finish, this board’s frame looks as though it could be an antique. What
truly makes this a beautiful bulletin board, however, is the adorable moon and
stars that adorn it. Tack up important memos or cherished photos onto this
starry backdrop that will keep your desk from getting cluttered while adding a
touch of whimsy to any room.
14Moon and stars Bulletin Board
by PLA Schneider
MATERIALS: INSTRUCTIONS:
Americana Decor Chalky Finish Paint
®
NOTE: Let dry completely between painting steps.
• Delicate (ADC11)
• Treasure (ADC19) 1. Remove the glass and backing from the wooden
frame (or use an “open” frame). Using a 3/4” flat
Americana Decor® Mediums brush, paint entire frame in Treasure.
• Crackle Medium (ADM08) 2. Using a 3/4” flat brush, add Crackle Medium to the
outer portion of the frame.
Americana Decou-Page™
• Fabric Decou-Page (DS116) 3. Use tape to mask off the inner area of frame (the
portion that will remain in the solid basecoated color,
Other supplies Treasure).
• Water container
4. Using a 3/4” flat brush, paint Delicate over dried
• Palette or plastic plate Crackle Medium.
• Paper towels
• Staple gun 5. Cut fabric slightly larger than the cork board and
• 3/4” flat brush wrap it around, firmly securing with a staple gun.
• Fabric of choice Trace and cut out the moon and stars, place on the
• 1” painter’s tape cork board, and adhere with 3/4” flat brush and
• Rectangle wooden frame Americana Fabric Decou-Page.
• Cork board 6. Place the cork board in the frame and the backing in
• Pattern the frame. Secure.
15Distressed Decoupaged Cabinet
by Alison Craig
Decoupage DIY projects are simple to create and look amazing around
the house. This Distressed Decoupaged Cabinet will have you saving (and
feeling like) a million bucks. Cabinets are sort of like treasure chests. Each
one holds precious objects to be put on display. The cabinet itself can look
just as lovely as the items inside it with a little bit of paint and a pair of crafty
hands. These luxuriously rustic decoupage project ideas will have your home
looking like a stately southern mansion.
16Distressed Decoupaged Cabinet
by Alison Craig
MATERIALS: 3. Cut the scrapbook paper the same size as the back
Americana Decor® Chalky Finish Paint of the cabinet. (My cabinet required two pieces of
• Cameo (ADC10) paper.) Wet the paper slightly and decoupage down
• Everlasting (ADC01) with the Americana Matte Decou-Page and the 1” flat
• Timeless (ADC04) brush.
• Treasure (ADC19)
Americana Decou-Page™
• Matte Decou-Page (DS106)
Other supplies
• Palette or plastic plate
• Paper towels
• Scissors
• 1/4” flat brush
• Craft glue
4. Mix 3 parts Timeless with 1 part Treasure in a jar
• 1” flat brush
with a lid. Shake until mixed. Paint the outside of the
• Sandpaper cabinet with the mixture using the 1” flat brush.
• Wooden knobs
• Jar with lid
• 2 sheets of scrapbook paper
• Glass door cabinet (flea market find)
INSTRUCTIONS:
NOTE: Coat with varnish if desired. Wetting the
paper when you decoupage helps to reduce
bubbles and wrinkles. Let dry completely between
steps.
1. Wipe down the cabinet with a damp paper towel.
5. Paint both knobs with Cameo.
6. Distress the cabinet using sandpaper. Sand the edges
and anywhere else that you want wood to show
through. Sand the knobs.
7. Glue the knob on the drawer using craft glue.
8. On the palette, mix 1 part Cameo and 1 part
Everlasting. You will just need a tiny bit. Using the
1/4” flat brush, paint the edge of the shelf with a
checkerboard pattern.
2. Paint the interior of the cabinet with Cameo using the
1” brush.
17Vintage Numbered Tray
by Alison Craig
DIY serving tray projects are simple ways to make your kitchen or family room a little
more decorative. This Absurdly Useful Numbered Tray will make your home feel especially
welcoming. Trays are often considered underrated kitchen supplies. However, once you
paint your own serving tray, you’ll wonder why you haven’t used one before. This DIY
decorative tray is great for bringing out snacks and beverages in style. It also looks cool
just sitting on a coffee table with a few decorative jars.
18Vintage Numbered Tray
by Alison Craig
MATERIALS: 2. Paint the front of the tray with the 1” flat brush and
Americana Decor® Chalky Finish Paint Heritage.
• Everlasting (ADC01)
• Heritage (ADC09) 3. Paint the inner edge of the tray with the 1” flat brush
and Yesteryear.
• Yesteryear (ADC27)
Americana Decor® Crème Waxes
• Clear (ADM01)
• Golden Brown (ADM02)
Americana Decor® Stencils
• Olde World Numbers (ADS09)
Other supplies
• Water container
• Palette or plastic plate
• Paper towels
• Rubbing alcohol
• Sandpaper
• 1/2” flat brush
• 1” painter’s tape
• Cosmetic sponge 4. Using the 1/2” flat brush and Everlasting, paint stripes
• 1” flat brush around the inner edge of the tray.
• Clean cloth
• Metal tray (flea market find)
INSTRUCTIONS:
NOTE: If you have trouble wiping off the Golden Brown
Crème Wax, dip the cloth into the Clear Crème Wax first.
Be creative with the stencil. Let dry completely between
painting steps.
1. Clean the tray with rubbing alcohol and a clean cloth.
19Vintage Numbered Tray - continued
5. Tape the Olde World Numbers stencil onto the
Heritage part of the tray. Using the cosmetic sponge,
stencil the numbers on with Everlasting.
6. Distress lightly with sandpaper.
7. Paint with Clear Crème Wax all over the painted
surface with the 1” flat brush.
8. Paint Golden Brown Crème Wax over the Clear Crème
Wax and wipe off with a clean cloth to get an aged
effect.
20Must-Make French Chair
by Alison Craig
Learn how to paint a chair the French way - with lots of style and plenty
of flair. No classy home is complete without the Must-Make French Chair.
Every time you sit in this chair, you will feel like you’re seated at a quaint little
Parisian cafe. All you need is a croissant and a latte. This tutorial will show
you how to paint a wooden chair with a pretty harlequin pattern that will
surely turn heads. Paint your own Must-Make French Chair for a quick trip to
Paris that you never have to leave.
21Must-Make French Chair
by Alison Craig
MATERIALS: 3. Rub paraffin over the chair in areas you would like the
Americana Decor® Chalky Finish Paint Rouge to show through.
• Enchanted (ADC16)
• Everlasting (ADC01)
• Inheritance (ADC12)
• Rouge (ADC07)
Americana Decor® Stencils
• Distressed Harlequin (ADS03)
• French Living (ADS05)
Other supplies
• Water container
• Palette or plastic plate
• Paper towels
4. With the 1” flat brush, paint the chair Enchanted.
• Sandpaper
• 1” flat brush 5. Sand the chair to expose the Rouge paint.
• Paraffin
• Wooden chair
• Cosmetic sponge
• 1” blue painter’s tape
INSTRUCTIONS:
NOTE: Use paint very sparingly on the sponge to
get a clean stencil image. Apply multiple coats as
needed. Let dry completely between painting steps.
Top coat with wax to protect if needed.
6. Secure stencil with tape. Mix 3 parts Enchanted with
1. Wipe down the chair with a damp paper towel. 1 part Everlasting. Use this paint and the cosmetic
sponge to stencil parts of the Distressed Harlequin
design on the back, front, and sides of the chair.
7. Use the cosmetic sponge to apply the French Living
stencil on the seat with Inheritance.
2. Paint entire chair with Rouge using the 1” flat brush.
8. When dry, lightly sand the stenciled image to soften.
22Blue Ombre Whale Dresser
by PLA Schneider
This Blue Ombre Whale Dresser is the furniture piece that pops. Learn how to paint
a dresser for your child’s room with this adorable and easy-to-follow tutorial. Many
little children dream of the sea and adventuring on grand ships. Give your child the
stuff dreams are made of with this shipshape painted dresser idea. Complete with
a friendly whale and a blue ombre color scheme, this piece will give his or her room
some fun and soothing colors to enjoy.
23Blue Ombre Whale Dresser
by PLA Schneider
MATERIALS: 3. Using a 3” flat brush, paint the dresser with two coats
Americana Decor® Chalky Finish Paint of Everlasting and the “legs” in Legacy.
• Escape (ADC20)
• Everlasting (ADC01)
• Legacy (ADC21)
• Serene (ADC18)
• Treasure (ADC19)
Americana Decor® Varnishes
• Soft-Touch Varnish (ADM03))
Other supplies
• Water container
• Palette or plastic plate
• Paper towels
• Pencil
• 3/4” flat brush
• #8 round brush
• 3” flat brush
• Paper
• Sea sponge
• Clean cloth
• 2” wide painter’s tape
• Child’s wooden dresser
• Scissors
• Pattern 1
• Pattern 2
4. Trace and cut out the whale and water spouting
pattern to desired size (fit the drawers). Cut wavy
pattern on whale bottom.
5. Use the bottom of the whale to create a wave stencil.
INSTRUCTIONS: Trace and repeat wavy pattern on to 2” painter’s
NOTE: When using a sea sponge to stencil on waves, tape the width of the drawer. Place and adhere the
dab off excess paint by blotting on paper towel or paper wavy tape pattern to bottom drawer (the one painted
plate before dabbing on the surface. Let dry completely in Legacy - the darkest blue) and use a sponge to
swiftly dab on two coats of Everlasting. Immediately
between painting steps.
remove the tape slowly. This will ensure crisper lines.
1. Remove the drawers from the dresser and wipe 6. Place whale/water spouting pattern on drawer and
clean, making sure everything is clear of dust, dirt, trace using a pencil. Using a #8 round brush outline
and debris. the whale and water spouting in Everlasting. Fill in
using a 3/4” flat brush.
2. Using a 3” flat brush, paint the drawers with two
coats of each color, from the top lightest to darkest: 7. Using 3” flat brush seal dresser with two coats of
Serene, Escape, Treasure, and Legacy. Soft-Touch Varnish (or varnish of your choice —
Ultra-Matte or Satin).
24French Bistro Stationery Box
by Katie Blevins
Create a DIY stationery box with all the elegance of a French bistro.
This French Bistro Stationery Box truly lives up to its name. It’s time to
put away the boring boxes of yesterday and create something entirely
new and beautiful. Even old stationery gift boxes can be made new
with this creative tutorial. Sometimes, all you need to get inspired is
a little bit of adorable organization. This stationery box will look nice
even if you never put it away.
25French Bistro Stationery Box
by Katie Blevins
MATERIALS: 5. Use the Waxing & Finishing Brush, mix 1 part Golden
Brown Crème Wax with 2 parts Clear Crème Wax and
Americana Decor® Accessories apply over the outside of the box. Rinse brush. Let
• Waxing & Finishing Brush (ADB01) dry completely. Optional: Use a white cloth to buff
wax.
Americana Decor® Chalky Finish Paint
• Lace (ADC02)
Americana Decor® Stencils
• The French Bakery (ADS11)
Americana Decor® Crème Waxes
• Clear (ADM01)
• Golden Brown (ADM02)
Americana Decor® Mediums
• Image Transfer Medium (ADM10)
Americana Decor® Varnishes
• Soft-Touch (ADM03)
6. Use scissors to carefully cut out laser print image.
Other supplies Remember if the image has words or numbers to
• Water container reverse the image beforehand.
• Paper towels
• Sandpaper
• Scissors
• White cloth
• Laser copy of image of your choice
• Screwdriver
• Tape or spray adhesive
• Brayer
• 2" flat brush
• 3/4” pouncer
(Americana Dual Sided Pouncers - DABK19)
7. Place images face down and eyeball the placement
before attaching images to surface.
INSTRUCTIONS:
NOTE: Let dry completely between painting steps.
Top coat with wax to protect if needed.
1. Use screwdriver to remove all hardware.
2. Use a damp paper towel to wipe the piece down very
well, in case there is dust or residue on it.
3. Use 2" flat brush to apply a basecoat to the entire
outside of the box using Lace. Rinse brush. Let dry
completely.
4. Lightly sand box and edges. Wipe clean with a damp 8. Use 2" flat brush to apply Image Transfer Medium
paper towel. over the top of the box. Rinse brush (work quickly).
26French Bistro Stationery Box - continued
9. Place images face down onto surface. Immediately 13. Spray a stencil adhesive spray or use tape to
smooth out with your fingers. Use a brayer to smooth position stencil where you want.
images from the center out.
14. Use a 3/4” pouncer with Lace to apply The French
Baker Stencil to the top of stationery box. Remove
stencil and wash.
10. Follow label instructions for times on Image Transfer
Medium.
11. Once image is completely dry, dampen images with 15. Use 2" flat brush and apply Soft-Touch Varnish over
damp paper towel and let sit 1-2 minutes. This will entire box. Apply two coats to fully seal over the
soften the paper. waxes. Rinse brush. Let dry completely. Optional:
Buff with clean white cloth for a satin finish.
12. Use index finger to very gently rub the image; the
backing of the paper should begin to lift. Wipe away 16. Use screwdriver to replace hardware and enjoy!
pieces of paper; if they ball up, they could damage
the delicate photo. Work in one small section at a
time and keep images moist.
27Simple but Striking
Modern Breadbox
by Alison Craig
Bring an old breadbox back in style with this cool room decor idea. The World’s Easiest
Modern Breadbox can be upcycled from a much older, out-of-date breadbox. Add a
little color to your kitchen with this room decoration idea. Combining the antique with
the modern creates something entirely new and unique. You will love having this World’s
Easiest Modern Breadbox in your kitchen. Hiding your breads away in a cool box looks
much nicer than leaving them out on the counter.
28Simple but Striking Modern Breadbox
by Alison Craig
MATERIALS: 3. Paint the door front with the 1” flat brush and
Heritage.
Americana Decor® Chalky Finish Paint
• Everlasting (ADC01) 4. Measure a 1/2” border around the door front and
• Heritage (ADC09) paint it with the 1/4” flat brush and Everlasting. Also,
• Yesteryear (ADC27) paint the sides of the door.
Other supplies
• Water container
• Palette or plastic plate
• Paper Towels
• Transfer paper
• Sandpaper
• Ruler
• Pencil
• 1/4” flat brush
• #5 round brush
• 1” flat brush
• 1” blue painter’s tape
• Breadbox (flea market find)
• Pattern
5. Transfer the flowers on the breadbox door with the
INSTRUCTIONS: pattern and transfer paper. Put the flower on three
times with varying heights. (Instead of graphite
NOTE: Let dry completely between painting steps.
paper, just trace the back of the drawing with a
Top coat with wax to protect if needed.
pencil. Then tape it into place with painter’s tape and
retrace the front. Graphite paper may smudge on the
1. Dust off the breadbox with a damp paper towel. If it chalk paint.)
seems greasy, wash with warm, soapy water.
6. Paint the flower top and stem Everlasting with the
1/4” flat brush.
7. Paint the leaves Yesteryear with the #5 round brush.
8. Paint the circle with the 1/4” flat brush and Yesteryear.
9. Sand the edges lightly to distress.
2. Paint all of the breadbox except the door with the 1”
flat brush and Yesteryear. Paint the knobs Yesteryear
with the 1/4” flat brush
2930
Stylish Planting Shelf
                       watch the step-by-step video

                                         by Mark Montano

 Learn how to paint a door so that it’s ready for the garden. This Stylish
   Planting Shelf is a great way to turn an old door into a chic place to
    display your plants. When the plants are small and don’t look too
spectacular, turn to this tutorial and learn how plants can be dressed up
just by resting on a cute door. Door decorating ideas are great for rustic
gardens, and you’ll love showing friends and neighbors around the yard
                       to adore your chic new décor.

                                                                             31
Stylish Planting Shelf
by Mark Montano
MATERIALS: 2. Rub the paraffin on the door and on the five pine
boards, rubbing paraffin on all the areas where you
Americana Decor® Chalky Finish Paint want the original color to show through.
• Delicate (ADC11)
• Heritage (ADC09) 3. Use a 2” flat brush to paint large areas of Lace and
• Lace (ADC02) Heritage all over the doors and shelves (no pattern or
neatness are necessary; just make random patches).
• Rustic (ADC25)
Rinse brush. Let dry completely.
Americana® DecorTM Crème Waxes
• Clear (ADM01)
• Deep Brown (ADM07)
Americana® DecorTM Stencils
• The Flower Market (ADS08)
Other supplies
• Water container
• Palette or plastic plate
• Paper towels
• Sanding block
• Painter’s tape
• 2” flat brush
• Paraffin 4. Use paraffin again over the raised edges and details
• #12 stencil brush on the door and shelves.
(Americana Stencil Brushes - DABK20)
5. Use 2” flat brush to paint over the entire door and
• Hand drill
shelves with Delicate. Rinse brush.
• Hammer
• Solid wooden door (flea market find) 6. Use a sanding block over the door and shelves to
• Five 1” x 12” x 24” pine boards give them a layered and worn look. Dust door and
• Ten L-brackets with screws shelves for any sanding residue with a damp paper
• Clean white cloth towel and let dry.
INSTRUCTIONS:
NOTE: Let dry completely between painting steps.
1. Wipe the door down with a damp paper towel to
remove any dust or residue.
7. Optional: Use a hammer or any object to beat up the
door so it has more scratches and dents.
32Stylish Planting Shelf - continued
8. Use a 2” flat brush to apply Clear Crème Wax over the 12. Center the shelves on the door and screw into place.
entire door and shelves. Rinse brush.
9. Use the same brush to apply Deep Brown Crème Wax
over the entire door and shelves and immediately
wipe back with a clean white cloth. Let dry.
13. Use 2” flat brush to paint Delicate over brackets and
then wax them to blend in with the other pieces.
Rinse brush between steps and at end.
14. Use the painter’s tape to attach the Flower Market
Stencil to the top shelf.
15. Use a #12 stencil brush to fill in the whole stencil or
just part of it with Rustic.
10. Optional: Once the door is dry, you can go back over
it with a clean white cloth to buff to a satin finish.
11. Center the “L” brackets on the shelves and screw into
place.
16. Use a 2” flat brush to brush another coat of Clear
and Deep Brown Crème Waxes over the stenciled
image to blend into the rest of the shelf. Rinse brush
in between steps and at end. Once dry, add the
Americana Decor® varnish of your choice for outdoor
protection.
33Farmhouse Cupboard
by Linda Dresselhaus
Certain painted kitchen cabinets have the ability to give your house a vintage, country look.
This Farmhouse Cupboard is definitely one of those kitchen or living room ideas. All you
need is an old cupboard, and this tutorial will show you how to distress furniture with paint.
You’ll soon have a special cupboard for all your antique china and linens. You may even be
inspired to give even more furniture that coveted vintage look. This
prize-worthy furniture piece is one that the neighbors will be raving about.
34Farmhouse Cupboard
by Linda Dresselhaus
MATERIALS: 2. Use a 2” flat brush and Everlasting to apply one or
two coats to both furniture pieces, painting over the
Americana Decor® Accessories hardware as well as the wood.
• Waxing & Finishing Brush (ADB01)
Americana Decor® Chalky Finish Paint
• Everlasting (ADC01)
Americana® DecorTM Crème Waxes
• Clear (ADM01)
Other supplies
• Water container
• Sandpaper
• 2” flat brush
• Soft cloth or old T-shirt
• Wooden hutch and dresser base
3. Once dry, distress the paint with sandpaper to allow
some of the original wood finish to show through
in areas where wear would naturally occur. For
INSTRUCTIONS: example: around handles and on edges.
NOTE: Distressing can also be accomplished with
a damp cloth before paint is totally dry/cured. For
smooth brushstrokes, paint in the direction of the
wood grain. Also, better quality brushes result
in a smoother finish. Use inexpensive chip bristle
brushes if obvious brush strokes and texture are
desired. When waxing, light coats will make for an
easier buffing process. Let dry completely between
painting steps.
1. Use the cloth to wipe down the furniture pieces to
remove dust, etc.
4. Wipe down the furniture pieces with a soft cloth or
use a vacuum cleaner to remove all dust.
5. Using the Waxing & Finishing Brush, apply an even
coat of Clear Crème Wax over the entire piece,
including the hardware. When dry to the touch, buff
the wax to a smooth finish.
35Perfect Storage Shelf
by Katie Blevins
Everybody has a special spot commonly known as the “junk
drawer.” This Perfect Storage Shelf is the ideal DIY storage shelf
upgrade to our favorite dumping ground. Best of all, this is the
easiest storage shelf you’ll ever make. When you look at these
cute shelves, all thoughts of junk will fly out the window. Get
yourself a bit more organized with the Perfect Storage Shelf, the
most adorable DIY shelving idea around. After all, your precious
“junk” deserves a much cuter home.
36Perfect Storage Shelf
by Katie Blevins
MATERIALS: INSTRUCTIONS:
Americana Decor Accessories
®
NOTE: Let dry completely between painting steps.
• Waxing & Finishing Brush (ADB01)
1. Remove the baskets and wipe down the shelf frame
Americana Decor® Chalky Finish Paint with a damp paper towel.
• Everlasting (ADC01)
• Heritage (ADC09)
• Inheritance (ADC12)
• New Life (ADC14)
• Relic (ADC28)
• Remembrance (ADC23)
• Romance (ADC06)
• Treasure (ADC19)
Americana® DecorTM Crème Waxes
• Clear (ADM01)
Primers, Sealers, and Finishes
• Americana® Matte Spray Finish (DAS13)
Other supplies
• Water container
• Palette or plastic plate
• Paper towels 2. Use a 2” flat brush to basecoat the entire frame with
• Sandpaper Relic. Rinse brush.
• Scissors
3. Use scissors to cut the Contac paper to fit the top of
• White cloth the shelf.
• 2” flat brush
• Tape or spray adhesive 4. Use a very light coat of the spray adhesive to adhere
• Contac® paper the Contac paper to the top of the shelf.
• X-Acto® knife
• 1-1/2” pouncer
• White gel pen
• Shelf frame with baskets (flea market find)
• Pattern
5. Put the pattern on top and hold down with tape or
use a spray adhesive with a very light coat.
37Perfect Storage Shelf - continued
6. With an X-Acto knife, cut out the shapes and words 9. Carefully remove the Contac paper and let paint
to create a pattern. dry completely. Use sandpaper to sand the entire
storage frame and over the pattern. Wipe the frame
clean with a damp paper towel.
7. Use pouncer to fill in words and shapes. Load
separately with Treasure, Romance, New Life,
Remembrance, Inheritance, and Heritage. Rinse and
dry pouncer between each color change and at end.
10. Use a white gel pen to add little dots and lines for a
more whimsical look. Let dry completely.
11. Use a light mist of Americana Matte Spray Sealer to
hold the gel pen dots in place.
8. Use the pouncer and the handle end of a small paint
brush or pencil eraser to make various size dots to
areas on the pattern using Everlasting, Inheritance,
Relic, Remembrance, and Heritage. Rinse the pouncer
and wipe off handle or eraser in between color
changes and at end.
12. Use 2” flat brush with Treasure to paint the two
wicker baskets. Rinse brush and let dry completely.
13. Use the Waxing & Finishing Brush to apply Clear
Crème Wax to entire the storage frame and the
baskets. Let dry completely.
14. Optional: Use a white cloth to buff wax to a light satin
sheen.
15. Optional: Add embellishments or ribbon to baskets
and place baskets back into storage frame.
38Boho Bangles
watch the step-by-step video
by Mark Montano
Learn how to make DIY bracelets with this stylish tutorial. These Boho
Bangles are fun to paint and will have you feeling like a queen. Nothing
says fashion quite like an armful of bangles, and once you learn how
to make bracelets that truly stand out, you won’t want to stop. This
tutorial will also show you how to make wood look weathered and
antique. Turn on some soothing music, pour yourself your favorite cup
of tea, and grab the paintbrushes.
39Boho Bangles
by Mark Montano
MATERIALS: 2. Use paraffin wax to randomly scratch over areas of
each bangle; just do not coat the entire bracelet.
Americana Decor® Chalky Finish Paint
• Heritage (ADC09)
• Inheritance (ADC12)
• New Life (ADC14)
• Remembrance (ADC23)
• Romance (ADC06)
• Treasure (ADC19)
Americana® DecorTM Varnishes
• Ultra-Matte Varnish (ADM04)
Other supplies 3. Use 3/4” flat brush to put on next color: Brush New
• Water container Life on top of 1 Inheritance bangle, Romance on top
• Palette or plastic plate of the other Inheritance bangle, Inheritance on top of
• Paper towels both Treasure bangles, and paint Treasure on top of
the Romance bangle. Rinse brush in between steps
• 3/4" flat brush
and at end. Let dry completely.
• Parafin wax
• Sandpaper
• Wood bangles
4. Use sandpaper to lightly sand back to see the layers.
(If you sand harder, you can see original wood or
paint.)
5.
INSTRUCTIONS:
NOTE: Let dry completely between painting steps.
1. Use a 3/4” flat brush to basecoat the bangles: two
bangles with Inheritance, two bangles with Treasure,
and one bangle with Romance. Rinse brush in
between steps and at end. Let dry completely. 6. On Inheritance/Romance bangle and the Treasure/
Inheritance bangle, add more paraffin.
7. Use a 3/4” flat brush with Remembrance to paint
over the Inheritance/Romance bangle. Rinse brush.
8. Use same brush to paint Heritage over the Treasure/
Inheritance bangle. Rinse brush and let dry
completely.
9. Use sandpaper to lightly sand bangles to show layers.
Wipe clean with a damp cloth.
10. Use a 3/4” flat brush to seal bangles with Ultra-Matte
Varnish. Let dry completely.
40Amore Oval & Rectangular Frames
by Alison Craig & Micaela Spiggle
Everybody has an artistic side, and finding and creating beautiful
picture frame ideas is one way to show it. These Amore Oval and
Rectangular Frames look as though they were taken off the walls
of an old-fashioned mansion, but you’d be surprised to know they
are actually made from plastic. Show your love for photography and
all things vintage with the Amore Oval and Rectangular Frames. A
portrait of your family or you and your loved one needs a beautiful
home, and these frames will suit it nicely.
41Amore Oval and Rectangular Frames
by Alison Craig
MATERIALS: 4. For the rectangular frame, wipe it clean with a damp
paper towel.
Americana Decor® Accessories
• Waxing & Finishing Brush (ADB01) 5. Use painter’s tape to mark off the mirror so that paint
will not get on it.
Americana Decor® Chalky Finish Paint
6. Use a 1” chip brush to basecoat the frame with
• Lace (ADC02) Vintage. Rinse brush.
• Vintage (ADC17)
Americana Decor® Crème Waxes
• Clear (ADM01)
• Deep Brown (ADM07)
• Golden Brown (ADM02)
Other supplies
• Water container
• Palette or plastic plate
• Paper towels 7. Use the Waxing & Finishing Brush or 3/4” flat brush
• Painter’s tape to apply Clear Crème Wax. Rinse brush.
• 1” chip brush
• 3/4” flat brush
• Clean cloth
• Plastic frames (flea market finds)
INSTRUCTIONS:
NOTE: Let dry completely between painting steps.
1. For the oval frame, paint the entire frame with Lace 8. While still wet, apply Deep Brown Crème Wax over
using the 3/4” flat brush. the Clear Crème Wax with the same brush.
2. Cover the entire frame with Clear Crème Wax
brushed on with the 3/4” flat brush.
3. Paint the entire frame with the Golden Brown Crème
Wax in little sections. As you get about a 4” section
waxed, take the cloth and wipe off the excess wax.
Move on to the next section. If the brown wax dries
and becomes hard to remove, put a little Clear Crème
Wax on the clean cloth and it will help to remove it.
9. Use a clean white cloth to wipe back wax as desired.
If it is too dark, just apply more Clear Crème Wax
on top and wipe back again. Optional: Once frame
is dry, you can buff it using a clean white cloth to a
satin finish.
42Irresistible Telephone Table
by Margot Potter
Just because tables are old doesn’t mean they don’t deserve
some love and a fresh coat of paint. Table decorating ideas can
give outdated tables new life, and this Irresistible Telephone
Table tutorial can help you achieve that new life. This is a
wonderful small living room decorating idea that can be
tucked into a corner or butted up next to a couch. Dress up
your telephone with a chic piece of furniture that will add a
splash of cuteness into any room.
43Irresistible Telephone Table
by Margot Potter
MATERIALS: 5. Dry-brush Everlasting across the surface of the table
(don’t dry-brush door or drawer). Allow to dry.
Americana Decor® Accessories
• Waxing & Finishing Brush (ADB01)
Americana Decor® Chalky Finish Paint
• Everlasting (ADC01)
• Relic (ADC28)
• Remembrance (ADC23)
• Yesteryear (ADC27)
Americana Decor® Crème Waxes
• Clear (ADM01)
• Deep Brown (ADM07)
Americana Decor® Stencils
• Olde World Numbers (ADS09)
Americana® Stencils
• Traditional Medallions (ASC05)
Dazzling Metallics®
• Luminous Gold (Glaze) (DGM02)
Other supplies
• Water container
• Paper towels
• Stencil brush (Americana Stencil Brushes -
DABK20)
• Painter’s tape
6. Buff Luminous Gold over the surface of the table
• 2” flat brush with a paper towel or soft cloth (this gives the table a
• Screwdriver slightly-metallic finish). Allow to dry.
• Paint tray
• Fine-grit sandpaper 7. Attach Olde World Numbers Stencil as shown to the
• Telephone table front of the door with painter’s tape. Use a stencil
brush to apply Yesteryear to the stencils. Remove the
stencils. Allow to dry.
INSTRUCTIONS:
NOTE: If you wish to give the surface a more
antiqued finish, use a hammer or large chain to
distress the surface before you begin adding paint.
1. Use a damp paper towel to wipe down the surface of
the telephone table. Allow to dry.
2. Use a screwdriver to remove the door, door handle,
drawer, and drawer pull from telephone table. 8. Tape off the openings to apply the very tip of the
Traditional Medallion corner stencil to the top front
3. Using a 2” flat brush, paint a coat of Remembrance and left edge. Use a stencil brush to apply Yesteryear.
on the table. Allow to dry. Repeat. Remove the stencil. Allow to dry.
4. Using a 2” flat brush, paint a coat of Relic on the front 9. Use fine-grit sandpaper to sand the edges exposing
of the drawer and door. Allow to dry. Repeat. the wood beneath. Paint a coat of Clear Crème Wax
to seal the table. Allow to dry.
10. Dry-brush a small amount of Deep Brown Crème
Wax to create an antiqued finish. Allow to dry.
44Tropical Teal Shimmery Dresser
by Margot Potter
Nothing brightens up a room quite like some cheery pastel colors. This
Tropical Teal Shimmery Dresser tutorial will show you how to paint a
dresser that will surely bring some light into any room of the house. With
shimmering metallic accents, this painted dresser idea becomes an even
more vibrant addition to your furniture. This Tropical Teal Shimmery
Dresser will turn your room into a soothing paradise. If you can’t go to
the beach, let the inspiration of beach life come to you.
45Tropical Teal Shimmery Dresser
by Margot Potter
MATERIALS: 4. Dry-brush Shimmering Silver over the entire surface
of the dresser with the Waxing & Finishing brush,
Americana Decor® Accessories repeating the process you used in Step 3. Allow to
Waxing & Finishing Brush (ADB01) dry.
Americana Decor® Chalky Finish Paint
• Refreshing (ADC13)
• Serene (ADC18)
Americana® DecorTM Crème Waxes
• Clear (ADM01)
Americana® DecorTM Stencils
• Olde World Numbers (ADS09)
Dazzling Metallics®
• Shimmering Silver (DAO70)
Other supplies
• Water container
• Paper towels
• Flat brush
• Painter’s tape
• Sea sponge
• Paint tray
• Stencil of your choice
• Dresser
INSTRUCTIONS:
1. Wipe surface with a damp paper towel. Remove
drawers and hardware from drawers. No other prep 5. Add one knob back to the right side of each drawer
required! and slide them back into the dresser. Tape stencil to
the top left side of the drawer. Use sea sponge to dab
Shimmering Silver into the stencil. Wash and dry the
stencil after each use, repeating the previous painting
process and working from top to bottom.Switch the
knobs to the left side and repeat the process on the
right side.
2. Paint a layer of Serene over the drawers and entire
dresser. Let dry. Paint a second layer. Let dry. 6. Replace all knobs. Use a sea sponge to add
Shimmering Silver to all knobs. Let all surfaces dry.
3. Dry-brush Refreshing over the entire surface of
the dresser. Don’t over-saturate the brush. Strokes 7. Cover the dresser with an even coat of Clear Crème
on front and top of desk are horizontal; add some wax using the Waxing & Finishing brush.
vertical strokes to the side panels. Allow to dry.
46Beautiful Coffee Table
watch the step-by-step video
by Mark Montano
There is nothing that looks like adventure more than an old travel trunk. This Beautiful
Coffee Table is a DIY coffee table made from an antique trunk. This is a unique and
charming DIY coffee table idea that gives an old trunk new life. Paint it in a vibrant
color for a new furniture piece to really pop. You can even use it as a place to store
any sort of treasures. Although you might not be a traveler, you can capture the spirit
of adventure with this Beautiful Coffee Table.
47Beautiful Coffee Table
by Mark Montano
MATERIALS: 2. Rub paraffin over the trunk where you want the trunk
surface to show through. (Do not wax the whole
Americana Decor® Chalky Finish Paint trunk).
• Rustic (ADC25)
• Treasure (ADC19)
• Yesteryear (ADC27)
Americana® DecorTM Stencils
• Café Paris (ADS02)
Americana® DecorTM Varnishes
• Ultra-Matte Varnish (ADM04)
Other supplies
• Water container
• Palette or plastic plate
• Paper towels 3. Use a 2” flat brush to paint the entire trunk Rustic.
Rinse brush.
• Sanding block
• 2” flat brush
• 5/8” stencil brush
(Americana Stencil Brushes - DABK20)
• Paraffin
• 1” painter’s tape
• Storage trunk (flea market find)
4. When the paint is dry, use a sanding block to distress
the trunk. (You’ll see in the sanded areas that the
paint will be removed and leave an aged look like the
INSTRUCTIONS: paint has chipped and worn away over time.) Dust off
NOTE: Let dry completely between painting steps. with a damp paper towel.
1. Wipe down the trunk with a damp paper towel to
remove any dust or residue.
5. Rub paraffin again over the trunk in areas you would
like the Rustic and original surface color to show
through. (Areas where the paint has worn away is a
good place to start. Get the details again, too.)
48Beautiful Coffee Table continued
6. Use the 2” flat brush to paint the entire trunk 8. Use the painter’s tape to attach the Café Paris Stencil
Treasure. (You don’t have to be perfect, but do be in place on the front of the trunk
careful around the metal hinges and straps.) Rinse
brush. 9. Use a 5/8” stencil brush with Yesteryear to fill in the
address only. Rinse brush. Let dry completely.
7. After the paint is dry, go over it again with a sanding
block to reveal a perfectly aged, colorful trunk.
10. Use a 2” flat brush to seal the entire trunk with
Ultra-Matte Varnish. Rinse brush.
49French Country Kitchen Stool
watch the step-by-step video
by Mark Montano
Whether you have a small kitchen or are small in stature, you should
consider making this handy French Country Kitchen Stool. This tutorial
will show you how to decorate a small kitchen with a simple yet cool step
stool. The French theme is very popular and with good reason. Paris
brings thoughts of fashion, classiness, and elegance. This vintage kitchen
decor is just what your kitchen needs for some French “ooh la la.” Easy to
make and lovely to look at, the French Country Kitchen Stool will be the
envy of your other kitchen furniture.
50French Country Kitchen Stool
by Mark Montano
MATERIALS: INSTRUCTIONS:
Americana Decor® Chalky Finish Paint NOTE: Let dry completely between painting steps.
• Lace (ADC02)
• Relic (ADC28) 1. Use a pencil and a ruler to draw a straight line down
• Serene (ADC18) the exact center of the two 17” long boards on both
sides.
Americana® DecorTM Crème Waxes
• Golden Brown (ADM02)
Americana® DecorTM Stencils
• Distressed Harlequin (ADS03)
• The French Bakery (ADS11)
Americana® DecorTM Varnishes
• Light Satin Varnish (ADM05)
Other supplies
• Water container 2. Spread wood glue on one 12” side of the 13” long
• Palette or plastic plate board and position it on the center line of one board
• Paper towels so that the pieces are flush.
• Ruler
• White cloth 3. Use a hammer to nail the two pieces together with
• 1” flat brush three finishing nails and then repeat on the other side
• #12 stencil brush to create the base of the stool.
(Americana Stencil Brushes - DABK20)
• Wood glue
• 1” painter’s tape
• Hammer
• Pencil
• Two 17” pine boards, 1” x 12”
• 13” long pine board, 1” x 12”
• 18” long pine board, 1” x 12”
• 2” finishing nails (12)
4. Add wood glue to the top of the base and then
center the 18” board on top of the base and nail in
place with the remaining finishing nails.
51French Country Kitchen Stool - continued
5. Use a 1” flat brush to paint the entire bench Lace. 9. Use a #12 stencil brush and fill in stencil using Relic.
Rinse brush. Let dry completely. Rinse brush.
10. Use the straight edge of the stencil to create a small
1/4” frame around the top of the stool.
6. Use the 1” painter’s tape to tape down the Distressed
Harlequin stencil on the top. Use a #12 stencil brush
to fill in the stencil using Serene.
7. Place Distressed Harlequin stencil on each side and
use a #12 stencil brush to fill in the stencil. Rinse
brush.
11. When everything is dry, use the 1” flat brush to
apply Light Satin Varnish to seal the entire piece.
Let dry completely.
8. Center the French Bakery stencil on top of the bench
and use the painter’s tape to hold down. 12. Use the 1” flat brush to apply Golden Brown Crème
Wax and immediately wipe back with a clean white
cloth. Optional: Use a clean white cloth to buff wax
to a satin finish.
52You can also read