HP LEFTHAND SAN SOLUTIONS - SUPPORT PROCEDURES SETING UP ISCSI VOLUMES ON CENTOS 5, REDHAT 5, FEDORA 7 AND, DEBIAN UBUTU LINUX
←
→
Page content transcription
If your browser does not render page correctly, please read the page content below
HP LeftHand SAN Solutions
Support Document

Support Procedures
Seting Up iSCSI volumes on CENTOS 5, RedHat 5, Fedora 7 and, Debian
Ubutu Linux
Legal Notices
Warranty

The only warranties for HP products and services are set forth in the express warranty
statements accompanying such products and services. Nothing herein should be construed as
constituting an additional warranty. HP shall not be liable for technical or editorial errors or
omissions contained herein.
The information contained herein is subject to change without notice.

Restricted Rights Legend

Confidential computer software. Valid license from HP required for possession, use or copying.
Consistent with FAR 12.211 and 12.212, Commercial Computer Software, Computer Software
Documentation, and Technical Data for Commercial Items are licensed to the U.S.
Government under vendor's standard commercial license.

Copyright Notices

© Copyright 2009 Hewlett-Packard Development Company, L.P.

2
Seting Up iSCSI volumes on CENTOS 5, RedHat
5, Fedora 7 and, Debian Ubutu Linux

       The following is a step by step process to setup and using Lefthand Networks
       iSCSI volumes on the following versions of Linux:
       •   CENTOS 5
       •   Redhat 5
       •   Fedora 7
       •   Debian / Ubutu.
       This process was tested at LeftHand Networks on CENTOS 5, but it should
       work on all the versions listed.
       For each step in this process I will give examples using the Command Line
       Interface (CLI) and the Graphical User Interface (GUI), when possible.

       SAN/iQ Version / Platform

       7.0 SP1 / All platforms

       Solution

       Install the iSCSI Initiator
       First check to see if the initiator is already installed.
       Using the CLI run the yum command in the example. If you get following, the
       initiator is already installed.
       “yum list | grep iscsi”
       iscsi-initiator-utils.i386 6.2.0.865-0.8.el5 installed
       If the initiator has not been installed run the following command:
       yum install iscsi-initiator-utils
       If you are using Debian / Ubuntu Linux install open-iscsi package use the
       “apt-get” command.

                                                                                   3
Using the GUI go to Applications – Add/Remove Software. Select the search
tab and type “iscsi” in the search line and hit the Search button.
If the iSCSI initiator isn’t checked, check it and hit Apply to install the
iSCSI initiator.
Configure CHAP
If you want to use CHAP you have to complete the steps in this section
otherwise you may skip this.
Open /etc/iscsi/iscsid.conf with your favorite editor and setup the username
and password:
node.session.auth.username = My_ISCSI_USR_NAME
node.session.auth.password = MyPassword
discovery.sendtargets.auth.username = My_ISCSI_USR_NAME
discovery.sendtargets.auth.password = MyPassword
Where,
• node.session.* is used to set a CHAP username and password for
initiator authentication by the target(s).
• discovery.sendtargets.* is used to set a discovery session CHAP
username and password for the initiator authentication by the target(s)
Start the iSCSI Service
Now start the iscsi service, using the CLI issue the following command:
4# /etc/init.d/iscsi start
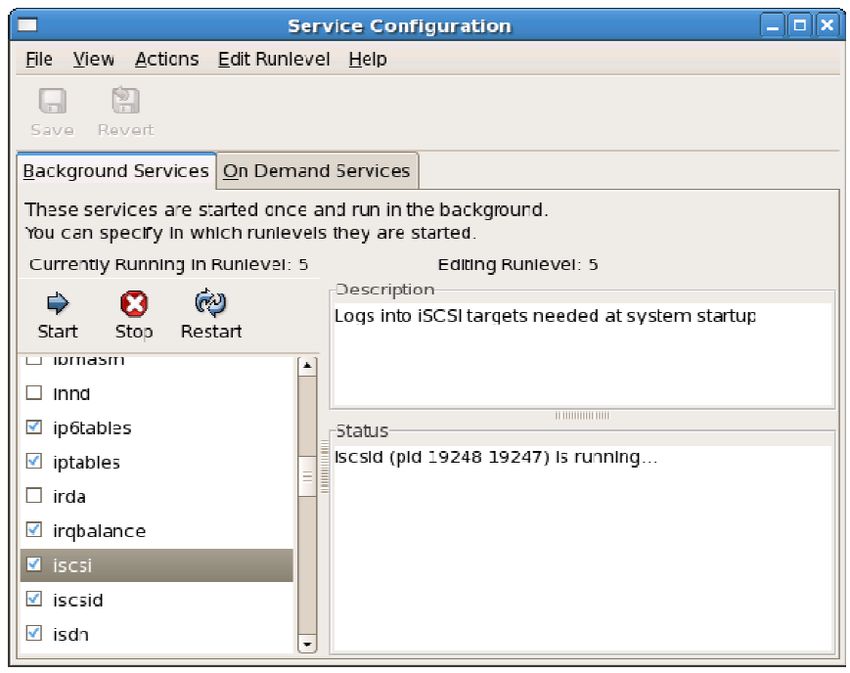
To use the GUI go to System – Administration – Server Settings – Services.
Scroll down to and select “iscsi” and then hit the start button.
From here on everything has to be done via the CLI except for editing files
that can be done using vi or the graphical text editor.
Discover Targets
First you get the initiator node name for your server and put it into the
Authentication Group. To get the initiator node name do the
following command:
# cat /etc/iscsi/initiatorname.iscsi
InitiatorName=iqn.1994-05.com.redhat:2bd8911ebc10
Copy the name and paste it in the Authentication Group initiator node
name field.
If you want to change the initiator node name you can edit this file.
5Now use iscsiadm command, which is a command-line tool allowing discovery
and login to iSCSI targets, as well as access and management of the open-iscsi
database. If your storage server IP address is 192.168.1.5, enter:
# iscsiadm -m discovery -t sendtargets -p 10.0.19.11
10.0.19.11:3260,1 iqn.2003-10.com.lefthandnetworks:bradachmg3:
45:centostest-02
/etc/init.d/iscsi restart
Logout session [sid: 1, target: iqn.2003-
10.com.lefthandnetworks:bradach-mg3:41:centostest, portal:
10.0.19.11,3260]
Stopping iSCSI daemon: /etc/init.d/iscsi: line 33: 21592 Killed
/etc/init.d/iscsid stop
iscsid dead but pid file exists [ OK ]
Turning off network shutdown. Starting iSCSI daemon: [ OK ]
[ OK ]
Setting up iSCSI targets: Login session [iface: default, target:
iqn.2003-10.com.lefthandnetworks:bradach-mg3:41:centostest,
portal: 10.0.19.11,3260]
Login session [iface: default, target: iqn.2003-
10.com.lefthandnetworks:bradach-mg3:45:centostest-02, portal:
10.0.19.11,3260 [ OK ]
Now there should be a block device under /dev directory. To obtain new device
name, you can use the fdisk or tail commands. Here are some examples:
# fdisk -l
Disk /dev/sda: 17.9 GB, 17980981248 bytes
255 heads, 63 sectors/track, 2186 cylinders
Units = cylinders of 16065 * 512 = 8225280 bytes
Device
Boot Start End Blocks Id System
/dev/sda1 * 1 13 104391 83 Linux
/dev/sda2 14 2186 17454622+ 8e Linux LVM
Disk /dev/sdd: 26.8 GB, 26843545600 bytes
64 heads, 32 sectors/track, 25600 cylinders
Units = cylinders of 2048 * 512 = 1048576 bytes
Disk /dev/sdd doesn't contain a valid partition table
# tail -f /var/log/messages
6Jun 20 12:15:52 test kernel: SCSI device sdd: 52428800 512-byte
hdwr sectors (26844 MB)
Jun 20 12:15:52 test kernel: sdd: Write Protect is off
Jun 20 12:15:52 test kernel: SCSI device sdd: drive cache: none
Jun 20 12:15:52 test kernel: sdd: unknown partition table
Jun 20 12:15:52 test kernel: sd 3:0:0:0: Attached scsi disk sddJun 20
12:15:52 test kernel: sd 3:0:0:0: Attached scsi generic sg3
type 0
Jun 20 12:15:52 test iscsid: connection3:0 is operational now
Jun 20 12:45:54 test ntpd[2266]: synchronized to 75.144.70.35,
stratum 2
Jun 20 13:13:18 test ntpd[2266]: synchronized to 69.16.152.68,
stratum 2
Jun 20 13:20:00 test pcscd: winscard.c:219:SCardConnect() Reader
E-Gate 0 0 Not Found
Look at the bold SDD device. This is what you are looking for from
these commands.
Format and Mount iSCSI Volume
At this point it is al standard Linux file system stuff. First create a partition
with fdisk.
# fdisk /dev/sdd
Device contains neither a valid DOS partition table, nor Sun, SGI or OSF disklabel
Building a new DOS disklabel. Changes will remain in memory only, until you decide to
write them. After that, of course, the previouscontent won't be recoverable.
The number of cylinders for this disk is set to 25600.
There is nothing wrong with that, but this is larger than 1024, and could in certain
setups cause problems with:
1 software that runs at boot time (e.g., old versions of LILO)
2 booting and partitioning software from other OSs
(e.g., DOS FDISK, OS/2 FDISK)
Warning: invalid flag 0x0000 of partition table 4 will be corrected by w(rite)
Command (m for help): n
Command action
e extended
p primary partition (1-4)
Partition number (1-4): 1
First cylinder (1-25600, default 1):
Using default value 1
Last cylinder or +size or +sizeM or +sizeK (1-25600, default
25600):
Using default value 25600
Command (m for help): w
The partition table has been altered!
Calling ioctl() to re-read partition table.
7Syncing disks.
Next create a file system.
# mkfs.ext3 /dev/sdd1
mke2fs 1.39 (29-May-2006)
Filesystem label=
OS type: Linux
Block size=4096 (log=2)
Fragment size=4096 (log=2)
3276800 inodes, 6553596 blocks
327679 blocks (5.00%) reserved for the super user
First data block=0
Maximum file system blocks=0
200 block groups
32768 blocks per group, 32768 fragments per group
16384 inodes per group
Superblock backups stored on blocks:
32768, 98304, 163840, 229376, 294912, 819200, 884736, 1605632,
2654208, 4096000
Writing inode tables: done
Creating journal (32768 blocks): done
Writing superblocks and file system accounting information: done
This file system will be automatically checked every 27 mounts or 180 days, whichever
comes first. Use tune2fs -c or -i to override.
Now all you have to do is create a directory and mount the file system.
# mkdir /mnt/iscsi
# mount /dev/sdd1 /mnt/iscsi
# df
Filesyste
m 1K-blocks Used Available Use Mounted on
/dev/mapper/VolGroup00-LogVol00
14918496 3429888 10718560 25% /
/dev/sda1 101086 17449 78418 19% /boot
tmpfs 1037768 0 1037768 0% /dev/shm
/dev/sdd1 25803052 176200 24316136 1% /mnt/iscsi
8You can also read