Installation - Manual - Solflex
←
→
Page content transcription
If your browser does not render page correctly, please read the page content below
Installation - Manual
     H - Acoustic Housing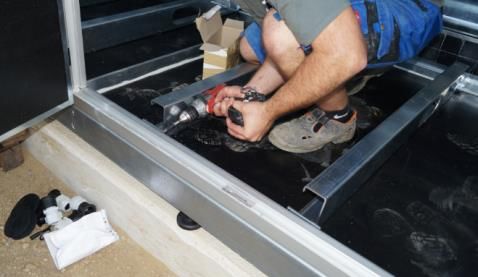
Solflex GmbH
Am Feuerstein 282
2392 Wienerwald
Austria

T: +43223820336
E: office@solflex.eu
www.solflex.eu

ATU 65324348
FN 337206t

 Always observe all relevant standards and
          statutory regulations.

Subject to change without prior notice.
All business transactions based on our Terms and Conditions, available
atwww.solflex.eu

Manual H Acoustic Housing                                                Page 2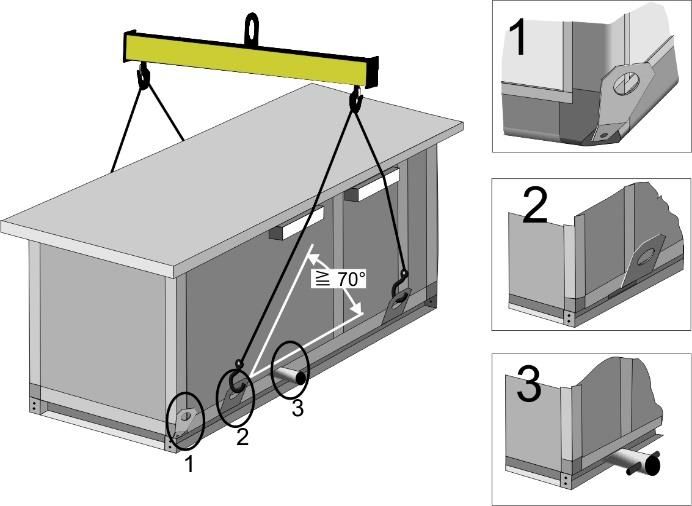
Table of content
1.       General information ............................................................. 4
2.       Technical Data .................................................................... 4
3.       Warranty............................................................................ 7
4.       Safety................................................................................ 7
4.1.     Intended use ...................................................................... 7
4.2.     Safety instructions............................................................... 7
4.2.1.   Risks during unloading and transportation .............................. 7
4.2.2.   Risk of damage to property and the environment .................... 7
4.3.     Emergency procedures ......................................................... 7
4.3.1.   Fire fighting ........................................................................ 7
5.       Product delivery .................................................................. 7
5.1.     Unloading / transport to location of installation ....................... 8
4.1      Entladung mit Stapler oder Hubwagen ................................... 8
4.2      Entladung mit einem Kran .................................................... 9
4.3      Manuelle Positionierung....................................................... 10
6.       Installation of unit .............................................................. 11
4.4      Aufstellungsort...................................................................12
4.5      Fundament ........................................................................12
4.6      Aufstellung ........................................................................13
4.7      Einstellen der Füße ............................................................. 13
4.8      Querträger ........................................................................14
6.1.     Installation of Heat Pump, Air Conditioning and Refrigeration ..15
6.2.     Installation of Heat Pump, Air Conditioning and Refrigeration ...19
7.       Maintenance and Service ..................................................... 19
7.1.     General .............................................................................19
7.2.     Silencers ...........................................................................19
4.9      Lufttrennung......................................................................19
4.10     Kondensatwanne ................................................................ 19
4.11     Einstellen der Türen ............................................................ 20
4.12     Demontage von Paneelen und Zwischenprofilen ..................... 20
4.13     Demontage von Rahmenprofilen...........................................21
4.14     Vormontierte Geräte ........................................................... 21
4.15     Grounding .........................................................................23
4.16     Test run ............................................................................23
4.17     Removal and disposal ......................................................... 23
4.18     Wartungstabelle des Schalldämmgehäuses ............................ 23

Manual H Acoustic Housing                                                                    Page 3
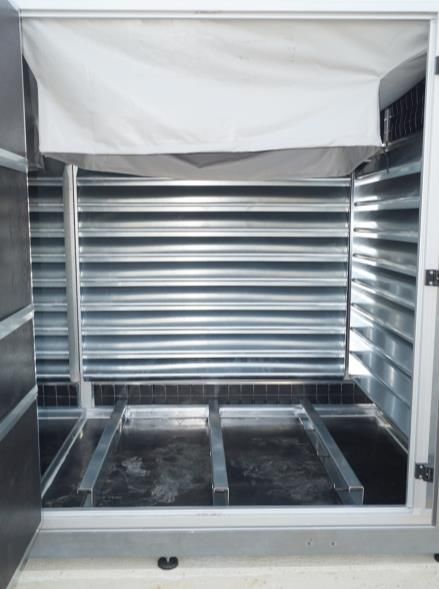
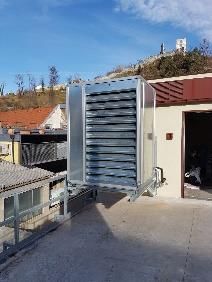
1. General information
Solflex produces SonaSafe acoustic housing for a wide range of Heat Pump, Air
Conditioning and Refrigeration systems.

This manual applies to the following series:

SonaSafe H* Serie
2. Technical Data

Stable self-supporting, insulated box housing with fully demountable structure
without welding and riveting. All housing components are resistant to corrosion by the
use of galvanized steel sheets and aluminium. Profile frame construction with
mechanically loaded, all sides easily removable panels in sandwich construction. Inner
surfaces are fully lined with sound-absorbing foam. Frame constructed of solid hollow
profiles made of anodized aluminium and rounded at the outer edges. The extruded
profiles are fitted and bolted at the corners by in accordance with its interior moulded
connectors made of cast aluminium.
The box housing is pre-mounted on a stable base frame made of high-strength,
galvanized steel profiles. In the base frame adjustable crossbeams made of
galvanized steel profiles are integrated which allow optimum adaptation of the
outdoor units built in. The base frame is designed with height-adjustable, sturdy feet
with plastic plates and to be placed on a firm ground, a strip foundation or provided
on concrete slabs.
Exact separation of the suction and discharge air flow provided by a flexible, airtight
air separator between the lamella-pack and the outdoor unit. This air separator is
mounted on the lamella-pack already ex works. The other side of the air separator is
attached from the installation company with Velcro fastener tape on the outer edge
of the air conditioner.
Integrated special designed lamella-pack sets at the back side for large-scale and
laminar air intake, as well as on the front side of the housing for air discharge with
same integrated silencing baffles in V-shape.
Sound insulation made of high quality material combination for the absorption of
airborne sound from PUR foam with heavy foil on the backside. Visible surface is
resistant against dirt and water splash due to special foil. Fire behavior according to
DIN4102 B3, Operating temperature range -40 °C to + 100 °C, thickness 52 mm.

Manual H Acoustic Housing                                                        Page 4
The lamella-packs can easily be removed from the box housing for easy access for
operation and maintenance of the outdoor units (condensers and fans) with the built-
in quick-release fasteners.
In addition, the panels on the top and on left and right hand side can be dismantled
by means of quick-release fasteners for optimal access and insertion of the unit.
The cables and pipes of the outdoor unit can be put through on 2 sides (front and
back side) of the housing using the supplied cable glands and rubber gaskets.
As option a drain pan made of galvanized steel can be integrated in the base frame
(version “W”), which is lined with a special damping rubber mat to avoid a drone
effect and to reduce freezing of condensing water. In addition, the defrost water pan
has a drain at the back for the derivation of the water.
Depending on requirements, it is recommended to heat the drain pan with a heater
system consisting of a built-in heating cable, including connection box with sensors,
control thermostat, on/off switch, earth leakage trips and operation lamp as option
from factory (version H) or this is built in from the installation company separately.
The complete construction is completely weatherproof and also optimized for the
operation of heat pumps. For safe loading and positioning 4 stable crane lugs are
mounted on the base frame.
Optionally, the acoustic housing can be produced with a colored foil on galvanized
steel sheet. This foil increases the weather protection and gives the housing a softer
appearance.

Manual H Acoustic Housing                                                       Page 5

Housing                  Max. dimensions
                                              dimensions       Weight     for installation        Unit
  Prinzip        SonaSafe    Edition             [mm]           [kg]
                                                                               [mm]*
                   Type
                                          H       W        D             H       W       D

                 HS100NA                 1008   1350   1240      230    850     1200    500        1

                 H100NA                  1220   1350   1240      250    950     1200    500        1

Rear suction,    H200NA                  1825   1350   1240      400    1550    1200    500        1
     front                  Galvanized
  discharge      H110NA      steel and   1220   2550   1240      500    950     1200    500        2
   Lateral                  aluminum
suction, front
                 H220NA                  1825   2550   1240      800    1550    1200    500        2
  discharge
                 H111NA                  1220   3750   1240      700    950     1200    500        3

                 H222NA                  1825   3750   1240     1200    1550    1200    500        3

                 HX100NA                 1390   1900   1340      400    1050    1700    600        1

                 HX200NA                 2065   1900   1340      550    1750    1700    600        1
Rear suction,
     front       HX110NA    Galvanized   1390   3600   1340      800    1050    1700    600        2
  discharge                  steel and
   Lateral       HX220NA    aluminum     2065   3600   1340     1100    1750    1700    600        2
suction, front
  discharge
                 HX111NA                 1390   5300   1340     1200    1050    1700    600        3

                 HX222NA                 2065   5300   1340     1650    1750    1700    600        3

                 HY100NA                 1480   1450   1340      375    1200    1250    600        1

                 HY200NA                 2025   1450   1340      500    1750    1250    600        1
Rear suction,
     front       HY110NA                 1480   2750   1340      750    1200    1250    600        2
                            Galvanized
  discharge
                             steel and
   Lateral       HY220NA                 2025   2750   1340     1000    1750    1250    600        2
                            aluminum
suction, front
  discharge
                 HY111NA                 1480   4050   1340     1125    1200    1250    600        3

                 HY222NA                 2025   4050   1340     1500    1750    1250    600        3

   Manual H Acoustic Housing                                                             Page 6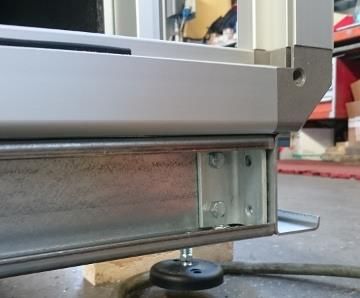
3. Warranty                                 4.2.2.     Risk of damage to
                                            property and the environment
24 months from delivery.

4. Safety
In the event of improper operation or
operation for a purpose other than the      Serious damage to property from
intended, there is however a risk of        dropping loads;
serious or even fatal injury to persons     please observe the instructions in
and a risk of damage to the unit and        section "Delivery of product".
other property.
                                            Serious damage to heat exchanger
4.1. Intended use                           connections, panelling and other
                                            mounted components from force impact
The unit must only be used as acoustic
                                            during moving of unit elements; always
housing for compatible Heat Pump, Air
                                            move the unit elements by their
Conditioning and Refrigeration systems.
                                            base frame.
Any other use is strictly prohibited.
                                            Risk of damage to components from
4.2. Safety instructions
                                            heavy impact, e.g. when attempting to
All work about the assembly, installation   dislodge a part with a hammer, etc.:
and commissioning of the unit must be       Components that rest on the
carried out by specially trained            foundation must only be moved by
technicians.                                shifting.

                                            4.3. Emergency procedures
4.2.1.     Risks during
unloading and transportation                4.3.1.         Fire fighting
                                            Strictly adhere to all statutory fire safety
                                            regulations.
Risk of serious injury from dislodged       The insulation foam has a fire behaviour
loads.                                      according norm.
Do not stand under suspended loads.         5. Product delivery
Risks from electric power                   Upon delivery, inspect the product for
                                            damage caused during transport and
                                            ensure that the delivery is complete.
                                            Record any damage or missing parts on
Risk of electric shock from electrostatic   the transport documents. Complaints
charge of housing:                          regarding obvious transport damage or
Earth the device.                           incomplete deliveries cannot be
                                            considered if made too late.
                                            On the construction site, protect the unit
                                            against dirt, impact and the elements.

Manual H Acoustic Housing                                                        Page 7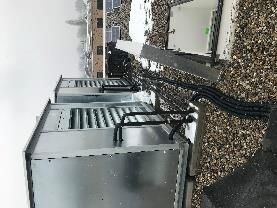
5.1. Unloading / transport to                 5.2. Entladung mit Stapler oder
location of installation                      Hubwagen
This unit is shipped in parts on a pallet.    Es ist darauf zu achten, dass das Produkt
For unloading, lift the unit by the pallet.   mit dem Grundrahmen auf den Gabeln
                                              des Hubgerätes vollständig aufliegt und
Too short forks can damage the acoustic       der Geräteschwerpunkt zwischen den
housing.                                      Gabeln liegt.
                                              Beim Entladen ist darauf zu achten, dass
                                              die Profile nicht beschädigt werden. Zu
                                              kurze Gabeln können die
                                              Kondensatwanne zerstören.
Schwerste Personen- oder Sachschäden
durch herunterfallende Lasten
Sicherheitsvorschriften der
Förderfahrzeuge und Transportmittel
beachten.

Base frame

Risk of serious injury or damage to
property from dropping loads.
Observe the safety instructions of the
transport equipment and lifting gear.

Do not climb onto the unit.

Manual H Acoustic Housing                                                      Page 8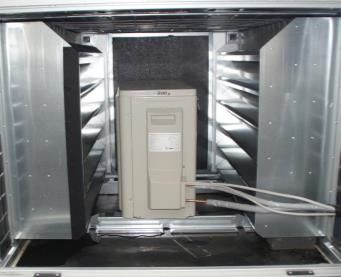
5.3. Entladung mit einem Kran
Es dürfen nur geeignete und zugelassene
Anschlagmittel (Seile, Hebebänder...)
verwendet werden. Um das
Schalldämmgehäuse vor Beschädigung zu
schützen, sind Distanzhalter zu verwenden.

Zum Transport der Schalldämmgehäuse
sind die eigens dafür vorgesehenen
Kranlaschen zu verwenden. Diese dürfen
auf keinen Fall an den oberen
Eckverbindungen montiert werden.

Schematische Darstellung, bitte die
obengenannte Beschreibung beachten!

Manual H Acoustic Housing                    Page 9
Es können 3 verschiedene Varianten von Anschlagmitteln zur Verfügung stehen:

                                                        Variante 1
                                                        Kranlasche am Eckwinkel

                                                        Variante 2:
                                                        Kranlasche am
                                                        Grundrahmen

                                                        Variante 3:
                                                        Formrohr durch
                                                        Grundrahmen

Größere Schalldämmgehäuse werden             Schalldämmgehäuse niemals mit
mit 8 Laschen ausgestattet, bitte            Schlägen von schweren Geräten (z.B.
beachten Sie die Darstellung.                Hammer) bewegen.

                                                   Rollen

5.4. Manuelle Positionierung
Beim Verschieben der                                                    min
                                                                            10   0 mm
Schalldämmgehäuse darf die Kraft
niemals an Anschlüssen und Paneelen
wirken. Die Kraft soll immer auf den
Grundrahmen wirken. Das                               Rohre

Manual H Acoustic Housing                                                        Page 10
6. Installation of unit At the place of installation, it must be possible to provide impeccable service and maintenance and the necessary air intake of the built-in air-conditioning, refrigeration and heat pump units. When planning the installation site, the guide lines for minimum distances around the air-conditioning, refrigeration and heat pump manufacturer must be respected. The acoustic louvre, on the suction and exhaust sides has a depth of 200mm and the site must enable this to remove to have access to the built-in air conditioning, refrigeration and heat pump equipment. Important NOTE: Please always use the required safety work gear during installation. Due to the packaging materials and the production process, personal injury may occur, such as hand injuries. If the soundproof housing is freely accessible, the necessary measures during assembly should be taken to local conditions to avoid personal injury. Manual H Acoustic Housing Page 11
6.1. Aufstellungsort
Am Aufstellungsort muss einen einwandfreien Service und Wartung und notwendige
Luftansaugung der eingebaute Klima-, Kälte- und Wärmepumpengeräte möglich sein. Bei
der Planung der Aufstellungsort ist auf folgende Mindestabstände zu Wänden zu achten:

6.2. Fundament

The foundation must meet the relevant static and sound propagation requirements
and must feature a proper drain for water. It must be level and smooth. The
resonance frequency of the support structure must be distinctly different from the
excitation frequency of the rotating machine components (Heat Pump, Air
Conditioning and Refrigeration system).

An uneven foundation might cause malfunction or jammed panels. Liability is
excluded for damage caused by installation on an uneven surface.

Manual H Acoustic Housing                                                     Page 12
6.3. Aufstellung
Alle Gehäuse sind ab Werk bereits fertig zusammengebaut und können einfach auf
einem Fundament, wie einem Streifenfundament oder Betonplatten auf einem
befestigten Untergrund, aufgestellt werden. Ein separater Grundrahmen ist
normalerweise nicht notwendig, außer es handelt sich um eine Dachaufstellung wo eine
spezielle Lastverteilung notwendig ist.

Der Grundrahmen und die Kranlaschen sind statisch so ausgelegt und dimensioniert
das die Klima-, Kälte-, Wärmepumpengeräte vormontiert werden können im
Schalldämmgehäuse und gemeinsam mit dem Kran gehoben werden können. Für,
wenn die Fixierung und Überprüfung von der Fixierung des Querträgers und die
Vormontage des Klima-, Kälte-, Wärmepumpengerätes nicht Ordnungsgemäß
ausgeführt würde, daraus resultierende Fehler oder Folgen wird keine Haftung
übernommen.

6.4. Einstellen der Füße
Mittels verstellbarer Füße am Grundrahmen können die Gehäuse auf den Untergrund
waagrecht ausgerichtet werden.

Die Konter-Muttern müssen auf der Baustelle bei allen Füssen nochmals
nachgezogen und auf korrekten Sitz und Festigkeit geprüft werden.

Manual H Acoustic Housing                                                   Page 13
6.5. Querträger
Die Querträger in der Tauwasserwanne sind bereits ab Werk auf ein bestimmtes
Geräte-Standardmaß fixiert. Falls dieses für das einzubauende Klima-, Kälte- und
Wärmepumpengeräte nicht passen sollte, müssten die Träger von der ausführenden
Firma entsprechend versetzt werden.

Eine korrekte (Wieder-) Verschraubung der Querträger auf der Innenseite
des Grundrahmens ist für die Stabilität der Geräte im Gehäuse sehr wichtig!

                                                        Querträger zur Aufnahme
                                                        des Klima-, Kälte- oder
                                                        Wärmepumpengeräte

Manual H Acoustic Housing                                                     Page 14
6.6. Installation of Heat Pump, Air Conditioning and Refrigeration
outdoor unit
The correct installation position of the air conditioning, refrigeration or heat pump unit
is decisive for the fit and function of the acoustic housing.
Der Abstand zwischen Ausblas-Lamellenpaket und Lüfterseite des Gerätes muss 100
mm betragen
100
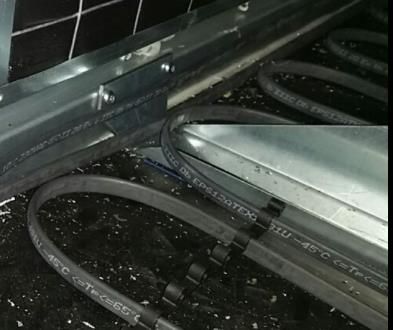
Anschließend können entsprechende Rohr- und Kabeldurchführungen in das Gehäuse
gebohrt werden. Hierfür ist eine ausreichende Anzahl von Original Gummi-Rosetten
und Kabeldurchführungen in einem Karton im Gehäuse beigelegt.
Manual H Acoustic Housing Page 15Bohrdurchmesser für Kabelverschraubungen im Sandwichpaneel
Bohr Ø für Kabelverschraubungen ( in mm )
Größe Filetage Ø nominal Bohr-Ø Gewinde Nenn-Ø Muffe Bohr-Ø Muffe
M 16 16 17 22 23
M 20 20 21 26 27
M 25 25 26 31 32
M 32 32 33 38 39
M 40 40 41 48 49
M 50 50 51 56 57
M 63 63 64 70 69
Rosette für
Kältemittelleitung
Kabeldurchführung für
Elektroleitungen
Manual H Acoustic Housing Page 16Die Original Rosetten und Kabeldurchführungen müssen zur Erhaltung der
Schalldämmwerte und Produkteigenschaften unbedingt verwendet werden. Andere
Öffnungen oder großflächige Ausschnitte in das Schalldämmgehäuse sind nicht
zulässig, da diese Veränderung des Gehäuses massive Einschränkungen bei den
erzielbaren Einfügedämpfungen und Schallreduzierungen, als auch bei der Stabilität
und Wetterfestigkeit mit sich zieht.
Die weiteren Anschluss- und Inbetriebnahme-Arbeiten am Klima-, Kälte- oder
Wärmepumpen Gerät sind ident mit einer normalen Montage ohne
Schalldämmgehäuse.
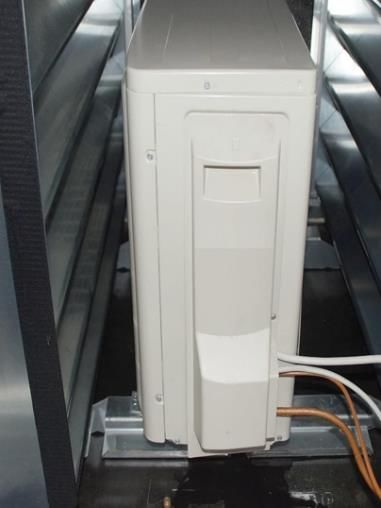
Abschließend wird das Lufttrennungsteil zur Trennung der Ansaug- zur Ausblasluft am
Kälte-, Klima- oder Wärmepumpen Gerät befestigt. Um eine möglichst dichte
Verbindung zu erreichen, ist auf der Innenseite ein Klettband eingenäht. Auf der
Ausblas-Lamelle ist bereits ab Werk umlaufend ein Klettband verklebt. Am Kälte-,
Klima- oder Wärmepumpen Gerät soll das mitgelieferte Klettband an vorher
gereinigten und getrockneten Gehäuse-Oberfläche rund um das Lüftergitter verklebt
werden.
Klettband am Gerät
verkleben.
Klettband ab Werk
verklebt
Lufttrennungsteil
fixieren
10
Manual H Acoustic Housing Page 17Für die H-Serie gibt es auch die optionale Möglichkeit mit Option HxxxCap (=Haube-
Ausführung um direkt über eine bestehende Installation zu geben oder seitlich zu
schieben ohne Kondensatwanne und ohne Querträger). Wenn das
Schalldämmgehäuse seitlich über das bestehende Kälte-, Klima- oder Wärmepumpen
Gerät geschoben werden soll, müssen folgende Schritte ausgeführt werden um das
seitliche Panel zu demontieren und zurück zu montieren.
• 8 Schrauben im Grundrahmen
• 4 Schrauben für die Eckverbindungen
Manual H Acoustic Housing Page 187. Maintenance and Service 7.2. Silencers
The sound insulation material of the
7.1. General silencers should be checked for dust
during major maintenance work and, if
For maintenance and service work on necessary, cleaned with a vacuum
the refrigeration, air-conditioning or cleaner.
heat pump unit, the necessary panels
can be easily removed from the acoustic If necessary, the silencers must be
housing. checked for free passage, as this is
necessary for perfect air circulation and
Cleaning and maintenance of the function of the installed
refrigeration, air conditioning or heat
the acoustic housing
pump unit.
Gegebenenfalls sind die
• Remove other dirt with a damp
Schalldämmkulissen auf freien
cloth; if necessary, use grease-
Durchgang zu prüfen, da dieses für eine
or oil-dissolving detergents
einwandfreie Luftdurchströmung und
(concentrated neutral
Funktion des eingebauten Kälte-, Klima-
detergent with pH between 8
oder Wärmepumpengerätes absolut
and 9).
notwendig sind.
• Treat galvanized parts with
preservation spray.
• Regularly lubricate moving 7.3. Lufttrennung
parts such as panel locks with
Die Lufttrennung soll über das Kälte-,
a lubrication spray.
Klima- oder Wärmepumpen Gerät fixiert
• Regularly treat seals.
werden und ist jährlich auf
• Repair any damage to the
Verschmutzung und Beschädigung zu
coating, including areas that
überprüfen. Abgelagertes Laub, Papier
show signs of corrosion, with
usw. sind zu entfernen.
repair paint.
• Clean the unit thoroughly to
remove all construction dust 7.4. Kondensatwanne
and other dirt.
Die Kondensatwanne und der Ablauf
• Prior to shipping, each unit is
sind auf Schmutzablagerungen zu
carefully inspected at our
überprüfen und bei Bedarf zu reinigen,
factory.
auf jeden Fall vor der Heizsaison.
Eine separate Beheizung der
Kondensatwanne ist nach den
spezifischen Erfordernissen des
Projektes und der eingebauten Geräte
vom Anlagenbauer zu entscheiden.
Bitte beachten Sie, dass die Anti-Dröhn-
Einlage auf der Innenseite der
Tauwasserwanne nur für eine maximale
Temperatur von +50°C geeignet ist. Wir
empfehlen zumindest den Ablauf der
Kondensatwanne mit einem separaten,
Manual H Acoustic Housing Page 19selbstregulierenden Heizband Durch Einstellen(Drehen) der
auszurüsten, um ein Einfrieren des exzentrischen Scharnierlagerung wird
Kondensats im Winter zu vermeiden. der Anpressdruck der Türe erhöht oder
verringert.
Im Sinne eines möglichst geringen
Stromverbrauches der gesamten Anlage Feststellschraube festdrehen.
Abb.4.4.2
sollte die Regelung des Heizbandes so
eingestellt sein und überprüft werden,
dass diese nur in Betrieb ist, wenn
unbedingt notwendig.
Die optionale Beheizung bzw. das
Heizkabel in der Kondensatwanne muss
auf korrekte Funktion und Einstellung Feststell
der Einschalt-Temperatur am
Thermostat geprüft werden.
schraube
Exzentrische Scharnierlagerung
7.6. Demontage von Paneelen
und Zwischenprofilen
Mit Stemmeisen die Klemmleiste
heraushebeln, und Paneel
herausnehmen. Klemmleisten nicht
beschädigen!
Klemmklötzchen seitlich ca. 35mm
verschieben.
Schraube lösen.
Nun kann Zwischenprofil abgenommen
werden.
3
2
1
4
7.5. Einstellen der Türen
Sollten Bedienungstüren nicht sauber
schließen kann die Türscharniere
eingestellt werden.
Feststellschraube lockern.
Manual H Acoustic Housing Page 207.7. Demontage von der Dichtung zu überprüfen. Nachdem
Rahmenprofilen sichergestellt ist, dass die Dichtung
korrekt sitzt, werden die Paneele
umlaufend mit den mitgelieferten
Für die Demontage der Rahmenprofile,
Klemmleisten fixiert.
bitte nachstehendes Bild beachten.
Wir weisen darauf hin, dass
vormontierte Produkte bzw. Produktteile
nur von speziell geschultem
Fachpersonal demontiert und wieder
montiert werden dürfen.
Bei der Demontage und Montage
der vormontierten Produkte bzw.
Geräteteile müssen folgende Punkte
speziell beachtet werden:
Alle Produktteile müssen beim Zerlegen
so gekennzeichnet werden, dass diese
bei der Wiedermontage an der
ursprünglichen Position montiert werden
7.8. Vormontierte Geräte können.
Wenn bei Produkte oder Produktteilen
anstelle der Klemmleisten nur ca. 30mm
lange Kunststoffklemmteile montiert
sind, sind die Paneele nur vormontiert, Alle Produktteile bei denen Kondensat
und die originalen Klemmleisten werden oder sonstige Flüssigkeiten anfallen
lose mitgeliefert. Dies wird in folgenden können, sind sorgfältig von innen
Fällen praktiziert: abzudichten.
Der Kunde bestellt Schalldämmgehäuse Alle Paneele müssen umlaufend mittels
mit Option Hxxx in Parts oder Option der mitgelieferten Klemmleisten fixiert
Vxxx in Parts im vormontierten werden.
Zustand, da diese größer als die
Einbringöffnung sind, zerlegt diese vor
Ort, bringt diese ein und montiert diese
wieder.
Sind Produktteilungen nach dem
Zusammenstellen der einzelnen
Produktteile nicht mehr zugänglich,
müssen jedoch von innen untereinander
verschraubt werden, so werden die
umliegenden Paneele nur vormontiert,
sodass diese einfach demontiert, die
Innenverbinder montiert und die
Paneele wieder fix montiert werden
können.
Vormontierte Paneele müssen in jedem
Fall demontiert werden, um den
korrekten Sitz bzw. das Vorhandensein
Manual H Acoustic Housing Page 21Vormontiert Betriebsbereit
Kondensatwannen
Dichtmasse im Lieferumfang
Paneele
Ohne Klemmleisten Mit Klemmleisten
Klemmleisten im Lieferumfang
Für Folgeschäden, welche durch fehlerhafte bzw. unvollständige Montage
von vormontierten Geräten bzw. Geräteteilen auftreten, wird keine Haftung
übernommen.
Manual H Acoustic Housing Page 227.9. Grounding 7.11. Removal and disposal
Depending on the local regulations Metal parts and plastic parts are to be
and position, we recommend to recycled, per applicable regulations.
carry out a grounding or lightning
protection.
7.10. Test run
After working on the acoustic housing,
the person responsible must ensure that
no persons are in the acoustic housing
before it is put into operation again.
7.12. Wartungstabelle des Schalldämmgehäuses
Activity Maintenance
maintenance
Part Component
half-yearly
wöchentlich
quarterly
montalich
cleaning
control
lamellas / insulation X X X yearly
air separation X X X
SonaSafe Drain pan X X X
housing X X X
door X X
Manual H Acoustic Housing Page 23Do you have anymore questions?
Solflex GmbH
Am Feuerstein 282
A-2392 Wienerwald, Austria
+43 2238 203 36, office@solflex.eu
IM-02/2021-ENG
Erste Bank AG, IBAN AT702011129323600200, BIC IBAATWWXXX, UID ATU65324348, FN 337206t, Gerichtsstand Wiener Neustadt, Austria
All business transactions based on our Terms and Conditions, available at www.solflex.eu. Subject to change without prior notice.You can also read