The B2 and C in car chips - oXigen system - SLOT.IT
←
→
Page content transcription
If your browser does not render page correctly, please read the page content below
oXigen system
                                                                                              Doc.

                                                                                              Pag.

                “Type C” Universal (O2-SSD-D132) and "B" (O2) in-car chip manual                 1/ 24

                                       The B2 and C in car chips
This manual is about the third generation of in-car chips from Slot.it. It describes the features, installation
and operation of the ‘B2’ and ‘C’ type chips. They are based on a multi protocol radio device IC
manufactured by Nordic Semiconductors. They are compact devices that require some care in handling and
installation.
Important note: these devices come with a protective screen glued to the bottom side of the chip. The screen
is there for a specific reason: to protect a very, very tiny device which could easily be damaged, as well as
keeping the rest of the circuit safe, as well. Do not remove, or attempt to remove, the screen: such action will
immediately invalidate any warranties, no exceptions made.
If a digital slot car chip could speak, it would tell a horror story of a life subject to electrical arcing,
vibrations, heat, g-shocks. Please, at least you, the user, be kind to them.
The B2 type chips keep the same footprint and external interface of the B1 chips. A car equipped with a B1
chip can be chipped with B2 unit with minimal effort: the lighting kit and Hall sensors’ connectors are
compatible.
Type C is a universal chip which can run on most all the digital systems supported by track manufacturers:
oXigen, Scalextric SSD, Carrera D132. It is also the smallest of its kind; to reduce its size as much as
possible, lighting kit and Hall sensor.

Before we start, a word on warranty.
         A “kapton” protective cover is glued to the bottom side of the chip to protect the electronic
         components. Don't remove this protection to avoid damage to the chip AND loss of warranty.
         We will not even try to repair a chip returned with no screen or with a damaged one. The screen is
there for a reason, so don’t remove it, as it protects miniaturized components that may be easily damaged.
DO NOT USE hot glue if you plan to remove the chip from the chassis. Use blue-tac (also known as ‘patafix’
or the likes of it) or double sided tape.
Proper handling of the chip is also required. Chips with missing parts, detached capacitors, hacked
pcb, are not covered by warranty.
A valid proof of purchase must be provided as well, so please keep your receipts.

                                                                              1/24 rev 2.10 en, Feb 20th 2021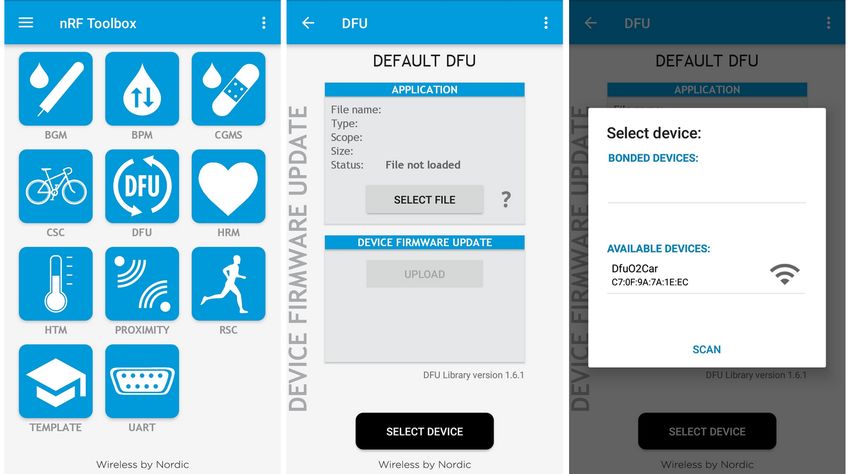
oXigen system
Doc.
Pag.
“Type C” Universal (O2-SSD-D132) and "B" (O2) in-car chip manual 2/ 24
AC/DC
The car is propelled by a motor which gets its power from the track. Such current and voltage can either be
'continuous', such as the one coming from a standard battery, or 'alternate', like the power mains.
oXigen systems are preferably powered by DC power. Carrera is DC, too. Scalextric SSD is unique in using
AC power.
All oXigen chips are compatible with both AC and DC:
1 – if the power on the rails is DC (analog track), or comes from Carrera digital power bases, chips can be
either in DC or AC+DC modes. In this latter case, the car will be able to run in both directions, but it will be
slightly slower than if it was powered from the DC pad (0.5V loss approximately).
2 – if the rails are powered from a Hornby power base or a derivative, the AC setup must be used, or the car
will not work.
Unless you plan to use the chips on Scalextric SSD, leave them in DC mode, such as they are sold. Keep in
mind that, anyway, AC position is compatible with DC mode, but at the expense of some small power loss.
Viceversa is not true. To recap: for maximum power, and if system is DC, use DC mode (box stock). For
universal compatibility, use AC pads:
Power wires soldered oXigen SSD D132 Analog
on:
DC pads / screw pos. unidirectional
AC pads / screw pos.
2/24 rev 2.10 en, Feb 20th 2021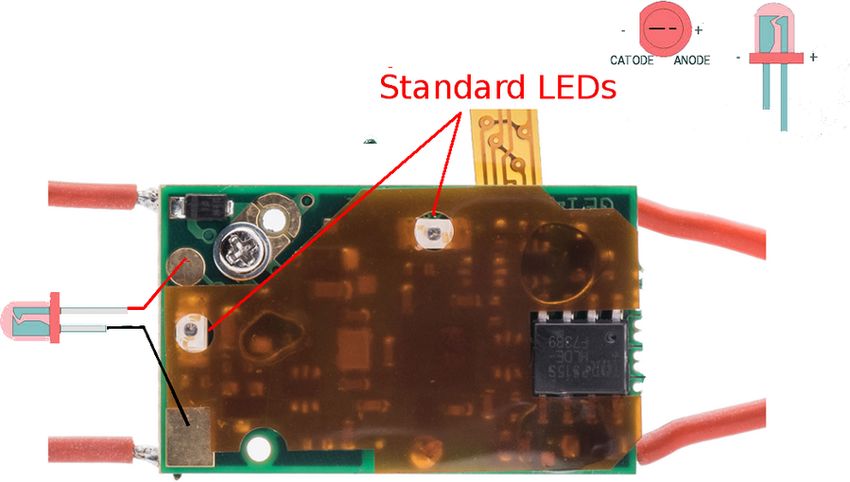
oXigen system
                                                                                             Doc.

                                                                                             Pag.

                “Type C” Universal (O2-SSD-D132) and "B" (O2) in-car chip manual                3/ 24

The 'C' type chip

The type 'C' chip is a compact and powerful device. All what follows applies to type C and C1 devices,
except that type C is only compatible with oXigen hardware and is being phased out.

It's a universal unit, being natively compatible with oXigen, Scalextric SSD, and Carrera digital. 'Compatible'
means that the chip performs like any SSD or Carrera 132 original system once the proper software is loaded.
In other words, when appropriately programmed, you can use this chip on either Scalextric SSD, or Carrera
D132, as if it was a 'standard' device for the said system.
Known limits: on Carrera, it doesn't support Ghost and Pace car modes. The advanced 'Slot.it Autonomous
car', under development, will replace Ghost car for all systems, analog included. Fast pairing will be
supported but it is not, currently. Analog mode as defined by Carrera and SSD is also not supported, but the
chip works properly on any analog tracks when used with an oXigen compatible controller, provided the
track is powered with a fixed voltage.
Scalextric and Carrera made two incompatible choices when they started developing their systems: they both
send command data on rails, but while Scalextric SSD runs on AC power, Carrera uses DC. oXigen is
different as it communicates via 2.4 GHz radio. It runs with both AC and DC, but DC is advisable.
Type C can either be run in DC mode for oXigen or Carrera systems, or AC mode for Scalextric SSD.
Switching between the two is done by changing a small screw's position on the PCB: no soldering is
required.

                                                                              3/24 rev 2.10 en, Feb 20th 2021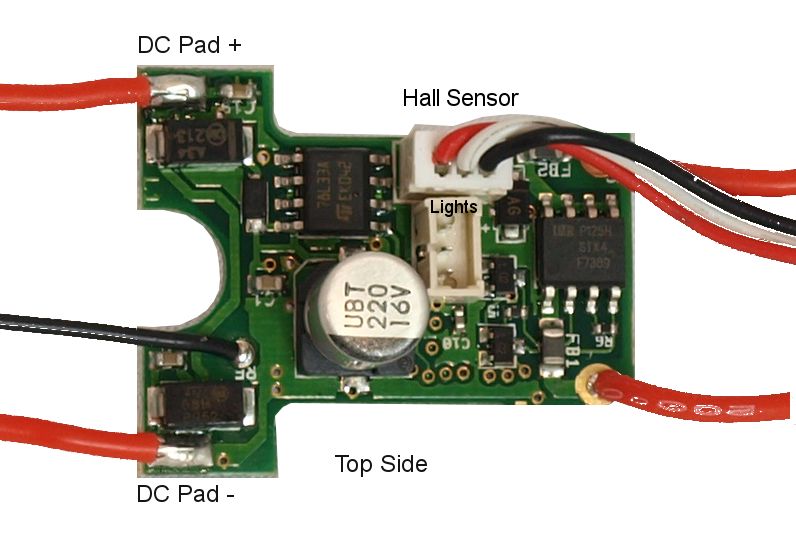
oXigen system
                                                                                            Doc.

                                                                                            Pag.

                 “Type C” Universal (O2-SSD-D132) and "B" (O2) in-car chip manual              4/ 24

           AC mode for Scalextric SSD       DC mode for Carrera D132
                                                                                C mode (top) / AC
                                                                                mode (bottom)

The little screw detailed above from DC to AC. For

System ↓                   Power →                   AC                                DC
Carrera D132                                         X                                 OK
Scalextric SSD                                       OK                                 X
Slot.it oXigen                                       OK                                OK

In DC mode, the power is routed through one diode only, which keeps the voltage loss to a minimum.. The
AC mode setup, required to race the car on a Scalextric SSD system, makes it run both ways. For oXigen,
either AC or DC can be used, but AC will deliver about 0.5V less to the motor. Carrera needs DC.
Keep in mind that the polarity on Carrera track is opposite to the majority of other slot cars systems.
Therefore, it may be necessary to swap wires on the pickup compared to, say, oXigen. Future versions of the
chip will come with a polarity inversion optional cable.
       Be very careful when changing the position of the screw! A screwdriver slipping from the screws’
       head and hitting the PCB may damage yor chip.
The chip size is smaller than type B. It measures 15*25mm and fits on a Scalextric DPR latch, in which case
its double LEDs match the proper position for all of the above said systems, but, due to the dual LED on
board, can also be used when rotated 90° in an oXigen or SSD system.
The special DPR latch is available from Slot.it Shapeways online shop as part S99-S04 – also available in 2
pieces unit S99-S04-2pcs, to save you some penny on the unit cost, as Shapeways has a fixed fee per print.

                                                                           4/24 rev 2.10 en, Feb 20th 2021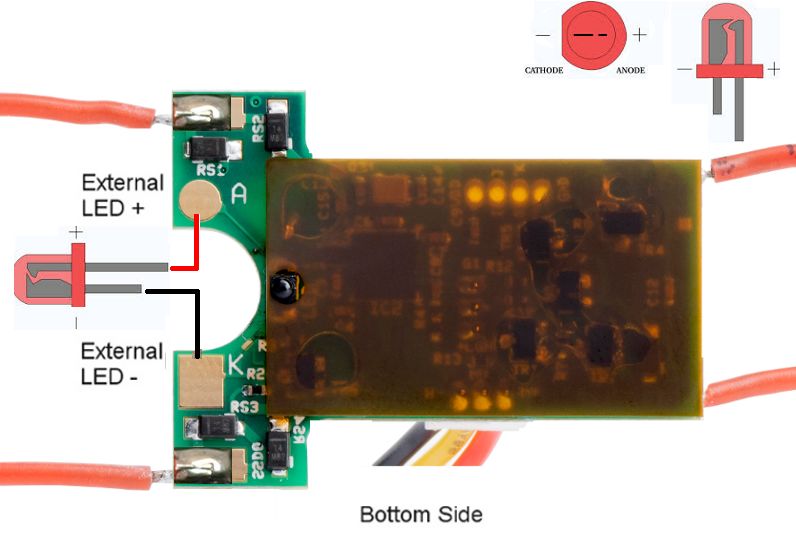
oXigen system
                                                                                                                            Doc.

                                                                                                                            Pag.

                     “Type C” Universal (O2-SSD-D132) and "B" (O2) in-car chip manual                                          5/ 24

Here is how.
Oxigen and SSD receivers are located in the bottom of the slot of the track. Carrera D132 is located right
before the lane changing mechanism, to the left of the rails.
The special SSD latch can be purchased from Slot.it's 3D print shop.
On a DPR ready Scalextric, or PCR chassis, installation is straightforward [1].

                                           ”B” LED
          ”A” LED

Hardware compatibility: “A” LED is compatible with oXigen and Scalextric SSD lane changers but not with
D132. “B” LED is compatible with oXigen, SSD, and Carrera D132 hardware.
What does this mean in practice?
Recent Slot.it models come equipped with a very simple mounting mechanism: make sure that the reference
pin on the chassis and the correspondent hole on the circuit are matched:

This design places the chip in the proper position for all systems, when used on a recent Slot.it car.
[1] Note that on some very narrow PCR cars such as the BMW E30, it may not be possible to use this chip on the special DPR latch due to dimensional
constraints.

                                                                                                       5/24 rev 2.10 en, Feb 20th 2021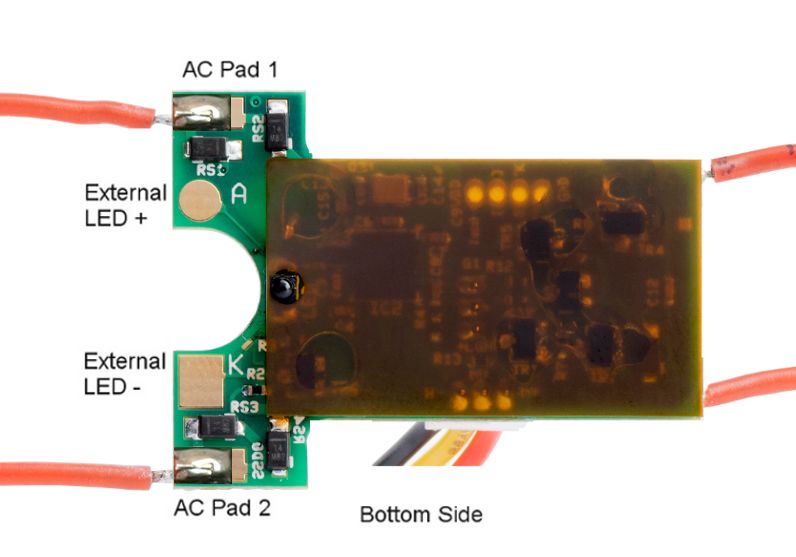
oXigen system
                                                                                             Doc.

                                                                                             Pag.

               “Type C” Universal (O2-SSD-D132) and "B" (O2) in-car chip manual                 6/ 24

There may be cases, however, where an 'inline' mounting of the chip may be useful, especially in older Slot.it
cars:

Once the chip is properly placed inside the car chassis, make sure the “B” LED can be seen through the
chassis hole which is aligned to the middle of the chassis.
The chip also provides extra pads to wire an external additional lane changer LED. There is no need to
remove the standard LEDs, which are mounted directly on the board. This is useful if for any reasons if
cannot mount the chip so that the LEDS are aligned with the receivers. For example, if you are running on
Carrera D132 natively, and alignment of the “B” LED with the D132 receiver is impossible, you may use the
wired LED and place it so that it aligns with the D132 receiver

       A “kapton” protective cover is glued to the bottom side of the chip to protect the electronic
       components. Don't remove this protection to avoid damage to the chip AND loss of warranty.
       Did we say this before?

Two connectors are placed on the top of the chip. A flat flexible cable with a unipolar Hall sensor is plugged
to the connector on the left. The sensor works as lap and finish line detector, sensing the magnetic field
created by magnets that, when placed under the track, delimit the finish line and pit lane. Said Hall sensor
must be fixed to the chassis of the car so that it faces down as described in the picture below; otherwise the
sensor won't work (unless the magnets are also wrongly placed!).

                                                                             6/24 rev 2.10 en, Feb 20th 2021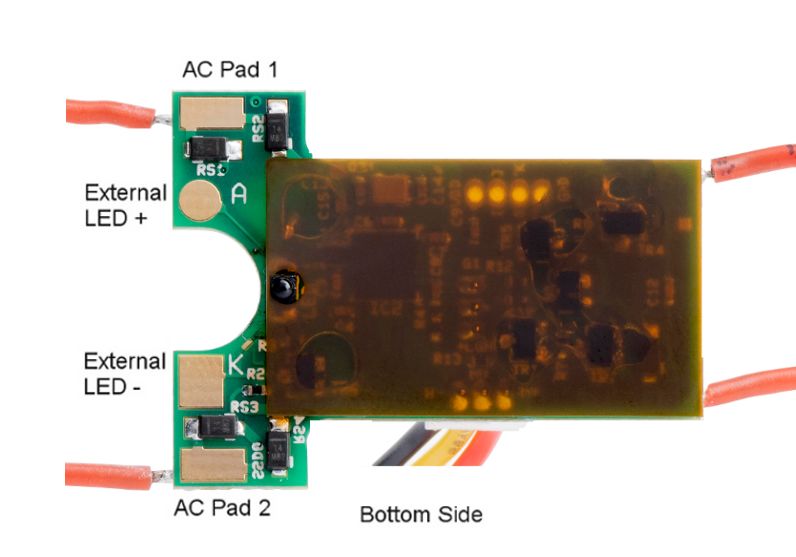
oXigen system
                                                                                             Doc.

                                                                                             Pag.

               “Type C” Universal (O2-SSD-D132) and "B" (O2) in-car chip manual                 7/ 24

If you are using the chip on Scalextric SSD or Carrera D132, you can ignore this sensor.
The other connector is for the lighting kit (under development).
Type 'C' comes with a red LED mounted on the top face which blinks according to the following table:

                             Blinking type   Meaning
                             fixed           power is on, no link
                             fixed           power is on, UP arrow pressed
                             quick flashing linked, no button pressed
                             off             no power
                             off             power is on, DOWN arrow pressed

The antenna, which is the 2.5cm long piece of wire coming out from the top of the chip, should be kept
vertical, within the realms of possible. It is not recommended to lay the antenna flat down on the chip or
close to the motor. It will work, but it's not good practice.
The Hall sensor strip connects the HALL sensor to the chip itself. Tha Hall sensor picks up the signal from
the finish line or pit lane entry and exit points. The strip must be mounted so that the chip is facing
downwards. To secure the strip to the car, use blu-tac or double sided tape. Do not use hot glue: the sensor’s
strip will break if you try to move it around after glueing it.

                                                                             7/24 rev 2.10 en, Feb 20th 2021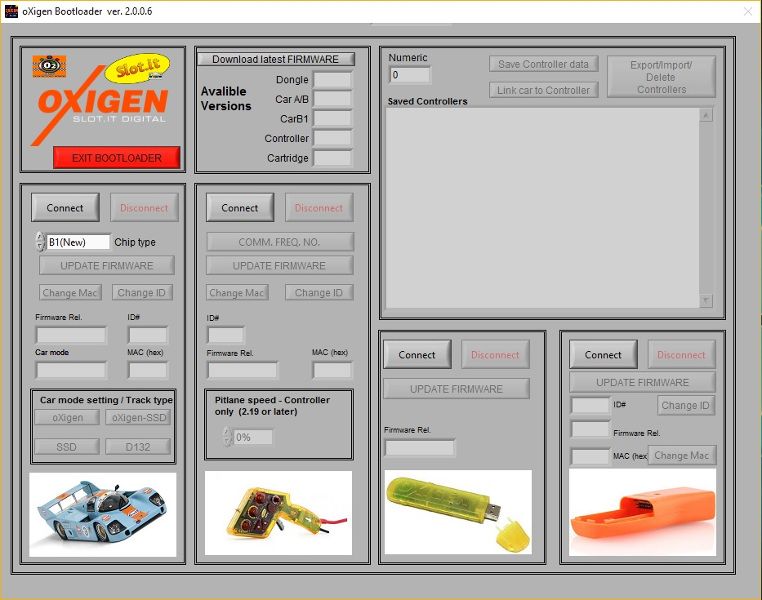
oXigen system
                                                                                    Doc.

                                                                                    Pag.

               “Type C” Universal (O2-SSD-D132) and "B" (O2) in-car chip manual        8/ 24

The 'B2' type chip

       A “kapton” protective cover is glued to the bottom side of the chip to protect the electronic
       components. Don't remove this protection to avoid damage to the chip AND loss of warranty.

                                                                      8/24 rev 2.10 en, Feb 20th 2021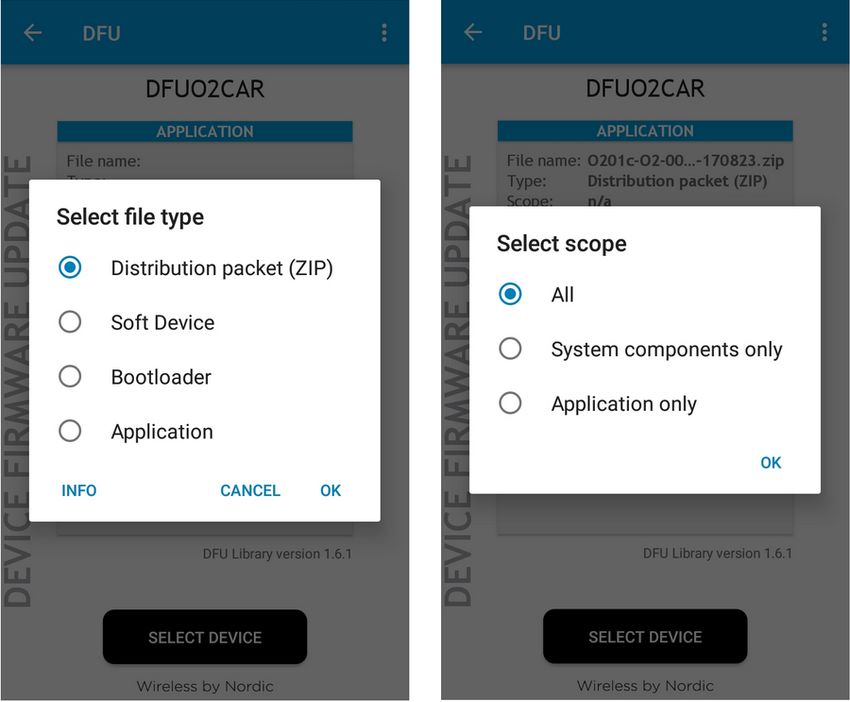
oXigen system
                                                                                             Doc.

                                                                                             Pag.

               “Type C” Universal (O2-SSD-D132) and "B" (O2) in-car chip manual                 9/ 24

Type B2 chip is sold with power wires connected to DC Pads. This is optimal for running on oXigen digital,
and on analog tracks: the power is routed through one diode only, which keeps the voltage loss to a
minimum. Such setup will work on Carrera D132 as well, but chipped car may only run in one direction.
To set the B2 'type chip in DC. or AC+DC mode, two separate sets of pads are provided, to connect the wires
coming from the pickup: the soldering pads for the DC systems are on top of the chip, whereas the ones to be
used for the AC systems are located on the bottom side.
This chip also provides extra pads to use an external lane changer LED on wires. There is no need to remove
the standard LED, which is mounted directly on the board.

                  A.Box stock DC wired B2 IC, top side      B.Box stock DC wired B2 IC, bottom side

       A “kapton” protective cover is glued to the bottom side of the chip to protect the electronic
       components. Don't remove this protection to avoid damage to the chip AND loss of warranty.

                                                                            9/24 rev 2.10 en, Feb 20th 2021
oXigen system
                                                                                               Doc.

                                                                                               Pag.

               “Type C” Universal (O2-SSD-D132) and "B" (O2) in-car chip manual                   10/ 24

If you plan to race the car on a Scalextric SSD sytem as well, or if you want to make it run both ways (for
example to match the running direction on a Carrera D132 system), then the power wires from the pickup
must be soldered to the AC pads. See image “SSD circuit” (C.) below. If necessary, an external, wired LED
can be connected to the board, soldering the LED wires to the provided LED pads as shown (D.).

                  C.SSD AC wired circuit, bottom side          D.Circuit with wired LED, bottom side

Once the chipped is properly placed inside the chassis, make sure the LED can be seen through the chassis
hole:

If you are running on Carrera D132 instead of oXigen or SSD, use the wired LED and place it so that it
aligns with the Carrera receiver that can be found on the track, right before the lane changing mechanism.

                                                                            10/24 rev 2.10 en, Feb 20th 2021
oXigen system
Doc.
Pag.
“Type C” Universal (O2-SSD-D132) and "B" (O2) in-car chip manual 11/ 24
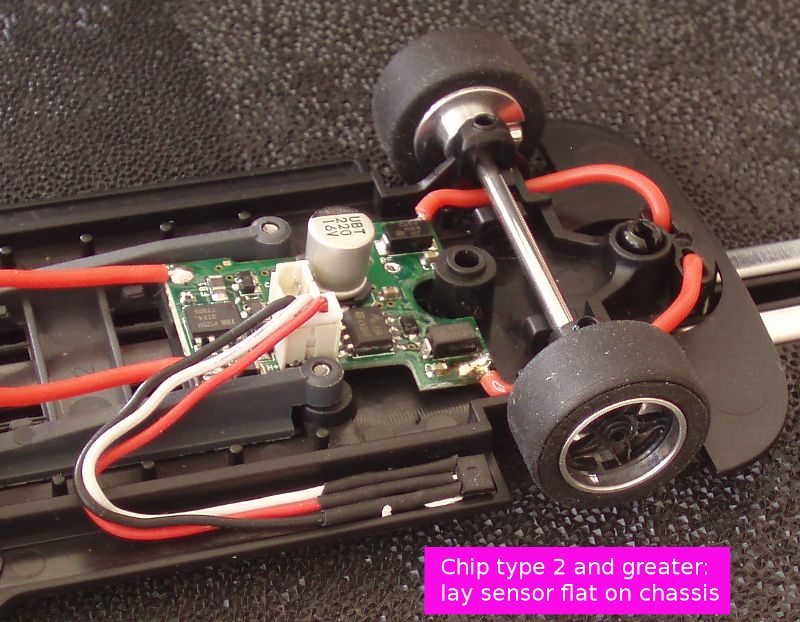
On the left side of the chip, attached to three wires colored in yellow, black and red, a unipolar Hall sensor
works as lap and finish line detector. This sensor is responsible of sensing the magnetic field created by
magnets that, when placed under the track, delimitate the finish line and pit lane. Said Hall sensor must be
fixed to the chassis of the car so that front face of the sensor, the bevelled one, is facing down. This is very
important: laying the sensor with the bevelled side up won't work (unless the magnets are also wrongly
placed!). The sensor must be laid flat on the chassis as described in the picture.
The antenna, which is the 2.5cm long piece of wire coming out from the top of the chip, should be kept
vertical, within the realms of possible. It is not recommended to lay the antenna flat down on the chip or
close to the motor. It will work, but it's not good practice.
Type 'B2' also comes witha a red LED mounted on the top face. It blinks according to the following table:
Blinking type Meaning
fixed power is on, no link
fixed power is on, UP arrow pressed
quick flashing linked, no button pressed
off no power
off power is on, DOWN arrow pressed
11/24 rev 2.10 en, Feb 20th 2021oXigen system
Doc.
Pag.
“Type C” Universal (O2-SSD-D132) and "B" (O2) in-car chip manual 12/ 24
The FERRITE MAN
The name 'ferrite man' refers to the device made by one capacitor and one ferrite choke, which comes
preassembled on the in-car chip wires, and that must be mounted on the motor terminals. Its purpose is to
suppress electrical noise coming from the motor, that may interfere with the proper working of the in-car chip
The ferrite man is REQUIRED. It must be soldered on the motor copper tabs as described by these pictures.
However... we have anedoctal evidence that if your motor is equipped with an electrical noise suppressor
known as 'varistor ring' ( a small ceramic ring located around the collector), the chip may work even without
the ferrite man.
Short circuits of any of the 'ferrite man' limbs, either between themselves, or across any
metallic parts (motor edges), will damage the in-car chip. Make sure the 'limbs' stay clear of
each other and of any metallic parts
12/24 rev 2.10 en, Feb 20th 2021oXigen system
Doc.
Pag.
“Type C” Universal (O2-SSD-D132) and "B" (O2) in-car chip manual 13/ 24
oXigen in-car chip 'modes' vs. ‘native’ mode.
Up until type C chip, oXigen chips were only partially compatible with Scalextric SSD and Carrera D132
systems. This partial compatibility was called respectively ‘SSD mode’ and ‘D132 mode’.
With the advent of type C we have full compatibility with the original systems, that is, type C can run on all
three systems ‘natively’. This means that the chip, once setup properly, will behave as a standard SSD or
D132 chip: the commands are read from the rails rather than over the 2.4GHz link as in the oXigen system,
and the chip responds to those commands like a Scalextric SSD or Carrera D132 chip.
In most cases, the communication between the car and the lane changers and/or lap counter is done through
an infrared-emitting LED. Unfortunately, while oXigen and SSD share the basics of such infrared protocol,
Carrera systems are completely different. For this reason, each car must be programmed so that its working
'mode' is appropriate for the intended use.
In other words: you must select the modes depending on what lane changers you are using.
If you use the oXigen chip with:
• an oXigen system, and the oXigen lane change electronics, modes 'y' or 'o' are both correct.
• an oXigen system, and the original unmodified Scalextric SSD lane changer, select the 'o' mode.
• an oXigen system with Carrera unmodified D132 lane changers, select 'd' mode and refer to "Running
with Carrera Digital D132" paragraph as the D132 lane changers require the original Carrera Power
Base to operate.
• a Scalextric SSD system:
◦ type C chip is natively compatible once the correct firmware is loaded
◦ type B2, select 'h' mode and refer to 'Running with Hornby SSD Digital' paragraph
• a Carrera D132 system:
◦ type C chip is natively compatible once the correct firmware is loaded
◦ type B2, select 'd' mode and refer to 'Running with Carrera D132 Digital' paragraph
Refer to the in-car chip for further understanding
13/24 rev 2.10 en, Feb 20th 2021oXigen system
Doc.
Pag.
“Type C” Universal (O2-SSD-D132) and "B" (O2) in-car chip manual 14/ 24
IR TX means 'InfraRed Transmission'
oXigen in-car chip working modes
Mode name System Note
'y' oXigen IR TX always on. oXigen default.
SSD lane changer compatible
'o' oXigen+SSD IR TX on only when lane change request is made.
Works on any oXigen Lane Change electronic board.
'h' SSD Hornby SSD system mode for type B chips. Refer to
'Running with Hornby SSD Digital' paragraph
'd' Carrera D132 Carrera Digital system mode for type B chips. Refer to
"Running with Carrera Digital D132" paragraph.
Modes can be selected only with the Bootloader software. We have removed the feature from the controller
as it made matters too complex.
oXigen 'hybrid' mode is necessary when runningoXigen chipped cars with SSD lane changers. It is anyway
advisable to use it every time oXigen cars are used with lane changers based on Ninco track pieces. On
Carrera based lane changers, it doesn't matter which oXigen mode is selected.
Please refer to the relevant sections to understand how to run oXigen chipped cars on SSD or Carrera
systems.
14/24 rev 2.10 en, Feb 20th 2021oXigen system
Doc.
Pag.
“Type C” Universal (O2-SSD-D132) and "B" (O2) in-car chip manual 15/ 24
The Autonomous Car
With the proper firmware, the type C and B2 chips can drive around the track with reasonable performance,
once its limits and caveats are understood. The firmware is available for download from the Slot.it web site.
The principle is very simple: load the firmware (whose name ends in -ATC, such as O201c-O2-0310-
200508-ATC.zip for example), place the car on the track before the finish line, press the up and down buttons
at the same time for two seconds to set the car in 'recording' mode, then start driving. As soon as the car
crosses the finish line magnet, it starts recording controller input.
After one lap, stop the car and press the same two buttons for two seconds if you're happy with the outcome.
Now lift the car, and switch off the controller it is linked to. Put the car on the track and (if the controller is
off), it will ramp up to speed for 0.5". If the finish line is reached (i.e. magnet is detected), the car will start
playing back the speed values that were saved during the 'learning lap'. The car resyncs every lap.
This is a very simple system and can only do so much, but if the track provides a good, constant grip, and the
learning lap is driven with margin, the results can be quite good.
The most difficult thing to master, apart from the indispensable 'drive smoothly and allow ample braking and
acceleration areas' advice, is this: when the car starts its first autonomous lap, it accelerates from zero to
target speed with a smooth ramp, then keeps the target speed for 0.3", then it stops if no finish line is crossed.
This 0.3" time limit is necessary to avoid cars from running away for an indefinte period of time, eventually
crashing badly. Thus, depending on the distance from the finish line and also depending on the target speed,
it may not cross the finish line with the expected speed, hence the first lap may be the most difficult to finish
properly. It may be necessary to adjust the starting position (closer to or farther away from the finish line) so
that the first lap is successfully completed in the best possible way. Sometimes, the car needs to be pushed so
that it reaches a higher initial speed.
A good advice is to try crossing the finish line, at the beginning and at the end of the recorded lap, with the
same speed.
In general, avoid all sliding and any sort of wheelspin, as they cannot be exactly reproduced lap after lap.
If a proper magnet is placed under the track, you may make this work on an analog track as well.
As we develop it, some parameters of the autonomous car may one day be adjusted via the app, thus making
it more robust. Future developments include versions for Scalextric SSD, Carrera Digital D132, and detection
of magnets of different polarity to enhance it further.
This software is provided absolutely without any sort of warranty, as it may cause the car to crash badly.
15/24 rev 2.10 en, Feb 20th 2021oXigen system
Doc.
Pag.
“Type C” Universal (O2-SSD-D132) and "B" (O2) in-car chip manual 16/ 24
Activation (registration) of your in-car chips
Starting from versions 3.10 the type C and B2 chip must be 'activated' i.e. the chip must be connected to the
Slot.it app so that a few parameters are recorded inside the chip's permanent memory and in our database.
1. Search for oXigen in the APP store. Don’t search for
Slot.it unless you want get a darn slot machine game.
Sownload and install the Slot.it APP on your
Android (Android 7.0 or greater) or iOS device.
Make sure the geographic location is turned on. This
is need by Android Bluetooth function, we don’t use
such data.
2. Register yourself (email necessary) to access the APP.
Enter your email, and tap on the
‘Request Access Code’ field. The APP sends a
confirmation email is sent to your address: copy the
code from your inbox, and enter it into the app in the
‘Access Code’ field. Now press the ‘User
Login’button that has just appeared
3. Power on the chip. After about 10" the LED will flash
and then turn off.
4. So launch the APP (you’ve done that already if you’ve
followed steps 1. and 2.), login if necessary, then click
‘Add’
5. The APP searches for a while (you will see a spinning
circle in the middle of the screen), then when the chip
is detected, it appears on screen. At this points two
things may happen: if your firmware is obsolete, the
APP asks you to upgrade it, else it will prompt for a
name that you should give your chip.
16/24 rev 2.10 en, Feb 20th 2021oXigen system
Doc.
Pag.
“Type C” Universal (O2-SSD-D132) and "B" (O2) in-car chip manual 17/ 24
6. If you see this message, select OK, then proceed
further. Select the appropriate version (the name of the
chip firmware firmware begins with O201C...) for
example O201C-310-200520, tap on 'Confirm
upgrade' then on 'OK' once the upgrade is finished.
If this image doesn't appear, you don't need to upgrade
the firmware, unless you are suggested otherwise.
7. Tap register, name your chip, and you're done. Tap on
'Devices' to see the list of your registered devices.
8. You may now add more Slot.it devices or tap on
'Info' to know all about your device (this is the same
data that we store in your database)
9. The name can be changed at will. You can name the
chip so that, for example, you give a meaningful name
such as ‘Porsche956 n.3’. Name length is limited to
14 characters.
17/24 rev 2.10 en, Feb 20th 2021oXigen system
Doc.
Pag.
“Type C” Universal (O2-SSD-D132) and "B" (O2) in-car chip manual 18/ 24
Updating Firmware – basics
To perform a firmware upgrade, chip must be in DFU mode (Direct Firmware Update). We've tried to
make it easy for customers, especially for those who only use type C chip as a SSD or D132 unit, to avoid the
use of the oXigen dongle.
Starting from versions 3.10 (oXigen) - 1.10 (SSD and D132 native, type C only) or greater, the firmware of
the in car chips must be upgraded using the Slot.it app.
If your firmware version is older than 3.10 (oXigen) - 1.10 (SSD and D132 native, type C only) the firmware
of the in car chips can also be upgraded using the Nordic Semiconductors app. DFU can be invoked by the
Bootloader (which hands control to the Nordic app) or at power on. Read below to understand why and how.
The Slot.it app establishes a Bluetooth Low Energy (BLE) communication link between the chip and the
phone. When you ask the app to upgrade the firmware, the app informs the chip, and the chip goes into
Direct Firmware Upgrade mode (DFU). The app then fetches the firmware from our web site and starts the
DFU procedure. To make this all possible, the firmware inside the chip must be able to understand the app
commands – and this is only possible with versions greater than 3.10 or 1.10 as said above.
However, the latest versions of the Slot.it app can detect early firmware, and bring it up to the latest version.
It is important to understand that firmware 3.10 and greater requires the activation with the APP, therefore,
after you upgrade from 3.06 (say) to 3.10, you must register (Activate) the chip!
The new firmware versions remain compatible with the Bootloader.
How to start BLE so that tit can be contacted with the Slot.it app: if your chip is:
• New (factory fresh, firmware 3.10 and later): BLE starts automatically. Contact the chip with the
app, then register it and upgrade if so desired.
• oXigen: switch off the controller, if any are linked to the chip. Power on the chip (car) on DC power,
wait 10 seconds. 5 flashes follow (only from version 3.05 onwards)
• SSD and D132: leave the chip on SSD track for 10” without pulling the controller’s trigger, then
press the lane change button for 2".
Once this is done, the chip can be contacted by the Slot.it app. Press ‘Connect’.
Alternatively, there is also a backdoor to start DFU to contact the chip with the Nordic DFU app: this
is true for all firmware versions
• oXigen, SSD, D132: power on the chip while the Hall sensor is placed on a magnet (South pole
polarity – if it doesn’t work, reverse the sensor or the magnet).
Alternatively, at power on the chip tries to detect whether it is on the right track for the firmware it is loaded
with. If not, it will enter DFU mode. Therefore, this is an alternate way to activate DFU mode.
• oXigen: switch off the controller, if any are linked to the chip. Power on the chip (car) on SSD or
D132 power.
• SSD/D132: Power on the chip (car) on a DC powered track. Chip enteres DFU mode after 5”
Once this is done, the chip is in DFU mode and can be contacted with the Nordic app
18/24 rev 2.10 en, Feb 20th 2021oXigen system
Doc.
Pag.
“Type C” Universal (O2-SSD-D132) and "B" (O2) in-car chip manual 19/ 24
And finally the chips can be contacted via the Bootloader (BL) of course: this is true for all firmware
versions released, new and old.. Follow BL instructions. Summary:
• oXigen: switch off the controller, if any are linked to the chip. Power on the chip (car) on a DC
powered track (such as a standard oXigen one). Contact the chip with BL within 10”. Once the BL is
linked to the chip, click on ‘UPDATE FIRMWARE’. This sets the chip in DFU mode and hands it
over to the Nordic app.
• SSD: no bootloader available.
• D132: no bootloader available.
How to update firmware with the Slot.it APP
This section assumes that you are familiar with the Slot.it app and that your chips have been registered
already.
Start BLE in your chip, according to the procedure above.
Contact your in-car chip, then select DFU. The app will take you to a list of firmware versions, Pick the one
you want, then start DFU upgrade.
Any upgrades (or downgrades) starting from firmware versions 3.10 / 1.0 or greater should in principle be
made with the app, unless you use the BL or the DFU backdoor (Nordic app).
Firmware earlier than 3.10 or 1.10 are not app compatible, therefore upgrades or downgrades must be made
via the BL or the DFU backdoor (Nordic app).
19/24 rev 2.10 en, Feb 20th 2021oXigen system
Doc.
Pag.
“Type C” Universal (O2-SSD-D132) and "B" (O2) in-car chip manual 20/ 24
How to update firmware with the Slot.it Bootloader.
The Bootloader itself can only upgrade firmware for the legacy, discontinued chips type A and B.
For B2 and C types, the BL sets the chip in DFU mode, then hands it over to the Nordic DFU app.
To contact the chip with the oXigen bootloader, make sure that any oXigen or ARC PRO controllers paired
to the car are switched off, then apply power to the car chip (for example, put it on the powered track rails)
and click on the 'YES' button within ten (10) seconds. Note that as the car can enter the 'bootloading' mode
only during the first ten seconds after it's been powered on, so, if the car was already powered, you must
switch it off first, then on again. Also note that if the car receives a valid driving command from its own
controller, it cannot enter bootloading mode either, so make sure the controllers are switched off!
20/24 rev 2.10 en, Feb 20th 2021oXigen system
Doc.
Pag.
“Type C” Universal (O2-SSD-D132) and "B" (O2) in-car chip manual 21/ 24
How to update firmware with the NORDIC APP
The upgrade can be initiated with the Bootloader or by putting the chip directly in DFU mode via the above
mentioned backdoor (also known as the ‘magnet trick’).
1. Download the nRF toolbox app from the Google Play store.
2. Download the firmware version that you want to put on your chip from our website
(http://www.slot.it – oXigen Download Firmware area) on the Android device. Note where it is being
saved. Remember that Your firmware has a name and the name follows this convention: O201c-sys-
reldate.zip file, where:
sys: system oXigen (O2), Scalextric SSD (SSD) or Carrera digital (D132)
rel: firmware release number
date: firmware release date
Example:
O201c-O2-170823.zip: oXigen firmware released on Aug 23, 2017
O201c-SSD-180423.zip: SSD firmware released on Apr 23, 2018
O201c-D132-180502.zip: D132 firmware released on May 2, 2018
3. Start the nRF Toolbox app on the device and select DFU button
21/24 rev 2.10 en, Feb 20th 2021oXigen system
Doc.
Pag.
“Type C” Universal (O2-SSD-D132) and "B" (O2) in-car chip manual 22/ 24
4. Tap on SELECT DEVICE and choose DfuO2Car which should appear in the list of available devices,
under your list of paired/bonded devices. If it is not present, repeat the steps above to set the chip to
DFU mode.
5. Tap on SELECT FILE
6. Choose Distribution packet (ZIP) and press OK.
Now locate the file you just downloaded at step 2, select it, then select Scope: All
If given a choice, choose the whole file, not a part of it. Once the file has been selected, the app
returns to the DFU screen.
22/24 rev 2.10 en, Feb 20th 2021oXigen system
Doc.
Pag.
“Type C” Universal (O2-SSD-D132) and "B" (O2) in-car chip manual 23/ 24
7. Tap on UPLOAD: Firmware upgrade should start and be finished in a few seconds.
8. The chip resets automatically after being upgraded, but you may need to lift and put the car back on
the track before using it.
9. The area of memory which is reserved to pairing info and other setup values is not overwritten during
the update of the firmware, therefore your pairing will not be lost.
23/24 rev 2.10 en, Feb 20th 2021oXigen system
Doc.
Pag.
“Type C” Universal (O2-SSD-D132) and "B" (O2) in-car chip manual 24/ 24
Chip history and compatibility
Chip type Year Firmware Status
A 2009 2.13 discontinued and unsupported
B 2011 2.13 discontinued and unsupported
B1 2014 3.01 partly supported
B2 2018 3.10 in production
C 2018 3.10 supported (O2 only)
C1 2019 3.10 in production
24/24 rev 2.10 en, Feb 20th 2021You can also read