INSTRUCTION Pop Up Gazebo - MANUAL - Hercules Marquees
←
→
Page content transcription
If your browser does not render page correctly, please read the page content below
The Largest Range of Event Marquee Supplier

      Pop Up Gazebo
       INSTRUCTION
            MANUAL
HERCULES WELLINGTON                                   HERCULES AUCKLAND

A: 13 Aglionby St, Lower Hutt                    A: 1/110 Mays Rd, Onehunga

E: info@herculesgazebo.co.nz                E: auckland@herculesgazebo.co.nz

P: (+64) 04 5699715                                       P: (+64) 09 5731458

HERCULES CHRISTCHURCH                                HERCULES AUSTRALIA

A: 66 Magdala Pl, Middleton            A: 17/256-258 Musgrave Rd, Queensland

E: christchurch@herculesgazebo.co.nz      E: sales@herculesinstantshelter.co.nz

P: (+64) 03 3746381                                      P: (+61) 1300 810 910

                 WWW.HERCULESGAZEBO.CO.NZ
              WWW.HERCULESINSTANTSHELTER.COM.AU

                                           WE’VE GOT
                                          YOU COVERED!
HERCULES INSTANT SHELTER
Thank you for selecting Hercules™ pop up gazebo. The Hercules™ pop up gazebo is
easy and quick to erect and take down due to its concertina scissor frame structure,
and offers dependable sturdiness in all situations. The canopy is manufactured using
premium fabric which is waterproofed, flame retardant and has guarantee UV
protection to UPF 50+. This user manual provides information about conditions of
warranty and how to operate your Hercules™ pop up gazebo correctly to ensure
trouble-free use and ease of operation.

Please read the instruction manual carefully before using the gazebo, and keep this
manual in case you need it again in the future.

TABLE OF CONTENTS
CONDITIONS OF WARRANTY……………….……………….……………….. 02

IMPORTANT INFORMATION .……………….……………….…………….….. 03

GAZEBO ASSEMBLY GUIDE ……………….……………….………….. 04 - 05

VELCRO WALL ASSEMBLY GUIDE ……………….……………….……….. 06

ZIP WALL ASSEMBLY GUIDE ……………….……………….………..…….. 07

ANCHORING GUIDE ……………….……………….…………….…………… 08

REPAIRS ……………….……………….…………….…..…….…..…….…….. 09

CARE DIRECTIONS ……………….……………….…………….…..…….….. 10

1

CONDITIONS OF WARRANTY
Hercules™ Instant Shelter provides a limited manufacturing warranty on all products
from the date of original purchase that the product will be free from defect in material
and workmanship. The length of the limited warranty may vary by product. The
warranty is valid for the original purchaser from the date of initial purchase and is not
transferable.

    Product                   Model                      Warranty
                              Series 30                  2 Year
                              Hex 45S                    3 Year
                              Hex 45A                    3 Year
    Frame                     45mm Compact               3 Year
                              Pro 37                     6 Year
                              Pro 40                     8 Year
                              Pro 57                     10 Year
                              Polyester Fabric           1 Year
    Fabric
                              100% PVC Fabric            2 Year

Hercules™ Instant Shelter will not be responsible for the damage to your product
caused by adverse weather conditions, incorrect assembly, dismantling, improper
storage or accidental damage. Colour fading and UV breakdown of any fabric from
exposure to sunlight is not covered by the manufacturer’s warranty. We advise you
seek a private insurance to protect yourself against these possibilities. Please check
the contents of the boxes in advance of using your product for the first time, we would
recommend that you check if you have all the components within 14 days of receiving
the products. Ensure that you are familiar with the erecting of the product and that all
parts are accounted for. You should familiarise yourself with the structure including any
restriction it may have for your particular use. A Hercules™ pop up gazebo is a
transportable structure, which under most circumstances will provide shelter against
the elements. There are however extremes of weather for which allowance should be
made.

2
IMPORTANT INFORMATION
Read and follow the safety statements, warnings, assembly instructions and care
directions before using the gazebo. Keep these instructions handy for future reference.
Do not leave the gazebo erected in severe weather conditions, as damage
may occur to the fabric and structure.
Do not leave the gazebo outside unattended and without anchoring for a long
period of time. This can cause your gazebo to serious damage. Pop up
gazebos are designed as temporary shelters.
Take great care of the gazebo in windy conditions and make sure always
using tie-down ropes and pegs provided to prevent property damage or
personal injury. Further support can be achieved by using sandbags and leg
weight on each leg.
Take great care of the gazebo in rain, make sure water does not pond on the
canopy; the weight of the water could cause breakage and collapse.
Do not fold up the gazebo with the canopy still attached. Remove canopy from
the frame after use and store them in a dry place at room temperature then
use them again the following day.
Take a canopy down and store it away when is not being used, because long
term exposure to sunlight will make colour fading easily and even damage.
Allow the gazebo & accessories to completely dry before packing down and
fitting the storage bag, do not store away wet.
Keep flame and heat sources away from the gazebo fabric to prevent damage
and safety hazard.
Your Hercules™ pop up gazebo is NOT covered under warranty if damage
occurs due to adverse weather conditions, incorrect erection, dismantling,
packing, storage and colour fading of any fabric. However, Hercules™ Instant
Shelter offers a repair service and replacement at a reasonable price.
3
GAZEBO ASSEMBLY GUIDE
Find a level piece of ground on which to erect your Hercules™ pop up gazebo. Ensure
that you have enough help to lift the gazebo without straining yourself on the frame.
Recommend required persons to erect the structure for guidance and safety.
2.0m x 2.0m / 2.5m x 2.5m / 3.0m x 3.0m / 3.0m x 4.5m = 2 Persons
3.0m x 6.0m / 4.0m x 4.0m = 3 - 4 Persons
4.0m x 6.0m / 4.0m x 8.0m = 4 - 5 Persons
STEP 1
Grasp the lower “V” at the center truss
bar. Lift & pull the frame to 50% open.
STEP 2
Position the canopy top over the
partially open frame and align to each
corner.
STEP 3
Attach Velcro securely at each corner.
Fit the centre of the roof on top of the
centre pole cap and pull strings until
tight.
STEP 4
Grasp the lower “V” at the center truss
bar again. Lift & pull the frame to fully
open.
4
STEP 5

Step on the footplate and lift the lower
corner truss bars up by using two
hands until the slider bracket locks into
place.

STEP 6

Tighten roof by feeding straps around
the lower truss bars. Once clipped in,
pull down on the strap until proper firm.
Make sure the canopy looks tidy and
nice.

STEP 7

Lift each leg until each ring pulls snaps
into the first hole, then slowly extend
each leg to the desired height. Ensure
all legs are being extended equally.
DO NOT STEP ON THE FOOTPLATE.

FINISH

This is how your Hercules™ pop up
gazebo should look after you have
done the setup correctly. Please
ensure always using tie-down ropes
and pegs provided to secure your
gazebo on the ground. See details in
anchoring instruction.

For set up tutorial video visit
www.herculesgazebo.co.nz/gazebo-
assembly-instruction/
5

WALL ASSEMBLY GUIDE
VELCRO WALL ASSEMBLY

STEP 1

Attach Velcro from side wall to canopy
and line up the corner of Velcro with
the center of leg pole. (2.5m wall
should be started from the center
indicated lining.) Fasten the Velcro all
the way across the top of the canopy.
*Make sure there are no creases along
the Velcro.

STEP 2

Attach the side wall to the leg pole
using full Velcro strips. Make sure all
the Velcro strips are well fastened.

STEP 3

Once this has been completed on all
the walls you wish to add. You can
now attach walls enclosed using
Velcro stripes. Make sure all the
Velcro strips are well fastened.

FINISH

This is how your Hercules™ pop up
gazebo should look after you have
attached the Velcro walls correctly.

6
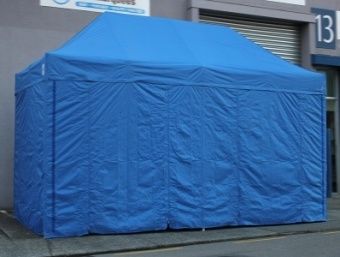
WALL ASSEMBLY GUIDE
ZIP WALL ASSEMBLY

STEP 1

Attach Velcro from side wall to canopy
and line up the corner of Velcro with
the center of leg pole. (2.5m wall
should be started from the center
indicated lining.) Fasten the Velcro all
the way across the top of the canopy.
*Make sure there are no creases along
the Velcro.

STEP 2

Attach the side wall to the leg pole
using the Velcro.

STEP 3

Once this has been completed on all
the walls you wish to add. You can
now zip the corner of leg closed to
ensure security.

FINISH

This is how your Hercules™ pop up
gazebo should look after you have
attached the zip walls correctly.

7

ANCHORING GUIDE
PEGS & GUY ROPES

STEP 1

Put pegs into the ground from the hole
on each leg plate as deep as you can.

STEP2

Secure the guy ropes from the D-ring
on the canopy to the peg on the
ground. Once clipped in, pull straps
until tight.

FINISH

Please ensure always use the tie-
down ropes and pegs provided to
secure your gazebo on the ground.

LEG WEIGHT

Further support can be achieved by
using leg weights, such as Hercules™
sandbags, steel weight plates (15kg
each) and bottles with heavyweight,
etc. Each sandbag can be filled with
15-20kg sands.
For leg weight anchoring and tips visit www.herculesgazebo.co.nz/blog.

8
REPAIRS
Should your gazebo roof or frame be damaged, please contact a nearest Hercules™
Instant Shelter store. The following options are available.

IF THE CASE OF A WARRANTY CLAIMS:

Contact Hercules™ Instant Shelter with the following details.

• Purchase details (name, contact and invoice number, etc.)

• Description of the fault/the damage.

• Photos of the fault/the damage.

We will assess the fault/the damage and either suggest a repair, or exchange. DO
NOT RETURN PRODUCT WITHOUT AUTHORIZATION. AND WE RESERVE THE
RIGHT TO REPAIR OR REPLACE ANY PART WHICH MAY PROVE FAULTY.

IF NOT THE CASE OF A WARRANTY CLAIM:

This would have been a simple process if you had purchased a Hercules ™ Instant
Shelter as all spare parts can be purchased in the store. Advise which size of canopy
roof or which connectors, truss bar or leg requires replacement. As for the replacement
parts, you can use an Allen key or screwdriver to remove damage component, replace
with the new part.

9
CARE DIRECTIONS
CLEANING

Fabric: To regularly clean the gazebo canopy/side is recommended. Wipe down the
surface with fresh cold water after use. To remove marks, wash it with hands or use a
soft brush with cold water and a household mild detergent is recommended. Allow the
gazebo to dry thoroughly. DO NOT USE MACHINE-WASH AND HAND WASH IN
HOT WATER. Use a UV Protectant (specifically for fabric use) on the canopy and
sides to prevent fading, cracking and premature ageing.

Frame: To regularly clean the gazebo frame is recommended. Use a silicone spray on
the frame either after use or in damp conditions. This will ensure your frame operates
easily and will maintain a clean look. Be sure to remove any excess spray before
attaching the roof.

Ensure screws and nuts and bolts are checked and tightened using an Allen key or
screwdriver on a regular basis. DO NOT USE SOLVENTS ON ANY PARTS OF THE
GAZEBO.

STORAGE

Frame and fabric need to be stored separately to prevent damage. Store in a dry place
at room temperature is recommended. Always allow the gazebo to dry completely
before packing and stowing. Pack away in damp, dirty or wet condition is not
recommended.

Avoid excessive pressure and contact with the non-colourfast material. Excessive
sunlight exposure is not recommended.

TRANSPORT

To prevent damage during the transit, DO NOT position your gazebo horizontally with
the canopy still attached. Keep the gazebo protected with a protective cover like a
carry bag.

10
You can also read