INSTRUCTIONS FOR USING THE A3M V2.0 TYING MACHINE
←
→
Page content transcription
If your browser does not render page correctly, please read the page content below
English G2

            INSTRUCTIONS FOR USING THE
              A3M V2.0 TYING MACHINE:

Version 2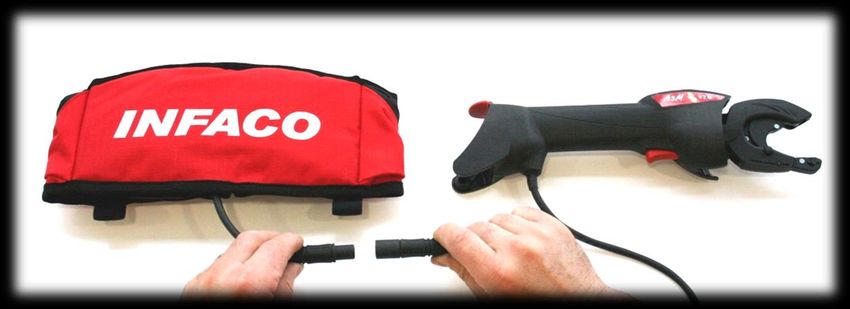
CONTENTS

General presentation                           P. 1

Using your machine for the first time          P. 2

Carrying the machine                           P. 2

Switching on                                   P. 3

Loading the reel                               P. 4

Unloading the reel                             P. 6

User guide                                     P. 7

Recharging the battery                         P. 9

Daily maintenance                              P. 11

Operating problems                             P. 13

Safety instructions                            P. 17

Appropriate tying method                       P. 18

Guarantee conditions                           P. 19

Specifications                                 P. 20

Guarantee coupon                               P. 22

PRE
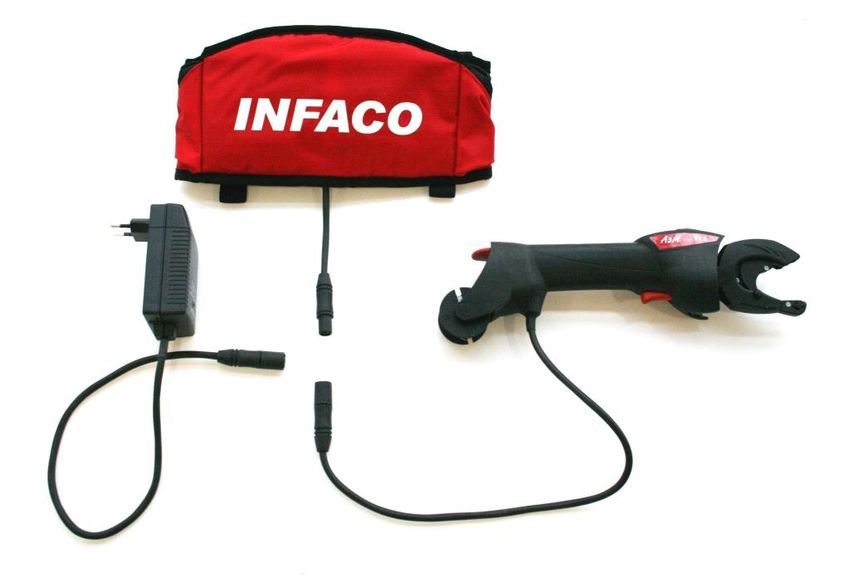
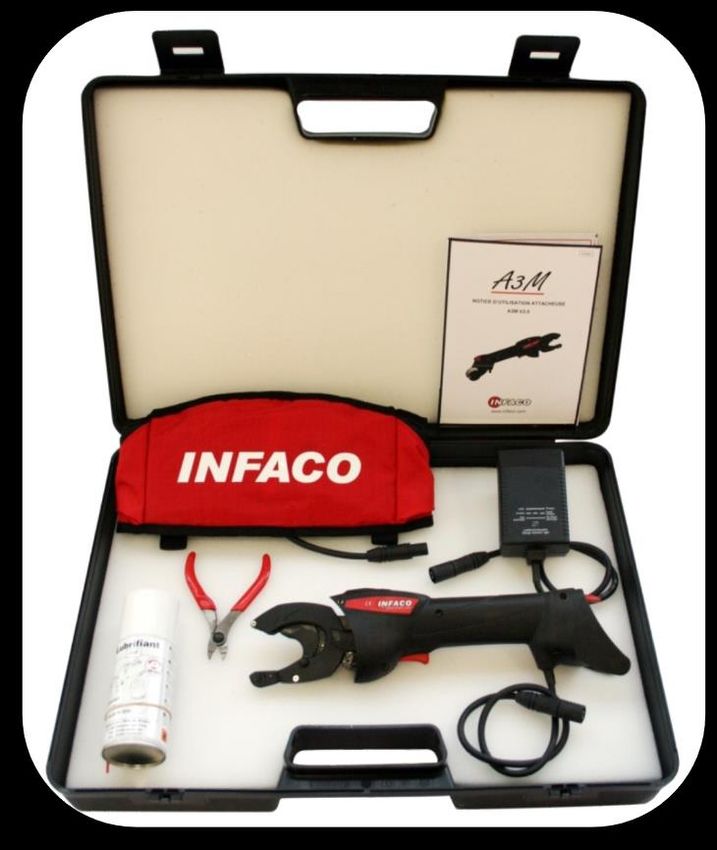
GENERAL PRESENTATION

D
                              01. TOOL CARY BAG

                              02. INSTRUCTIONS FOR USE

                              03. 12VOLT BATTERY POUCH

                              04. 12VOLT BATTERY CHARGER

                              05. PINCERS

                              06. GREASE SPRAY

                              07. A3M V2 MACHINE

                              08. TYING HEAD UNLOCKING KEY

                     08. TYING HEAD

                     09. ADJUSTMENT WHEEL
                        Adjusts the number of turns: 3 to 6 twists.

                     10. MULTIFUNCTION CONTROL SWITCH
                         Short pressure = controls the blade only.
                         Sustained pressure = controls the tying cycle.

                     11. LEVER
                         Used to activate a roller system to prevent the wire
                         from moving backwards.

                     12. REEL OF WIRE
                         Wire available in Ø 0.40 / 0.46/ 0.50 /0.55mm.

                     13. 12Volt SUPPLY CABLE

Version 2
                                                                            -1-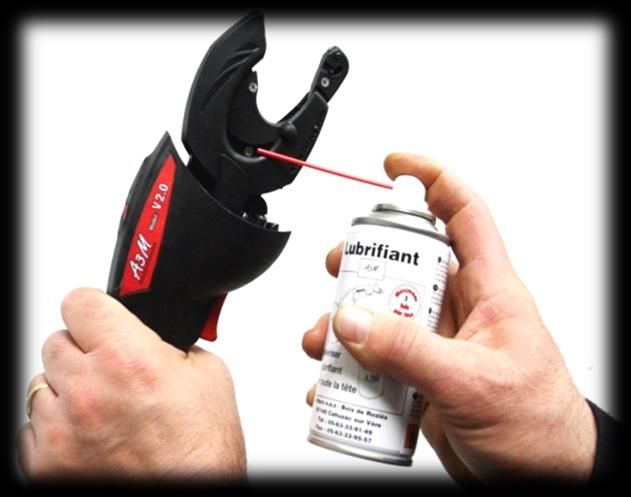
BEFORE USING YOUR MACHINE FOR THE FIRST
                    TIME
Please read these instructions carefully before using the machine.

We strongly recommend that you ask for assistance from your retailer, who is authorised to
give you all the advice you need to use the machine properly and achieve a good output.

It will take a day’s use to acquire a sound knowledge of how to operate the machine.

Charger the battery for at least 3 hours before starting your first day’s work.
(See chapter P9 battery recharge).

Disconnect the machine from its battery for all operations apart from tying.

Always keep your hands well away from the tying head when the machine is in operation.

We strongly recommend that, for safety and practical reasons, you use the case provided for
carrying the machine and the battery in the workplace.

                        CARRYING THE MACHINE

                                            01. ELASTIC BELT WITH VELCRO

                                            02. STORAGE POCKETS (reel, tools, etc.)

                                            03. TOOL CARY BAG

                                            TION
Attach the belt 01 around your waist.

Place the battery on your stomach side.

       In wet weather, the battery belt must be worn under waterproof clothing to keep
       the battery unit dry.

                                                                                              -2-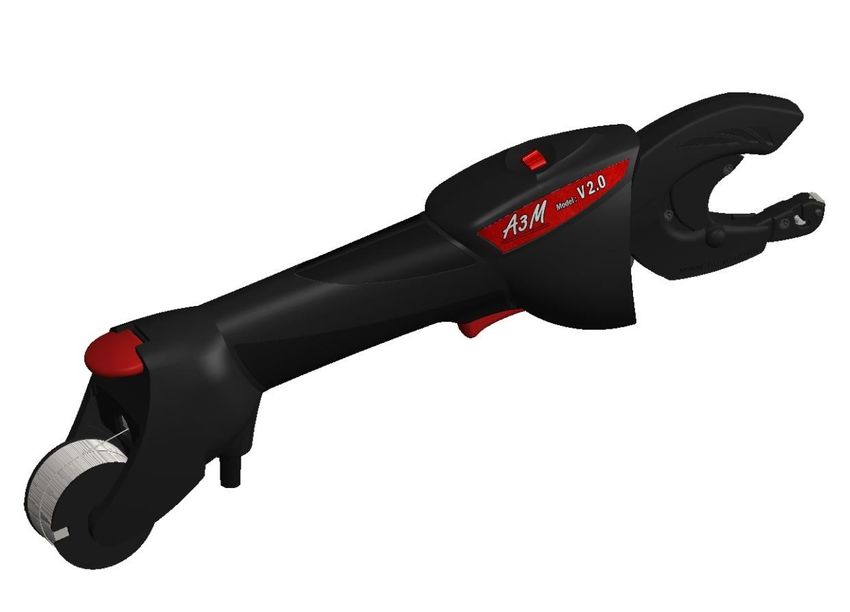
SWITCHING ON
       The tying head should be in the working position before switching on.

   CORRECT             INCORRECT

Connect the battery exit cable 01 to the machine supply cable 02.

                                01     02                       03             04

The machine is switched on.

Short pressure on the switch 03 will control only the wire cutting function (zone 04).

Sustained pressure will launch the complete tying cycle (See chapter “Making a tie”).

Version 2
                                                                                         -3-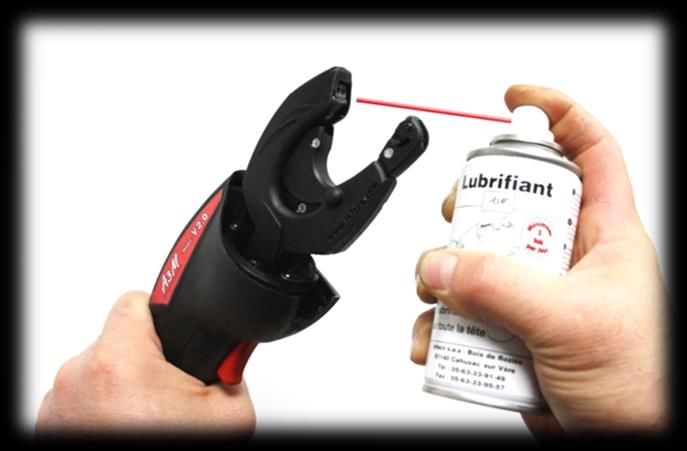
LOADING THE REEL

The wire needs to be prepared to make it easier to feed through the machine.

 Cut the end to obtain a wire with no    Smoothe the wire for at least 40 cm.
             bends in it.

      Clip the lever 01 upwards.        Clip the reel on to the machine between
                                                   cheeks 01 and 02.

                                                             01

 01                                         02

                                                                                  -4-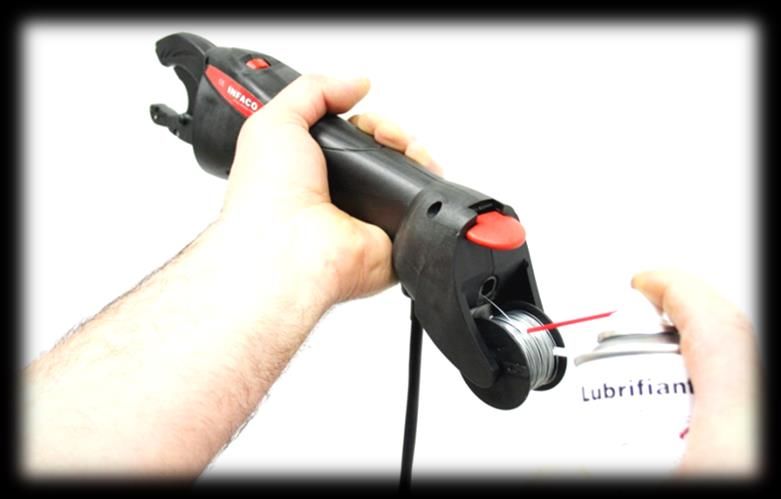
Insert the wire into hole 01.          Keep on feeding the wire through until it
If you come up against an obstacle during         emerges from the tying head 01.
insertion, move the wire gently backwards
 and forwards and/or press once or twice               IF THE WIRE STILL DOESN’T
  the control switch to pivot the tying head          COME OUT: we recommend that
 and to keep the wire moving through the                you disconnect the tying head
                  machine.                                 (See chapter “Operating
                                                       problems” P16), check that the
                                                      wire isn’t stuck and try to insert it
                                                           with the head removed.

            01

                                                                                01

     Unclip the brake system lever 01.         Switch the machine on and press briefly
  At the start of each reel, check that the    on the control switch to cut the excess
  wire is properly rolled and doesn’t stick    wire.
        between cheeks 02 and 03.                 You can now start tying operations.

    01

    02

    03

Version 2
                                                                                              -5-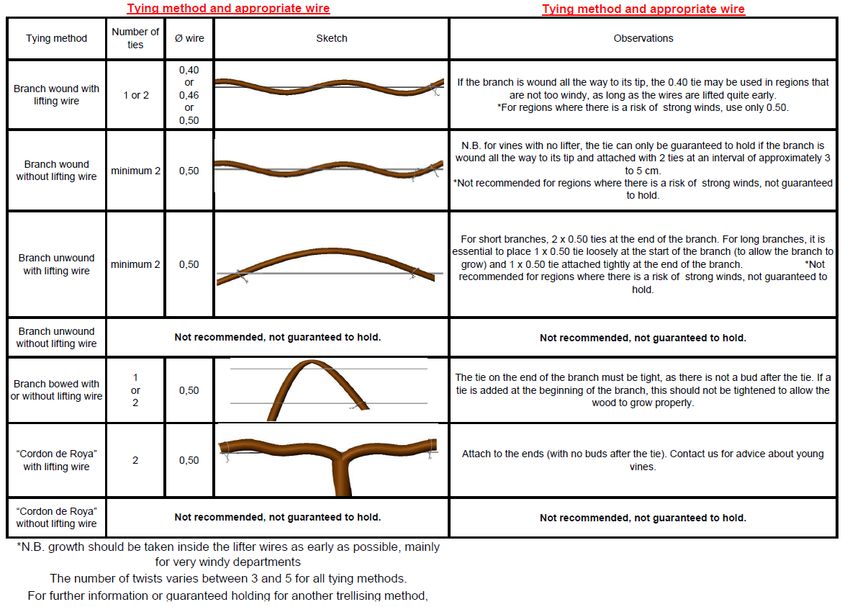
REMOVING THE REEL
REEL WITH REMAINING WIRE
Clip lever 01 upwards to allow the wire free Pull the reel to unclip it from the machine.
movement through the passage.
EMPTY REEL
Pull directly on the reel to unclip it from the Carry out a visual check on wire exit 01 to
machine. ensure that there is no wire remaining in
the machine.
01
After the last tying operation it is possible
that some wire may remain stuck in the
tying head:
If it does not prevent you from
loading another reel, carry on
working. It will come out during
tying, usually without a problem.
If it does prevent you from feeding a
new wire through, disconnect the
head and remove the remaining wire
by hand (See chapter “Solving
operating problems”).
-6-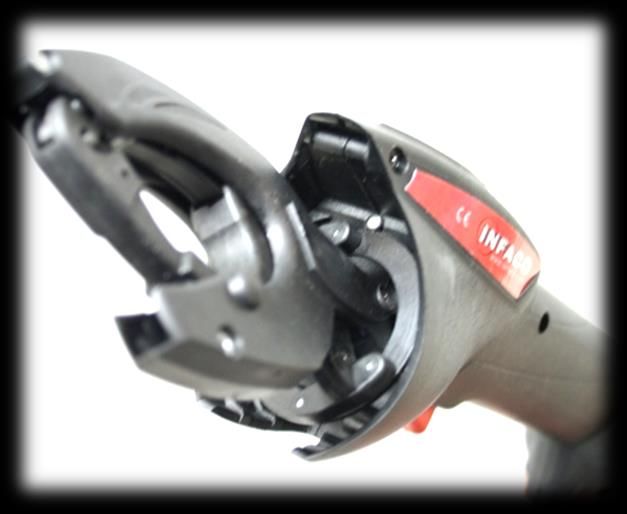
USER GUIDE
                      GENERAL POINTS ON TYING METHODS.

                              See attached sheet:
                       “APPROPRIATE TYING METHODS P18”

               MAKING A TIE (the machine should be switched on).

    Hold the end of the branch and the
trellising wire firmly in your free hand and     Firmly place the branch + the trellising
          bring the A3M V2 closer.                     wire inside the tying head.

                                                         01

Position the tying head just before the        Go right up to the abutment to ensure
last node on the branch.                       that the arm closes fully and attaches
                                               the wire correctly.

 Move the machine back firmly to release
the tying head: the wire then wraps round
  the branch. Press control switch 01 to        The tie holds the branch on the trellising
             complete the tie.                                    wire.

                 01

The knot is made more or less tight
depending on how far you pull back
the machine: See next chapter.

Version 2
                                                                                             -7-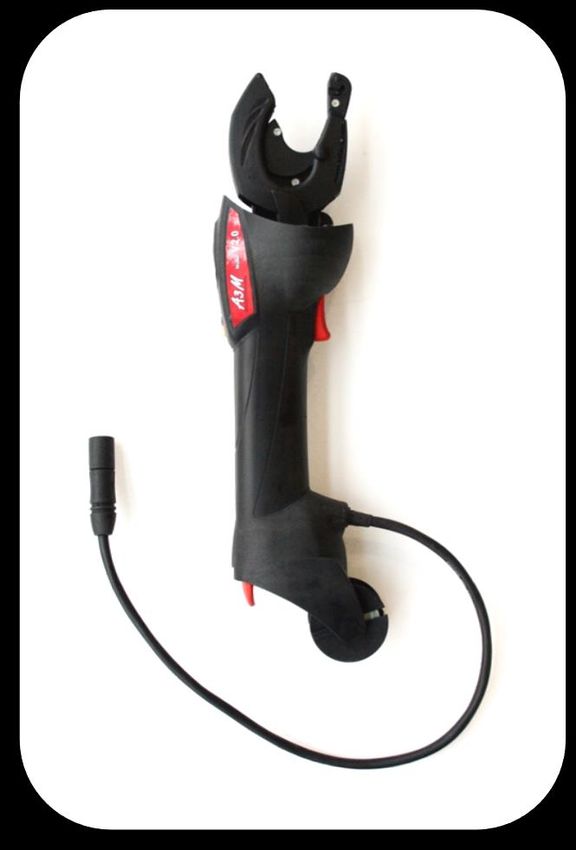
TIGHTENING THE KNOT

           Position 1 = tight knot.                Position 2 = loose knot.

Pull the machine back approximately 1 to 2 Pull the machine back approximately 3 to
      cm, then press the control switch.     4 cm, then press the control switch.

                       ADJUSTING THE NUMBER OF TURNS.

  To vary the number of turns, move the       The number of twists increases the
       wheel 01 to the right or left.              holding power of the tie.

                                                            3 to 6
      01                                                    twists

                                           Ask your retailer to help you choose
Adjustments vary from 3 to 6 turns.
                                           the best compromise to suit your
The standard knot adjustment is 4          region, the type of wire you are using
twists.                                    and the tying method.

                                                                                      -8-
RECHARGING THE BATTERY
The battery has sufficient autonomy to complete between 7000 and 8000 ties.
If you are thinking of doing more than 8000 ties a day, we advise you to:
1. Either recharge the battery for at least an hour during your lunch break to
achieve extra autonomy of approximately 3000 ties.
2. Or buy the 2-battery option.
N.B. a few minutes before your battery is completely discharged, the A3M V2 may
lose speed or no longer cut the wire.
Charger Battery pack
A3M V2
04
05
Sacoche porte outil
01 02 03
Disconnect connector 03 on the A3M V2 from the battery (connector 02).
Connect plug 04 on the charger to the 230 V 50 Hz supply in a well-ventilated room
free of inflammable products and sources of ignition.
Connect connector 01 on the charger to connector 02 on the battery.
The charger starts to work automatically as soon as the battery is connected.
Indicator light 05 remains lit throughout charging. It starts flashing when your battery
is fully charged. If the indicator light on your charger does not light up, leave your
battery connected and, at the same time, disconnect the plug (230 V) from your
charger and re-connect it until the orange indicator lights light up.
For information, it takes about 5 hours to charge up the battery belt.
Do not leave your battery on charge for more than 15 hours.
Version 2
-9-When the battery is charged, disconnect the charger to avoid damage caused by a
possible power surge in your electricity supply.
Using a charger or battery other than those made by us is strictly prohibited as there
is a risk of breakdown or accident; such use will cancel the manufacturer’s
guarantee.
It is essential to recharge the battery at least every three months during the off-
season.
Safety instructions for batteries:
When on charge, the battery should be placed in a room, open to the air, out of its carrying
case.
The room temperature should be between 10° C and 25° C and should not be damp.
The battery should not be covered or close to a heat source.
Never try to open it for any reason whatsoever.
Never place it in contact with water.
Check that it is clean and dry before putting it on charge.
Environmental protection instructions:
Batteries known under the abbreviation NiCd contain Cadmium; those known under the
abbreviation NiMh contain Metal hydride.
Worn or faulty batteries must be recycled in compliance with directive 91/157/EEC.
Do not throw the battery out with the household rubbish; do not throw it into flames or water.
Do not open the battery/ machine.
Drop the battery/ machine off with an INFACO approved retailer.
The A3M charger should only be used with the A3M batteries provided for the purpose.
It is formally prohibited to use the A3M charger to recharge a non-rechargeable battery. This
would lead to serious damage.
-10-DAILY MAINTENANCE
Lubricate at least twice a day, in the morning before you start work and at midday,
on the lubrication points shown below:
The following tasks should be carried out with the machine disconnected.
LUBRICATE TO RESTRICT WEAR
Spray the end of the head on the
Spray the end of the head on the blade side. wire-pinching side.
Spray inside the head. Spray beneath the metal ring.
Version 2
-11-LUBRICATE TO MAKE YOUR WORK EASIER
Spray the point of contact between the Spray the point of contact between the
reel and the left cheek. reel and the right cheek.
Spray directly on to the wire on the reel, once or twice per reel, to help the wire to
slide more easily as it moves round the reel.
We strongly recommend doing this when the wire becomes unpleasantly difficult to
pull on during the typing operation.
ANNUAL MAINTENANCE
During the off-season, recharge your battery at least once every two months
and store your machine in a dry place at a temperature of between 10° C and
25° C maximum.
We strongly recommend that you carry out our suggested servicing routine every
year. This will allow you to start off the following season comfortably and in complete
safety.
-12-OPERATING PROBLEMS
Unless stated to the contrary, these tasks should be carried out with the
machine disconnected.
THE LOOP NO LONGER FORMS AROUND THE BRANCH DURING THE TYING
OPERATION
To release it, press pin 02 in the circular
A piece of wire may be stuck in the orifice with your fingernail or using the
wire pincher 01. supplied pliers.
01 02
The wire may be bent at exit 01: (no need to disconnect the machine) simply go
through the cycle empty or run the knife only and resume the tying action.
01
Version 2
-13-THE WIRE HAS RETREATED INSIDE THE MACHINE
Try first of all to take hold of the wire at the back of the machine (area 01) and push it
forwards. If the wire emerges (area 03) switch the machine back on and press
control switch 01 to carry out a short cut, then resume tying operations.
03
01 02
If the wire does not emerge, unclip lever 01 Remove the wire; it may be jammed
and pull it right out of the machine. because of a bend, in which case you
will need to pull firmly to remove it.
Then straighten the wire so that it
threads smoothly through the machine.
01
Thread the wire through until it emerges Unclip lever 01 and resume tying
(area 01). Switch the machine back on and operations .
press control switch 02 to carry out a short
cut .
01
02 01
-14-THE TYING HEAD IS STUCK, THE MACHINE NO LONGER OPERATES
Push rod 01, which hits against ring 02 Bring tying head 01 in to a central
when the wire is cut, sometimes goes out working position, following the arrow
of its trajectory and become stuck on the below. Then take hold of ring 02 and
outer edge of ring 02. The arm 03 often move it forwards and backwards until the
remains locked and can’t open completely push rod returns to its position beneath
Do not try to force arm 03 open as you ring 02.
may damage the mechanism.
01 01
02
02
03
It is normal for the tying head 01 to resist
and make you force it to bring it back into
its operating position.
Ring 02 is released when the push rod has returned to its initial position. The arm 03
must be fully open. Check that the tying head can turn freely again. You can then
switch the machine back on and resume tying operations.
01
03
02
Version 2 -15-AT THE END OF THE REEL, SOME WIRE IS STUCK IN THE TYING HEAD
Pivot tying head 01 90° to gain access to Use key 01 to loosen screw 02 by
screw 02. approximately 4 or 5 turns.
To avoid the risk of losing screw 02, we
recommend that you do not unscrew it
01 completely.
02 02
01
Once you have disconnected the tying head,
remove the end-of-reel wire 01 from the tying
head. You can also take the opportunity to
Take hold of tying head 01 and pull it to insert the new wire, as it will be easier to
remove it from the body 02 of the machine. thread through.
01
01
02
Before you put the head back on, we Put the tying head back on, positioning guide
recommend lubricating the shaft with guide pin 01 opposite its housing. Then tighten
pin 01. screw 02 to complete the operation.
01
01 02
-16-SAFETY INSTRUCTIONS
Disconnect the machine from its battery for all operations apart from tying
DO NOT LEAVE THE TYING MACHINE SWITCHED ON DURING TRANSPORT.
The tying machine must be disconnected from its battery for the following operations:
- When you are putting on or removing the battery belt.
- For all repair or maintenance jobs on the tying machine.
When the machine is in operation, always remember to keep your hands away from the tying
head.
Never leave your battery on charge for more than 15 hours.
Do not work with the tying machine if you are tired or if you don’t feel well.
Wear non-skid shoes.
Do not leave the machine within the reach of children or visitors.
Do not use the machine if there is a risk of fire or explosion, e.g. the presence of
inflammable liquids or gases.
Never carry the charger by its cable. Keep the cable away from heat, oil and cutting edges.
Never place the charger in contact with water.
Never use the machine at night or in poor light without setting up extra lighting.
This machine does not cause vibrations or jerks.
Do not leave the machine on the ground and do not leave it exposed to bad weather.
When using the machine, keep both feet firmly on the ground and stay as well balanced as
possible.
If the supply cable on your charger is damaged, have it changed by the INFACO factory or an
approved A3M retailer.
Version 2
-17--18-
Version 2
GUARANTEE CONDITIONS
A3M machines are guaranteed for one year against all faults and manufacturing defects.

The guarantee is not valid unless the guarantee card has been duly filled in and returned to the
address printed on it.

If the guarantee card has not been returned at the time of the guarantee request, the ex-works
departure date will be used to determine the guarantee period.
INFACO may not be held liable for any machines sold by distributors more than a year after they have
left the factory.

This guarantee covers normal usage of the machine and does not cover:
       - damage caused by poor maintenance or a lack of maintenance,
       - damage caused by incorrect usage,
       - damage caused by normal wear and tear,
       - machines that have been dismantled by unauthorised repairers,
       - outside agents (fire, flood, lightning, etc...),
       - impacts and their consequences,
       - machines for which the guarantee card has not been returned at the time of purchase,
       - machines used with a battery or charger other than an A3M brand.

In no circumstances will the guarantee give rise to compensation for the fact that the machine is
immobilised while it is being repaired. Repair or replacement during the guarantee period does not
give the right to an extension or renewal of the initial guarantee.

The guarantee covers factory labour costs (on the condition that the machine has always been
serviced) but does not necessarily apply to retailer labour costs.
The guarantee on the machine will no longer be valid if the machine has been worked on by anyone
other than an approved A3M agent.

We strongly recommend that, in the event of a breakdown, users of A3M equipment should contact
the retailer who sold the machine or our after-sales department on (925) 371-0796

To avoid disputes, please note the following procedure:

          - for equipment covered by the guarantee, please send it to us carriage paid and we will return
it at our expense,
          - for equipment not covered by the guarantee, but which has been serviced during the
previous off-season, please send it to us carriage paid and we will return it at our expense,
          - for equipment not covered by the guarantee, and which has not been serviced during the
previous off-season, please send it to us carriage paid and we will return it at your expense, cash on
delivery. We will send you an estimate if the cost of the repair is more than 80 € ex-VAT.

We offer a servicing package for an inclusive fee at the end of each season.
You may choose to extend your guarantee over the first 2 seasons. N.B. to take advantage of the
guarantee extension over the first 2 seasons:
- you must opt for the servicing package from the end of the first season (servicing carried out
between April and late July).
If the service is not carried out during the first season after you have purchased your machine, the
guarantee extension will be cancelled.

                                                                                                            -19-
SPECIFICATIONS
Manufacturer: INFACO S.A.S. - 81140 CAHUZAC-SUR-VÈRE (FRANCE)
Type: A3M v2.0
Machine weight: 690 g
Battery weight: 655 g
Wiring and battery belt weight: 890 g
Tie capacity: maximum 28 mm
Machine power: 120 W
Charger model: A369C
Charger power: 65 W
Battery voltage: 12 Volts
Primary charger voltage: 230 Volts 50 Hz
Secondary charger voltage: 12 Volts
Attacheuse A3MV2
Fonctionnement à vide
Valeur d'émission sonore déclarée conformément à la NF EN 60745-
1:2009
Niveau de pression acoustique pondéré
A 72 dB(A)
au poste de travail, LpA
Incertitude, KpA 3 dB(A)
Attacheuse A3MV2
Fonctionnement à vide
Valeur d'émission vibratoire déclarée conformément à l'EN 12096
Valeur mesurée d'émission vibratoire, aH 5,3 m/s²
Incertitude, K 1,5 m/s²
Valeurs déterminées conformément à la NF EN 60745-2-
15:2009
These specifications are given for guidance only. They are in no circumstances contractually
binding and may be modified for the purpose of improving the product without prior notice.
Patented equipment.
Version 2RETAILER SECTION
The retailer should keep this section
Name: .......................................................................... First name: .............................................................
Company name: .........................................................................................................................................
Full address: ...................................................................................................................................
...................................................................................................................................................................
Postcode: .......................... Town: ........................................................................................................
Telephone: ..................................... Fax: ....................................... Mobile: ........................................
E-mail: ......................................................................................................................................................
Serial no.: ...................................................... Purchase date: ............. / ................ / ...........................
Comments: ...........................................................................................................................................
...................................................................................................................................................................
CUSTOMER SIGNATURE: RETAILER STAMP:
not correctly filled in and not sent in time may not be taken into consideration
RETURN THIS COUPON TO INFACO AS SOON AS YOU HAVE PURCHASED THE MACHINE
RETURN this form IMMEDIATELY, duly filled in in CAPITAL LETTERS to ensure full guarantee cover.
Name: .......................................................................... First name: .............................................................
Company name: .........................................................................................................................................
Full address: ...................................................................................................................................
...................................................................................................................................................................
Postcode: .......................... Town: ........................................................................................................
Telephone: ..................................... Fax: ....................................... Mobile: ........................................
E-mail: ......................................................................................................................................................
Serial no.: ...................................................... Purchase date: ............. / ................ / ..........................
Comments: ...........................................................................................................................................
...................................................................................................................................................................
CUSTOMER SIGNATURE: RETAILER STAMP:
Any coupon not correctly filled in and not sent in time may not be taken into consideration
Version 2Serial no.: ......................................
RETAILER
To be kept
by the retailer
for the INFACO
customer file
Electric tying machine
INFACO-USA, INC.
2356 RESEARCH DRIVE
LIVERMORE, CA 94550 USA
Office: (925) 371-0796
contact@infaco-usa.com
http://www.infaco-usa.comVersion 2
DÉCLARATION DE CONFORMITÉ CE
                         DECLARATION OF CONFORMITY (CE)
                 INFACO s.a.s. déclare que le matériel neuf désigné ci-après :
                     INFACO S.A.S. declares that the new equipment designated below:
                                                Attacheuse électrique
                                                      Tying machine

               de marque : - brand name: INFACO - modèle : - model: A3Mv2
        N° de série : - Serial no :          Année de fabrication : - Year of manufacture:

                                est conforme aux dispositifs des directives :
                                     complies with the provisions of the directives for:
- “Machines” (directive 2006/42/CEE).
“appliances” (directive 2006/42/CEE)

- “ Emissions sonores machines utilisées en extérieur ” directive 2000/14/CE (arrêté du
18 mars 2002) modifiée par la 2005/88/CE (arrêté du 22 mai2006).
Directive 200/14/EC « on the noise emission by equipment for use outdoors » (order of 18 march 2002)
modified by the directive 2005/88/EC (order of 22 may 2006).

                                      Attacheuse électrique – Tying machine
                                             A3Mv2
          Niveau de pression acoustique pondéré A au poste de travail, LpA
                                                                                              72 dB(A)
          Sond pressure level, LpA

- “Chargeurs électriques” (directive 2004/108/CEE) et aux réglementations nationales
les transposant.
“electric chargers” (directive 2004/108/CEE) and with national legislation adapting them.

- La personne autorisée à constituer le dossier technique au sein d’INFACO est
M.ALVAREZ Grégory.
The person authorized to compile the technical file within the company INFACO is Mr. Gregory
ALVAREZ.
     L’appareil est également conforme aux dispositions des directives européennes
                                      suivantes :
     The equipment also complies with the provisions of the following European directives:

     NF EN 61000-3-2                               NF EN 61000-4-5                NF EN 550014-2
     NF EN 61000-4-2                               NF EN 61000-4-6                NF EN 55022
     NF EN 61000-4-3                               NF EN 61000-4-11               NF EN 55011
     NF EN 61000-4-4                               NF EN 55014-1
 Fait à : Signed in : CAHUZAC SUR VÈRE                                                     Le : Date:   28/08/2013

 M. DELMAS Daniel, PDG de la Société INFACO                                                Signature : Signature:
 INFACO Managing Director

      INFACO s’engage à fournir aux autorités nationales les
     informations pertinentes concernant la machine. INFACO
    undertakes to provide national authorities with all relevant information
You can also read