Interactors CSBridge Summer 2019 By Ayca Tuzmen - CS Bridge
←
→
Page content transcription
If your browser does not render page correctly, please read the page content below
Interactors

CSBridge Summer 2019
By Ayca Tuzmen

             Summer 2019
            By Ayca Tuzmen
How do programs interact with a user?

 • Console Program

 • Mouse and Keyboards

 • GUI Elements
Different Type of Programs in Java

• Console Program

• Mouse and Keyboards

• GUI Elements
Interactive Program
•   Most application programs today include a graphical user
    interface or GUI (pronounced gooey) consisting of buttons and
    other on-screen controls. Collectively, these controls are called
    interactors.

•   Graphical applications usually make it possible for the user to
    control the action of a program by using an input device such as a
    mouse. Programs that support this kind of user control are called
    interactive programs.

•   In modern interactive programs, user input doesn ’ t occur at
    predictable times. A running program doesn’t tell the user when to
    click the mouse. The user decides when to click the mouse, and
    the program responds. Because events are not controlled by the
    program, they are said to be asynchronous.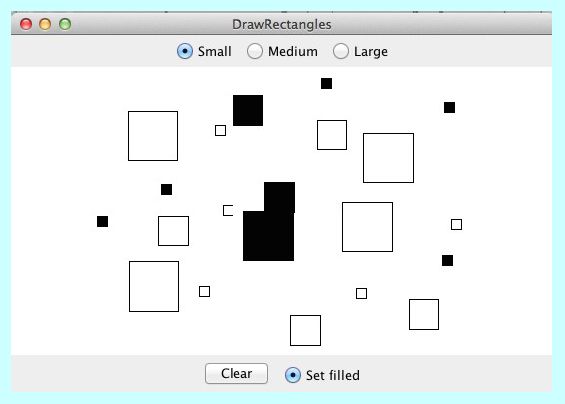
Event Driven
• User actions such as clicking the mouse are
  called events. Programs that respond to events
  are said to be event-driven.

• When you write a Java program, you indicate
  the events to which you wish to respond by
  designating some object as a listener for that
  event.

• When the event occurs, a message is sent to
  the listener, which triggers the appropriate
  response.
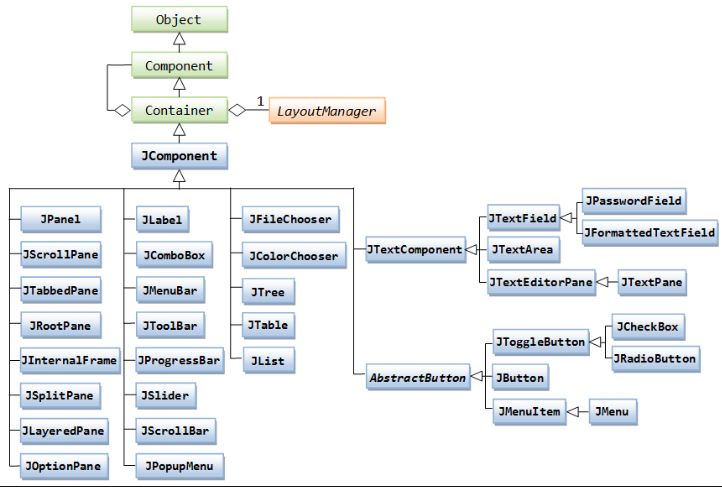
Java Swing Library

• Java defines many types of interactors, most of
  which are part of a collection called the Swing
  library,
• You create a GUI by constructing the Swing
  interactors you need and then arranging them
  appropriately in the program window.
Java Swing Classes
Layout
•   When you create an instance of any Program subclass, Java divides the
    window area into five regions as follows:

                                      NORTH

                    W                                         E
                    E                                         A
                    S                 CENTER                  S
                    T                                         T

                                      SOUTH

•   The CENTER region is typically where the action takes place. A
    ConsoleProgram adds a console to the CENTER region, and a
    GraphicsProgram puts a GCanvas there.

•   The other regions are visible only if you add an interactor to them. The
    examples in the text use the SOUTH region as a control strip containing a
    set of interactors, which are laid out from left to right in the order in which
    they were added.
Execution of a Java Program
Execution of a Interactive Program
Init()
Responding to Events
•   On a more practical level, the process of making a program respond to mouse
    events requires the following steps:

    1. Call addMouseListeners.
    2. Write new definitions of any listener methods you need.

•   The most common mouse events are shown in the following table, along with the
    name of the appropriate listener method:

    mouseClicked( e)         Called when the user clicks the mouse
    mousePressed( e)         Called when the mouse button is pressed
    mouseReleased(e)         Called when the mouse button is released
    mouseMoved(e)            Called when the user moves the mouse
    mouseDragged(e)          Called when the mouse is dragged with the button down
    The parameter e is a MouseEvent object, which gives more data about the
    event, such as the location of the mouse.
Anatomy of the Program
JButton
•   The most common interactor in GUI-based applications is an on-screen
    button, which is implemented in Swing by the class JButton. A JButton
    object looks something like

                                   Push Me

•   The constructor for the JButton class is

                            new JButton(label)
    where label is a string telling the user what the button does. The button
    shown earlier on this slide is therefore created by

       JButton pushMeButton = new JButton("Push Me");

•   When you click on a button, Java generates an action event, which in turn
    invokes a call to actionPerformed in any listeners that are waiting for
    action events.
Detecting Event
• Before you can detect action events, you need to enable an action listener
for the buttons on the screen. The easiest strategy is to call
addActionListeners at the end of the init method. This call adds the
program as a listener to all the buttons on the display.
• You specify the response to a button click by overriding the definition of
actionPerformed with a new version that implements the correct actions
for each button.
• If there is more than one button in the application, you need to be able to
tell which one caused the event. There are two strategies for doing so:
1. Call getSource on the event to obtain the button itself.
2. Call getActionCommand on the event to get the action command
string, which is initially set to the button label.JButton Code
JButton Code
JButton Code
Hitchhiker Button
      Arthur listened for a short while, but being unable to understand the vast
      majority of what Ford was saying he began to let his mind wander, trailing
      his fingers along the edge of an incomprehensible computer bank, he reached
      out and pressed an invitingly large red button on a nearby panel. The panel
      lit up with the words “Please do not press this button again.”
                          —Douglas Adams, Hitchhiker’s Guide to the Galaxy, 1979

The HitchhikerButton program on the next slide uses this
vignette from Hitchhiker’s Guide to the Galaxy to illustrate the
process of creating a GUI without focusing on the details. The
code creates a single button and adds it to the SOUTH region. It
then waits for the user to click the button, at which point the
program responds by printing a simple message on the console.
                                     HitchhikerButton
             Please do not press this button again.
             Please do not press this button again.

                                           Red
Hitchhiker Button
import acm.program.*;
import java.awt.event.*;
import javax.swing.*;
/*
* This program puts up a button on the screen, which triggers a
* message inspired by Douglas Adams's novel.
*/
public class HitchhikerButton extends ConsoleProgram {
/* Initializes the user-interface buttons */
public void init() {
add(new JButton("Red"), SOUTH);
addActionListeners();
}
/* Responds to a button action */
public void actionPerformed(ActionEvent e) {
if (e.getActionCommand().equals("Red")) {
println("Please do not press this button again.");
}
}
}Let's get our hands dirty
• Creating a ConsoleProgram including action buttons:
• add buttons to the 4 sides and print which one is
clicked on the console.
Keywords: JButton, addActionListeners, actionPerformed(ActionEvent e),
e.getActionCommand()JToggle Button
• The JToggleButton class is another type of button that is similar to
JButton but maintains an on/off state. On the screen, a JToggleButton
looks just like a JButton except for the fact that it stays on after you
release the mouse button.
• As its name suggests, a JToggleButton toggles back and forth between
on and off when it is clicked. Clicking the first time turns it from off to on;
clicking a second time turns it off.
Toggle
• You can determine whether a JToggleButton is on by calling isSelected,
which returns true if the button is on.
• The JToggleButton class itself is not used as much as two of its
subclasses, JCheckBox and JRadioButton, which are described on the
next two slides.JCheckBox
• The JCheckBox class is a subclass of JToggleButton and therefore
inherits its behavior.
• In terms of its operation, a JCheckBox works exactly like an instance of
its parent class. The only difference is in what the button looks like on the
screen. In a JCheckBox, the button label appears to the right of a small
square that either contains or does not contain a check mark, like this:
CheckBox
• Because a JCheckBox is a JToggleButton, you can call the
isSelected method to determine its state.
• Like a JButton, a JCheckBox generates action events when it is
clicked. Both of these classes inherit this behavior from
AbstractButton, which is their common superclass.JRadio Button
• The JRadioButton class also extends JToggleButton and behaves in
much the same way. In this case, the button is displayed as a circle that is
tinted and marked with a dot when it is selected, as follows:
Radio button
• Radio buttons are ordinarily not used individually but instead as a set. If
you create a ButtonGroup object and then add several radio buttons to
it, the Swing libraries make sure that only one of those buttons is selected
at a time.
• Grouped radio buttons are used to allow the user to choose among several
mutually exclusive options. As an example, the text extends the
DrawStarMap program to allow the user to choose the size of the star by
selecting a radio button:
Small Medium LargeLet's implement an event-driven program from
scratchJSlider Button
• In many applications, you want to let the user adjust a value over a wide
range instead of selecting among a set of options.
• The Swing libraries include several different interactors that allow the user
to adjust a parameter. The text uses the JSlider class, which appears on
the screen like this:
The user can adjust a JSlider by dragging the slider knob.
• The simplest form of the JSlider constructor looks like this:
new JSlider(min, max, value)
where min and max are integers giving the minimum and maximum values
of the slider and value is the initial value.
• You can retrieve the current value by calling getValue.Let's replace our size buttons with a slider
JLabel
• The interactors you display on the screen sometimes don’t provide the
user with enough information. In such cases, it is useful to include JLabel
objects, which appear as text strings in the user interface but do not
respond to any events.
• As an example, if you wanted to label a slider so that it was clear it
controlled size, you could use the following code to produce the control
strip shown at the bottom of the screen:
add(new JLabel("Small"), SOUTH);
add(sizeSlider, SOUTH);
add(new JLabel("Large"), SOUTH);
DrawStarMap
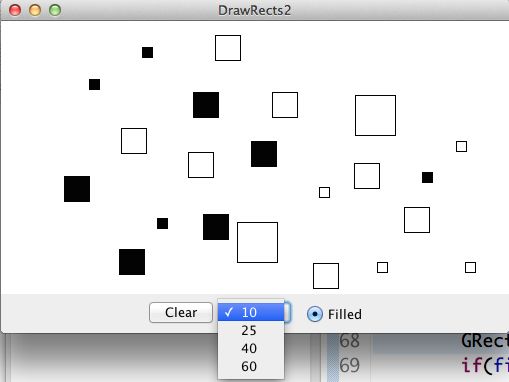
Small LargeJComboBox
• In some applications, you may need to allow the user to chose
among a set of options that would take up too much space on
the screen if you listed them all. In such situations, you can
use the JComboBox class, which lists the available options in a
popup menu that goes away once the selection is made.
• A JComboBox used to select T-shirt sizes might look like this
on the screen:
Small
X-Large
Medium
Large
• From the user’s point of view,
X-Largea JComboBox workslike
JComboBox works likethis:
this:
– Depressing the mouse brings up a popup menu.
– Dragging the mouse selects from the different options.
– Releasing the mouse sets the state to the current option.
• Given that its purpose is to offer the user a choice of options,
the JComboBox interactor is sometimes called a chooser.JComboBox
• The standard constructor for a JComboBox creates an empty interactor
that contains no options; you then add the desired options by calling the
addItem method for each one.
• The code to create the T-shirt size chooser looks like this:
JComboBox sizeChooser = new JComboBox();
sizeChooser.addItem("Small");
sizeChooser.addItem("Medium");
sizeChooser.addItem("Large");
sizeChooser.addItem("X-Large");
sizeChooser.setEditable(false);
The last line prevents the user from typing in some other size.
• The items in a JComboBox need not be strings but can instead be any
object. The label that appears in the popup menu is determined by
applying the object’s toString method.
• The getSelectedItem and setSelectedItem methods allow you to
determine and set which item is selected.Let's use JComboBox as alternative to
selecting radio buttonsJTextField
• Although Swing’s set of interactors usually make it possible for the user to
control an application using only the mouse, there are nonetheless some
situations in which keyboard input is necessary.
• You can accept keyboard input in a user interface by using the JTextField
class, which provides the user with an area in which it is possible to enter a
single line of text.
• The HelloGUI program on the next slide illustrates the use of the
JTextField class in a ConsoleProgram that prints a greeting each time a
name is entered in the text field.
HelloGUI
Hello, world.
Hello, Eric.
Name world
EricJTextField
• The constructor for the JTextField class has the form
new JTextField(columns)
where columns is the number of text columns assigned to the field. The
space often appears larger than one might expect, because Java reserves
space for the widest characters.
• You can get and set the string entered in a JTextField by calling the
getText and setText methods.
• A JTextField generates an action event if the user presses the ENTER key
in the field. If you want your program to respond to that action event, you
need to register the program as an action listener for the field. In the
HelloGUI example, the action listener is enable by the statement
nameField.addActionListener(this);Hello GUI
import acm.program.*;
import java.awt.event.*;
import javax.swing.*;
/** This class displays a greeting whenever a name is entered */
public class HelloGUI extends ConsoleProgram {
public void init() {
nameField = new JTextField(10);
add(new JLabel("Name"), SOUTH);
add(nameField, SOUTH);
nameField.addActionListener(this);
}
public void actionPerformed(ActionEvent e) {
if (e.getSource() == nameField) {
println("Hello, " + nameField.getText());
}
}
/* Private instance variables */
private JTextField nameField;
}DoubleField, IntField
• The acm.gui package includes two JTextField subclasses that simplify
the process of reading numeric input within a graphical user interface. The
IntField class interprets its text string as an int; the DoubleField class
interprets the text string as a double.
• In addition to the usual operations on a JTextField, the IntField and
DoubleField classes export getValue and setValue methods that get
and set the numeric value of the field.
• Although it is beyond the scope of the text, the IntField and
DoubleField classes support numeric formatting so that you can control the
number of digits in the display. The methods that support this capability are
described in the javadoc documentation for these classes.Managing Layout
• So far, the interactors live in control strips on each side of the window.
Although using control strips makes sense for simple applications, creating
a more sophisticated user interface requires you to be able to place
interactors anywhere inside a window.
• Arranging interactors to form an elegant, easy-to-use interface is a difficult
design challenge. One of the factors that complicates the design is the fact
that the size of the program window can change over time. A layout that
makes sense for a large window may not be appropriate for a small one.
• Java seeks to solve the problem of changing window size by using layout
managers, which are responsible for arranging interactors and other
components when the windows that contain them change size.Various Layout Managers exist in Swing l BorderLayout l BoxLayout l CardLayout l FlowLayout l GridBagLayout l GridLayout l GroupLayout l SpringLayout
TableLayout
•   The TableLayout manager arranges components into a two-dimensional grid.

•   The TableLayout constructor takes the number of rows and columns in the
    grid:

                   new TableLayout(rows, columns)

• Example:

                                    TableLayoutExample

                             Button 1    Button 2    Button 3

                             Button 4    Button 5    Button 6
Temperature Convertor
The TemperatureConverter program on the next slide uses the
TableLayout manager to create a simple user interface for a program that converts
temperatures back and forth from Celsius to Fahrenheit. The steps involved in using
the program are:
1. Enter an integer into either of the numeric fields.
2. Hit ENTER or click the conversion button.
3. Read the result from the other numeric field.
TemperatureConverter
Degrees Fahrenheit 212
32 F -> C
Degrees Celsius 101
1000 C -> FTemperature Convertor Code
/**
* This program allows users to convert temperatures back and forth
* from Fahrenheit to Celsius.
*/
public class TemperatureConverter extends Program {
/* Initializes the graphical user interface */
public void init() {
setLayout(new TableLayout(2, 3));
fahrenheitField = new IntField(32);
fahrenheitField.setActionCommand("F -> C");
fahrenheitField.addActionListener(this);
celsiusField = new IntField(0);
celsiusField.setActionCommand("C -> F");
celsiusField.addActionListener(this);
add(new JLabel("Degrees Fahrenheit"));
add(fahrenheitField);
add(new JButton("F -> C"));
add(new JLabel("Degrees Celsius"));
add(celsiusField);
add(new JButton("C -> F"));
addActionListeners();
}Temperature Convertor Code
/**Listens for a button action */
/*
* public
This program allows users to convert temperatures
void actionPerformed(ActionEvent e) { back and forth
* from Fahrenheit
String to Celsius.
cmd = e.getActionCommand();
*/ if (cmd.equals("F -> C")) {
public classint fTemperatureConverter extends Program {
= fahrenheitField.getValue();
int c = GMath.round((5.0 / 9.0) * (f - 32));
/* Initializes the graphical user interface */
celsiusField.setValue(c);
public void
} else if init() {
(cmd.equals("C -> F")) {
setLayout(new TableLayout(2, 3));
int c = celsiusField.getValue();
fahrenheitField = new IntField(32);
int f = GMath.round((9.0 / 5.0) * c + 32);
fahrenheitField.setActionCommand("F
fahrenheitField.setValue(f); -> C");
}fahrenheitField.addActionListener(this);
} celsiusField = new IntField(0);
celsiusField.setActionCommand("C -> F");
celsiusField.addActionListener(this);
/* Private instance variables */
add(new
private JLabel("Degrees
IntField Fahrenheit"));
fahrenheitField;
add(fahrenheitField);
private IntField celsiusField;
} add(new JButton("F -> C"));
add(new JLabel("Degrees Celsius"));
add(celsiusField);
add(new JButton("C -> F"));
addActionListeners();
}You can also read